Concerto SASE End-to-End Configuration
Secure Service Edge Overview and Architecture
The Versa Networks unified Secure Access Service Edge (SASE) solution is one of the most comprehensive SASE solutions available. It encompasses a wide range of functionalities and aligns to the Gartner definition of what a SASE offering should be.
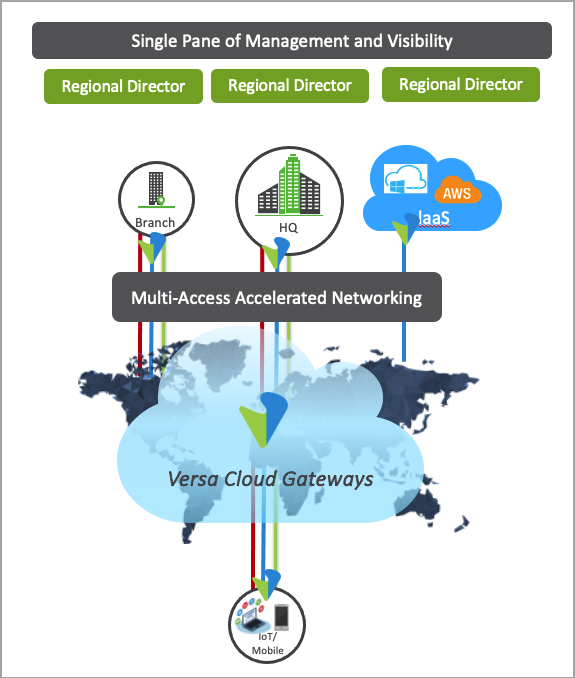
The following figure illustrates the Versa SASE solution, which provides secure networking and SASE services to any user in any location, and access to applications running in private and public clouds. The Versa SASE solution is delivered by the Versa Operating System™ (VOS™) software, either on-premises or in the cloud.

The Versa unified SASE solution includes the following components:
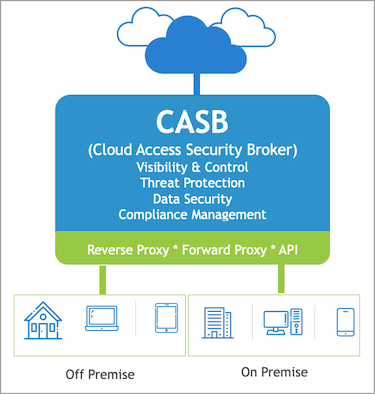
- Cloud Access Service Broker (CASB)—A next-generation firewall service that provides:
- Secure access to SaaS applications, such as Facebook, Salesforce, and Office 365
- Application microsegmentation and shadow IT discovery and control
- Access compliance
- Data Loss Prevention (DLP)—Secures sensitive corporate data and enforces relevant regulatory compliance.
- Firewall as a Service (FWaaS)—Safeguards users, devices, and applications (both on-premises and in the cloud) from internal and external threats.
- Unified Threat Management (UTM)—Protects against advanced threats, such as malware, spyware, trojans, worms, bots, and known vulnerabilities.
- Secure SD-WAN—Provides service level agreement (SLA)-aware connectivity between users and the SASE fabric.
- Secure Web Gateway (SWG)—A cloud delivered component that protects users from internet-based threats and enforces access control to the internet.
- Zero Trust Network Access (ZTNA)—A least-trust architecture that is based on identity access.

Versa SSE Components
Versa unified SASE has two key building blocks: Versa Secure Service Edge (SSE) and Versa Secure SD-WAN. Versa SSE consists of two components:
- Versa Secure Internet Access (VSIA) securely connects users through the Versa SASE fabric of Secure Web Gateways (SWGs) to public clouds, SaaS applications, and the internet.
- Versa Secure Private Access (VSPA) is the remote-access component that provides secure private access with ZTNA to resources within the enterprise. These resources could be located in on-premises data centers or in the public cloud.

Versa Secure Private Access
VSPA is a ZTNA solution that securely connects users to private applications by enforcing identity-based network access, regardless of location or hosting environment. Traditional VPN concentrators implement network-based access using methods such as static access lists to provide some security. However, these traditional methods are unable to differentiate between user contexts. ZTNA enables policies based on the user context. ZTNA not only enforces policy against the user traffic, it also determines the client behavior based on the user context.
VSPA integrates with your existing tools and applications, allowing direct, risk-minimized access using least-privilege control and continuous trust evaluation.
The VSPA component of Versa SSE comprises the following:
- Cloud gateways—The Versa Cloud Gateways (VCGs) form the Versa SASE fabric and process remote user traffic using an efficient single-pass architecture to deliver all the functions of the solution.
- SASE client for end-user devices—The SASE client extends the Versa SASE fabric to the end-user appliance, enabling SD-WAN-like, context-aware connectivity that is centered around user experience. Versa SASE clients are available on Windows, MacOS, iOS, Android, Chromebook, and Linux platforms. Clientless connectivity is also supported in VSPA.
- SD-WAN enabled—As part of the SD-WAN overlay, the VCGs deliver branch and data center connectivity with the following benefits:
- Provides SLA-aware traffic engineering between the data center and the VCGs to optimize user experience.
- Enables automatic discovery of the gateways and branches without the need to create and manage manual IPsec tunnels.
- Self-management portal—The single-pane-of-glass management orchestrator that allows enterprise administrators to manage and control their users and applications. It presents a unified interface for policy management between remote users and branch offices.
VSPA provides a three-stage protection for enterprises:
- Stage 1: SASE client registration—At first use, the client must be registered to the SASE portal. This is necessary for two reasons:
- Client authentication ensures that only authorized users can connect to the enterprise. The authentication process itself is robust, supporting LDAP, single-sign on (SSO), and the Versa Directory of local users. The client-authentication process also supports multifactor authentication (MFA) using a time-based one-time password (TOTP) or email.
- Client policy—The client policy step locates and downloads the SASE client's configuration from the SASE portal. The registration process is now complete.
- Stage 2: Connection—This stage determines the type of connectivity required and the behavior of the client based on the context. Features of this stage include fail close/fail open, best gateway selection, gateway-to-client policy (such as encryption levels and EIP policy), and client-always-on functionality to ensure that the VPN is always established without user intervention. In addition, the trusted network detection feature allows the client to determine if the user is on a public network, such as a café WIFI, or in a secure corporate office location.
- Stage 3: Policy enforcement—This final stage enforces corporate policy on user traffic, ZTNA, and other SWG features, such as URL filtering, file filtering, DNS filtering, IP filtering, antivirus, and vulnerability prevention systems. The security and integrity of corporate data is maintained using features such as DLP.
Versa SSE maintains traffic segmentation across each component from the SASE client to the cloud gateways. On the end user device, the SASE client helps differentiate between business-critical applications which must be specifically secured, such as Office 365 traffic, from domestic or casual internet traffic, such as social media or news sites. You can enforce this separation at the application level on the device, at the FQDN level, or at the network level using network prefixes. This separation persists in the cloud gateway, where the different traffic segments can receive different network and security treatment. For example, you can use Network Address Translation (NAT) or a proxy for internet-bound traffic, along with some unified threat management (UTM), while you can simply route private-application traffic with some application filtering.
Versa CSGs can provide network obfuscation to conceal end users and applications, keeping threat actors from enterprise resource knowledge and protecting against attack vectors such as lateral movement and port scanning. Versa's network obfuscation capabilities use a suite of technologies, such as DNS proxy, CGNAT, tunneling protocol, ZTNA, and NGFW to improve upon standard network obfuscation protection.
Versa Secure Internet Access
VCGs are unique in the industry as they offer both network services and security services. They function as an extension of the customer enterprise network, allowing enterprise administrators to perform important networking functions in the cloud. These functions include the following:
- Best gateway selection
- Per-tenant trusted network detection
- Routing protocol support
- Secure connectivity toward users, offices, and private applications
- SLA-based traffic steering

Similarly, VSGs perform security functions using secure web gateway (SWG) capabilities, which include authentication, user and group policy, NGFW functions (such as URL filtering, IP filtering, file filtering, and application filtering), and unified threat management (UTM). The SWG also functions as part of a wider security ecosystem from Versa Networks that delivers capabilities such as SSL decryption, and inline CASB and DLP.
VSIA provides the following features:
-
Traffic identification and policy-based filtering—VCGs can identify traffic based on network location, SASE client version, predefined and user-defined applications, users, and user groups. You can define and apply specific filters and actions at a granular level to ensure the scalability of your security posture.

-
CASB—A critical security service that helps an enterprise set policy, monitor behavior, and manage risks, ensuring safe usage of cloud applications and services to prevent accidental data leakage. CASB can sit between the end user and the cloud, allowing visibility and control by shadow IT discovery, firewall log ingestion, data security, threat protection, and compliance management.
-
DLP—A cybersecurity solution used to prevent the leakage of sensitive information through the network. An effective DLP solution monitors, detects, and potentially blocks the exfiltration of sensitive data while the data is in motion across the network using various protocols or when it is residing in popular cloud repositories.

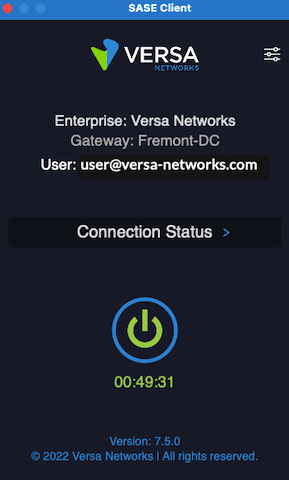
Versa SASE Client
Versa SASE client brings SD-WAN-type connectivity to the end host, is simple to use, and can be configured centrally by the administrator. The SASE client features include:
- Best gateway selection based on the load on the gateway
- Device posture check and compliance checks
- Digitial Experience Management (DEM) for end devices
- Intelligent local breakout to the internet
- Location-aware policy
- Multitenancy support
- Network authentication tool for end devices
- Traffic steering based on the application or FQDN
- User identification
The SASE client is available on the following platforms:
- Android, including Chromebook
- iOS
- Linux
- MacOS
- Windows
The process for registering the SASE client and establishing a connection consists of the following steps:
- You receive an automated email with important information, such as the FQDN of the portal and links to download and install the client.
- When installation is complete, follow the email instructions to register the client. Additional authentication steps, such as time-based one-time password (TOTP) or email-based one-time password (OTP), can be used to further validate the user.
- A portal policy is chosen based on match criteria, such as user location or device posture.
- Once a portal policy match is found, the SASE client configuration is downloaded and applied to the SASE client. The registration process is complete.
- The SASE client now has the configuration necessary to establish a connection to its gateway. At this point, a best-gateway selection is made based on the reported load from the gateways and the user’s proximity to the gateway.
- The gateway-client policy is then matched for the user traffic. Gateway policies can enforce specific authentication, MFA, or EIP profile.
- An IPsec tunnel is established.
- User traffic can then pass over the tunnel and may be further processed by the security modules.
Management Portal
The Concerto SSE management portal is a single pane of glass for provisioning, fault and performance monitoring, and visibility of the SASE fabric. The portal can manage both the SSE and SD-WAN components, allowing the administrator to easily configure end-to-end policies across those elements. You can view historical performance data through the portal, including statistics around traffic types, hits on rules, threats, and other important information. You can also view and query the security logs.

The management portal includes the following features:
- Unified policy language—Versa Concerto provides a unified policy language in which all components are presented in a consistent manner. For example, you configure policies with match criteria as well as the action to be taken when a match is found. A single policy can apply to multiple network segments with support for zones within each rule, providing flexibility to administrators. You can define multiple rules in each module, with rules processed from top to bottom. A wizard-style policy configuration tool guides users through the process in an intuitive manner.
- Policy enforcement—Once you define the match criteria, you can select various actions to enforce the policy depending on the module. Policy can be enforced with a simple action such as allow or deny, or with a more advanced action called from another profile object. For example, you can use a URL filtering profile as the enforcement action. Versa SSE includes a large list of predefined profiles for the most common use cases, and also supports user-defined profiles.
- Review and deploy—Provides a one-page view of the entire policy configuration. You specify a name for the policy, and then review the details of the entire policy at a glance. You can edit individual policy sections as needed. You can also disable a configured policy without deleting the policy. Once you are done, you save the policy.
- Publishing—Saved configurations are not automatically applied. You must publish the configuration to the gateways for it to take effect. You can choose to apply a configuration to some or all of the gateways, and you can publish a configuration to multiple gateways concurrently. The status column displays the progress of this operation for each gateway. You can publish a configuration at any time. A task log provides an audit and status trail of all changes.
Configuration Overview
To configure and activate a new SASE tenant, you perform the following steps:
- Configure authentication
- Configure site-to-site tunnels
- Configure Versa Secure Access (VSA) client access policies
- Configure the Versa SASE client
- Configure TLS decryption
- Configure SASE internet protection rules
- Configure real-time protection
- Configure advanced internet protection:
- Use Versa Analytics
The following sections describe each of the steps and provide links to articles that provide more detail.
Configure Authentication
User authentication is a critical component of the SASE framework, as it implements Zero Trust Network Access (ZTNA) principles. ZTNA provides micro-segmentation, multi-factor authentication, per-application authorization, and network and user visibility. Remote users can be authenticated using a local database. Versa SASE also supports LDAP, SAML, and RADIUS for user and group authentication.
LDAP is a client-server protocol that enables a network device to access an LDAP server, which provides directory services that store descriptive attribute-based information. When an end user sends a request to access a webpage, the VOS device accesses the LDAP server to validate the user. Based on the authentication result, the user is either authentication or their authentication request is denied. You can configure either a user-based or group-based policy to allow or deny traffic.
SAML authenticates users to access multiple services and applications. SAML is useful when you want to access multiple services or applications and have to authenticate for each service or application, for example, Google and its related services. SAML is a common standard for exchanging authentication between parties, most commonly used for web browser-based single sign-on (SSO).
With Versa Directory authentication, you upload lists of users and groups for authentication purposes. You can also add individual users and groups using the GUI.
To configure authentication, you do the following:
- Configure User and Device Authentication Profiles—User and group profiles specify the authentication type for user authentication. These profiles are used in user and device authentication rules, to specify the method to authenticate users who match the authentication rule criteria.
- Configure User and Device Authentication Rules—You can define rules for user and device authentication based on match criteria for destination zones, IP addresses, SASE services, and schedules. User authentication rules are used when there is no SASE client that provides user identity information to the SSE service. When user authentication rules are configured, and the user traffic matches the rule criteria, the user is directed to a captive portal is presented and asked to provide its credentials. Once the user successfully authenticates, the policy can enforce the rules specific to that user.
Configure User and Device Authentication Profiles
To specify the authentication type for user authentication, you configure user and device authentication profiles. For each enterprise, you can configure profiles for Lightweight Directory Access Protocol (LDAP), RADIUS, Security Assertion Markup Language (SAML), and Versa Directory.
For Releases 12.2.1 and later, you can configure multiple authentication profiles of each type, except for Versa Directory. You can configure only one Versa Directory profile.
For Releases 12.1.1 and later, you can also configure user and device certificate-based profiles. You can configure both an LDAP and a SAML profile for an enterprise, but for RADIUS and Versa Directory profiles types, you can configure only one per enterprise. You can configure user and device certificate-based profiles with each other, or with LDAP or SAML authentication profiles.
LDAP is a client–server protocol that allows a network device to access an LDAP server, which provides directory services that store descriptive attribute-based information. When an end user sends a request to access a webpage, the Versa Operating SystemTM (VOSTM) device accesses the LDAP server to validate the user. Based on the authentication result, the user is either authenticated or their authentication request is denied. You can configure either a user-based or group-based policy to allow or deny traffic.
RADIUS is a distributed client–server system that secures networks against unauthorized access. A RADIUS server provides an external database that you can use to authenticate users before allowing them to access a network, a device, or related services.
SAML authenticates users so that they can access multiple services and applications. SAML is useful when you want to access multiple services or applications and have authentication for each service or application, for example, Google and its related services. SAML is a common standard for exchanging authentication between parties and is most commonly used for web browser-based single sign-on (SSO).
With Versa directory authentication, you upload lists of users and groups for authentication purposes. You can also add individual users and groups using the GUI.
Certificate-based authentication is a secure method to validate the identity of users and devices. For Releases 12.1.1 and later, Versa SSE supports user and device certificate-based authentication. When you enable certificate-based authentication, the gateway initiates a request to the SSE client for users to provide their certificates during client portal registration and gateway connection.
Note: You must configure the following SSE rules, profiles, and settings in a specific order:
- Configure users and groups, and them publish them to the gateway, as described in this article.
- Configure site-to-site tunnels. For more information, see Configure SASE Site-to-Site Tunnels.
- Configure secure client access profiles and rules. For more information, see Configure SASE Secure Client-Based Access Rules.
You do not need to configure the remaining SSE rules, profiles, and settings in a specific order.
To configure user and device authentication profiles:
- Go to Configure > Security Service Edge > User and Device Authentication > Profiles.

The User and Device Authentication Profiles screen displays.

- To create a new profile, click + Add.
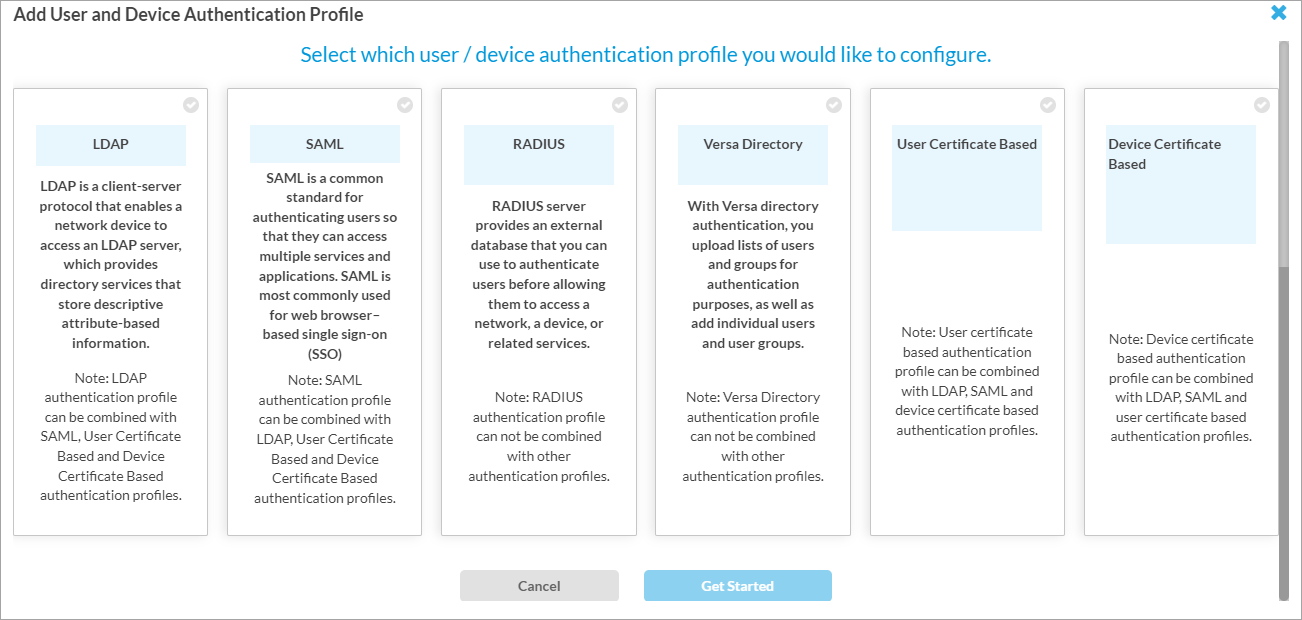
- For Releases 12.2.1 and later, the Add User and Device Authentication Profile screen displays. On this screen, you can configure multiple authentication profiles of each type, except for Versa Directory, which can have only one profile.

- For Release 12.1.1, the Add User and Device Authentication Profile screen displays.
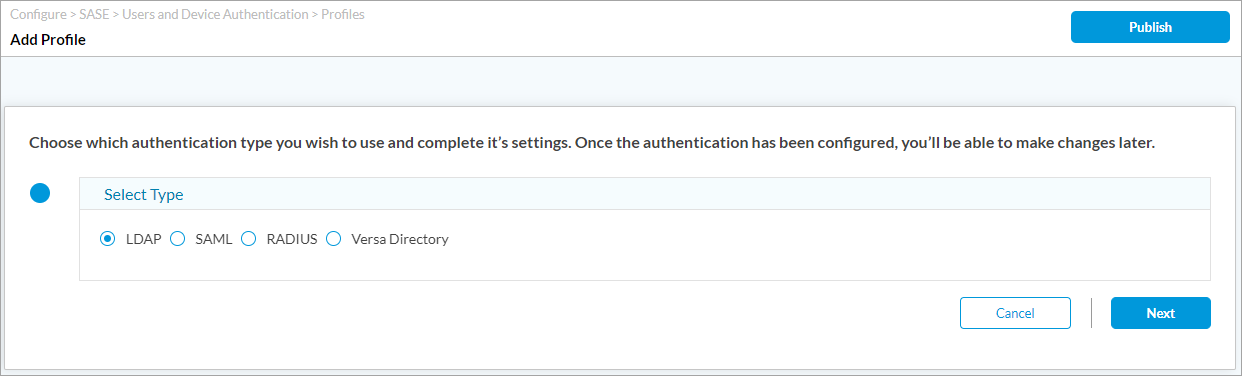
- For Releases 11.4.1 and earlier, the Add Profile screen displays.
- For Releases 12.2.1 and later, the Add User and Device Authentication Profile screen displays. On this screen, you can configure multiple authentication profiles of each type, except for Versa Directory, which can have only one profile.
- Select the type of authentication to configure:
- (For Releases 12.1.1 and later.) Select one of the following options: Device Certificate Based, LDAP, RADIUS, SAML, User Certificate Based, or Versa Directory.
- (For Releases 11.4.1 and earlier.) In the Select Type field, click one of the following options: LDAP, RADIUS, SAML, or Versa Directory.
- Click Next (or Get Started for Releases 12.1.1 and later).
- For the LDAP authentication type, the following screen displays. Enter information for the following fields.

Field Description Server Type Select the server type:
- Active Directory
- Open LDAP
Select Either FQDN or IP Address Click FQDN or IP Address, and then enter the FQDN or IP address of the Active Directory or LDAP server. Routing Instance
Select the name of the tenant routing instance to use to reach the LDAP server. Port
Enter the listening port number on the LDAP server, which allows you to communicate with the LDAP directory service.
Range: 0 through 65535
Default: None
+ Add Secondary Server Click to add a secondary server of the same type. In the Add Secondary Server popup window, enter the required information, then click Add:
- FQDN or IP Address
- Routing Instance
- Port

Enable SSL Click the slider to enable SSL for the LDAP session.
Click the slider again to disable SSL for the LDAP session.
SSL Mode If you enable SSL, select the SSL mode for the LDAP session:
- LDAPS—Use secure LDAP (LDAP over SSL)
- STARTTLS—Use LDAP over TLS
CA Certificate If you enable SSL, select the CA certificate to use for the secure LDAP connection. To add a new CA certificate, click + Add New, and the enter the required information.

Bind DN Enter the bind distinguished name (DN) to use when logging in to the LDAP server. Bind Password Enter the password that the bind DN uses when logging in to the LDAP server. Bind Timeout (sec) Enter the bind timeout period, in seconds.
Default: 30 seconds
Base DN Enter the base distinguished name DN to use when an LDAP client initiates a search. Domain Name Enter the domain name to use for LDAP searches, for example, versa-networks.com. Domain Base Enter the name of the base domain. Cache Expiry Time (mins) Enter the time after which the cache expires, in minutes. When the cache expiry time is reached, the user is logged out.
Default: 10 minutes
Cache Expiration Mode (For Releases 12.2.2 and later.) Select the mode to use to end a session:
- Fixed Interval—Use the time specified in the cache expiration as the time interval to end a session.
- Inactivity—Use the time specified in the cache expiration as the interval of inactivity after which to end a session.
Cookie Expiry Time (For Releases 12.2.2 and later.) Enter the amount of time after which the cookie for the authentication profile expires, in minutes. When the cookie expires, the user will need to log in again.
Default: 720 minutes
If you do not manually configure the cookie expiry time, the default value of 720 minutes is applied and this value will take precedence over the Cache Expiry Time in VOS. Also, the "Caching mode" is set to hybrid internally and is not configurable.
Note that the default value is set to 720 minutes even if the Cookie Expiry Time field is blank in the Concerto UI.
Concurrent Logins Enter the number of concurrent logins allowed.
Range: 1 through 255
Default: 1
Search Timeout (sec) Enter the search timeout period, in seconds.
Default: 30 seconds
- Click Next.
- The Define User/Group Profile screen displays. Enter information for the following fields.
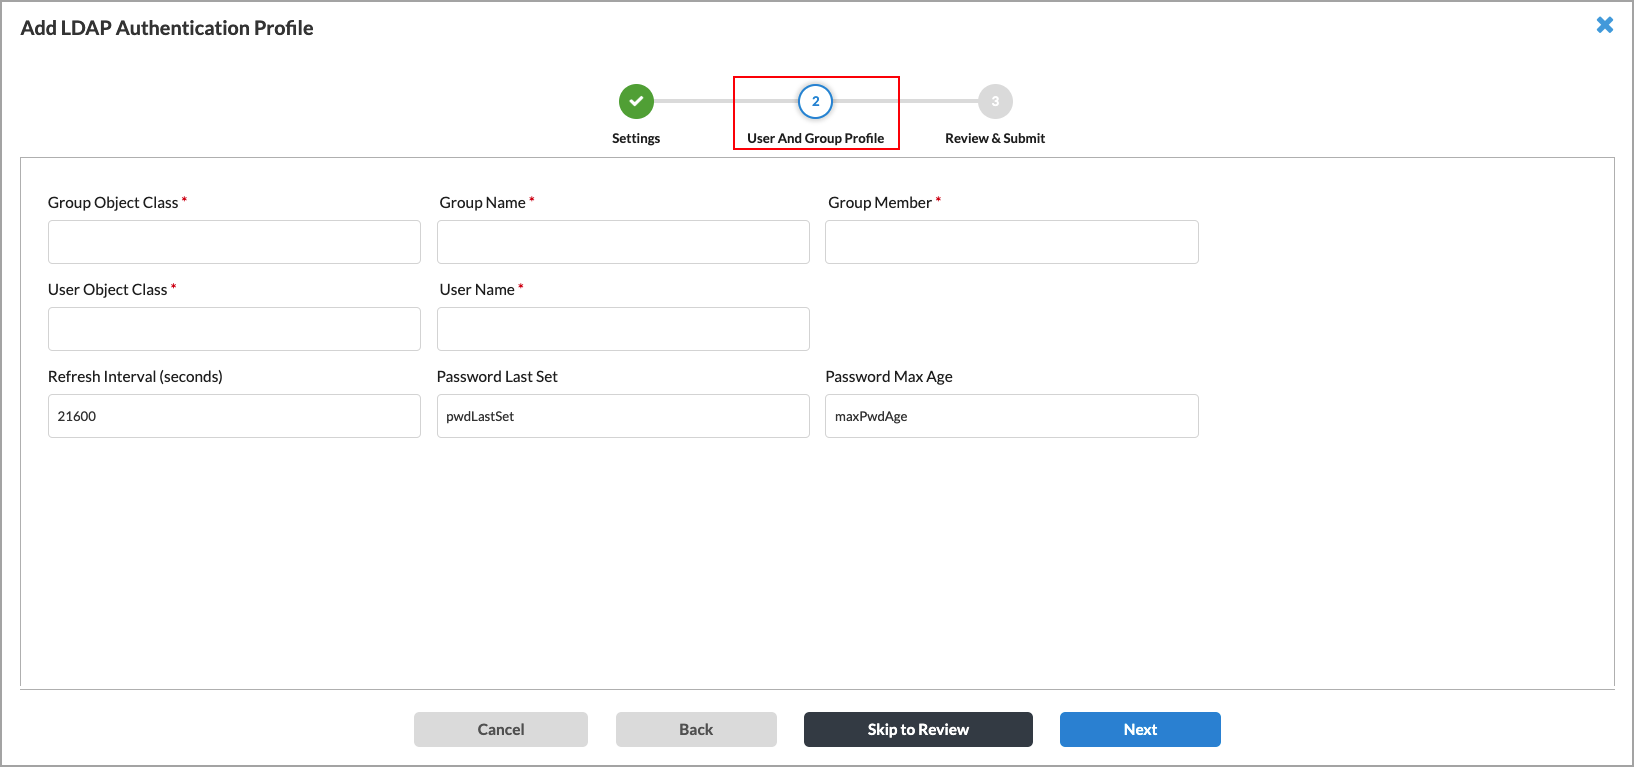
Field Description Group Object Class (Required) Enter the group object class provided by your administrator. Group Name (Required) Enter the group name provided by your administrator. Group Member (Required) Enter the group member provided by your administrator. User Object Class (Required) Enter the user object class provided by your administrator. User Name (Required) Enter the format of the username, for example, User Principal Name. Refresh Interval Enter how often to refresh the LDAP profile information, in seconds.
Range: 60 through 86400 seconds
Default: 21600 seconds
Password Last Set Enter the time when the user password was last set or updated. Password Max Age Enter the validity period of the password. - Click Next. (For Releases 11.4.1 and later.) The Provide Information screen displays. This screen is common for all authentication types. Enter the required information, as described in Step 26.
- For the SAML authentication type, the following screen displays. Enter information for the following fields.
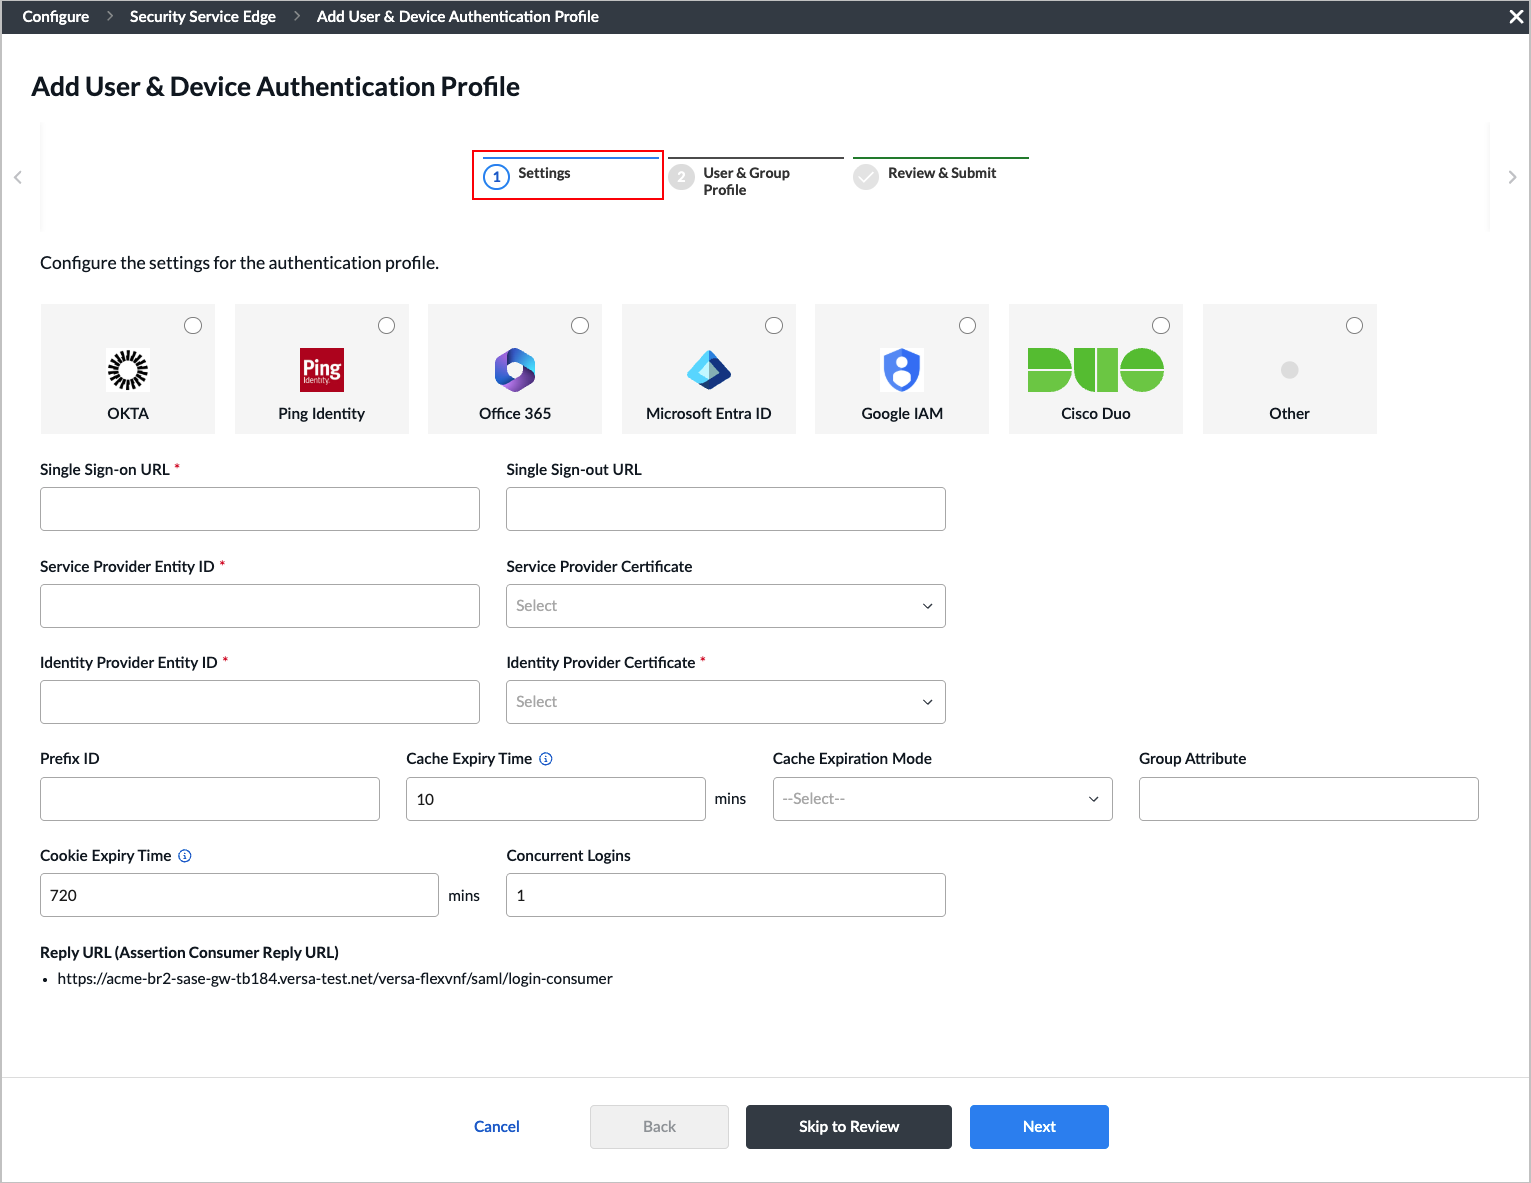
Field Description Select SAML Type Select the SAML type:
- Cisco Duo
- Google IAM
- Microsoft Entra ID
- Office 365
- Okta
- PingIdentity
- Other
Single Sign-on URL (Required) Enter the URL of the identify provider (IdP) to use for single sign-on. Single Sign-out URL Enter the URL to point to for single sign-out. Service Provider Entity ID (Required) Enter the entity ID of the service provider. Service Provider Certificate Select the certificate that the service provider uses to authenticate. Identity Provider Entity ID (Required) Enter the entity ID that uniquely identifies the SAML IdP. Identity Provider Certificate (Required) Select the authentication certificate issued by the IdP. Prefix ID Enter the name of the external IdP. Cache Expiry Time (mins) Enter the time after which the cache expires, in minutes. When the cache expiry time is reached, the user is logged out.
Default: 10 minutes
Cache Expiration Mode (For Releases 12.2.2 and later.) Select the mode to use to end a session:
- Fixed Interval—Use the time specified in the cache expiration as the time interval to end a session.
- Inactivity—Use the time specified in the cache expiration as the interval of inactivity after which to end a session.
Group Attribute Enter the SAML group attribute to identify group value from the SAML response. Cookie Expiry Time (For Releases 12.2.2 and later.) Enter the amount of time after which the cookie for the authentication profile expires, in minutes. When the cookie expires, the user will need to log in again.
Default: 720 minutes
If you do not manually configure the cookie expiry time, the default value of 720 minutes is applied and this value will take precedence over the Cache Expiry Time in VOS. Also, the "Caching mode" is set to hybrid internally and is not configurable."
Note that the default value is set to 720 minutes even if the Cookie Expiry Time field is blank in the Concerto UI.
Concurrent Logins Enter the number of concurrent logins allowed.
Range: 1 through 255
Default: 1
Reply URL (Assertion Consumer Reply URL) Enter the assertion consumer reply URL from which the application receives the authentication token. SAML also refers to this to as the Assertion Consumer Service (ACS). - Click Next. (For Releases 11.4.1 and later.) The Location of Users and User Groups screen displays. Enter information for the following fields.
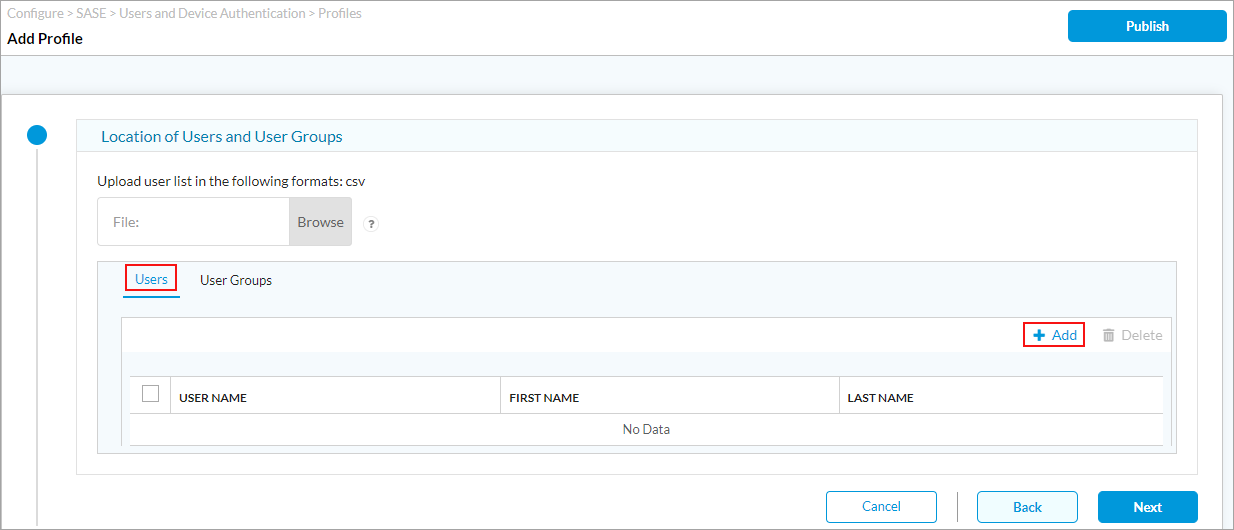
For Releases 12.1.1 and later, the following screen displays.

Field Description Upload user list in the following formats: csv If you select the Users tab in the Define Settings section, click File: Browse. In the popup window, select a user list file in CSV format to upload. Each line in the CSV file must be in the following format:
- User Name*, First Name, Last Name, Password*, Email*, Phone, Description, Group Name. (Note that fields marked with an asterisk (*) are mandatory.)
Users tab Click + Add to add a new user. In the Add User screen, enter the required information. When you select LDAP or SAML as the authentication type, the following screen displays:
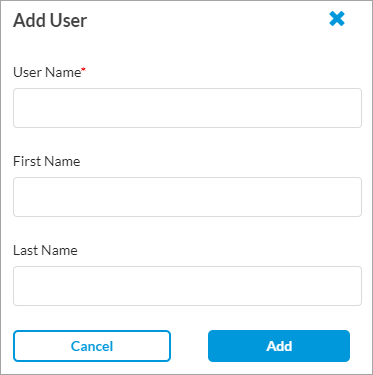
For Versa Directory, the following screen displays when you click + Add to add a user:
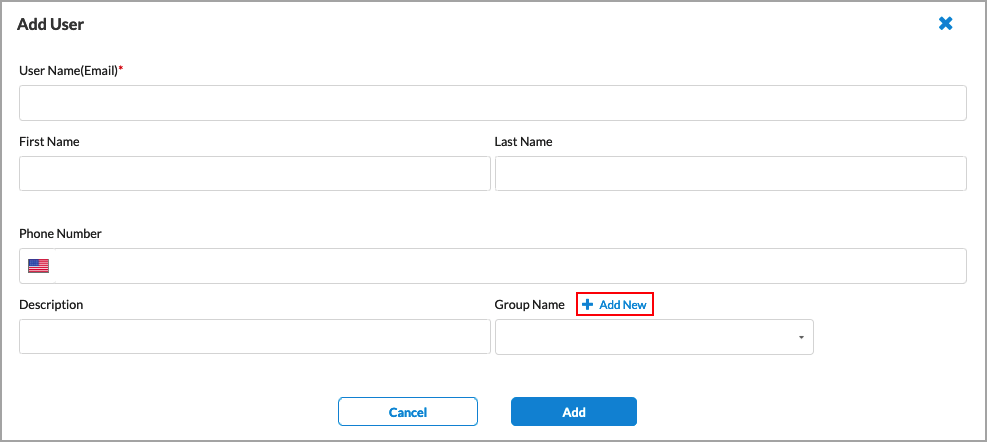
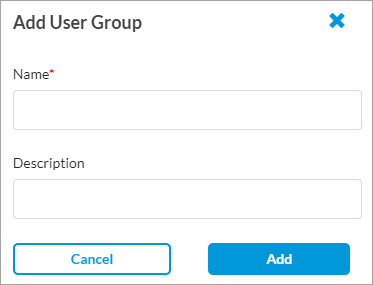
Click + Add New to add a new user group, as shown below in the User Groups tab.
Upload group list in the following formats: csv If you select the User Groups tab in the Define Settings section, click File: Browse. In the popup window, select a user group file in CSV format to upload. Each line in the CSV file must be in the following format:
- Group Name*, Description

User Groups tab Click + Add to add a new user group. In the Add User Group screen, enter the required information.
- Click Next. The Provide Information screen displays. This screen is common for all authentication types. Enter the information as described in Step 16.
- If you select RADIUS as the authentication type, the following screen displays. Enter information for the following fields.

Field Description IP Address (Required) Enter the IP address of the RADIUS server. Port (Required) Enter the port number to use on the RADIUS server. VPN Name Select the VPN instance to use to connect to the RADIUS server. Shared Secret Enter the RADIUS shared secret (password) string. Cache Expiry Time Enter the time in minutes after which the cache expires.
Default: 10 minutes
Concurrent Logins Enter the number of concurrent logins allowed.
Range: 1 through 255
Default: 1
- Click Next. The Location of Users and User Groups screen displays. Enter the information as described in Step 10.
- Click Next. The Provide Information screen displays. This screen is common for all authentication types. Enter the information as described in Step 16.
- If you select Versa Directory as the authentication type, the Location of Users and User Groups screen displays. Enter the information as described in Step 10.
- (For Releases 12.1.1 and later.) If you select User Certificate Based as the authentication type, the Add User Certificate Authentication Type screen displays. In the Settings screen, enter information for the following fields.
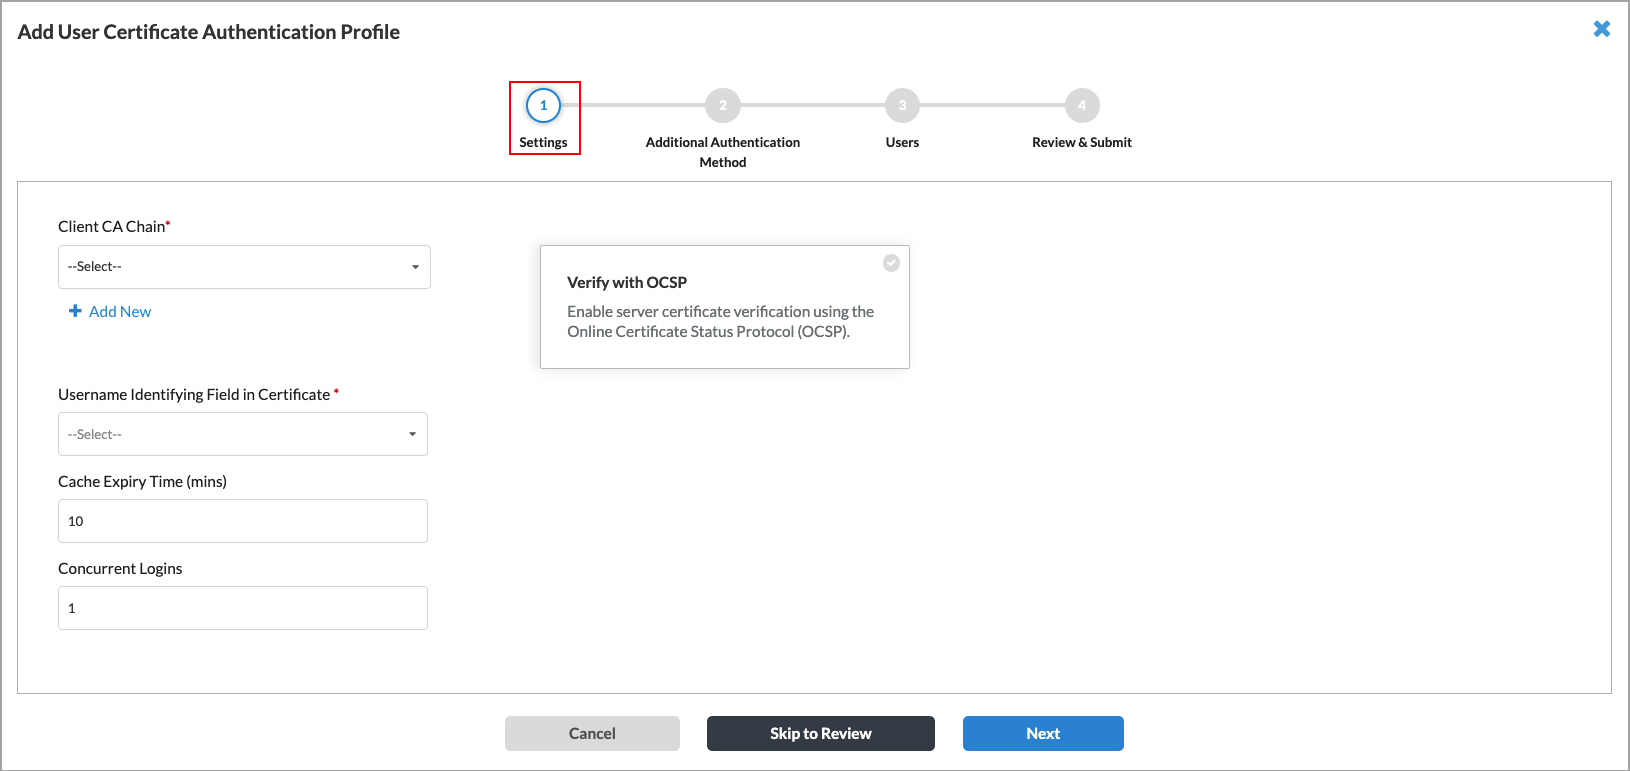
Field Description Client CA Chain (Required) Select the client CA certificate chain to authenticate the user. To add a new CA certificate, click + Add New. The Add CA Certificate window displays. For more information, see Configure SASE Certificates. Username Identifying field in Certificate (Required) Select the field that Concerto uses to validate a name match in the client certificate:
- Subject-Alternative-name Email
- Subject Alternative-name Principal Name
- Subject Common-name
Cache Expiry Time Enter the time in minutes after which the cache expires.
Default: 10 minutes
Concurrent Logins Enter the number of concurrent logins allowed.
Range: 1 through 255
Default: 1
Verify with OSCP Click to enable verification of server certificate using Online Certificate Status Protocol (OCSP). The following fields display:
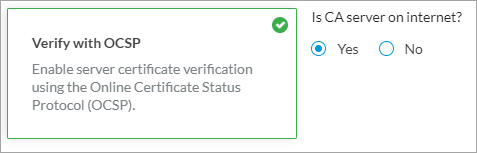
Yes is selected by default and if you select Yes, Concerto uses the CA server on the internet for OCSP verification.If you select No, enter the VPN name to check for to server certificate.
- Click Next or select Step 2, Additional Authentication Method. The following screen displays.

- To enable multi-factor authentication using LDAP or SAML profiles, slide the Multi-factor Authentication Disabled toggle. This is disabled by default.
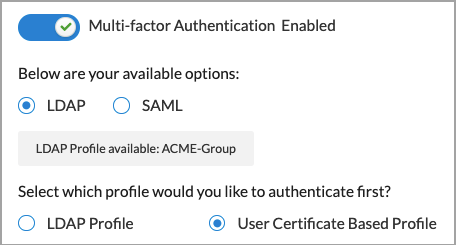
- If LDAP and SAML profiles are configured, the profiles display.
- (Releases 12.1.1 and earlier) Click Add Profile to add a profile. For adding LDAP profiles, follow Step 5 through 7 and for SAML profile, follow Steps 9 through 11.
- Click Next. The Users and User Groups screen displays. Enter the information as described in Step 10.
- (For Releases 12.1.1 and later.) If you select Device Certificate Based as the authentication type, the Add Device Certificate Authentication Type screen displays. In the Settings screen, enter information as described in Step 16.

- Click Next or select Step 2, Authentication Order. The following screen displays.

Field Description Prelogon Device Authentication (For Release 12.2.1) Click the slider bar to enable prelogon Device Authentication to authenticate using a device certificate instead of user credentials. Device Authentication Click the slider bar to enable Device Authentication to authenticate in postlogon with MFA using device certificate authentication and user credentials. If you enable device authentication, the following screen displays.
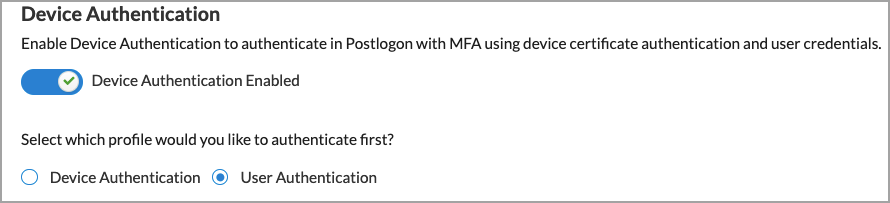
Select which profile to authenticate first.
- (For Release 12.2.1) Click Next.
- (For Releases 12.1.1 and earlier.) If you have configured a user certificate-based authentication profile, select Device Authentication or User Authentication to specify which profile to use first for authentication. Device Authentication is select by default.
- (For Releases 11.4.1 and earlier.) Click Next. In the Provide information screen, enter information for the following fields.
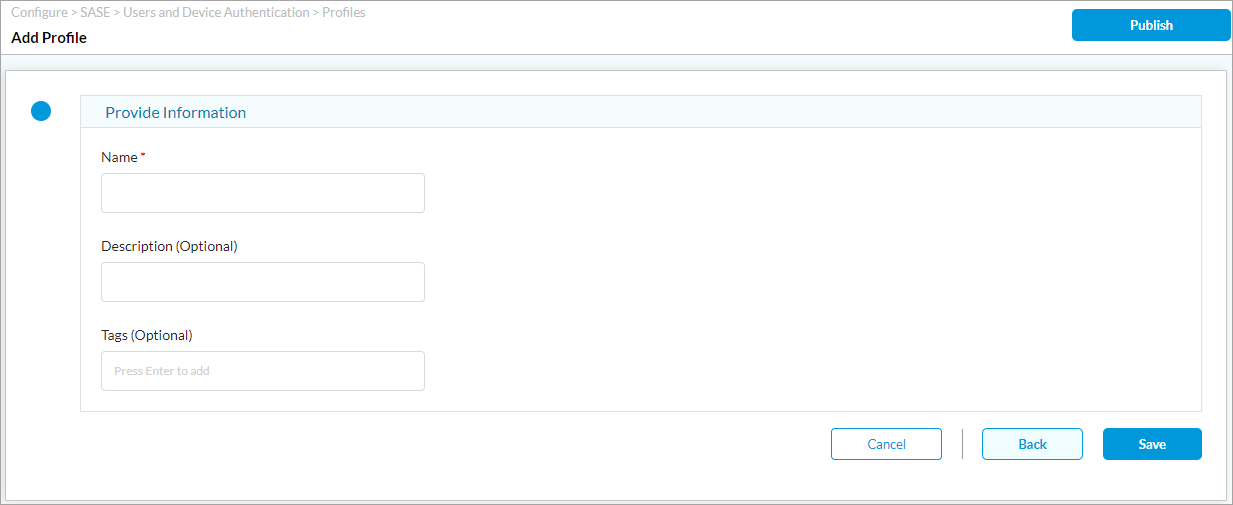
Field Description Name Enter a name for the authentication profile, for example, ACME-SAML-Profile or ACME-LDAP-Profile. Description Enter a text description for the text authentication profile. Tags Enter tags to associate with the authentication profile. - Click Save.
- (For Releases 12.1.1.) Click Next. The Review and Submit screen displays. This screen is common for all authentication types.

- In the General box, enter a name for the rule, and optionally, enter a text description for the rule and one or more tags.
- Review the selected settings. Click the
 Edit icon to change a setting, as needed.
 - Click Save to create the authentication profile.
Configure User and Device Authentication Rules
To configure user and device authentication rules for SSE users and groups:
- Go to Configure > Security Service Edge > User and Device Authentication > Rules.
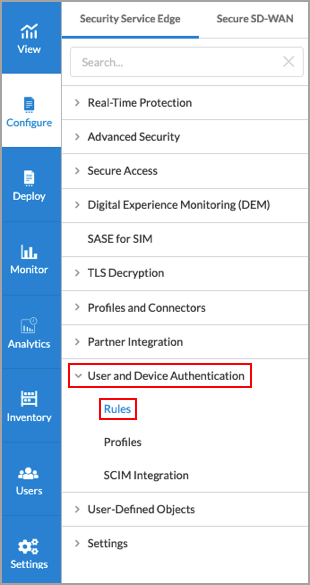
The Rule screen displays.

- To create a new users and groups profile, click + Add. The Create Users and Device Authentication Rule window displays the first step of the workflow:
- For Releases 12.1.1 and later, the first step is Applications and URLs.
- For Releases 11.4.1 and earlier, the first step is Network Layer 3-4. Skip to Step 11 of this procedure to continue.
- For Releases 12.1.1 and later, in Step 1, Applications and URLs, select the match criteria for applications, reputations, and URLs. By default, all applications, URLs, and reputations are included in the match criteria.
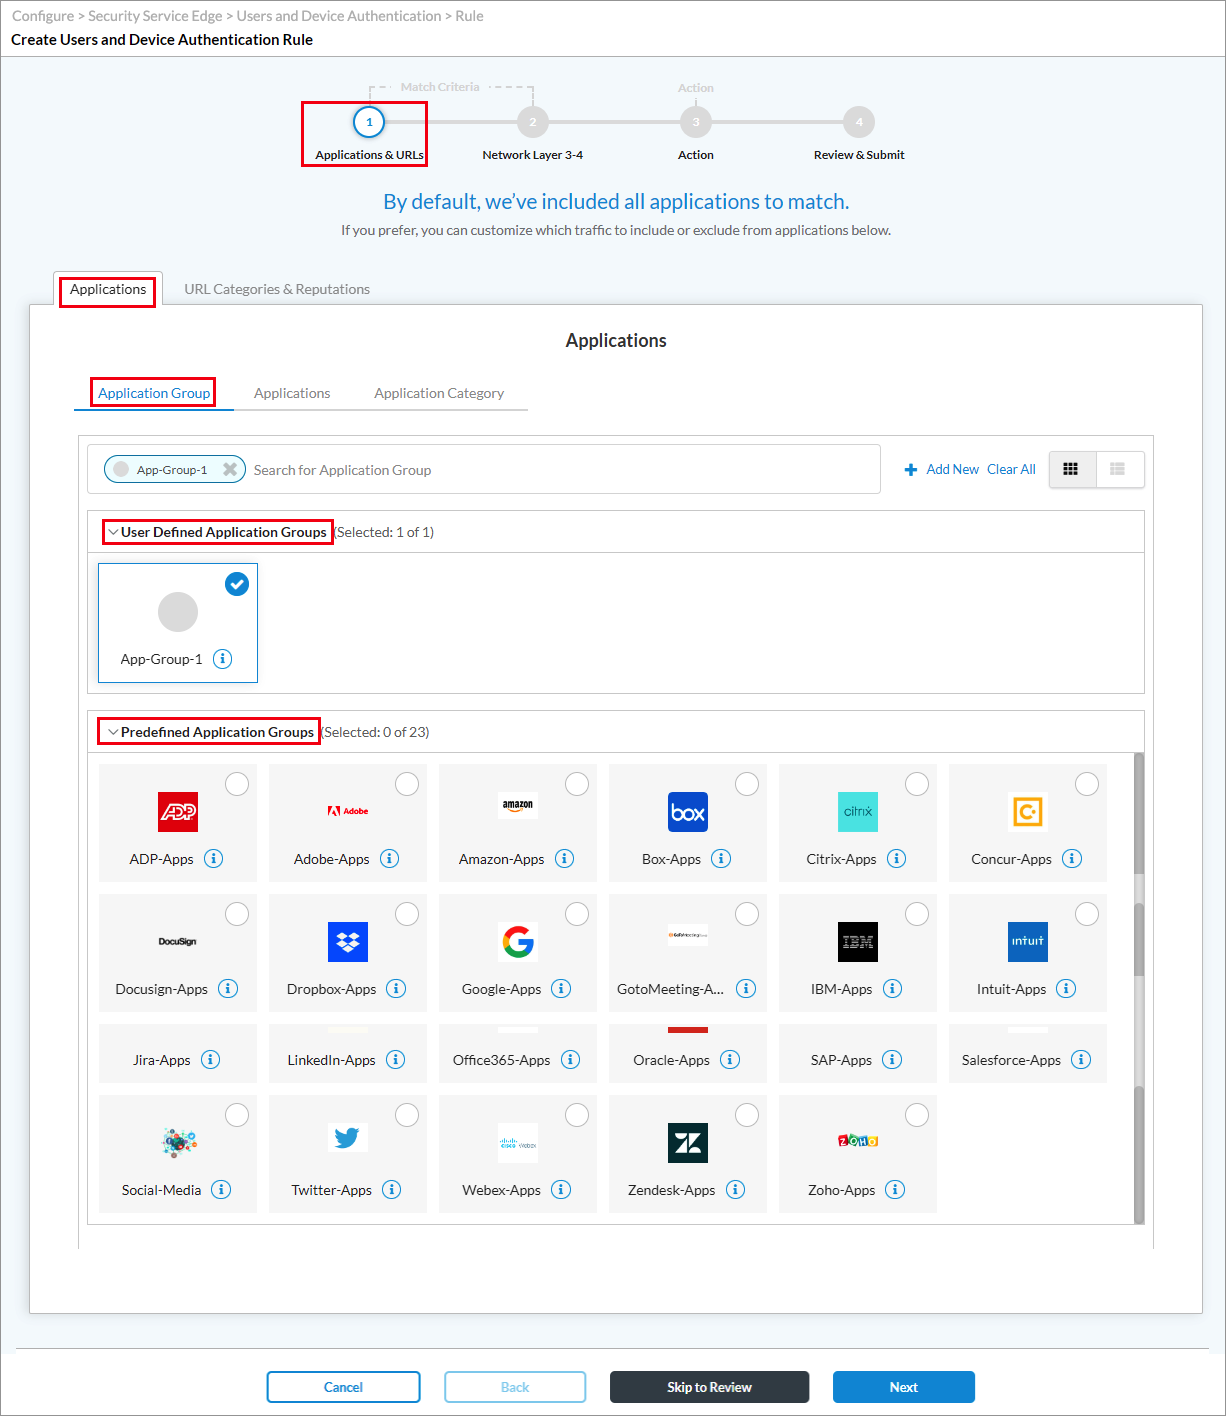
- Select the Applications > Application Group tab, and then select one or more user-defined and predefined application groups for the rule to match.
- Select the Applications > Applications tab, and then select one or more user-defined and predefined applications for the rule to match.

- Select the Applications > Application Category tab, and then select one or more predefined application categories for the rule to match.

- Select the URL Categories and Reputations tab. The following screen displays.

- In the URL Categories field, click the down arrow, and then select one or more URL categories for the rule to match.
- In the Reputations field, click the down arrow, and then select one or more reputations for the rule to match:
- High risk
- Low risk
- Moderate risk
- Suspicious
- Trustworthy
- Undefined
- Click Next.
- In Step 1, Network Layer 3-4 (for Release 11.4.1) or in Step 2, Network Layer 3-4 (for Releases 12.1.1 and later), you can customize the Layer 4 services, Layer 3 source and destination information, and schedules to which the previously selected security enforcements should apply. By default, all traffic receives the previously selected security enforcements.

- To customize the Layer 4 services, click Customize in the Services pane.
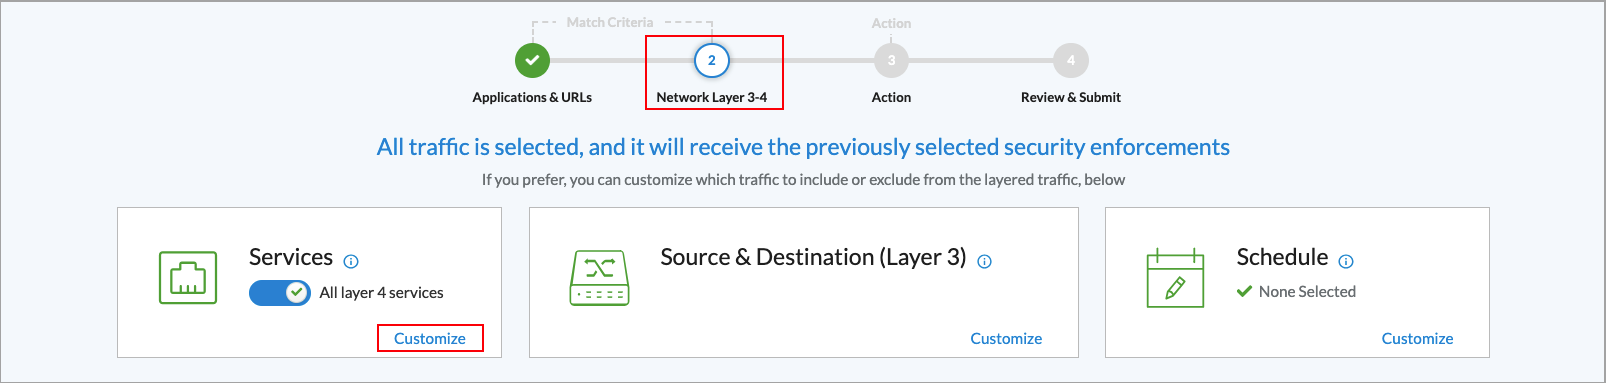
The Services window displays.

- To find a service, enter the name of the service in the Services field, and then press Enter, or click All Services and then select User-defined Services or Predefined Services to filter the list of service objects.
- To add a custom service object, click + Add User-Defined. The Service window displays. For more information, see Configure SASE Services.
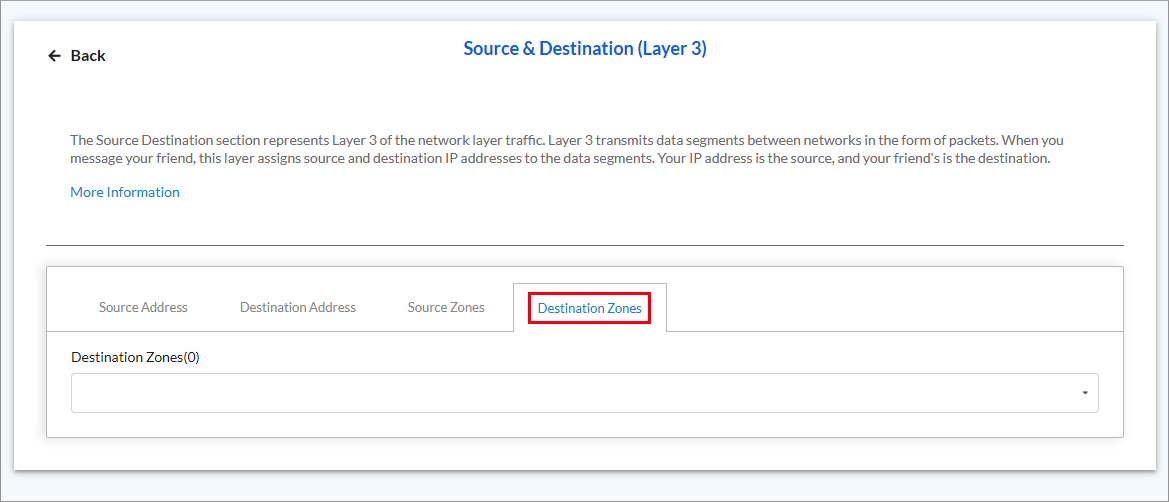
- To customize the source and destination information for a rule, in Network Layer 3-4 screen, click Customize in the Source and Destination Layer box.
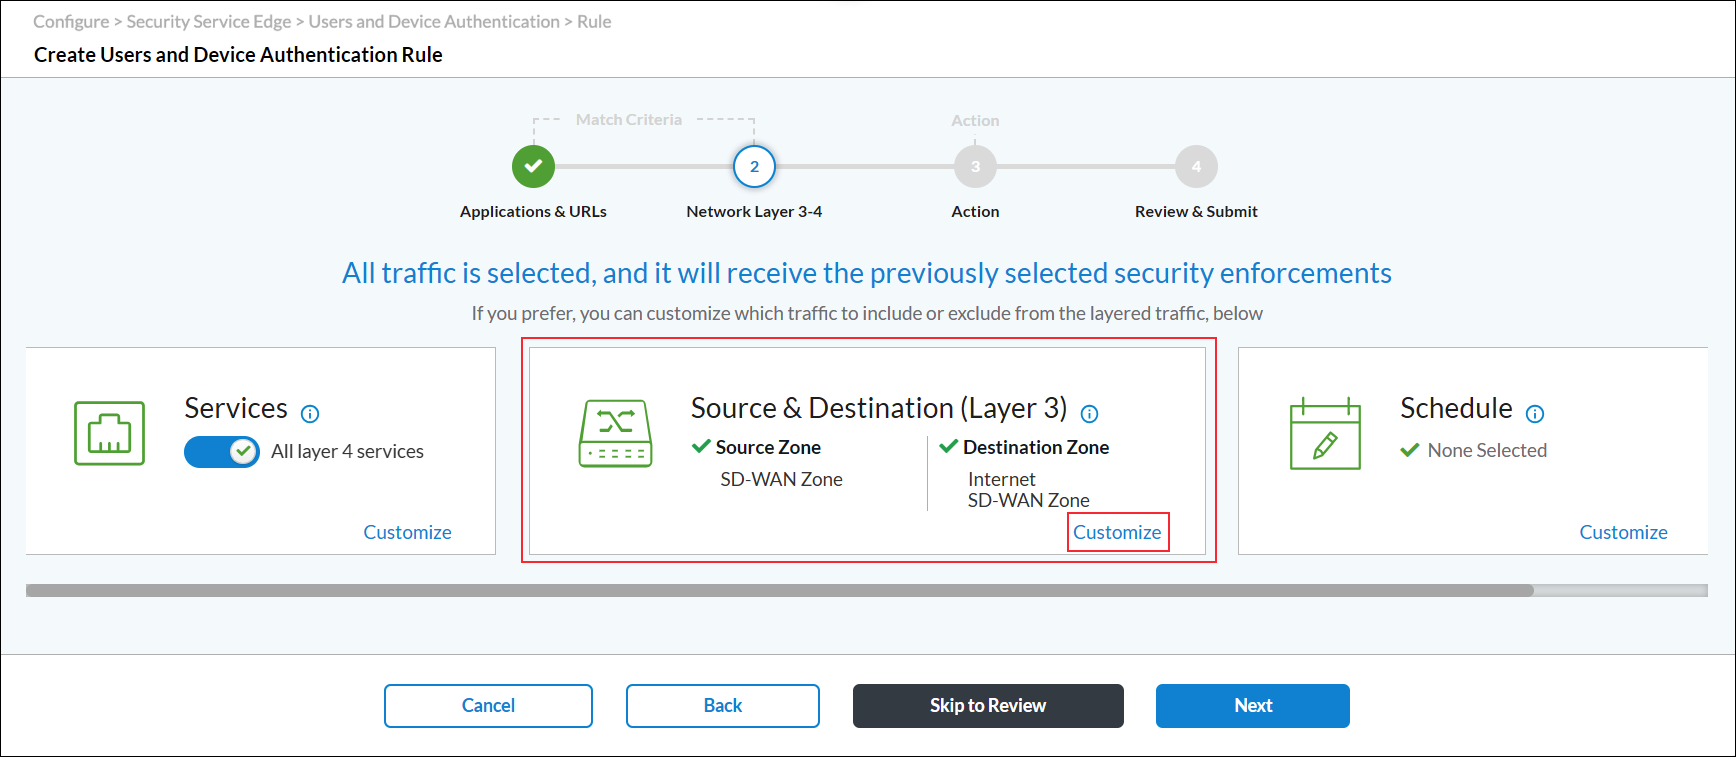
- The Source and Destination (Layer 3) window displays. Select the Source Address tab, and then enter information for the following fields.
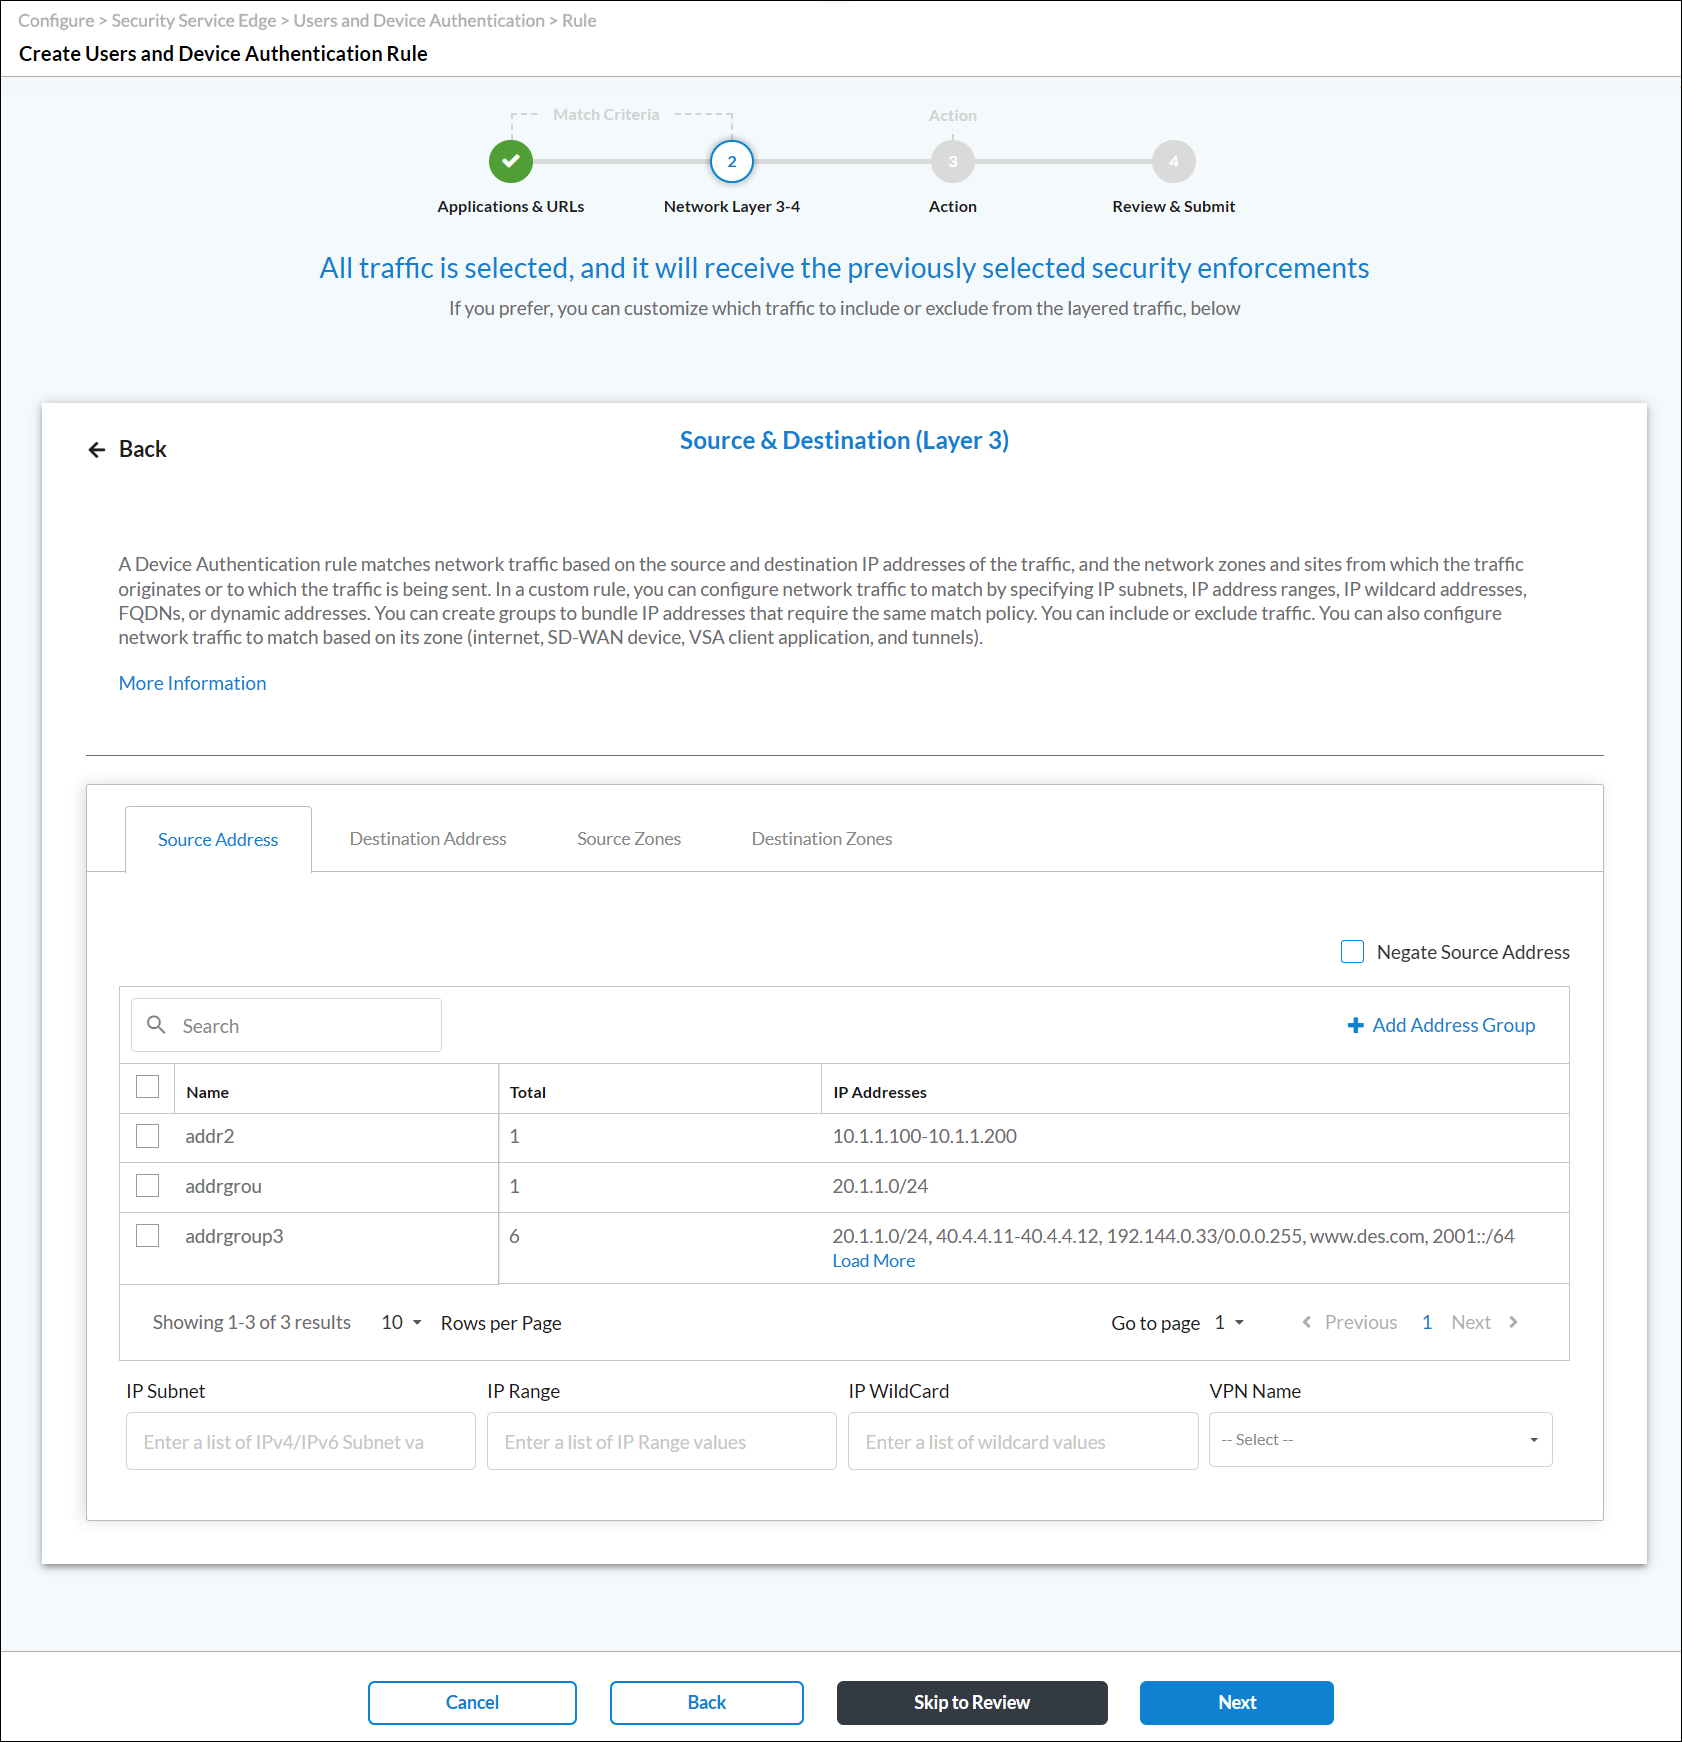
Field Description Negate Source Address Click to match any source addresses except the configured addresses.
Address Group
Select an address group to match. To add a source address group, click  Add Address Group. The Address Group screen displays. For more information, see Configure Address Group Objects.
IP Subnet
Enter an IPv4 or IPv6 subnet. IP Range
Enter an IP address range. IP Wildcard
Enter a list of wildcard IP addresses. VPN Name (For Releases 12.2.1 and later.) Select the VPN through which the IP address is reachable. - Select the Destination Address tab, and then enter information for the following fields.
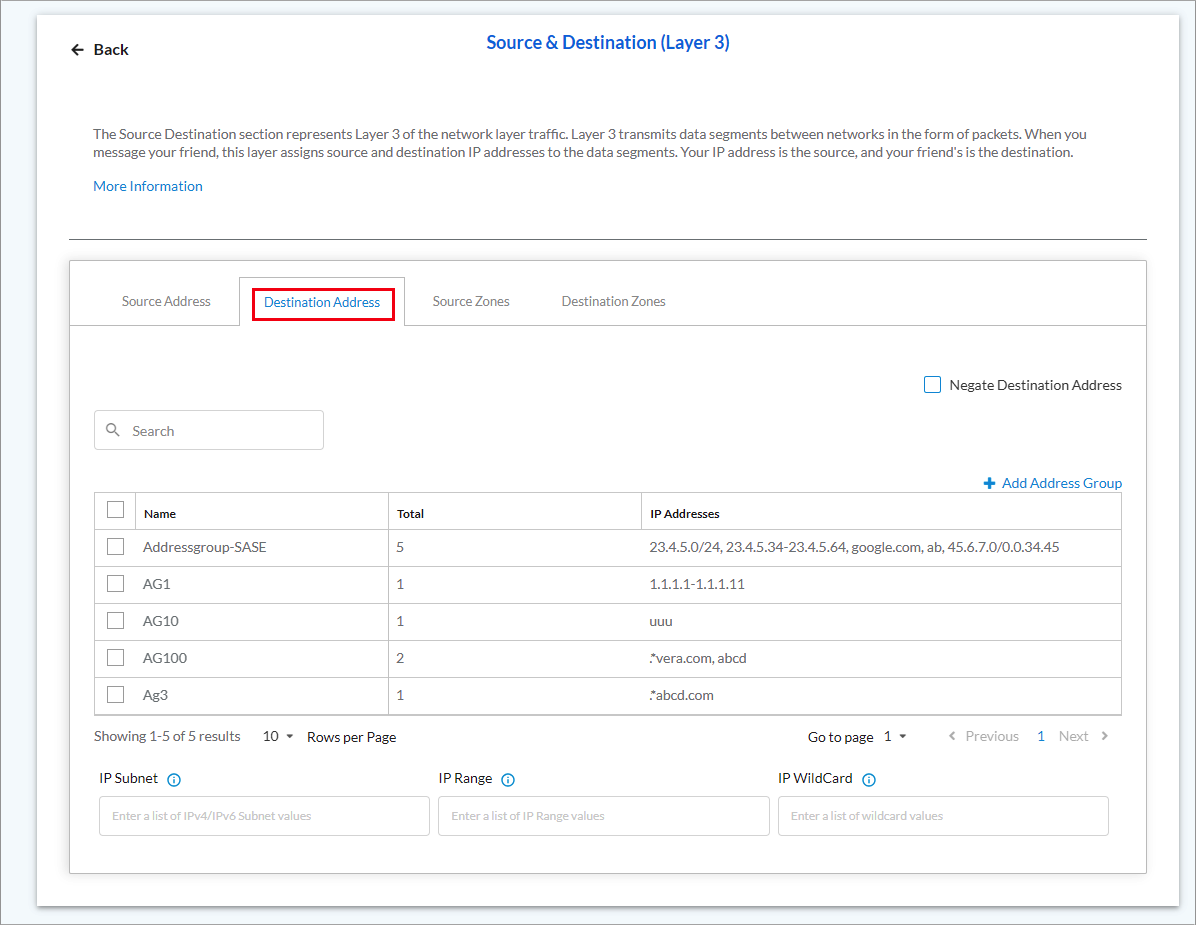
Field Description Negate Destination Address Click to match any destination addresses except the configured addresses.
Address Group
Select an address group to match. To add a source address group, click + Add Address Group. The Address Group screen displays. For more information, see Configure Address Group Objects. IP Subnet
Enter an IPv4 or IPv6 subnet. IP Range
Enter an IP address range. IP Wildcard
Enter a list of wildcard IP addresses. - Select the Source Zone tab, the and select the user source zone for which to create authentication rule. You must configure a source zone.

- Select the Destination Zone tab, and then select the user destination zone for which to create authentication rule.
- To customize the schedule for when the rule is in effect, in Network Layer 3-4 screen, click Customize in the Schedule box.

The Schedule window displays.

- Select an existing schedule.
- Click Add New to add a new schedule. The Schedule window displays. For more information, see Configure SASE Schedules.
- Click Next. The Step 2, Action (for Release 11.4.1) or Step 3, Action (for Releases 12.1.1 and later) displays.
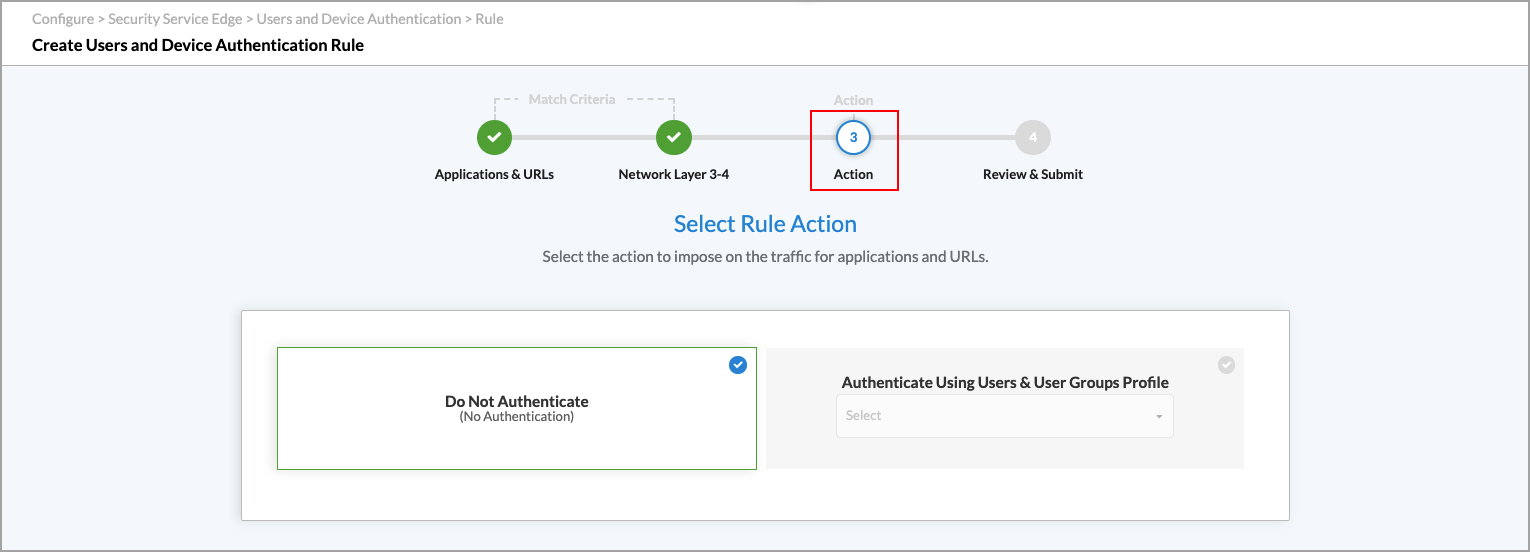
- If you do not want to authenticate users for the match criteria you selected above, click Do Not Authenticate.
- If you want to use a profile to specify the authentication type, click Authenticate Using User and Group Profile, and then select a profile that you configured in Configure User and Device Authentication Profiles, below.

- Click Next. The Step 3, Review and Submit (for Release 11.4.1) or Step 4, Review and Submit (for Releases 12.1.1 and later) displays.
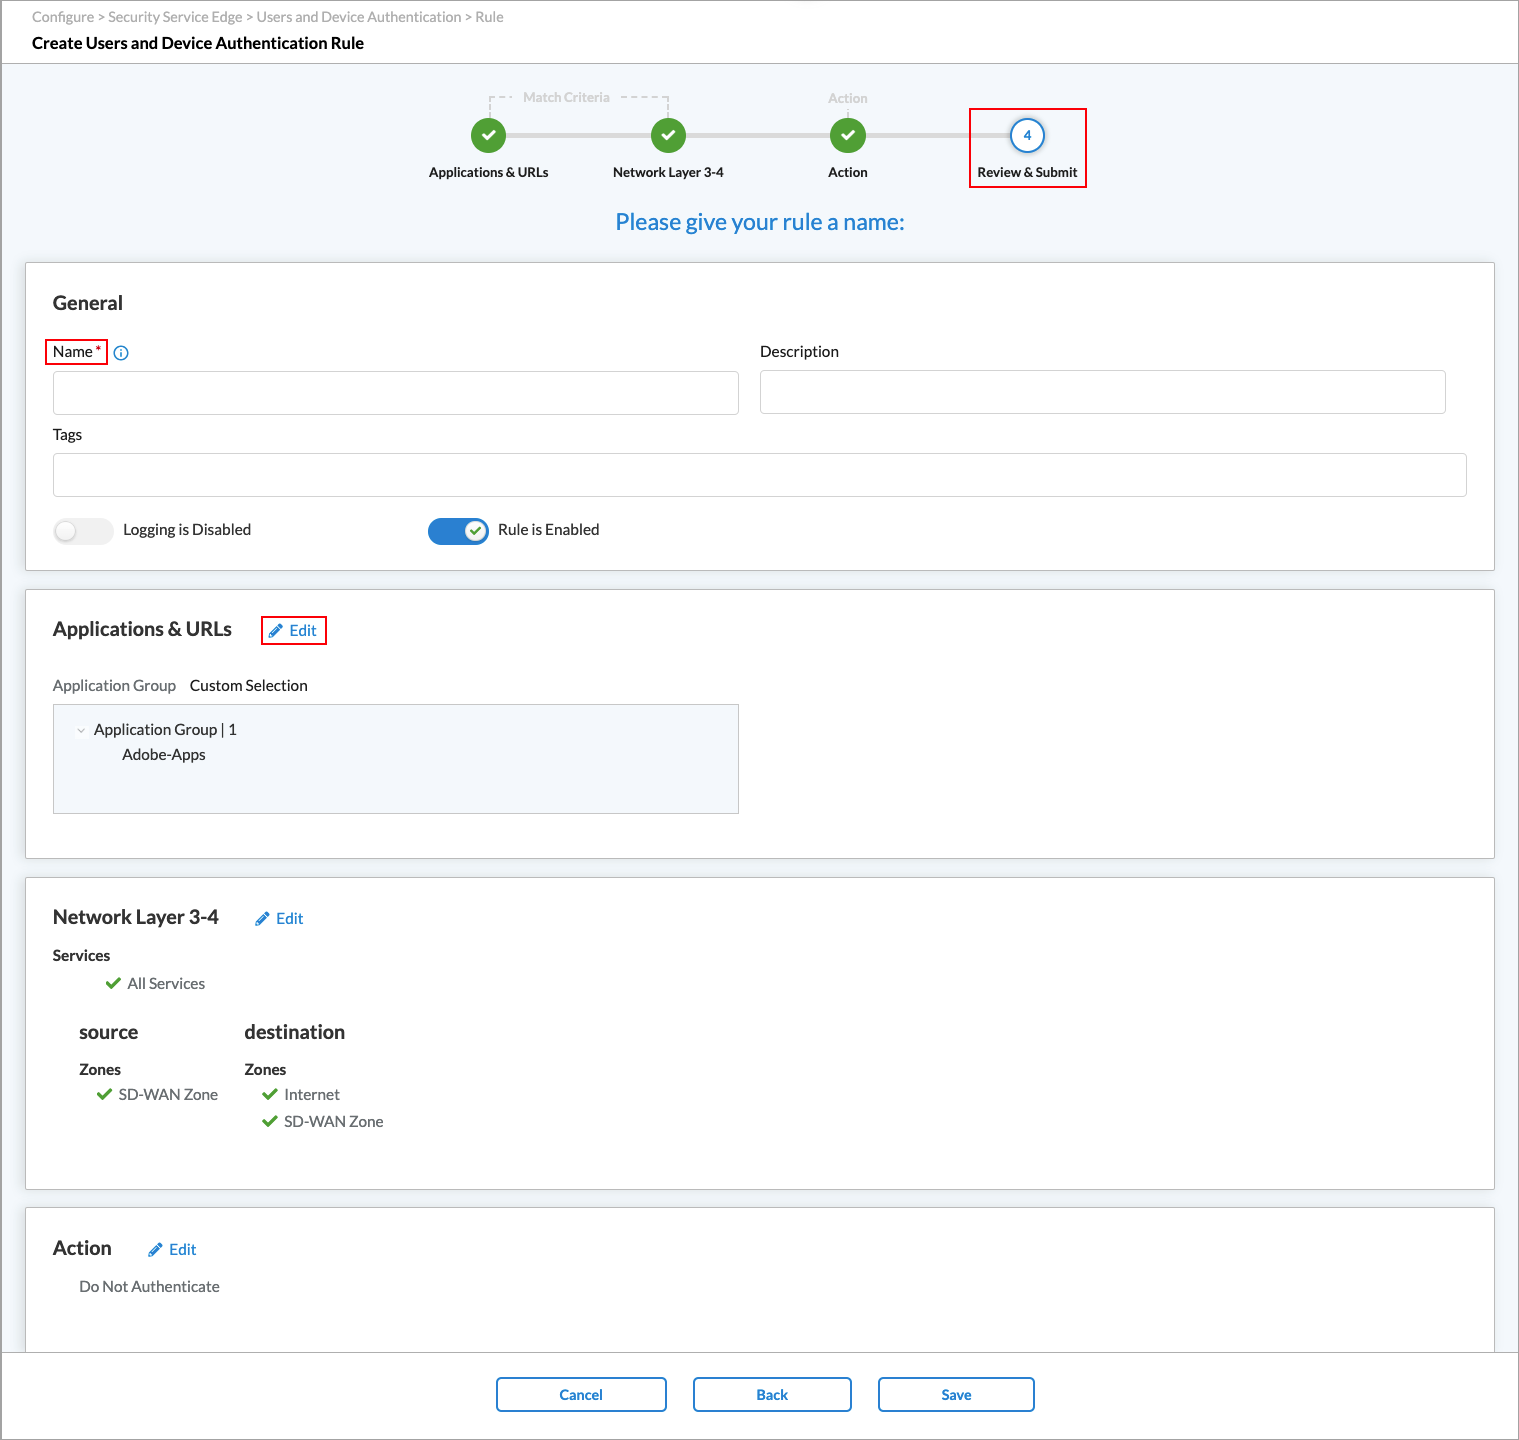
- In the General section enter a name for the rule. Optionally, enter a description and add tags for the rule.
- To enable logging for the rule, slide the toggle to Enabled.
- The rule is enabled by default. Slide the Rule is Enabled toggle to disable the rule.
- Click the Edit icon next to any section to make changes.
- Click Save.
Verification
To monitor and validate user authentication in the SASE portal, click the Analytics tab in the left menu.
- To view user authentication events, go to Logs > Authentication.

- To view usage and statistics for users, go to Dashboards > Secure Access > Users.

Configure Site-to-Site Tunnels
Site-to-site tunnels establish a Virtual Private Network (VPN) for networking devices to communicate over the public internet with the SSE gateway. This point-to-point private connection allows remote users to securely access private cloud-hosted applications, and allows onsite users to securely access the internet through the Versa SASE platform.
- Go to Configure > Settings > SiteToSite Tunnels.

The following screen displays.

- To customize which columns display, click to select or deselect the columns you want to display. Click Reset to return to the default columns settings.

- Click + Add to create a new tunnel. In the Add Site-to-Site Tunnel screen, enter information for the following fields in the Enter Type section.

Field Description Type Select the tunnel type:
- GRE
- IPsec (for Releases 11.4.1 and later)
Enabled Click the slider to enable the tunnel. Tunnel Type For the IPsec tunnel type, select the tunnel configuration to use:
- Policy-based (for Releases 11.4.1 and later)
- Route-based
Gateway Link (Group of Fields) - Versa Gateway
For an IPsec tunnel type, select a gateway, and then enter the IP address or FQDN of the remote device. For Releases 11.4.1 and later, optionally enter a remote public IP address or FQDN.

For the GRE tunnel type, select a gateway, then select a gateway circuit, and then enter the IP address of the remote device.

- Click Next. For the IPsec tunnel type, enter information for the following fields in the Enter IPsec Information section. For the GRE tunnel type, continue with the next step, Enter Address and Routing/Policy Configurations.

Field Description IKE (Group of Fields) - Version
Select the IKE version:
- V1
- V2
- V1 or V2
- Transform
Select the IKE transform type to use:
- 3des-md5
- 3des-sha1
- aes128-sha1
- aes128-md5
- aes256-sha1
- aes256-md5
- aes128-sha256
- aes256-sha256
- aes128-sha384
- aes256-sha384
- aes128-sha512
- aes256-sha512
- Diffie-Hellman Group (DH Group)
Select the Diffie-Hellman group to use:
- Diffie-Hellman Group 1—768-bit modulus
- Diffie-Hellman Group 2—1024-bit modulus. This is the default.
- Diffie-Hellman Group 5—1536-bit modulus
- Diffie-Hellman Group 14—2048-bit modulus
- Diffie-Hellman Group 15—3072-bit modulus
- Diffie-Hellman Group 16—4096-bit modulus
- Diffie-Hellman Group 19—256-bit elliptic curve
- Diffie-Hellman Group 20—384-bit elliptic curve
- Diffie-Hellman Group 21—521-bit elliptic curve
- Diffie-Hellman Group 25—192-bit elliptic curve
- Diffie-Hellman Group 26—224-bit elliptic curve
- No PFS
Default: Diffie-Hellman Group 2—1024-bit modulus
- DPD Timeout
Enter how long to wait for traffic from the destination peer on the tunnel before sending a dead-peer-detection (DPD) request packet.
Range: 10 through 180 seconds
Default: 30 seconds- Unit Type
Select the time units for how often to regenerate the IKE key, and then enter the time interval:
- Hours
- Minutes
- Seconds
- IKE Rekey Time
Enter how often to regenerate the IKE key. The value range depends on the units you select in the Unit Type field.
Range:
- 132 through 86400, for seconds
- 3 through 1440, for minutes
- 1 through 24, for hours
Default: 28800 seconds
IPsec (Group of Fields) - IPsec Transform
Select the IPsec transform type to use:
- esp-3des-md5
- esp-3des-sha1
- esp-aes128-ctr-sha1
- esp-aes128-ctr-xcbc
- esp-aes128-gcm
- esp-aes128-md5
- esp-aes128-sha1
- esp-aes128-sha256
- esp-aes128-sha384
- esp-aes128-sha512
- esp-aes256-gcm
- esp-aes256-md5
- esp-aes256-sha1
- esp-aes256-sha256
- esp-aes256-sha384
- esp-aes256-sha512
- esp-null-md5
- Perfect Forward Secrecy Group (PFS Group)
Select the Diffie-Hellman groups to use for PFS:
- Diffie-Hellman Group 1—768-bit modulus
- Diffie-Hellman Group 2—1024-bit modulus.
- Diffie-Hellman Group 5—1536-bit modulus
- Diffie-Hellman Group 14—2048-bit modulus
- Diffie-Hellman Group 15—3072-bit modulus
- Diffie-Hellman Group 16—4096-bit modulus
- Diffie-Hellman Group 19—256-bit elliptic curve
- Diffie-Hellman Group 20—384-bit elliptic curve
- Diffie-Hellman Group 21—521-bit elliptic curve
- Diffie-Hellman Group 25—192-bit elliptic curve
- Diffie-Hellman Group 26—224-bit elliptic curve
- No PFS. This is the default.
Default: No PFS
- Hello Interval
Enter the IPsec keepalive timeout, which is how often to send a Hello message to the peer to determine whether the peer is still up and operational.
Range: 0 through 36000 seconds
Default: 10 seconds
- Unit Type
Select the time units for how often to regenerate the IPsec key, and then enter the time interval:
- Hours
- Minutes
- Seconds
Default: Seconds
- IPsec Rekey Time
Enter how often to regenerate the IPsec key. The value range depends on the units you select in the Unit Type field.
Range:
- 132 through 86400, for seconds
- 3 through 1440, for minutes
- 1 through 24, for hours
Default: 28800 seconds
- Authentication
Select the authentication:
- Certificate Authentication
- PSK
- Local—PSK Authentication (Group of Fields)
For PSK authentication, enter information for the following fields:

Field Description Local (Group of Fields) - Identity Type
Select an identity type:
- FQDN
- IP address
- Value
Enter a value for the identity type:
- Email—Enter a valid email address.
- FQDN—Enter a valid FQDN.
- IP Address—Enter a valid IP address.
- Share Key
Enter the share key for the local devices. Remote (Group of Fields) - Identity Type
Select an identity type:
- FQDN
- IP address
- Value
Enter a value for the identity type: - Email—Enter a valid email address.
- FQDN—Enter a valid FQDN.
- IP Address—Enter a valid IP address.
- Share Key
Enter the share key for the remote devices. - Local—Certificate Authentication (Group of Fields)
For Certificate Authentication, enter information for the following fields:

- Certificate Name—Select a certificate name for both the local and remote devices.
- CA Chain—Select a CA chain for both the local and remote devices.
Click + Add New to add new certificates names and CA chains for the local and remote devices. Fore more information, see Configure SASE Certificates.
- Click Next.
- For the GRE tunnel type and for a route-based tunnel configuration for an IPsec tunnel type, enter information for the following fields in the Enter Address and Routing/Policy Configurations section, and then continue with Step 8. Note that Enter IPsec Information section is not applicable for GRE tunnel type. For the Policy-based tunnel configuration for an IPsec tunnel type, continue with Step 7.

Field Description Tunnel Virtual Interface IP Address Enter the tunnel virtual interface IP address. VPN Name Select the VPN through which the IP address is reachable. MTU (For Releases 11.4.1 and later.) Enter the maximum transmission unit size, in bytes, of the largest protocol data unit that the port can receive or transmit.
Range: 256 through 9000 bytes
Static Routes (Group of Fields) - + Add
Click to add a static route. Enter information for the following fields.

- IPv4 Destination—Enter the IPv4 destination address.
- Preference—Enter a preference value for the static route.
Range: 1 through 255
Default: None  Minus icon—Click to delete a static route entry.
 Plus icon—Click to add a static route entry.
Routing Protocol Select the routing protocol:
- EBGP
- None
If you select None, no further information is required. If you select EBGP, enter information for the following fields.
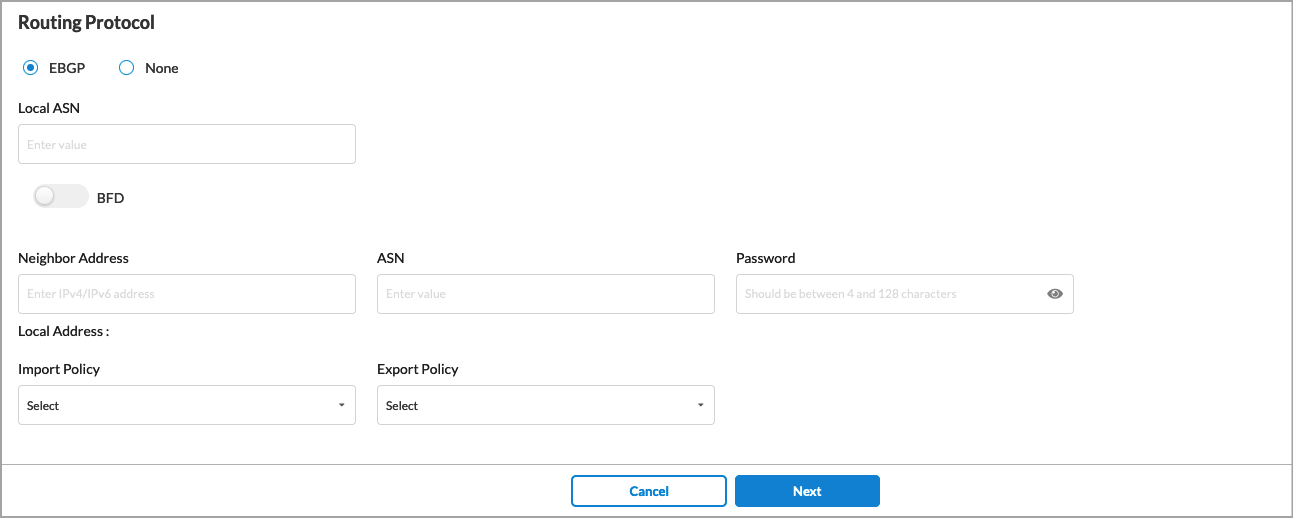
- Local ASN—Enter the local AS number.
- BFD—Click the slider to enable Bidirectional Forwarding (BFD).
- Neighbor Address—Enter the IP address of the peer device.
- ASN—Enter the AS number of the peer device.
- Password—Enter the password for the peer device.
- Local Address (Group of Fields)—
- Import Policy—(Optional) Select an EBGP import policy from the drop-down list.
- Export Policy—(Optional) Select an EBGP export policy from the drop-down list.
For information about creating import and export policies, see Configure SASE BGP Peer Policies
- (For Releases 11.4.1 and later.) For the policy-based tunnel configuration for an IPsec tunnel type, enter information for the following fields.

Field Description VPN Name Select the VPN through which the IP address is reachable. Policy Configurations (Group of Fields) - Protocol
Select a protocol:
- Any
- ICMP
- TCP
- UDP
- Source IP Address/Prefix
Enter the IPv4 source prefix. - Source Port
Enter the source port number.
Range: 0 through 65535
- Destination IP Address/Prefix
Enter the IPv4 destination prefix. - Destination Port
Enter the destination port number.
Range: 0 through 65535
- Precedence
If there are multiple matches for the policies, indicate the precedence level of the tunnel. A number closer to 0 indicates a higher priority.
Range: 0 through 512
- Click Next.
- In the Enter Name, Description, and Tags section, enter information for the following fields.

Field Description Name (Required) Enter a name for the tunnel. Description Enter a description for the tunnel. Tags Enter one or more tags for the tunnel. -
Click Save.
Verification
To verify site-to-site tunnel status information, click the View tab in the left menu, and then go to Secure Access > Site-to-Site Tunnels.

Site-to-site tunnel details displays tunnel name, gateway connected to, type of tunnel, status, destination IP address, type of routing, and routing status.

Configure Versa Secure Client Access Policies
Versa secure client access policies define the conditions and authorization for remote users when connecting to the SSE service. When a user registers the SASE client, the SASE portal checks for a secure client access policy, matches the user to a policy based on identity and context, and downloads the appropriate SASE client configuration. Depending on their end-device security posture, access location, or compliance state, the user may get restricted access to the network. The scope of access is defined by the secure client access policy.
The portal policy is looked up based on a match criteria which could include user location, device posture, etc. Once a portal policy match is found, the SASE client configuration is downloaded and applied to the SASE client.
To configure Versa secure client access policies, you do the following:
- Configure secure client-based access profiles.
- Configure secure client-based access rules.
- Configure secure clientless access rules.
Configure Secure Client-Based Access Profiles
Secure client-based access profiles define the application monitors, browser access, DNS resolvers, and routes that are used to bind public keys to the client. A DNS resolver is a server that determines which DNS name server the client uses to perform DNS lookups for all traffic. You can configure DNS resolvers that are then shared with the clients when they register.
To periodically monitor end-to-end network and application performance for a user device, you can enable Digital Experience Monitoring (DEM) on SASE clients. To do this, you configure DEM when configuring a secure client-based access profile. (You can also configure DEM directly by going to Configure > Security Service Edge > Digital Experience Monitoring. For more information, see Configure Digital Experience Monitoring.)
The SASE client receives the DEM settings when it registers with the SASE portal. The SASE client collects DEM statistics based on these settings and periodically forwards them to its currently connected SASE gateway. For information about viewing DEM statistics, see View Digital Experience Monitoring Dashboards.
To configure SASE secure client-based access profiles:
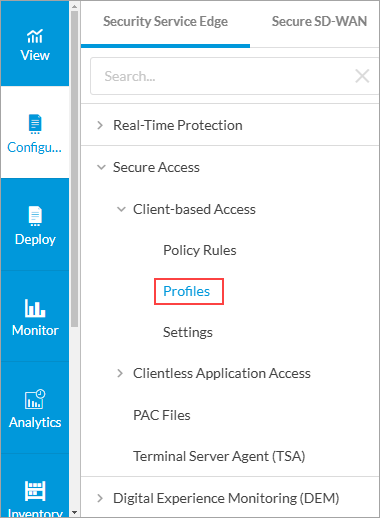
- Go to Configure > Security Service Edge > Secure Access > Client-based Access > Profiles.
Note: In Releases 12.1.1 and earlier, the Secure Access folder was called Secure Client Access and Profiles was located directly under Secure Client Access (Configure > Security Service Edge > Client-based Access > Profiles).
The following screen displays.

- To customize which columns display, click Select Columns and then click the columns to select or deselect the ones you want to display. Click Reset to return to the default columns settings. The available columns are:
- Routes
- DNS Resolvers
- Name
- User Defined Applications
- Predefined Applications
- Browser Access
- Click the
 Add icon to create a new client-based profile. The following screen displays. Note that the Digital Experience Monitoring (DEM) tab appears only if you have enabled DEM for the tenant. For more information about enabling DEM for a tenant, see Configure SASE Tenants.

- Click Add Routes to add a route that needs to be advertised to the secure client access users. The following screen displays.

- Click the Add icon. In the Add Route pop-up window, enter information for the following fields, and then click Add.

Field Description Name (Required) Enter a name for the route. Description Enter a text description for new route. Prefix (Required) Enter a prefix for the route.
If you are using Versa Secure Internet Access (VSIA), the 0.0.0.0/0 subnet is advertised to the client by default.
If you are using Versa Secure Private Access (VSPA):
- For Releases 12.1.1 and earlier, the prefix must be in the private access subnet range as defined in RFC 1918 (10.0.0.0/8, 172.16.0.0/12, or 192.168.0.0/16).
- For Releases 12.2.1 and later, the prefix for the route can be in the private access subnet range and public access subnet range for VSPA clients.
Metric Enter a value for the route metric.
Range: 0 through 4294967295
Default: None
Encryption Select to encrypt the route and to route the traffic for applications and domains to an encrypted tunnel. By default, encryption is enabled.

To disable encryption, click the slider.

If you disable encryption, traffic is routed on an encrypted or non-encrypted (clear-text) route, depending on the configuration, for applications and domains. If the route is not encrypted, the Versa secure client access creates two tunnels, encrypted and clear text, and then routes traffic. In this case, you might consider securing the application using a different method, such as SSL/TLS.
- Click the
 Back arrow to return to the Create Secure Access Client screen.
 - Click Add DNS Resolvers to add DNS resolvers. The following screen displays.

- Click the Add icon. In the Add DNS Resolvers popup window, enter information for the following fields.

Field Description Name (Required) Enter a name for the DNS resolver. Description Enter a text description for the DNS resolver. Domain Enter a valid domain name for the DNS resolver to send to the client. The client uses the DNS resolver to perform DNS lookups for all traffic. DNS Server IP Address Enter a valid IP address for the DNS server. To enter additional addresses, click the
 Plus icon.
 - Click Add.
- Click Next to go to Step 2, Digital Experience Monitoring.
Note: In Release 12.1.1, you configured DEM when configuring an application monitor.

- Click Customize in the Digital Experience Monitoring pane to select a DEM profile.
Note: The Digital Experience Monitoring step only displays if DEM has been enabled for the tenant. For more information about enabling DEM for a tenant, see Configure SASE Tenants.

- Click the Add icon to configure a new client-based DEM profile, or select a DEM profile from the list. If you select a previously configured DEM profile, go to Step 17, Review and Deploy.

- Select one or more custom or predefined applications.
Note: If DEM is enabled for this tenant, you can configure up to 50 predefined applications. If DEM is not enabled, you can configure three predefined applications.
- Click Next to go to the Name, Description, and Tags section.

- Enter a name for the new DEM profile.
- Click Save to save the new client-based DEM profile.
- Click the Back arrow icon to return to the Secure Client Access configuration screen, or click Next to go to Step 3, Review and Deploy.
- In the Review and Deploy screen, enter a name for the new secure client access profile.

- Review the configuration. Click the
Edit icon to revise the sections as needed.
- Click Save to create the client-based secure access profile.
Configure Secure Client-Based Access Rules
You use secure client-based access rules and profiles to manage Versa Secure Private Access (VSPA) client applications running on personal computers and mobile phones. You configure secure client-based access rules and apply them to secure access clients.
You can also configure policy rules for secure clientless access. See Configure SASE Secure Clientless Access Policy Rules for more information.
Note: You must configure the following SASE rules, profiles, and settings in the following order:
- Configure users and user groups first, and then publish them to the gateway. For more information, see Configure SASE User and Device Authentication and Publish a SASE Gateway.
- Configure site-to site tunnels. For more information, see Configure SASE Site-to-Site Tunnels.
- Configure secure client-based access profiles. For more information, see Configure SASE Secure Client-Based Access Profiles.
- Configure secure client-based access rules, as described in this article.
You do not need to configure the remaining SASE rules, profiles, and settings in any particular order.
To configure secure client-based access rules:
- Go to Configure > Secure Services Edge > Secure Access > Client-based Access > Policy Rules.
Note: In Releases 12.1.1 and earlier, the Secure Access folder was called Secure Client Access and Policy Rules was located directly under Secure Client Access (Configure > Security Service Edge > Secure Client Access > Policy Rules). In addition, you configured both client-based and clientless access from Secure Client Access > Policy Rules screens.

If you have not yet configured a client-based access policy rule, the following screen displays:
For information about configuring authentication profiles, see Configure User and Device Authentication. For information about configuring a secure client profile, see Configure SASE Secure Client-Based Access Profiles.
If you have already configured one or more client-based access policy rules, the Client-based Access Rules screen displays all configured secure client-based access rules.

- In the horizontal menu bar, you can perform the following operations.

Operation Description Add Create a new internet protection rule. This button is active when no existing rule is selected. Clone Clone the selected internet protection rule. When you select this option, the configuration wizard for the rule displays with the Review & Deploy screen selected. You can rename the default name of the cloned rule, if desired, then click Save.
Reorder Reorder the selected internet protection rule. A popup window similar to the following displays.

1. Select one of the three options:
- Process the rule last
- Process the rule first
- Process the rule in specific placement—A list of the existing rules displays. Click the position in the list where you want to place the rule.
2. Click Move.
Delete Delete the selected internet protection rule. A popup window similar to the following displays:

Click Yes to delete the internet protection rule, or click No to retain the rule.
Refresh Refresh the list of existing rules. - To customize which columns display, click Select Columns and then select or deselect the columns you want to display. Click Reset to return to the default columns settings.
The options are:- Status
- Operating System Versions
- Users & Groups
- EIP & Entity Risk Bands
- Device Compliance Status
- Source Geo Locations
- Source IP Address
- Traffic Action
- VPN & Gateway Groups
- Client-based Access Profile
- MFA Status
- VPN
- Client Controls
- EIP Agent
- Creation Date
- Last Modified By & Date
- Pre-Logon Configuration
Note: The Pre-Logon Configuration column only appears if you have enabled pre-logon in the tenant configuration. See Configure Pre-Logon for the Versa SASE Client and Configure SASE Tenants for more information.
- Click the
 Add icon to configure the policy rule.
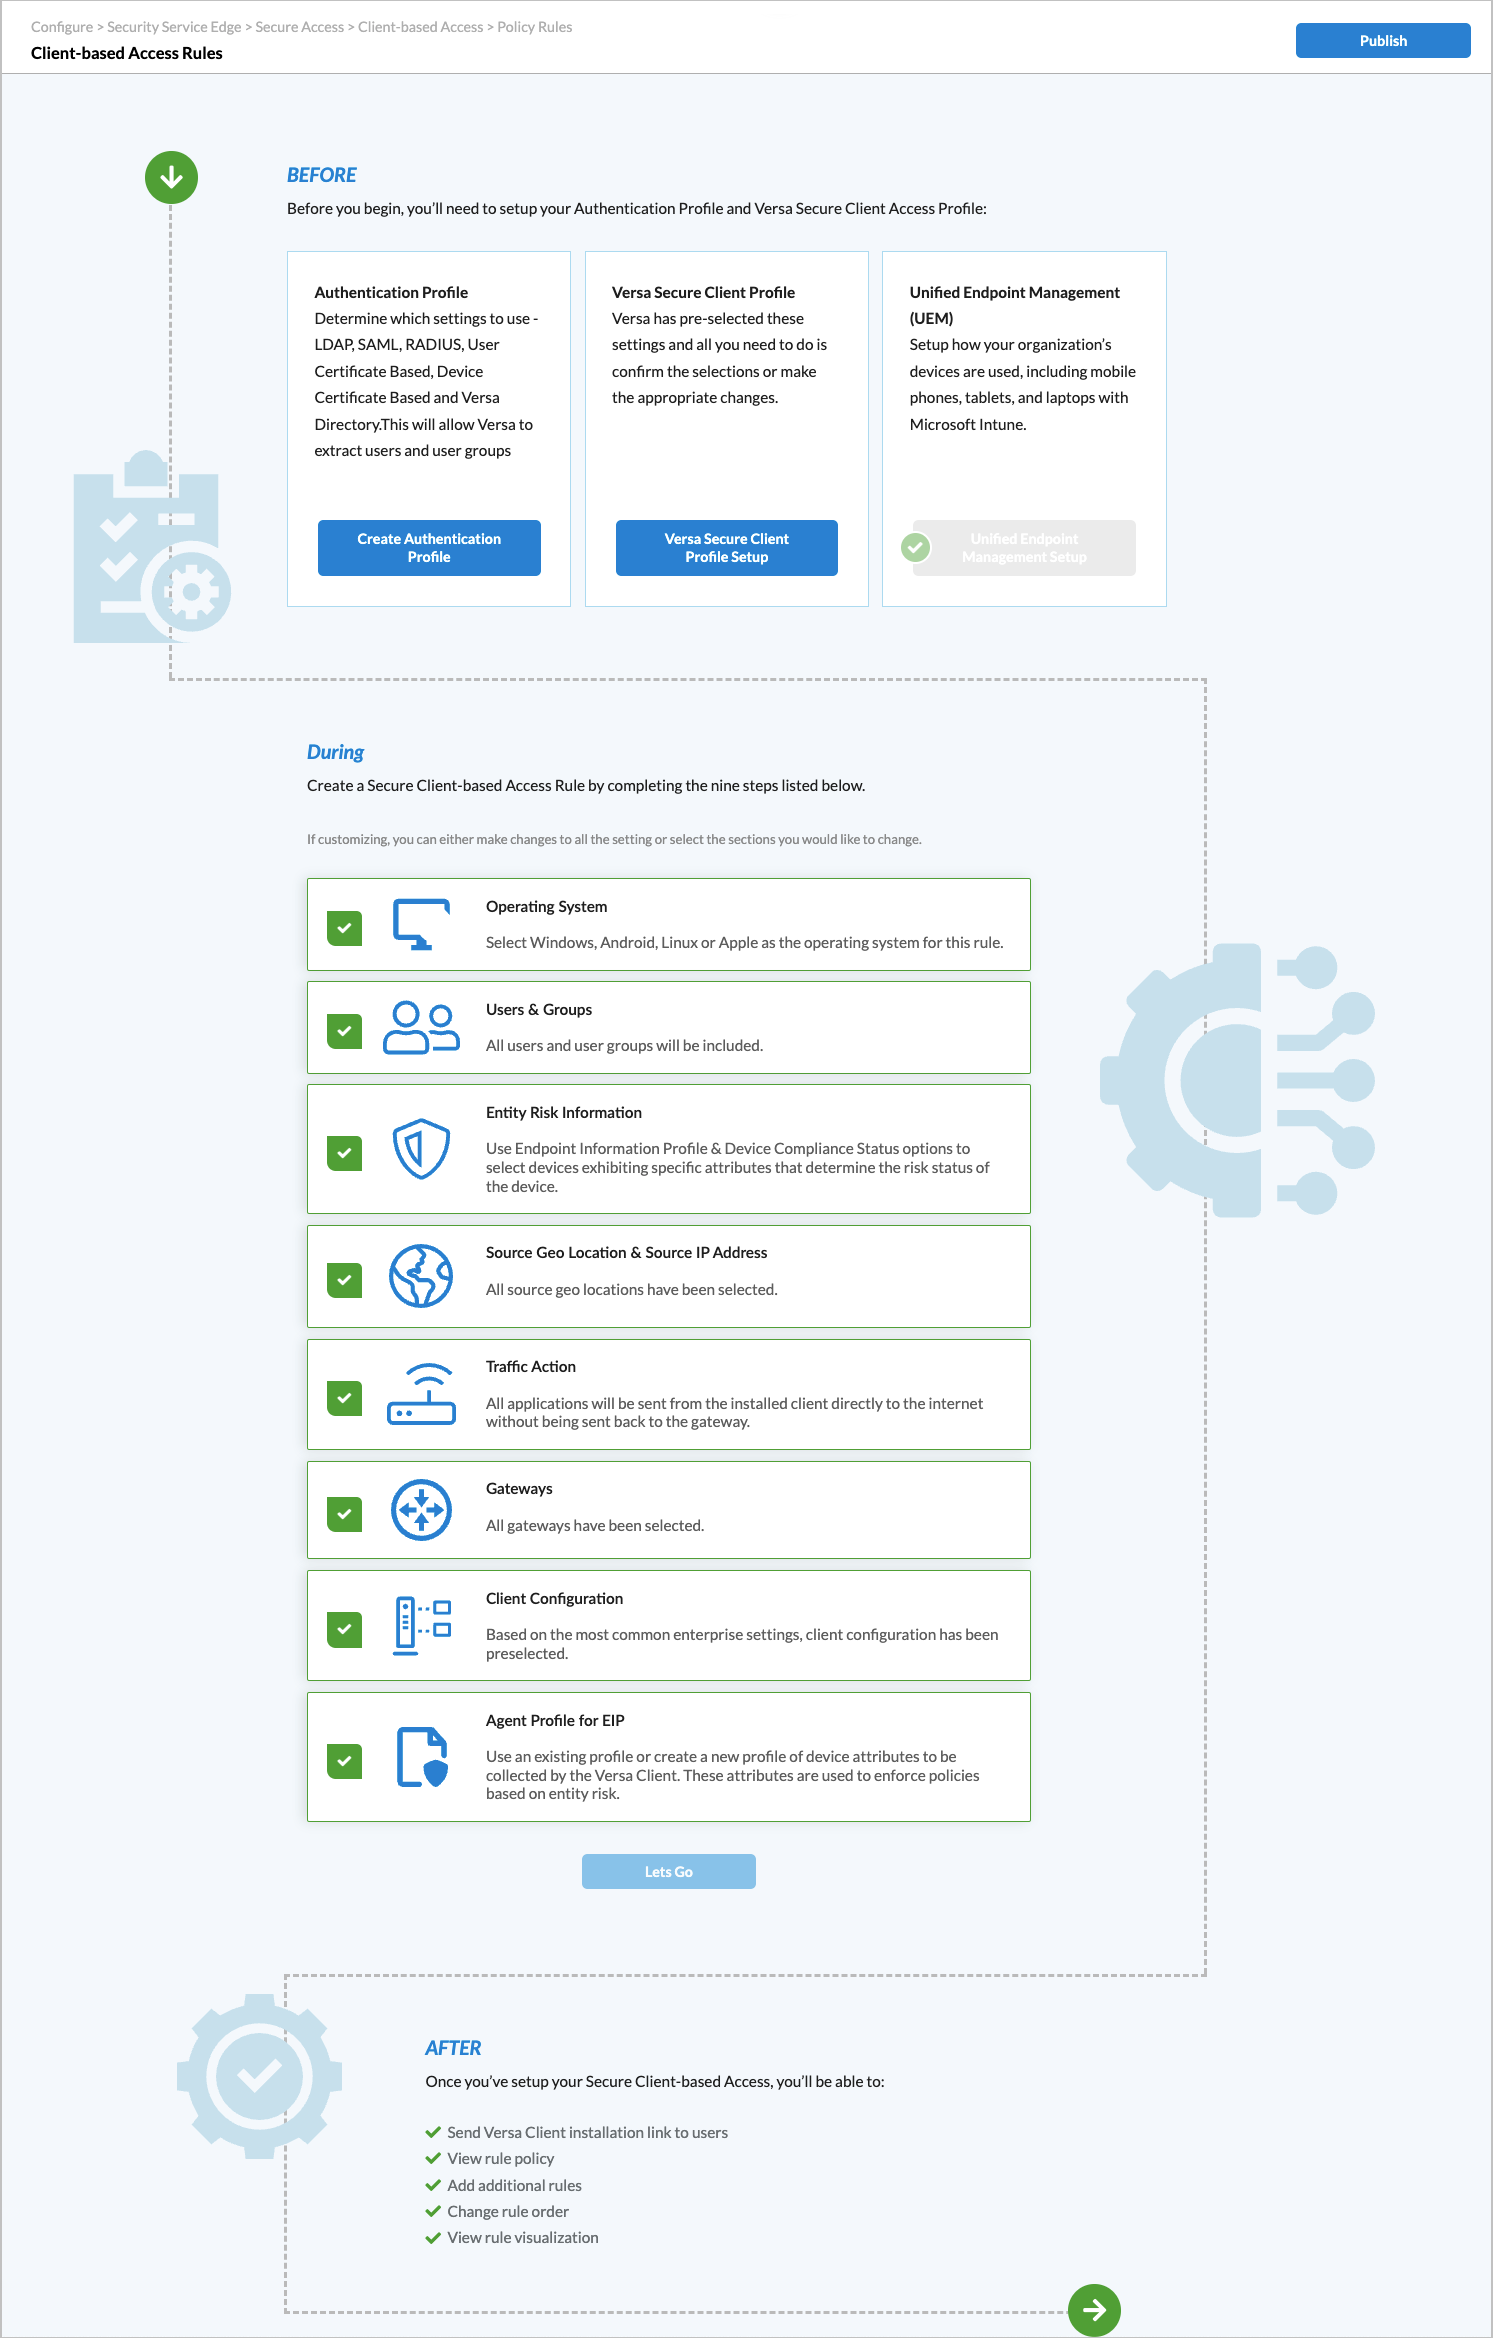
 - The Create Client-based Access Rule screen displays. There are nine steps to configure for each client-based secure client-based access rule.

- Match Criteria:
- Operating System—Select the operating system to use with the rule.
- Users/User Groups—Define the users and user groups to which the secure client-based access rules apply.
- Endpoint Posture—Customize the Endpoint Information Profile (EIP), device compliance status, and the device/endpoint risk score.
- Source Geo Location and Source IP Address—Define which geographic locations and IP addresses can access the network.
- Actions:
- Traffic Action—Select which traffic to send to the Versa Cloud Gateway or directly to the internet, and which traffic to block and not sent to the Versa Cloud Gateway.
- Gateways—Select which gateway groups VSPA clients can use.
- Client Configuration—Configure multifactor authentication (MFA) and other client parameters.
- Agent Profile from EIP—Define the conditions that the SASE client uses to filter information from endpoint devices.
- Review & Configure—Review the new rule configuration, edit it if needed, and save the new rule.
See the sections below to configure secure client-based access rules.
Download the Versa SASE Client
To download and install the Versa SASE client from Concerto:
- In Tenant view, select Configure > Secure Services Edge > Secure Access > Client-based Access > Policy Rules. The following screen displays.

- Click Client Download in the top-right corner. The following screen displays.

- Click the operating system that you want to download (here, Windows). The Client Download window displays.
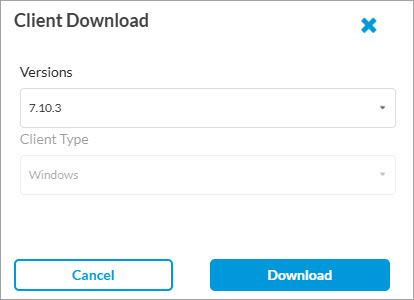
- Click the Versions field and select the appropriate SASE client version.
- Click Download and save the .zip file on your device.
- Open the .zip file and select the file appropriate for the SASE client version:
- For Releases 7.10.2 and earlier, run the Application file (here, VersaSASEClient_v7.10.2):

- For Releases 7.10.3 and later, run the Windows Installer Package file to install the client with the Advanced Installer package (here, VersaSASEClient_v7.10.3_x64):
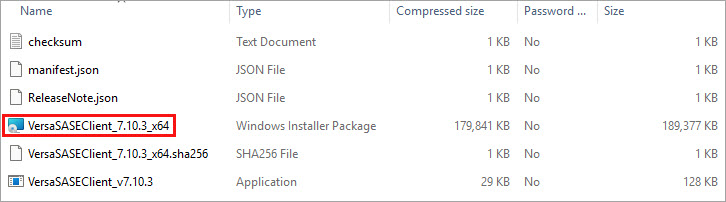
- For Releases 7.10.2 and earlier, run the Application file (here, VersaSASEClient_v7.10.2):
Configure Operating Systems for a Secure Client-Based Access Rule
When you configure a secure client-based access rule, you can choose an operating system from one of the following categories: Android, Apple, Linux, or Windows. For each operating system category, you choose one or more versions of the operating system. These include predefined operating systems and custom operating systems. For information on creating a custom operating system, see Configure SASE User-Defined Objects.
The list below shows the predefined operating systems. If you create a custom operating system, it appears in the list for its category in the UI.
- Android
- Android
- Apple
- MacOS
- Mac OS X Server
- OS X
- iOS
- iPadOS
- Linux
- Cent OS
- Fedora
- FreeBSD
- Gentoo
- Linix Mint
- Open SUSE
- Slackware Linux
- Ubuntu
- Windows
- Windows 7
- Windows 8
- Windows 8.1
- Windows 10
- Windows 10 Mobile
- Windows 11
- Windows Server 2012
- Windows Server 2012 R2
- Windows Server 2016
- Windows Server 2019
- Windows Server 2022
- Windows Vista
- Windows XP
You can choose only one operating system category: Android, Apple, Linux, or Windows. When you select an operating system category, all versions are selected by default. You can deselect versions but you must have at least one selection.
To configure an operating system for a secure client-based access rule:
- In the Create Secure Client Access Rule screen, select Step 1, Operating System. The following screen displays.
Note that the list of Windows operating systems includes examples of custom operating systems.
- Click the
 Circle icon in one of the operating system cards to choose an operating system. By default, all versions of the operating systems are selected. For example, if you click the Circle icon in the Windows box, the screen displays the following:
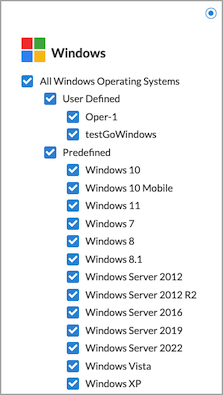
- To deselect one or more Windows versions, click the boxes next to those versions. You can also click the box next to All Windows Operating Systems to deselect all versions, then you can click one or more versions to use in the rule. You must select at least one version.
- Click Next to go to the Users/User Groups screen.
Configure SASE Users and User Groups for Secure Client-Based Access
Configure SASE Endpoint Posture Information for Secure Client-Based Access Rules
Endpoint posture allows you to select predefined and user-defined Endpoint Information Profiles (EIP) to include in the match criteria for secure client-based access rules. For information about configuring EIPs, see Configure Endpoint Information Profiles.
Endpoint posture also allows you to create additional match criteria by choosing a device compliance status to select devices that exhibit specific attributes that are used to determine the risk status of the device. You can also configure a device/endpoint risk score to attribute to the entities within the network’s policy rule. This score helps determine the credibility and the likelihood of activities being legitimate or malicious. These match criteria can then be used when creating policies and rules. For more information, see Configure Endpoint Detection and Response.
To configure endpoint posture information:
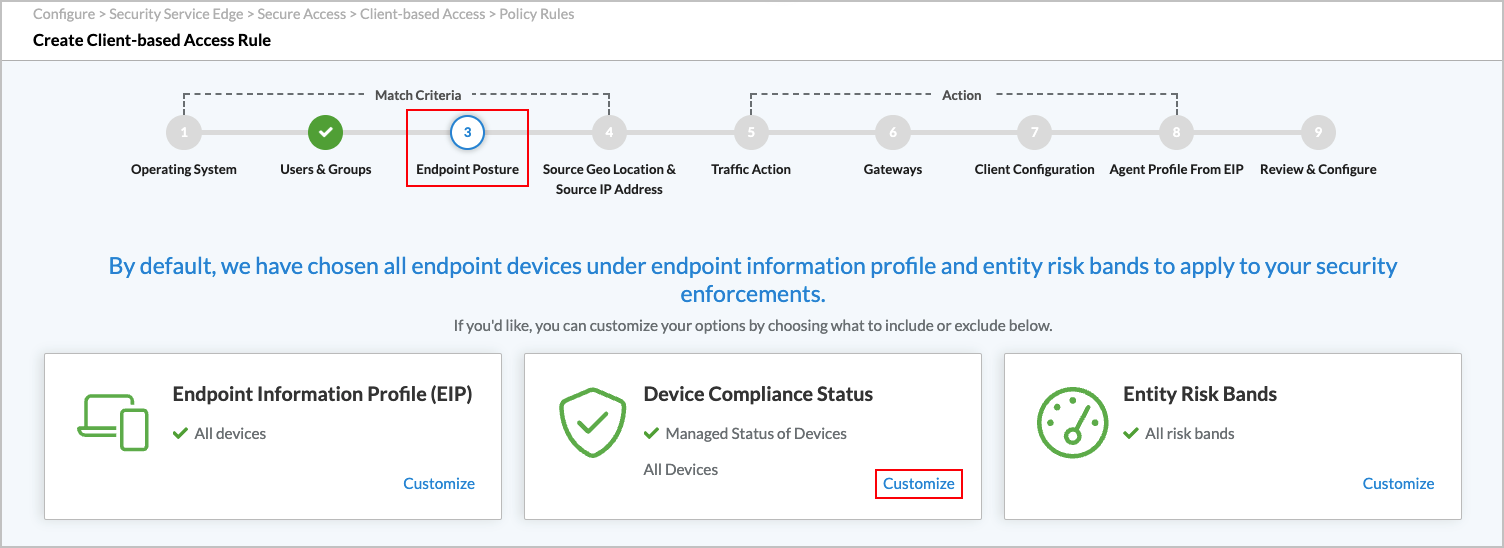
- In the Create Secure Client Access Rule screen, select Step 3, Endpoint Posture in the Create Secure Client Access Rule screen. In the Endpoint Posture screen, you can configure an Endpoint Information Profile (EIP), device compliance status options, and entity risk bands. If you are using third-party Unified Endpoint Management (UEM), formerly known as the Mobile Device Manager (MDM), use the device compliance status options to select one or more compliance statuses for a device.
Configure an EIP Profile
EIPs ensure that the endpoint devices that access the enterprise network maintain and adhere to enterprise security standards before they access enterprise network resources. EIPs collect information about the security status of the endpoint devices connecting to your networks. You then classify endpoints based on multiple types of endpoint posture information, defining rules to extract information from endpoint devices and then match the information to enforce security policy.
You can select existing user-defined or predefined EIPs, and you can also create new EIP profiles from this screen.
To configure an EIP profile:
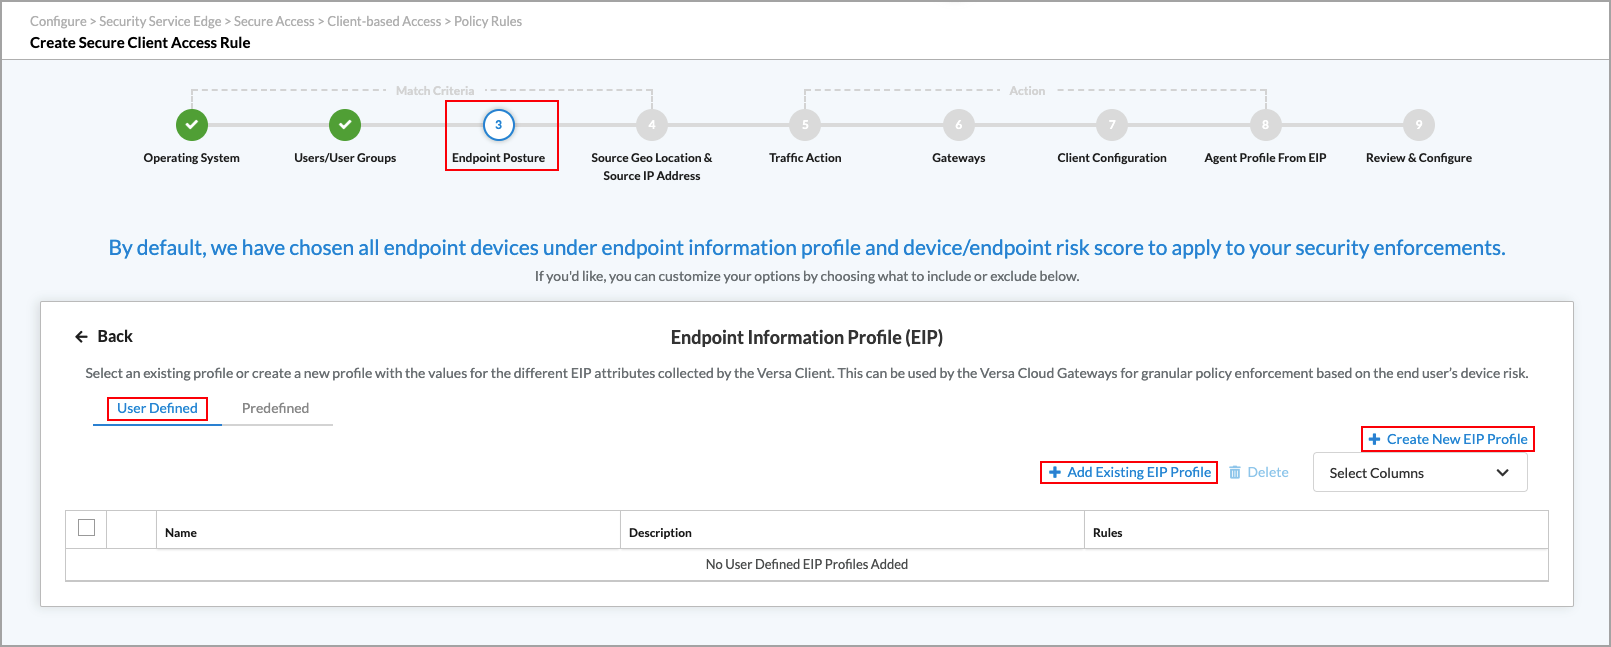
- Click Customize in the Endpoint Information Profile (EIP) pane. The following screen displays.
- To customize which columns display, click Select Columns and then select or deselect the columns you want to display. Click Reset to return to the default columns settings.
- You can select a user-defined or predefined EIP profile.
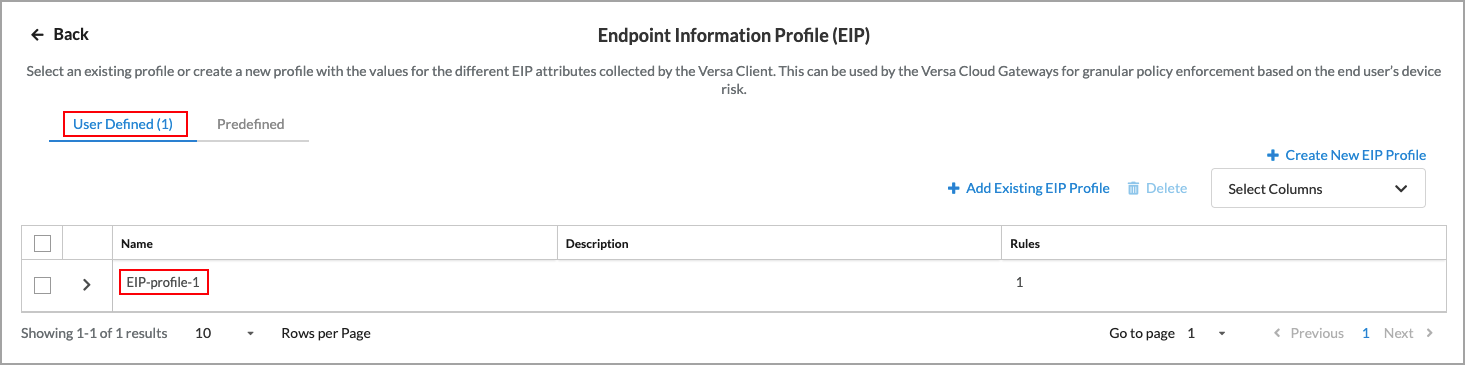
- Under the User Defined tab, you can add an existing EIP profile or create a new EIP profile:
- To select an existing user-defined EIP:
- Click the User Defined tab.
- Click Add Existing EIP Profile.
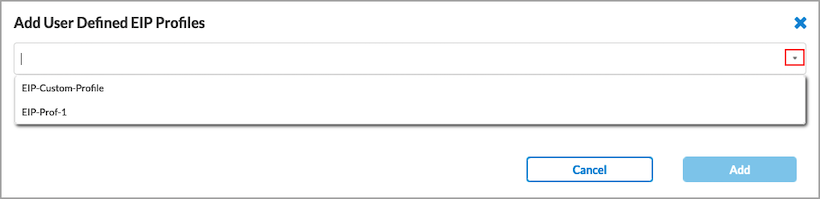
- Select a profile, and then click Add. You can add multiple profiles.
- To create a new user-defined EIP profile:
- Click Create New EIP Profile under the User Defined tab in the Endpoint Information Profile (EIP) screen. The Create EIP Profile screen displays.
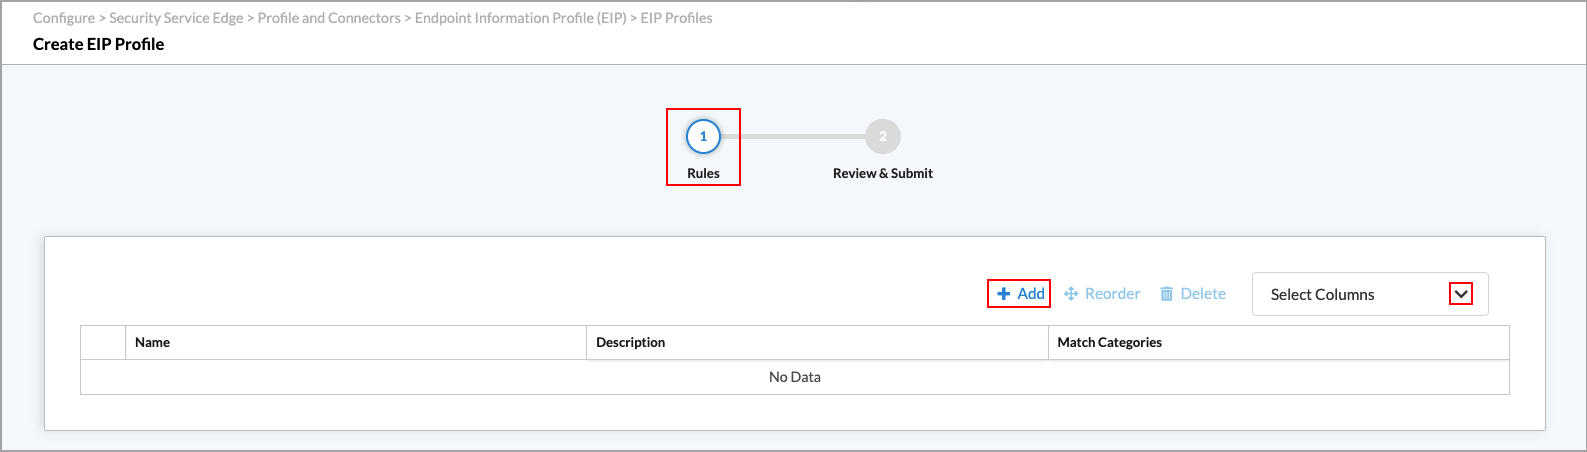
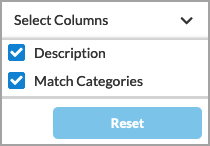
- To customize which columns display, click Select Columns and then select or deselect the columns you want to display. Click Reset to return to the default columns settings.
- Click the Add icon in the Rules tab to add a new rule.
- To customize which columns display, click Select Columns and then select or deselect the columns you want to display. Click Reset to return to the default columns settings.
The options are:- Category
- Objects
- User Defined Objects
- Predefined Objects
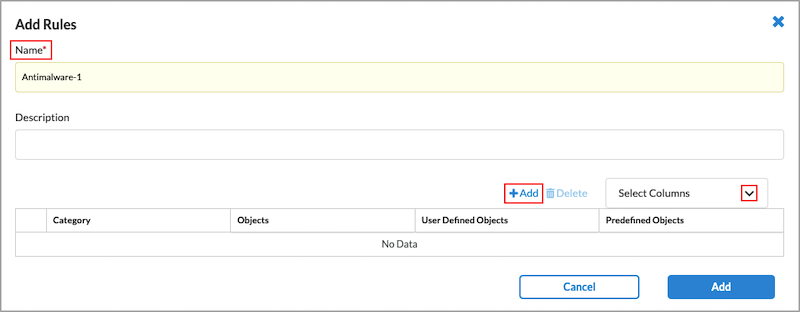
- Enter a name for the new rule in the Name field.
- Click the Add icon. In the Add EIP Object screen, enter information for the following fields.
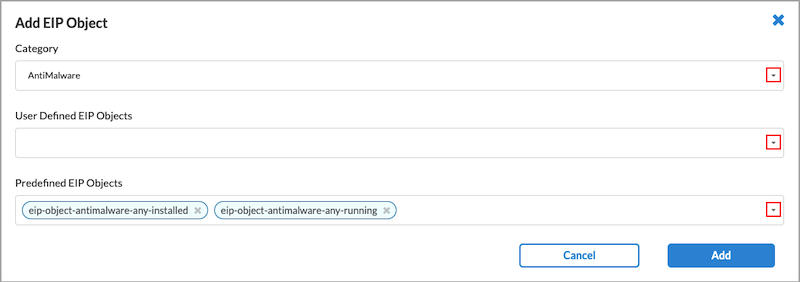
Field Description Category Select an EIP object category. User Defined EIP Objects Select one or more user-defined EIP objects. Predefined EIP Objects Select one or more predefined EIP objects. - Click Add to add the new EIP object. The Add Rule screen displays.
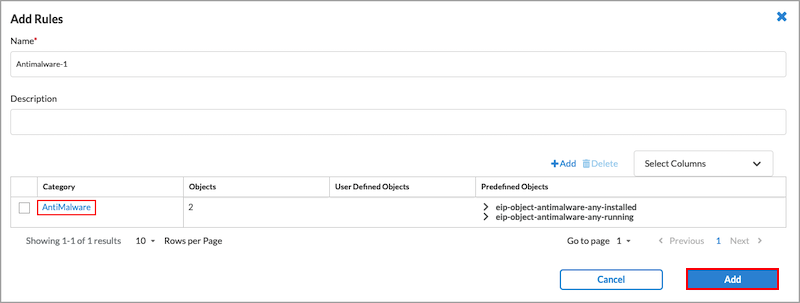
- Click
- In the Add Rule screen, click Add in the lower right corner. The Create EIP Profile screen displays.
- In the Create EIP Profile screen, click Next to go to the Review & Submit screen.

- Review the configuration details.
- Click the
 Edit icon to make any need changes, then click Save to save the EIP profile. The Endpoint Information Profile (EIP) screen displays showing the new EIP profile.
- To select an existing user-defined EIP:
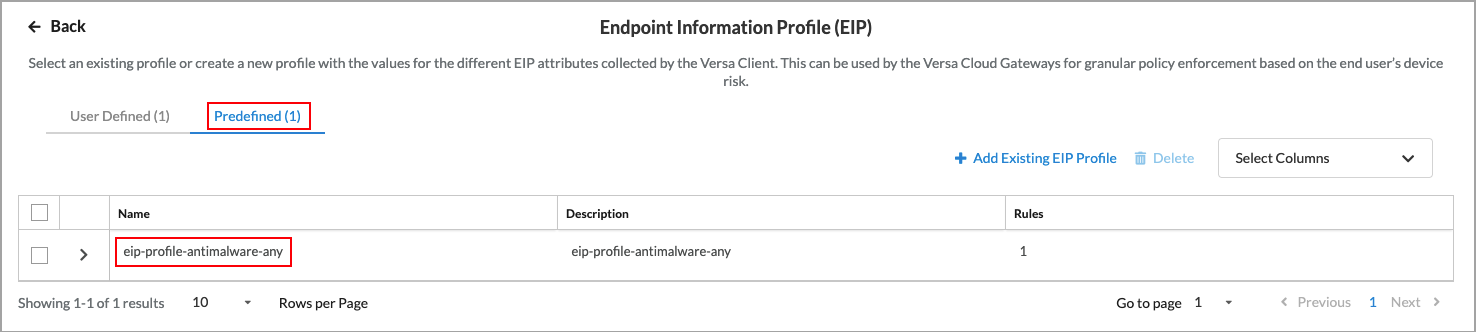
- Under the Predefined tab, you can add an existing EIP profile.

- To select an existing predefined EIP profile:
- Click the Predefined tab.
- Click
 Add Existing Profile. The Add Predefined EIP Profiles screen displays.
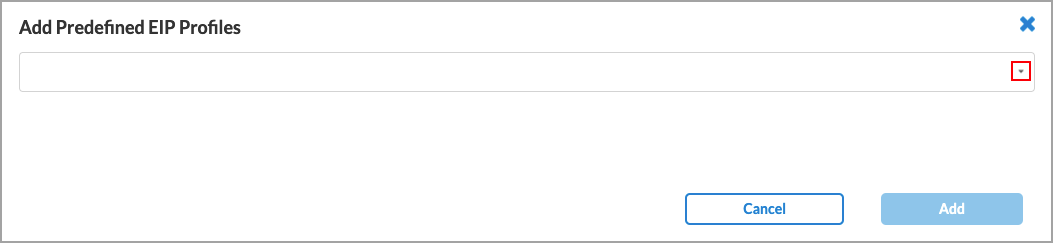
- Select a predefined EIP profile.
- Click the Add button. The Endpoint Information Profile (EIP) screen displays showing the selected predefined EIP profile.
- Under the User Defined tab, you can add an existing EIP profile or create a new EIP profile:
- Click the
 Back arrow to return to the Endpoint Posture screen.
Select the Compliance Status of a Device
By default, all device compliance statuses are selected.
To customize a device's compliance status:
- Go to the Endpoint Posture screen.
- In the Device Compliance Status box, click customize. The Device Compliance Status popup window displays with All Devices selected by default. You can customize the settings by selecting Managed Devices or Unmanaged Devices.

- If you are using Unified Endpoint Management (UEM), formerly known as the SASE Mobile Device Manager (MDM), click Managed Devices and select one or more of the compliance status boxes.

- Click the Back arrow to return to the Endpoint Posture screen.
Select the Device/Endpoint Risk Score
The device risk score helps determine the credibility and the likelihood of activities being legitimate or malicious. By default, all risk scores are selected. You can customize these settings to choose which level of risk to attribute to the entities within this network’s policy rule.
To customize the entity risk bands:
- Go to the Endpoint Posture screen.

- In the Entity Risk Bands pane, click Customize. The Entity Risk Bands screen displays.
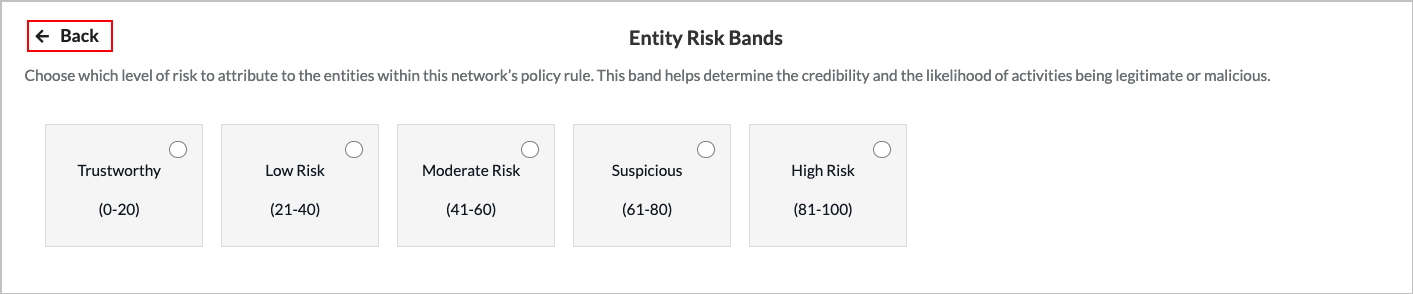
- Select one or more levels of risk to attribute to the entities within this network’s policy rule. This score helps determine the credibility and the likelihood of activities being legitimate or malicious. The options are:
- High Risk (81–100)
- Suspicious (61–80)
- Moderate Risk (41–60)
- Low Risk (21–40)
- Trustworthy (0–20)
- Click the Back arrow to return to the Endpoint Posture screen, or click Next to go to Step 4, Source Geographic Locations and Source IP Addresses.
Configure SASE Source Geographic Locations and Source IP Addresses for Secure Client-Based Access
By default, VSPA clients from all source geographic locations and all source IP addresses are allowed network access. You can also specify which VSPA client locations and source IP addresses are allowed access.
To customize VSPA client-based access based on source location and source IP address:
- In the Create Secure Client Access Rule screen, select Source Geo Location and Source IP Address. By default, all geographic locations are allowed access to the Versa secure client-based access.

- To allow access to the Versa secure client-based access from specific source locations, click Customize. The Source Geo Location screen displays.

- Click Clear All to remove all of the default source locations. (Because all locations are selected by default, they are not displayed).
- (For Releases 12.2.1 and later.) To customize the source location by country, state, or city, click the down arrow in the Country box. The Selected section lists the country, state, or city with name and location type.

- Select Country, and then select one or more countries from the list. The map changes to highlight the countries that are selected.
- Select State, and then enter the name of the state and select the state from the list.
- Select City, and then enter the name of the city and select the city from the list.
- To remove a location from the selected list, click the X next to the location type name.
- To remove all locations from the selected list, click Clear All.
- Click Back to customize the source IP addresses. The Source Geo Location & Source IP Address screen displays again. Note that to accept the default source IP addresses, click Next at the bottom of the screen.
- To change the source IP addresses to include, click Customize under Source IP Address. In the Source Traffic screen, enter information for the following fields.
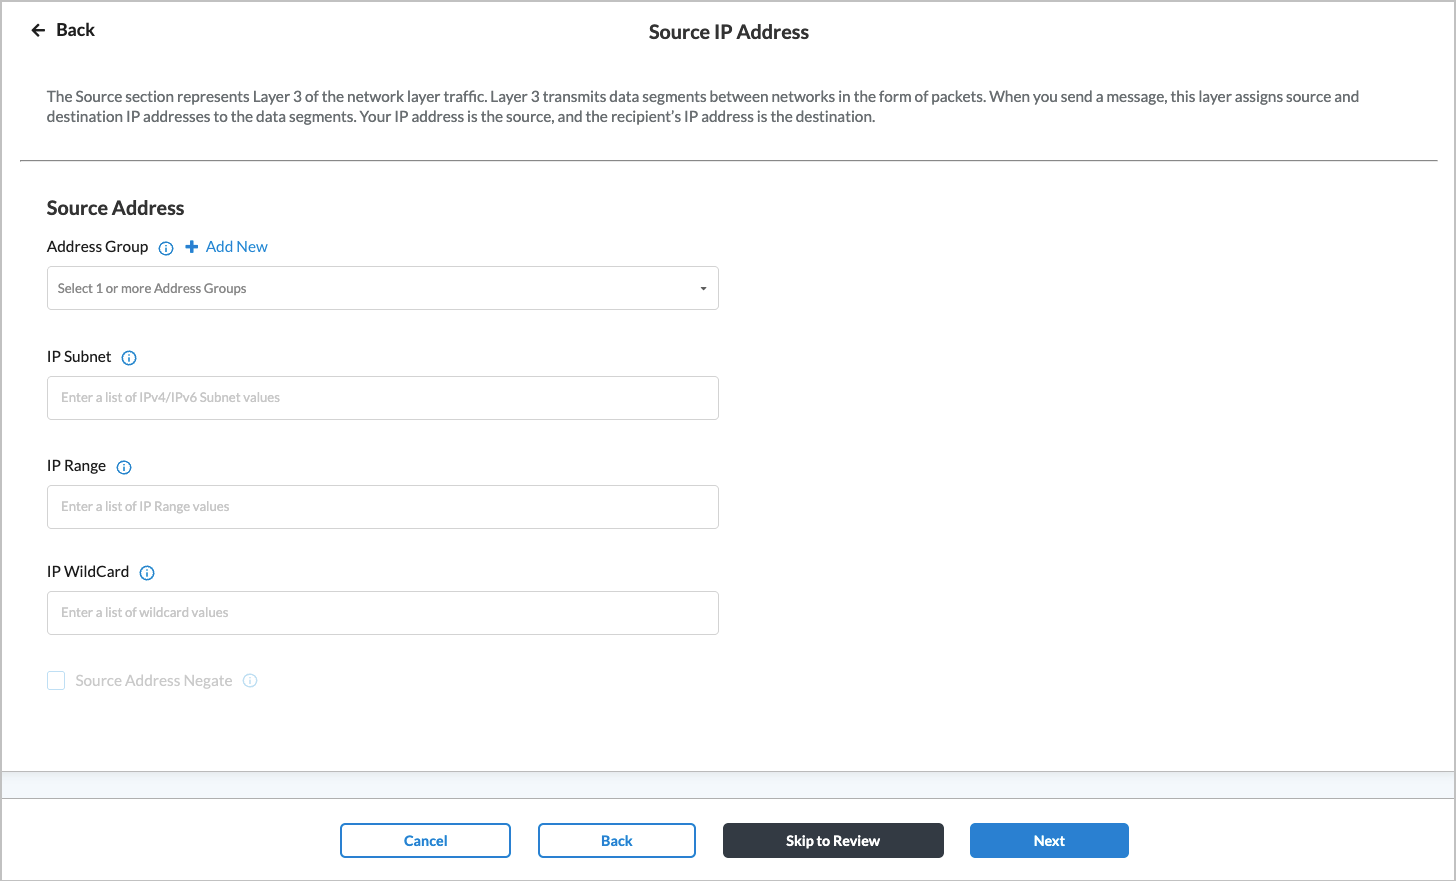
Field Description Source Address (Group of Fields) - Address Group
Click in the box, and then select one or more address groups. The address groups in the list are those defined in the User Defined Objects section.
If you want to provide one or more specific source IP addresses, you do not need to select an address group. Instead, use the IP Wildcard field to enter the IP address.
To create a new address group, click + Add New. On the Addresses tab, select either Static Address or Address Feed.

- If you select Static Address:
- Select the static address Type. The type can be IP Subnet, Address File, Address Object, Dynamic Address, FQDN, IP range, IP wildcard, or IPv6 subnet.
- Based on the type selected, enter one of the following and then press Return:
- Subnet: An IP address and subnet mask, for example, 10.2.1.0/24
- IP range: An IP address range, for example, 10.2.1.1-10.2.2.2
- IP wildcard: A specific IP addresses, for example, 192.68.0.56/255.255.0.255
- IPv6 subnet: A valid IPv6 subnet
- FQDN: A fully qualified domain name (FQDN)
- Dynamic Address: One or more address object names
- To add additional address group types, click the
 Plus icon. To remove an address group type, click the
  Minus icon.
- Click Next.
- If you select Address Feed:

- Enter one or more address feeds.
- Click Next.
- In the Review and Submit step, enter a name for the address group and any tags you want to associate with the group.

- Review the configuration. Click the Edit icon to make changes.
- Click Submit.
IP Subnet Enter an IP subnet to include in the match list (for example, 10.0.0.0/24), then press Return. You can add additional IP subnets by entering the subnet and pressing Return for each one. IP Range Enter an IP address ranges to include in the match list (for example, 10.2.1.1-10.2.2.2), then press Return. You can add additional IP address ranges by entering the range and pressing Return for each one. IP Wildcard Enter an IP address and mask to include in the match list (for example, 192.68.0.56/255.255.0.255), then press Return. You can add additional IP addresses and masks by entering the it and pressing Return for each one. Source Address Negate Select to apply the rule to any source addresses except the ones in the Source Address field. - Click Next to go to the Traffic Action screen.
Configure SASE Traffic Action Rules for Secure Client-Based Access
You can use traffic-action rules to specify whether application-specific traffic should be sent to the Versa Cloud Gateway or directly to the internet, or whether the traffic should be blocked from being sent to the Versa Cloud Gateway. The available traffic-action options depend on the subscription type assigned to the tenant and to the type of operating system running. The subscription types are:
- Versa Secure Private Access (VSPA)—Enables breakout of specific custom applications to the internet
- Versa Secure Internet Access (VSIA)—Sends custom or predefined applications to the Versa cloud gateway; can also exclude routes so that certain traffic is not sent to the Versa cloud gateway
- Versa Secure Private Access (VSPA) and Versa Secure Internet Access (VSIA)—Allows you to configure actions available in both the VSPA and VSIA subscription types
The operating system types are:
- Windows—Supports all traffic actions by subscription type
- Apple—Supports all traffic actions by subscription type
- Android—Supports all traffic actions by subscription type
- Linux—Support the following traffic actions by subscription type:
- VSPA—Sends all private traffic over the tunnel to the Versa Cloud Gateway and all internet-bound traffic from the user device to the internet directly (split tunnel/Direct Internet Access)
- VSIA—Sends all traffic from the user device to the Versa Cloud Gateway; allows you to exclude routes so that certain traffic is not sent to the Versa cloud gateway.
- VSPA and VSIA—Sends all traffic from the user device to the Versa Cloud Gateway; allows you to exclude routes so that certain traffic is not sent to the Versa cloud gateway.
To configure traffic action rules for secure client-based access:
- In the Secure Client Access Rule List screen, click + Add to create a new rule. The Create Secure Client Access Rule screen displays.
- Select Step 5, Traffic Action. The following screen displays. The default settings are:
- Subscription type—Versa Secure Private Access (VSPA) and Versa Secure Internet Access (VSIA)
- Traffic Action—Allow
- Rule type—Breakout to Internet
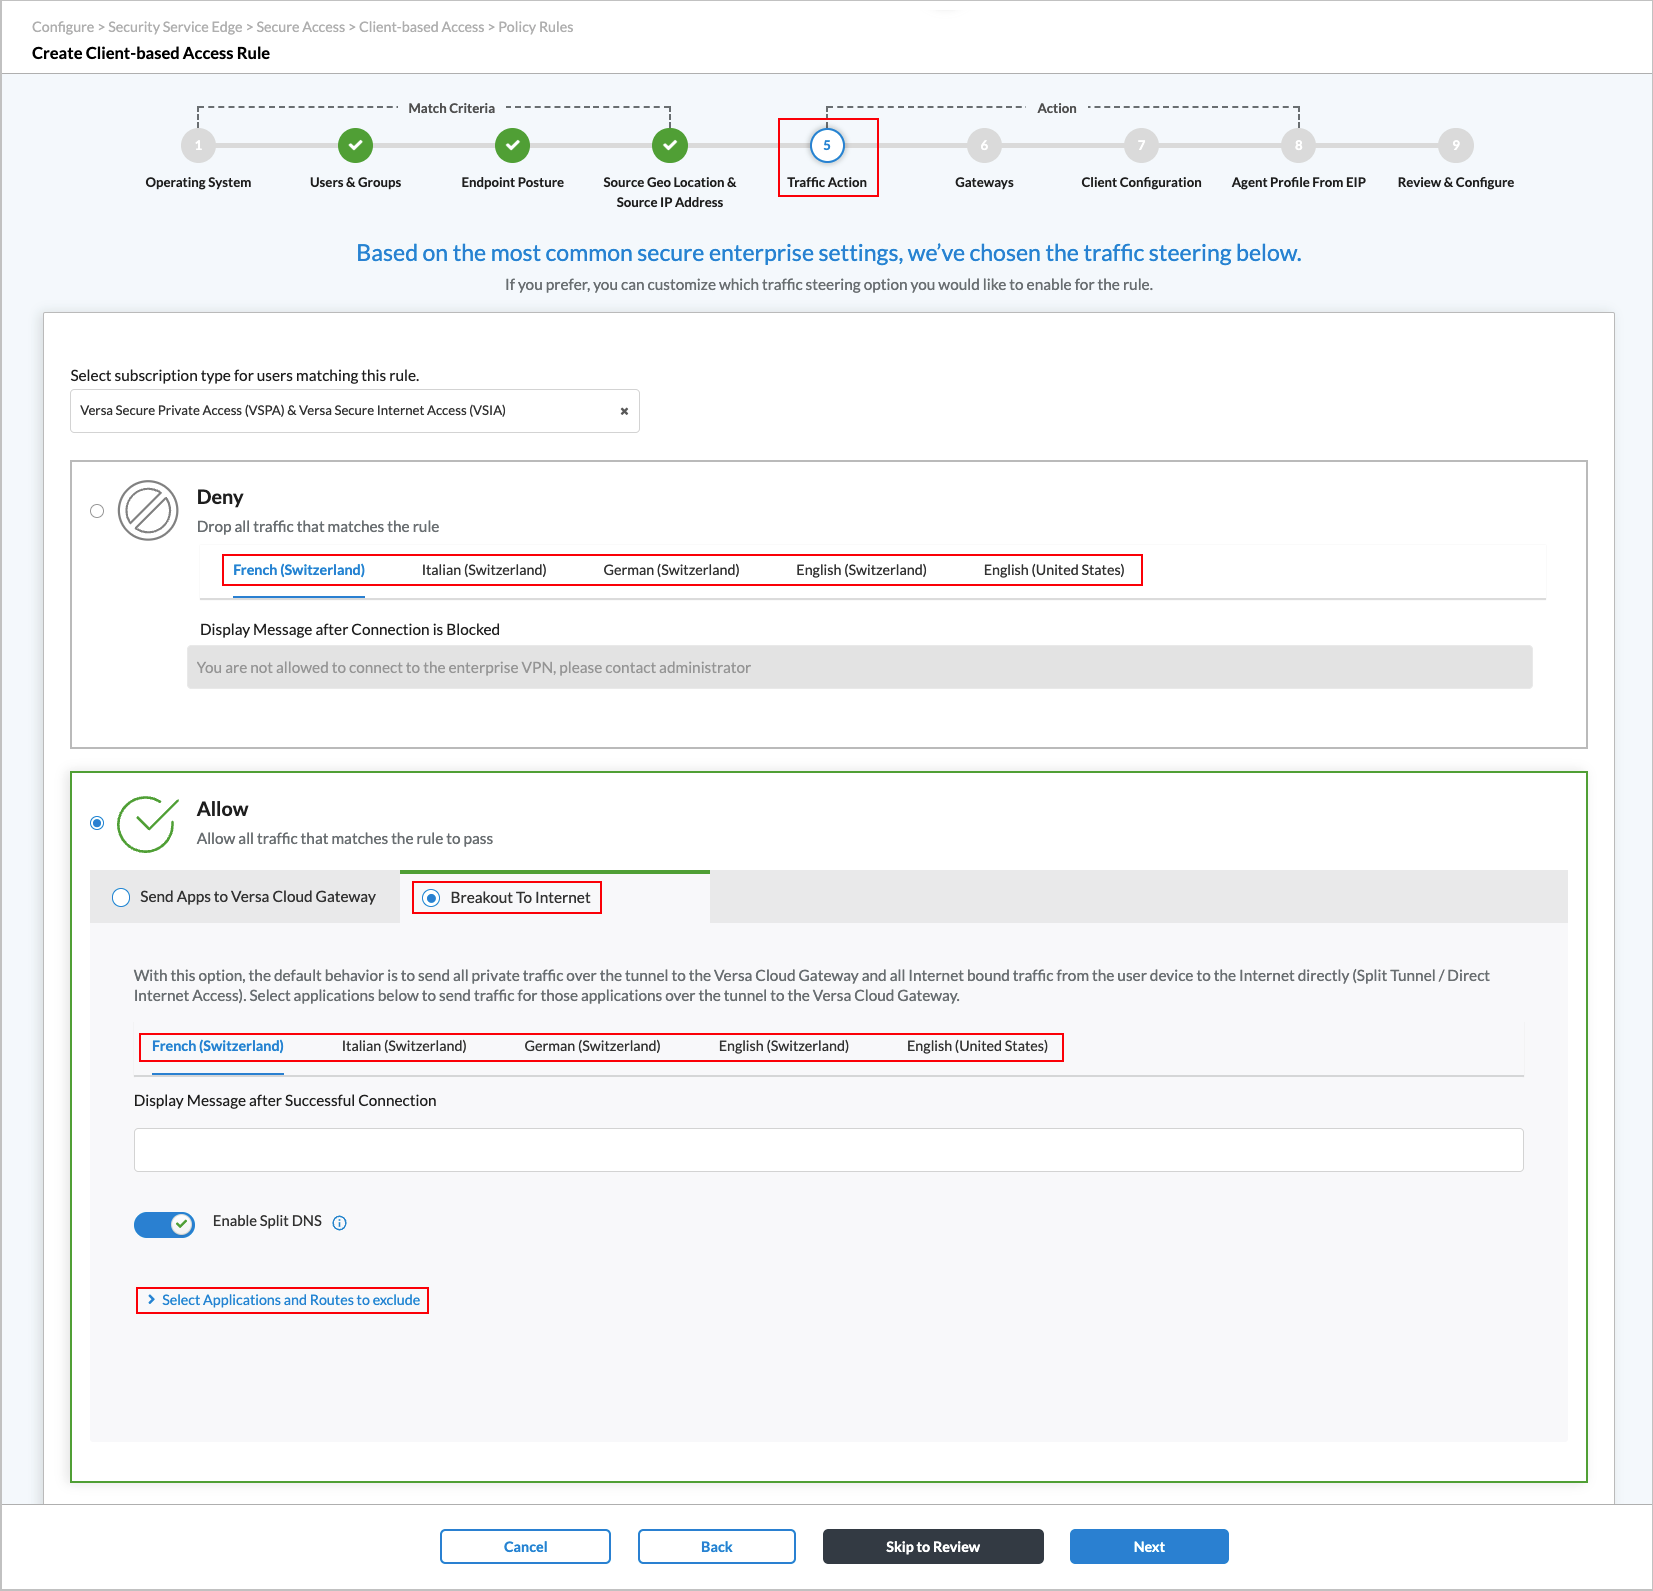
- To customize the default settings, enter information for the following fields.
Note: If you configured the tenant to allow the support of different languages, the languages appear under the Deny and Allow actions. If you did not configure the tenant to allow the support of different languages, the languages do not display. For information about configuring a tenant to allow language support, see Configure SASE Tenants.
Field Description Select subscription type for users matching this rule Click and then select a subscription type. Note that this option is visible only if you select the Allow traffic action. It is not visible if you select the Deny traffic action.
- Versa Secure Internet Access (VSIA)
- Versa Secure Private Access (VSPA)
- Versa Secure Private Access (VSPA) & Versa Secure Internet Access (VSIA). This is the default setting.
Deny Click to drop all traffic that matches the rule. If you configured the tenant to allow the support of different languages, select a language.
Note: If you select the Deny option, the Gateways, Client Configuration, and Agent Profile from EIP workflow steps are removed from the workflow. The next workflow step becomes Review & Configure.
- Display Message after Successful Connection
Enter the message to display after the connection is established. If you selected a specific language option, enter the message in the language you selected. Allow Click to send all traffic that matches the rule to pass. - Breakout to Internet
Click to send all private traffic over the tunnel to the VCG and all internet-bound traffic from the user device to the internet directly (split tunnel/Direct Internet Access). You can then select custom and predefined applications to send traffic for those applications over the tunnel to the VCG. See the description of the "Select Applications and Routes to exclude" field below.
If you configured the tenant to allow the support of different languages, select a language.
Note: This option is available for the following subscription types:
- Versa Secure Private Access (VSPA)
- Versa Secure Private Access (VSPA) and Versa Secure Internet Access (VSIA)
- Send Apps to Versa Cloud Gateway
Click to send all traffic from the user device to the VCG. You can then select custom and predefined applications to bypass the tunnel and be sent out directly to the internet from the user device. See the description of the "Select Applications and Routes to exclude" field below.
Note: This option is available for the following subscription types:
- Versa Secure Internet Access (VSIA)
- Versa Secure Private Access (VSPA) and Versa Secure Internet Access (VSIA)
If you configured the tenant to allow the support of different languages, select a language.
Display Message after Successful Connection
Enter the message to display after the connection is successful. If you selected a specific language option, enter the message in the language you selected. Enable Split DNS
(For Releases 13.1.1 and later.) (For VSPA and Breakout to Internet only.) Split DNS is enabled by default to send DNS requests for configured domains to the SASE gateway and to break out the remaining DNS requests to the internet. Click the toggle to disable this option.
Select Applications and Routes to exclude Click the
 Expand icon to display custom and predefined applications and routes to exclude.
 Note: In Releases 12.2.2 and earlier custom and predefined applications and routes were displayed by default.
- Custom Applications
Select one or more custom applications to send traffic for those applications over the tunnel to the VCG.

- Predefined Applications
Select one or more predefined applications to send traffic for those applications over the tunnel to the VCG.

- Excluded Routes
(For Releases 11.4.3 and later.) If you do not want to send specific traffic to the gateway, you can specify routes to exclude. Traffic that uses an excluded route is not sent to the gateway, even if you select Send Apps to Versa Cloud Gateway traffic action.
To add routes to exclude, click the
Expand icon, and then enter one or more route prefixes.This field displays if you choose one of the following subscription types:
- Versa Secure Internet Access (VSIA)
- Versa Secure Private Access (VSPA) & Versa Secure Internet Access (VSIA)

- If you selected Deny as the traffic action for the rule, click Next to go to the Review and Configure screen. See Review and Configure SASE Secure Client-Based Access Rules.
- If you selected Allow as the traffic action for the rule, click Next to go to the Gateways workflow step.
Configure SASE Gateways for Secure Client-Based Access
By default, VSPA clients can use all available gateway groups to access the enterprise network. You can also customize the configuration to choose which gateway groups the VSPA clients can use.
When a tenant is provided with a new gateway, the gateway is not automatically added to existing secure access profiles. If the existing user requires access to the new gateway, the administrator must add the new gateway to existing profiles and republish the configuration to enable access.
To configure SASE gateway groups:
- In the Create Secure Client Access Rule screen, select Gateways. The following screen displays:

- In the Gateway Groups box, select one or more gateway groups. Note that you must select at least one gateway group. The gateways belonging to the selected gateway group display in the Gateways box to the right.
- In the Gateways box:
- Select a VPN. The screen then displays the available gateways for that VPN.
- Select one or more of the gateways, and then select a client address pool name. Each drop-down list contains the client IP address pools that are configured on the selected gateway.
- Click Next to go to the Client Configuration screen.
For information about configuring multiple VPNs and multiple client address pools, see Configure SASE Tenants.
Create a SASE Client Configuration for Secure Client-Based Access
By default, a SASE client is configured using the most common enterprise settings. You can customize the client configuration in the following ways:
- Choose a different secure client-based access profile or create a new secure client-based access profile.
- Enable/disable and configure multifactor authentication (MFA).
- Select the type of VPN to use, IPsec VPN or SSL VPN (for Releases 12.1.1 and later). For Releases 12.2.1 and later, you can also select DTLS.
- Choose which controls are available to SASE client users.
To customize a client configuration:
- In the Create Secure Client Access Rule screen, select Client Configuration.
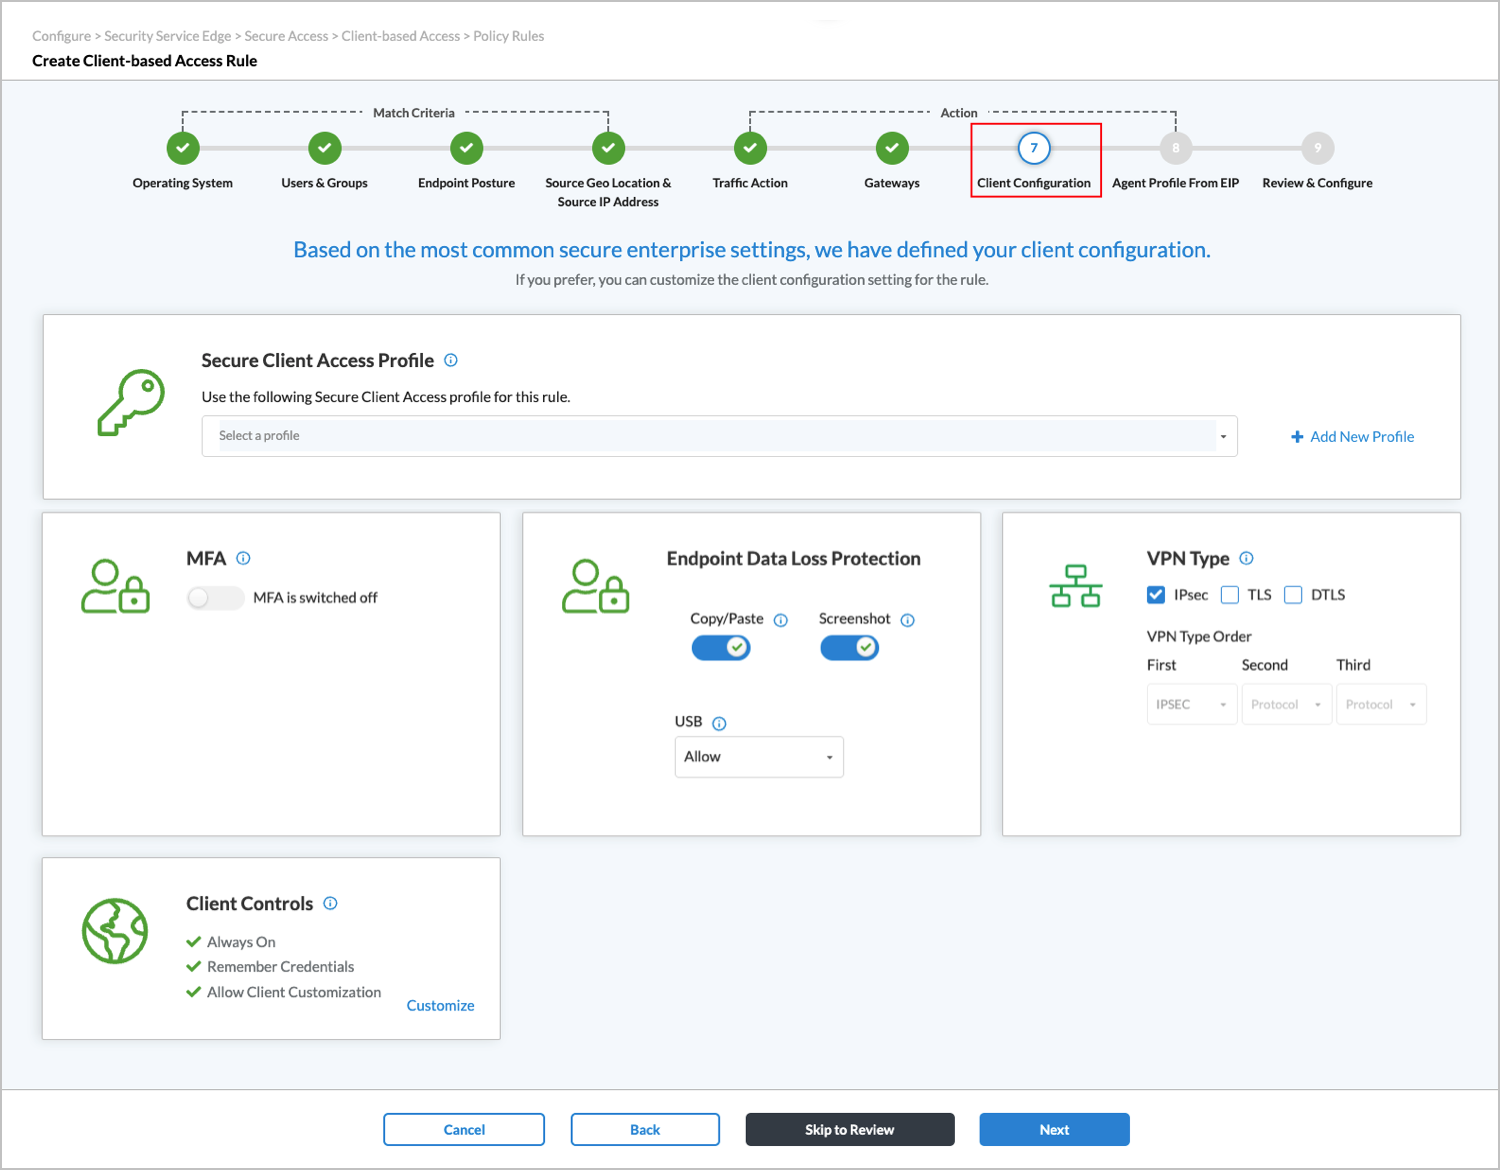
- To specify a secure client-based access profile for the rule, click the down-arrow in the Secure Client Access Profile box, and then choose a profile. The Profile Details table displays. To add a new profile, click
 Add New Profile. See Configure SASE Secure Client-Based Access Profiles for more information about adding new profiles.
 - In the Profile Details table, click the Plus icon to view information about the route and DNS resolvers defined in the profile.

- To add a new profile, click Add New Profile. For more information, see Configure SASE Secure Client-Based Access Profiles.
- By default, MFA is disabled. To enable MFA, in the Create Secure Client Access Rule screen, click the toggle. When MFA is enabled, the Customize option displays.

- Click Customize to change the MFA settings. In the Configure MFA screen, enter information for the following fields.
- Select Email OTP Authentication Service to enable one-time password authentication using email.
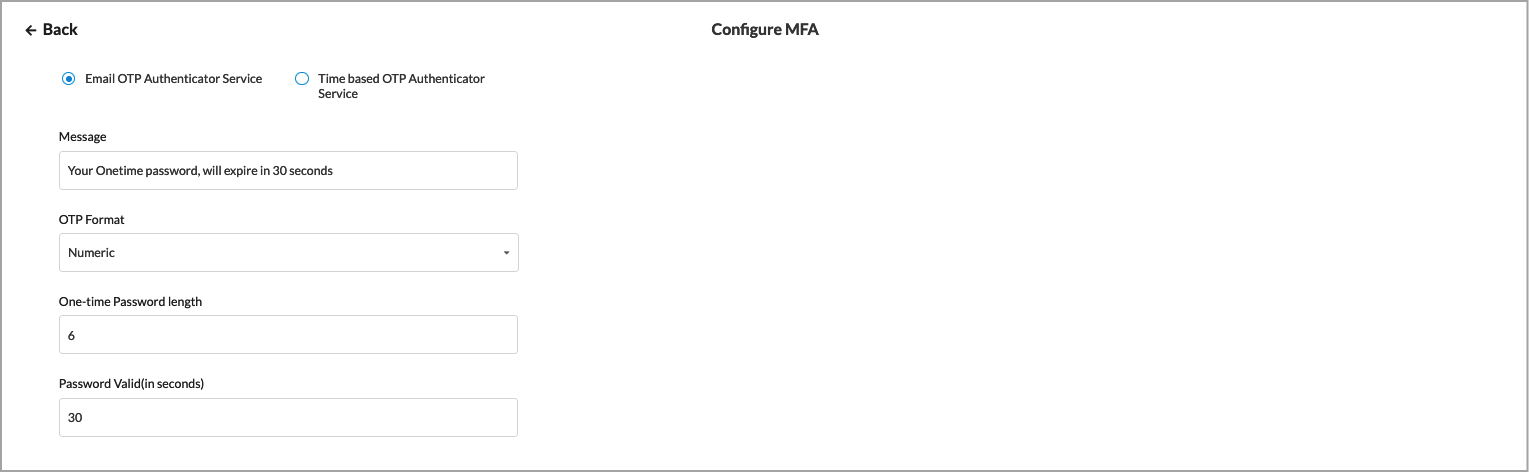
Field Description Message Enter a message to send using the email OTP authentication service. OTP Format Select a format for the one-time password:
- Alphabetic,
- Alphanumeric
- Numeric
One-time Password Length Enter the length of the password.
Default: 6
Range: 6 through 14Password Valid Enter how long the password is valid, in seconds
Default: 3 secondsRange: 1 through 3600 seconds
- Select Time-Based OTP (TOTP) Authentication Service to enable time-based authentication.

Field Description QR Code (For Releases 12.2.2 and later.) Send the QR code using SASE Client or email address:
- Send to Client—Click to send the QR code to SASE Client.
- Sent by Email—Click to send the QR code to the email address.
- Select Email OTP Authentication Service to enable one-time password authentication using email.
- Click Back to return to the Client Configuration screen.
- (For Releases 13.1.1 and later.) The Endpoint Data Loss Protection pane displays the default settings:
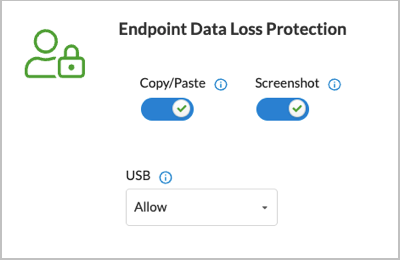
- Copy/Paste—Detect a copy-from or paste-to the clipboard action (Windows only). Enabled by default. Click the toggle to disable copy/paste detection.
- Screenshot—Detect a screenshot action (Windows only). Enabled by default. Click the toggle to disable screenshot detection.
- USB—Detect data exfiltration through a USB device. Allowed by default. You can change the default by selecting Block or Read Only from the drop-down list. For more information, see Configure DLP Data Exfiltration.
- (For Releases 12.1.1 and later.) Select the VPN type: IPsec, SSL, or both. By default, Concerto uses IPsec as the VPN type. IPsec VPN defines the properties of the IPsec and IKE tunnels between tenants (organizations) and SD-WAN network devices. SSL VPN allows remote users to connect to Versa gateways using the Versa SASE client. The Versa proprietary SSL VPN protocol is based on Transport Layer Security (TLS) and Datagram Transport Layer Security (DTLS). You can choose either or both of these SSL VPN options.
(For Releases 12.2.1 and later.) If you select more than one VPN type, you can specify the order in which the Versa secure access client will use the VPN types, including the two types of SSL: TLS or DTLS.
The following screenshot shows the default VPN type selection (IPsec). To select advanced encryption algorithms when the VPN type is IPsec, see Configure SASE Client Encryption Algorithms.

- To use only DTLS or TLS, unselect IPsec and then select DTLS or TLS. The following screen shows DTLS selected.

- You can use more than one VPN type. When you select two or more VPN types, you can specify the order in which the secure access client will use the VPNs. The following screen shows that IPsec and DTLS have been selected, and that the secure access client will use DTLS first and IPsec second.
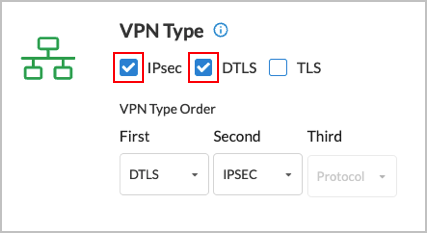
- The following screen shows that all three VPN types have been selected, and that the secure access client will use DTLS first, IPsec second, and TLS third.
Note: Choosing TLS-based tunneling might cause TCP-over-TCP tunneling issues, where packet loss and latency amplify performance problems. Versa recommends using DTLS or IPsec-based tunnels.

- To use only DTLS or TLS, unselect IPsec and then select DTLS or TLS. The following screen shows DTLS selected.
- By default, you have full control of the secure client gateways. Client controls are the configurations that control the Versa Client Application's (also called the SASE Client Application) behavior and permissions. Click Customize in the Client Controls box to change the the secure client gateway settings.

- In the Configure Client Controls screen, enter information for the following fields.

Field Description What client controls do you have Select one or more client controls:
- Allow Client Customization—Enable or disable the Edit Gateway tab.
- Remember Credentials—Enable or disable the remembering or credentials.
- Auto Update—(For Releases 11.4.1 and later.) Enable or disable automatic updating of the client. If enabled, the client automatically updates to the version you select. Click Edit Preferred Client Version to change the software version to which to automatically update the client. The Preferred Client Version window displays. For more information, see Select Preferred SASE Client Version, below.
Client Log URL Enter the URL to reach the client logo. Portal Lifetime (in Minutes) Enter the desired registration lifetime of the portal.
Default: 300 minutes
Range: 1 through 1440 minutes
Certificate Issuer Enter the name of the entity that issued the certificate.
Note: If you do not enter the name of the certificate issuer, the Versa Secure Access client will not send a device ID while connecting to the gateways and the correct policy will not match.
Trusted Network Hostname Enter the hostname of the trusted accessible network. This option determines whether a SASE client is already behind a trusted VPN network. If so, connecting to the SASE gateway is bypassed. See Configure Detection of Trusted Networks for SASE Gateways. - Click the Expand icon to configure advanced settings.
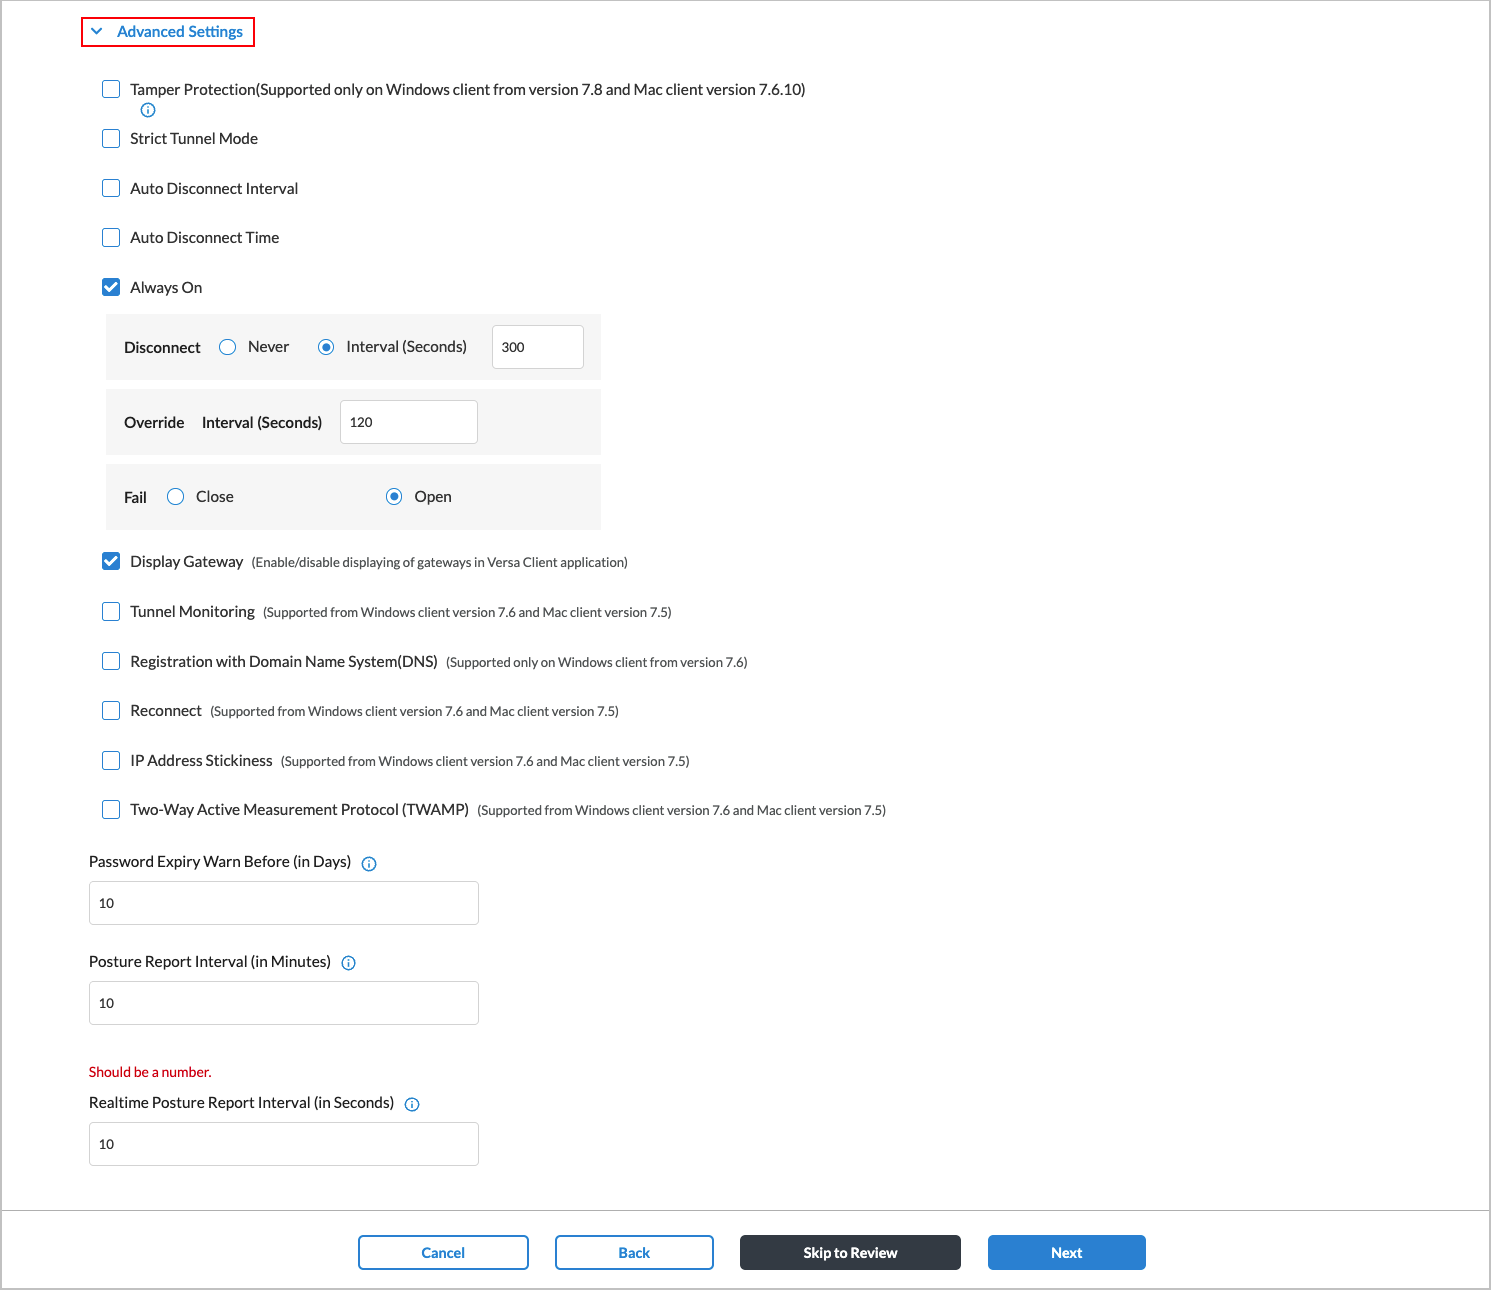
Field Description Advanced Settings (Group of Fields) - Tamper Protection
(For Releases 11.4.1 and later.) If enabled from the server side, you cannot uninstall the client, delete the client account, or delete any files from the installation directory. See Configure Tamper Protection.
To disable, click the Tamper Protection toggle button in the Account Details window and then enter the tamper protection authentication key. See the Disable Tamper Protection From the SASE Client section in Configure Tamper Protection.
Note: Supported on Windows Client, version 7.8 and later.- Strict Tunnel Mode
(For Releases 11.4.1 and later.) Redirect all traffic through the tunnel. If disabled, specific traffic is routed through a tunnel and the rest is sent directly onto a WiFi or Ethernet interface. - Auto Disconnect Interval
(For Releases 11.4.1 and later.) Automatically disconnect tunnel after the configured autodisconnection interval.
Range: 1 through 65535 minutes
Default: 480 minutes
- Auto Disconnect Time
(For Releases 12.2.1 and later.) Automatically disconnect all VPNs and all users at the specified time each day.
Hours: 0 through 23
Minutes: 0 through 59
For example, if the select 17 hours and 30 minutes, all VPNs will be disconnected at 5:30 p.m. (1730 hours) each day.
- Always On
Enter information for the following fields:
- Disconnect—Enter a disconnect interval time.
- Range: 1 through 65535
- Default: 120
- Override Interval—Enter an override interval time.
- Range: 1 through 65535
- Default: 120
- Fail—Choose the action to take when the connection fails
- Close
- Open (default)
For more information, see Configure Always On.
Display Gateway Click to enable display of gateways on the SASE client UI. Tunnel Monitoring (Supported on Windows client version 7.6 and Mac client version 7.5)
Enter information for the following fields:
- Hosts—Enter one or more hosts to use for tunnel monitoring. Click the
 Add icon to add additional hosts.
 - Interval—Enter the tunnel monitoring interval, in seconds.
- Range: 1 through 255 seconds
- Default: 60 seconds
- Interval Retry—Enter the interval between tunnel monitoring retry attempts, in seconds.
- Range: 1 through 255 seconds
- Default: 10 seconds
- Connection Retry—Enter the number of connection retry attempts before concluding that the tunnel is down.
- Range: 1 through 255
- Default: 5
Registration with Domain Name System (DNS) (Supported on Windows client versions 7.6 and later)
Enter a DNS suffix to enable or disable registering the tunnel IP address with a DNS server.
Range: 1 through 255
Default: None
Reconnect (Supported on Windows client version 7.6 and Mac client version 7.5)
Enter information for the following fields
- Interval—Interval between autoreconnect attempts, in seconds.
- Range: 1 through 255, in seconds
- Default: 10 seconds
- Retry Count—Number of autoreconnect retry attempts.
- Range: 1 through 255
- Default: 5
IP Address Stickiness (Supported on Windows client version 7.6 and Mac client version 7.5)
Click to enable IP address stickiness. IP stickiness allows the SASE client to receive the same IP address even if it reconnects. When this feature is enabled on the SASE client, it stores the IP address which was received during a connection, and requests the same IP address on subsequent connections to the same gateway. This helps to ensure users always connect with the same IP address, which makes it easier to enforce security policies for specific users.
Two-Way Active Measurement Protocol (TWAMP (Supported on Windows client version 7.6 and Mac client version 7.5)
Click to enable TWAMP. Password Expiry Warn Before (in Days) Enter the number of days before a password expiration warning is displayed.
Default: 10 days
Range: 1 through 255 days
Posture Report Interval (in Minutes) Enter the EIP posture check interval, in minutes.
Range: 1 through 65535 mins.
Default: 10 mins.
Realtime Posture Report Interval (in Seconds) Enter the real-time posture report interval, in seconds.
Real-Time Endpoint Information Profiles (RT-EIP) delivers incremental security posture changes by enabling rapid detection of security state changes on endpoint devices. For more information, see Real-Time Endpoint Information Profiles.
Range: 1 through 4294967295 seconds
Default: 10 seconds
- Click Next to go to the Agent Profile from EIP screen.
Configure EIP Agent Profiles for Secure Client-Based Access
EIP agent profiles define when the SASE client extracts information from endpoint devices. You associate predefined or custom EIP agents with secure client-based access rules to enforce EIP security. For more information, see Configure a Custom EIP Agent Profile.
To configure EIP agent profiles for secure client-based access rules:
- In the Create Secure Client Access Rule screen, select the Agent Profile from EIP tab.

- To associate an existing custom EIP agent profile with the secure client-based access rule:
- Select User Defined in the Type field.
- Select a custom profile under EIP Agent Profiles.
- To add a new EIP Agent Profile, click + Create New. The Create EIP Agent Profile screen displays. For more information, see Configure a Custom EIP Agent Profile.

- To associate a predefined EIP agent profile with the secure client-based access rule, select Predefined in the Type field, and then select a profile in the EIP Agent Profiles field. The match categories for the selected type and EIP agent profile display.
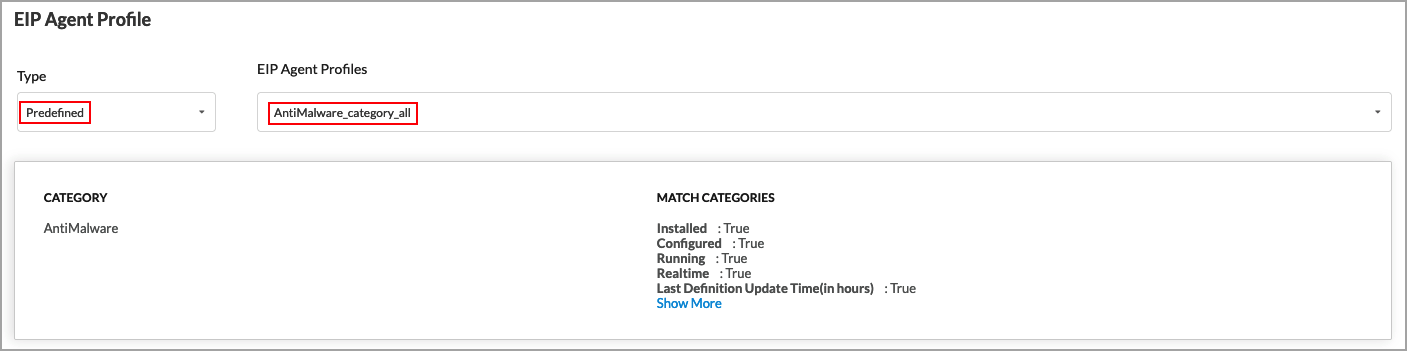
- Click Next to go to the Review & Configure screen.
Review and Configure SASE Secure Client-Based Access Rules
The final step in configuring secure client-based access rules is to review the choices you have made, edit them if needed, and then deploy the new rule.
- In the Create Secure Client Access Rule screen, select Review and Configure, and then enter information for the following fields.
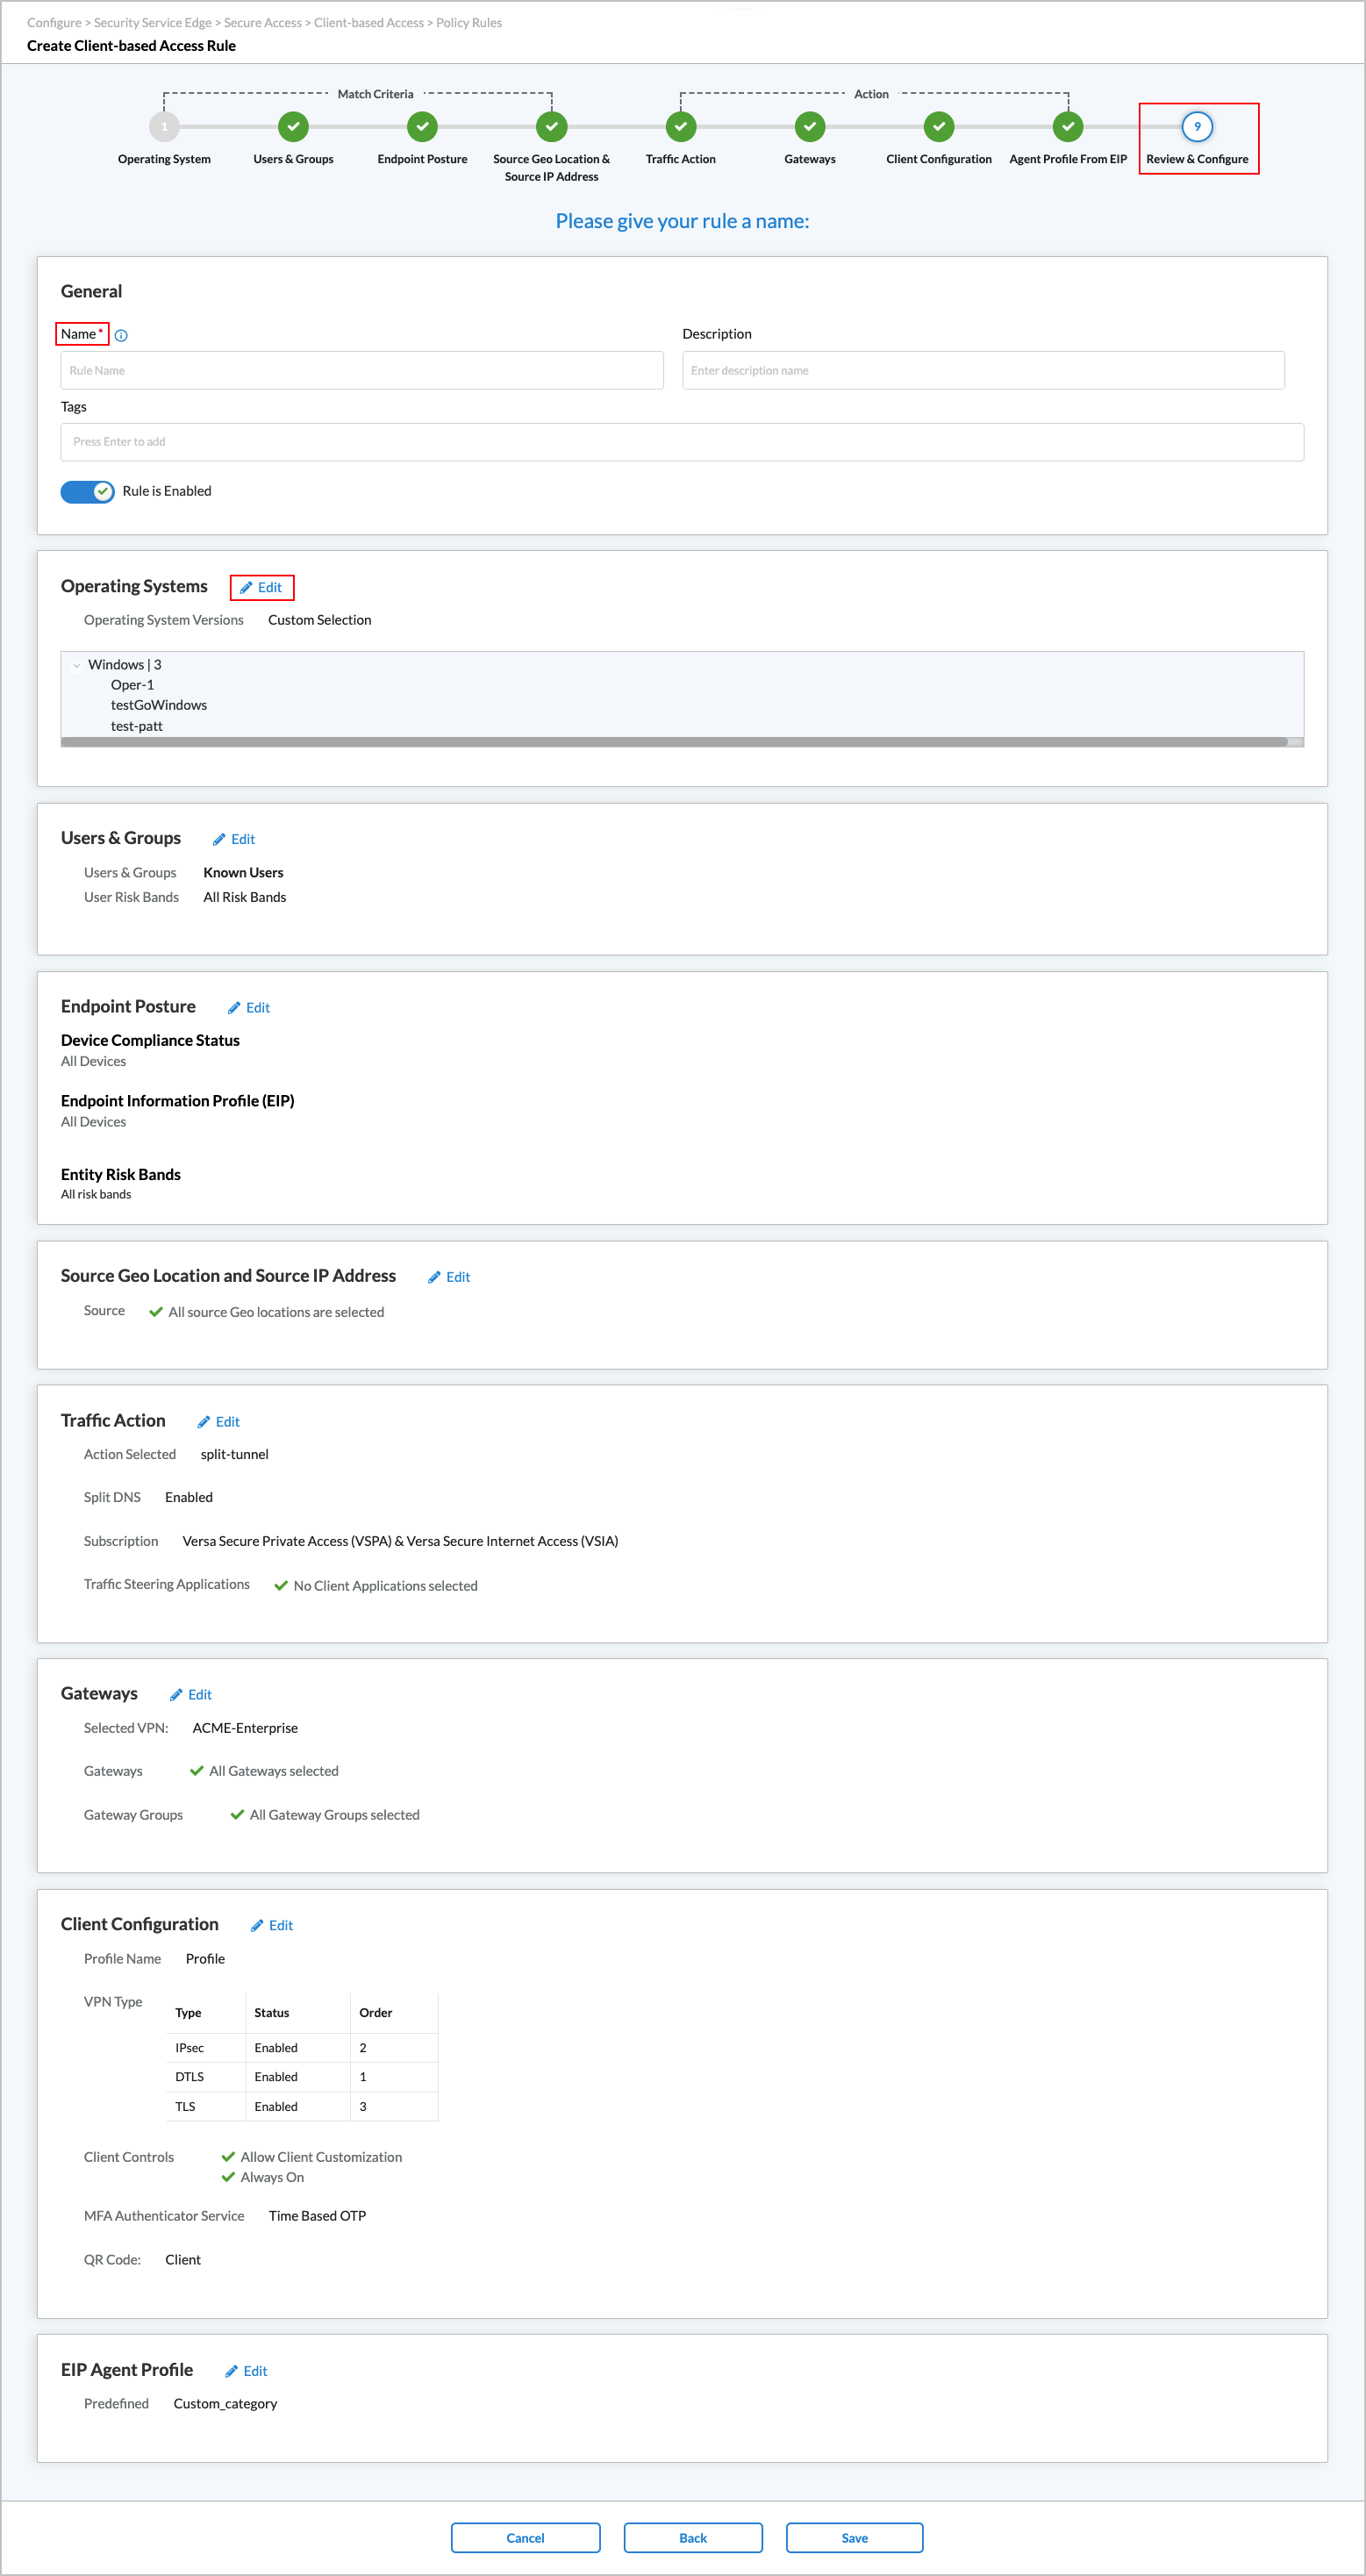
Field Description Name (Required) Enter a name for the rule. Description Enter a text description for the rule. Tags Enter one or more tags to help identify the rule. A tag is an alphanumeric text descriptor with no white spaces or special characters that you can use to search objects. You can specify multiple tags.
Rule is enabled Click the toggle to enable the rule.

- If required, edit the configuration for a given section by clicking the Edit icon.
- Click Save to save the new secure client-based access rule.
Verification
To verify secure access operations, select View in the left navigation pane, and then go to Secure Access > Users:
- Select the Summary tab to view a summary of user analytics statistics by user count for top devices, continents, countries, and cities.

- Select the Usage tab to view analytics statistics per user and top users.

- Select the Events tab to view detailed information about client connection or disconnection events, along with the Versa Secure Access Rule, matched for each user, and the VCG used.

- Select the Registry tab to view detailed information about client registration events, along with Versa SASE Client and OS details for each user.

- To view client authentication event details, click Analytics in the left menu, and then go to Logs > Authentication.

Configure the Versa SASE Client
The Versa SASE client application is a native VPN client that supports Android, iOS, Linux, MacOS, and Windows operating systems.
Note that in earlier software releases, for releases prior to Release 7.4.3 for Android, Release 7.3.7 for MacOS, and Release 7.4.5 for Windows, the product was called the Versa Secure Access (VSA) client application software.
To configure the Versa SASE client, you do the following:
- Install the VSA client on a device.
- Register the VSA client (includes authentication).
- Connect to a VSA gateway.
Install a SASE Client on a MacOS Device
To install the Versa SASE client on a MacOS device:
- Download and install the Versa SASE client from this location.
- Open the SASE client. The Register screen displays. For more information, see Register the SASE Client section below.
Install a SASE Client on a Windows Device
This section describes how to install the SASE client on a Windows device. To install the SASE client on a Windows device:
- Download and install the application from this location. Confirm the download link with your organization's IT administrator before you download the SASE client.
- Start the application. The Select Components wizard screen displays. By default, Versa SASE Client is selected.
- Click Next in the setup wizard screen.
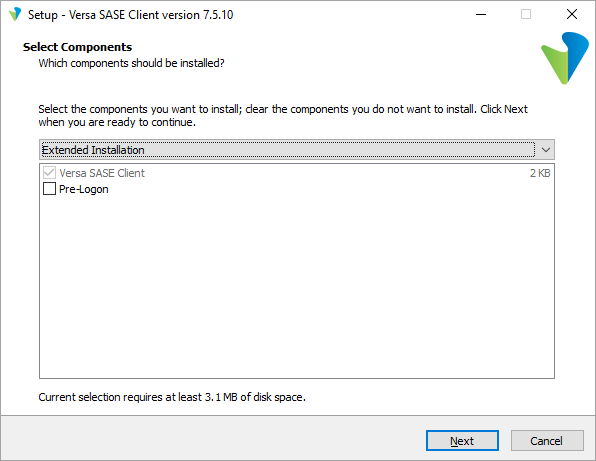
- In the last wizard window, click Install to complete the installation.

The Register screen displays, unless you deselected Launch Versa SASE Client. For more information, see Register the SASE Client section below.
Register the SASE Client
After you install the SASE client, register to the SASE platform using the following information from the email notification that you received. This information is provided to your organization's IT administrator:
- Link to the registration portal's FQDN or IP address
- Your enterprise name
- Your user ID
To authenticate with the SASE portal, the following types of authentication are supported:
- Basic local authentication
- SAML
- Time-based one-time password (TOTP)
- Two-factor authentication
To register the SASE client:
- Click the link to the registration portal that was included in the email.
- Open the SASE Client, and click Register.

- Enter the portal's FQDN or IP address, enterprise name, and your user ID, and then click Submit.

- Enter the username and password that you received from the administrator, and then click Submit.

- If authentication using two-factor authentication is required, enter the one-time password that you received in email or SMS, and click Submit. After the one-time password is validated, the registration process is complete.
- If TOTP authentication is required, the screen displays a QR code:

- Scan the QR code using any authenticator application.
- Click Done after you scan the QR code. The following screen displays with a field to enter OTP.

- Enter the OTP that the authenticator application displays and click Submit.
- After the TOTP is validated, the registration process is complete.
- If SAML authentication is used, the client login page similar to the following displays:

- Enter the user name and password, and then click Login.
- After the login credentials are validated, the registration process is complete.
Connect to a VSA Gateway
Configure TLS Decryption
To take advantage of the advanced security inspection features of the Versa Secure Services Edge (SSE), you configure Transport Layer Security (TLS) decryption. Most internet traffic is encrypted using TLS, which may hide malicious content, payloads, and flows. This makes it difficult to apply content-specific security policies to the traffic. TLS decryption enables the Versa SASE solution to enforce security policies on encrypted traffic.
TLS decryption is an industry-standard protocol that is used to provide a secure communications channel between clients (end devices) and servers (destination sites) over the internet. TLS decryption uses two mechanisms to secure traffic:
- Handshake protocol—Authenticates the client and server devices at both ends of a secure communications channel, negotiates cryptographic modes and parameters, and establishes shared keying material used to negotiate the security parameters of a connection. The handshake protocol then sends messages to the TLS record protocol.
- Record protocol—Takes transmitted messages from the handshake protocol, fragments the data into manageable blocks, protects the records, and transmits the result. The data received is verified, decrypted, reassembled, and then delivered to higher-level clients.
Configure TLS Decryption Rules
To configure TLS decryption rules:
- Go to Configure > TLS Decryption > Policy Rules.

The TLS Decryption Rules List screen displays all current rules.

Note: Release 12.2.1 supports three new built-in TLS decryption rules: DoNotDecrypt-LegalLiability, StandardInspect, and RiskyWebsites. Built-in rules are predefined in Concerto. You can use them without modification, or you can clone and modify them. The rules are automatically generated when you publish a tenant. You can treat them as you would any user-defined rule; you can modify, reorder, move, and delete the rule. If you delete a built-in rule and then republish the tenant, the rule is created again in the disabled state.
- To customize which columns display, click Select Columns and click the columns select or deselect the columns you want to display. Click Reset to return to the default columns settings. The options are:
- Decryption Profile
- Bypass URL Filtering Profile
- Applications & URLs
- Users & Groups
- Endpoint Posture
- Source & Destination
- Services
- Schedule
- Status
- Click + Add to add a TLS decryption rule. The Create TLS Decryption Rule screen displays. In the first step, Decryption Enforcement, enter information for the following fields.

Field Description Decrypt and Inspect the Traffic (Group of Fields) Select to decrypt and inspect all traffic. - Use the following decryption profile
Select a decryption profile. - + Add New
Click to add a decryption profile. To create a profile, see Create a TLS Decryption Profile. - URL Filtering Action Override (optional)
Select a URL filtering profile to override the current profile. - Bypass Certificate-Pinned Traffic
Enable this option to dynamically bypass TLS decryption for certificate-pinned applications for the logged in users. Do Not Decrypt (Group of Fields) Select how to bypass decryption of the traffic. - Do not decrypt but do inspect the traffic
Do not decrypt the traffic but inspect the traffic to identify, classify, and inspect the traffic for threats. Select a profile. - Do not decrypt and do not inspect the traffic
Click to allow traffic from certain trusted sites to not be inspected. - Click Next to go to the second step, Applications & URLs. By default, all applications, URLs, and reputations are included in the match, which means that all applications, URLs, and reputations are matched by this rule. To accept the default settings, click Next to continue to Step 3, Users & Groups.

The screen displays all custom and predefined application groups. Note that you can create internet protection rules based on either applications or URL categories and reputations, but not both. To match both applications and URL categories or reputations, create two separate internet protection rules. ClickAdd New to add a new application category. See the Configure Application Categories section in Configure SASE User-Defined Objects.
- To create a TLS decryption rule based on applications, select the user-defined and/or predefined application groups to include in the match list, or type the name of the application group in the search box and select it from the search results. The application group is added to the search bar. In the following example, the predefined application groups Adobe-Apps and Box-Apps are selected. To remove an application, click X next to the application in the search box.

- Click the Applications tab in the submenu. The following screen displays.

- Select the user-defined and/or predefined applications to include in the match list, or type the name of the application in the search box and then select it from the search results. The application is added to the search bar. To remove an application, click X next to the application in the search box.
Note: In Release 12.2.1 and later, deprecated predefined applications are not displayed. If you had already configured a rule in Releases 12.1.1 and earlier that included a now-deprecated application in its match criteria, and then try to edit that rule, an error message similar to the following is displayed.

- Click the Application Category tab in the submenu. The following screen displays.

- Select the user-defined and/or predefined application categories to include in the match list, or type the name of the application category in the search box and then select it from the search results. The application category is added to the search bar. To remove an application category, click X next to the application category in the search box.
- To create a TLS decryption rule based on URL categories and reputations, click the URL Categories & Reputations tab in the top menu. The following screen displays.

- In the URL Categories and Reputation fields, select one or more URL categories and reputations to include in the internet protection rule. The URL category and reputation are added to the respective search bar. To remove a URL category or reputation, click X next to the name in the search box.
- Click Next to go to the next step, Users & Groups. The Users & Groups screen displays. By default, security enforcement is applied to all users, user groups, and user device groups. To accept the default, click Next to go to the next step, Endpoint Posture.

- To change the users and groups settings, click Customize in the Users & Groups box. The Users & User Groups screen displays with All Users selected by default.

- You can choose the following user types to include in the match list:
- All Users—Apply the security policy to all users, whether whether they are authenticated (known) or not authenticated (unknown)
- Selected Users—Apply the security policy to users or groups from IdP that you select
- Known Users—Apply the security policy to all authenticated users
- Unknown Users—Apply the security policy only to users that are not authenticated
- If you choose Selected Users, the following screen displays. You can choose user groups, individual users, or both user groups and users to include.

- In the Enable TLS Decryption for the following matched users or user groups field, select one or more users or user groups profile.
- Under the User Groups tab, select the user groups to include in the match list, or type the name of a user group in the search box and then select it from the search results.
- Click the Users tab in the submenu. The following screen displays.
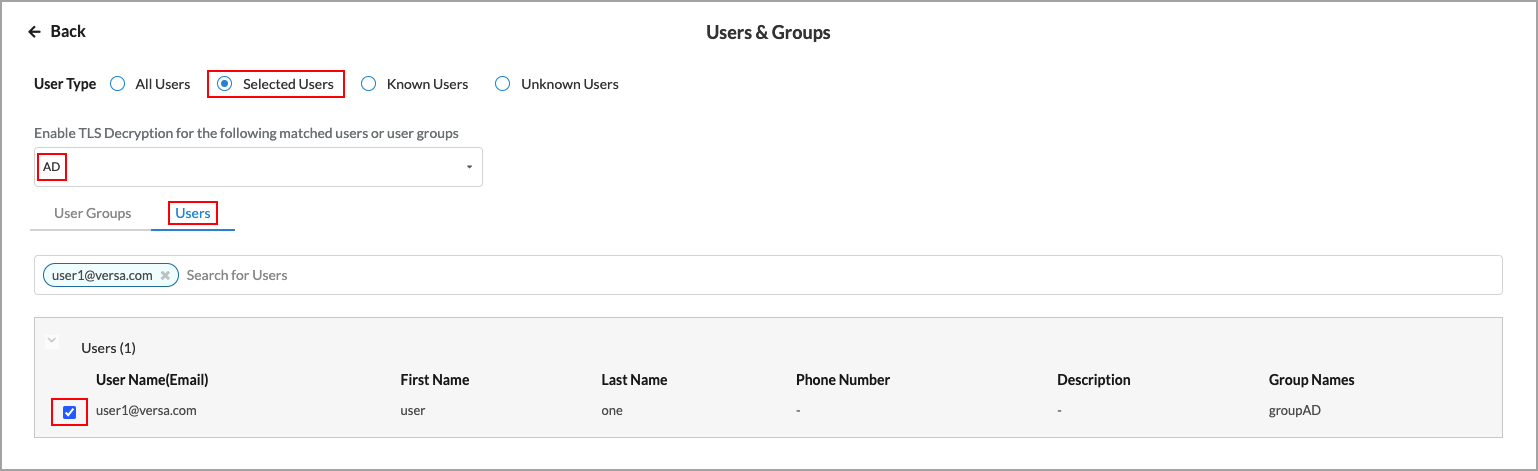
- In the Enable TLS Decryption for the following matched users or user groups field, select one or more users profiles.
- Under the Users tab, select the users to include in the match list, or type the name of a user in the search box and then select it from the search results.
- Click
 Back arrow to return to the main Users & Groups screen.

By default, security enforcement is applied to all user device groups. To accept the default, click Next to go to the next step, Endpoint Posture.
- To change the user device groups settings, click Customize in the Users Device Groups box. The following screen displays.

- Select one or more user device groups to include in the rule.
- Click the Back arrow to return to the main Users & Groups screen, or click Next to continue the next step, Endpoint Posture. The following screen displays.

Endpoint posture allows you to select predefined and user-defined Endpoint Information Profiles (EIP) to include in the match criteria for TLS decryption rules. For information about configuring EIPs, see Configure Endpoint Information Profiles.
Endpoint posture also allows you to create additional match criteria by choosing a device/endpoint risk score to attribute to the entities within the network’s policy rule. This score helps determine the credibility and the likelihood of activities being legitimate or malicious. These match criteria can then be used when creating policies and rules. For more information, see Configure Endpoint Detection and Response.
- To select EIPs to include in TLS decryption rule, click Customize in the Endpoint Information Profile (EIP) box. The following screen displays.

- To create a new EIP profile, click
 Create New EIP Profile. For more information, see Configure Endpoint Information Profiles.
 - To add a user-defined EIP, select the User Defined tab, then click Add Existing EIP Profile. In the Add User Defined EIP Profiles popup window, select one or more EIP profiles from the drop-down list.

- Click Add.
- To add a predefined EIP profile, select the Predefined tab in the Endpoint Information Profile (EIP) screen, then click Add Existing EIP Profile. In the Add Predefined EIP Profiles popup window, select one or more EIP profiles from the drop-down list.

- Click Add.
- Click the Back arrow to return to the Endpoint Posture screen.

- By default, all device/endpoint risk scores are applied to the security enforcements. To choose which risk score to apply, click Customize in the Device/Endpoint Risk Score box. The following screen displays.

- Select one or more entity risk scores from the list. The options are:
- High Risk (80–100)
- Suspicious (60–80)
- Moderate Risk (40–60)
- Low Risk (20–40)
- Trustworthy (0–20)
- Click Next or click the Back arrow to return to the Endpoint Posture screen, then go to the Network Layer 3-4 step. The following screen displays.

By default, all Layer 4 services and all source and destination traffic are included in TLS rule. There are no default schedules.
- To change the services to include in the rule, click Customize in the Services box. The following screen displays.

- Click to select one or more of the services in the table, or use the search box to locate the service. To add a custom service, click Add User-Defined. The following screen displays.

- Select a protocol or a port number. The available options are AH, ESP, TCP, UDP, ICMP, or 0 through 255. If you select TCP, UDP, or TCP and UDP, the following popup window displays.

- Under Port, select either Source AND Destination or Source OR Destination, as follows:
- Source AND Destination—Select both a source port number and a destination port number (range 0 through 255)
- Source OR Destination—Select either a source port number or a destination port number (range 0 through 255)
- Click Next to to the Name and Tags step, then enter the following information.

Field Description Name Enter a name for the rule. Description (Optional) Enter a description of the rule. Tags (Optional) Add one or more tags. A tag is an alphanumeric text descriptor with no spaces or special characters. You can specify multiple tags added for the same object. The tags are used for searching the objects. Edit Click the  Edit icon to make any needed changes to your selections.
 - Click Save to save the new service. You can then select the service in the drop-down list.
- Click the Back arrow to return to the Network Layer 3-4 main screen.

- To change the source and destination traffic to include in the match list, click Customize under Source & Destination (Layer 3). The following screen displays any previously configured source address.

- Enter information for the following fields.
Field Description IP Subnet Enter the IP subnet of the source address, such as 10.1.1.0/24. You can enter multiple subnets. IP Range Enter the IP range of the source address, such as 10.1.1.1-10.1.2.1. You can enter multiple ranges. IP Wildcard Enter the IP wildcard of the source address, such as 192.168.0.56/0.0.0.255. You can enter multiple wildcards. VPN Name Select the VPN name of the source address. Negate Source Address Select to apply the rule to any source addresses except the ones in the Source Address field. Add Address Group Click the Add icon to add an address group. See Configure SASE User-Defined Objects for more information. - Click the Destination Address tab change the destination address information. The fields are the same as those for the Source Address tab, as shown above.
- Click the Source Zone & Sites tab. The following screen displays.

- Select a source zone. There are two default zones: Versa Client and SD-WAN Zone. Select Versa Client if traffic comes from a Versa Secure Access (VSA) client application, and select SD-WAN Zone if traffic comes from an SD-WAN device.
- Select a source site. There is one default site: USA.
- Click the Destination Zone & Sites tab. The following screen displays, with the Internet destination zone pre-selected.

- Select a destination zone. There are two default zones: Internet and SD-WAN Zone. Select Internet if traffic is going to the internet, and select SD-WAN Zone if traffic is going to an SD-WAN device.
- Select a destination site. There is one default site: USA.
- Click the Back arrow to return to the Network Layer 3-4 main screen.

- To customize schedules, click Customize under Schedule. The following screen displays.

- Click the drop-down list to select a schedule. If no schedules are listed, create one by clicking Add New. For more information, see Configure SASE User-Defined Objects.
- Click Next to go to the Review & Validate screen, then enter the following information.

Field Description Name Enter a name for the new rule. Description Enter a description of the new rule. Tags Enter one or more tags for the new rule. A tag is an alphanumeric text descriptor with no spaces or special characters that is used for searching rules. You can specify multiple tags. Rule is enabled Click the slider to enable the rule (default).

Click the slider again to disable the rule.

Edit Click the Edit icon to make any changes to the configuration. - Click Save to create the TLS decryption rule.
Create a TLS Decryption Profile
When you configure TLS decryption for a tenant, the VOS device behaves as an SSL proxy, and it generates a TLS/SSL certificate for each HTTPS URL that the tenant tries to access (for example, https://example.com). The certificate allows the VOS device to inspect the data flow and take any necessary actions. To optimize the SSL proxy behavior, the VOS device uses the same generated public–private key pair for certificates issued across domains. This key pair is generated for each configured decryption profile, and hence is unique for each tenant.
To create a TLS decryption profile:
- Go to Configure > TLS Decryption > Profiles.

The TLS Decryption Profiles List screen displays all current profiles.
Note: Release 12.2.1 supports two new implicit TLS decryption profiles: Standard and Strict. Implicit profiles are predefined in Concerto. You can use them without modification, or you can clone and modify an implicit profile.

- Click + Add New to add a TLS decryption profile. The Create TLS Decryption Profile screen displays with the first step, Profile Type, selected by default. Decryption enforces security policies on encrypted traffic to help prevent malicious content from entering the network and to protect sensitive data disguised as encrypted traffic from leaving the network. You can configure a decryption profile with SSL inspection and policy enforcement information.

- Select a decryption profile or an inspection profile:
- Decryption Profile—Applies both decryption and inspection protocols that you can associate with your decryption rules.
- Inspection Profile—Applies only inspection protocols that you can associate with your decryption rules.
- Click Next to go to Step 2, Certificate Setup.

- Click Next to accept the default certificate authority (CA). To use a different CA, select one of the previously uploaded certificates, or click + Add New to configure a new CA. In the Certificates popup window, enter information for the following fields.

Field Description Certificate Type Click CA Certificate. Default slide Click the slider to have the added CA certificate to be the default CA certificate.
Certificate Name Enter a name for the certificate. Upload File Click to upload a CA certificate file. Add Click to add the new certificate. - Click Next to go to Step 3, Inspection Options.


Field Description Certificate Validation (Group of Fields) - Verify with OCSP
Select to use the Online Certificate Status Protocol (OCSP) to verify a server certificate. - Block Unknown Certificates
Select to block SSL sessions whose certificate status is unknown. - Response timeout (seconds) for an OCSP request
Enter how long, in seconds, before an OCSP request times out.
Default: 5 seconds
Range: 1 to 255 seconds
Server Certificate Actions (Group of Fields) - When the certificate expires, do the following:
Select an action to take when the certificate expires.
- When the certificate is received from an untrusted issuer, do the following
Section an action to take when a certificate is received from an untrusted issuer. - Restrict Certificate Extension
Click to choose whether to restrict the certificate key usage extensions to either digital signature or key encipherment. SSL or TLS Protocol Checks (Group of Fields) - When the negotiated SSL or TLS protocol between the client and server uses an unsupported key length, do the following:
Select an action to take when SSL or TLS between the client and server uses an unsupported key length. - Minimum Supported RSA Key Length
Enter the minimum supported RSA key length, in bits.
Default: 1024 bit
Range: 512 bits or longer
- When the negotiated SSL or TLS protocol between the client and server uses an unsupported cipher, do the following:
Select an action to take when SSL or TLS between the client and server uses an unsupported cipher. - When the negotiated SSL or TLS protocol between the client and server uses an unsupported protocol version, do the following:
Select an action to take when SSL or TLS between the client and server uses an unsupported protocol version. - Click Next to go to Step 4, Decryption Options, and then enter information for the following fields.


Field Description Transport Layer Security (TLS) Version Support (Group of Fields - Minimum and maximum version of TLS that is supported
Use the slider to select the minimum and maximum TLS version that is supported. If you select a version that is not TLS 1.3, select one or more key exchange algorithms for the SSL connection.
- Key Exchange Algorithms
Select one or more key exchange algorithms:
- ECDHE—Elliptic-Curve Diffie-Hellman Key Exchange
- RSA—Rivest-Shamir-Adleman algorithm.
Advanced Click to configure algorithms and TLS cipher suites. Algorithms Select which encryption and authentication algorithms to use. TLS Cipher Suites Displays the TLS cipher suites selected depending on the algorithms. - Click Next to go to Step 5, Review & Validate, and then enter information for the following fields.


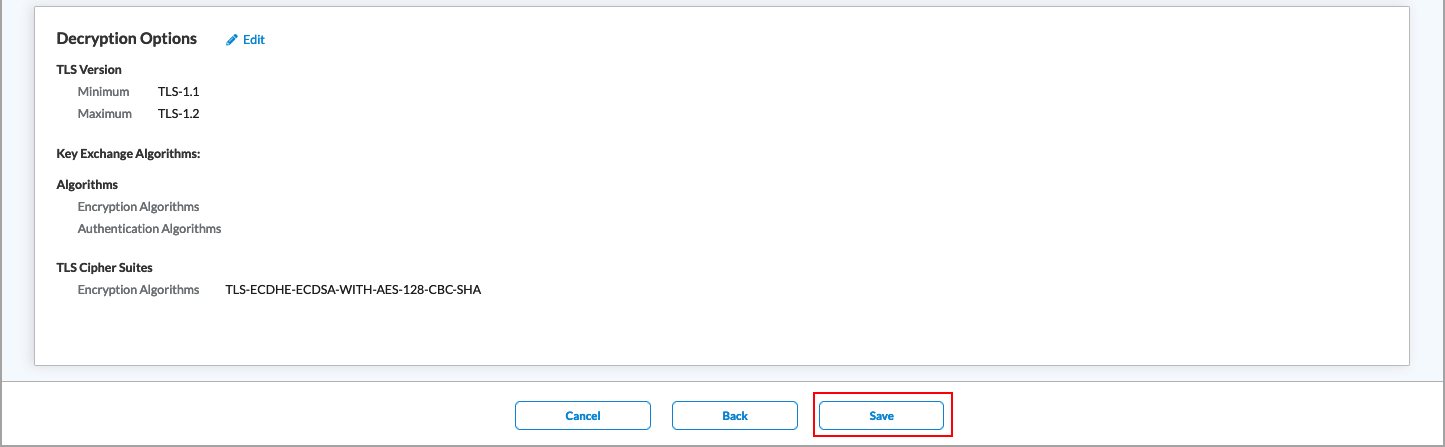
Field Description General (Group of Fields) - Name
Enter a name for the TLS decryption profile. - Description
Enter a text description for the profile. - Tags
Enter one or more tags. A tag is an alphanumeric text descriptor with no spaces or special characters that is used for searching profiles. You can specify multiple tags. - Review the Certificate Setup, Inspection Options, and Encryption Option sections.
- To change any of the information, click the
 Edit icon in the section and then make the required changes.
 - Click Save to save the new TLS decryption profile.
Verification
To verify TLS decryption at the client level, you can check the certificate in the browser, or you can view real-time analytics in the SASE portal.
To view real-time analytics, click Analytics in the left menu, and then go to Logs > SSL Decryption.

Configure Real-Time Protection
Real-time protection policies define the actual behavior of the firewall inside the Versa SASE platform. You can configure the following types of real-time protection in Concerto:
- Internet protection rules—Firewall rules are applied on the Versa Secure Web Gateway for internet-bound traffic.
- Private application protection rules—Firewall rules are applied on the Versa Gateway for traffic that stays within the enterprise VPN.
The following sections define the different protection rules and how to use them.
Configure SASE Internet Protection Rules
Internet protection rules are firewall rules that are applied to internet-bound traffic on a per-tenant basis. They provide network protection by establishing match criteria and enforcement actions. To configure internet protection rules, you configure the following match criteria and enforcement actions:
- Applications—Match criteria based on individual applications, groups of applications, categories of applications, predefined URL categories (such as business and economy, computer and internet security, and entertainment and arts), and predefined reputations (such as high and low risk).
- User and user groups—Match criteria based on individual users or groups of users.
- Source geolocation and source IP address—Match criteria based on the geographic location of source or destination traffic.
- Network Layer 3 and Layer 4—Match criteria based on the IP address of the source and destination traffic or on custom or predefined protocol-based services.
- Security enforcement—After you select the match conditions, you specify a security enforcement action, which is either allow, deny, or reject. You can also create custom security enforcement profiles in which you specify the enforcement criteria.
After you configure match criteria and security enforcement actions, you review and deploy the internet protection rule.
The first time you create an internet protection policy rule, a wizard displays (shown in the screenshot below) that guides you through the configuration steps. Thereafter, you do not see this wizard. You configure subsequent rules manually using the Internet Protection Rules screens.

To configure an internet protection rule:
- Go to Configure > Secure Services Edge > Real-Time Protection > Internet Protection.

The Internet Protection Rules List screen displays all configured internet protection rules.

- In the horizontal menu bar, you can select one of the following operations.

Operation Description Add Create a new internet protection rule. This button is active when no existing rule is selected. Clone Clone the selected internet protection rule. When you select this option, the configuration wizard for the rule displays with the Review & Deploy screen selected. You can rename the default name of the cloned rule, if needed, and then click Save.
Reorder Reorder the selected internet protection rule. A popup window similar to the following displays.
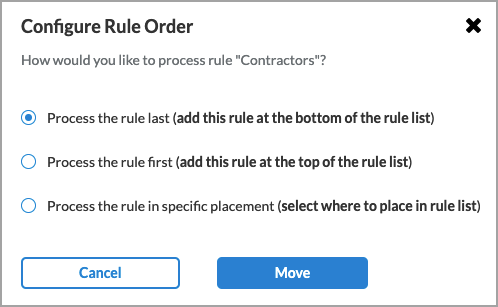
1. Select the rule order:
- Process the rule last.
- Process the rule first.
- Process the rule in specific placement—A list of the existing rules displays. Click the position in the list where you want to place the rule.
2. Click Move.
Delete Delete the selected internet protection rule. A popup window similar to the following displays:

Click Yes to delete the internet protection rule, or click No to retain the rule.
Refresh Refresh the list of existing rules. - To customize which columns display, click Select Columns and then click the columns to display or hide. Click Reset to return to the default column settings.

- In the Internet Protection Rules List screen, click + Add to create a rule. The Create Internet Protection Rule screen displays.
From here, you configure the match criteria and enforcement actions. For more information, see:
- Configure SASE Internet Protection Rule Match Criteria
- Configure Security Enforcement Actions for SASE Internet Protection Rules
Configure SASE Private Application Protection Rules 
SASE private application protection rules are firewall rules that you configure to define protection for custom applications. You configure these protection rules on a per-tenant basis. Private application protection is similar to internet protection, except that private application protection applies only to custom applications. You cannot configure private application protection for predefined applications or for application groups.
Private application protection rules consist of match criteria and enforcement actions. You can configure the following match criteria and enforcement actions:
- Applications—Match criteria based on individual applications, groups of applications, categories of applications, predefined URL categories (such as business and economy, computer and internet security, and entertainment and arts), and predefined reputations (such as high and low risk).
- User groups—Match criteria based on individual users or groups of users.
- Geolocation—Match criteria based on the geographic location of the source or destination traffic.
- Network Layer 3 and Layer 4—Match criteria based on the IP address of the source and destination traffic or on custom or predefined protocol-based services.
- Security enforcement—Security enforcement actions that are applied to traffic that matches the match criteria. You can allow, deny, or reject the traffic, and you can also create custom security enforcement profiles.
After you configure match criteria and security enforcement actions, you review and deploy the private protection rule.
To configure private application protection, you must first create one or more private applications under Configure > Settings > User-Defined Objects > Applications. For more information, see Configure SASE User-Defined Objects. After you have created a private application, you create a private application rule in much the same way that you configure an internet protection rule.
The first time you create a private application protection policy rule, a wizard (shown in the screenshot below) guides you through the configuration steps. Thereafter, you do not see this wizard. You configure subsequent rules manually using the Private Application Protection Rules screens.

To configure a private application protection rule:
- Go to Configure > Real-Time Protection > Private Application Protection.

The Private Application Protection Rules List screen displays all the private application protection rules that are already configured.

- In the horizontal menu bar, you can perform the following operations.
Operation Description Add Create a new internet protection rule. This button is active when no existing rule is selected. Clone Clone the selected private application protection rule. If you select this option, the configuration wizard for the rule displays with the Review & Deploy screen selected. You can rename the default name of the cloned rule, if desired, then click Save.
Reorder Reorder the selected private application protection rule. A popup window similar to the following displays.
1. Select one of the three options:
- Process the rule last
- Process the rule first
- Process the rule in specific placement—A list of the existing rules displays. Click the position in the list where you want to place the rule.
2. Click Move.
Delete Delete the selected private application protection rule. A popup window similar to the following displays.
Click Yes to delete the internet protection rule, or click No to retain the rule.
Refresh Refresh the list of existing rules. - To customize which columns display, click Select Columns and then click to select or deselect the columns you want to display. Click Reset to return to the default columns settings.
- In the Private Application Protection Rules List screen, click + Add to create a rule. The Create Private Application Protection Rule screen displays.
From here, you configure the match criteria and enforcement actions. For more information, see:
Verification
To verify the session details for filtered or blocked sessions, click Analytics in the left menu, and then go to Logs > Threat Filtering.

To view a log of all Web sessions which were allowed or denied, click Analytics in the left menu, and then go to Dashboards > SASE Web Monitoring.

Configure Advanced Internet Protection with CASB
Cloud Access Security Broker (CASB) is on-premises or cloud-based policy enforcement that secures the data flowing between users and cloud applications in order to comply with corporate and regulatory requirements. CASB applies enterprise security policies when users access cloud-based resources.
To enforce CASB security policies, you create one or more CASB profiles, specify match criteria for applications, and then associate CASB profiles with an internet protection rule. For Releases 12.1.1 and later, you add CASB rules to configure CASB profiles. You can also add constraint profiles to configure constraints from and to users or user groups. You associate constraint profiles with CASB profiles.
To use CASB, you must be using premium security pack (SPack) Version 1939 or later.
Configure a Custom CASB Profile
For Releases 12.1.1 and later.
- Go to Configure > Security Service Edge > Real-Time Protection > Profiles.
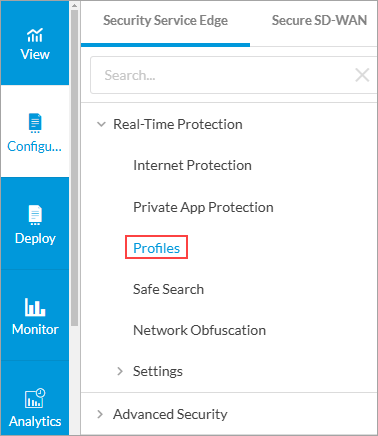
The following screen displays.
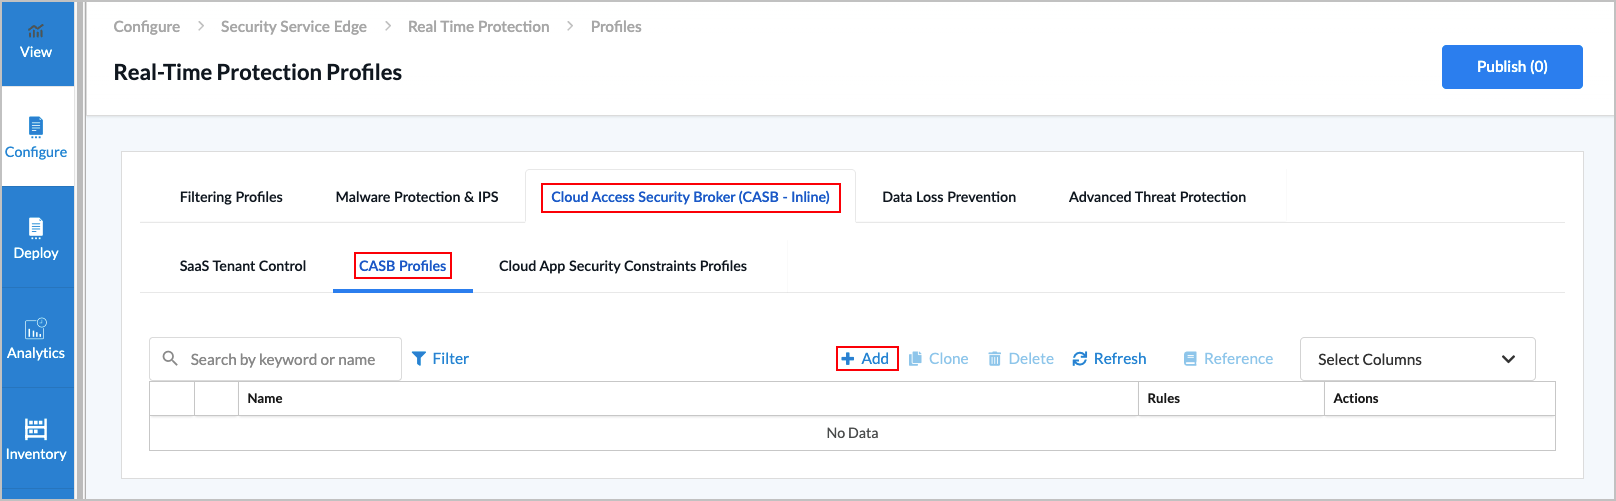
- Select the Cloud Access Security Broker (CASB Inline) tab.
- To customize which columns display, click Select Columns, and then click Applications to display or hide the applications. Click Reset to return to the default columns settings. The options are:
- Rules
- Actions
- Select the CASB Profiles tab.
- Click the
 Add icon to create a profile. The Create Cloud Access Security Broker (CASB) Profile screen displays.
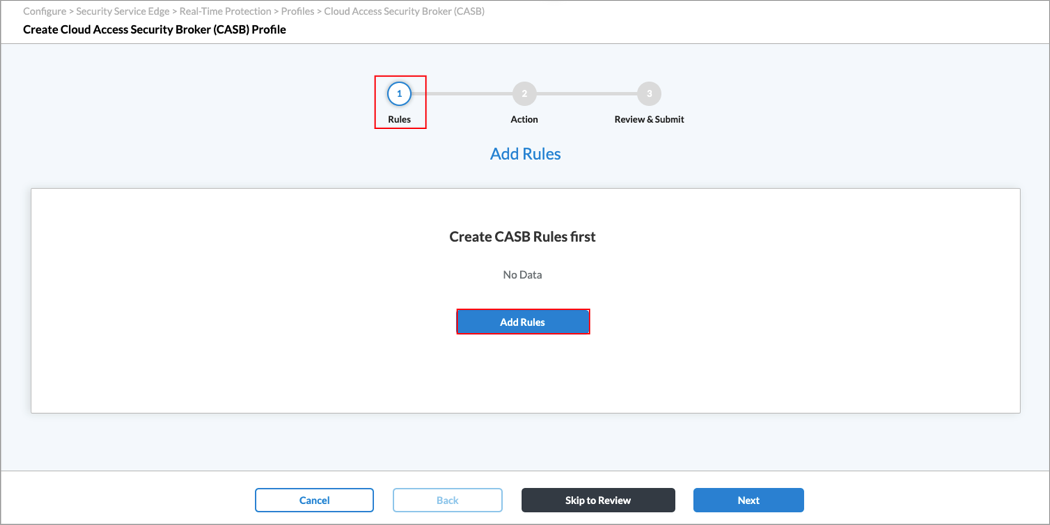
- In Step 1, Rules, click Add Rules to create CASB rules. You must add at least one rule to proceed. The Add CASB Rules screen displays. Each application has four icons to the right. Hover over these icons to see support information for Windows, Android, MacOS, and iOS.

- In Step 1, Applications, select one or more cloud applications for which you want to configure actions. You can also search for applications to select. For more information about supported applications, see Supported Applications and Activities, below.
- Click Next to go to Step 2, Activities. The screen displays the applications that you selected in Step 1, Applications.

- Select the application activities for which you want to configure actions.
- To add or remove applications, click Add/Remove Application. The Step 1, Application, screen displays again. You can now delete previously selected applications or add additional applications to the CASB rule.
- If you delete an application, click Next to return to the Step 2, Activities.
- If you add an application, click Next to return to the Step 2, Activities, select the activities for the new application.
- Click Next to go to Step 3, Constraints to select constraints for applications.
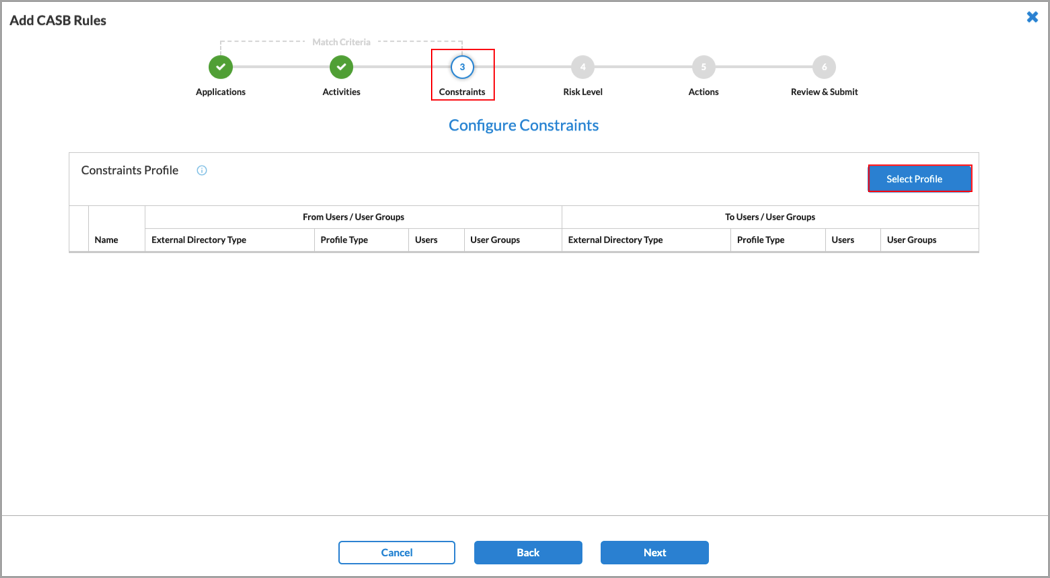
- Click Select Profile to select a constraint profile. The User Constraints Profile screen displays.

- Select a constraint profile and click Save. You can select only one constraint profile for a CASB rule. To create a new constraint profile, click Create New. For more information, see Configure Constraint Profiles, below.
- In the Add CASB Rules screen, click Next to go to Step 4, Risk Level.

- Select the risk level, which can be Lowest Risk, Low Risk, Medium Risk, High Risk, and Highest Risk. A color is associated with each selected risk level.
Note: If you configure an application activity match and a risk match in the same CASB rule, the risk and application activity matches are processed with a logical AND operator. For example, if Application A is low-risk, Application B is medium risk, and Application C is high risk, and the activity from Application A Activity1, from Application B Activity2, and from Application C Activity3 is configured along with risk match High risk, then only Application C Activity3 traffic will hit that rule.
- To select all risk levels, click Enable All.
- Click Next to go to Step 5, Actions.

- Select a predefined or custom action to perform when there are no matching criteria. For more information, see Configure Custom Security Actions. The predefined actions are:
- Allow—Allow cloud applications.
- Block—Block cloud applications.
- Drop Session—Drop cloud application sessions.
- Reject—Reject cloud applications.
These actions will apply to the activities you configure in a rule.
- In the Notification Profile field, select a profile to send email notifications.
- To configure a new notification profile, click Create New. For more information, see Configure a Notification Profile.
- Click Next to go to Step 6, Review and Submit.

- In the General section, enter a name for the CASB profile and, optionally, a description.
- For all other sections, review the information. To make changes, click the
 Edit icon.
 - Click Save.
- In the Create Cloud Access Security Broker Profile screen, click Next to go to Step 2, Action, to select the default action to perform when there are no matching criteria. By default, applications that do not match any criteria are allowed. Enter information for the following fields when no criteria are matched.

Field Description Action Select the user-defined or predefined action to perform when there are no matching criteria. The predefined actions are:
- Allow—Allow cloud applications.
- Block—Block cloud applications.
- Drop Session—Drop cloud application sessions.
- Reject—Reject cloud applications.
Enable Logging Click to enable CASB logging. Notification Profile Select a profile to send email notifications. Click Create New to create a new notification profile. For more information, see Configure a Notification Profile. - Click Next to go to Step 3, Review and Submit.

- In the General section, enter a name for the CASB profile and, optionally, a description and tags. A tag is an alphanumeric text descriptor with no spaces or special characters. You can specify multiple tags added for the same object. The tags are used for searching the objects.
- For all other sections, review the information. To make changes, click the Edit icon.
- Click Save.
Configure Constraint Profiles
For Releases 12.1.1 and later.
You configure CASB constraint profiles to control which users and groups can access the activities configured in CASB. You can apply the CASB constraint profiles when you configure a CASB profile rule. The following table shows activities and applications that you can configure as a CASB constraint.
| Activity | Description | Applications |
|---|---|---|
| Call From User | Users who can initiate a call in the application | MS Teams–audio |
| Call To User | Users who can receive a call in the application | MS Teams–audio |
| Send From User | Users who can send content in the application | Outlook |
| Share From User | Users who can share content in the application | Sharepoint Online |
| Share To User | Users who can received shared content in the application. | Box, Dropbox, One Drive, Sharepoint Online |
To add constraint profiles:
- In the Cloud Access Security Broker (CASB Inline) tab, select Constraints Profiles.

- Click + Add. The Create Constraints Profile screen displays. In Step 1, From Users/User Groups, configure a custom constraint profile.
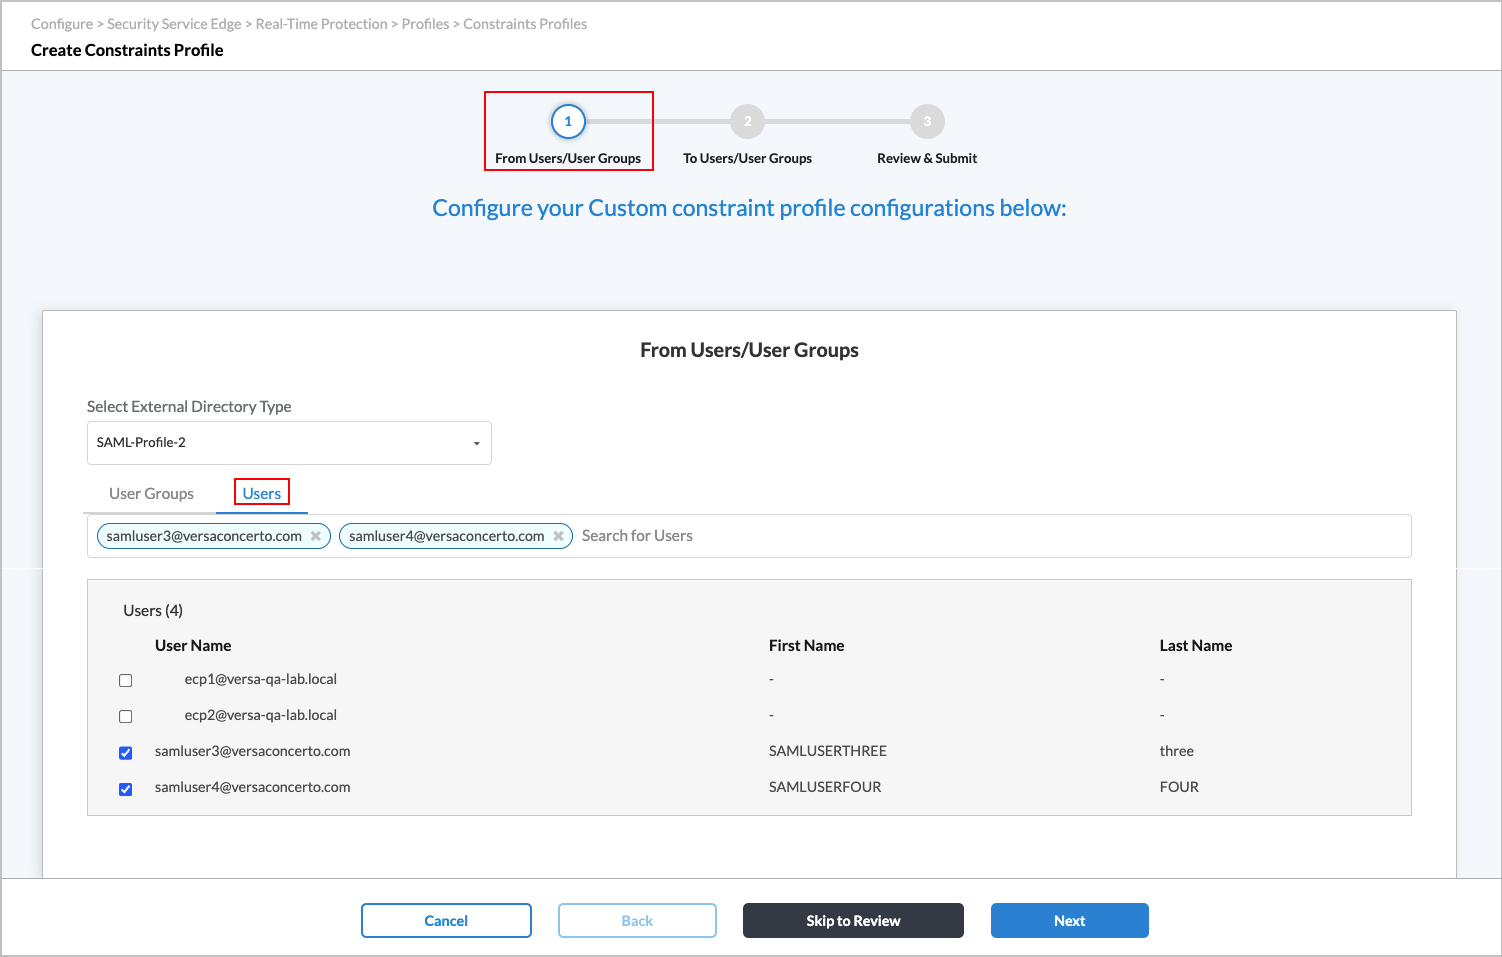
- Select the external directory type, and then add users in the Users Tab.
- Select the User Groups tab, and then select user groups.

- Click Next to go to Step 2, To Users/User Groups screen.

- Select the external directory type, and then add users in the Users Tab.
- Select the User Groups tab, and then select user groups.

- Click Next to go to Step 3, Review and Submit.

- In the General section, enter a name for the constraints profile and, optionally, a description and tags.
- For all other sections, review the information. To make changes, click the Edit icon.
- Click Save.
Associate a CASB Profile with a SASE Internet Protection Rule
To allow or deny traffic, you associate a CASB profile with a SASE internet protection rule. CASB secures the data flowing between users and cloud applications in order to comply with corporate and regulatory requirements.
To associate a CASB profile with a SASE internet protection rule:
- Go to Configure > Real-Time Protection > Internet Protection.
- In the Internet Protection Rules List screen, click + Add to create a rule. The Create Internet Protection Rule screen displays. For more information, see Configure SASE Internet Protection Rules.
- Select the Security Enforcement screen, and then select Profiles.
- Select the Cloud Access Security Broker (CASB Inline) tab, and then enable CASB.

- Select User-Defined Profiles, and then select the CASB profile to associate with the internet protection rule.

- Click Next.
- In the Review & Deploy screen, enter a name for the profile.
- Review internet protection rule. To make changes, click the Edit icon.
- Click Save to create the new profile.
Verification
To view the logs for CASB policy enforcement actions in the SASE portal, click Analytics in the left menu, and go to Logs > Threat Filtering. On the Dashboard tab, click CASB.

Configure Advanced Internet Protection with DLP
Data loss prevention (DLP) is a set of tools and processes for detecting and preventing data breaches, cyber exfiltration, and unwanted destruction of sensitive data. You use DLP to protect and secure an organization's data and to comply with regulations.
To configure DLP, you do the following:
- Define a data protection profile—You associate data patterns with a data protection profile, and you then use the data protection profile when you create DLP rules.
- Define DLP rules—You create the rules that are used in a DLP profile to match data.
- Configure a DLP profile—Create an ordered set of DLP rules that you can then apply to a security policy or to an internet protection rule.
Configure Data Protection Profiles
A data protection profile consists of an ordered set of rules in which each rule has one or more match conditions and an action. You can configure a data protection profile to stop evaluating rules after the first rule that matches (Exit on First Rule Match option) or to evaluate all rules and apply all those that match (default behavior).
After you create a data protection profile, you can use it as part of the enforcement actions on a policy rule in a security access control policy.
To configure a data protection profile:
- Go to Configure > Secure Services Edge > Real-Time Protection > Profiles.

The following screen displays.

- Select the Data Loss Prevention (DLP) tab, and then select the Data Protection Profiles tab.
- Click
 Add. In Step 1, Select DLP Data Pattern, you can select either user-defined (custom) or predefined data patterns for your DLP rule.

- To select user-defined data patterns, click Add User-Defined Data Pattern, and then select one or more custom data patterns to use in the data protection profile.

- Click Save to add the user-defined data patterns to the data protection profile.
- To select predefined data patterns, click Add Predefined Data Pattern, and then select one or more predefined data patterns to use in the data protection profile.
- Click Save. The Data Pattern screen displays the selected data patterns.

- To select user-defined data patterns, click Add User-Defined Data Pattern, and then select one or more custom data patterns to use in the data protection profile.
- Click Next.The Boolean Operation screen displays, and the data patterns that you selected above are displayed on the left side.

- In Step 2, Action, you create a Boolean operation that defines how to match the selected data patterns. To do this, click a data pattern, click a Boolean operator, and then click a second data pattern to complete the Boolean operation. If a Boolean operation includes multiple data patterns, separate them with a Boolean operator. The following example shows a Boolean operation created from the data patterns shown in the previous screenshot:
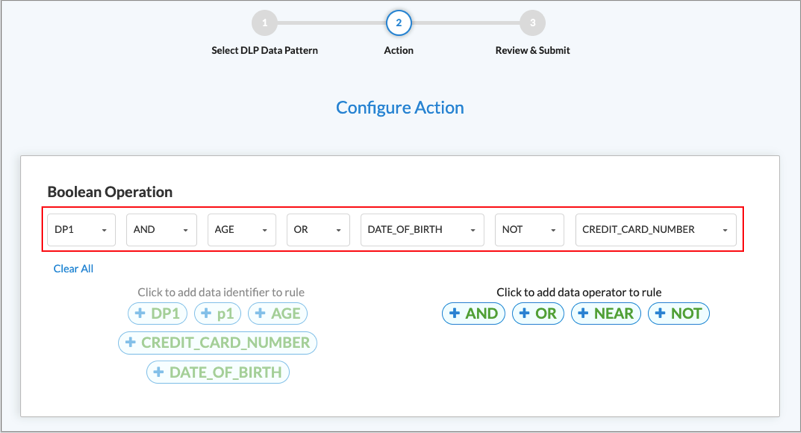
To replace one data pattern in the Boolean operation with another, click the down arrow next to the data pattern name, and then select a different one.

To change the Boolean operator, click the down arrow next to the operator name and then select a different one.

To remove the last element of a Boolean operation, click the down arrow, and then click Remove Selection.

- Click Next.
- In Step 3, Review and Submit, enter a name for the data protection profile and, optionally, a text description and one or more tags. A tag is an alphanumeric descriptor, with no white spaces or special characters, that you can use to search the objects.

- Review the data protection profile entries.
- To change any of the information, click the
 Edit icon in its section, and then make the required changes.
 - Click Save to create the data protection profile.
Configure DLP Rules
A DLP profile rule consists of the following components:
- Rule type—You can select one or more of the following rule types:
- Content analysis—Scan data in the HTTP Context, such as HTTP Attachment, HTTP Body, and HTTP Header.
- Document fingerprinting—Convert a standard form into a sensitive information type, which can then be used to define DLP policy rule. The DLP software examines files that have been fingerprinted and the directory path to these files to determine how similar a candidate file is to a previously fingerprinted file. The DLP software then computes a similarity threshold between the two files and compares the similarity threshold to the configured threshold. The configured threshold is the percentage of content that needs to be similar to the previously fingerprinted file stored in the folder path.
- Exact data match (EDM)—Validate the match result of a custom or predefined data pattern against a user-provided data set. An exact data match rule can reduce false positives and can help to guarantee precise DLP for entries in the data set.
- File DLP—Provide protection based on the configured file attributes.
- Optical character recognition (OCR)—Converts images to text and applies DLP policies on the converted text data.
- File-type filtering—You can configure data filters based on the file types.
- Activity, Protocol, and Context scanning—DLP monitoring can scan by activity (upload, download, or both), the HTTP protocol, and context (header, body, attachment) .
The following applications are supported by DLP:
- Box
- DLP_apps
- Dropbox_download
- Dropbox_upload
- Dropbox_upload_download
- Dropbox
- Github
- Gmail
- Gmail_basic
- Gmail_chat
- Gmail_drive
- Gmail_mobile
- Google_docs
- Google_photos
- Gsuite
- Gtalk
- Microsoft
- MS_teams
- My_Yahoo
- office365
- Onedrive
- Outlook
- Owa
- Salesforce
- Salesforce_chatter
- Service Now
- Sharepoint
- Sharepoint_document
- Sharepoint_online
- Slack
- Teamspeak
- Teamspeak_v3
- Yahoo
- Ymail_classic
- Ymail2
To configure rules to use in DLP profiles:
- Go to Configure > Secure Services Edge > Real-Time Protection > Profiles.
The following screen displays, showing currently configured DLP rules.
Note: Release 12.2.1 supports three new implicit DLP rules: Source_Code, US_Financial, and PII_US.
Note: Release 12.2.2 supports the following new implicit DLP rules:- Default_EDM_Match—Match and redact the specified expression in specified file types, for example, SSN, credit card numbers.
- Default_Fingerprint_Document—Fingerprint documents that are added to the folder path. Compare files up to the configured similarity threshold.
- Default_GDPR_Violations—Default rule to block GDPR violations in specified file types.
- Default_HIPAA_Violation—Default rule to block HIPAA violations in specified file types.
- Default_OCR_PII—Default rule to block PlI text in images.
- Default_PCI_DSS—Default rule to block Payment Card Industry (PCI)-specific classifiers like credit cards in specified file types.
- Default_Prevent_Largefiles—Prevent data exfiltration when large files are sent as attachments.
- Default_US_PII—Default rule to block Personally Identifiable Information (US) in specified file types.

- Select the Data Loss Prevention (DLP) tab, and then select the DLP Rules tab.
- To customize which columns display, click Select Columns down arrow, and then click the columns to select or deselect the ones you want to display. Click Reset to return to the default column display settings. The options are:
- Rule Type
- Logging
- Context
- Protocol
- File Type
- Action
- Enabled
- Click the Add icon to add a DLP rule. The Select a Rule Type screen displays. You can create Content Analysis, Exact Data Match (EDM), File DLP, Document Fingerprinting, and Optical Character Recognition (OCR) rule types. The following sections describe how to configure the DLP file types.

- To create a content analysis rule, click the Content Analysis box in the Select a Rule Type screen. The following screen displays, which lists all predefined data protection profiles by default. The predefined profiles are:
- CCPA_California_Consumer_Privacy_Act
- Financial_Information
- GDPR_General_Data_Protection_Regulation
- GLBA_Gramm_Leach_Bliley_Act
- US_PHI
- PCI_DSS
- US_HIPAA
- US_PII
- US_FEDERAL_TRADE_COMMISSION_RULES
- US_FINANCIAL_DATA
- SOCIAL_SECURITY_NUMBER_CONFIDENTIALITY_ACT2000
- US_PATRIOTS_ACT
- UK_PII
- UK_FINANCIAL_DATA
- UK_ACCESS_TO_MEDICAL_REPORTS_Act1988
- AUSTRALIA_FINANCIAL_DATA
- SOURCE_CODE_ACT
- US_DRIVERS_LICENSE_NUMBER_ALL_STATES
- WESTERN_AUSTRALIA_HEALTH_SERVICES_ACT

- Enter information for the following fields.
Field Description Severity Level Select a severity level from the drop-down list. The options are:
- Low
- Medium
- High
- Critical
Severity Value
Enter a severity value. All Categories Filter the data protection profiles by category. All Regions Filter the data protection profiles by region. Search Search for a specific category from the list. - To view the user-defined data protection profiles, click User Defined.
- To add the DLP rule for analysis, click one predefined or one user-defined data protection profile. You can select only one data protection profile, which can be either a predefined or a user-defined profile.
- To create a file DLP rule, click File DLP in the Select a Rule Type screen. In the File DLP screen, enter information for the following fields.

Field Description Filename Enter a name for the file. File Size (Group of Fields) - Enter Minimum
Enter the minimum size of the DLP file, and then select the size unit, either megabytes (MB), gigabytes (GB), kilobytes (KB), or bytes. The configured action is taken on all files that are smaller than the minimum size and that match the configured file type. If you set the minimum size to 0, the maximum DLP file size is used for the action. - Enter Maximum
Enter the maximum size of the DLP file, and then select the size unit, either megabytes (MB), gigabytes (GB), kilobytes (KB), or bytes. The configured action is taken on all the files that are larger than the maximum size that match the configured file type. SHA256 Enter the secure hash algorithm 256-bit (SHA256) value. To enter multiple SHA256 values, separate them by a new line. File Label Enter a file label, and then click Add. - To create an optical character recognition (OCR) rule, click Optical Character Recognition in the Select a Rule Type screen. The following screen displays, which lists all predefined data protection profiles by default.

- To view the user-defined data protection profiles, click User Defined.
- To add the DLP rule for analysis, click one predefined or one user-defined data protection profile. You can select only one data protection profile, which can be either a predefined or a user-defined profile. To filter the data protection profiles by category, click All Categories. To filter the data protection profiles by region, click All Regions.
- To create an exact data match rule, click Exact Data Match (EDM) in the Select a Rule Type screen. The following screen displays.

- To create an expression, click Create Expression, and then enter information for the following fields.

Field Description Expression Name Enter a name for the expression. Data Pattern Select a data pattern. Enter Value Enter a value for the expression, the click Add. You can add multiple values. - Click Save.
- To upload a CSV file that contains a list of exact data matches:
- Click Upload File.
- Drag and drop the CSV file into the window, or click Select CSV File to upload the file.
- To hash the CSV file, click Hash the File.
- Click Save.
Note: If you are uploading a new version of a CSV file that was previously uploaded, the new version must have a unique file name and must contain newly created expressions.

- To select a filename, click Select File Name. The Select Filename screen displays.

- In the Filename field, select a filename. Note that this list shows the names of CSV files that were previously uploaded. For information about uploading CSV files, see the Manage DLP Files and Folders, below.
- Click Get Columns. The screen displays the columns for each field in the CSV file.

- In the Data Pattern column, select a data pattern to apply to each entry. Click Remove to remove an entry from the CSV file.
- Click Save.
- To create a document fingerprinting rule, click the Document Fingerprinting in the Select a Rule Type screen, and then enter information for the following fields.

Field Description Folder Name Select a folder. For information about DLP folders, see the Manage DLP Files and Folders, below. Similarity Threshold Enter the percentage of content that needs to be similar to the previously fingerprinted file stored in the folder path.
Range: 1 through 100
Default: None
- Click Next to go to Step 2, File Type in the Create DLP Rule screen.
- Select one or more file types to be analyzed. To search for specific file types, use the search box. To select all file types, click Select All File Types.
Concerto supports the following file types:
any bmp c class cpp csv doc docx gif gzip html jpeg msoffice pdf pem pgp php pl png ppk ppt pptx rtf sh tar tif txt visio csf xls xlsx xml xz zip

- Click Next.
- In Step 3 Configure Activity, Protocol, and Context, enter information for the following fields.

Field Description Activity Select the direction of the traffic on which to apply the rule:
- Both—Apply the rule to both download and upload traffic.
- Download—Apply the rule when the client requests data from a server.
- Upload—Apply the rule when the client posts data to a server.
Protocol Click the protocol to scan:
- Web Protocol
- HTTP
Context Select one or more HTTP contexts of data to scan:
- Attachment—Data in an attachment
- Body—Data in the body
- Header—Data in the header of a packet
- Click Next.
- In Step 4, Exclude, in the Filename field, enter the names of a file to exclude, for example, budget.xlsx, and then click Add. The filename displays to the right of the Add button. You can exclude multiple files. To delete a filename from the list, click the
 Trash icon next to the filename.

- Click Next.
- In Step 5, Action, enter information for the following fields.
The following table shows the applications supported by DLP and whether file-name matching is supported for upload and download.
Applications Download Upload Box Supported Supported Dropbox Supported Not supported Github Supported Supported Gmail Supported Supported Google Chat Supported Not supported Google Docs Supported Not supported Google Drive Supported Not supported MS Teams (web) Supported Not supported Office365 Supported Not supported OneDrive Supported Not supported Salesforce Supported Supported Service Now Developer Console Supported Supported Sharepoint Supported Not supported Slack Supported Supported Yahoo Mail Supported Not supported

Field Description Action Select an action to take if the traffic matches the rule:
- Alert—Allow traffic to pass and log it to Versa Analytics
- Allow—Allow traffic to pass without logging it to Versa Analytics
- Block—Drop the traffic without sending a notification to the client host that originated the traffic.
- Encrypt—Encrypt the traffic before sending it.
- Legal Hold—Apply a legal hold profile to the traffic.
- Quarantine—Send the traffic to the customer-provided cloud portal without encrypting it.
-
Redaction—If a rule match is detected in an editable, text-based file, change the content of the matched packet to random characters. Note that redaction is supported for Exact Data Match (EDM) with the file types txt, xml, sh, html, c, and php.
-
Reject—Drop the traffic and send a notification to the client host indicating that the traffic was dropped.
- Tokenization—(Supported for the EDM rule type only, which you select from the Rule Component tab.) Replace sensitive data in text-based files with a token value that retains the format (character set and length) of the sensitive data but changes the actual values.
Logging Click to enable LEF logging to Analytics, which logs all actions to Versa Analytics, except fo actions that explicitly do not log. If you do not enable logging, no logging information is sent to Versa Analytics. Notification Profile Select a notification profile. To configure a notification profile, see Configure Notification Profiles. Labels Select Set Label or Remove Label to set or remove a sensitivity label on a file before uploading or downloading it. Threat Type (For Release 12.2.1 and later.) Select the type of threat to which the rule will apply. If the threat type is matched, then Analytics will generate an alarm or a log, depending on the Threat Type and Threat Severity settings.
The options are:
- Alert
- Block
- Document Fingerprint
- Exfilteration in context analysis
- File DLP
- File size not in range
- Ml document fingerprint
- Ml image classification
- Ml source code
- Ml spam mail
- MIP label
- OCR match
- Source code detection
Threat Severity (For Release 12.2.1 and later.) Select the severity of the threat to which the rule will apply. If the threat severity is matched, then Analytics will generate an alarm or a log, depending on the Threat Type and Threat Severity settings.
The options are:
- Critical
- Major
- Normal
- Click Next.
- In Step 5, Review and Submit, review the configuration entries.

- Enter a name for the rule in the Name field.
- The rule is enabled by default. Click the slider to disable the rule.
- To change any of the information, click the Edit icon and then make the required changes.
- Click Save to create the DLP rule.
Configure DLP Profiles
A DLP profile consists of one or more DLP rules.
To configure a DLP profile:
- Go to Configure > Secure Services Edge > Real-Time Protection > Profiles.
Select the Data Loss Prevention (DLP) tab. The following screen displays.
Note: Release 12.2.1 supports a new built-in DLP profile, GenAI_DLP. The GenAI_DLP profile has three built-in DLP rules: Source_Code, US_Financial, and PII_US.

- Select the DLP Profiles subtab.
- To customize which columns display, click Select Columns down arrow and then click the columns to select or deselect the ones you want to display. Click Reset to return to the default column display settings. The options are:
- Rules
- Exit
- Logging
- Action
- Click the Add icon to add a new DLP profile. The Create DLP Profile screen displays.

- In Step 1, Select DLP Rules, select one or more DLP rules. To filter the types of rules that are displayed, use the User-Defined, All Categories, and All Regions boxes.
- Click Next to go to Step 2, Applications & Group. Enter information for the following fields.

Field Description Additional Application Group Select an additional application group. You can select only one group. Note that only user-defined application groups are listed in this example. Applications Enter the name of an application to search for. User Defined Applications Select one or more user-defined applications. Predefined Applications Select one or more predefined applications. - Click Next to go to Step 3, Configure Rule Order.

- If you select two or more DLP rules in the Select DLP Rules screen, you can change the order in which the rules are processed by dragging and dropping the rules to the desired order. For example, the following screen shows that the rules have been reordered so that the FileDlp1 rule is processed first, followed by Corporate-Financial-Docs-Rule and then EDM-1.

- (For Releases 12.2.1 and later.) Click Next to go to Step 4, Reputation. Enter information for the following fields.

Field Description Enable Logging Select to enable logging to Versa Analytics. Cloud Lookup State Click to enable cloud lookup. If the cloud lookup state is not configured for this profile, it is inherited from the tenant VOS device. - Click Next to go to Step 5, Action. Enter information for the following fields.

Field Description Default Action Click the down arrow, and the select a default action. The default action is applied if none of the scanned data matches a rule.
- Alert
- Allow
- Block
- Reject
Exit on First Rule Match Click to exit rule processing after the first match occurs. Logging Enable logging of the DLP rules processing. All logs are sent to Versa Analytics. Forensic Enabled (For Release 12.2.1 and later.) Click the slider bar to enable forensic profiles. Profile (For Release 12.2.1 and later.) Select a forensic profile from the drop-down list. Upload original file (For Release 12.2.1 and later.) Select disable to disable uploading the original forensic file (default setting). Select enable to enable uploading the original forensic file. - Click Next.
- In Step 6, Review & Submit. Enter a name for the DLP rule and, optionally, a description and one or more tags. A tag is an alphanumeric descriptor, with no white spaces or special characters, that you can use to search the rules.

- Review the configuration.
- To change any of the information, click the Edit icon and then make the changes.
- After review, click Save to create the new DLP profile.
You can use the DLP profiles when you configure internet protection rules. For more information, see Configure SASE Internet Protection Rules.
Associate the DLP Profile with a SASE Internet Protection Rule
To oversee, track, and report all data transactions in the network and to scan all content that passes through an organization's ports and protocols to ensure data security in the organization, you can associate a DLP profile with a SASE internet protection rule. DLP provides a set of tools and processes for detecting and preventing data breaches, cyber exfiltration, and unwanted destruction of sensitive data. You use DLP to protect and secure an organization's data and to comply with regulations.
To associate a DLP profile with a SASE internet protection rule:
- Go to Configure > Real-Time Protection > Internet Protection.
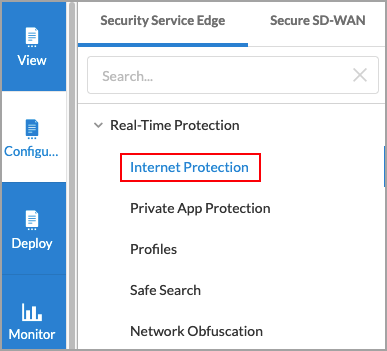
- In the Internet Protection Rules List screen, click the Add icon to create a rule. The Create Internet Protection Rule screen displays. For more information, see Configure SASE Internet Protection Rules.
- Select the Security Enforcement screen, select Profiles, and then select the Data Loss Prevention (DLP) tab.

- Click the slider bar to enable DLP.

- Select a DLP profile from the drop-down list.
- To create a new DLP profile, click Create New. For more information, see Configure DLP Profiles.
- Click Next to go to Review and Deploy.
- In the Review & Deploy screen, review your selections and make any needed updates.
- Click Save.
Verification
To view the logs for DLP in the SASE portal, click Analytics in the left menu, and go to Logs > DLP.

Use Versa Analytics
To monitor Concerto and analyze Concerto information, you use Versa Analytics.
For more information on real-time monitoring of site-to-site tunnels, routes, and digital experience, see Monitor with Analytics.
For information about Versa Analytics, including dashboards and logs, see Versa Analytics.