Configure Pre-Logon for the Versa SASE Client
![]() For supported software information, click here.
For supported software information, click here.
The pre-logon connection method for a Versa SASE client allows a client device to establish a secure connection to an organization's network. Pre-logon authenticates a user on the client device and then establishes a VPN connection to the network.
To use pre-logon authentication, you must do the following before you ship a laptop device to a new enterprise user:
- Install the SASE client with pre-logon enabled.
- Install the necessary OS updates and security patches to meet the security requirements of your organization.
Then, the new user is able to log in to and access the organization's internal resources when they log in for the first time, regardless of where they log in from.
If the organization uses Active Directory (AD) on-premises, connectivity between the user device and AD is required when a user logs in for the first time. Pre-logon authenticates the user and establishes a secure connection to the organization’s network. When you enable pre-logon, a new user who has no connectivity to Active Directory can log in to the network the first time, because they can log in using the SASE client and the login credentials provided by the network administrator.
To allow endpoints to access resources in the network, you must create security policies that match the pre-logon user. These policies must allow access only to basic services such as DHCP, DNS, Active Directory, and antivirus.
This article describes how enable pre-logon for an SSE tenant and to enable pre-logon on the SASE client. For information on configuring SSE rules, see Configure SASE Secure Client-Based Access Rules.
Enable Pre-Logon from Concerto
To enable pre-logon for a SASE tenant:
- From the Tenants dashboard screen, click + Tenant to add a new tenant, or click the
 Edit icon to edit an existing tenant.

- In the Create/Edit Tenant screen, select step 3, Security Service Edge (Product & Gateways). For more information, see Configure SASE Tenants.

- Under Select Usage Type, click the Pre-logon Enabled toggle to enable pre-logon for SASE clients of the tenant.
- For information about configuring other parameters, see Configure SASE Tenants.
- Click Skip to Review, or step 7, Review & Submit.
- Review and submit your tenant.
Enable Pre-Logon on the SASE Client
This section describes how to enable pre-logon on a SASE client for a Windows 10 device.
Before You Begin
Before you begin, ensure that you have the following on the local drive:
- Pre-logon configuration file, which is a JSON file. Versa provides a default pre-logon file file. For more information, see Download the Default Pre-Logon File, below.
- CA certificate for secure access server tunnel authentication.
Download the Default Pre-Logon File
The Secure Client Access Policy Rule List screen provides the option to download a sample JSON file, which includes the pre-logon parameters. You must transfer this file to all user devices that use the SASE client on which you configure pre-logon. Note that the Pre-Logon Configuration column only appears if you have enabled pre-logon in the tenant configuration as described in Enable Pre-Logon from Concerto, above.
To download the default pre-logon JSON file:
- Go to Configure > Secure Services Edge > Secure Access > Client-based Access > Policy Rules.
- From the list of rules, click Download JSON file under the Pre-Logon Configuration column.

The default pre-logon JSON file that Versa provides contains the following information.
| Field | Description |
|---|---|
| PrelogonControl (Group of Fields) | |
|
When enabled (set to true), tunnels that are established in pre-logon mode are disconnected when a user connects to a gateway using the SASE client after logging in to the device. Values: False, True |
|
Duration, in minutes, for which the pre-logon tunnel is available. If you enable PrelogonDisconnectOnConnect, the tunnel is disconnected as soon as the user connects, even if the AutoPrelogonDisconnectTimeoutMins time has not elapsed. |
|
When enabled (set to true), pre-logon supports only Device Certificate Method for authentication. You must set this field to true to enable always-on in pre-logon mode. |
|
Enterprises (Group of Fields) |
|
|
Name of the tenant or enterprise. |
|
List of gateways associated with the enterprise or tenant. To obtain the values for the parameters GatewayProfileName, IPSECProfileID, and FQDN, create a ticket to the Versa Managed Services team. |
|
Name of the connecting gateway. |
|
Gateway priority to use when connecting. |
|
Profile ID associated with the gateway. |
|
FQDN to reach the gateway. |
|
Port on which the gateway listens. |
|
Specify how to apply routes when establishing a tunnel. |
|
Specify how to handle split-tunnel traffic:
|
|
Configure the routes for the client to route traffic:
|
| Domain Servers (Group of Fields) | DNS servers to use for name resolution. |
|
Name of the domain. |
|
IP addresses of the DNS server. |
Enable Pre-Logon
To enable the pre-logon option on the SASE client:
- Download and install the application. For more information, see Configure the Versa SASE Client.
- Start the application. The setup wizard screen displays.
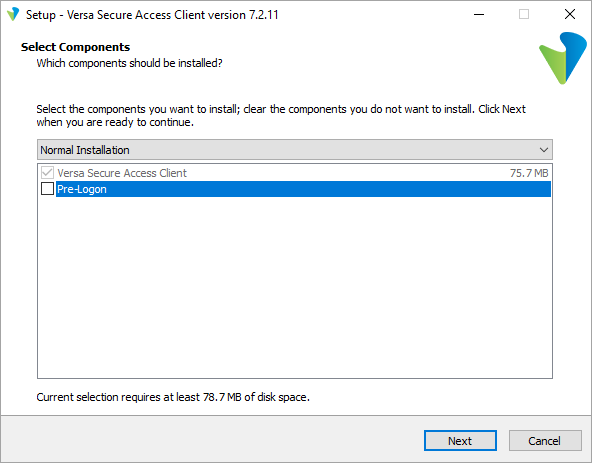
- In Select Components, select Pre-Logon. The Normal Installation window then changes to Extended Installation.

- Click Next. The Select Additional Tasks window displays.

- Click Next. The Pre-Logon Configuration window displays.

- Upload the pre-logon configuration file. For information about downloading the default pre-logon file that Versa provides, see Download the Default Pre-Logon File, above.
- Upload the CA certificate of the VSA server. In the CA Certification of VSA Server field, click Browse, and then select the certificate. You can also associate these files after the client installation. For more information, see Configure Pre-Logon Settings, below.
- Click Next. The Ready to Install screen displays.

- Click Install. The installation begins, and an installation status screen displays. To stop the installation, click Cancel.
- After the installation completes, the Completing the Versa Secure Access Client Setup Wizard screen displays.

- By default, Launch Versa SASE Client is selected. Click to deselect the option.
- Click Finish to complete the installation. The Register screen displays, unless you deselected Launch Versa Secure Access Client. For more information, see Register and Connect a Versa SASE Client.
- Reboot the device to display the network sign-in option on the locked screen. For more information, see Example of Pre-Logon using SASE Client, below.
Install Pre-Logon Using CLI
If you are using tools such as the Microsoft System Center Configuration Manager (SCCM), you can install and configure pre-logon on SASE clients from the CLI.
To silently install the SASE client with pre-logon enabled from the CLI, issue the following CLI command. For version-number, enter the version of client that you are installing.
VersaSecureAccessClient_version-number.exe /SP- /silent /components=base,prelogon /SUPPRESSMSGBOXES /LOG="log-file-path" /NOICONS /ALLUSERS
Configure Pre-Logon Settings
This section describes how to configure the pre-logon configuration file. You can also perform this step if you do not upload a pre-logon configuration file during the SASE client installation.
- Select the folder in which the SASE client application is installed, for example, C:\Program Files (x86)\Versa Secure Access>.
- In the file explorer path of this location, type cmd and then press Enter. The following command prompt displays.

- To apply the pre-logon configuration, issue the following CLI commands. Note that you must run these commands from administrator mode.
C:\Program Files (x86)\Versa Secure Access>VersaSecureAccessClientConsole.exe --prelogon_config
C:\Users\user\Desktop\PrelogonConfig\PreLogonConfig.json --trusted_root_ca_certificate
C:\Users\user\Desktop\PrelogonConfig\VersaIntermediateCertificateAuthority1.cer --silent
453 [1] INFO Versa Secure Access (null) - Starting application in prelogon_config mode. Version 7.2.11_51ee8fb6
515 [1] DEBUG Versa Secure Access (null) - Prelogon configuration initiated
515 [1] DEBUG Versa Secure Access (null) - Verifying and Applying Prelogon Configuration
2062 DEBUG Versa Secure Access (null) - Prelogon Configuration Applied Successfully!
- Reboot the device to display the network sign-in option on the locked screen. For more information, see Example of Pre-Logon using SASE Client, below.
Edit the Pre-Logon Configuration File Controls
You can edit the pre-logon configuration file to change the control settings.
- Select the pre-logon configuration file (here, PreLogonConfig.json) and right-click to edit the file using. Here, Notepad ++ is used.

- To edit the pre-logon control options, edit the fields displayed under PrelogonControl at the top of the file.

- To disconnect pre-logon when a user registers on the VSA portal and connects after login, change the PrelogonDisconnectOnConnect value to "true." The default is "false."
- To disconnect the pre-logon connection after a number of minutes, update the AutoPrelogonDisconnectTimeoutMins value. The default is 60 minutes, and the range is 5 through 120 minutes.
- Save the file.
- Follow the steps described in Configure Pre-Logon Settings, above, to update the pre-logon configuration file on the endpoint machine.
Example of Pre-Logon using SASE Client
After you configure pre-logon on the SASE client application, new users who do not have connectivity to your network's AD can log in to the network. The example screens in this section show how a new user can log in to the network.
- After you configure pre-logon on an endpoint machine, when a new user logs in, the network sign-in option displays on the locked screen.

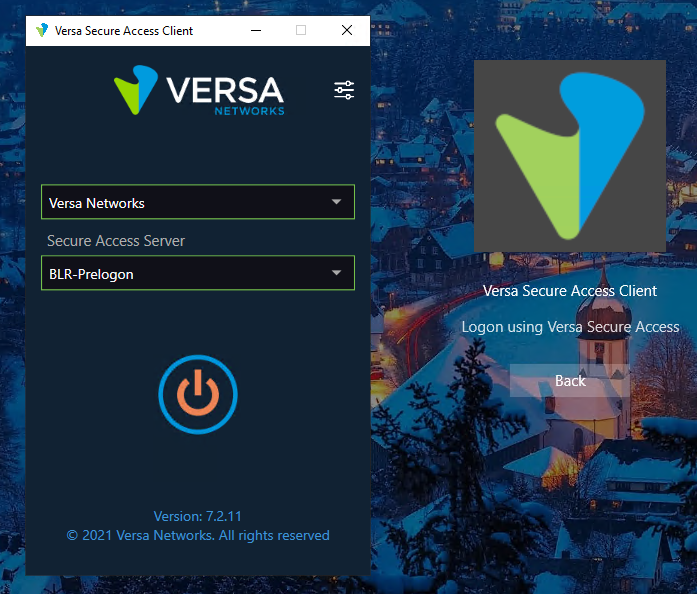
- When the user clicks the Network sign-in, the following screen displays.

- To login, the user clicks Logon Using Versa Secure Access. The SASE client login screen displays.
- When the user clicks the Connect icon, the option to enter login credentials displays.

- The user then enters the user ID and password provided by the network administrator, and clicks Submit to log in to the network.
- (For Windows) To verify the connection, after you log in, open the command prompt and run the route print CLI command. The following example shows that the tunnel is established with the SASE gateway and the default route points to the gateway tunnel IP address formed during pre-logon:
IPv4 Route Table
================================================================================
Active Routes:
Network Destination        Netmask          Gateway        Interface       Metric
          0.0.0.0          0.0.0.0          10.163.0.1     10.163.104.25   281
          0.0.0.0          0.0.0.0          On-link        10.200.1.57     3
          8.8.8.8          255.255.255.255  On-link        10.200.1.57     10
     10.163.0.0            255.255.0.0      On-link        10.163.104.25   281
     10.163.104.15         255.255.255.255  On-link        10.163.104.25   26
     10.163.104.25         255.255.255.255  On-link        10.163.104.25   281
     10.163.255.255        255.255.255.255  On-link        10.163.104.25   281
     10.192.181.20         255.255.255.255  10.163.0.1     10.163.104.25   525
     10.200.1.57           255.255.255.255  On-link        10.200.1.57     258
        127.0.0.0          255.0.0.0        On-link        127.0.0.1       331
        127.0.0.1          255.255.255.255  On-link        127.0.0.1       331
  127.255.255.255          255.255.255.255  On-link        127.0.0.1       331
        224.0.0.0          240.0.0.0        On-link        127.0.0.1       331
        224.0.0.0          240.0.0.0        On-link        10.163.104.25   281
        224.0.0.0          240.0.0.0        On-link        10.200.1.57     258
  255.255.255.255          255.255.255.255  On-link        127.0.0.1       331
  255.255.255.255          255.255.255.255  On-link        10.163.104.25   281
  255.255.255.255          255.255.255.255  On-link        10.200.1.57     258
================================================================================
Supported Software Information
Releases 12.1.1 and later support all content described in this article.
Releases 7.8.9 of Versa SASE Client and later support all content described in this article.