Configure a Terminal Server Agent
![]() For supported software information, click here.
For supported software information, click here.
In a multi-user virtual desktop environment, it is difficult to identify users when many users share the same IP address. A Versa terminal server agent (TSA) identifies users from virtual desktop instances, such as Windows-based terminal servers, by allocating a unique port range to each user. The TSA then notifies each connected firewall about the allocated port range. The firewall then creates an IP-address-to-port user mapping table and enables user-based and group-based security policy enforcement.
To create user-based and group-based security policy for the TSA, you configure a TSA profile, which is used to synchronize the agent with Concerto and to allocate port ranges for users. You can then use the TSA profile in TSA services to enforce policies for user authentication. After a user installs a TSA on a Windows device, the agent starts sending user events to the associated Versa Operating SystemTM (VOSTM) device.
This article describes the Versa TSA in secure access gateways where multiple users access shared Windows-based terminal servers, and how to configure a TSA profile.
Note: You can configure only one TSA profile in Concerto.
Terminal Server Agent Overview
This section discusses the following common scenarios for TSA:
- Internal application access—When multiple users connect to internal applications from a shared terminal server, all traffic comes from the same IP address. In this scenario, it becomes impossible to enforce identity-based or role-based access policies for security controls to an individual user because the user's identity or role is unknown. Without this information, organizations cannot control access to sensitive systems, enforce segmentation, or track individual user activity.
- Private application access—When multiple users access private applications through a shared terminal server, enforcing zero-trust network access (ZTNA) requires identifying users individually, rather than relying on shared attributes like IP addresses. TSA helps to address this challenge by enabling user-level visibility and the ability to apply access control policies. For example, users with different access privileges can use remote desktop protocol (RDP) into the same terminal server but receive access to private applications based on their individual identities.
Example: Terminal Server at Headquarters with Internet Through an SSE Gateway
The following figure illustrates the terminal server at headquarters (HQ) with internet through a Secure Service Edge (SSE) gateway.
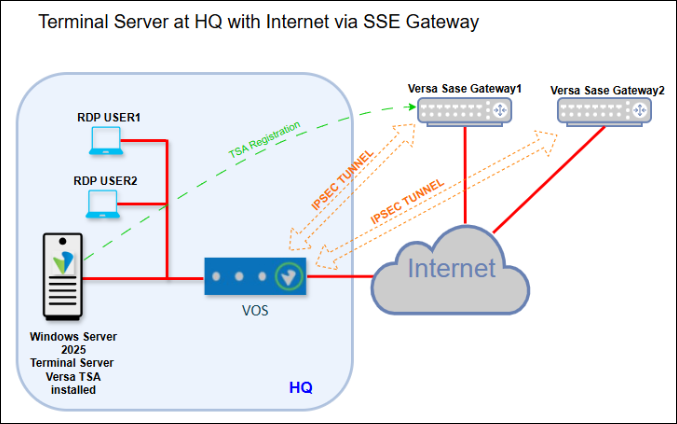
In this scenario, the terminal server is hosted at the customer’s headquarters (HQ), data center (DC), or branch office. Users connect remotely to this terminal server, and all internet-bound traffic is routed through an SSE gateway for inspection and policy enforcement.
Traffic from the terminal server is routed to the SSE gateway through the local branch using an SD-WAN overlay or site-to-site IPsec tunnel, depending on the existing network. The connection provides a secure path for forwarding internet-bound traffic from the terminal server to the SSE infrastructure.
To enable integration between the TSA and the SSE gateway, you need the following setup:
- Pre-configured SSE portal URL—The SSE gateway is pre-configured with a portal URL. TSA uses this URL during the registration process.
- TSA configuration—The TSA installed on the terminal server is configured to communicate with the SSE gateway using an SSE portal URL.
- Private IP address resolution—The captive portal URL or SSE portal URL must resolve to the private IP address of the SSE gateway. This ensures secure and direct communication for user session registration and updates over the SD-WAN overlay or IPsec tunnel.
Note: The portal URL can also resolve to a public IP address and support registration over TLS. However, resolving to a private IP address is recommended for environments that require fully private communication.
- Traffic path requirement—Regardless of how the portal URL resolves to an IP address, a secure tunnel (SD-WAN or IPsec) to the SSE gateway is required to carry user traffic.
- High availability (HA) support—If multiple SSE gateways are deployed for redundancy, the portal URL’s FQDN must resolve to both private IP addresses. This enables automatic failover and load balancing between gateways.
High Availability Support for TSA Gateway Failover
TSA supports high availability through automatic failover to a secondary gateway when the primary gateway is unavailable. The high availability for TSA is achieved through the routing failover and Domain Name System (DNS) failover mechanisms working together. You must implement routing failover and DNS failover together to redirect traffic to the secondary gateway's IP address. This ensures that both existing traffic and new client connection attempts are directed to the active gateway. If only one mechanism fails over, clients lose connectivity.
- Routing failover—Routing failover ensures that network traffic automatically redirects to the secondary gateway when the primary gateway is unreachable. An inline SD-WAN device handles failover natively through its existing failover policies. In deployments without inline SD-WAN, configure BGP peering with Bidirectional Forwarding Detection (BFD) to detect gateway failure and reinstate routing within seconds.
- DNS failover—DNS failover ensures that clients resolve the TSA portal FQDN to the secondary gateway's IP address (active gateway) when the primary gateway becomes unavailable. Otherwise, clients continue attempting to connect to the failed primary gateway. The DNS failover supports the following DNS resolution methods, depending on your infrastructure:
- Global load-balancing DNS—If your environment includes a global load-balancing DNS service, the service performs health checks on both the primary and secondary gateways and updates TSA portal FQDN resolution automatically upon failover.
- Gateway DNS proxy—Each gateway includes a built-in DNS proxy that resolves the TSA portal FQDN to its own IP address. When the gateway is inline to DNS traffic, a routing failover causes client DNS queries to reach the newly-active gateway, which responds with the correct address. No additional DNS configuration is required.
- SD-WAN DNS interception—When the SD-WAN device sits inline to DNS queries, it intercepts TSA portal FQDN lookups and either resolves them locally, based on gateway reachability, or forwards them to the active gateway. This centralizes the handling of DNS failover at the SD-WAN layer.
Configure a TSA Profile
- Go to Configure > Security Service Edge > Secure Access > Terminal Server Agent (TSA).

- In the Terminal Server Agent (TSA) screen, click Get Started.

- In the TSA Configuration section, enter information for the following fields.

Field Description Sync Interval Enter how often, in minutes, to synchronize the configuration with the TSA.
Range: 0 through 65535
Default: 360 minutesUsername Format Select the username format to have the TSA recognize:
- userPrincipleName—User principle name. A user principle name consists of a prefix (user account name), followed by the @ symbol and a suffix (DNS domain name). For example, someone@my-company.com.
- sAMAccountName—The sAMAccountName attribute is a login name that supports clients and servers from previous Windows versions, for backwards compatibility, such as Windows NT 4.0, Windows 95, Windows 98, and LAN Manager
Port Allocation (Group of Fields) - Reserved Port Range
Enter the reserved port allocation range for user sessions. The value must be entered in the PortStart-PortEnd format and the port range must have a minimum of 10000 ports. For example, enter 0-10000 for start port 0 and end port 10000.
Range: 0 through 65535
- Maximum Size (Required)
Enter the maximum port allocation size for each user. The maximum size must be a multiple of the start size.
Range: 0 through 65535
Default: 5000
- Fail Mode
Select the traffic mode if the TSA server connection fails:
- Close—Deny traffic if the TSA server connection fails. This is the default.
- Open—Allow traffic if the TSA server connection fails.
Fully Qualified Domain Name (FQDN) Use this FQDN URL when configuring the TSA application. - Click Next.
- In the Device Certificate Authentication section, click the toggle to enable or disable device certificate-based authentication for TSA profile. When enabled, you must configure a device certificate authentication profile.

- Click Next.
- In the Enter Name, Description & Tags section, enter information for the following fields.
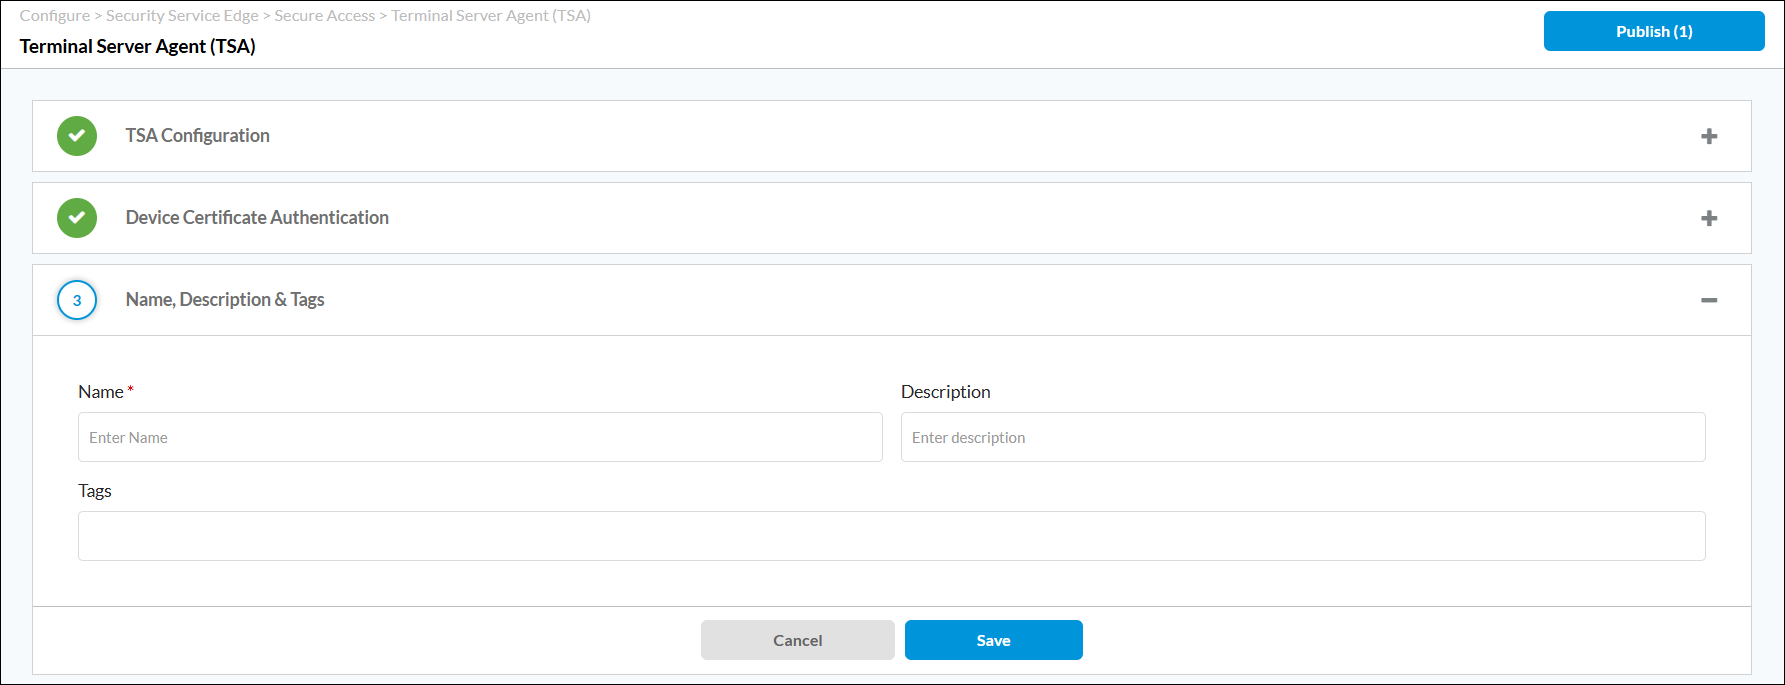
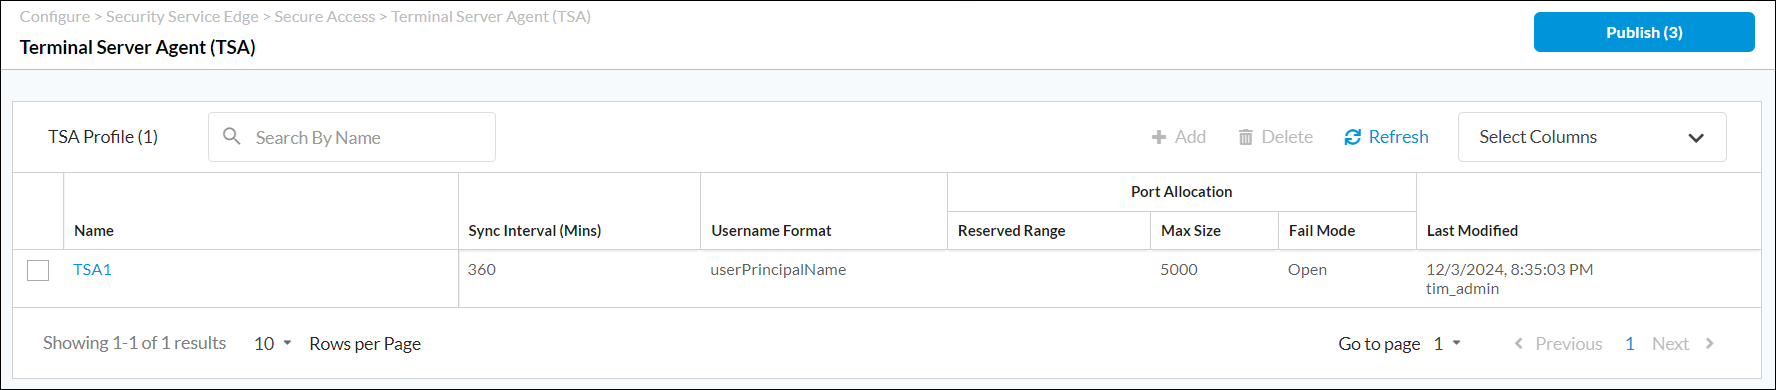
Field Description Name (Required) Enter a name for the TSA profile. Description Enter a text description for the TSA profile. Tags Enter one or more tags to help identify the TSA profile. - Click Save. The TSA profile displays in the Terminal Server Agent (TSA) screen.
Configure User Authentication Profiles
To specify the authentication type for user authentication, you configure user authentication profiles to match remote desktop users.
To configure user authentication profiles:
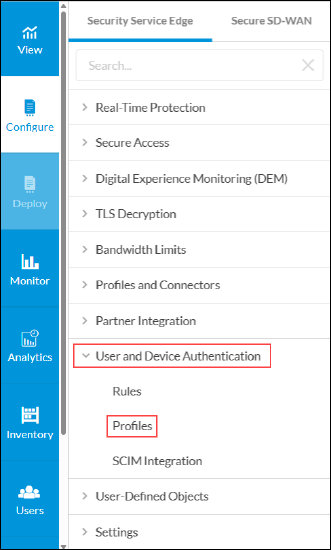
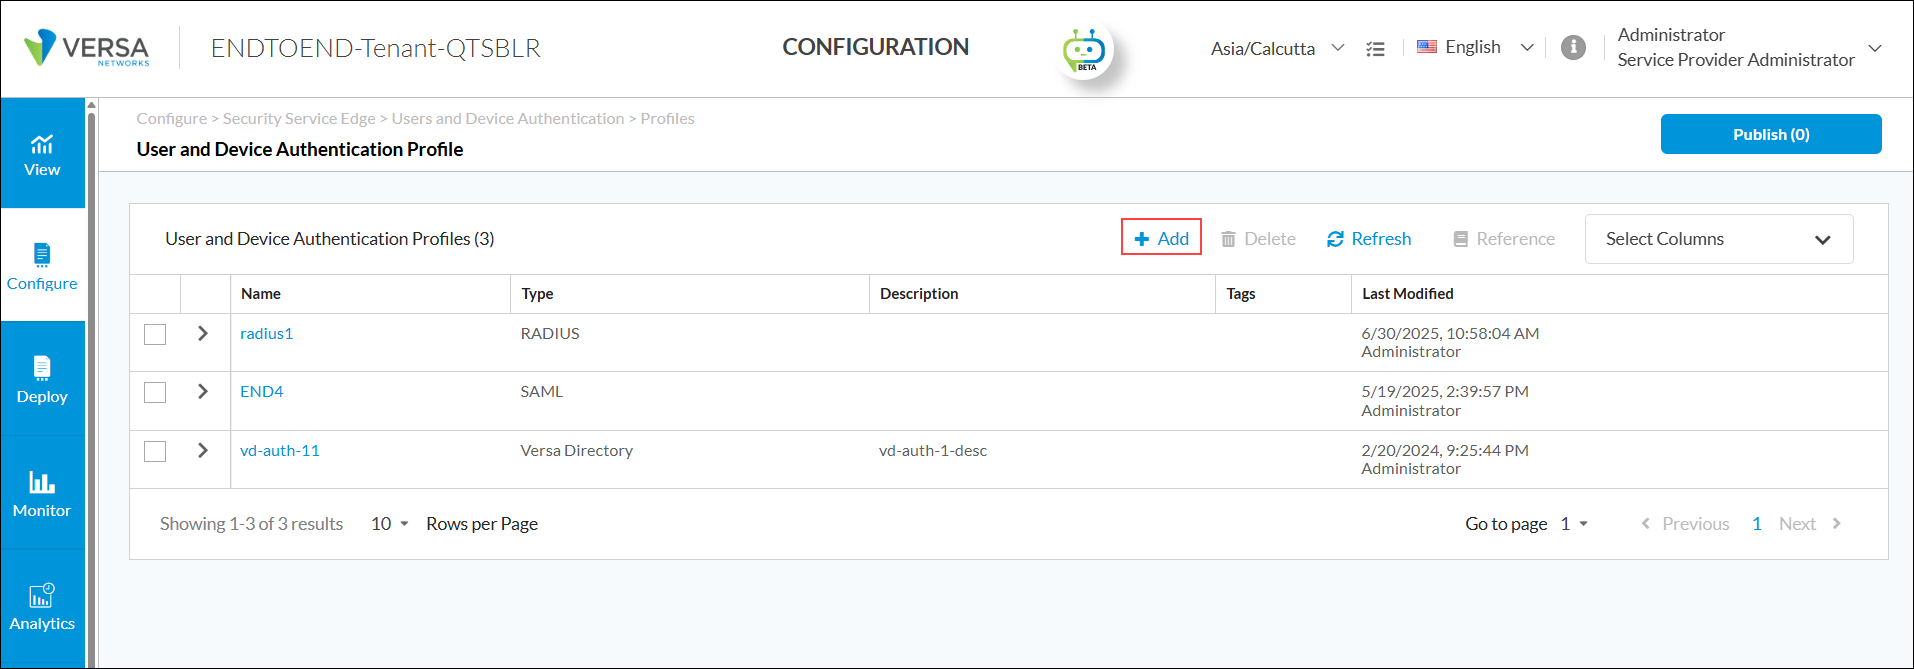
- Go to Configure > Security Service Edge > User and Device Authentication > Profiles.
- To create a new profile, click + Add.
- In the Add User and Device Authentication Profile screen, select the type of authentication to configure, and then click Get Started.

- For the LDAP authentication type, the following screen displays. Enter information for the following fields.

Field Description Server Type Select the Active Directory (AD) server type.
IP Address Click IP Address, and then enter the IP address of the AD server. VPN Name (Required) Select the name of the tenant VPN to use to reach the AD server. Port (Required) Enter the listening port number on the AD server, which allows you to communicate with the AD service.
Range: 0 through 65535
Default: None
Bind DN (Required) Enter the bind distinguished name (DN) to use when logging in to the AD server. Bind Password (Required) Enter the password that the bind DN uses when logging in to the AD server. Base DN (Required) Enter the base distinguished name DN to use when an AD initiates a search. Domain Name (Required) Enter the domain name to use for AD searches, for example, versa-networks.com. - Click Next.
- For step 2, User and Group Profile, enter information for the following fields.

Field Description Group Object Class (Required) Enter the group object class provided by your administrator. Group Name (Required) Enter the group name provided by your administrator. Group Member (Required) Enter the group member provided by your administrator. User Object Class (Required) Enter the user object class provided by your administrator. User Name (Required) Enter the format of the username, for example, User Principal Name. - Click Next.
- For step 3, Review and Submit, enter a name for the authentication profile, for example, ACME-LDAP-Profile.

- Click Save. For more information about configuring user and device authentication, see Configure User and Device Authentication.
Create Security Policies to Filter Traffic
To configure internet protection rule match criteria:
- Go to Configure > Real-Time Protection > Internet Protection.

- To configure match criteria for users and groups, in the Create Internet Protection Rule screen, select Step 2, User & Groups, and then click Customize in the Users & Groups box.

- To enable internet protection for selected users, choose the Selected Users user type, click the Users tab, and then select individual users to include.

- Select step 5, Network Layer 3-4. The Source and Destination (Layer 3) box shows that all services are matched with Internet as the destination.

- Click Next to go to step 6, Security Enforcement.
- Select Allow to allow all traffic that matches the rule to pass unfiltered.

-
Click Next to go to step 7, Review and Deploy. In the General group of fields, enter a name for the rule.

-
Click Save to deploy the rule.
Similarly, you can create a policy rule for a different user connectivity using a terminal server and apply different enforcement action for the user. For example, select Deny enforcement action to deny all traffic.
For more information about Internet protection rules, see Configure SASE Internet Protection Rules.
Supported Software Information
Releases 12.2.1 and later support all content described in this article.
Additional Information
Configure User and Device Authentication
Install and Use a Terminal Server Agent