Versa SASE Client Quick Start
![]() For supported software information, click here.
For supported software information, click here.
The Versa SASE client application is a native VPN client that supports Android, iOS, Linux, MacOS, and Windows operating systems.
Note that in earlier software releases, for releases prior to Release 7.4.3 for Android, Release 7.3.7 for MacOS, and Release 7.4.5 for Windows, the product was called the Versa Secure Access (VSA) client application software.
To configure a SASE client, you install the server access client on the MacOS or Windows device, and then you register the client and connect to it, as described in this article.
Install a SASE Client on a MacOS Device
To install the Versa SASE client on a MacOS device:
- Download and install the Versa SASE client from this location.
- Open the SASE client. The Register screen displays. For more information, see Register the SASE Client section below.
Install a SASE Client on a Windows Device
This section describes how to install the SASE client on a Windows device. To install the SASE client on a Windows device:
- Download and install the application from this location. Confirm the download link with your organization's IT administrator before you download the SASE client.
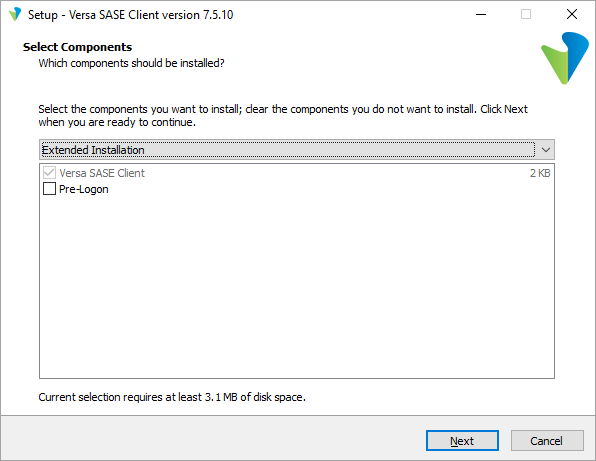
- Start the application. The Select Components wizard screen displays. By default, Versa SASE Client is selected.
- Click Next in the setup wizard screen.
- In the last wizard window, click Install to complete the installation.

The Register screen displays, unless you deselected Launch Versa SASE Client. For more information, see Register the SASE Client section below.
Install a SASE Client on Linux Device
To install the Versa SASE client for Linux, download the versa-sase-client.deb package (for Debian-based distributions) or versa-sase-client.rpm package (for Fedora-based distributions) from this location. Double-click the package, and open it with the distribution's software tool.
Register the SASE Client
After you install the SASE client, register to the SASE platform using the following information from the email notification that you received. This information is provided to your organization's IT administrator:
- Link to the registration portal's FQDN or IP address
- Your enterprise name
- Your user ID
To authenticate with the SASE portal, the following types of authentication are supported:
- Basic local authentication
- SAML
- Time-based one-time password (TOTP)
- Two-factor authentication
To register the SASE client:
- Click the link to the registration portal that was included in the email.
- Open the SASE Client, and click Register.

- Enter the portal's FQDN or IP address, enterprise name, and your user ID, and then click Submit.

- Enter the username and password that you received from the administrator, and then click Submit.

- If authentication using two-factor authentication is required, enter the one-time password that you received in email or SMS, and click Submit. After the one-time password is validated, the registration process is complete.
- If TOTP authentication is required, the screen displays a QR code:

- Scan the QR code using any authenticator application.
- Click Done after you scan the QR code. The following screen displays with a field to enter OTP.

- Enter the OTP that the authenticator application displays and click Submit.
- After the TOTP is validated, the registration process is complete.
- If SAML authentication is used, the client login page similar to the following displays:

- Enter the user name and password, and then click Login.
- After the login credentials are validated, the registration process is complete.
Connect to a Versa SASE Gateway
To connect to a Versa SASE gateway after you register the SASE client:
- From the SASE client home screen, click the Power icon to connect to the server.

- Click Connection Status to view configuration details about the server and to view statistics.

- Click Details to display the server details. Click the Back
 button to return to the previous screen.

- Click Statistics to view the server statistics. Click the Back button to return to the previous screen.

Supported Software Information
SASE Client Releases 7.2.0 and later support all content described in this article.