Configure Data Loss Prevention in Concerto
![]() For supported software information, click here.
For supported software information, click here.
Data loss prevention (DLP) is a set of tools and processes for detecting and preventing data breaches, cyber exfiltration, and unwanted destruction of sensitive data. You use DLP to protect and secure an organization's data and to comply with regulations. The Versa Networks DLP solution oversees, tracks, and reports all data transactions in the network, scanning all content that passes through an organization's ports and protocols to ensure data security in the organization. All the data gathered is sent to Versa Analytics, which generates detailed reports about what data is being used, who is using it, and where the data is sent. These reports are available to users.
To configure DLP in Concerto, you create a DLP profile that you associate with a security policy. To create the DLP profile, you do the following:
- Configure data patterns—Data patterns define the specific data strings that you want to filter in a data protection profile. Concerto includes a large number of predefined data patterns that are provided in the Versa security pack (SPack) software, and you can create custom data patterns.
- Define a data protection profile—You associate data patterns with a data protection profile, and you then use the data protection profile when you create DLP rules.
- Define DLP rules—You create the rules that are used in a DLP profile to match data.
- Configure a DLP profile—Create an ordered set of DLP rules that you can then apply to a security policy or to an internet protection rule.
Configure Custom Data Patterns
- Go to Configure > Secure Services Edge > Real-Time Protection > Profiles.

The following screen displays.

- Select the Data Loss Prevention (DLP) tab, and then select the Data Patterns tab.
- To customize which columns display, click Select Columns down arrow, and then click the columns to select or deselect the ones you want to display. Click Reset to return to the default column display settings.
The options are:- Regex
- Keyword
- Range Window
- Range From
- Click + Add to add a new data pattern. In the Data Patterns popup window, enter information for the following fields.

Field Description Name Enter a name for the data pattern. Regex Enter a regular expression to search for in a file, for example, Employee.*Salary. Keywords Enter one or more keywords to search for in a file, and then press Enter to add the keyword. When a keyword is found, the DLP engine scans for the regular expression pattern within the given range. Use a comma to separate multiple keywords. Range From Select the location to search in the file:
- Anywhere—Start the scan anywhere in the file.
- Start—Start the scan at the beginning of the file.
Range Window Enter a range for the search with the file, which is sometimes called the proximity.
If you select Range From Anywhere, you do not need to specify a range window, because the entire file is scanned.
If you select Range From Start, enter the number of bytes to scan from the start of the file.If you do not enter a range window, the entire file is scanned.
Range: 0 through 4294967295 bytes
Default: 8192 bytes - Click Save.
Configure Data Protection Profiles
A data protection profile consists of an ordered set of rules in which each rule has one or more match conditions and an action. You can configure a data protection profile to stop evaluating rules after the first rule that matches (Exit on First Rule Match option) or to evaluate all rules and apply all those that match (default behavior).
After you create a data protection profile, you can use it as part of the enforcement actions on a policy rule in a security access control policy.
To configure a data protection profile:
- Go to Configure > Secure Services Edge > Real-Time Protection > Profiles.
The following screen displays.

- Select the Data Loss Prevention (DLP) tab, and then select the Data Protection Profiles tab.
- Click
 Add. In Step 1, Select DLP Data Pattern, you can select either user-defined (custom) or predefined data patterns for your DLP rule.

- To select user-defined data patterns, click Add User-Defined Data Pattern, and then select one or more custom data patterns to use in the data protection profile.

- Click Save to add the user-defined data patterns to the data protection profile.
- To select predefined data patterns, click Add Predefined Data Pattern, and then select one or more predefined data patterns to use in the data protection profile.
- Click Save. The Data Pattern screen displays the selected data patterns.

- To select user-defined data patterns, click Add User-Defined Data Pattern, and then select one or more custom data patterns to use in the data protection profile.
- Click Next.The Boolean Operation screen displays, and the data patterns that you selected above are displayed on the left side.

- In Step 2, Action, you create a Boolean operation that defines how to match the selected data patterns. To do this, click a data pattern, click a Boolean operator, and then click a second data pattern to complete the Boolean operation. If a Boolean operation includes multiple data patterns, separate them with a Boolean operator. The following example shows a Boolean operation created from the data patterns shown in the previous screenshot:
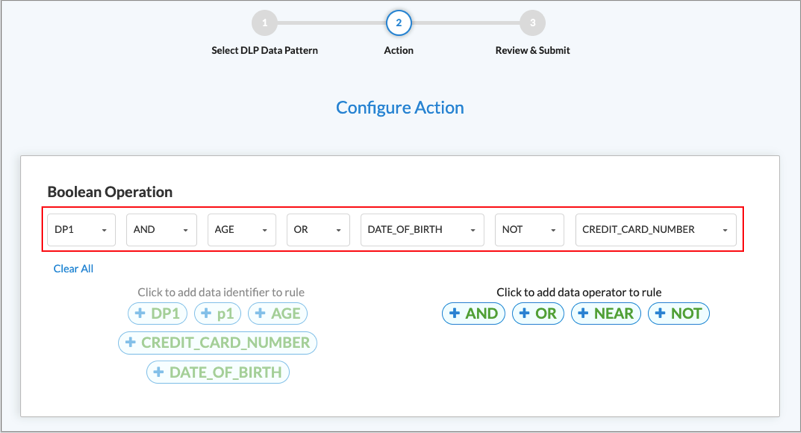
To replace one data pattern in the Boolean operation with another, click the down arrow next to the data pattern name, and then select a different one.

To change the Boolean operator, click the down arrow next to the operator name and then select a different one.

To remove the last element of a Boolean operation, click the down arrow, and then click Remove Selection.

- Click Next.
- In Step 3, Review and Submit, enter a name for the data protection profile and, optionally, a text description and one or more tags. A tag is an alphanumeric descriptor, with no white spaces or special characters, that you can use to search the objects.

- Review the data protection profile entries.
- To change any of the information, click the
 Edit icon in its section, and then make the required changes.
 - Click Save to create the data protection profile.
Configure DLP Rules
A DLP profile rule consists of the following components:
- Rule type—You can select one or more of the following rule types:
- Content analysis—Scan data in the HTTP Context, such as HTTP Attachment, HTTP Body, and HTTP Header.
- Document fingerprinting—Convert a standard form into a sensitive information type, which can then be used to define DLP policy rule. The DLP software examines files that have been fingerprinted and the directory path to these files to determine how similar a candidate file is to a previously fingerprinted file. The DLP software then computes a similarity threshold between the two files and compares the similarity threshold to the configured threshold. The configured threshold is the percentage of content that needs to be similar to the previously fingerprinted file stored in the folder path.
- Exact data match (EDM)—Validate the match result of a custom or predefined data pattern against a user-provided data set. An exact data match rule can reduce false positives and can help to guarantee precise DLP for entries in the data set.
- File DLP—Provide protection based on the configured file attributes.
- Optical character recognition (OCR)—Converts images to text and applies DLP policies on the converted text data.
- File-type filtering—You can configure data filters based on the file types.
- Activity, Protocol, and Context scanning—DLP monitoring can scan by activity (upload, download, or both), the HTTP protocol, and context (header, body, attachment) .
The following applications are supported by DLP:
- Box
- DLP_apps
- Dropbox_download
- Dropbox_upload
- Dropbox_upload_download
- Dropbox
- Github
- Gmail
- Gmail_basic
- Gmail_chat
- Gmail_drive
- Gmail_mobile
- Google_docs
- Google_photos
- Gsuite
- Gtalk
- Microsoft
- MS_teams
- My_Yahoo
- office365
- Onedrive
- Outlook
- Owa
- Salesforce
- Salesforce_chatter
- Service Now
- Sharepoint
- Sharepoint_document
- Sharepoint_online
- Slack
- Teamspeak
- Teamspeak_v3
- Yahoo
- Ymail_classic
- Ymail2
To configure rules to use in DLP profiles:
- Go to Configure > Secure Services Edge > Real-Time Protection > Profiles.
The following screen displays, showing currently configured DLP rules.
Note: Release 12.2.1 supports three new implicit DLP rules: Source_Code, US_Financial, and PII_US.
Note: Release 12.2.2 supports the following new implicit DLP rules:- Default_EDM_Match—Match and redact the specified expression in specified file types, for example, SSN, credit card numbers.
- Default_Fingerprint_Document—Fingerprint documents that are added to the folder path. Compare files up to the configured similarity threshold.
- Default_GDPR_Violations—Default rule to block GDPR violations in specified file types.
- Default_HIPAA_Violation—Default rule to block HIPAA violations in specified file types.
- Default_OCR_PII—Default rule to block PlI text in images.
- Default_PCI_DSS—Default rule to block Payment Card Industry (PCI)-specific classifiers like credit cards in specified file types.
- Default_Prevent_Largefiles—Prevent data exfiltration when large files are sent as attachments.
- Default_US_PII—Default rule to block Personally Identifiable Information (US) in specified file types.

- Select the Data Loss Prevention (DLP) tab, and then select the DLP Rules tab.
- To customize which columns display, click Select Columns down arrow, and then click the columns to select or deselect the ones you want to display. Click Reset to return to the default column display settings. The options are:
- Rule Type
- Logging
- Context
- Protocol
- File Type
- Action
- Enabled
- Click the Add icon to add a DLP rule. The Select a Rule Type screen displays. You can create Content Analysis, Exact Data Match (EDM), File DLP, Document Fingerprinting, and Optical Character Recognition (OCR) rule types. The following sections describe how to configure the DLP file types.

- To create a content analysis rule, click the Content Analysis box in the Select a Rule Type screen. The following screen displays, which lists all predefined data protection profiles by default. The predefined profiles are:
- CCPA_California_Consumer_Privacy_Act
- Financial_Information
- GDPR_General_Data_Protection_Regulation
- GLBA_Gramm_Leach_Bliley_Act
- US_PHI
- PCI_DSS
- US_HIPAA
- US_PII
- US_FEDERAL_TRADE_COMMISSION_RULES
- US_FINANCIAL_DATA
- SOCIAL_SECURITY_NUMBER_CONFIDENTIALITY_ACT2000
- US_PATRIOTS_ACT
- UK_PII
- UK_FINANCIAL_DATA
- UK_ACCESS_TO_MEDICAL_REPORTS_Act1988
- AUSTRALIA_FINANCIAL_DATA
- SOURCE_CODE_ACT
- US_DRIVERS_LICENSE_NUMBER_ALL_STATES
- WESTERN_AUSTRALIA_HEALTH_SERVICES_ACT

- Enter information for the following fields.
Field Description Severity Level Select a severity level from the drop-down list. The options are:
- Low
- Medium
- High
- Critical
Severity Value
Enter a severity value. All Categories Filter the data protection profiles by category. All Regions Filter the data protection profiles by region. Search Search for a specific category from the list. - To view the user-defined data protection profiles, click User Defined.
- To add the DLP rule for analysis, click one predefined or one user-defined data protection profile. You can select only one data protection profile, which can be either a predefined or a user-defined profile.
- To create a file DLP rule, click File DLP in the Select a Rule Type screen. In the File DLP screen, enter information for the following fields.

Field Description Filename Enter a name for the file. File Size (Group of Fields) - Enter Minimum
Enter the minimum size of the DLP file, and then select the size unit, either megabytes (MB), gigabytes (GB), kilobytes (KB), or bytes. The configured action is taken on all files that are smaller than the minimum size and that match the configured file type. If you set the minimum size to 0, the maximum DLP file size is used for the action. - Enter Maximum
Enter the maximum size of the DLP file, and then select the size unit, either megabytes (MB), gigabytes (GB), kilobytes (KB), or bytes. The configured action is taken on all the files that are larger than the maximum size that match the configured file type. SHA256 Enter the secure hash algorithm 256-bit (SHA256) value. To enter multiple SHA256 values, separate them by a new line. File Label Enter a file label, and then click Add. - To create an optical character recognition (OCR) rule, click Optical Character Recognition in the Select a Rule Type screen. The following screen displays, which lists all predefined data protection profiles by default.

- To view the user-defined data protection profiles, click User Defined.
- To add the DLP rule for analysis, click one predefined or one user-defined data protection profile. You can select only one data protection profile, which can be either a predefined or a user-defined profile. To filter the data protection profiles by category, click All Categories. To filter the data protection profiles by region, click All Regions.
- To create an exact data match rule, click Exact Data Match (EDM) in the Select a Rule Type screen. The following screen displays.

- To create an expression, click Create Expression, and then enter information for the following fields.

Field Description Expression Name Enter a name for the expression. Data Pattern Select a data pattern. Enter Value Enter a value for the expression, the click Add. You can add multiple values. - Click Save.
- To upload a CSV file that contains a list of exact data matches:
- Click Upload File.
- Drag and drop the CSV file into the window, or click Select CSV File to upload the file.
- To hash the CSV file, click Hash the File.
- Click Save.
Note: If you are uploading a new version of a CSV file that was previously uploaded, the new version must have a unique file name and must contain newly created expressions.

- To select a filename, click Select File Name. The Select Filename screen displays.

- In the Filename field, select a filename. Note that this list shows the names of CSV files that were previously uploaded. For information about uploading CSV files, see the Manage DLP Files and Folders, below.
- Click Get Columns. The screen displays the columns for each field in the CSV file.

- In the Data Pattern column, select a data pattern to apply to each entry. Click Remove to remove an entry from the CSV file.
- Click Save.
- To create a document fingerprinting rule, click the Document Fingerprinting in the Select a Rule Type screen, and then enter information for the following fields.

Field Description Folder Name Select a folder. For information about DLP folders, see the Manage DLP Files and Folders, below. Similarity Threshold Enter the percentage of content that needs to be similar to the previously fingerprinted file stored in the folder path.
Range: 1 through 100
Default: None
- Click Next to go to Step 2, File Type in the Create DLP Rule screen.
- Select one or more file types to be analyzed. To search for specific file types, use the search box. To select all file types, click Select All File Types.
Concerto supports the following file types:
any bmp c class cpp csv doc docx gif gzip html jpeg msoffice pdf pem pgp php pl png ppk ppt pptx rtf sh tar tif txt visio csf xls xlsx xml xz zip

- Click Next.
- In Step 3 Configure Activity, Protocol, and Context, enter information for the following fields.

Field Description Activity Select the direction of the traffic on which to apply the rule:
- Both—Apply the rule to both download and upload traffic.
- Download—Apply the rule when the client requests data from a server.
- Upload—Apply the rule when the client posts data to a server.
Protocol Click the protocol to scan:
- Web Protocol
- HTTP
Context Select one or more HTTP contexts of data to scan:
- Attachment—Data in an attachment
- Body—Data in the body
- Header—Data in the header of a packet
- Click Next.
- In Step 4, Exclude, in the Filename field, enter the names of a file to exclude, for example, budget.xlsx, and then click Add. The filename displays to the right of the Add button. You can exclude multiple files. To delete a filename from the list, click the
 Trash icon next to the filename.

- Click Next.
- In Step 5, Action, enter information for the following fields.
The following table shows the applications supported by DLP and whether file-name matching is supported for upload and download.
Applications Download Upload Box Supported Supported Dropbox Supported Not supported Github Supported Supported Gmail Supported Supported Google Chat Supported Not supported Google Docs Supported Not supported Google Drive Supported Not supported MS Teams (web) Supported Not supported Office365 Supported Not supported OneDrive Supported Not supported Salesforce Supported Supported Service Now Developer Console Supported Supported Sharepoint Supported Not supported Slack Supported Supported Yahoo Mail Supported Not supported

Field Description Action Select an action to take if the traffic matches the rule:
- Alert—Allow traffic to pass and log it to Versa Analytics
- Allow—Allow traffic to pass without logging it to Versa Analytics
- Block—Drop the traffic without sending a notification to the client host that originated the traffic.
- Encrypt—Encrypt the traffic before sending it.
- Legal Hold—Apply a legal hold profile to the traffic.
- Quarantine—Send the traffic to the customer-provided cloud portal without encrypting it.
-
Redaction—If a rule match is detected in an editable, text-based file, change the content of the matched packet to random characters. Note that redaction is supported for Exact Data Match (EDM) with the file types txt, xml, sh, html, c, and php.
-
Reject—Drop the traffic and send a notification to the client host indicating that the traffic was dropped.
- Tokenization—(Supported for the EDM rule type only, which you select from the Rule Component tab.) Replace sensitive data in text-based files with a token value that retains the format (character set and length) of the sensitive data but changes the actual values.
Logging Click to enable LEF logging to Analytics, which logs all actions to Versa Analytics, except fo actions that explicitly do not log. If you do not enable logging, no logging information is sent to Versa Analytics. Notification Profile Select a notification profile. To configure a notification profile, see Configure Notification Profiles. Labels Select Set Label or Remove Label to set or remove a sensitivity label on a file before uploading or downloading it. Threat Type (For Release 12.2.1 and later.) Select the type of threat to which the rule will apply. If the threat type is matched, then Analytics will generate an alarm or a log, depending on the Threat Type and Threat Severity settings.
The options are:
- Alert
- Block
- Document Fingerprint
- Exfilteration in context analysis
- File DLP
- File size not in range
- Ml document fingerprint
- Ml image classification
- Ml source code
- Ml spam mail
- MIP label
- OCR match
- Source code detection
Threat Severity (For Release 12.2.1 and later.) Select the severity of the threat to which the rule will apply. If the threat severity is matched, then Analytics will generate an alarm or a log, depending on the Threat Type and Threat Severity settings.
The options are:
- Critical
- Major
- Normal
- Click Next.
- In Step 5, Review and Submit, review the configuration entries.

- Enter a name for the rule in the Name field.
- The rule is enabled by default. Click the slider to disable the rule.
- To change any of the information, click the Edit icon and then make the required changes.
- Click Save to create the DLP rule.
Configure DLP Profiles
A DLP profile consists of one or more DLP rules.
To configure a DLP profile:
- Go to Configure > Secure Services Edge > Real-Time Protection > Profiles.
Select the Data Loss Prevention (DLP) tab. The following screen displays.
Note: Release 12.2.1 supports a new built-in DLP profile, GenAI_DLP. The GenAI_DLP profile has three built-in DLP rules: Source_Code, US_Financial, and PII_US.

- Select the DLP Profiles subtab.
- To customize which columns display, click Select Columns down arrow and then click the columns to select or deselect the ones you want to display. Click Reset to return to the default column display settings. The options are:
- Rules
- Exit
- Logging
- Action
- Click the Add icon to add a new DLP profile. The Create DLP Profile screen displays.

- In Step 1, Select DLP Rules, select one or more DLP rules. To filter the types of rules that are displayed, use the User-Defined, All Categories, and All Regions boxes.
- Click Next to go to Step 2, Applications & Group. Enter information for the following fields.

Field Description Additional Application Group Select an additional application group. You can select only one group. Note that only user-defined application groups are listed in this example. Applications Enter the name of an application to search for. User Defined Applications Select one or more user-defined applications. Predefined Applications Select one or more predefined applications. - Click Next to go to Step 3, Configure Rule Order.

- If you select two or more DLP rules in the Select DLP Rules screen, you can change the order in which the rules are processed by dragging and dropping the rules to the desired order. For example, the following screen shows that the rules have been reordered so that the FileDlp1 rule is processed first, followed by Corporate-Financial-Docs-Rule and then EDM-1.

- (For Releases 12.2.1 and later.) Click Next to go to Step 4, Reputation. Enter information for the following fields.

Field Description Enable Logging Select to enable logging to Versa Analytics. Cloud Lookup State Click to enable cloud lookup. If the cloud lookup state is not configured for this profile, it is inherited from the tenant VOS device. - Click Next to go to Step 5, Action. Enter information for the following fields.

Field Description Default Action Click the down arrow, and the select a default action. The default action is applied if none of the scanned data matches a rule.
- Alert
- Allow
- Block
- Reject
Exit on First Rule Match Click to exit rule processing after the first match occurs. Logging Enable logging of the DLP rules processing. All logs are sent to Versa Analytics. Forensic Enabled (For Release 12.2.1 and later.) Click the slider bar to enable forensic profiles. Profile (For Release 12.2.1 and later.) Select a forensic profile from the drop-down list. Upload original file (For Release 12.2.1 and later.) Select disable to disable uploading the original forensic file (default setting). Select enable to enable uploading the original forensic file. - Click Next.
- In Step 6, Review & Submit. Enter a name for the DLP rule and, optionally, a description and one or more tags. A tag is an alphanumeric descriptor, with no white spaces or special characters, that you can use to search the rules.

- Review the configuration.
- To change any of the information, click the Edit icon and then make the changes.
- After review, click Save to create the new DLP profile.
You can use the DLP profiles when you configure internet protection rules. For more information, see Configure SASE Internet Protection Rules.
Manage DLP Files and Folders
You can upload files and then perform exact data matching or document fingerprinting on them, and you can create folders to manage the files. By default, the DLP software creates three folders: DLP, EDM, and Fingerprints. You can create additional folders. After you upload the files, you can use them when you create exact data match or document fingerprinting rules.
To manage DLP files and folders:
- Go to Configure > Security Service Edge > Settings > Files and Folders.

- Select Files and Folders in the left navigation bar. The following screen displays. Note that the
 Expand icon displays only when a folder contains files.

- To customize which columns display, click Select Columns down arrow, and then click the columns to select or deselect the ones you want to display. Click Reset to return to the default column display settings. The options are:
- File Count
- Checksum
- File Size
- Data Modified
- Modified By
- Actions
- Click the Add Folder icon to add a new folder. In the Add Folder screen, enter information for the following fields.

Field Description Where should the folder be placed? Select the location for the new folder. Folder Name Enter a name for the new folder. - Click Add to add the new folder.
- To upload a new file, click the
 Upload File icon in the File and Folder Management screen. In the Upload File screen, enter information for the following fields.

Field Description Where should the folder be placed? Select the folder in which to place the file Hash the File Click to perform a hash operation on the file that you are uploading. Upload File Click to upload a file, and then select the file to upload from the pop-up window. For EDM processing, files must be in .csv format. For document fingerprinting processing, files must be in .doc, .docx., or .pdf format. - Click Upload to upload the file.
Associate a DLP Profile with a SASE Internet Protection Rule
To oversee, track, and report all data transactions in the network and to scan all content that passes through an organization's ports and protocols to ensure data security in the organization, you can associate a DLP profile with a SASE internet protection rule. DLP provides a set of tools and processes for detecting and preventing data breaches, cyber exfiltration, and unwanted destruction of sensitive data. You use DLP to protect and secure an organization's data and to comply with regulations.
To associate a DLP profile with a SASE internet protection rule:
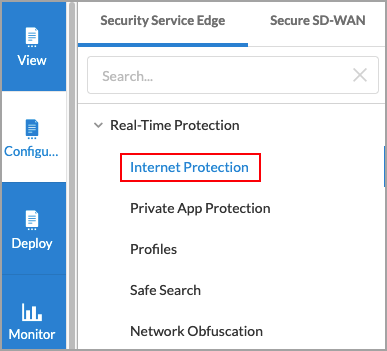
- Go to Configure > Real-Time Protection > Internet Protection.
- In the Internet Protection Rules List screen, click the Add icon to create a rule. The Create Internet Protection Rule screen displays. For more information, see Configure SASE Internet Protection Rules.
- Select the Security Enforcement screen, select Profiles, and then select the Data Loss Prevention (DLP) tab.

- Click the slider bar to enable DLP.

- Select a DLP profile from the drop-down list.
- To create a new DLP profile, click Create New. For more information, see Configure DLP Profiles.
- Click Next to go to Review and Deploy.
- In the Review & Deploy screen, review your selections and make any needed updates.
- Click Save.
Associate a DLP Profile with a Private Application Protection Rule
You can associate a DLP profile with a private application protection rule. DLP provides a set of tools and processes for detecting and preventing data breaches, cyber exfiltration, and unwanted destruction of sensitive data. You use DLP to protect and secure an organization's data and to comply with regulations.
To associate a DLP profile with a private application rule:
- Go to Configure > Real-Time Protection > Private Application Protection.

- In the Private Application Protection Rules List screen, click the Add icon to create a rule. The Create Private Application Protection Rule screen displays.
- Select the Security Enforcement screen, and then select Profiles.

- Select the Data Loss Prevention (DLP) tab.
- Click the slider bar to enable DLP.

- Select a DLP profile.
- Click Next.
- In the Review & Deploy, review your selections and make any needed updates.
- Click Save.
Supported Software Information
Releases 11.3.1 and later support all content described in this article, except:
- Release 11.4.1 adds support for exact data match and document fingerprinting DLP rules; applications and groups in DLP profiles; file and folder management for EDM and document fingerprinting rules files.
- Release 12.2.1 adds support for optical character recognition (OCR) DLP rules; a new built-in DLP profile, GenAI_DLP; and three new built-in DLP rules, Source_Code, US_Financial, and PII_US.
- Release 12.2.2 adds support for the following built-in DLP rules:
- Default_EDM_Match
- Default_Fingerprint_Document
- Default_GDPR_Violations
- Default_HIPAA_Violation
- Default_OCR_PII
- Default_PCI_DSS
- Default_Prevent_Largefiles
Additional Information
Configure Notification Profiles
Configure SASE Internet Protection Rules