Configure Endpoint Information Profiles
![]() For supported software information, click here.
For supported software information, click here.
Enterprise users can connect to the enterprise's networks and resources from a variety of locations and using a variety of endpoints, or remote computing devices, including smartphones, laptops, desktops, tablets, and internet-of things (IoT) devices. Endpoint devices represent vulnerable points of entry, places where attackers can attempt to infiltrate the enterprise network or exploit vulnerabilities.
To protect the enterprise network and resources, you can create endpoint information profiles (EIPs), which ensure that the endpoint devices that access the enterprise network maintain and adhere to enterprise security standards before they access enterprise network resources. With EIPs, you collect information about the security status of the endpoint devices connecting to your networks, such as whether they have the latest security patches and antivirus definitions installed. You then classify endpoints based on multiple types endpoint posture information, defining rules that allow the VOS SASE software to extract information from endpoint devices and then match the information to enforce security policy. You can configure notifications that alert users about the reason for access denial and that allow users to access the installation program for missing encryption software.
Concerto EIP allows you to classify EIP information into the following security-related categories:
- Anti-malware
- Anti-phishing
- Browser
- Cloud storage
- Custom
- Data loss prevention
- Disk backup
- Disk encryption
- Endpoint Security
- Firewall
- General
- Health agent
- Management status
- Messenger
- Mobile
- Patch management
- Public file sharing
- Remote control
- Virtual machine
To configure EIP, you create three building blocks for each tenant:
- EIP profiles—Collect the EIP objects, which are the match criteria, into a profile that is evaluated together for monitoring and for enforcing security policy for SASE portals and gateways.
- EIP agent profile—Define the conditions that the SASE client uses to filter information from endpoint devices. When you configure a SASE portal policy, you associate the agent profile with the enforcement action in the policy.
- EIP objects—Define the match criteria to use in an EIP profile. The match criteria filter the raw data reported by endpoint devices.
The EIP profile and policy rule evaluation logic is as follows:
- Single Rule, Different Categories—Uses AND logic; all configured categories must match for the rule to apply.
- Single Rule, Same Category, Multiple Objects—Uses OR logic; a match with any configured object is sufficient.
- Multiple Rules—Rules are evaluated sequentially from top to bottom, and the first matching rule is applied.
- Policy Rules with Multiple EIP Profiles—Uses OR logic across profiles; the policy rule applies if any associated EIP profile matches.
After registration of endpoint devices, the SASE client collects device information based on the EIP agent profile associated with the SASE portal policy and reports this information to the SASE gateway. The gateway evaluates the information and enforces the associated security policy. For example, you can create an EIP agent profile to verify if endpoint devices have installed the mandatory antivirus software. If the SASE client finds a device that has not installed the mandatory software, it does not allow the user to connect to the enterprise network and displays a message to install the software.
The frequency of how often the client collects and reports data depends on the posture check interval configured in the secure access profile.
This article describes how to:
- View predefined EIP objects and to configure custom EIP objects.
- View predefined EIP profiles, to configure custom EIP profiles, and to use EIP objects to configure EIP profile rules.
- View predefined EIP agents and to configure custom EIP objects.
- Associate an EIP profile with secure service edge rules.
- Associate an EIP agent profile with an SCA rule.
View Predefined EIP Objects
Concerto supports predefined EIP objects that you can use to define rules associated with EIP profiles.
To view predefined EIP objects:
- Go to Configure > Profiles and Connectors > Endpoint Information Profile (EIP).
Note that for Releases 12.1.1 and earlier, the Endpoint Information Profile folder is located at Configure > Security Service Edge > Settings > Endpoint Information Profile.

- Select the EIP Objects tab and then select the Predefined tab to view the predefined EIP objects that Concerto supports. The table displays the name, description, category, and details of the object.

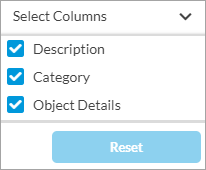
- To customize which columns display, click Select Columns down arrow and then click the columns to select or deselect the ones you want to display. Click Reset to return to the default column display settings. The options are:
- Description
- Category
- Object Details
Configure a Custom EIP Object
You can use EIP objects to define rules associated with EIP profiles.
To configure a custom EIP object:
- Go to Configure > Security Service Edge > Profiles and Connectors > Endpoint Information Profile (EIP).
Note that for Releases 12.1.1 and earlier, the Endpoint Information Profile folder is located at Configure > Security Service Edge > Settings > Endpoint Information Profile.
- Select the EIP Objects tab, and then select the User-Defined tab.

- To customize which columns display, click the Select Columns down arrow, and then click the columns to select or deselect the ones you want to display. Click Reset to return to the default column display settings.
- Click the
 Add icon to add a new EIP object. The Add EIP Object screen displays. Enter information for the following fields.
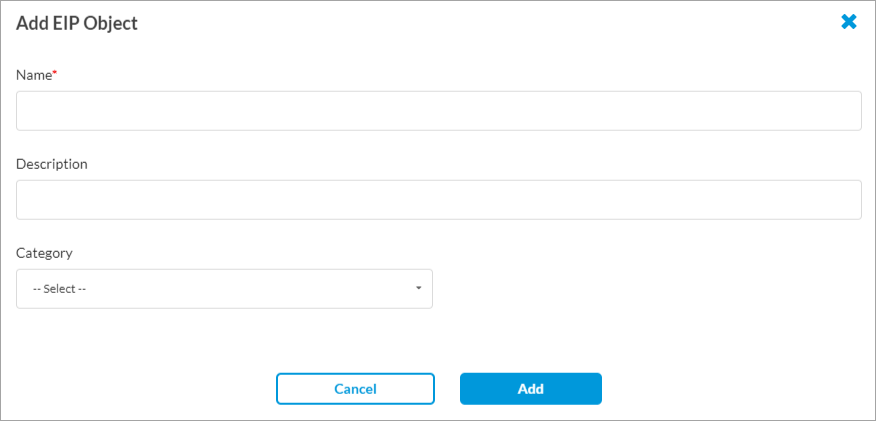
Field Description Name Enter a name for the EIP object. Description Enter a text description for the EIP object. Category Select the EIP category. There are 19 categories, and each EIP object belongs to only one category. The fields in the screen may change depending on the value you select in the category field. - For each EIP object, enter information in the following fields to configure when the SASE client should filter the object.
Note: In the following table, many categories listed in the Field column have the same fields in their UI screens. For these categories, one example UI screen in shown. Other categories have unique UI screens, and the example UI screens for those categories are shown separately.
Field Description AntiMalware
Configure when the SASE client should validate information related to anti-malware security. By default, all information extraction is disabled.

- Configured
- Installed
- Real Time
- Running
Whether to match the anti-malware software configuration, installation, real-time, or running status information:
- Disabled—Perform no validation. This is the default.
- False—Perform validation, and if the endpoint reports the status as False, the match is successful.
- True—Perform validation, and if the endpoint reports the status as True, the match is successful.
- Last Definition Update Time
Enter how often to validate the last definition update time of the anti-malware software, in hours. - Range: 1 through 65535 hours
- Default: 0
- Last Scan Time
Enter how often to validate the last scan time of the anti-malware software, in minutes. - Range: 1 through 65535 minutes
- Default: 0
- Vendor
Select the anti-malware software vendor name. - Product
Select the anti-malware software product name. When you select the product name, the Major field is enabled. - Major
Whether to validate the major version of the anti-malware software installed on the SASE client. - Disabled—Click to not validate the major software version. This is the default.
- Range—Click and then select a range for the major software version.
- Value—Click and then select a value for the major software version.
- Minor
Whether to validate the minor version of the anti-malware software installed on the SASE client. When you select the minor version, the Service field is enabled.
- Disabled—Click to not validate the minor software version. This is the default.
- Range—Click and then select a range for the minor software version.
- Value—Click and then select a value for the minor software version.
- Service
Whether to validate the anti-malware software service number on the SASE client. After you select the service, the Patch field is enabled.
- Disabled—Click to not validate the software service number. This is the default.
- Range—Click and then select a range for the service software number.
- Value—Click and then select a value for the service software number.
- Patch
Whether to validate the latest patch number available for the anti-malware software package.
- Disabled—Click to not validate the latest patch number. This is the default.
- Range—Click and then select a range for the latest patch number.
- Value—Click and then select a value for the latest patch number.
Antiphishing
Browser
Cloud storage
Data loss prevention
Disk backup
Disk encryption
Endpoint Security
Firewall
Health agent
Messenger
Patch management
Public file sharing
Remote control
Virtual machine
Configure when the SASE client should filter information related to EIP security. By default, all information extraction is disabled.
Note: The Endpoint Security category currently supports the following two vendors:
- Crowdstrike Falcon from Crowdstrike
- Sentinel Agent from Sentinel One

- Configured
- Installed
- Running
Whether to match the configuration, installation, or running status of the selected security software:
- Disabled—Perform no validation. This is the default.
- False—Perform validation, and if the endpoint reports the status as False, the match is successful.
- True—Perform validation, and if the endpoint reports the status as True, the match is successful.
- Vendor
Select the security software vendor name. - Product
Select the security software product name of the software. When you select the product name, the Major field is enabled. - Major
Whether to validate the major version of the security software installed on the SASE client. When you select the major version, the Minor field is enabled.
- Disabled—Click to not validate the major software version. This is the default.
- Range—Click and then select a range for the major software version.
- Value—Click and then select a value for the major software version.
- Minor
Whether to validate the minor version of the security software installed on the SASE client. When you select the minor version, the Service field is enabled.
- Disabled—Click to not validate the minor software version. This is the default.
- Range—Click and then select a range for the minor software version.
- Value—Click and then select a value for the minor software version.
- Service
Whether to validate the security software service number on the SASE client. When you select the service, the Patch field is enabled.
- Disabled—Click to not validate the software service number. This is the default.
- Range—Click and then select a range for the service software number.
- Value—Click and then select a value for the service software number.
- Patch
Whether to validate the latest patch number available for the security software package.
- Disabled—Click to not validate the latest patch number. This is the default.
- Range—Click and then select a range for the latest patch number.
- Value—Click and then select a value for the latest patch number.
- Location
(For Disk Encryption only.) - Path
Enter the path to the encrypted disk. - Status
Selected one or more status categories, as follows:
- Encrypted
- Unknown
- Unencrypted
- Partial
- Suspended
- Last Connected Since
(For the Endpoint Security category only.) Enter a value in minutes.
Range: 1 through 65535 minutes
Default: None
Mobile 
- Check-in Time (in minutes)
Enter the check-in time in minutes. - IMEI
Note: Due to privacy and security rules on Android and iOS, the Versa client cannot currently fetch the International Mobile Equipment Identity (IMEI).
- Phone Number
Enter the mobile device's phone number. - Model
Enter the model of the mobile phone. - Passcode
Configure the passcode feature:
- Disabled—Disable the passcode feature. This is the default.
- False—User does not need to enter a passcode.
- True—User needs to enter a passcode.
- Malware App
Configure the malware app feature:
- Disabled
- False
- True
- Disk Encryption
Configure the disk encryption feature:
- Disabled—Disable the passcode feature. This is the default.
- False—Do not encrypt the disk.
- True—Encrypt the disk.
- Jailbroken
Configure the jailbroken feature, which allows users to remove a manufacturer's restrictions on a mobile device.
- Disabled—Disable the jailbraking feature. This is the default.
- False—Do not allow the jailbraking feature.
- True—Allow the jailbraking feature.
- Biometric Support
Configure the biometric support feature:
- Disabled—Disable the biometric support feature. This is the default.
- False—Do not turn on biometric support.
- True—Turn on biometric support.
- Applications
Enter the applications to which the biometric feature is applied. Type the name of the application, then press the Enter/Return key. You can enter multiple applications. Custom
Configure when the SASE client should filter information related to custom security. By default, all information extraction is disabled.

- Process Name
Enter the name of a process. If the process is running, click the Running check box. Click the  Add icon to add additional processes.
- Windows Files
Enter the absolute path of a Windows file to determine whether the file is present on the end device, for example, C:\Windows\System32\drivers\fileinfo.sys. Click the  Add icon to add another row.
- Windows Registry (Group of Fields)
- Registry Path
Enter the absolute path of a registry to determine the value of the registry on the end device, for example, HKEY_LOCAL_MACHINE\SYSTEM\State\DateTime\NTP Enabled. Click the Add icon to add another row.- Exists
Click if the file is present on the end device. - Value
Enter the value of the registry on the end device. General
Configure when the SASE client should filter information related to general security. By default, all information extraction is disabled.

- Hostname
Enter the name of the device. - Host ID
Enter the unique identification number of the host. - Windows Domain
For a Windows device, enter the domain to which the Windows system belongs. - Username
Enter the username to log in to the system. - OS Vendor
Enter the OS vendor of the installed operating system. - OS Product
Enter the product name of the endpoint operating system installed. - OS Major
Whether to validate the major version of the OS software installed on the SASE client. When you select an OS major software version, the Minor field is enabled. - Disabled—Click to not validate the OS major software version. This is the default.
- Value—Click and enter a number from 0 through 4294967295 or select from the list for the OS major software version.
- Range—Click and enter a number from 0 through 4294967295 or select from the list for the OS major software version.
- Minimum—Enter a number from 0 through 4294967295 or select from the list.
- Maximum—Enter a number from 0 through 4294967295 or select from the list.
- OS Minor
Whether to validate the minor version of the OS software installed on the SASE client. When you select an OS minor software version, the OS Service field is enabled. - Disabled—Click to not validate the OS minor software version. This is the default.
- Value—Click and enter a number from 0 through 4294967295 or select from the list for the OS minor software version.
- Range—Click and enter a number from 0 through 4294967295 or select from the list for the OS minor software version.
- Minimum—Enter a number from 0 through 4294967295 or select from the list.
- Maximum—Enter a number from 0 through 4294967295 or select from the list.
- OS Service
Whether to validate the service version of the OS software installed on the SASE client. When you select an OS service software version, the OS Patch field is enabled.
- Disabled—Click to not validate the OS service software version. This is the default.
- Value—Click and enter a number from 0 through 4294967295 or select from the list for the OS service software version.
- Range—Click and enter a number from 0 through 4294967295 or select from the list for the OS service software version.
- Minimum—Enter a number from 0 through 4294967295 or select from the list.
- Maximum—Enter a number from 0 through 4294967295 or select from the list.
- OS Patch
Whether to validate the latest OS patch number of the OS software installed on the SASE client:
- Disabled—Click to not validate the OS patch range. This is the default.
- Value—Click and enter a number from 0 through 4294967295 or select from the list for the OS patch range.
- Range—Click and enter a number from 0 through 4294967295 or select from the list for the OS patch range.
- Minimum—Enter a number from 0 through 4294967295 or select from the list.
- Maximum—Enter a number from 0 through 4294967295 or select from the list.
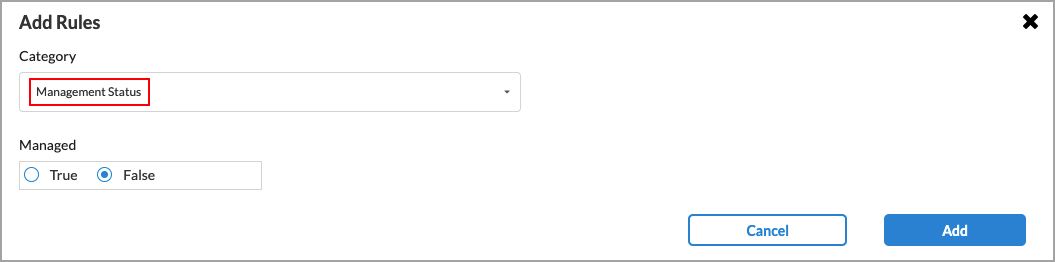
Management status
Configure when the SASE client should filter information related to management status security. By default, all information extraction is disabled.

- Managed
Whether to validate if the endpoint device is managed by the organization:
- Disabled—Click to neither validate nor not validate. This is the default.
- False—Click to not validate.
- True—Click to validate.
- Click Add.
View Predefined EIP Profiles
Concerto supports predefined EIP profiles that you can use to create security rules.
To view predefined EIP profiles:
- Go to Configure > Security Service Edge > Profiles and Connectors > Endpoint Information Profile (EIP).
Note that for Releases 12.1.1 and earlier, the Endpoint Information Profile folder is located at Configure > Security Service Edge > Settings > Endpoint Information Profile.
The following screen displays:

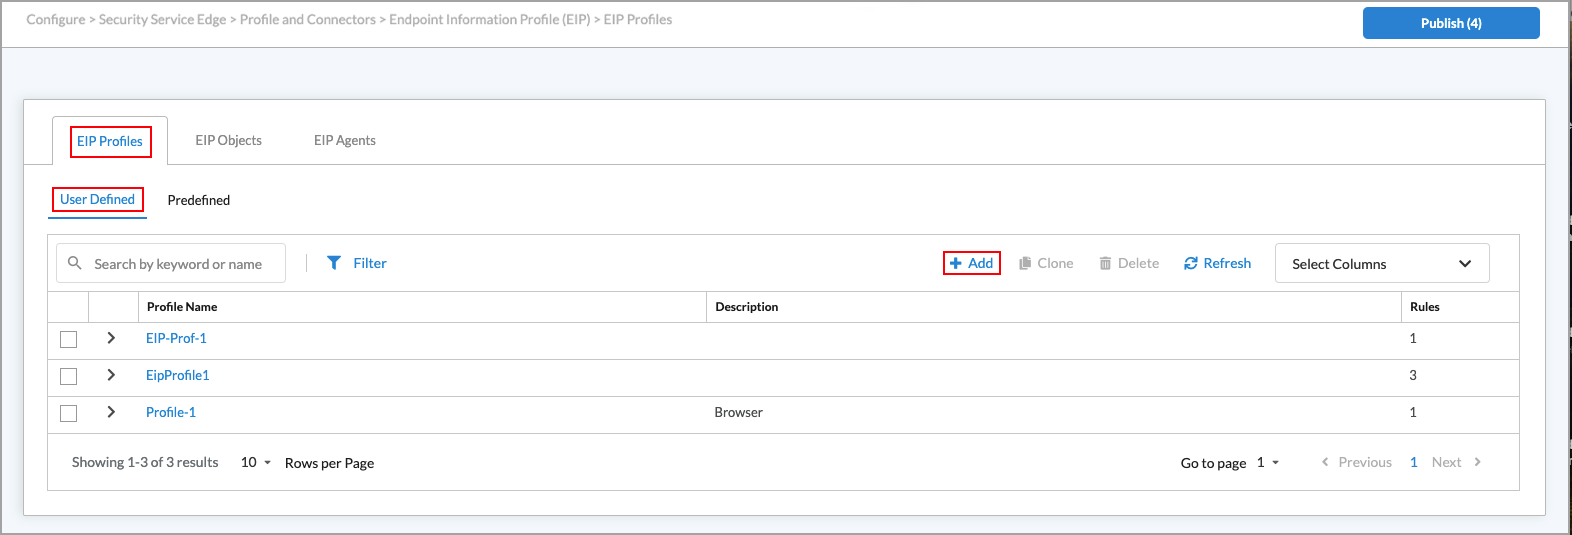
- Select the EIP Profile tab, and then select the Predefined tab to view the predefined endpoint information profiles that Concerto supports. The table displays the name of the profile, a description for the profiles, and the number of rules that the profile supports.
- To customize which columns display, click the Select Columns down arrow, and then click the columns to select or deselect the ones you want to display. Click Reset to return to the default column display settings.
- Click the
 right angle bracket next to a predefined profile name to view the rules that are part of the EIP profile. Click the right angle bracket next to the object name to view the details of that object.

Field Description Name Displays the name of the EIP rule. Category Displays the category of the rule. Objects Displays the number of EIP objects associated with the rule. User-Defined Objects Displays the number of custom EIP objects associated with the rule. Predefined Objects Displays the number of predefined EIP objects associated with the rule.
Configure a Custom EIP Profile
In addition to using predefined EIP profiles, you can create custom EIP profiles to suit your endpoint security policy.
To configure a custom EIP profile:
- Go to Configure > Security Service Edge > Profile and Connectors > Endpoint Information Profile (EIP). The following screen displays.
Note that for Releases 12.1.1 and earlier, the Endpoint Information Profile folder is located at Configure > Security Service Edge > Settings > Endpoint Information Profile.
- Select the EIP Profiles tab, and then select the User Defined tab.
- To customize which columns display, click Select Columns down arrow and then click the columns to select or deselect the ones you want to display. Click Reset to return to the default column display settings.

- Click the Add icon to add an EIP profile. The Create EIP Profile screen displays.

- Under Rules, click the Add icon to add an EIP rule.
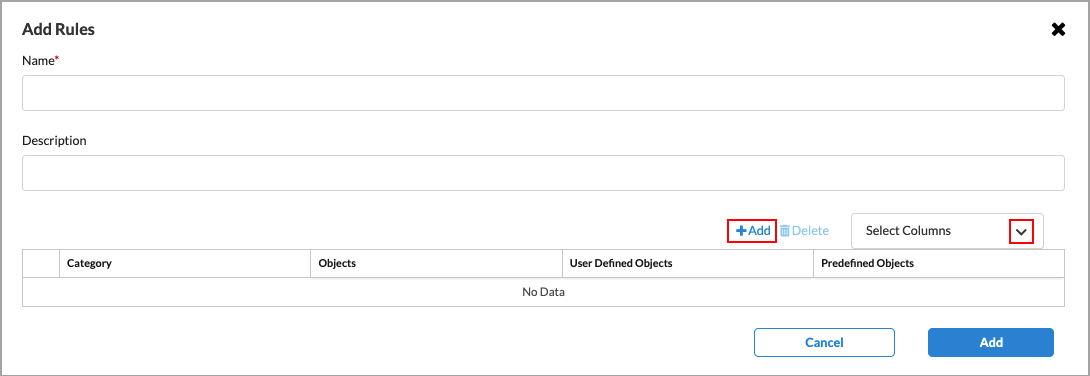
- Click the Add icon to add a predefined or custom EIP object to the rule. In the Add EIP Object popup window, enter information for the following fields. You must add at least one EIP object to the rule. An EIP object identifies particular information about the software, such as management status, AD domain, and the unique host ID of an endpoint. For more information, see Configure a Custom EIP Object, above.
Note: Within a single EIP rule, EIP objects from different categories use AND logic, requiring all categories to match for the rule to allow access. Within a single EIP rule, multiple EIP objects from the same category use OR logic, where any matching object allows access. Multiple EIP rules are evaluated top-down, and the first matching rule determines the action. When multiple EIP profiles are attached to a policy, a match in any profile allows access.

Field Description Category Click the down arrow, and then select an EIP object category. Versa EIP supports the following classification categories on Linux, Mac, and Windows devices:
- Anti-malware
- Anti-phishing
- Browser
- Cloud storage
- Custom
- Data loss prevention
- Disk backup
- Disk encryption
- Endpoint Security
- Firewall
- General
- Health agent
- Management status
- Messenger
- Mobile
- Patch management
- Public file sharing
- Remote control
- Virtual machine
User-Defined EIP Objects Click the down arrow, and then select one or more user-defined EIP object categories. For more information, see Configure a Custom EIP Object. Predefined EIP Objects Click the down arrow, and select one or more predefined EIP object categories. - Click Add to add the EIP objects to the EIP rule.
- Click Next.
- In the Review and Submit screen, in the General section, enter a name for the EIP rule. Optionally, you can add a description and one or more tags. A tag is an alphanumeric descriptor, with no white spaces or special characters, that you can use to search the objects.

- Review the configuration entries, and click the
 Edit icon to make any needed changes.
 - Click Save to create the new EIP rule.
View Predefined EIP Agent Profiles
Concerto supports predefined EIP agent profiles that you can use to create rules.
To view predefined EIP agent profiles:
- Go to Configure > Security Service Edge > Profile and Connectors > Endpoint Information Profile (EIP).
Note that for Releases 12.1.1 and earlier, the Endpoint Information Profile folder is located at Configure > Security Service Edge > Settings > Endpoint Information Profile.
- Click the EIP Agents tab and then select the Predefined subtab to view the predefined EIP agent profiles that Concerto supports. The table displays the profile name, description, and the number of rules associated with the profile.

- To customize which columns display, click Select Columns down arrow and then click the columns to select or deselect the ones you want to display. Click Reset to return to the default column display settings.
Configure a Custom EIP Agent Profile
You configure an EIP agent profile to define when the SASE client must extract information from endpoint devices. You associate predefined or custom EIP agents with secure client access rules to enforce EIP security.
To configure a custom EIP object:
- Go to Configure > Security Service Edge > Profile and Connectors > Endpoint Information Profile (EIP).
Note that for Releases 12.1.1 and earlier, the Endpoint Information Profile folder is located at Configure > Security Service Edge > Settings > Endpoint Information Profile.
- Select the EIP Agents tab and then select the User Defined tab. The following screen displays.

- To customize which columns display, click Select Columns right angle bracket, and then click the columns to select or deselect the ones you want to display. Click Reset to return to the default column display settings.
- Click + Add to add an EPS agent profile. The Create EIP Agent Profile screen displays.

- Select step 1, Rules, and then click the Add icon to add a rule to the EIP agent profile. In the Add Rules popup window, enter information for the following fields.

EIP Category and Field Description AntiMalware Configure when the SASE client should extract information related to the anti-malware security type from the endpoint device traffic. For each item, select one of the following options:
- Disabled—The item is disabled.
- True—Click to extract the information for this category.
- False—Click to not extract the information for this category.

- Configured
- Installed
- Running
- Realtime
Select one of the options to extract the anti-malware software configuration, installation, or running status, or real-time information.
- Last Definition Update Time (in hours)
Whether to extract information about the last definition update time of the anti-malware software, in hours.
- Last Scan Time (in minutes)
Whether to extract the last scan time of the anti-malware software, in minutes.
- Software Details (Group of Fields)
- Vendor
Whether to extract the anti-malware software vendor name on the SASE client.
- Product
Whether to extract the anti-malware software product name on the SASE client.
- Major
Whether to extract the major version of the anti-malware software installed on the SASE client.
- Minor
Whether to extract the minor version of the anti-malware software installed on the SASE client.
- Service
Whether to extract the anti-malware software service number on the SASE client.
- Patch
Whether to extract the latest patch number available for the anti-malware software package
Custom
Configure when the SASE client should extract information for the custom security type from the endpoint device traffic.

- Process Name
Enter the name of the process. - Windows Files
Enter the absolute path of a Windows file to determine whether the file is present on the end device, for example, C:\Windows\System32\drivers\fileinfo.sys.
Click the Add icon to add another row.
- Windows Registry
Enter the absolute path of a registry to determine the value of the registry on the end device, for example, HKEY_LOCAL_MACHINE\SYSTEM\State\DateTime\NTP Enabled.
Click the
Add icon to add another row.General
Configure when the SASE client should extract information related to general security from the endpoint device traffic. For each item, select one of the following options:
- False—Click to not extract the information.
- True—Click to extract the information.

- Hostname
Whether to extract the name of the Windows host. - Host ID
Whether to extract the unique identification number of the host.
- Windows Domain
Whether to extract the Windows domain information of the end device.
- Username
Whether to extract the username to log in to the system.
- OS Vendor
Whether to extract the vendor name of the installed endpoint operating system installed.
- OS Product
Whether to extract the product name of the installed endpoint operating system.
- OS Major
Whether to extract the installed OS major software version. - OS Minor
Whether to extract the installed OS minor software version.
- OS Service
Whether to extract the OS software service number.
- OS Patch
Whether to extract the latest patch number and OS versions available for each software package.
Management Status
Configure when the SASE client should extract information related to management status security.
For each item, select one of the following options:
- True—Click to extract the information for this category.
- False—Click to not extract the information for this category.
Mobile Configure when the SASE client should extract information related to mobile.
For each item, select one of the following options:
- Disabled—The item is disabled.
- True—Click to extract the information for this category.
- False—Click to not extract the information for this category.

Antiphishing
Browser
Cloud Storage
Data Loss Prevention
Disk Backup
Disk Encryption
Endpoint Security
Firewall
Health Agent
Messenger
Patch Management
Public File Sharing
Remote Control
Virtual Machine
Configure when the SASE client should extract information for the EIP security type from the endpoint device traffic. For each item, select one of the following options:
- Disabled—The item is disabled.
- True—Click to extract the information for this category.
- False—Click to not extract the information for this category.

- Configured
Whether to extract information about the configuration status of the software.
- Installed
Whether to extract information about the installation status of the software.
- Running
Whether to extract information about the running status of the software.
- Last Connected Since (minutes)
(For the Endpoint Security category only.) Enter a value in minutes.
Range: 1 through 65535 minutes
Default: None
- Software Details (Group of Fields)
- Vendor
Whether to extract the vendor software.
- Product
Whether to extract the software product name.
- Major
Whether to extract the major software version of the installed software.
- Minor
Whether to extract the minor software versions of the installed software.
- Service
Whether to extract the software service number.
- Patch
Whether to extract the latest software package patch number.
- Click Add to add the EIP rule to the EIP agent profile.
- Click Next.
- In the step 2, Review and Submit screen, in the General section, enter a name for the EIP agent profile. Optionally, you can add a description and one or more tags. A tag is an alphanumeric descriptor, with no white spaces or special characters, that you can use to search the objects.

- Review the configuration entries, and click the Edit icon to make any needed changes.
- Click Save.
Associate an EIP Profile with Security Service Edge Rules
To enforce EIP profile rules, you associate predefined or custom EIP profiles with internet protection (IP) rules, secure client access (SCA) rules, and TLS decryption rules.
Associate an EIP Profile with an Internet Protection Rule
- Go to Configure > Security Services Edge > Real-Time Protection > Internet Protection.

The following screen displays.

- In the Internet Protection Rules List screen, click the Add icon to create a rule, or select an existing rule to edit. The Create Internet Protection Rule screen displays. For more information about configuring internet protection rules, see Configure SASE Internet Protection Rules.
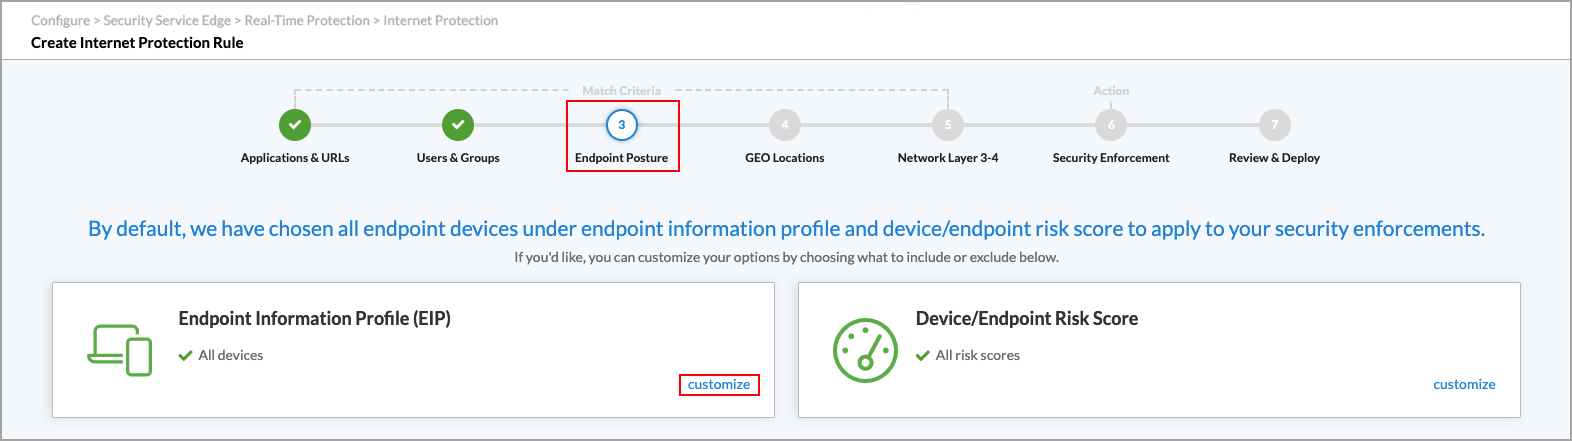
- Select the step 3, Endpoint Posture tab, and then click Customize in the Endpoint Information Profile (EIP) pane. The following screen displays with the User Defined tab selected by default.
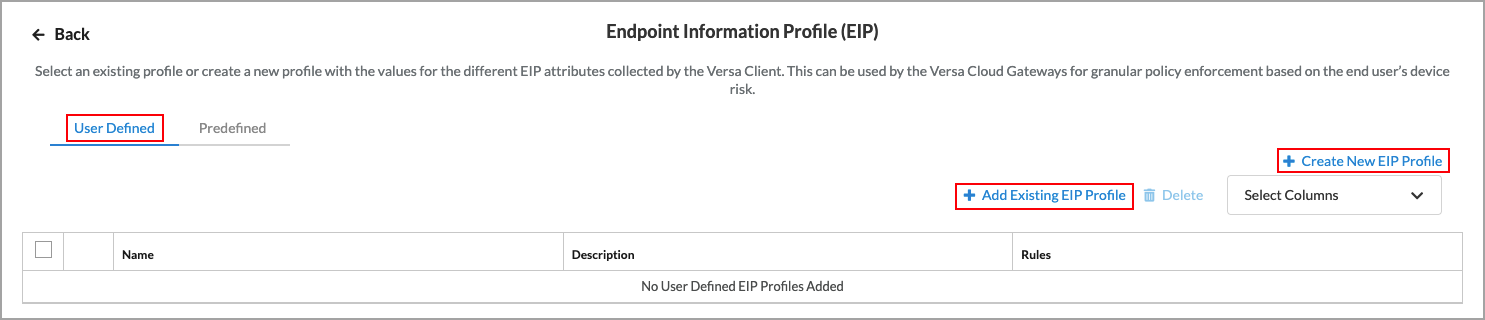
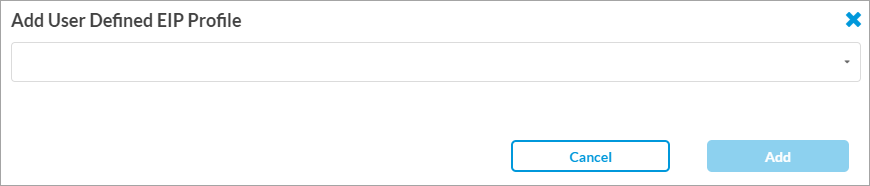
- To associate an existing custom EIP profile with the internet protection rule, click Add Existing EIP Profile. The Add User Defined EIP Profile popup screen displays.

- Select a custom EIP profile in the drop-down list, and then click Add.
- To add a new EIP profile, click Create New EIP Profile. The Create EIP Profile screen displays. For more information, see Configure a Custom EIP Profile, above.
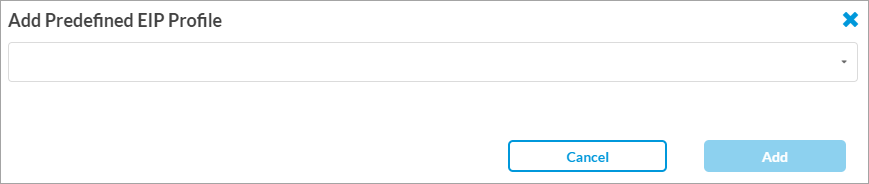
- To associate a predefined EIP profile with the internet protection rule, select the Predefined tab in the Endpoint Information Profile (EIP) screen.

- Click + Add Existing EIP Profile. The Add Predefined EIP Profile popup screen displays.

- Select a predefined EIP profile in the drop-down list, and then click Add.
- Click the
 Back icon to return to the Endpoint Posture screen.
Associate an EIP Profile with a Secure Client-based Access Rule
- Go to Configure > Secure Services Edge > Secure Access > Client-based Access > Policy Rules.
Note: In Releases 12.1.1 and earlier, the Secure Access folder was called Secure Client Access, and Policy Rules was located directly under Secure Client Access (Configure > Security Service Edge > Secure Client Access > Policy Rules). In addition, you configured both client-based and clientless access from Secure Client Access > Policy Rules screens.

The following screen displays.

- Click the Add icon. The Create Client-based Access Rule screen displays.

- Select Endpoint Posture, then click Customize in the Endpoint Information Profile (EIP) pane. The following screen displays.
- To associate an existing custom EIP profile with the secure client-based access rule, select the User Defined tab, and then click Add Existing EIP Profile. The Add User Defined EIP Profile popup screen displays.
- Select a user-defined EIP profile in the drop-down list, and then click Add.
- To add a new EIP profile, click Create New EIP Profile in the Endpoint Information Profile (EIP) screen. The Create EIP Profile screen displays. For more information, see Configure a Custom EIP Profile, above.
- To associate a predefined EIP profile with the secure client-based access rule, select the Predefined tab then click Add Existing EIP Profile.

- In the Add Predefined EIP Profile popup screen, select a predefined EIP profile in the drop-down list, and then click Add.
- Save the secure client access rule.
Associate an EIP Profile with a TLS Decryption Rule
- Go to Configure > Security Services Edge > TLS Decryption > Policy Rules.

The following screen displays.

- Click the Add icon. The Create TLS Decryption Rule screen displays. For detailed information, see Configure TLS Decryption Rules.

- Select Customize in the Endpoint Information Profile (EIP) pane. The following screen displays.
- To associate an existing custom EIP profile with the TLS decryption rule, select the User Defined tab, and then click Add Existing EIP Profile. The Add User Defined EIP Profile popup screen displays.
- Select a custom EIP profile in the drop-down list and click Add.
- To add a new EIP profile, click Create New EIP Profile in the Endpoint Information Profile (EIP) screen. The Create EIP Profile screen displays. For more information, see Configure a Custom EIP Profile, above.
- To associate a predefined EIP profile with the TLS decryption rule, select the Predefined tab in the Endpoint Information Profile (EIP) tab.
- Click Add Existing EIP Profile. The Add Predefined EIP Profile popup screen displays.
- Select a predefined EIP profile in the drop-down list, and then click Add.
- Save the TLS decryption rule.
Associate an EIP Agent Profile with a Secure Client-Based Access Rule
To enforce an EIP agent profile rule, you associate predefined or custom EIP agent profiles with secure client-based access rules.
To associate an EIP agent profile with an secure client-based access rule:
- Go to Configure > Security Service Edge > Secure Access > Client-based Access > Policy Rules.

The following screen displays.

- To customize which columns display, click the Select Columns down arrow, and then click the columns to select or deselect the ones you want to display. Click Reset to return to the default column display settings. The options are:
- Operating System Versions
- Users and Groups
- EIP and Device Endpoint Risk Score
- Device Compliance Status
- Source Geo Locations
- Source IP Address
- Traffic Action
- VPN and Gateway Groups
- Client-Based Access Profile
- MFA Status
- VPN
- Client Controls
- EIP Agent
- Status
- Creation Date
- Last Modified
- Pre-Logon Configuration
- To associate an EIP agent profile with a secure client-based access rule, click a previously configured rule name. The following screen displays.
Note: If you are adding a new secure client-based access rule, see Configure SASE Secure Client-Based Access Rules for more information.

- Click step 8, Agent Profile from EIP. The following screen displays.
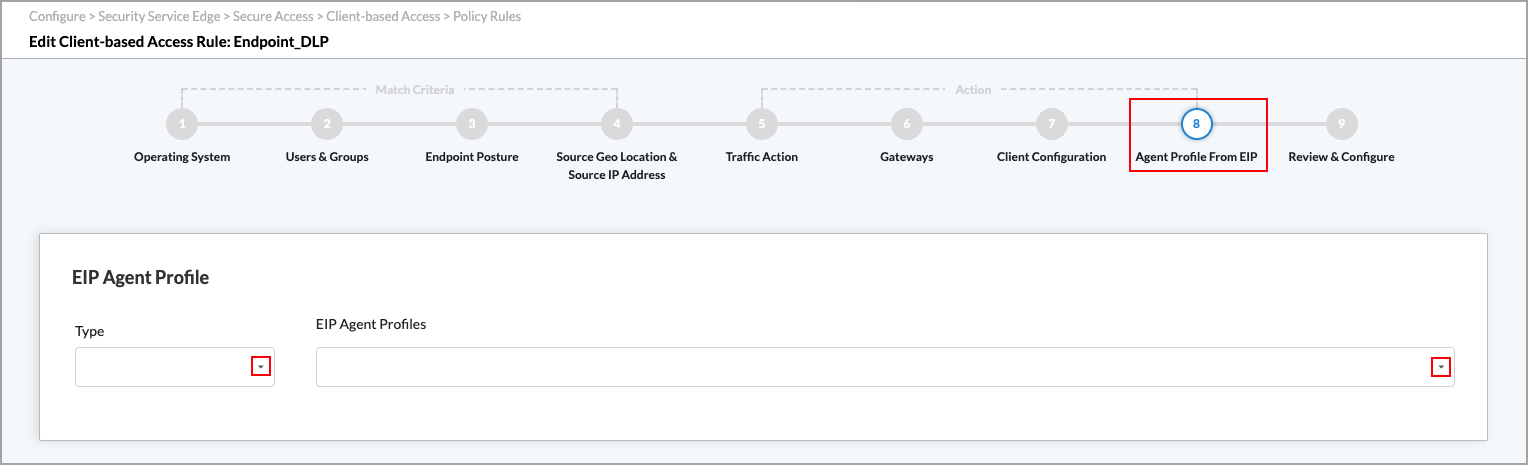
Field Description Type Select an EIP agent profile type. The options are User Defined or Predefined. EIP Agent Profile Select an EIP agent profile. - Click Next to go to step 9, Review & Configure.
- Click Save to associate the selected EIP agent profile with the client-based access rule.
Associate an EIP Agent Profile with an Secure Client Access Rule for Releases 12.1.1 and Earlier
To enforce an EIP agent profile rule, you associate predefined or custom EIP agent profiles with secure client access rules.
To associate an EIP agent profile with a secure client access rule:
- Go to Configure > Secure Services Edge > Secure Client Access > Policy Rules.

The following screen displays.

- In the Secure Client Access Rule List screen, click the Add icon to create a rule, or select an existing rule to edit. The following popup window displays.

- Click Add to select the default rule type, Secure Remote Access Rule Client-based. The Create Secure Client Access Rule screen displays. For more information about configuring secure client access rules, see Configure SASE Secure Client Access Rules.

- Select step 8, Agent Profile from EIP.
- To associate an existing custom EIP agent profile with the secure client access rule:
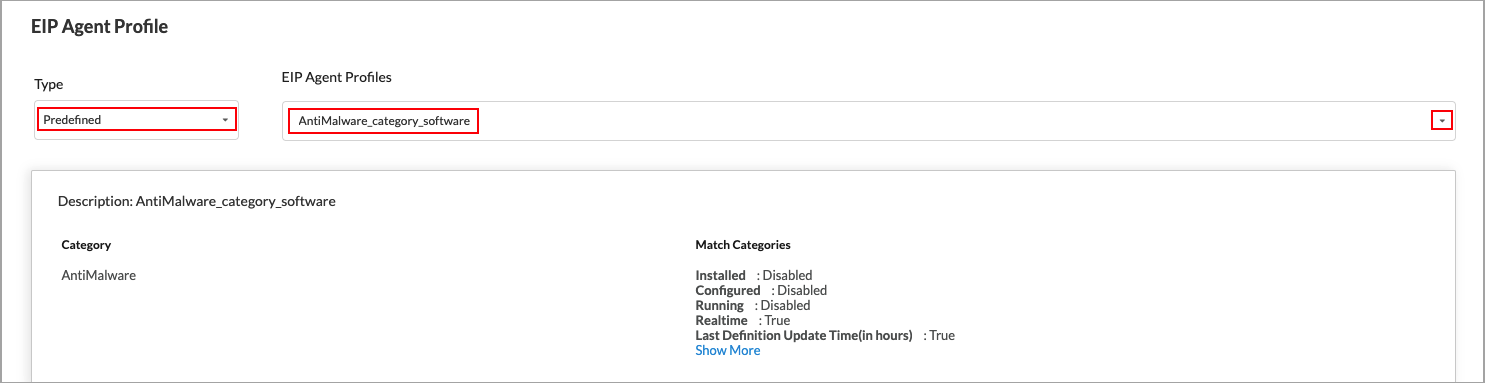
- Select User Defined in the Type field.
- Select a custom profile in the EIP Agent Profiles field. In the screen shot above, the user-defined A2 EIP agent profile is selected, and the screen displays the details of this profile.
- To add a new EIP Agent Profile, click Create New. The Create EIP Agent Profile screen displays. For more information, see Configure a Custom EIP Agent Profile, above.
- To associate a predefined EIP agent profile with the secure client access rule, select Predefined in the Type field, and then select a profile in the EIP Agent Profiles field.
- Save the secure client access rule.
Supported Software Information
Releases 11.3.1 and later support all content described in this article, except:
- Release 12.2.1 adds support for the Endpoint Posture workflow and for the Endpoint Security and Mobile custom EIP object categories.