Configure Endpoint Detection and Response
![]() For supported software information, click here.
For supported software information, click here.
Endpoint detection and response (EDR) is a cybersecurity technology that monitors and responds to threats coming from endpoint devices such as laptops, mobile phones, and internet-of-things (IoT) devices. EDR primarily detects advanced threats that can evade front-line defenses and successfully enter the network environment. By collecting and aggregating data from endpoints and other sources, EDR can identify suspicious behavior and alert administrators to eliminate the threat before it can spread.
Concerto integrates with the following EDR vendors:
- CrowdStrike
- Microsoft Defender
- SentinelOne
Note: Before configuring EDR on Concerto, you must create an account with the EDR vendor and configure the EDR service to integrate with Concerto.
Configure EDR
To configure EDR on Concerto:
Note: If you reached this page by clicking + Configure EDR in the Configure Unified Entity Risk Profiles in Concerto article, skip to Configure Crowdstrike.
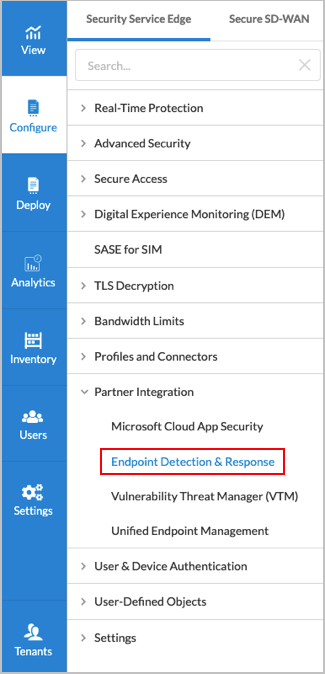
- From the Tenant home page, click Configure in the left menu bar.
- Select Security Service Edge > Partner Integration > Endpoint Detection & Response.
Note that for Releases 12.1.1 and earlier, the Partner Integration Profile folder is located at Configure > Security Service Edge > Settings.
Configure Crowdstrike
When you select Partner Integration > Endpoint Detection and Response in the left navigation menu, the following screen displays with the CrowdStrike tab selected by default.
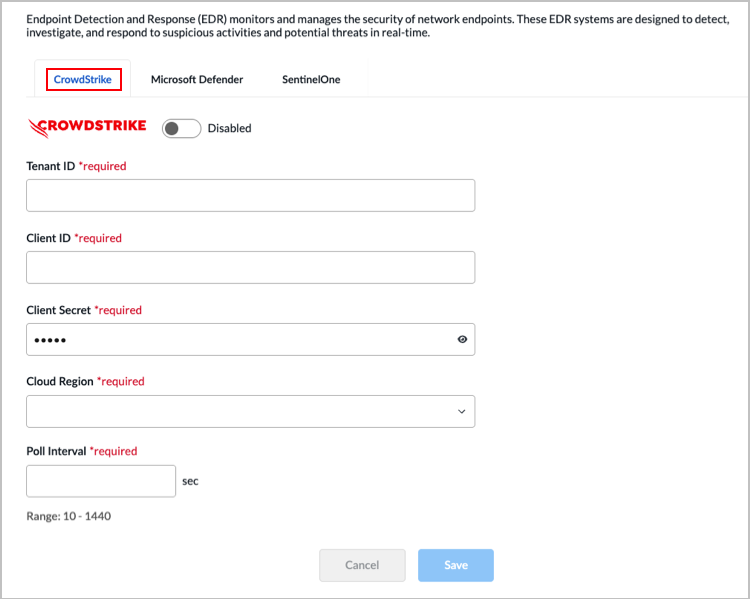
- To configure Crowdstrike, enter information for the following fields.
Field Description Disabled Click the slider to enable Crowdstrike. The default is Disabled. Client ID Enter the client ID that was generated by Crowdstrike. Tenant ID Enter the tenant ID that was generated by Crowdstrike. Client Secret Enter the client secret that was generated by Crowdstrike. Cloud Region Select the region of the CrowdStrike instance. Poll Interval Enter the time, in minutes, between polling actions.
Range: 10 through 1440 seconds
Default: None
- Click Save.
Configure Microsoft Defender
To configure Microsoft Defender:
- Click the Microsoft Defender tab, then enter information for the following fields.

Field Description Disabled Click the slider to enable Microsoft Defender. The default is Disabled. Client ID Enter the client ID that was generated by Microsoft Defender Tenant ID Enter the tenant ID that was generated by Microsoft Defender. Client Secret Enter the client secret that was generated by Microsoft Defender. Poll Interval Enter the time, in minutes, between polling actions.
Range: 10 through 1440 seconds
Default: None
- Click Save.
Configure SentinelOne
To configure SentinelOne:
- Click the SentinelOne tab, then enter information for the following fields.

Field Description Disabled Click the slider bar to enable SentinelOne. Account ID (Required) Enter the account ID. Connector URL (Required) Enter the URL of the SentinelOne instance. Poll Interval (Required) Enter the interval between polling events, in minutes.
Range: 10 through 1440
Default: 10
Admin Email (Required) Enter the email of the SentinelOne administrator. API Key (Required) Enter the API key value.
You can configure additional parameters by clicking Advanced Settings. You can assign weights in percentages for the following parameters:- Critical Risk Indicators
- Operational Health Indicators
- Risk Bands
Note: The cumulative weight total for the following parameters must not exceed 100%.
- Select the Critical Risk Indicators tab, then enter information for the following fields.
Note: You can click the
 Example Scores icon to view the following example scores:
- Low risk—Lean device, all protections active, approximately → ~19
- Suspicious—Learning mode, firewall off, stale check-in approximately → ~64
- High risk—Active infection, detection disabled, fully degraded approximately → ~99
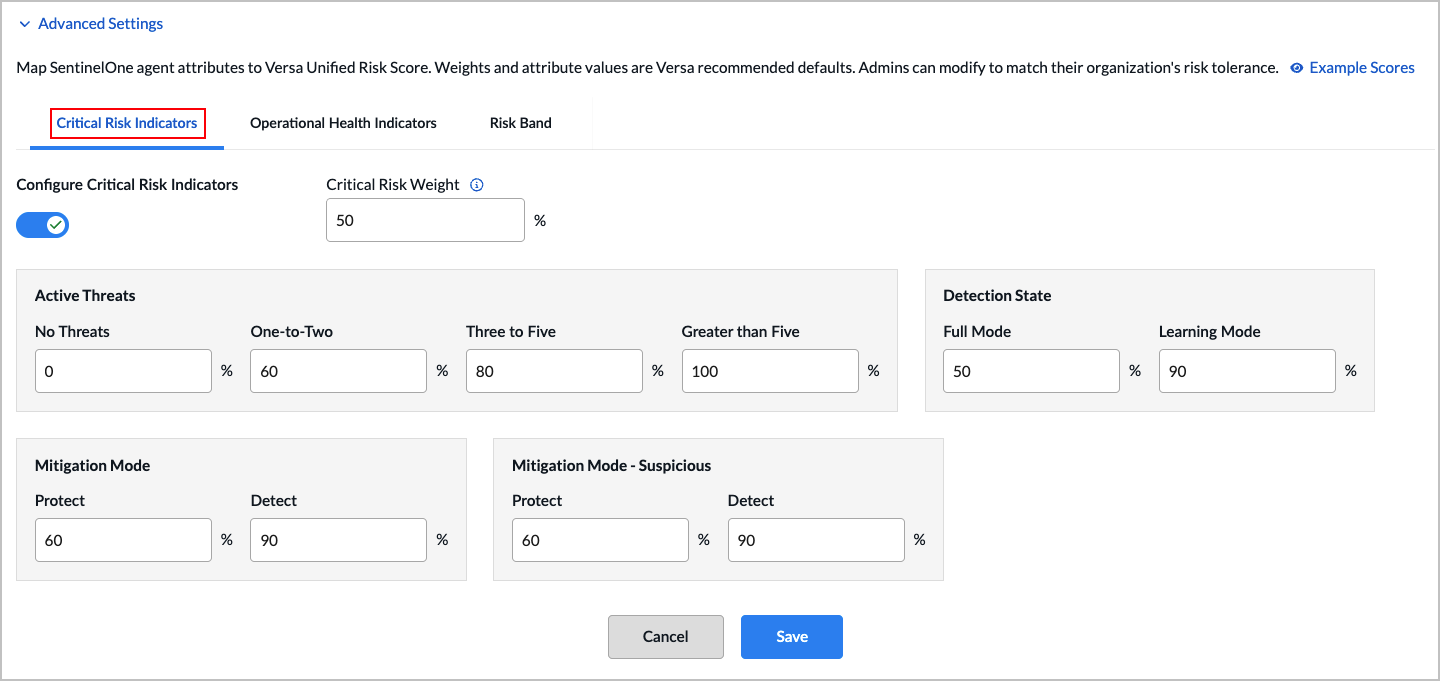
Field Description Critical Risk Indicators Click the slider bar to enable the Critical Risk Indicators. Critical Risk Weight Enter the total weight of the Critical Risk Indicators, as a percentage.
Range: 0 through 100 percent
Default: 50 percent
Active Threats (Group of Fields) Enter the weight to give to active threats that are detected, as a percentage. - No Threats
Enter the weight to give when no active threats are detected.
Range: 0 through 100 percent
Default: 0 percent
- One-to-Two
Enter the weight to give when one-to-two active threats are detected.
Range: 0 through 100 percent
Default: 60 percent
- Three to Five
Enter the weight to give when three-to-five active threats are detected.
Range: 0 through 100 percent
Default: 80 percent
- Greater than Five
Enter the weight to give when greater than five active threats are detected.
Range: 0 through 100 percent
Default: 100 percent
Detection State (Group of Fields) Enter the weight to give to the detection state, as a percentage. - Full Mode
Enter the weight to give to Full mode, which detects malicious activity and immediately acts to remediate the activity.
Range: 0 through 100 percent
Default: 0 percent
- Learning Mode
Enter the weight to give to Learning mode, which monitors for threats and gathers data without taking any action.
Range: 0 through 100 percent
Default: 60 percent
Mitigation Mode Mitigation mode is an active, automated security posture in which the SentinelOne agent automatically remediates, quarantines, or kills malicious threats and processes in real-time. - Protect
Enter the weight to give to Protect mode, which automates the response to malicious activity and remediates, quarantines, or kills malicious threats and processes in real-time.
Range: 0 through 100 percent
Default: 0 percent
- Detect
Enter the weight to give to Detect mode, which sends alerts on threats but does not take automatic action.
Range: 0 through 100 percent
Default: 90 percent
Mitigation Mode—Suspicious - Protect
Enter the weight for Protect mode, which automates the response to suspicious activity and remediates, quarantines, or kills suspicious threats and processes in real-time.
Range: 0 through 100 percent
Default: 60 percent
- Detect
Enter the weight for Detect mode for suspicious traffic, which sends alerts on suspicious threats but does not take automatic action.
Range: 0 through 100 percent
Default: 90 percent
-
Click the Operational Health Indicators tab, then enter information for the following fields.

Field Description Configure Operational Health Indicators Click the toggle to enable operational health indicators. Operational Health Weight Enter the total weight of the operational health of a device, as a percentage.
Note: If you configure both Critical Risk Indicators and Operational Health, Critical Risk Weight and Operational Health Rate must add up to a total of 100%.
Range: 0 through 100 percent
Default: 20 percent
Firewall (Group of Fields) - Active
Enter the weight for devices with an active firewall, as a percentage. Range: 0 through 100 percent
Default: 0 percent
- Inactive
Enter the weight for devices with an inactive firewall, as a percentage.
Range: 0 through 100 percentDefault: 100 percent
Last Active Date (Group of Fields) - Less than 1 Day
Enter the weight for devices that have been active for less than one day, as a percentage.
Range: 0 through 100 percent
Default: 20 percent
- 1 to 3 Days
Enter the weight for devices that have been active for one to three days, as a percentage.
Range: 0 through 100 percent
Default: 40 percent
- 4 to 7 Days
Enter the weight for devices that have been active for four to seven days, as a percentage.
Range: 0 through 100 percent
Default: 60 percent
- 8 to 14 Days
Enter the weight for devices that have been active for eight to fourteen days, as a percentage.
Range: 0 through 100 percent
Default: 80 percent
- Greater than 14 Days
Enter the weight for devices that have been active for greater than fourteen days, as a percentage.
Range: 0 through 100 percent
Default: 100 percent
User Actions Needed (Group of Fields) - 1 Action
Enter the weight for devices that require one user action, as a percentage.
Range: 0 through 100 percent
Default: 40 percent
- 2-3 Actions
Enter the weight for devices that require 2-3 user actions, as a percentage.
Range: 0 through 100 percent
Default: 60 percent
- Greater than 3 Actions
Enter the weight for devices that require more than 3 user actions, as a percentage.
Range: 0 through 100 percent
Default: 80 percent
Missing Permissions (Group of Fields) - None
Enter the weight for devices that do not have missing permissions, as a percentage.
Range: 0 through 100 percent
Default: 0 percent
- One Permission
Enter the weight for devices that are missing one permission, as a percentage.
Range: 0 through 100 percent
Default: 60 percent
- Two to Three Permissions
Enter the weight for devices that are missing two-to-three permissions, as a percentage.
Range: 0 through 100 percent
Default: 80 percent
- More than Three Permissions
Enter the weight for devices that are missing more than three permissions, as a percentage.
Range: 0 through 100 percent
Default: 100 percent
- Select the Risk Band tab, and then enter information for the following fields.
Note: The allowed range for any band is 0 to 100. There is no requirement that a risk band must be limited to a specific range, such as 0 to 20 or 21 to 40. The only restriction is that the ranges for different bands must not overlap. For example, a configuration in which Trustworthy is set to 0 to 40 and Low Risk is set to 30 to 50 would not be valid because the ranges overlap each other.

Field Description Trustworthy Enter the lower and upper range for the Trustworthy risk band.
Range: 0 through 100
Default: 0 through 20
Low Risk Enter the lower and upper range for the Low Risk risk band.
Range: 0 through 100
Default: 21 through 40
Moderate Risk Enter the lower and upper range for the Moderate Risk risk band.
Range: 0 through 100
Default: 41 through 60
Suspicious Enter the lower and upper range for the Suspicious risk band.
Range: 0 through 100
Default: 61 through 80
High Risk Enter the lower and upper range for the High Risk risk band.
Range: 0 through 100
Default: 81 through 100
-
Click Save.
Software Release Information
Releases 12.2.1 and later support all content described in this article, except:
- Releases 13.1.1 and later support SentinelOne integration with Concerto.
Additional Information
Configure Endpoint Information Profiles
Configure Unified Entity Risk Profiles in Concerto