Configure the Versa Secure Access Service
![]() For supported software information, click here.
For supported software information, click here.
The Versa secure access service allows you to configure a Versa Operating SystemTM (VOSTM) device to be a secure access portal or a secure access gateway so that a Versa SASE client can connect to it. You can configure both portal and gateway services on two different VOS devices or on the same VOS device. The Versa SASE client communicates with the portal for user registration. After registration, the client communicates with the gateway.
For Releases 21.2.1 and later, you can configure multiple policies for portals and gateways. Contextual information, such as username, user group, location, and device compliance status, is used to download and apply the appropriate portal or gateway policy.
The Versa secure access service supports local user authentication and LDAP user authentication.
The Versa secure access module performs the following functions:
- Authenticate Versa SASE client users.
- Push configurations to the Versa SASE client.
- Control the behavior of the client based on users, groups, region, or device.
- Generate and share the one-time secret password used for the VPN tunnel.
To configure the basic Versa secure access service, you do the following:
After you configure the secure access portal and gateway, you can configure Versa SASE client for VPN access to corporate resources using secure access. For more information see, Configure Versa SASE Clients.
You can also configure addtional features including configuring RADIUS for user authentication, using OpenSSL to generate CA and EE certificates, and configuring Versa SASE clients using a native Android, MacOS, or Windows VPN client. For more information, see the links in Additional Information.
Configure a Secure Access Portal
A secure access portal authenticates users and provides configurations, polices, and user-specific controls to a Versa SASE client. After a user is authenticated and registered, the client is automatically configured with the configuration and policies. The secure access portal authenticates users using local authentication or the LDAP protocol, and it also supports two-factor authentication. The secure access portal shares configurations with Versa SASE clients based on user, group, region, or device.
To configure a secure access portal, you configure secure access portal objects and the portal itself, as follows. The Versa SASE client retrieves the secure access portal objects when the client is registered. At a minimum, you must add a secure access portal.
Add a Secure Access Portal
- In Director view:
- Select the Configuration tab in the top menu bar.
- Select Templates > Device Templates in the horizontal menu bar.
- Select an organization in the left menu bar.
- Select a template in the main pane. The view changes to Appliance view.
- Select the Configuration tab in the top menu bar.
- Select Services > Secure Access > Portal > General in the left menu bar.

- Click the
 Edit icon. In the Add Services popup window, enter information for the following fields.

Field Description URI (For Releases 21.2.1 and later.) Displays portal as the uniform resource identifier for the secure access portal, and you cannot edit this field.
Service Type (For Releases 21.2.1 and later.) Displays the service type as Portal, and you cannot edit this field. Secure Access Profile Select the secure access profile to associate with the portal. The drop-down list displays the profiles that you created, as described in Configure Secure Access Profiles, below. Authentication Select an authentication profile to associate with the portal. For more information, see Configure an Authentication Profile.
Device Authentication Profile (For Releases 22.1.3 and later.) Select a certificate authentication profile to authenticate SASE client devices. For more information, see Configure Certificate Authentication Profile. LEF Profile (For Releases 21.2.1 and later.) Select a log export functionality (LEF) profile to use to record logs for the secure access portal, or click the Default LEF profile box to use the default LEF profile instead. For more information, see Configure Log Export Functionality. Default LEF Profile (For Releases 21.2.1 and later.) Click to use the default LEF profile. Query MDM (For Releases 21.2.1 and later.) Click to enable mobile device management queries for device information. Clicking this enables the MDM Profile drop-down list. If you do not enable Query MDM and do not select an MDM profile, the default MDM profile is used. MDM Profile (For Releases 21.2.1 and later.) When you enable Query MDM, select an MDM profile to use for MDM queries. For more information, see Configure MDM Profiles. Authentication Order (For Releases 22.1.3 and later.) Select to set the order for authentication so you can choose whether to use user or device authentication first. If you do not configure an authentication order, user authentication is used by default.
- Click OK.
Configure Secure Access Routes
You can configure specific or default secure access routes by using route objects. You then attach the route objects to a secure access profile to advertise them to the clients.The Versa secure access portal sends these routes to Versa SASE clients when the clients register.
To configure a secure access route:
- In Director view:
- Select the Configuration tab in the top menu bar.
- Select Templates > Device Templates in the horizontal menu bar.
- Select an organization in the left menu bar.
- Select a template in the main pane. The view changes to Appliance view.
- Select the Configuration tab in the top menu bar.
- Select Services > Secure Access > Portal > Routes in the left menu bar.

- Click the + Add icon. In the Add Routes popup window, enter information for the following fields. Note that the
 Parameterize Icon displays only in Template view.

Field Description Name (Required) Enter a name for the route.
Description
Enter a text description for the route. Prefix Enter the route prefix. Click the Parameterize icon to specify the default parameterized variable. If you edit the parameterized value, you must retain the {$v*__*} format.Metric Enter a value for the route metric. Click the Parameterize icon to specify the default parameterized variable. If you edit the parameterized value, you must retain the {$v*__*} format.Encrypted (For Releases 21.2.1 and later.) Select to encrypt the route and to route the traffic for applications and domains to an encrypted tunnel. If not selected, traffic is routed on an encrypted or non-encrypted (clear-text) route, depending on the configuration, for applications and domains. If the route is not encrypted, the Versa SASE client creates two tunnels, encrypted and clear text, and then routes traffic. For more information, see Configure Secure Access Applications and Domains. - Click OK.
Configure DNS Resolvers
You can configure DNS resolvers that are shared with Versa SASE clients when the clients register. A DNS resolver determines which DNS server the client uses to perform DNS lookups for all traffic.
To configure a DNS resolver:
- In Director view:
- Select the Configuration tab in the top menu bar.
- Select Templates > Device Templates in the horizontal menu bar.
- Select an organization in the left menu bar.
- Select a template in the main pane. The view changes to Appliance view.
- Select the Configuration tab in the top menu bar.
- Select Services > Secure Access > Portal > DNS Resolvers in the left menu bar.

- Click the + Add icon. In the Add DNS Resolves popup window, enter information for the following fields. Note that the Parameterize Icon displays only in Template view.

Field Description Name (Required) Enter a name for the DNS resolver instance.
Description
Enter a text description for the DNS resolver. Name Server Click and select the DNS name server. Click the
 Add icon to add a DNS name server.
Domain Enter the name of the domain in which the DNS resolver is located. Click the Parameterize icon to specify the default parameterized variable. If you edit the parameterized value, you must retain the {$v*__*} format. - Click OK.
Configure Gateway Groups
In Releases 21.2.3 and earlier, gateway groups are called server groups.
You configure gateway groups and associate secure access gateways with gateway groups. The gateway groups that you configure here are displayed as VPN gateway groups on the Versa SASE client.
To configure a gateway group:
- In Director view:
- Select the Configuration tab in the top menu bar.
- Select Templates > Device Templates in the horizontal menu bar.
- Select an organization in the left menu bar.
- Select a template in the main pane. The view changes to Appliance view.
- Select the Configuration tab in the top menu bar.
- Select Services > Secure Access > Portal > Gateway Groups in the left menu bar.

- Click the + Add icon. In the Add Gateway Group popup window, enter information for the following fields.
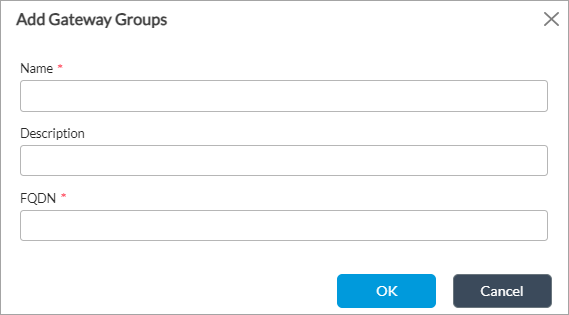
Field Description Name (Required) Enter a name for the secure access gateway group.
Description
Enter a description for the secure access gateway group. FQDN Enter the host server address as a fully qualified domain name. - Click OK.
Configure Gateways
In Releases 21.2.3 and earlier, gateways are called servers.
You configure secure access gateways to use during the portal registration. The gateways that you configure here are displayed as VPN gateways on the Versa SASE client.
To configure a secure access gateway:
- In Director view:
- Select the Configuration tab in the top menu bar.
- Select Templates > Device Templates in the horizontal menu bar.
- Select an organization in the left menu bar.
- Select a template in the main pane. The view changes to Appliance view.
- Select the Configuration tab in the top menu bar.
- Select Services > Secure Access > Portal > Gateways in the left menu bar.

- Click the + Add icon. The Add Gateways popup window displays.
- Select the General tab, and enter information for the following fields. Note that the Parameterize Icon is displayed only in Template view.

Field Description Name (Required) Enter a name for the secure access server. This name is included in the list of gateways that is displayed on the SASE client.
Description
Enter a description for the secure access server. Allow Delete by Application Click to allow gateways to be deleted on the SASE client. Display VPN Profile in OS Click to display configured VPN profiles in the native user device's operating system. If you do not select this option, VPN profiles are displayed only on the Versa SASE client. Hot Standby (For Releases 22.1.3 and later.) Click to specify that the server is in hot-standby mode. Hosts (Required) Enter the IP address or FQDN of the host that the SASE client uses to connect to the gateway. Click the Parameterize icon to specify the default parameterized variable. If you edit the parameterized value, you must retain the {$v*__*} format.Tunnel Order (For Releases 22.1.3 and later.) Select the order in which to use the tunnels:
- DTLS
- IPsec
- TLS
IP Address (For Releases 21.2.1 and earlier.) Click to enter the host server address as an IP address. FQDN (For Releases 21.2.1 and earlier.) Click to enter the host server address as a fully qualified domain name. Priority Enter a value to set the order in which the server is listed on the SASE client. A higher value indicates a higher priority. Click the Parameterize icon to specify the default parameterized variable. If you edit the parameterized value, you must retain the {$v*__*} format.IPsec Profile ID Enter the identifier of the IPsec profile of the secure access server profile. CA Certificate
Enter the CA certificate for the captive portal certificate. A certificate authority (CA) is a trusted entity that issues electronic documents. Click the Parameterize icon to specify the default parameterized variable. If you edit the parameterized value, you must retain the {$v*__*} format.Service Port Enter the port number of the gateway. Gateway Groups Select a group from to associate the server with a server group. For more information, see Configure Server Groups. - Select the Traffic Steering tab.
- Select the Traffic Steering tab, and enter information for the following fields. Note that the information is displayed on two tabs, Traffic Steering and, for Releases 22.1.3 and later, SASE Client.

Field Description Force Tunnel Force Tunnle is selected by default and breaks out client traffic, including internet traffic via VPN. Split Tunnel
Click to enable split tunnel, which breaks out all client traffic to internet by default. For the routes configured in the SASE tunnel, the split tunnel routes traffic using the SASE tunnel; the remaining routes break out locally. To configure subnets to send over the tunnel, configure them using routes. For more information, see Configure Secure Access Routes, above. Split DNS (For Releases 22.1.3 and later.) Split DNS is enabled by default and allows a SASE client to send DNS requests via the SASE tunnel for the configured domains and rest of the DNS requests are sent over local internet. For more information, see Configure DNS Resolvers, above. Routes
Select the routes to send to the SASE client when it is registered. The drop-down lists the routes that you configured, as described in Configure Secure Access Routes, above. Trusted Routes Select the trusted routes to send the SASE client when it is registered. The drop-down lists the routes that you configured, as described in Configure Secure Access Routes, above. DNS Resolver
Select the DNS resolvers to send to the client. The drop-down lists the DNS resolvers that you configured, as described in Configure DNS Resolvers, above. - Select the SASE Client tab, and enter information for the following fields. Note that the Exclude fields in the SASE Client tab are enabled when you select Force Tunnel and Include fields are enabled when you select Split Tunnel in the Traffic Steering tab.
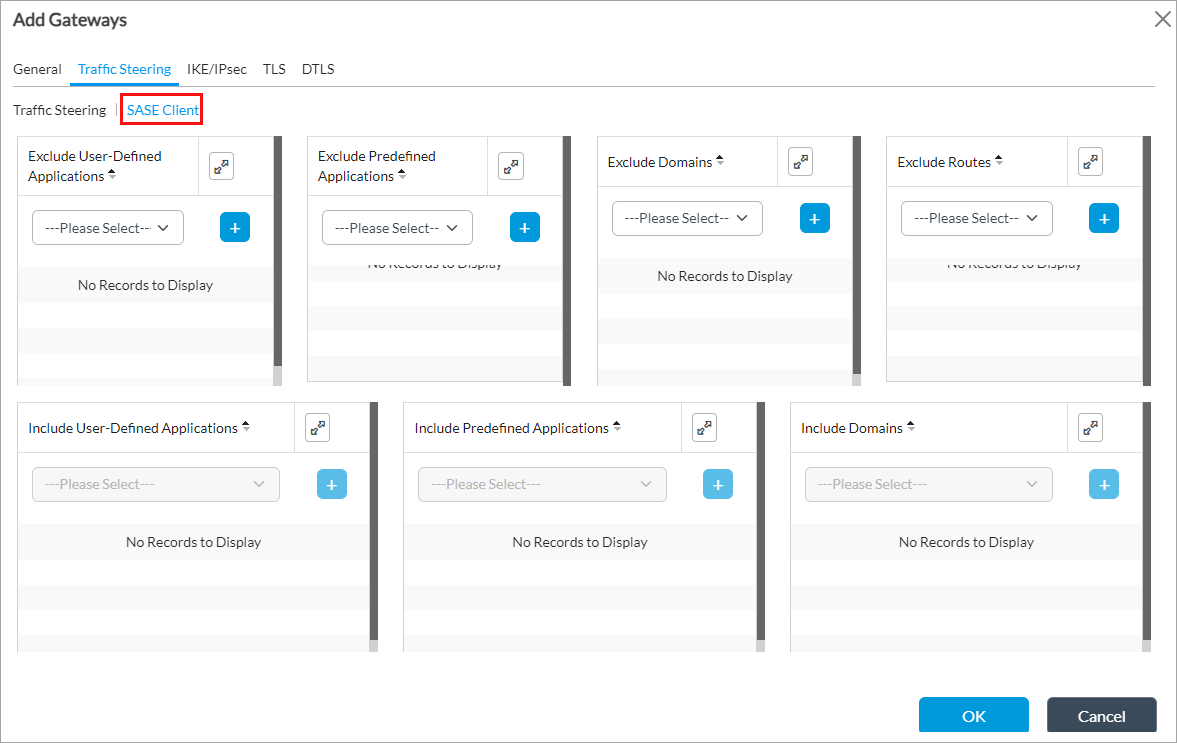
Field Description Exclude User-Defined Applications
Select a user-defined application from the drop-down list, and then click the  Add icon to add an application that you do not want to send to the client. For more information, see Configure Versa Secure Access Applications and Domains.
Exclude Predefined Applications
Select a predefined application from the drop-down list, and then click the Add icon to add an application that you do not want to send to the client. For more information, see Configure Versa Secure Access Applications and Domains.Exclude Domains
Select a domain from the drop-down list, and then click the Add icon to add a domain that you do not want to send to the client. For more information, see Configure Versa Secure Access Applications and Domains.Exclude Routes Select a route from the drop-down list, and then click the Add icon to add a route that you do not want to send to the client. For more information, see Configure Secure Access Routes above.Include User-Defined Applications
Select a user-defined application from the drop-down list, and then click the Add icon to add an application that you want to send to the client.Include predefined Applications
Select a predefined application from the drop-down list, and then click the Add icon to add an application that you want to send to the client.Include Domains
Select a domain from the drop-down list, and then click the Add icon to a domains that you want to send to the client.
- Select the Traffic Steering tab, and enter information for the following fields. Note that the information is displayed on two tabs, Traffic Steering and, for Releases 22.1.3 and later, SASE Client.
- Select the IKE/IPsec tab, and enter information for the following fields.
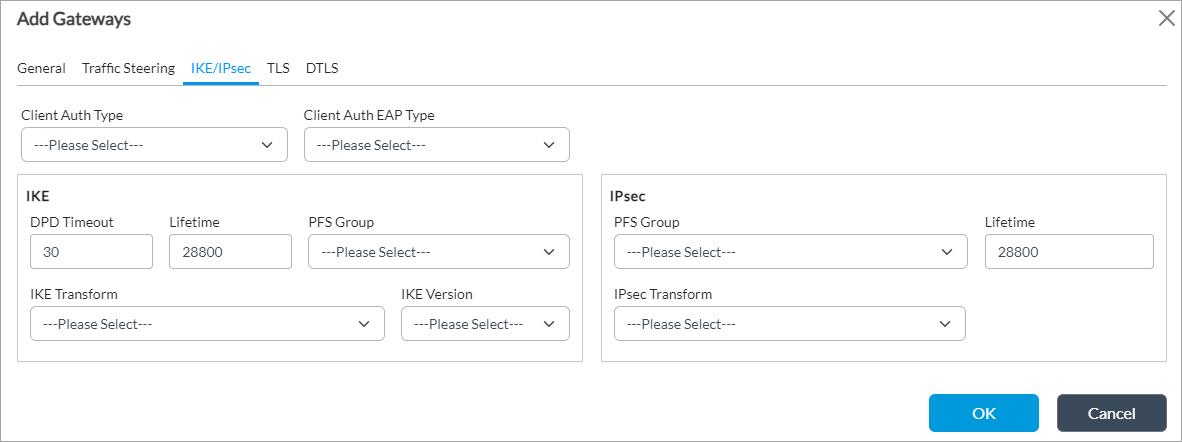
Field Description Client Authentication Type Select the type of authentication to use for the Versa SASE client:
- Certificate
- EAP
- Preshared
Client Authentication EAP Type
Select the EAP authentication type for the client:
- MD5
- MSCHAP_V2
IKE (Group of Fields) - DPD Timeout
Enter the IKE dead peer detection (DPD) idle timeout.
Default: 30 seconds
- Lifetime
Enter the IKE SA lifetime.
Default: 28,800 seconds (8 hours)
- PFS Group
Select the IKE perfect forward secrecy (PFS) group:
- Diffie-Hellman Group 1—768-bit modulus
- Diffie-Hellman Group 2—1024-bit modulus
- Diffie-Hellman Group 5—1536-bit modulus
- Diffie-Hellman Group 14—2048-bit modulus
- Diffie-Hellman Group 15—3072-bit modulus
- Diffie-Hellman Group 16—4096-bit modulus
- Diffie-Hellman Group 19—256-bit elliptic curve
- Diffie-Hellman Group 20—384-bit elliptic curve
- Diffie-Hellman Group 21—521-bit elliptic curve
- Diffie-Hellman Group 25—192-bit elliptic curve
- Diffie-Hellman Group 26—224-bit elliptic curve
- No PFS
- IKE Transform
Select the IKE transform type:
- 3DES encryption and MD5 hashing
- 3DES encryption and SHA-1 hashing
- AES 128-bit encryption and MD5 hashing
- AES 128-bit encryption and SHA-1 hashing
- AES 128-bit encryption and SHA-256 hashing
- AES 128-bit encryption and SHA-384 hashing
- AES 128-bit encryption and SHA-512 hashing
- AES 256-bit encryption and MD5 hashing
- AES 256-bit encryption and SHA-1 hashing
- AES 256-bit encryption and SHA-256 hashing
- AES 256-bit encryption and SHA-384 hashing
- AES 256-bit encryption and SHA-512 hashing
- IKE Version
Select the IKE version:
- Version 1
- Version 2
- Version 1 or Version 2
IPsec (Group of Fields) - PFS Group
Select the IPsec perfect forward secrecy group:
- Diffie-Hellman Group 1—768-bit modulus
- Diffie-Hellman Group 2—1024-bit modulus
- Diffie-Hellman Group 5—1536-bit modulus
- Diffie-Hellman Group 14—2048-bit modulus
- Diffie-Hellman Group 15—3072-bit modulus
- Diffie-Hellman Group 16—4096-bit modulus
- Diffie-Hellman Group 19—256-bit elliptic curve
- Diffie-Hellman Group 20—384-bit elliptic curve
- Diffie-Hellman Group 21—521-bit elliptic curve
- Diffie-Hellman Group 25—192-bit elliptic curve
- Diffie-Hellman Group 26—224-bit elliptic curve
- No PFS
- Lifetime
Enter the IPsec SA lifetime.
Default: 28,800 seconds (8 hours)
- IPsec Transform
Select the IPsec transform type:
- ESP with 3DES encryption and MD5 hashing
- ESP with 3DES encryption and SHA-1 hashing
- ESP with AES 128-bit encryption and GCM hashing
- ESP with AES 128-bit encryption and MD5 hashing
- ESP with AES 128-bit encryption and SHA-1 hashing
- ESP with AES 128-bit encryption and SHA-256 hashing
- ESP with AES 128-bit encryption and SHA-384 hashing
- ESP with AES 128-bit encryption and SHA-512 hashing
- ESP with AES 256-bit encryption and GCM hashing
- ESP with AES 256-bit encryption and MD5 hashing
- ESP with AES 256-bit encryption and SHA-1 hashing
- ESP with AES 256-bit encryption and SHA-256 hashing
- ESP with AES 256-bit encryption and SHA-384 hashing
- ESP with AES 256-bit encryption and SHA-512 hashing
- ESP with AES-CTR 128-bit encryption and SHA-1 hashing
- ESP with AES-CTR 128-bit encryption and XCBC hashing
- ESP with NULL encryption
Tunnel Authentication (Group of Fields) (For Releases 21.2.1 and earlier.) - Certificate
Click to use a CA certificate for the secure access server tunnel authentication method is CA certificate, and then select the certificate in the CA Certificate field. Click the Parameterize icon to specify the default parameterized variable. If you edit the parameterized value, you must retain the {$v*__*} format.- Shared Key
Click to use a shared key for the secure access server tunnel authentication method, and then enter the key in the Shared Key field. - Certificate
Select the CA certificate or enter the shared key. - (For Releases 22.1.3 and later.) Select the TLS tab, and enter information for the following fields.
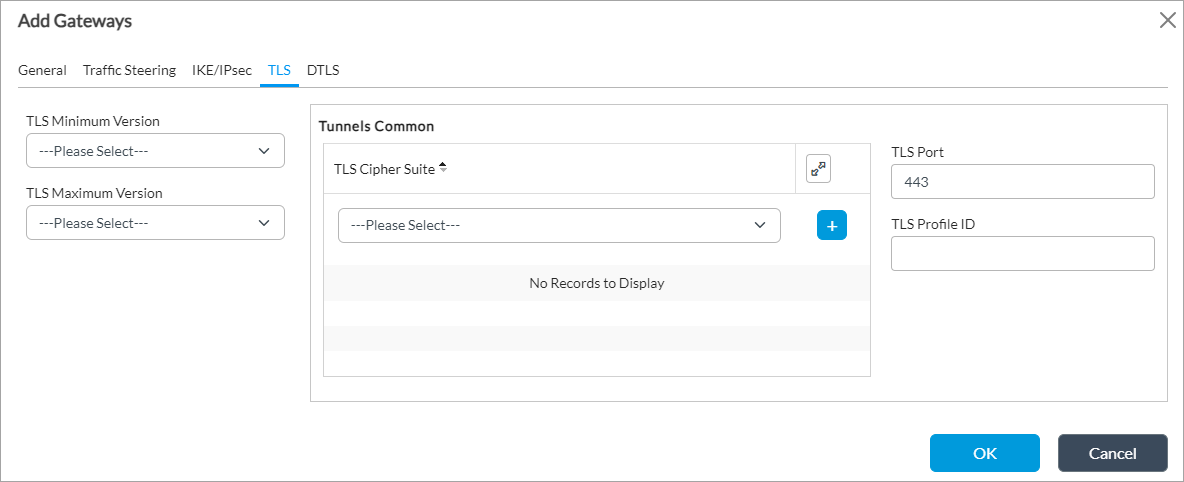
Field Description TLS Minimum Version Select the minimum supported version of Transport Layer Security (TLS). The minimum version must be the same as or earlier than the maximum version.
- TLS 1.0
- TLS 1.1
- TLS 1.2
- TLS 1.3
TLS Maximum Version Select the maximum supported version of TLS. The maximum version must be the same as or later than the minimum version. The options displayed depend on the version you select in the Minimum Version field. For example, if the minimum version is are TLS 1.0, the options TLS 1.0, TLS 1.1, TLS 1.2, and TLS 1.3 display. If the minimum version is TLS 1.2, the options TLS 1.2 and TLS 1.3 display.
Tunnels Common (Group of Fields) - TLS Cipher Suites
Select a TLS cipher suite. If you select a cipher suite, it must be consistent with the selected key exchange, encryption, and authentication algorithms. If you do not configure cipher suites, all cipher suites matching the selected key exchange, encryption, and authentication algorithms are selected by default.
- TLS-ECDHE-ECDSA-WITH-AES-128-CBC-SHA
- TLS-ECDHE-ECDSA-WITH-AES-128-CBC-SHA256
- TLS-ECDHE-ECDSA-WITH-AES-128-GCM-SHA25
- TLS-ECDHE-ECDSA-WITH-AES-256-CBC-SHA
- TLS-ECDHE-ECDSA-WITH-AES-256-CBC-SHA384
- TLS-ECDHE-ECDSA-WITH-AES-256-GCM-SHA384
- TLS-ECDHE-ECDSA-WITH-CHACHA20-POLY1305-SHA256
- TLS-ECDHE-RSA-WlTH-AES-128-CBC-SHA
- TLS-ECDHE-RSA-WlTH-AES-128-CBC-SHA25
- TLS-ECDHE-RSA-WlTH-AES-128-GCM-SHA256
- TLS-ECDHE-RSA-WlTH-AES-256-CBC-SHA
- TLS-ECDHE-RSA-WlTH-AES-256-CBC-SHA384
- TLS-ECDHE-RSA-WlTH-AES-256-GCM-SHA384
- TLS-ECDHE-RSA-WlTH-CHACHA20 POLY1305-SHA256
- TLS-RSA-WlTH-AES-128-CBC-SH
- TLS-RSA-WITH-AES-128-CBC-SHA256
- TLS-RSA-WlTH-AES-128-GCM-SHA256
- TLS-RSA-WlTH-AES-256-CBC-SHA
- TLS-RSA-WlTH-AES-256-CBC-SHA256
- TLS-RSA-WlTH-AES-256-GCM-SHA384
- TLS-RSA-WITH-CAMELLIA-256-CBC-SHA
- TLS-RSA-WITH-SEED-CBC-SHA
- TLS Port
Enter the TLS port number.
Default: 443
- TLS Profile ID
Enter the TLS profile identifier. - (For Releases 22.1.3 and later.) Select the DTLS tab, and enter information for the following fields.
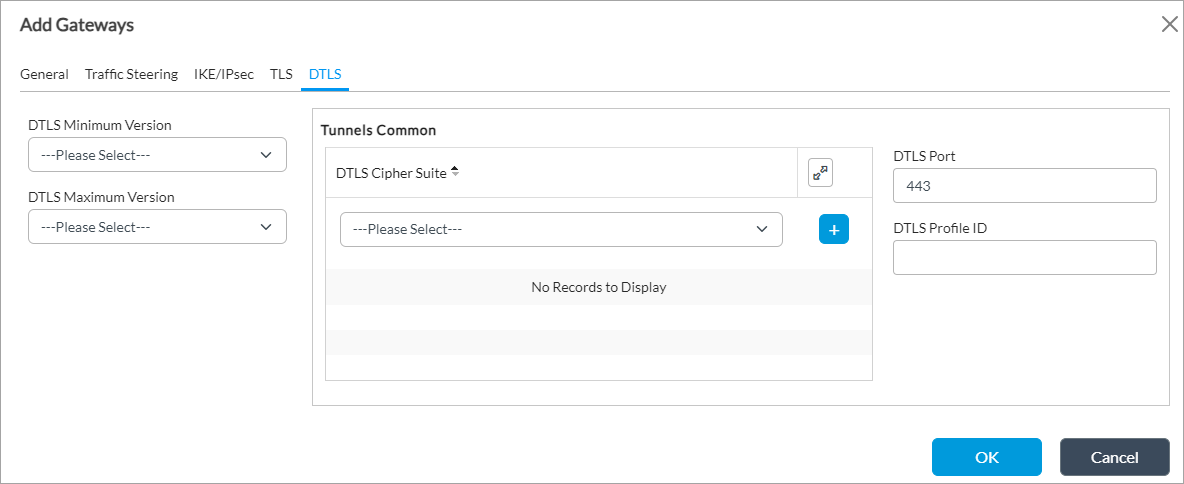
Field Description DTLS Minimum Version Select the minimum supported version of Datagram Transport Layer Security (DTLS). The minimum version must be the same as or earlier than the maximum version.
- DTLS 1.1
- DTLS 1.2
- DTLS 1.3
DTLS Maximum Version Select the maximum supported version of DTLS. The maximum version must be the same as or later than the minimum version. The options displayed depend on the version you select in the Minimum Version field.
Tunnels Common (Group of Fields) - DTLS Cipher Suites
Select a DTLS cipher suite. If you select a cipher suite, it must be consistent with the selected key exchange, encryption, and authentication algorithms. If you do not configure cipher suites, all cipher suites matching the selected key exchange, encryption, and authentication algorithms are selected by default.
- TLS-ECDHE-ECDSA-WITH-AES-128-CBC-SH
- TLS-ECDHE-ECDSA-WITH-AES-128-CBC-SHA256
- TLS-ECDHE-ECDSA-WITH-AES-128-GCM-SHA25
- TLS-ECDHE-ECDSA-WITH-AES-256-CBC-SHA
- TLS-ECDHE-ECDSA-WITH-AES-256-CBC-SHA384
- TLS-ECDHE-ECDSA-WITH-AES-256-GCM-SHA384
- TLS-ECDHE-ECDSA-WITH-CHACHA20-POLY1305-SHA256
- TLS-ECDHE-RSA-WlTH-AES-128-CBC-SHA
- TLS-ECDHE-RSA-WlTH-AES-128-CBC-SHA25
- TLS-ECDHE-RSA-WlTH-AES-128-GCM-SHA256
- TLS-ECDHE-RSA-WlTH-AES-256-CBC-SHA
- TLS-ECDHE-RSA-WlTH-AES-256-CBC-SHA384
- TLS-ECDHE-RSA-WlTH-AES-256-GCM-SHA384
- TLS-ECDHE-RSA-WlTH-CHACHA20 POLY1305-SHA256
- TLS-RSA-WlTH-AES-128-CBC-SH
- TLS-RSA-WITH-AES-128-CBC-SHA256
- TLS-RSA-WlTH-AES-128-GCM-SHA256
- TLS-RSA-WlTH-AES-256-CBC-SHA
- TLS-RSA-WlTH-AES-256-CBC-SHA256
- TLS-RSA-WlTH-AES-256-GCM-SHA384
- TLS-RSA-WITH-CAMELLIA-256-CBC-SHA
- TLS-RSA-WITH-SEED-CBC-SHA
- DTLS Port
Enter the DTLS port number.
Default: 443
- TLS Profile ID
Enter the DTLS profile identifier. - Click OK.
Configure SLA Profiles
For Releases 22.1.3 and later.
You can have an SASE client determine the best WAN IP address to use to connect to a gateway by configuring the SASE client to measure and evaluate service-level agreement (SLA) metrics. If the SLA metrics are out of compliance, the SASE client then automatically changes the circuit it uses to connect to a gateway if a better circuit is available. SLA measurement automatically measures circuit quality periodically and collects circuit quality metrics that the SASE client evaluates and sends to the Versa Analytics for analysis and report generation. You can use the structured data from the SLA measurements for the SASE client to help troubleshoot last-mile connectivity issues using the structured data available for the client.
To have a SASE client collect and evaluate SLA metrics, you create an SLA profile and associate it with a tenant on the gateway. To measure circuit performance, you enable Two-Way Active Measurement Protocol (TWAMP) on the gateway.
In the SLA profile, you configure round-trip circuit times and other threshold values related to circuit quality. When a SASE client connects to the VPN, it periodically measures the circuit quality of the circuits associated with the gateway's WAN IP addresses. If the SASE client detects any SLA violations on its connected path, it checks whether any of the gateway's other WAN IP addresses has better SLA metrics. If so, the SASE client automatically switches its IPsec connection to that path. The SASE client also sends its circuit quality measurements to Versa Analytics and to the local database of the SASE client. When the SASE client disconnects from the VPN, the measurement of SLA values stops.
For the SASE client to measure circuit quality so that it can automatically switch to a better circuit, you do the following:
- Configure a default SLA profile that defines the SLA threshold for the SASE client.
- Enable TWAMP in the gateway profile
- Associate the default SLA profile with the gateway profile.
To configure an SLA profile:
- In Director view:
- Select the Configuration tab in the top menu bar.
- Select Templates > Device Templates in the horizontal menu bar.
- Select an organization in the left menu bar.
- Select a template in the main pane. The view changes to Appliance view.
- Select the Configuration tab in the top menu bar.
- Select Services > Secure Access > Portal > SLA Profiles in the left menu bar.

- Click the + Add icon. In the Add SLA Profiles popup window, enter information for the following fields. Note that for a default SLA profile, the default threshold values cover majority of the use cases. If you want to make specific changes to threshold values, for example, for an particular geographic location, you can configure additional SLA profiles and associate them with the gateway.

Field Description Name Enter a name for the SLA profile. Round-Trip Delay (Group of Fields)
- Relative Threshold
Enter the threshold for the round-trip delay time in multiples of minimum round-trip time (RTT) value. This threshold sets the higher limit RTT during the last measurement window as compared to the minimum RTT during the time when the VPN is connected. For example, if the median RTT time to the gateway measured over the last 300 seconds time window is greater than the minimum RTT time to gateway during the VPN connection duration multiplied by the relative threshold (for example, 200 milliseconds), it is an SLA breach.
As another example, for a user connected to a gateway for two hours, if the RTT measurements over the last 300-second time window are 180, 200, 190, 210, 250, 220, 190, 600, 220, and 210, the RTT median value for last 300 seconds is 210 milliseconds.
If the minimum RTT to the gateway is 50 milliseconds for two hours of VPN connection, the relative threshold calculation is as follows:
- 50 x 200 = 1000 milliseconds. The median RTT of 210 milliseconds is not more than 1000 milliseconds. Hence, there is no SLA breach.
But if the minimum RTT to the gateway for two hours of VPN connection is 1 millisecond, the relative threshold calculation is as follows:
- 1 x 200 = 200 milliseconds. So, the median RTT of 210 milliseconds is greater than 200 milliseconds. Then, there is an SLA breach.
Value: Multiplier (number of times minimum RTT)
Default: 200
- Absolute Threshold
Enter the higher limit, in milliseconds, for the RTT in the last measurement window, as an absolute comparison. For example, if the median RTT time to gateway as measured over last a 300 seconds time window is more than the value set, for example, 500 milliseconds, it is an SLA breach.
As another example, for a user connected to a gateway for two hours, if the RTT measurements over the last 300-second time window are 180, 200, 190, 210, 250, 220, 190, 600, 220, and 210, the RTT median value for last 300 seconds is 210 milliseconds:
- Absolute threshold = 500 milliseconds. So, median RTT of 210 milliseconds is less than 500 milliseconds. Hence, there is no SLA breach.
Alternatively, for same user, if the RTT measurements over the last 300-second time window are 480, 500, 490, 510, 550, 520, 590, 600, 520, and 510, the RTT median value for last 300 seconds is 515 milliseconds:
- Absolute threshold = 500 milliseconds. So, median RTT of 515 milliseconds is greater than 500 milliseconds. Hence, there is an SLA breach.
Default: 500 milliseconds
Synthetic Packet Loss Ratio
Enter the higher limit of the packet loss ratio (as a percentage) of synthetic packets lost in the last measurement window, as a relative comparison.
Default: 40 percent
Duplicate Packets Ratio
Enter the higher limit of duplicate packets ratio (as a percentage) of synthetic packets in the last measurement window, as a relative comparison.
Default: 3 percent
Reorder Packets Ratio
Enter the higher limit of the reordered packet ratio (as a percentage) for synthetic packets in the last measurement window, as a relative comparison.
Default: 3 percent
TTL Enter the lower limit of the time-to-live (TTL) value in the IP header of synthetic packets in the last measurement window, as a relative comparison.
Default: 225
Real Packets Ratio Enter the upper limit of the real forward-packet loss ratio (as a percentage) of actual user traffic over VPN tunnel in the last measurement window, as a relative comparison.
Default: 10 percent
Transmit Error Enter the upper limit of packet transmission error for synthetic packets in the latest row, as an absolute comparison.
Default: 10
Receive Error Enter the upper limit of the packet receive error for synthetic packets in the latest periodic cycle, as an absolute comparison.
Default: 10
- Click OK.
To associate an SLA profile with a secure access gateway profile:
- In Director view:
- Select the Configuration tab in the top menu bar.
- Select Templates > Device Templates in the horizontal menu bar.
- Select an organization in the left menu bar.
- Select a template in the main pane. The view changes to Appliance view.
- Select the Configuration tab in the top menu bar.
- Select Services > Secure Access > Portal > Gateway Profiles in the left menu bar.
- Click the + Add icon. The Add Profiles popup window displays.

- Select the Client Controls tab.
- In the SLA Profile field, select the SLA profile you configured.
- Click TWAMP to enable the Two-Way Active Measurement Protocol (TWAMP) check.
- For information about other fields, see Configure Secure Access Profiles, below.
- Click OK.
Configure Monitoring Profiles
For Releases 22.1.3 and later.
The monitoring profile includes digital experience monitoring (DEM) settings for SASE clients. SASE clients automatically collect DEM metrics based on these settings.
You then associate the monitoring profile with a secure access portal gateway profile. When the end user registers their SASE client using the secure access portal, the portal automatically pushes the monitoring profile's DEM settings to the user's device. For more information, see Configure Digital Experience Monitoring.
- In Director view:
- Select the Configuration tab in the top menu bar.
- Select Templates > Device Templates in the horizontal menu bar.
- Select an organization in the left menu bar.
- Select a template in the main pane. The view changes to Appliance view.
- Select the Configuration tab in the top menu bar.
- Select Services > Secure Access > Portal > Monitoring Profiles in the left menu bar.

- Click the
 Add icon. In the Add Monitoring Profiles popup window, enter information for the following fields.

Fields Description Name (Required) Enter a name for the monitoring profile. Description Enter a text description for the monitoring profile. Interval Enter how often to monitor, in seconds.
Default: 300 seconds
Device Monitoring Click to monitor the device health (memory, CPU, disk utilization, battery life etc.) Internet Monitoring Click to monitor the internet performance, including delay, hops, hop-by-hop latency, jitter, and packet loss. Local Network Monitoring Click to monitor the local network performance, including latency, jitter, packet loss, WiFi SSID, and signal strength. Application Monitoring (Group of Fields) - Predefined Applications
Select a predefined application, and then click the  Add icon to add the application.
- User-Defined Applications
Select a user-defined application, and then click the Add icon to add the application. For more information, see Configure Versa Secure Access Applications and Domains. -
Click OK.
Configure Secure Access Gateway Profiles
After a user registers, an XML file that contains all configurations is sent to the Versa SASE client. To create a global configuration, you associate routes, DNS resolvers, and secure access servers with a secure access profile. For example, if a tenant has multiple gateways and each gateway has the same DNS resolvers and routes, you can create a profile that includes the routes and DNS resolvers, and then you select the secure access servers that share those routes and resolvers. Using such a profile means that you do not need to configure routes and DNS resolvers for each individual secure access server.
To configure a secure access gateway profile:
- In Director view:
- Select the Configuration tab in the top menu bar.
- Select Templates > Device Templates in the horizontal menu bar.
- Select an organization in the left menu bar.
- Select a template in the main pane. The view changes to Appliance view.
- Select the Configuration tab in the top menu bar.
- Select Services > Secure Access > Portal > Gateway Profiles in the left menu bar.

- Click the + Add icon. The Add Profiles popup window displays.
- Select the General tab, and enter information for the following fields.

Field Description Name (Required) Enter a name for the secure access gateway profile. Description Enter a text description for the secure access gateway profile. Tunnel Order (For Releases 22.1.3 and later.) Select a tunnel type, DTLS, IPsec, or TLS, and then click the + Add icon. Repeat the procedure to add additional tunnel types to the tunnel order list. Monitoring Profile (For Releases 22.1.3 and later.) Select a monitoring profile. For more information, see Configure Digital Experience Monitoring.
- Select the IKE/IPsec tab, and enter information for the following fields. If you do not configure IKE/IPsec parameters at the server level, the values you configure here are used.

Field Description IKE (Group of Fields) - DPD Timeout
Enter the IKE dead peer detection (DPD) idle timeout.
Default: 30 seconds
- Lifetime
Enter the IKE SA lifetime.
Default: 28,800 seconds (8 hours)
- PFS Group
Select the IPsec perfect forward secrecy group:
- Diffie-Hellman Group 1—768-bit modulus
- Diffie-Hellman Group 2—1024-bit modulus
- Diffie-Hellman Group 5—1536-bit modulus
- Diffie-Hellman Group 14—2048-bit modulus
- Diffie-Hellman Group 15—3072-bit modulus
- Diffie-Hellman Group 16—4096-bit modulus
- Diffie-Hellman Group 19—256-bit elliptic curve
- Diffie-Hellman Group 20—384-bit elliptic curve
- Diffie-Hellman Group 21—521-bit elliptic curve
- Diffie-Hellman Group 25—192-bit elliptic curve
- Diffie-Hellman Group 26—224-bit elliptic curve
- No PFS
- IKE Transform
Select the IKE transform type:
- 3DES encryption and MD5 hashing
- 3DES encryption and SHA-1 hashing
- AES 128-bit encryption and MD5 hashing
- AES 128-bit encryption and SHA-1 hashing
- AES 128-bit encryption and SHA-256 hashing
- AES 128-bit encryption and SHA-384 hashing
- AES 128-bit encryption and SHA-512 hashing
- AES 256-bit encryption and MD5 hashing
- AES 256-bit encryption and SHA-1 hashing
- AES 256-bit encryption and SHA-256 hashing
- AES 256-bit encryption and SHA-384 hashing
- AES 256-bit encryption and SHA-512 hashing
- IKE Version
Select the IKE version:
- Version 1
- Version 2
- Version 1 or Version 2
IPsec (Group of Fields) - PFS Group
Select the IPsec perfect forward secrecy group:
- Diffie-Hellman Group 1—768-bit modulus
- Diffie-Hellman Group 2—1024-bit modulus
- Diffie-Hellman Group 5—1536-bit modulus
- Diffie-Hellman Group 14—2048-bit modulus
- Diffie-Hellman Group 15—3072-bit modulus
- Diffie-Hellman Group 16—4096-bit modulus
- Diffie-Hellman Group 19—256-bit elliptic curve
- Diffie-Hellman Group 20—384-bit elliptic curve
- Diffie-Hellman Group 21—521-bit elliptic curve
- Diffie-Hellman Group 25—192-bit elliptic curve
- Diffie-Hellman Group 26—224-bit elliptic curve
- No PFS
- Lifetime
Enter the IPsec SA lifetime.
Default: 28,800 seconds (8 hours)
- IPsec Transform
Select the IPsec transform type:
- ESP with 3DES encryption and MD5 hashing
- ESP with 3DES encryption and SHA-1 hashing
- ESP with AES 128-bit encryption and GCM hashing
- ESP with AES 128-bit encryption and MD5 hashing
- ESP with AES 128-bit encryption and SHA-1 hashing
- ESP with AES 128-bit encryption and SHA-256 hashing
- ESP with AES 128-bit encryption and SHA-384 hashing
- ESP with AES 128-bit encryption and SHA-512 hashing
- ESP with AES 256-bit encryption and GCM hashing
- ESP with AES 256-bit encryption and MD5 hashing
- ESP with AES 256-bit encryption and SHA-1 hashing
- ESP with AES 256-bit encryption and SHA-256 hashing
- ESP with AES 256-bit encryption and SHA-384 hashing
- ESP with AES 256-bit encryption and SHA-512 hashing
- ESP with AES-CTR 128-bit encryption and SHA-1 hashing
- ESP with AES-CTR 128-bit encryption and XCBC hashing
- ESP with NULL encryption
- Select the Client Controls tab, and enter information for the following fields.

Field Description Logo URL (For Releases 22.1.3 and later.) Enter the URL from which the Versa SASE client can download an enterprise logo. This logo replaces the default logo on all clients when they register with the Versa secure access portal. Change Password URL Enter the URL that Versa SASE client users can use to change passwords. Click the Parameterize icon to specify the default parameterized variable. If you edit the parameterized value, you must retain the {$v*__*} format.Add Custom Gateway Click to allow SASE client users to add a customized gateway. Edit Gateway Click to allow SASE client users to edit a gateway. Display Gateway (For Releases 22.1.3 and later.) Click to allow the SASE client to display the connected gateway. Multitenancy Click to enable multitenant support for the SASE client. Remember Credential Click to have the Versa SASE client remember user login credentials. Tamper Protection and
Tamper Protection Override Key(For Releases 22.1.3 and later.) If enabled from the server side, you cannot uninstall the client, delete the client account, or delete any files from the installation directory. If you enable this, enter a tamper-protection authentication key in the Tamper Protection Override Key that you use to disable this feature from the SASE client.
To disable tamper protection from the SASE client, click the Tamper Protection toggle button in the Account Details window and then enter the tamper protection override key. For more information, see Enable Tamper Protection in Use the Versa SASE Client Application.
Always On (For Releases 21.2.1 and earlier.) Click to enable the VPN connection to be always on for the SASE client. For more information, see Enable Always On in Use the Versa SASE Client Application. Best Gateway (For Releases 21.2.1 and earlier.) Click to enable the VPN connection to be on the best gateway among the available gateways. Register with DNS (For Releases 22.1.3 and later.) Click to enable DNS registration for the gateway. IP Stickiness (For Releases 22.1.3 and later.) Click to enable IP stickiness for the IPsec tunnel. Auto Update (For Releases 22.1.3 and later.) Click to enable automatic update of the Versa SASE clients associated with the gateway. When a new client software version is available, SASE client users receive a message about the update. TWAMP (For Releases 22.1.3 and later.) Click to enable TWAMP and to allow SASE clients to capture SLA metrics. IPv6 (For Releases 22.1.3 and later.) Click to enable IPv6. Strict Tunnel Mode (For Releases 22.1.3 and later.) Click to redirect all traffic through one tunnel. If disabled, specific traffic is routed through a tunnel and the rest of the traffic is routed through WiFi or Ethernet. Auto Disconnect and
Auto Disconnect Interval(For Releases 22.1.3 and later.) Click to disconnect the SASE client from the gateway after the time (in minutes) you enter in the Auto Disconnect Interval field. The default value is 480 minutes. Portal Lifetime Enter the registration lifetime of the portal.
Default: 1440 minutes (24 hours)
Maximum Number of Gateway Enter the maximum number of gateways allowed on the Versa SASE client.
Default: 10
Password Expiry Warn Before (For Releases 21.2.1 and later.) Enter the number of days before password expiration to display a warning message to the SASE client user.
Default: 10 days
Certificate Issuer (For Releases 21.2.1 and later.) Enter the name of the certificate issuer. Register DNS Suffix (For Releases 22.1.3 and later.) Enter the DNS suffix to use when registering with DNS. Latency Bias (For Releases 22.1.3 and later.) Enter the latency bias as a percentage of the best value.
Default: 50 percent
Posture Check Interval (For Releases 22.1.3 and later.) Enter the elastic IP address posture check interval, in minutes. For this interval of time, the SASE client collects information from the associated endpoint information protection (EIP) profile. If the data changes from the previous interval, the client shares it with the secure access portal and gateway, which use the data to evaluate posture-based policies.
Default: 10 minutes
Trusted Network Hostname (For Releases 21.2.1 and later.) Enter the name of the trusted accessible network hostname. The name can be a maximum of 255 characters.
SLA Profile (For Releases 22.1.3 and later.) Select an SLA profile to associate with the gateway. For more information, see Configure SLA Profiles, above. Metric Reporting (Tab)
(For Releases 22.1.3 and later.)

- Metric Reporting
Click to activate metric reporting to the gateway. - Interval
Enter how often to report metrics, in seconds.
Default: 300 seconds
Reconnect (Tab)
(For Releases 22.1.3 and later.)
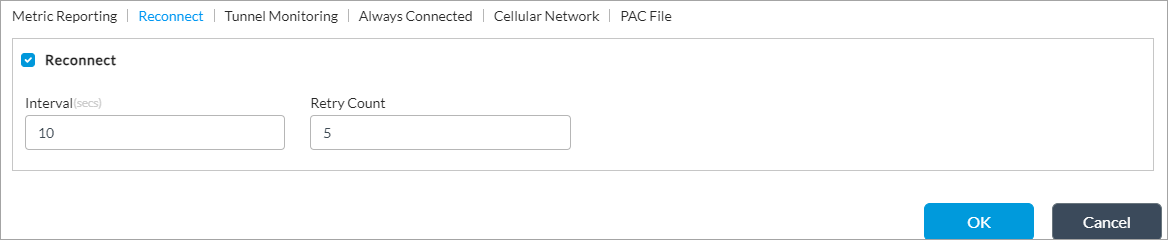
- Reconnect
Click to allow the SASE client to automatically reconnect after a tunnel has been down for reasons other than users disconnecting. - Interval
Enter the time, in seconds, between autoconnection attempts.
Default: 10 seconds
- Retry Count
Enter the number of times the SASE client retries to automatically connect.
Default: 5
Tunnel Monitoring (Tab)
(For Releases 22.1.3 and later.)

- Tunnel Monitoring
Click to enable tunnel monitoring. When enabled, the SASE client checks whether the configured host is reachable using the tunnel. If the SASE client cannot reach the host through the tunnel, the client considers the tunnel to be down and tries to reestablish the tunnel. It is recommended that you configure multiple hosts so that the client considers the tunnel as down only if none of the hosts is reachable. - Interval
Enter the tunnel monitoring interval, in seconds
Default: 60 seconds
- Retry Interval
Enter the time, in seconds, between each retry for monitoring.
Default: 10
- Retry Count
Enter the number of connection retry attempts before concluding the tunnel is down.
Default: 5
Always Connected (Tab)
(For Releases 22.1.3 and later.)

- Always Connected
Click to allow the VPN connection to always be connected to the SASE client. This connection is called an always on connection. For more information, see Enable Always On in Use the Versa SASE Client Application. - Disconnect
Select how to handle a temporary disconnection for an always on connection, to allow the connection to try to connect to a different gateway:
- Interval—The connection can disconnect for the amount of time specified in the Disconnect Interval. The default interval is 120 seconds. If no connection is made to a different gateway, the original connection automatically restores after the disconnect interval expires.
- Never—Disconnection is not allowed, and an always on connection cannot change its gateway connection.
- Fail Mode
Select whether traffic is allowed when an always on connection fails:
- Close—Do not allow traffic.
- Open—Allow traffic.
- Override
Click to override the option selected for fail mode - Override Interval
If you select fail mode override, enter how long to wait, in seconds, before overriding the fail mode.
Default: 120 seconds
Cellular Network (Tab)
(For Releases 22.1.3 and later.)

- Tunnel Bypass
Click to allow a tunnel to form when a user mobile device is connected through a cellular network. In this case, the SASE client does not establish a tunnel to the Versa gateway. PAC File (Tab)
(For Releases 22.1.3 and later.)

- PAC File
Select the proxy autoconfiguration (PAC) file to configure a URL proxy. A PAC file defines how web browsers automatically choose the appropriate proxy server to fetch a URL. You can upload PAC files to a VOS device. For more information, see Upload PAC Files.
- Name—Select to enter the PAC filename, and then enter the filename
- URL—Select to enter the URL of the PAC file, and then enter the URL
Data Exfiltration (Tab) 
Use this tab to allow or prevent endpoint data loss prevention (DLP) data exfiltration activities—Copy and paste, capture screenshot, and use of USB. For more information, see Configure DLP Data Exfiltration Activities.
- Copy Paste
Click to allow or deny copy and paste action (this is enabled by default). - Screenshot
Click to allow or deny user to take screenshot (this is enabled by default). - USB
Select the option when a user connect a USB drive:
- Allow (default)—Permits full access to the USB drive and you can copy files to and from the drive.
- Block—Access to USB drive is blocked. When user plugs in a USB drive, the DLP violation message displays that USB is blocked.
- Read-only—Permits to copy from USB drive to the device but does not allow to copy files from device to USB drive.
- Select the Traffic Steering tab, and enter information for the following fields.

Field Description Force Tunnel Force Tunnel is selected by default and breaks out client traffic, including internet traffic via VPN. Split Tunnel
Click to enable split tunnel, which breaks out all traffic to internet by default. For the routes configured in the SASE tunnel, the split tunnel routes traffic using the SASE tunnel; the remaining routes break out locally. To configure subnets to send over the tunnel, configure them using routes. For more information, see Configure Secure Access Routes, above. Split DNS (For Releases 22.1.3 and later.) Split DNS is enabled by default and allows a SASE client to send DNS requests via the SASE tunnel for the configured domains and rest of the DNS requests are sent over local internet. For more information, see Configure DNS Resolvers, above. Routes
Select the routes to send to the SASE client when it registers. The drop-down lists the routes that you configured in Configure Secure Access Routes, above. Trusted Routes Select the trusted routes to send the SASE client when it is registered. The drop-down lists the routes that you configured, as described in Configure Secure Access Routes, above. DNS Resolver
Select the DNS resolvers to send to the client when it registers. The drop-down lists the DNS resolvers that you configured in Configure DNS Resolvers, above. Gateways
Select the gateways to send to the SASE client when it registers. The drop-down lists the gateways that you configured in Configure Gateways, above.
If routes and DNS resolvers are associated with the servers you select, these routes and resolvers are included in the configuration XML files that are sent to the SASE client when a user registers. Otherwise, the routes and DNS resolvers that you select in the Add Profiles popup window are included in the XML files.
- Select the SASE Client tab, and enter information for the following fields. Note that the Exclude fields in the SASE Client tab are enabled when you select Force Tunnel and Include fields are enabled when you select Split Tunnel in the Traffic Steering tab.

Field Description Exclude User-Defined Applications
Select a user-defined application and click the  Add icon to add an application that you do not want to send to the client. For more information, see Configure Versa Secure Access Applications and Domains.
Exclude Predefined Applications Select a predefined application and click the Add icon to add an application that you do not want to send to the client.Exclude Domains
Select a domain and click the Add icon to add a domains that you do not want to send to the client. For more information, see Configure Versa Secure Access Applications and Domains.Exclude Routes Select a route from the drop-down list, and then click the  Add icon to add a route that you do not want to send to the client. For more information, see Configure Secure Access Routes above.
Include User-Defined Applications
Select a user-defined application and click the Add icon to add an application that you want to send to the client.Include Predefined Applications
Select a predefined application and click the Add icon to add an application that you want to send to the client.Include Domains
Select a domain and click the Add icon to a domains that you want to send to the client. - (For Releases 22.1.3 and later.) Select the TLS tab, and enter information for the following fields.
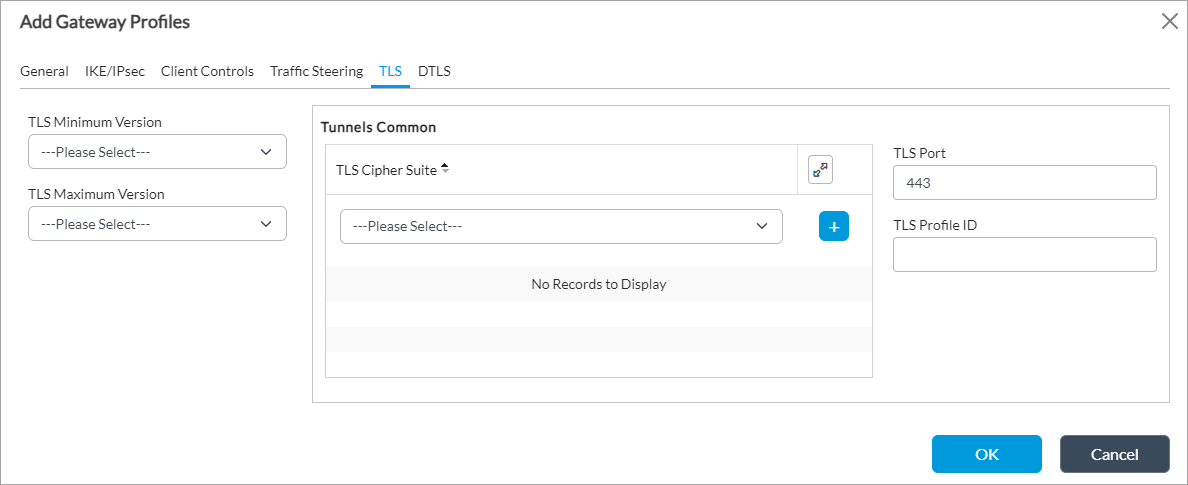
Field Description TLS Minimum Version Select the minimum supported version of Transport Layer Security (TLS). The minimum version must be the same as or earlier than the maximum version.
- TLS 1.0
- TLS 1.1
- TLS 1.2
- TLS 1.3
TLS Maximum Version Select the maximum supported version of TLS. The maximum version must be the same as or later than the minimum version. The options displayed depend on the version you select in the Minimum Version field. For example, if the minimum version is are TLS 1.0, the options TLS 1.0, TLS 1.1, TLS 1.2, and TLS 1.3 are displayed. If the minimum version is TLS 1.2, the options TLS 1.2 and TLS 1.3 are displayed.
Tunnels Common (Group of Fields) - TLS Cipher Suites
Select a TLS cipher suite. If you select a cipher suite, it must be consistent with the selected key exchange, encryption, and authentication algorithms. If you do not configure cipher suites, all cipher suites matching the selected key exchange, encryption, and authentication algorithms are selected by default.
- TLS-ECDHE-ECDSA-WITH-AES-128-CBC-SH
- TLS-ECDHE-ECDSA-WITH-AES-128-CBC-SHA256
- TLS-ECDHE-ECDSA-WITH-AES-128-GCM-SHA25
- TLS-ECDHE-ECDSA-WITH-AES-256-CBC-SHA
- TLS-ECDHE-ECDSA-WITH-AES-256-CBC-SHA384
- TLS-ECDHE-ECDSA-WITH-AES-256-GCM-SHA384
- TLS-ECDHE-ECDSA-WITH-CHACHA20-POLY1305-SHA256
- TLS-ECDHE-RSA-WlTH-AES-128-CBC-SHA
- TLS-ECDHE-RSA-WlTH-AES-128-CBC-SHA25
- TLS-ECDHE-RSA-WlTH-AES-128-GCM-SHA256
- TLS-ECDHE-RSA-WlTH-AES-256-CBC-SHA
- TLS-ECDHE-RSA-WlTH-AES-256-CBC-SHA384
- TLS-ECDHE-RSA-WlTH-AES-256-GCM-SHA384
- TLS-ECDHE-RSA-WlTH-CHACHA20 POLY1305-SHA256
- TLS-RSA-WlTH-AES-128-CBC-SH
- TLS-RSA-WITH-AES-128-CBC-SHA256
- TLS-RSA-WlTH-AES-128-GCM-SHA256
- TLS-RSA-WlTH-AES-256-CBC-SHA
- TLS-RSA-WlTH-AES-256-CBC-SHA256
- TLS-RSA-WlTH-AES-256-GCM-SHA384
- TLS-RSA-WITH-CAMELLIA-256-CBC-SHA
- TLS-RSA-WITH-SEED-CBC-SHA
- TLS Port
Enter the TLS port number.
Default: 443
- TLS Profile ID
Enter the TLS profile identifier. - (For Releases 22.1.3 and later.) Select the DTLS tab, and enter information for the following fields.
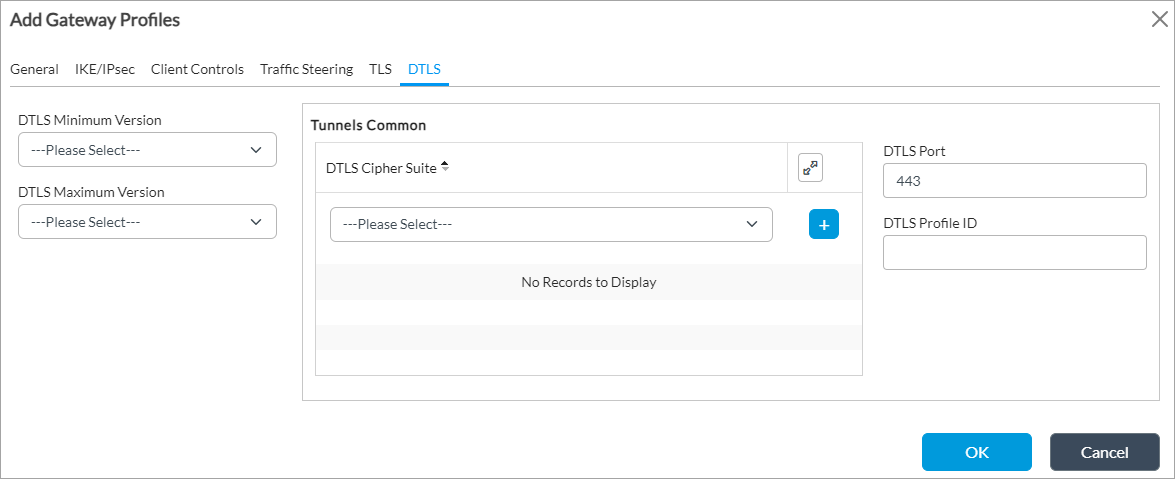
Field Description DTLS Minimum Version Select the minimum supported version of Datagram Transport Layer Security (DTLS). The minimum version must be the same as or earlier than the maximum version.
- DTLS 1.1
- DTLS 1.2
- DTLS 1.3
DTLS Maximum Version Select the maximum supported version of DTLS. The maximum version must be the same as or later than the minimum version. The options displayed depend on the version you select in the Minimum Version field.
Tunnels Common (Group of Fields) - DTLS Cipher Suites
Select a DTLS cipher suite. If you select a cipher suite, it must be consistent with the selected key exchange, encryption, and authentication algorithms. If you do not configure cipher suites, all cipher suites matching the selected key exchange, encryption, and authentication algorithms are selected by default.
- TLS-ECDHE-ECDSA-WITH-AES-128-CBC-SH
- TLS-ECDHE-ECDSA-WITH-AES-128-CBC-SHA256
- TLS-ECDHE-ECDSA-WITH-AES-128-GCM-SHA25
- TLS-ECDHE-ECDSA-WITH-AES-256-CBC-SHA
- TLS-ECDHE-ECDSA-WITH-AES-256-CBC-SHA384
- TLS-ECDHE-ECDSA-WITH-AES-256-GCM-SHA384
- TLS-ECDHE-ECDSA-WITH-CHACHA20-POLY1305-SHA256
- TLS-ECDHE-RSA-WlTH-AES-128-CBC-SHA
- TLS-ECDHE-RSA-WlTH-AES-128-CBC-SHA25
- TLS-ECDHE-RSA-WlTH-AES-128-GCM-SHA256
- TLS-ECDHE-RSA-WlTH-AES-256-CBC-SHA
- TLS-ECDHE-RSA-WlTH-AES-256-CBC-SHA384
- TLS-ECDHE-RSA-WlTH-AES-256-GCM-SHA384
- TLS-ECDHE-RSA-WlTH-CHACHA20 POLY1305-SHA256
- TLS-RSA-WlTH-AES-128-CBC-SH
- TLS-RSA-WITH-AES-128-CBC-SHA256
- TLS-RSA-WlTH-AES-128-GCM-SHA256
- TLS-RSA-WlTH-AES-256-CBC-SHA
- TLS-RSA-WlTH-AES-256-CBC-SHA256
- TLS-RSA-WlTH-AES-256-GCM-SHA384
- TLS-RSA-WITH-CAMELLIA-256-CBC-SHA
- TLS-RSA-WITH-SEED-CBC-SHA
- DTLS Port
Enter the DTLS port number.
Default: 443
- DTLS Profile ID
Enter the DTLS profile identifier. - Click OK.
Configure the Preferred Client Software Version
For Releases 22.1.3 and later.
For the operating systems running Versa SASE clients, you can configure the preferred version of the SASE client software to use for each operating system that the Versa SASE client might be running.
To configure the preferred SASE client software version:
- In Director view:
- Select the Configuration tab in the top menu bar.
- Select Templates > Device Templates in the horizontal menu bar.
- Select an organization in the left menu bar.
- Select a template in the main pane. The view changes to Appliance view.
- Select the Configuration tab in the top menu bar.
- Select Services > Secure Access > Portal > Preferred Client Versions in the left menu bar.

- Click the + Add icon. In the Add Preferred Client Versions popup window, enter information for the following fields.

Field Description Name Enter a name for the SASE client.
URL Enter the URL from which to download the preferred SASE client software. Operating System Select the SASE client operating system for the SASE client for which the SASE client software is the preferred software. Version Select the software version of the preferred SASE client software. The values depend on the operating system you select. - Click OK.
Add Secure Access Portal Policy
For Releases 21.2.1 and later.
Versa secure access supports policy-based registration and connection. You can create secure access policy and policy rules to provide different sets of gateways to the Versa secure access application based on users, user groups, location, and devices. You can enable or disable two-factor authentication (2FA) so that an administrator can enable or disable two-factor authentication based on user, group, location and devices.
A VOS device evaluates the secure access portal policy during registration. After authenticating a user, the secure access server evaluates the portal policy to verify whether two-factor authentication is enabled. If portal policy evaluation matches the portal policy rule, the authentication profile of the rule, if configured, is used for secure access. If an authenticator profile is not configured, two-factor authentication is disabled, and if the action in the portal policy rule is Deny, the registration attempt fails. If there is no matching rule, the server uses the authenticator profile configured in the authentication profile of the portal service. After completing two-factor authentication, the secure access server evaluates the portal policy again for the secure access profile to send the list of gateways to the Versa SASE client. If there is no matching rule, the secure access profile configured in portal service is used.
To configure a secure access policy:
- In Director view:
- Select the Configuration tab in the top menu bar.
- Select Templates > Device Templates in the horizontal menu bar.
- Select an organization in the left menu bar.
- Select a template in the main pane. The view changes to Appliance view.
- Select the Configuration tab in the top menu bar.
- Select Services > Secure Access > Portal > Policies in the left menu bar.

- Click the + Add icon. Note that the + Add icon displays only if a default policy is not added and you can add only one policy. In the Add Policies popup window, enter information for the following fields.

Field Description Name Enter a name for the secure access policy name.
Default: Default-Policy
Description Enter a text description for the secure access policy. - Click OK.
Add a Secure Access Portal Policy Rule
For Releases 21.2.1 and later.
A secure access policy consists of an ordered set of one or more policy rules. Each policy rule consists a set of match criteria and the enforcement actions.
To configure a secure access policy rule:
- In Director view:
- Select the Configuration tab in the top menu bar.
- Select Templates > Device Templates in the horizontal menu bar.
- Select an organization in the left menu bar.
- Select a template in the main pane. The view changes to Appliance view.
- Select the Configuration tab in the top menu bar.
- Select Services > Secure Access > Portal > Policies in the left menu bar, and then select the Rules tab.

- Click the + Add icon. The Add Rules popup window displays.
- Select the General tab, and enter information for the following fields.

Field Description Name (Required) Enter a name for the secure access policy rule.
Description Enter a text description for the secure access policy rule. Disable Rule Click to not activate the secure access policy rule after you configure it. - Select the Source tab to define the source address and device information for the secure access policy rule. Enter information for the following fields.

Field Description Address (Tab)
For Releases 22.1.3 and later. - Source Address
Select one or more source addresses or address groups to match, and then click the Add icon to add. For more information, see Configure Address Objects.- EIP Profiles
Select a predefined or custom EIP profile to match, and then click the Add icon.- Address Regions
Select an address region to match, and then click the Add icon.Device (Tab)

- Managed
Select True to mark the device as managed, and then select the compliance state of the device. - Endpoint Protections
Select the predefined or custom service endpoint object to match, and then click the Add icon. For more information, see Configure Versa Secure Access Objects.- Operating Systems
Select the predefined or custom operating system (OS) object to match, and then click the Add icon. For more information, see Configure Versa Secure Access Objects.- Compliance State
If Managed is True, select the compliance state for managed devices:
- Compliant—Device in the compliant state.
- Config-Manager—Device managed by the configuration manager.
- Conflict—Device conflicts with other rules.
- Error—Device in the error state.
- In-Grace-Period—Device is non-compliant but still has access to corporate resources.
- Non-compliant—Device is non-compliant and is blocked from corporate resources.
- Unknown—Device in unknown state.
- Negate
(For Releases 21.2.1 and earlier.) If you select Source Address, click to negate this rule for the traffic from the selected source address. Location (Tab)
(For Releases 22.1.3 and later.)

- State
Select a political state to match, and then click the Add icon.- City
Select a city to match, and then click the Add icon.- Custom Geographic Circle
Select a custom geographic circle to match, and then click the Add icon.- Source Location Negate
Click to negate this rule for traffic from the selected source location. - Select the Users/Groups tab to define the users and user groups to which the rule applies. Enter information for the following fields.

Field Description Match Users Select the users to match:
- Known—Match known users. This is the default.
- Selected—Match selected users.
Default: Known
User Group Profile If you match selected users, select a user group profile to match users in a group profile. Local Database If you match selected users, click to select users and user groups from a local database. Select the users and user groups in the Users and Groups fields. If you select a local database, you cannot configure a user group profile or an external database. For more information, see Configure a Local Database. External Database If you match selected users, click to select users from an external database. You can add external database user from Objects & Connectors > Connectors > Users/Groups > External Database in the left menu bar. Select users from the Users field. If you select an external database, you cannot select a user group profile, local database, or groups. Users If you match selected users, select a user and click the Add icon to add the user.Groups If you match selected users, select a user group and click the Add icon to add the user group. - Select the Enforce tab, and enter information for the following fields.
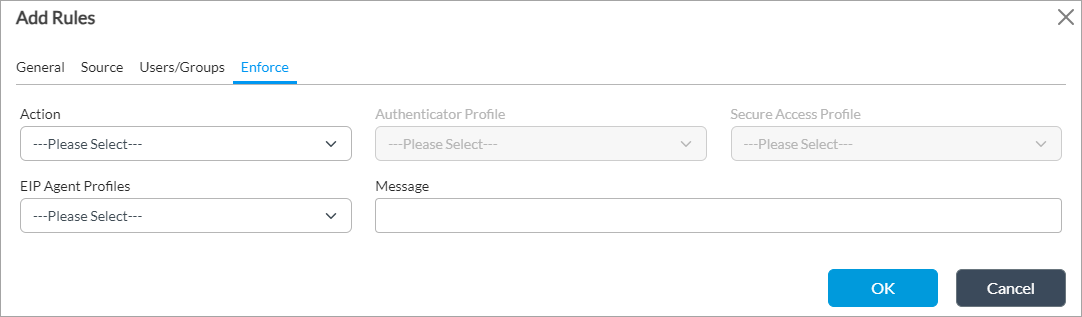
Field Description Action Select the action to take on matching traffic:
- Allow—Allow sessions that match the rule to pass.
- Deny—Drop sessions that match the rule.
Authenticator Profile If you select the Allow action, select an authenticator profile. For more information, see Configure an Authenticator Profile. Secure Access Profile Select the secure access profile to which to apply the secure access policy rule. For more information, see Configure Secure Access Profiles. EIP Agent Profiles (For Releases 22.1.3 and later.) Select the endpoint information protection (EIP) agent profile to associate with the rule. Message Enter a message to display on the SASE client when the client is registered. - Click OK.
Enable a Time-Based One-Time Password
For Releases 21.2.1 and later.
Versa secure access supports time-based one-time password (TOTP) verification, which is available on any third-party application that supports time-based, one-time passwords, such as Google authenticator. TOTP creates a one-time password generator that uses the current time as a unique factor. Note that the user application and server must have the same initialization parameters.
After initialization, a new one-time password (OTP) is generated after the configured interval. The server authenticates the client using the currently valid OTP. Because the OTP is valid only for a short time (generally, 30 seconds to 3 minutes), using TOTP reduces the impact of phishing and credential stealing attacks. For example, you can enforce TOTP for remote users who connect using the SASE client.
If you enable time-based, one-time passwords, during registration, a QR code is sent to the user's email if email is enabled for the authenticator profile associated with the secure access portal policy. If email is not enabled, the Versa SASE client displays a QR code that the user can scan using any authentication application.
After you scan the QR code, the SASE client displays a one-time password text box for entering the one-time password displayed in the time-based, one-time password application. By default, the time-based, one-time password is valid for 3 minutes. Client users must enter and submit the one-time password within this time.
After registration, the QR code is not displayed, and you can directly enter the one-time password. To scan the QR code again, you must reregister the client.
The secure access server generates a unique secret key that is used in the QR code and is attached to the authenticator profile for time-based, one-time passwords. If the administrator deletes the existing authenticator application or uses a new one, the QR code becomes invalid, and users must reregister the SASE client to scan the new QR code.
To configure time-based, one-time passwords, you do the following:
- Configure an authenticator profile with time-based, one-time password as the authenticator type.
- Associate the authenticator profile with a secure access portal policy rule.
To configure an authenticator profile with time-based, one-time password as the authenticator type.
- In Director view:
- Select the Administration tab in the top menu bar.
- Select Appliances in the left menu bar.
- Select a device name in the main panel. The view changes to Appliance view.
- Select the Configuration tab in the top menu bar.
- Select Objects & Connectors > Connectors > Users/Groups > Authenticator Profiles in the left menu bar.
- Click the + Add icon. The Add Authenticator window displays.
- In the Name field, enter an name for the authentication profile (here, Auth-Profile-TOTP)
- In the Authenticator Type field, select Time-Based Authenticator Service.
- Select Email Address to share a QR code to use to register the SASE client to the user's email address. Note that if the email address of the user is not configured or if the user is not available through LDAP or SAML, the authentication fails and the user cannot register the client.

- Enter other information as required, and then click OK. For more information, see Configure an Authentication Profile in the Configure User and Group Policy article.
- Ensure that Network Time Protocol (NTP) is enabled on the VOS device. For more information, see Configure Time Settings.
To associate the authenticator profile with a secure access portal policy rule:
- In Director view:
- Select the Configuration tab in the top menu bar.
- Select Templates > Device Templates in the horizontal menu bar.
- Select an organization in the left menu bar.
- Select a template in the main pane. The view changes to Appliance view.
- Select the Configuration tab in the top menu bar.
- Select Services > Secure Access > Portal > Policies in the left menu bar, and select the Rules tab.
- Click the + Add icon to add a rule for the new secure access policy. The Add Rule popup window displays.
- Select the Enforce tab.

- In the Action field, select Allow.
- In the Authenticator Profile Field, select the authenticator profile you configured in Step 1.
- In the Secure Access Profile file, select a secure access profile.
- Click OK.
For more information, see Add a Secure Access Portal Policy Rule, above.
Configure a Secure Access Gateway
After a user registers with a Versa SASE client, the client communicates with a secure access gateway. The secure access gateway can also authenticate users using local authentication or LDAP, and it supports two-factor authentication.
To configure a secure access gateway:
- In Director view:
- Select the Configuration tab in the top menu bar.
- Select Templates > Device Templates in the horizontal menu bar.
- Select an organization in the left menu bar.
- Select a template in the main pane. The view changes to Appliance view.
- Select the Configuration tab in the top menu bar.
- Select Services > Secure Access > Gateway > General in the left menu bar.

- Click the Edit icon. In the Add Services popup window, enter information for the following fields.

Field Description URI For Releases 21.2.1 and later, this field displays the uniform resource identifier as gateway, and you cannot edit this field.
Service Type For Releases 21.2.1 and later, this field displays the service type as gateway, and you cannot edit this field. Authenticator Profile Select the authenticator profile to use to create dynamic passwords for the VPN connection. For more information, see Configure an Authenticator Profile. Authentication Select an authentication profile to associate with the gateway. For more information, see Configure an Authentication Profile.
Device Authentication Profile (For Releases 22.1.3 and later.) Select a certificate authentication profile to authenticate SASE client devices. For more information, see Configure Certificate Authentication Profile. Prelogon Device Authentication Profile (For Releases 22.1.3 and later.) Select a certificate authentication profile for prelogon device authentication. This profile allows you to authenticate device certificate instead of user credentials. For more information, see Configure Certificate Authentication Profile. LEF Profile (For Releases 21.2.1 and later.) Select a log export functionality (LEF) profile to use to record logs for the secure access portal. If you have configured digital experience monitoring, the LEF profile destination must be either an Analytics node or an ADC that relays logs to Analytics nodes. Default LEF Profile (For Releases 21.2.1 and later.) Click to have the selected LEF profile be the default LEF profile. Trusted Network Detection (For Releases 22.1.3 and later.) Click to enable trusted network detection for the gateway. Query MDM (For Releases 21.2.1 and later.) Click to enable mobile device management (MDM) query for device information. If you do not enable this option and do not select an MDM profile, the default MDM profile is used. MDM Profile (For Releases 21.2.1 and later.) If you select Query MDM, select an MDM profile to use for MDM queries. For more information, see Configure MDM Profiles. - Click OK.
Add Secure Access Gateway Policy
For Releases 21.2.1 and later
You can configure a secure access gateway policy that a VOS device evaluates when the Versa SASE client connects to the gateway. After authenticating the user, the secure access server evaluates the gateway policy to check whether two-factor authentication (2FA) is enabled. If the gateway policy evaluation matches any rule, the authenticator profile of that rule is used to process traffic. If you do not configure an authenticator profile for the rule, two-factor authentication is disabled. If no rule matches, the server uses the authenticator profile of the authentication profile configured in the gateway service. If you select the Deny action in the gateway policy rule, the connection attempt fails.
To configure a secure access policy for the gateway:
- In Director view:
- Select the Configuration tab in the top menu bar.
- Select Templates > Device Templates in the horizontal menu bar.
- Select an organization in the left menu bar.
- Select a template in the main pane. The view changes to Appliance view.
- Select the Configuration tab in the top menu bar.
- Select Services > Secure Access > Gateway > Policies in the left menu bar.

- Click the + Add icon. Note that the + Add icon displays only if a default policy is not added and you can add only one policy. In the Add Policies popup window, enter information for the following fields.

Field Description Name (Required) Enter a name for the secure access policy name.
Default: Default-Policy
Description Enter a text description for the secure access policy. - Click OK.
Add a Secure Access Gateway Policy Rule
A secure access policy consists of an ordered set of one or more policy rules. Each policy rule consists a set of match criteria and the enforcement actions.
To configure a secure access policy rule:
- In Director view:
- Select the Configuration tab in the top menu bar.
- Select Templates > Device Templates in the horizontal menu bar.
- Select an organization in the left menu bar.
- Select a template in the main pane. The view changes to Appliance view.
- Select the Configuration tab in the top menu bar.
- Select Services > Secure Access > Gateway > Policies in the left menu bar, and then select the Rules tab.

- Click the + Add icon. The Add Rule popup window displays.
- Select the General tab, and enter information for the following fields.
Field Description Name (Required) Enter a name for the secure access gateway policy rule.
Description Enter a text description for the secure access gateway policy rule. Disable Rule Click to not activate the secure access policy rule after you configure it. - Select the Source tab to define the source address and device information for the secure access policy rule. Enter information for the following fields.
Field Description Address (For Releases 22.1.3 and later.)
- Source Address
Select one or more source addresses, address groups, or region to which the secure access policy rule applies. The configured address and address groups, and regions are displayed. Click the Add icon to add. For more information, see Configure Address Objects.- EIP Profiles
Select a predefined or custom EIP profile to match and then click the Add icon.- Address Region
Select an address region to match click the Add icon.Device (Tab)

- Endpoint Protections
Select the predefined or custom service endpoint object to match, and then click the Add icon. For more information, see Configure Endpoint-Protection Objects.- Operating Systems
Select the predefined or custom operating system (OS) object to match, and then click the Add icon. For more information, see Configure Endpoint-Protection Objects.- Managed
Select Trues to mark the device as managed, and then select the compliance state of the device. By default, Compliance State is disabled. - Compliance State
If you select Managed, select the compliance state for managed devices:
- Compliant—Device in the compliant state.
- Config-Manager—Device managed by the configuration manager.
- Conflict—Device conflicts with other rules.
- Error—Device in the error state.
- In-Grace-Period—Device is non-compliant but still has access to corporate resources.
- Non-compliant—Device is non-compliant and is blocked from corporate resources.
- Unknown—Device in unknown state.
- Negate
(For Releases 21.2.1 and earlier.) If you select Source Address, click to negate this rule for the traffic from the selected source address. Location (Tab) 
- State
Select a state to match and then click the Add icon.- City
Select a city to match and then click the Add icon.- Custom Geo Circle
Select a custom geographic circle to match and then click the Add icon.- Source Location Negate
Click to negate this rule for traffic from the selected source location. - Select the Users/Groups tab to define the users and user groups to which the rule applies. Enter information for the following fields.

Field Description Match Users Select the users to match:
- Known—Match known users.
- Selected—Match selected users.
User Group Profile If you match selected users, select a user group profile to match users in a group. Local Database If you match selected users, click to select users and user groups from a local database. Select the users and user groups in the Users and Groups fields. If you select a local database, you cannot configure a user group profile or an external database. For more information, see Configure a Local Database. External Database If you match selected users, click to select users from an external database. You can add external database user from Objects & Connectors > Connectors > Users/Groups > External Database left menu. Select users from the Users field. If you select an external database, you cannot configure a user group profile, local database, or group. Users If you match selected users, select a user and click the Add icon to add the user.Groups If you match selected users and select External Database, select a user group and click the Add icon to add the user group. - Select the Enforce tab, and enter information for the following fields.

Field Description Action Select the action to take when traffic matches:
- Allow—Allow sessions that match the rule to pass.
- Deny—Drop sessions that match the rule.
Authenticator Profile If you select the Allow action, select an authenticator profile. For more information, see Configure an Authenticator Profile. Secure Access Profile Select the secure access profile to which to apply the secure access policy rule. For more information, see Configure Secure Access Profiles. EIP Agent Profiles Select the EIP agent profile to associate with the rule. Message Enter a message to display on the SASE client when the client successfully connects to a gateway. - Click OK.
Configure a Versa Secure Access Service Template
After you complete the secure access configuration, you do the following:
- Edit the organization configuration to specify the fully qualified domain name (FQDN) or IP address of the secure access portal.
- Create a secure access service template.
- Create local database users for the service template. Using a service template allows the same database user information to be pushed to multiple devices, ensuring that the database is the same on all the devices.
To specify the FQDN or IP address of the secure access portal:
- In Director view, select the Administration tab in the top menu bar.
- Select Organizations in the left menu bar.
- Select the organization name in the main pane. The Edit Organization popup window displays.
- In the Secure Access Portal field, enter the FQDN or IP address of the secure access portal.

- Click OK.
To create a secure access service template:
- In Director view, select the Configuration tab in the top menu bar.
- Select Templates > Service Templates in the horizontal menu bar.
- Select an organization in the main pane.
- Click the
 Add icon. The Add Service Template popup window displays. Enter information for the following fields. For more information, see Create Service Templates.

Field Description Name (Required)
Enter a name for the service template. Organization (Required)
Select an organization. Type (Required) Select Secure Access. Dynamic Tenant Configuration (For Releases 22.1.3 and later.) Click to automatically select the service template and associate it with the VOS device when an organization is dynamically instantiated. - Click OK.
To create a local database user for the service template:
- Select the service template you created in the previous steps above from the Template main page.
- Select the Configuration tab in the top menu bar.
- Select Objects and Connectors > Connectors > Users/Groups > Local Database in the left menu bar to configure the local database on the appliance for authentication.
- Select the Users tab and click the + Add icon to add a new database user. In the Add User popup window, enter information for the following fields.
Field Description Username (Required)
Enter a username. Password (Required)
Enter the password for the user. Email ID Enter an email address that can be used for two-factor authentication and to register the user with the system. Phone Number Enter a phone number that can be used for two-factor authentication and to register the user with the system. - Click OK.
- Associate the newly created service template with a device group:
- In Director view, select the Configuration tab in the top menu bar.
- Select Devices > Device Groups in the horizontal menu bar.
- In the main pane, select the device group with which you want to associate the service template. The Edit Device Group popup window displays.

- Select the Post Staging Temple Association tab, and click the Edit button. The Edit Post Staging Template Association popup window displays.

- Click the + Add icon. In the Add Post Staging Template Association popup window, add information for the following fields.
Field Description Tenant (Required)
Enter the name of the tenant. Category (Required) Select Secure Access. Template (Required) Select the service template. - Click OK.
- Notify the users that they have been authorized to use secure access. Users can set passwords after they receive the notification.
- In Director view, select the Configuration tab in the top menu bar.
- Select Templates > Service Templates in the horizontal bar.
- Select the service template you created previously, and click the Notify All button.

- Click the
 Tasks icon to view status of the notification process. The users then receive an welcome email directing them to reset their passwords to begin the registration process.
After the account is registered, Versa Director performs an automatic template commit for devices in the device group so that the user password change is synchronized across all the local user databases. Versa Director then sends an email to the user indicating that the account is ready and providing the information needed to register the user's SASE client application. For more information, see Configure Versa SASE Clients.
If the service template is associated with a main template, the scheduled apply-template action is triggered every 15 minutes and pushes the local user information to the branch devices. The local user then receives a confirmation email, and they can the use the VPN login with the account created.
To configure the scheduled apply-template trigger time value in the /var/versa/vnms/data/conf/vnms.properties file, set the SECURE_ACCESS_APPLY_TEMPLATE_INTERVAL parameter. To set the interval to 15 minutes, configure the following attribute:
SECURE_ACCESS_APPLY_TEMPLATE_INTERVAL=15
You can configure the secure access endpoint host attribute. By default, the endpoint is configured as localhost (that is, the Versa Director IP address). If you edit the SECURE_ACCESS_VNMS_UI_ENDPOINT_HOST parameter to configure a domain name as the endpoint host, this name is used instead of the Versa Director IP address in the welcome notification email in the Click To Proceed link.
SECURE_ACCESS_VNMS_UI_ENDPOINT_HOST=localhost
If necessary, you can perform the apply-template action from the GUI to push the configuration to the branch devices.
Supported Software Information
Releases 20.2.2 and later support all content described in this article, except:
- Release 21.2.1 adds support for policy and rules for Versa secure access portals and gateways, MDM profiles in Versa secure access portals and gateways, time-based one-time-password (TOTP) verification, SAML authentication, and best gateway selection.
- Release 22.1.3 adds the dynamic tenant configuration field in the Add Service Template window, Preferred Client Versions menu, and SLA Profiles menu. The monitoring profile and tunnel order fields are added to the Add Gateway Profiles window.
Additional Information
Configure a Gateway To Use an LDAP Server for User Authentication
Configure AAA
Configure Address Objects
Configure Basic Features
Configure CA Certificates and CA Chains
Configure Digital Experience Monitoring
Configure Log Export Functionality
Configure MDM Profiles
Configure Pre-logon for the Versa SASE Client
Configure RADIUS for User Authentication
Configure Service Node Groups
Configure URL Filtering
Configure User and Group Policy
Configure the Versa SASE Client To Select the Best Gateway
Configure Versa SASE Clients
Configure Versa Secure Access Objects
Configure Versa Secure Access Subscriptions
Enable SAML Authentication
Generate CA and EE Certificates Using OpenSSL
Use the Versa SASE Client Application