Enable SAML Authentication
![]() For supported software information, click here.
For supported software information, click here.
Security Assertion Markup Language (SAML) is a common standard for authenticating users so that they can access multiple services and applications. SAML is a common standard for exchanging authentication between parties, and it is most commonly used for web browser–based single sign-on (SSO). SSO authenticates a user once and then communicates that authentication to multiple applications. Using SAML-based SSO in Versa secure access improves the user experience, because users do not have to enter user credentials frequently.
To enable SAML authentication, you do the following:
- Configure the SSO URL in the SAML application.
- Configure a SAML profile.
- Associate the SAML profile with an authentication profile.
- Associate the SAML authentication profile with a Versa secure access portal.
- Associate the SAML authentication profile with a Versa secure access gateway.
Configure the SSO URL in the SAML Application
To enable SAML authentication, configure the SSO URL in the SAML application in the following format. This is the URL to which the Versa secure access client sends the SAML response.
https://domain-name/secure-access/services/saml/login-consumer
Configure a SAML Profile
- In Director view:
- Select the Administration tab in the top menu bar.
- Select Appliances in the left menu bar.
- Select a device name in the main panel. The view changes to Appliance view.
- Select the Configuration tab in the top menu bar.
- Select Object and Connectors > Connectors > Users/Groups > SAML Profile in the left menu bar to configure SAML profile.
- Click the
 Add icon. The Add SAML Profile popup window displays.

- In the Name field, enter a name for the SAML profile.
- For information about configuring the other fields, see Configure SAML Profiles.
- Click OK.
Associate the SAML Profile with an Authentication Profile
- In Director view:
- Select the Administration tab in the top menu bar.
- Select Appliances in the left menu bar.
- Select a device name in the main panel. The view changes to Appliance view.
- Select the Configuration tab in the top menu bar.
- Select Objects & Connectors
 > Connectors
  > Users/Groups
  > Authenticator Profiles
  in the left menu bar.
 - Click the
 Add icon. The Add Authentication Profiles popup window displays.
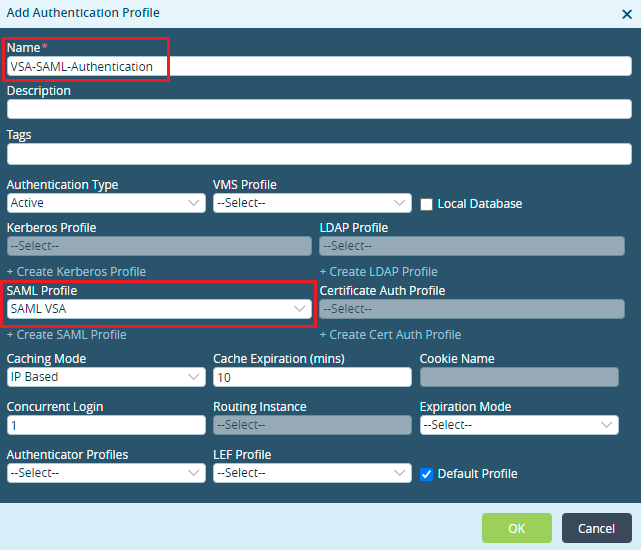
- In the Name field, enter a name for the authentication profile (here, VSA-SAML-Authetication).
- In the SAML Profile field, select the SAML profile you configured in Configure a SAML Profile above. To add an SAML Profile, click + Create SAML Profile.
- Click OK.
Associate the SAML Authentication Profile with a Versa Secure Access Portal
- In Director view:
- Select the Administration tab in the top menu bar.
- Select Appliances in the left menu bar.
- Select a device name in the main panel. The view changes to Appliance view.
- Select the Configuration tab in the top menu bar.
- Select Services
 > Secure Access
  > Portal
 > Servers
  in the left menu bar.
 - Click the
 Edit icon. The Add Services popup window displays.
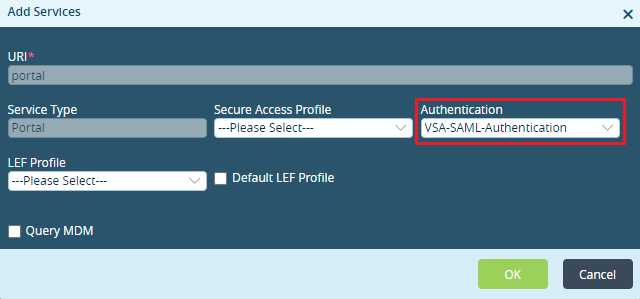
- In the Authentication field, select the authentication profile you configured in Associate the SAML Profile with an Authentication Profile, above (here, VSA-SAML-Authentication).
- For information about configuring the other fields, see Add a Secure Access Portal.
- Click OK.
Associate the SAML Authentication Profile with a Versa Secure Access Gateway
- In Director view:
- Select the Administration tab in the top menu bar.
- Select Appliances in the left menu bar.
- Select a device name in the main panel. The view changes to Appliance view.
- Select the Configuration tab in the top menu bar.
- Select Services > Secure Access > Gateway> General in the left menu bar.
- Click the Edit icon. The Add Services popup window displays.

- In the Authentication field, select the authentication profile you configured in Associate the SAML Profile with an Authentication Profile, above (here, VSA-SAML-Authentication).
- For information about configuring the other fields, see Configure a Secure Access Gateway.
- Click OK.
Supported Software Information
Releases 20.2.2 and later support all content described in this article.
Additional Information
Configure User and Group Policy
Configure the Versa Secure Access Service