Configure Versa Secure Access Applications and Domains
![]() For supported software information, click here.
For supported software information, click here.
As part of Versa secure access (VSA) and Secure Access Service Edge (SASE), you can configure a Versa Operating SystemTM (VOSTM) device to be a secure access portal or a secure access gateway so that a SASE client can connect to it. You can configure portal and gateway services on a single VOS device or on two different VOS devices. When the SASE client is performing user registration, it communicates with the secure access portal. After the registration process completes, the SASE client communicates with the secure access gateway to obtain secure web gateway (SWG) or zero-trust network access (ZTNA) services.
You can configure which applications and domains the SASE client sends to the Versa secure access gateway and which break out locally to the internet. You can also perform a reverse configuration, in which all traffic is sent to the Versa secure access gateway and only some applications and domains break out locally to the internet.
To configure SASE clients, you do the following:
- Define the applications and domains from the SASE client menu on the Director node.
- Configure traffic steering on the SASE portal server or in a gateway profile, a configuration that is pushed to the SASE client during the registration process.
Define SASE Client Applications
For a SASE client, you define that applications that the client is allowed or not allowed to steer traffic towards.
To add a SASE client application:
- In Director view:
- Select the Configuration tab in the top menu bar.
- Select the organization (tenant) name in the left menu bar.
- To make a permanent change to the device configuration, select Templates > Device Templates in the horizontal menu bar, and then, in the main pane, select the template to apply to the device.

- To make a temporary change to the device configuration, select Devices > Devices in the horizontal menu bar, and then, in the main pane, select the device. Temporary changes are overwritten if you later apply a template to the device.

- Select the Configuration tab in the top menu bar.
- Select Objects & Connectors > Objects > Custom Objects > SASE Client > Applications in the left menu bar. The main pane displays the SASE client applications that are already configured.

- Click the + Add icon. In the Add SASE Client Applications popup window, enter information for the following fields.

Field Description Name (Required)
Enter a name for the SASE client application. The name can be up to 128 characters.
Encrypted Click to enable encryption for the application. Selecting this option helps to control the tunnel that application traffic uses for encrypted and unencrypted communication between the SASE client and a Versa cloud gateway. For ZTNA traffic, you use encrypted traffic, while for SWG, you generally use unencrypted traffic.
Description Enter a text description for the application.
Path Enter the name of the application that you want to break out. Enter the name of the application with no suffix. For example, if the name of the application is "chrome.exe", enter the path as "chrome".

- Click OK.
Define SASE Client Domains
For a Versa secure access client, you define domains that the client is allowed or not allowed to steer traffic towards.
To add a SASE client domain:
- In Director view:
- Select the Configuration tab in the top menu bar.
- Select the organization (tenant) name in the left menu bar.
- To make a permanent change to the device configuration, select Templates > Device Templates in the horizontal menu bar, and then, in the main pane, select the template to apply to the device.
- To make a temporary change to the device configuration, select Devices > Devices in the horizontal menu bar, and then, in the main pane, select the device. Temporary changes are overwritten if you later apply a template to the device.
- Select the Configuration tab in the top menu bar.
- Select Objects & Connectors > Objects > Custom & Objects > SASE Client > Domains in the left menu bar. The main pane displays the SASE client domains that are already configured.

- Click the + Add icon. In the Add SASE Client Domains popup window, enter information for the following fields.
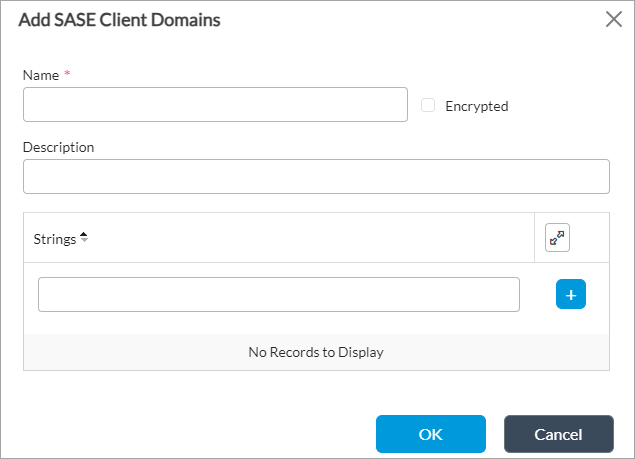
Field Description Name (Required)
Enter a name for the SASE client domain. The name can be up to 128 characters.
Strings Enter the name of the client domain you want to break out. Enter the name of the domain with no suffix. For example, if the name of the domain is "my-company.com", enter the path as "my-company".
Encrypted Click to enable encryption for the client domain. Selecting this option helps to control the tunnel that client domain traffic uses for encrypted and unencrypted communication between the SASE client and a Versa cloud gateway. For ZTNA traffic, you use encrypted traffic, while for SWG, you generally use unencrypted traffic. Description Enter a text description for the client domain. - Click OK.
Configure Traffic Steering for Applications and Domains
To be able to direct SASE client application and domain traffic so that some traffic is directed to the SASE gateway and some traffic breaks out locally to the internet, you configure traffic steering. There are two methods for doing this:
- Create a split tunnel, and then configure the applications and domains to send over the SASE tunnel. That is, you configure the applications and domains to include in the SASE tunnel. A SASE tunnel is an overlay tunnel that is established between an end device and the SASE gateway.
- Do not create a split tunnel, and then configure the applications and domains not to send over the SASE tunnel. That is, you configure the applications and domains to exclude from the SASE tunnel.
For both methods, you create the configuration on the SASE portal, and this configuration is pushed to the SASE clients during the registration process.
Note that you can configure traffic steering when you configure the SASE gateway, which is also referred to as the SASE server, or when you configure a gateway profile. A SASE server configuration can apply to more than one gateway, so it is recommended that you use this method when you want to use the same configuration on multiple SASE gateways. If you configure both a SASE server and a SASE gateway profile, the SASE server configuration overrides the SASE gateway profile. However, if you configure both and the configurations do not overlap, the fields you configure are combined. For example, if you configure only applications in the SASE gateway and only domains in the gateway profile, both configurations are applied. However, if you configure applications in both the SASE gateway and gateway profile, only the SASE server configuration is pushed to the SASE client during the registration process.
Configure Applications and Domains To Send over the SASE Tunnel
The procedure in this section shows how to explicitly specify the applications and domains to send over the SASE tunnel. You can configure the applications and domains to include, and you cannot configure any applications or domains to exclude.
To configure the applications and domains to send:
- In Director view:
- Select the Configuration tab in the top menu bar.
- Select Templates > Device Templates in the horizontal menu bar.
- Select an organization in the left menu bar.
- Select a template in the main pane. The view changes to Appliance view.
- Select the Configuration tab in the top menu bar.
- Select Services > Secure Access Portal > Gateways in the left menu bar (In Releases 21.2.3 and earlier, gateways are called servers).
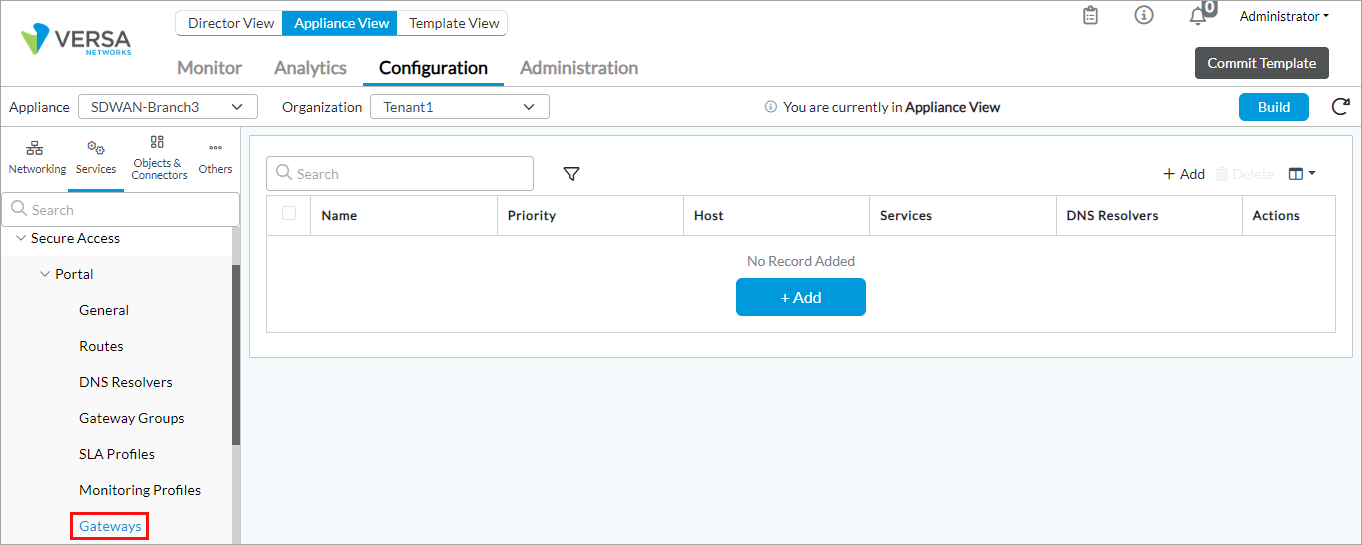
- Click the + Add icon. The Add Servers popup window displays.
- Select the Traffic Steering tab and then select the SASE Client tab, and enter information for the following fields.

Field Description Exclude Applications
Grayed out (no selections allowed). Exclude Domains
Grayed out (no selections allowed). Include Applications
Select applications that you added in Define SASE Client Applications, above. You can configure applications or domains, but not both. Include Domains
Select domains that you added in Define SASE Client Domains, above. You can configure applications or domains, but not both. - For information about the other tabs and fields, see the Configure Gateways section in Configure the Versa Secure Access Service article.
- Click OK.
- Reregister the SASE client for the configuration to take effect.
The following example explains how the split tunnel works. Suppose that the network configuration for the Windows operating system installs a default gateway route with a default priority 25. This default value is in effect even if you do not install the Versa SASE client. If you select the Split Tunnel option in the SASE gateway configuration, any routes that are pushed are installed with a priority value of priority + 100. For example, if you configure the route 0.0.0.0/0 with a priority of 10, the route installs with a priority of 110. Only the specified routes are preferred to go over the tunnel, and other routes go through the default gateway because they have a priority 25. So in this example, we configure two routes on the SASE portal—Default-GW and Half-Internet—and we enable split tunnel for traffic steering. Then we reregister the client and connect to the SASE gateway.

The following routing table output shows that both routes are pushed through the SASE portal with a much higher priority than the default gateway that was originally on the Windows machine. However, only 0.0.0.0/1 is preferred because of the shortest-route selection behavior.

Configure Applications and Domains To Not Send over the SASE Tunnel
The procedure in this section shows how to exclude applications and domains so that they are not sent over the SASE tunnel. You can configure the applications and domains to exclude, and you cannot configure any applications or domains to include. Generally, you apply this configuration with the default gateway pointing towards the SASE tunnel so that only selected applications and domains break out to the internet.
To configure the applications and domains not to send:
- In Director view:
- Select the Configuration tab in the top menu bar.
- Select Templates > Device Templates in the horizontal menu bar.
- Select an organization in the left menu bar.
- Select a template in the main pane. The view changes to Appliance view.
- Select the Configuration tab in the top menu bar.
- Select Services > Secure Access > Portal > Servers in the left menu bar.
- Click the + Add icon. The Add Servers popup window displays.
- Select the Traffic Steering tab and then select the SASE Client tab, and enter information for the following fields.
Field Description Exclude Applications
Select applications that you added in Define SASE Client Applications, above. You can configure applications or domains, but not both. Exclude Domains
Select domains that you added in Define SASE Client Domains, above. You can configure applications or domains, but not both. Include Applications
Grayed out (no selections allowed).
Include Domains
Grayed out (no selections allowed).
- For information about the other tabs and fields, see the Configure Gateways section in Configure the Versa Secure Access Service article.
- Click OK.
- Reregister the SASE client for the configuration to take effect.
To select the SASE clients for which traffic steering from a secure access gateway applies, associate SASE clients with a secure access gateway profile. For more information, see Configure SASE Secure Client-Based Access Profiles.
Supported Software Information
Releases 21.2.1 and later support all content described in this article.
Additional Information
Configure File Filtering
Configure the Versa Secure Access Service