Configure Time Settings
![]() For supported software information, click here.
For supported software information, click here.
You can configure the time settings on a Versa Operating SystemTM (VOSTM) device or Controller node. You can configure the VOS device to use an NTP server for time synchronization, or set the time manually. You can also configure the VOS device to act as an NTP server.
Configure Time
- In Director view:
- Select the Configuration tab in the top menu bar.
- Select Templates > Device Templates in the horizontal menu bar.
- Select an organization in the left menu bar.
- Select a device in the main pane. The view changes to Appliance view.
- Select the Configuration tab in the top menu bar.
- Select Others > System > Time & Date > Time Settings in the left menu bar.

- Click the
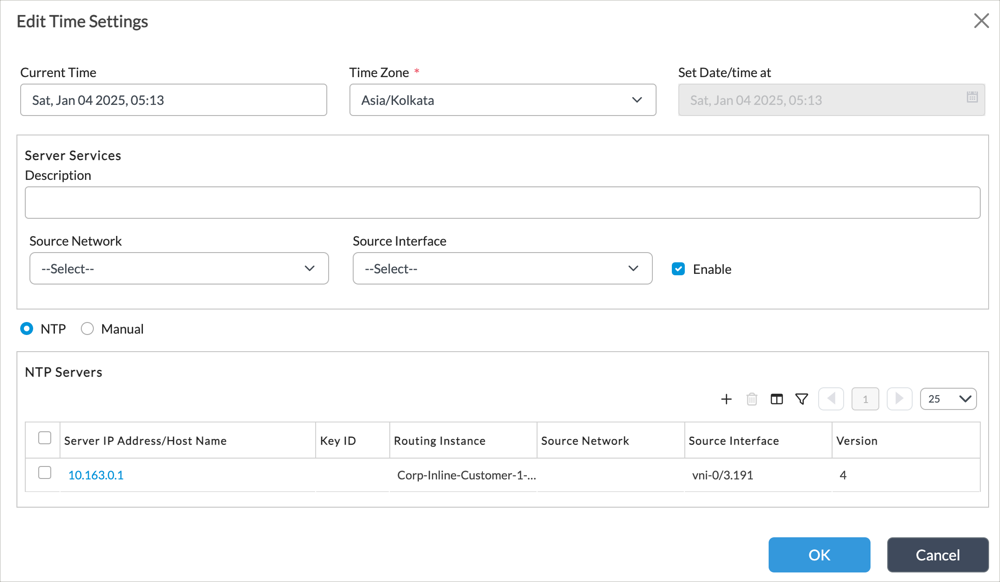
 Edit icon. In the Edit Time Settings popup window, enter information for the following fields.

Field Description Current Time Displays the current time on the device. Timezone Select the timezone to use for time settings. Server Services (Group of Fields) (For Releases 22.1.4 (Service Release dated 2024-12-20) and later.) Enter server settings to enable the VOS device to act as an NTP server. - Description
Enter a description for the time server. - Source Network
Select the source network for the time server. - Source Interface
Select the source interface for the time server. - Enable
Click to enable NTP server services on the VOS device. NTP Click to use the Network Time Protocol to set the time on the device.
Manual Click to set the time manually on the device. Set Date/time at If you select Manual mode, set the date and time on the device. - If you select NTP, click the
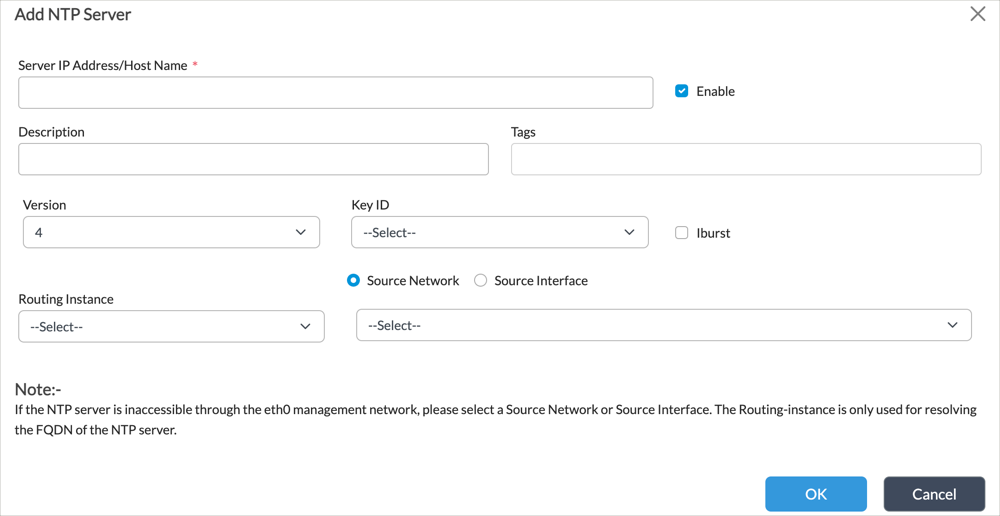
 Add icon in the NTP Servers pane to add NTP servers. In the Add NTP Server popup window, enter information for the following fields.

Field Description Server IP Address/Host Name (Required) Enter the IP address or host name of the NTP server. For DNS resolution of host names, NTP uses global DNS settings. If there are no global DNS setting, then select a Routing Instance, below. Description Enter a text description the server. Key ID Select the ID of the authentication key. For more information, see Configure an Authentication Key ID, below. Routing Instance Select the routing instance to resolve the FQDN of the NTP server. Source Network
Source InterfaceClick to select either the network or interface to use to reach the NTP server. This field is required if the NTP server is inaccessible through the management network.
Version Select the version of the NTP server. The current version is 4, which is compatible with version 3. Enable Click to activate NTP services. Iburst Click to enable iburst on the server. Using iburst improves the time required for initial synchronization. With iburst, when the NTP server is unreachable, a burst of eight packets is sent instead of the usual one packet. - Click OK.
Configure an Authentication Key ID
To configure an authentication key to validate the NTP server:
- In Director view:
- Select the Configuration tab in the top menu bar.
- Select Templates > Device Templates in the horizontal menu bar.
- Select an organization in the left menu bar.
- Select a device in the main pane. The view changes to Appliance view.
- Select the Configuration tab in the top menu bar.
- Select Others > System Time & Date > Key ID in the left menu bar.

- Click the
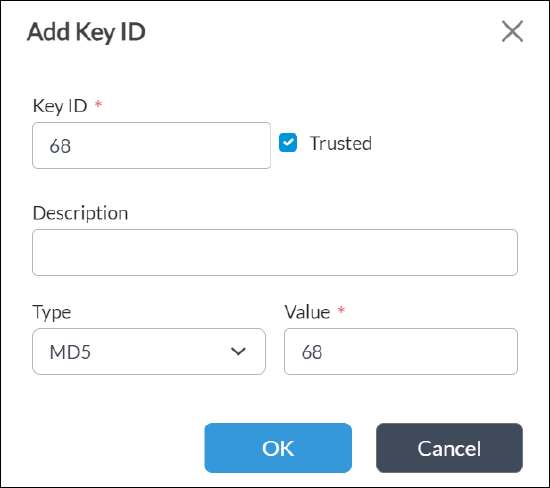
 Add icon. In the Add Key ID popup window, enter information for the following fields.

Field Description Key ID Enter an ID for the authentication key. Trusted Click to mark the key as trusted. Type Select the key type:
- MD5
- SHA1 (Releases 22.1.4 and later)
- SHA 256 (Releases 22.1.4 and later.)
Value Enter a key value. - Click OK.
Supported Software Information
Releases 20.2 and later support all content described in this article, except:
- Release 22.1.4 adds support for SHA-1 and SHA-256 type key IDs.
- Release 22.1.4 (Service Release dated 2024-12-20) adds support for configuring a VOS device to act as an NTP server.
