Install and Configure Versa SASE Clients
![]() For supported software information, click here.
For supported software information, click here.
You can install a Versa SASE client on the following devices:
- Android 6.0 and later
- iOS 13 and later. To install the Versa SASE client for iOS, download the client from the Apple App Store.
- Linux
- Debian 10 (Buster) and later (equivalent to Ubuntu 18.04 and later)
- Fedora 34 and later (equivalent to RHEL8 or CentOS8 and later)
For more information, see Install the Versa SASE Client.
- macOS 10.14 and later
- Windows (Note that the SASE client support for Windows 7 and 8.1 is limited as these versions have reached end of support from Microsoft)
- Windows 11 (all versions)
- Windows 10, 10.0.16299 and later
- Windows 7 Professional Version 6.1.7601
- Windows 8.1 Version 6.3 (OS Build 9600)
- Windows Server 2016 Version 1607 (OS build 14393.693)
- Windows Server 2019 Version 10.0.17763
- Windows Server 2012R2 6.3.9600
To configure a Versa SASE client, you install the client, register and connect to it.
For information about using the SASE client application, see Use the Versa SASE Client Application.
SASE Client Processes and Paths to Allow Before Installation
Before you install the Versa SASE client, configure your antivirus, endpoint detection and response (EDR), firewall application, and group policy object (GPO) settings to recognize Versa SASE client components as trusted. In some cases, security applications running on the endpoint may incorrectly flag Versa SASE client components, such as processes, folders, binaries, and supporting utilities, as suspicious or malicious. To prevent such false positives and ensure proper functionality, include in the allow list or create security exceptions for the following Versa SASE client components before installation.
Processes and Paths to Allow in Windows
Add the following executable files and paths to your antivirus, EDR, or GPO allow lists:
- C:\Program Files (x86)\Versa Secure Access\VersaSecureAccessClient.Alerts.exe
- C:\Program Files (x86)\Versa Secure Access\VersaSecureAccessClient.exe
- C:\Program Files (x86)\Versa Secure Access\VersaSecureAccessClient.NotificationTray.exe
- C:\Program Files (x86)\Versa Secure Access\VersaSecureAccessClientConsole.exe
- C:\Program Files (x86)\Versa Secure Access\VNSecureAccessWindowsService.exe
- C:\Program Files (x86)\Versa Secure Access\VNSecureAccessWindowsTPService.exe
- C:\Program Files (x86)\Versa Secure Access\VersaSecureAccessInstallerService.exe
- C:\Program Files (x86)\Versa Secure Access\VNSecureAccessWindowsEIPService.exe
- C:\Program Files (x86)\Versa Secure Access\VersaSecureAccessDEMService.exe
- C:\Program Files (x86)\Versa Secure Access\python.exe
- C:\Program Files (x86)\Versa Secure Access\unins000.exe
- C:\Program Files (x86)\Versa Secure Access\SASE.DLPService.exe
- C:\Program Files (x86)\Versa Secure Access\VersaSecureAccessClient.ClipboardMonitor.exe
Applications, XPC Services and Binaries to Allow in macOS
Add the following application bundles, XPC services, and binaries to your allow lists for macOS:
Application/App bundle
- /Applications/Versa SASE Client.app/Contents/MacOS/Versa SASE Client /bin
- /Applications/Versa SASE Client.app/Contents/VSATrayApp.app/Contents/MacOS/VSATrayApp
- /Applications/Versa SASE Client.app/Contents/SaseClientWebsockets.app/Contents/MacOS/SaseClientWebsockets
XPC Services
- /Applications/Versa SASE Client.app/Contents/XPCServices/SCAXPCServices.xpc/Contents/MacOS/SCAXPCServices
- /Applications/Versa SASE Client.app/Contents/XPCServices/EIPXPCServices.xpc/Contents/MacOS/EIPXPCServices
- /Applications/Versa SASE Client.app/Contents/XPCServices/DEMXPCService.xpc/Contents/MacOS/DEMXPCService
Binaries and Utilities
- /private/var/versa/mtr
- /private/var/versa/mtr-packet
- /Applications/Versa SASE Client.app/Contents/Resources/OESIS
- /private/var/versa/SSL/ssl-vpn
Firewall Requirements to Allow Domains, IP Addresses, Ports, and Protocols
To ensure seamless connectivity and reliable communication between the Versa SASE client and Versa SSE gateways, configure your firewall to allow the following protocols and ports:
- Add all the Versa SSE gateway domains and IP addresses in the allow list using the ports listed below.
- Ensure these ports and protocols are permitted for both inbound and outbound traffic, as required by your network configuration.
Required Ports and Protocols:
- TCP 443 — TLS (HTTPS)
- UDP 443 — DTLS (secure data-plane)
- UDP 500 — IKE (IPsec)
- UDP 4500 — IPsec NAT-T
- ESP (IP Protocol 50) — IPsec data-plane traffic
Note that the list of Versa SSE domains and IP addresses is maintained by your Managed Service Provider (MSP), or you can access it through the Versa Cloud portal. Verify and update these details periodically to maintain uninterrupted service connectivity.
Install a Versa SASE Client on an Android Device
To install a Versa SASE client on an Android 6.0 device:
- Download and install the Versa SASE client from the Google Play Store.
- Open the application.
- Grant permissions for the following mandatory settings:
- Display Popup over Other Apps—Allow the user to receive event notifications and take actions based on the alerts.
- Whitelist Power Optimization—Allow the application to run in the background to remain connected, to reconnect if the tunnel disconnects for any reason, and for event notification.
- Write external storage—This permission is optional but it is required to write and export logs. If this permission is not granted, users cannot export logs that can be used by technical support. If this permission is not granted, when a users clicks Export Logs in the Troubleshoot screen, the Versa SASE client prompts the user to grant permission.
Optionally, grant permission for the following setting:
- Access Location—Allow the Versa SASE client to provide geographic coordinates to enable the server to suggest the best gateway to connect the client based on user's location.

- Click Proceed. The Privacy Policy screen displays.

- Click Agree. The Register screen displays. For more information, see Register and Connect a Versa SASE Client, below.
Install a Versa SASE Client on a macOS Device
To install the Versa SASE client on a macOS device, open the SASE client. The Register screen displays. For more information, see Register and Connect a Versa SASE Client, below.
Install a Versa SASE Client on a Windows 10 Device
This section describes how to install a Versa SASE client on a Windows 10 device. To obtain the link from which to download the client, contact Versa Networks Customer Support.
To install the Versa SASE client on a Windows 10 device:
- Download and install the application from this location. Confirm the download link with your organization's IT administrator before you download the Versa SASE client.
- Start the application. The Select Components wizard screen displays. By default, Versa SASE Client is selected.

- Click Pre-Logon to configure the pre-logon feature. For more information, see Configure Pre-Logon for the Versa SASE Client.
- Click Next. The Select Additional Tasks screen displays.

- Click Create a desktop shortcut to create a shortcut of the SASE client on the desktop of your Windows device.
- Click Next. The Ready to Install screen displays.

- Click Install. The installation begins, and an installation status screen displays. To stop the installation, click Cancel.

- After the application is installed, the Completing the Versa SASE Client Setup Wizard screen displays.

- By default, Launch Versa SASE Client is selected. Click to deselect the option.
- Click Finish to complete the installation. The Register screen displays, unless you deselected Launch Versa SASE Client. For more information, see Register and Connect a Versa SASE Client, below.
Register and Connect a Versa SASE Client
To register and connect a Versa SASE client on an Android, a macOS, or a Windows 10 device:
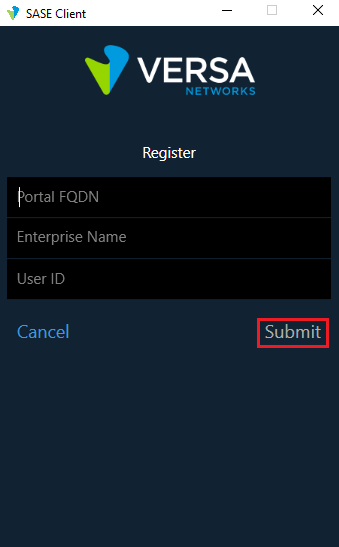
- Click Register in the Versa SASE Client home screen.

- Enter the information you received in email in the following fields:
- Fully qualified domain name (FQDN) or IP address of the portal.
Note that, for Windows, IP address is currently not supported. If you use IP address for Windows, ensure that the server certificate IP address is included the Common Name or Subject Alternative Name (SAN) property. Else, the https connection fails and so does the client registration. You can also add the host entry with the required FQDN and use this FQDN the instead of IP address. - Name for the enterprise
- User ID
- Fully qualified domain name (FQDN) or IP address of the portal.
- Click Submit to submit the registration.
- When prompted, enter your password.

- Click Submit. A one-time password (OTP) is sent to your mobile device.
- Enter the one-time password.

- (For Releases 21.2.1 and later.) If time-based OTP (TOTP) authentication is enabled, a QR code is sent to the user's email address.
- Scan the QR code using any authenticator application.
- The following screen displays when you scan the QR code with a field to enter OTP.

- Enter the OTP that the authenticator application displays.
- After the TOTP is validated, the registration process is complete.
- If SAML authentication is used, the client login page similar to the following displays:

- Enter the user name and password, and then click Login.
- After the login credentials are validated, the registration process is complete.
- Click Submit. If the registration is successful, the following screen displays:

- To connect to a secure access gateway, select a gateway from the drop-down list and click the Connect icon to connect to the gateway. An OTP is sent to your mobile device.

- Enter the OTP that was sent to your mobile device.

- Click Submit. The following screen displays.

- Click Connection Status to view details about the connection.

From this screen you can:
- View the available secure access servers.
- Reregister.
- Reset your password.
- Click the Remember Credentials toggle button.
- Delete the account.
For more information about using the SASE client, see Use the Versa SASE Client Application.
Versa SSE Service Certificates
If you use Versa SASE Client for the Versa SSE service, the client uses the Versa CA certificate to verify the connection to the Versa Cloud Gateway (VCG).
Note that you can use your own certificate for SSL decryption. The Versa CA certificate is used only for the VCG.
Supported Software Information
Releases 20.2.2 and later support all content described in this article.