Use the Versa SASE Client Application
![]() For supported software information, click here.
For supported software information, click here.
The Versa SASE client application is a native VPN client that supports Android, iOS, Linux, MacOS, and Windows operating systems.
Note that in earlier software releases, for releases prior to Release 7.4.3 for Android, Release 7.3.7 for MacOS, and Release 7.4.5 for Windows, the product was called the Versa Secure Access (VSA) client application software.
The SASE client provides secure IKEv2 IPsec-based remote access VPN connectivity with enterprise-grade authentication, including the following:
- EAP-MSCHAPv2
- Two-factor authentication (2FA)
- One-time password (OTP) delivered through SMS or email
- Time-based one-time password (TOTP)
The SASE client supports the following OS versions:
- Android 6.0 and later
- iOS 13 and later
- Linux
- Debian 10 (Buster) and later (equivalent to Ubuntu 18.04 and later)
- Fedora 34 and later (equivalent to RHEL8 or CentOS8 and later)
- MacOS 10.14 and later
- Versa Operating SystemTM (VOSTM) Releases 20.2.3 and later
- Versa Concerto Releases 11.3.1 and later
- Windows (Note that the SASE client support for Windows 7 and 8.1 is limited as these versions have reached end of support from Microsoft)
- Windows 11 (all versions)
- Windows 10, 10.0.16299 and later
- Windows 7 Professional Version 6.1.7601
- Windows 8.1 Version 6.3 (OS Build 9600)
- Windows Server 2016 Version 1607 (OS build 14393.693)
- Windows Server 2019 Version 10.0.17763
- Windows Server 2012R2 6.3.9600
This article describes the SASE features and how to configure and use them. Before using the SASE client application, you must set up the Secure Access Service. See Configure the Versa Secure Access Service. For more information about installing the SASE client, see Install and Configure Versa SASE Clients. For more information about SASE client features, see Enable SASE Client Features below.
For more information about troubleshooting the SASE client, see Troubleshoot the SASE Client.
SASE Client Features
The following table describes the important SASE client features available for Android (and ChromeOS), iOS, Linux, MacOS, and Windows clients, the SASE client application release in which the features are supported, and the corresponding VOS and Concerto software releases that support the feature. For a release-wise feature list of the client, see the following:
- Versa SASE Client Release Notes for Android
- Versa SASE Client Release Notes for iOS
- Versa SASE Client Release Notes for Linux
- Versa SASE Client Release Notes for macOS
- Versa SASE Client Release Notes for Windows
| Feature | Description | OS Support |
|---|---|---|
|
Always On connection |
Allow preregistered or authorized clients to connect to the VSA gateway without user intervention. |
|
|
Application-based split tunnel |
Exclude or include traffic from specific Windows processes or applications in the tunnel. |
|
|
Automatic configuration sync |
Automatically synchronize configuration with the secure access portal at configured regular intervals while connecting to a gateway. |
|
|
Autodisconnect |
Automatically disconnect tunnel after the configured autodisconnect interval. |
|
| Automatic Hide | Automatically minimize the client UI after 5 seconds of inactivity while on the home screen. |
|
|
Automatic software update |
Automatically check for software updates, and prompt users to update to the latest version when available. |
|
|
Best gateway selection |
Select the best available gateway in a gateway group based on gateway proximity, gateway load, and network latency. |
|
|
Captive portal detection |
Automatically detect captive portal in the internet path, and prompt users to restore internet connectivity using the captive portal page displayed automatically. |
|
|
Certificate-based device authentication |
Versa cloud gateway prompts SASE client to perform device authentication by presenting the device certificate. |
|
|
Connection to gateway group |
Connect to the most optimal gateway from a group of gateways. |
|
|
Connect to specific gateway |
Connect to a specific gateway from a list of gateways. |
|
|
Custom logo |
Customize the client screens with tenant-specific logo. Secure access portal provides the logo URL. Client downloads the logo from the configured URL and displays the custom logo instead of the default Versa Networks logo. |
|
| Digital experience monitoring (DEM) | Periodically monitors end-to-end network and application performance for an end-user device. |
|
|
Disable restricted access imposed during Fail mode Close action |
Disable restricted access. If the the Fail mode action is Close, client enforces restricted access by blocking all the traffic until the client establishes a tunnel to Versa cloud gateway. In Restricted mode, traffic is allowed only to allowed (whitelisted) domains and IP address destinations. |
|
| Display Modes | Change display mode or appearance of client (Default, Dark, or Light). |
|
| DLP Data Exfiltration | Allow or prevent endpoint data loss prevention (DLP) data exfiltration activities—Copy and paste, capture screenshot, and use of USB |
|
|
Domain-based split tunnel |
Exclude or include traffic specific domains in the tunnel. |
|
|
Endpoint information profile (EIP) |
A Versa endpoint information profile (EIP) can classify endpoints based on multiple types of endpoint posture information. To protect the endpoints in an enterprise network, you can create EIP profiles, which define rules that allow the VOS SASE software to filter information from endpoint device traffic and then match information to enforce security policy. |
|
|
Fail Mode (Close/Open) |
Configure faile mode:
|
|
|
FIPS compliance |
Enable systemwide FIPS policy and allow only FIPS-supported ciphers for TLS and IPsec communication. |
|
|
Hide gateways and list only gateway groups |
Use the Display Gateway option during portal registration on a VOS device to display or hide gateways. If disabled, the Gateways drop-down list in the main client window displays only gateway groups and not gateways. |
|
|
Maintenance mode notification |
When a VCG is under maintenance, notify clients connected to that gateway and prompt users to connect to a different gateway. |
|
|
Multifactor authentication (MFA) OTP TOTP Certificate |
Client uses authentication factors such as OTP, TOTP, and x509 certificate in addition to LDAP, RADIUS, and SAML. |
|
|
Option to disable IPv6 |
Instruct client to disable IPv6 on the device. |
|
|
Password expiry due warning |
Display password expiration notification message to remind users to reset the password. |
|
|
Path SLA monitoring as per the configured path switchover profile. |
Have client monitor the performance of all active paths to the connected Versa cloud gateway and switches to an alternate path if the SLA of the currently active path degrades while the other paths offer the required SLA. |
|
|
Periodic metric reporting |
Periodically send metric information to the SASE portal. |
|
|
Policy violation notification |
Notify users when their activities violate the company’s IT security polices |
|
|
Prefix-based split tunnel |
Exclude or include traffic destined to specific prefixes in the tunnel. |
|
|
Pre-logon connectivity |
Allow a SASE client to establish secure connection to an organization's network. Pre-logon authenticates a user on the client device and then establishes a secure connection to the organization’s network. |
|
| Realtime EIP | Realtime endpoint information protection (EIP) continuously monitors and collects critical security-related information from specific items on a user’s endpoint device. |
|
|
Register with DNS |
Indicate the client to register the host with the DNS server. |
|
|
Remember credentials |
Remember user credentials. |
|
|
Strict tunnel mode |
Redirect all traffic, including traffic to local networks, through the secure tunnel. When you disable this mode, traffic to local networks is directly routed through the local WiFi or Ethernet adapter. You can manage this mode from the Versa Secure Access Portal in Versa Director UI or via secure access client-based rules in Versa Concerto. |
|
|
Switch to optimal gateway |
Use dynamic gateway selection to allow SASE clients to select the best gateways based on distance and availability. |
|
|
Tamperproof protection |
If enabled from the server side, you cannot uninstall the client, delete the client account, or delete any files from the installation directory. To disable, click the Tamper Protection toggle button in the Account Details window and then enter the tamper protection authentication key. |
|
|
Trusted network detection and tunnel bypass |
Have the client bypass establishing a tunnel to the Versa Cloud Gateway when a device is already connected to a trusted network segment. When you configure trusted network detection on a VOS device, the SASE client tries to reach the host by bypassing the tunnel. The following conditions must be true for the client to bypass establishing a tunnel to Versa Cloud Gateway:
So, when gateway-assisted trusted network detection is enabled, when you try to connect using SASE Client, the client sends a request to the gateway to establish a VPN tunnel. The gateway then verifies if the client request is from an internal network. If it is, the server responds to client informing that it is in a trusted network and shares the time interval to send KeepAlive request. On receiving this information, the client applies the required configuration and sends periodic KeepAlive requests. The SASE client UI displays Trusted Network as the state to indicate that it is connected to a trusted network and that tunnel is bypassed. Trusted network connection does not change any other functionality of the SASE client. While connected to a trusted network, the client monitors network changes on the device and attempts reconnection if the underlay changes or if the KeepAlive request fails. This restarts the connect cycle and the client sends a request to the gateway to establish connection. For more information, see Configure Detection of Trusted Networks for SASE Gateways for Concerto and Configure the Versa Secure Access Service for Director. |
|
|
Tunnel monitoring |
Monitor the health of the tunnel by checking the reachability of the configured hosts through the tunnel. |
|
| Two-Way Active Measurement Protocol (TWAMP) Support | Configure a TWAMP auto-SLA to define client behavior on path degradation. For more information about TWAMP light sessions, see Configure TWAMP Light Test Sessions. |
|
|
User authentication |
Client supports authentication using LDAP, RADIUS, SAML, and local user certificate |
|
|
WebSocket-based notification |
Versa Cloud Gateway delivers various notifications to the client using the WebSocket connection established by the client. |
|
Register with the VSA Portal
After you place an order for VSA, you receive an email that contains the following information:
- Link to the registration portal's FQDN or IP address
- Your enterprise name
- Your user ID
To authenticate with the VSA portal, the following types of authentication are supported:
- Two-factor authentication
- Time-based one-time password (TOTP)
- SAML
To register with the VSA portal:
- Click the link to the registration portal that was included in the email.
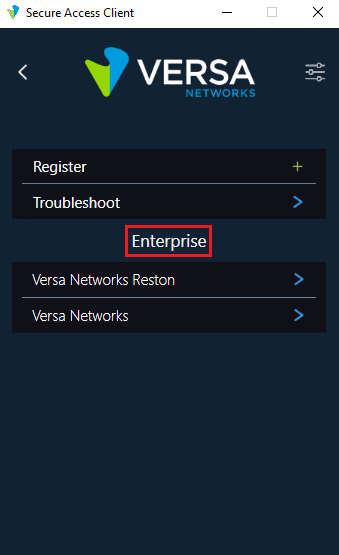
- Open the SASE Client, and click Register.
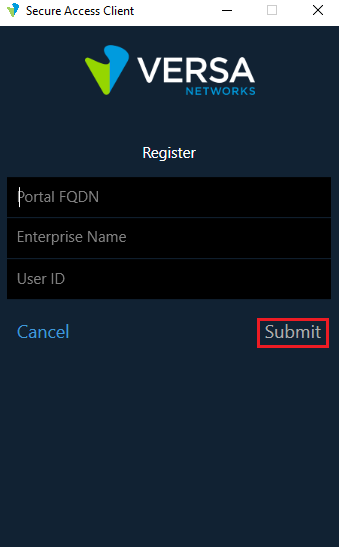
- Enter the portal's FQDN or IP address, enterprise name, and your user ID, and then click Submit.
- Enter the username and password that you received from the administrator, and then click Submit.

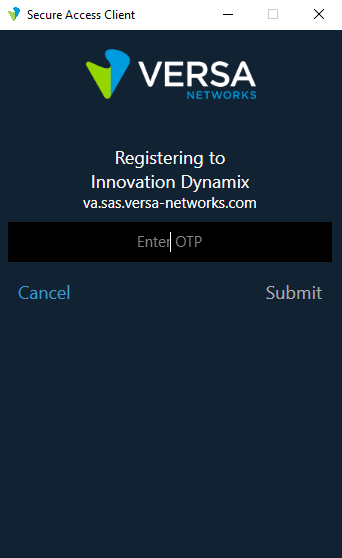
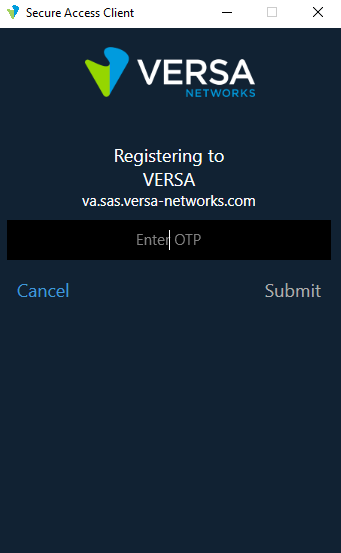
- If authentication using two-factor authentication is required, enter the one-time password that you received in email or through a mobile message server, and click Submit. After the one-time password is validated, the registration process is complete.
- (For Releases 21.2.1 and later.) If TOTP authentication is required, the screen displays a QR code:

- Scan the QR code using any authenticator application.
- Click Done after you scan the QR code. The following screen displays with a field to enter OTP.
- Enter the OTP that the authenticator application displays and click Submit.
- After the TOTP is validated, the registration process is complete.
- If SAML authentication is required, the client login page similar to the following displays:

- Enter the user name and password, and then click Login.
- After the login credentials are validated, the registration process is complete.
Add a New Connection to the Secure Access Gateway
For MacOS only.
After you successfully register with the portal, the system automatically creates a secure access gateway connection profile. In MacOS, you can add new connections manually.
To add a new connection to the secure access gateway:
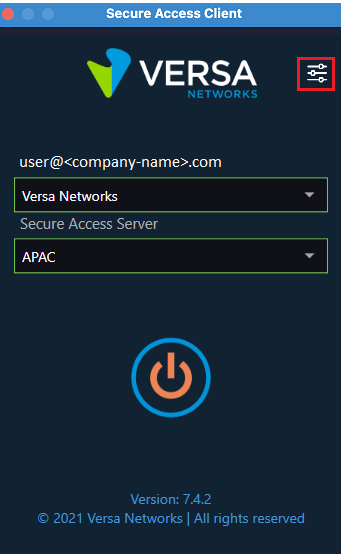
- In the SASE client home screen, click the
 Settings icon.
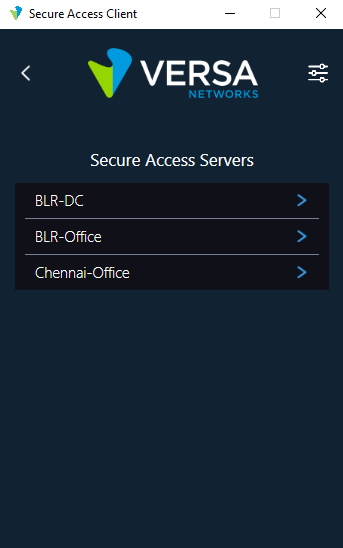
- Click the enterprise name under Enterprise, and then click Secure Access Servers..

- In the Secure Access Servers screen, click Add New Connection.

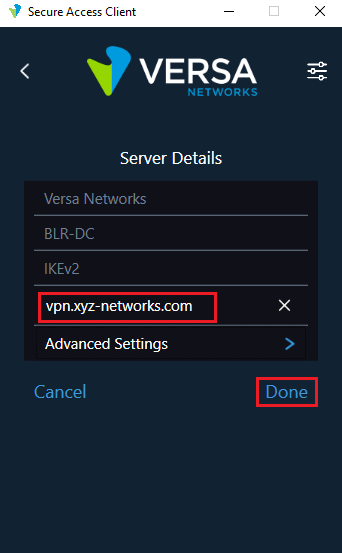
- Enter the information for the new connection in the following fields.

Field Description Connection Name Enter a name for the new connection. Connection Type Select the connection type. Gateway FQDN or IP Enter the FQDN or IP address of the gateway. User ID Enter the username or ID for the new user. Password Enter a password for the new user. Remember Credentials Toggle to remember the login credentials. Advanced Settings Click to enter advanced settings. For more information, see Configure Advanced Settings, below. - Click Done.
Configure Advanced Settings
Set IKE Phase 1 and Phase 2
For Android and MacOS only.
To set IKE Phase 1 and Phase 2 for MacOS devices:
- In the SASE client home screen, click the
 Settings icon.
 - In the Enterprise section, click the account for which to set IKE phase details.

- Click Secure Access Servers, and then click the secure access server for which to set IKE phase details.

- In the Server Details screen, click Advanced Settings, and then click IKE Phase 1.

- Enter the required information, and then click Done.

- In the Advanced Settings screen, click IKE Phase 2, and enter the required information.

- Click Done.
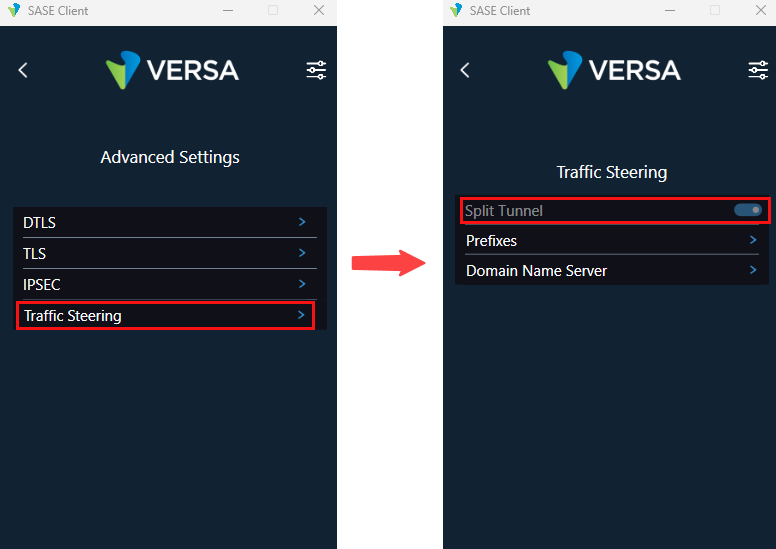
Set Prefixes and DNS Servers
To add prefixes:
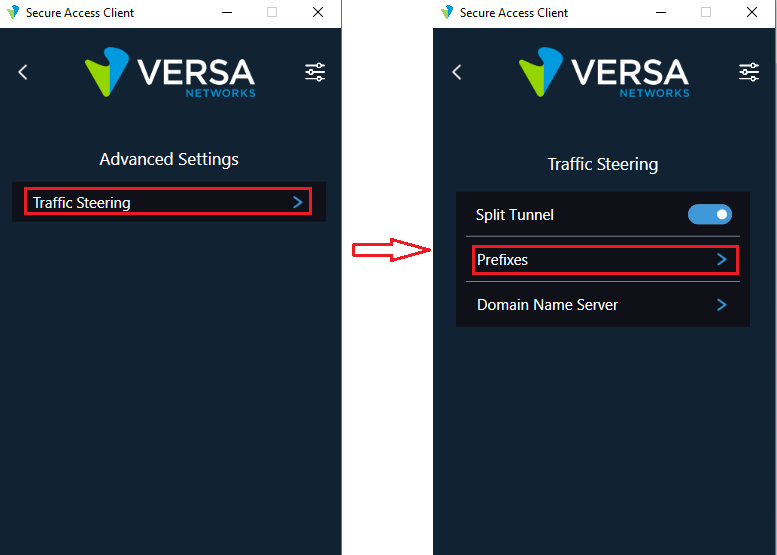
- In the Advanced Settings screen, click Traffic Steering, and then in the Traffic Steering screen, click Prefixes.
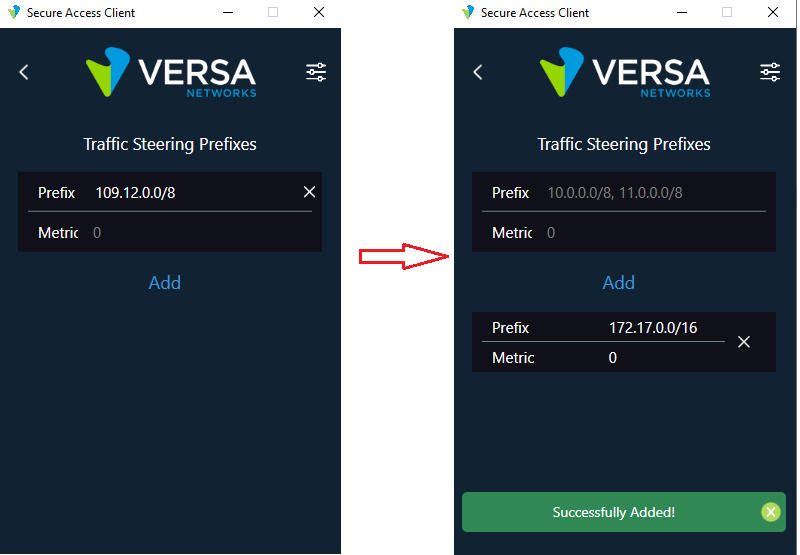
- In the Traffic Steering Prefixes screen, enter the prefix and metric values, and then click Add.
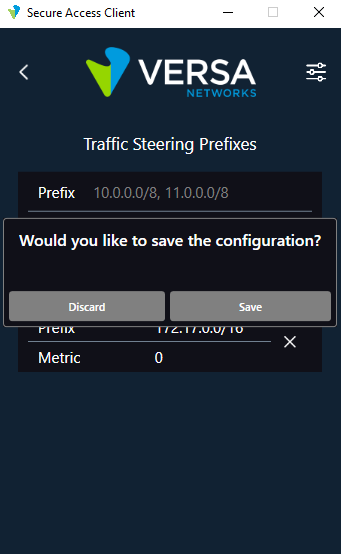
- Click the
 Back button, and save the configuration.
To add a DNS server:
Note that SASE Android client does not support split DNS.
- In the Traffic Steering screen, click Domain Name Server.
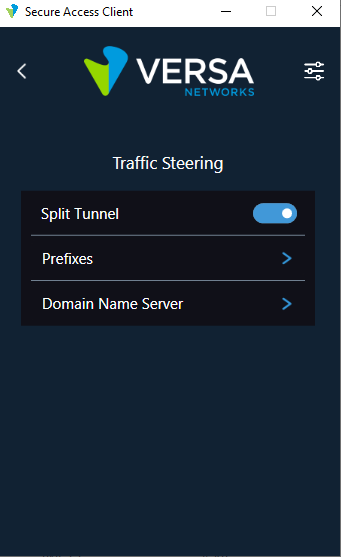
- In the Traffic Steering DNS screen, enter the IP address of the DNS server and, optionally, the domain name, and click Add. Add additional DNS servers, as needed.
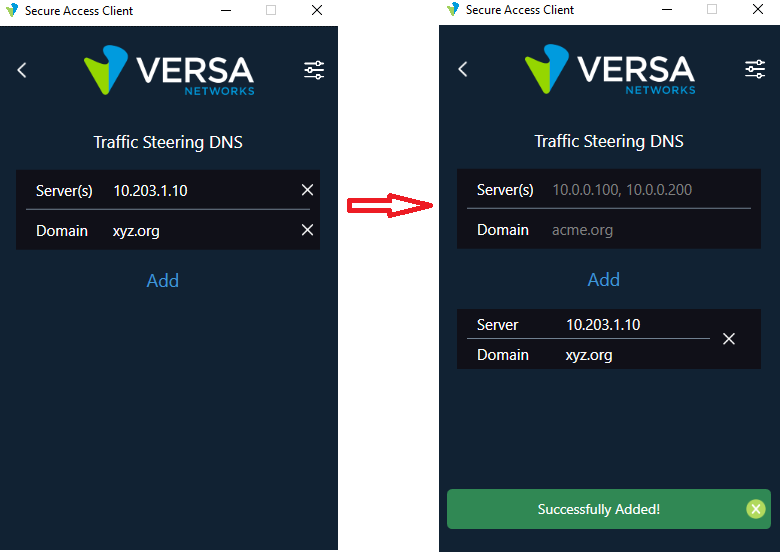
- Click the Back button, and save the configuration.

Edit a Connection
When you edit a connection to a secure access server, you can edit only the FQDN of the secure access server.
To edit a connection to the secure access server:
- In the SASE client home screen, click the Settings icon.
- In the Enterprise section, click the enterprise name, and then click Secure Access Servers.

- Click the secure access server connection to edit.
- In the Server Details screen, edit the FQDN of the server. Other fields are disabled.
- Click Done.
Delete an Enterprise Account
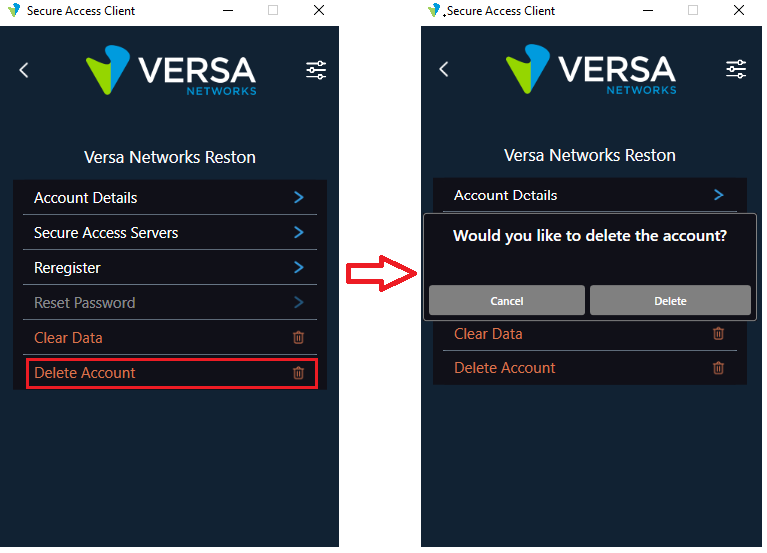
- In the SASE client home screen, click the Settings icon.
- In the Enterprise section, click the enterprise name.
- Click Delete Account. The connection is deleted, and the name of the connection is removed from the Secure Access Servers screen.
Display Connection Details
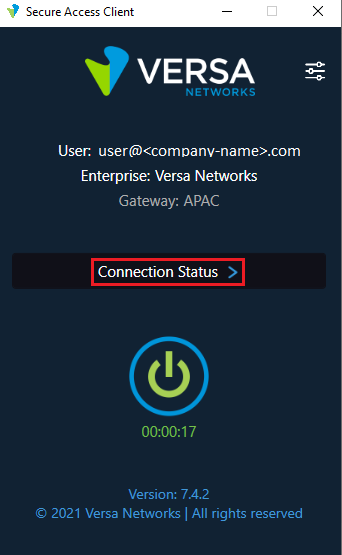
- From the SASE client home screen, click the Power icon to connect to the server.

- Click Connection Status to view configuration details about the server and to view statistics.
- Click Details to display the server details. Click the Back button to return to the previous screen.
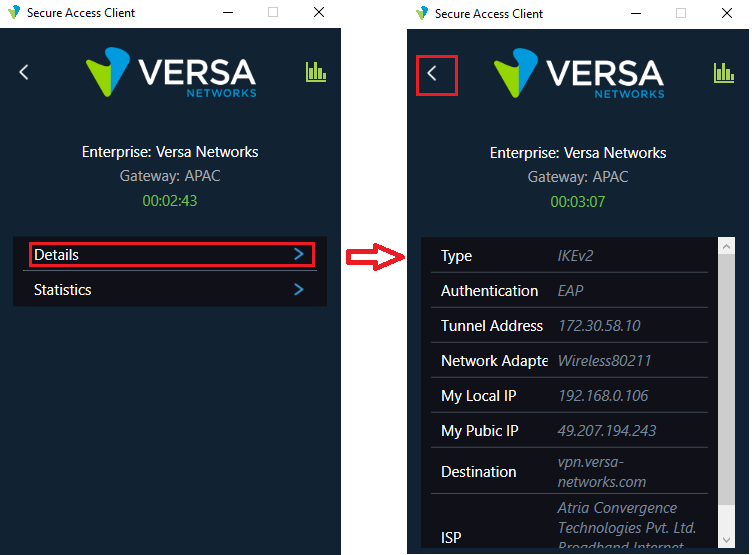
- Click Statistics to view the server statistics. Click the Back button to return to the previous screen.

Disconnect a SASE Client VPN Connection
- Click the Power icon. A popup message displays asking whether you want to disconnect from the secure access server.

- Click Disconnect to disconnect from the server and return to the client home screen.
Enable SASE Client Features
This section describes how to enable and/or use SASE client features.
Change Display Modes
For Windows only.
To change the display mode or appearance (Default, Dark, or Light) of the client:
- In the SASE client home screen, click the Settings icon.
- Click App Settings > Appearance (Preview).
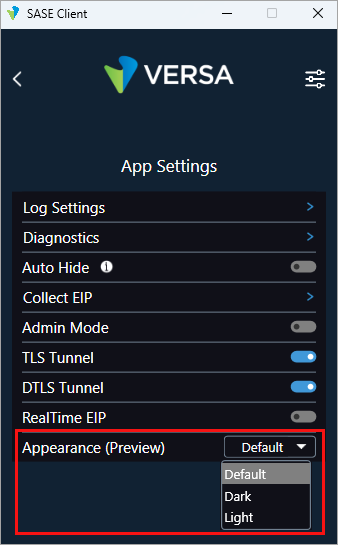
You can select Dark, Light, or Default. For example, if you select Light, the display looks like this:

- To change display options using the CLI, issue VersaSecureAccessClientConsole.exe client --appearance default/light/dark CLI commands.
Change Notification Tray Settings
You can monitor the SASE client from the notification tray. You can turn off notifications from the SASE client and modify notification settings. Note that the steps below are for Windows OS only.
To turn off all notifications:
- Click the Settings icon in the SASE client notification tray.

- Click Turn Off All Notifications for SASE client.

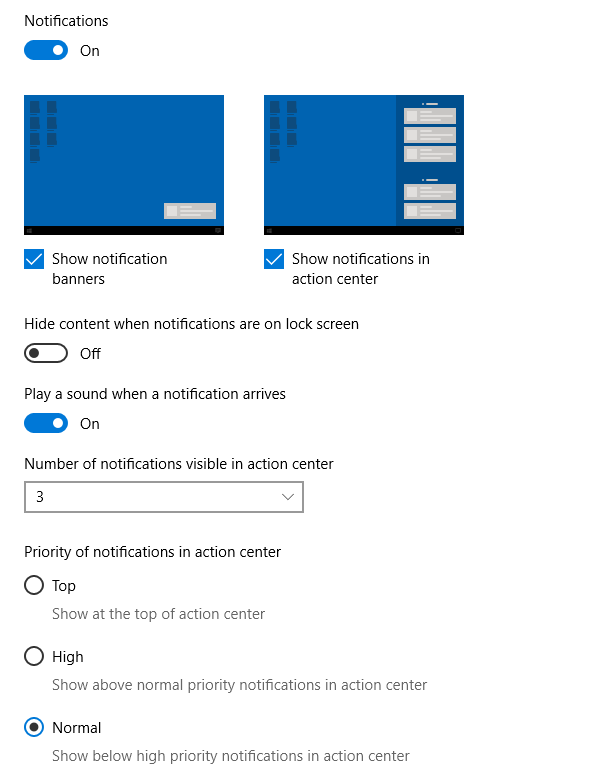
To edit notification settings:
- Click the Settings icon in the SASE client notification tray.
- Click Go To Notification Settings.

- Change the settings as required on the Versa Secure Access Client Notification window.
Configure DLP Data Exfiltration Activities
You can allow or prevent endpoint data loss prevention (DLP) data exfiltration activities—Copy and paste, capture screenshot, and use of USB. You enable these options from the gateway profile associated with the client and you can only view the supported exfiltration activities from the client.
To enable data exfiltration for a secure access gateway profile:
- In Director view:
- Select the Configuration tab in the top menu bar.
- Select Templates > Device Templates in the horizontal menu bar.
- Select an organization in the left menu bar.
- Select a template in the main pane. The view changes to Appliance view.
- Select the Configuration tab in the top menu bar.
- Select Services > Secure Access > Portal > Gateway Profiles in the left menu bar.
- Click the + Add icon. The Add Profiles popup window displays.
- Select the Client Controls tab and then select the Data Exfiltration tab.

- Click Copy Paste and Screenshot to allow copy and paste and capture screenshot activities for these user. These are enabled by default. Clear these to disallow these actions for the user.
- For USB, Allow is the default value. You can also select Block or Read-Only to disallow or allow only read option for a USB drive.
- Allow—Permits full access to the USB drive and you can copy files to and from the drive.
- Block—Access to USB drive is blocked. When user plugs in a USB drive, the DLP violation message displays that USB is blocked.
- Read-only—Permits to copy from USB drive to the device but does not allow to copy files from device to USB drive.
- Click OK.
To view the allowed exfiltration activities from the client:
- In the SASE client home screen, click the Settings icon.
- In the Enterprise section, click the account for which to view DLP data exfiltration settings. The following sample screenshot shows that copy/paste, screenshot, and USB activities are allowed:

Configure Pre-Logon
To configure pre-logon from a Versa Director node, see Configure Pre-Logon for the Versa SASE Client. To view and execute pre-logon options using the CLI, see Display and Execute Pre-Logon Options below.
Display Audit Logs
You display audit logs to view important client actions such as registration, VPN connection, and DEM collection status.
To display audit logs:
- In the SASE client home screen, click the Settings icon.
- Click App Settings > Log Settings > Audit Logs.

The following screenshot shows a sample audit log:

Enable Always On
To enable always on connectivity, you enable always on in a tenant's secure access gateway profile from the Versa Director node, and then you turn on always on from the SASE client.
To enable always on in a secure access gateway profile:
- In Director view:
- Select the Configuration tab in the top menu bar.
- Select Templates > Device Templates in the horizontal menu bar.
- Select an organization in the left menu bar.
- Select a template in the main pane. The view changes to Appliance view.
- Select the Configuration tab in the top menu bar.
- Select Services > Secure Access > Portal > Gateway Profiles in the left menu bar.
- Click the + Add icon. The Add Profiles popup window displays.
- Select the Client Controls tab.
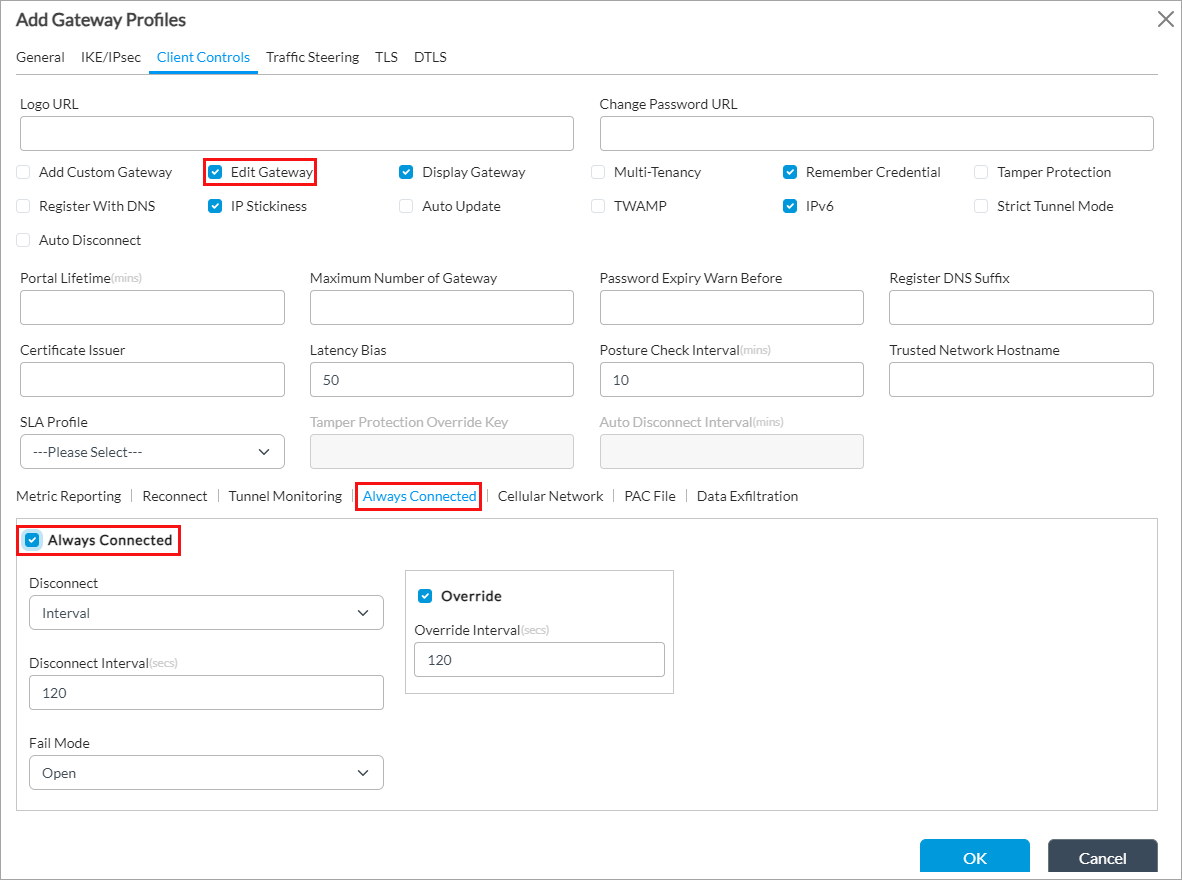
- Click Edit Gateway to allow SASE client users to edit a gateway.
- Select the Always Connected tab and click Always Connected so that the VPN connection for the secure access client is always on.
- For information about configuring other fields in the Add Profiles popup window, see Configure Secure Access Gateway Profiles in Configure the Versa Secure Access Service.
- Click OK.
To enable always on connectivity for the SASE client:
- In the SASE client home screen, click the
 Settings icon.
 - In the Enterprise section, click the account for which to enable an always on connection.

- Click Account Details, and then click the Always On toggle button. When you enable always on, the toggle button color changes from gray to blue. To disable always on, click the toggle button a second time.

If always on is not enabled for the secure access gateway profile, you can enable it from the SASE client if Edit Gateway is enabled for the gateway profile and if you have administrator privileges for your device. Note that always on is the only feature not enabled in the portal that you can enable using administrator credentials.
To enable always on connectivity from the SASE client:
- In the SASE client home screen, click the Settings icon.
- Click App Settings.
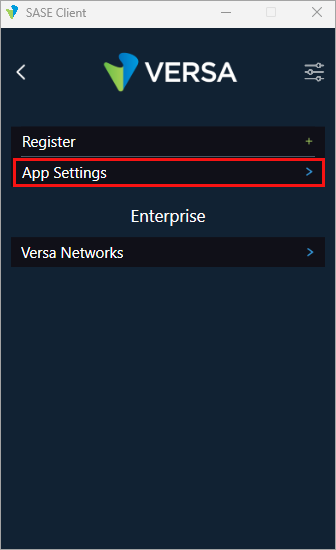
- In the App Settings screen, click the Admin Mode toggle button, and then enter the administrator username and password.
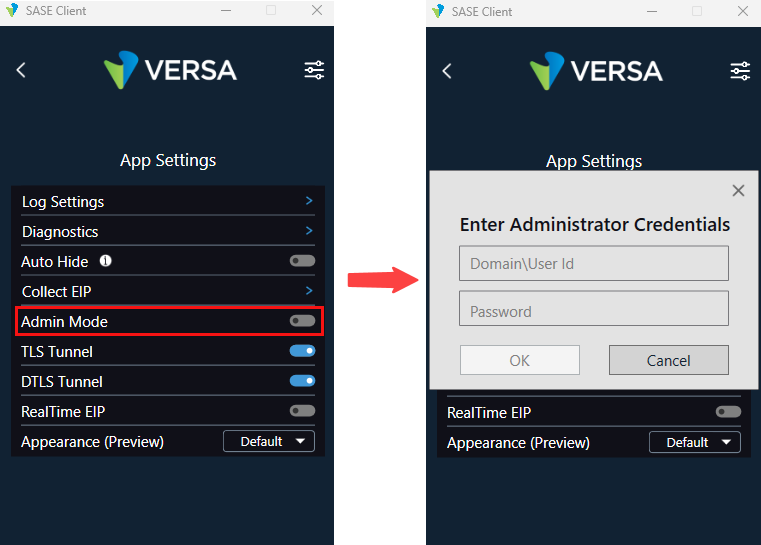
- Click OK.
- Follow Steps 1 through 4 in the previous procedure to enable always on connectivity for the client.
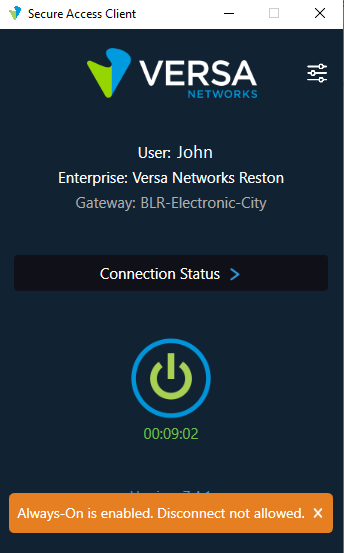
When always on is enabled, if the user tries to disconnect the SASE client, a message is displayed that disconnection is not allowed. For example:
Enable Automatic Hide
You enable automatic hide to automatically minimize the client UI after 5 seconds of inactivity while on the home screen.
To enable auto hide:
- In the SASE client home screen, click the Settings icon.
- Click App Settings.
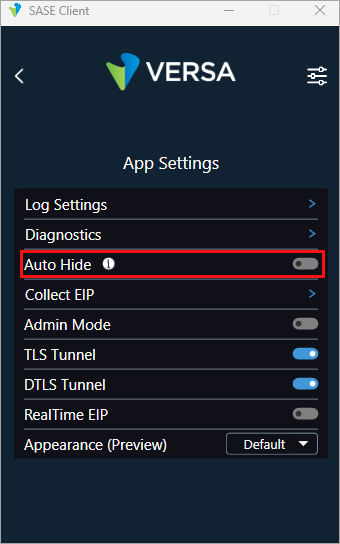
- In the App Settings screen, click the Auto Hide toggle button, to enable automatic hide. The default value to minimize the client window is 5 seconds.
Enable an Application-Based Split Tunnel
You configure application-based split tunnels so that you can exclude certain application traffic from the tunnel so that the traffic can be sent directly to the destination from the end device. To enable application-based split tunnels, you configure a secure access gateway profile from the Versa Director node. If you enable split tunnel in the gateway profile associated with a SASE client, the Split Tunnel toggle button in the SASE client is enabled by default. Otherwise, the Split Tunnel toggle button in the client is disabled.
To enable split tunnel in a secure access gateway profile:
- In Director view:
- Select the Configuration tab in the top menu bar.
- Select Templates > Device Templates in the horizontal menu bar.
- Select an organization in the left menu bar.
- Select a template in the main pane. The view changes to Appliance view.
- Select the Configuration tab in the top menu bar.
- Select Services > Secure Access > Portal > Gateway Profiles in the left menu bar.
- Click the + Add icon. The Add Gateway Profiles popup window displays.
- Select the Traffic Steering tab.
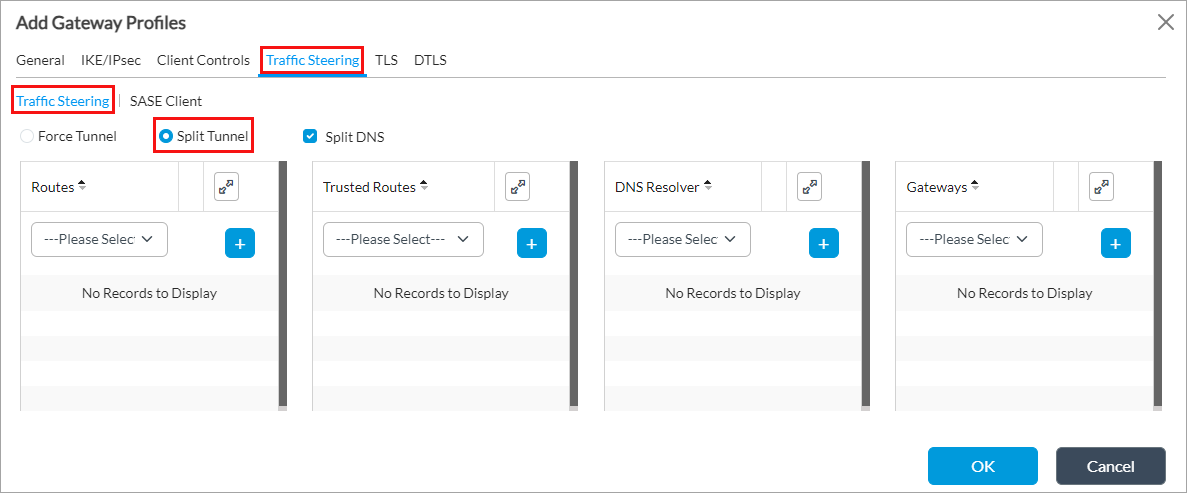
- Click Split Tunnel to enable split tunneling.
- Select the SASE client tab.

- Select the applications and domains whose traffic you do or do not want to send to the client.
- For information about configuring other fields on the Add Gateway Profiles popup window, see Configure Secure Access Gateway Profiles in Configure the Versa Secure Access Service.Click OK.
Note that to enable or disable change split tunnel from the SASE client, you must enable split tunnel for the associated secure access profile. Otherwise, split tunnel is disabled for users on the SASE client.
To change the split tunnel setting from the SASE client:
- In the SASE client home screen, click the Settings icon.
- In the Enterprise section, click the account, and then click Gateways.

- Click the gateway, and then in the Gateway Details screen, click Advance Settings.

- In the Advanced Settings screen, click Traffic Steering, and then in the Traffic Steering screen, click the Split Tunnel toggle button. When you enable split tunnel, the toggle button color changes from gray to blue. To disable split tunnel, click the toggle button a second time.
- Click the Back button to save the changes.

Enable Authentication
VSA provides user and two-factor authentication.
For user authentication, you can use LDAP or SAML.
You enable LDAP authentication from a Versa Director node. For more information, see Configure a Gateway To Use an LDAP Server for User Authentication.
You enable SAML authentication from a Versa Director node. For more information, see Enable SAML Authentication.
There are no SASE client settings for user authentication. For SAML authentication, the displayed client login page is similar to the following:
For two-factor authentication, you can use SMS or email-based OTP or you can use TOTP.
To enable SMS or email-based OTP for client registration and login, see Configure SMTP Server Settings and Configure an Authenticator Profile.
You enable TOTP from a Versa Director node. For more information, see Enable Time-Based One-Time Password in Configure the Versa Secure Access Service.
There are no SASE client settings for two-factor authentication. For information about registering and logging in to the SASE client for SMS or email-based OTP and TOTP, see Register with the Versa Secure Access Portal, above.
Enable Cookies
To enable cookies in the SASE client, you configure an authentication profile with caching mode enabled for cookies, and then you associate the authentication profile with the gateway and portal for the SASE client.
To configure an authentication profile with cookies enabled:
- In Director view:
- Select the Administration tab in the top menu bar.
- Select Appliances in the left menu bar.
- Select a device name in the main panel. The view changes to Appliance view.
- Select the Configuration tab in the top menu bar.
- Select Object and Connectors > Connectors > Users/Groups > Authentication Profiles in the left menu bar.
- Click the + Add icon. The Add Authentication Profile window displays.
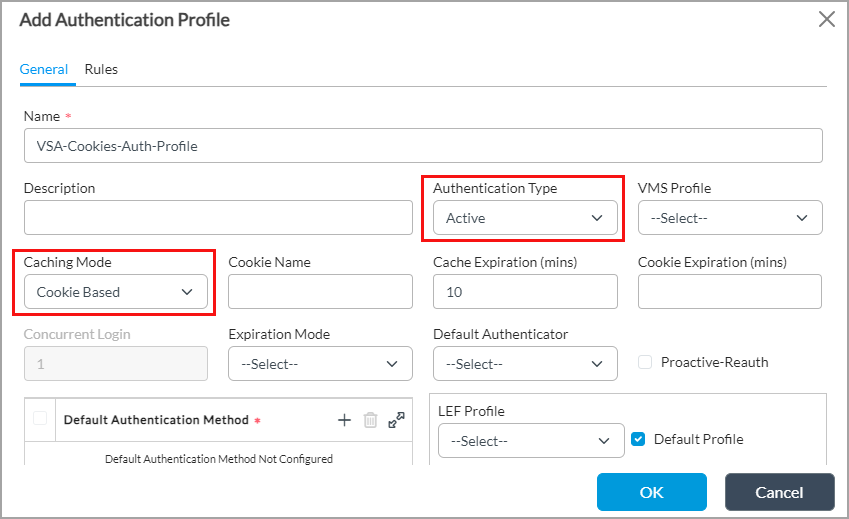
- In the Name field, enter a name for the authentication profile (here, VSA-Cookies-Auth-Profile).
- In the Authentication Type field, select Active.
- To enable caching mode, click Local Database, or select a Kerberos, an LDAP, a SAML, or a certification authentication profile to use for cookie support. The screenshot above shows that Local Database is selected.
- In the Caching Mode, select Cookie Based.
- In the Expiration Mode field, do not select a value, because an expiration is not applicable for the SASE client.
- For information about configuring other fields on the Add Authentication Profile popup window, see Configure an Authentication Profile.
- Click OK.
To associate the authentication profile with a VSA portal:
- In Director view:
- Select the Configuration tab in the top menu bar.
- Select Templates > Device Templates in the horizontal menu bar.
- Select an organization in the left menu bar.
- Select a template in the main pane. The view changes to Appliance view.
- Select the Configuration tab in the top menu bar.
- Select Services > Secure Access > Portal > General in the left menu bar.
- Click the
 Edit icon. The Add Services popup window displays.
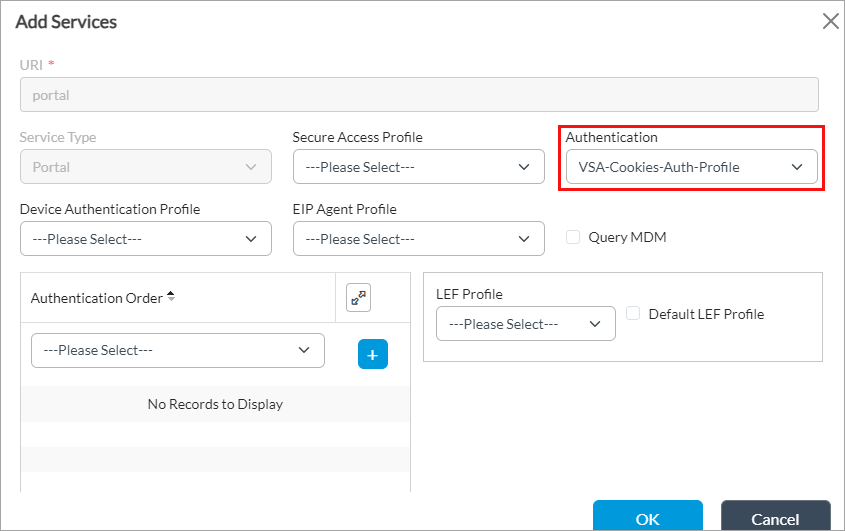
- Select the authentication profile you configured in the steps above (here, VSA-Cookies-Auth-Profile) from the Authentication drop-down list.
- For more information about configuring other fields in the Add Services popup window, see Add a Secure Access Portal in Configure the Versa Secure Access Service.
- Click OK.
To associate the authentication profile with a VSA gateway:
- In Director view:
- Select the Configuration tab in the top menu bar.
- Select Templates > Device Templates in the horizontal menu bar.
- Select an organization in the left menu bar.
- Select a template in the main pane. The view changes to Appliance view.
- Select the Configuration tab in the top menu bar.
- Select Services > Secure Access > Gateway > General in the left menu bar.
- Click the Edit icon. The Add Services popup window displays.
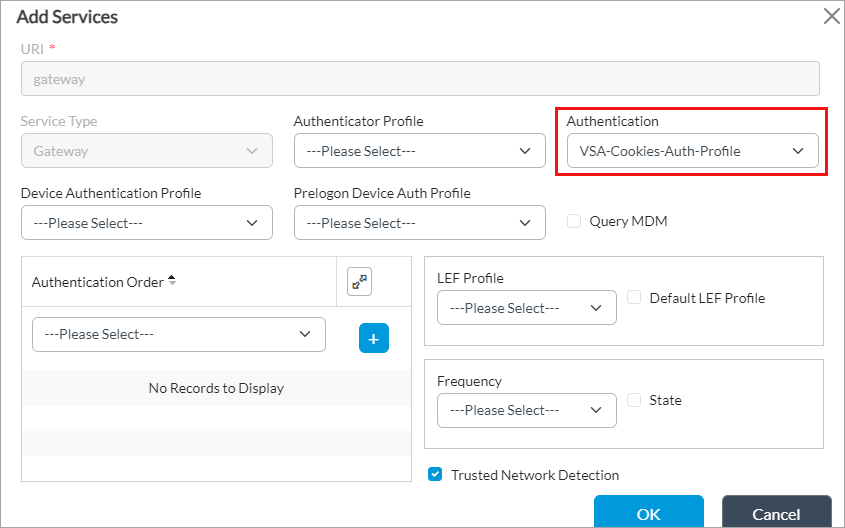
- In the Authentication field, select the authentication profile you configured above (here, VSA-Cookies-Auth-Profile).
- For more information about configuring other fields in the Add Services popup window, see Configure a Secure Access Gateway in Configure the Versa Secure Access Service.
- Click OK.
The SASE client has no fields that allow you to enable or disable cookies.
To clear stored cookies and data from the SASE client:
- In the SASE client home screen, click the Settings icon.
- In the Enterprise section, click the account for which you want to clear stored cookies and data, and then Click Clear Data.
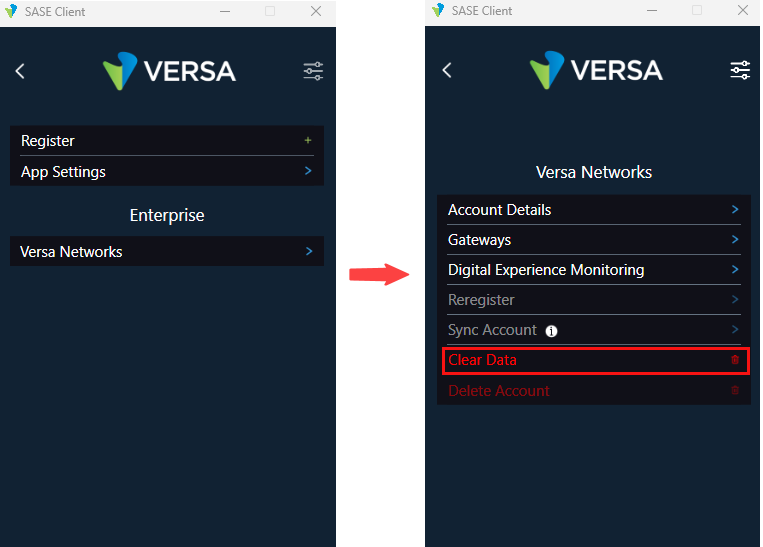
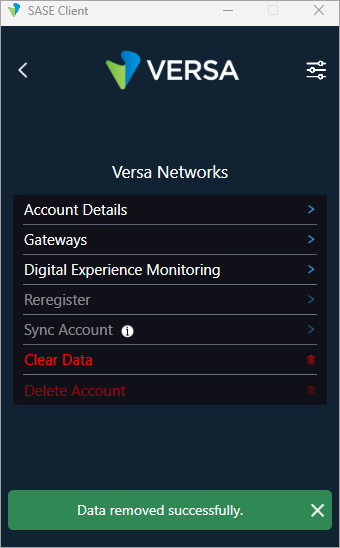
A message displays indicating that the data is cleared. For example:
Enable Endpoint Information Profile (EIP)
An endpoint information profile (EIP) can classify endpoints based on multiple types of endpoint posture information. To protect the endpoints in an enterprise network, you can create EIP profiles, which define rules that allow the VOS SASE software to filter information from endpoint device traffic and then match information to enforce security policy. Endpoint information ensures that remote hosts maintain and adhere to enterprise security standards before they access the network resources. You can configure a notification that alerts users about the reason for access denial and another that allows users to access the installation program for the missing software. For more information, see Configure Endpoint Information Profiles.
To collect EIP data:
- In the SASE client home screen, click the Settings icon.
- Click App Settings.

- Click Collect EIP. A message displays that EIP data collection has started.
Enable Performance-Based Dynamic Gateway Selection
Dynamic gateway selection allows SASE clients to select the best gateways based on distance and availability. You create groups of gateways that the client can use to choose the best gateway. When a user connects to a gateway group, the client selects the best available gateway. You add gateway groups from a Versa Director node and then associate gateways with gateway groups. For more information, see Configure the Versa SASE Client To Select the Best Gateway.
To configure gateway groups from a Versa Director node:
- In Director view:
- Select the Configuration tab in the top menu bar.
- Select Templates > Device Templates in the horizontal menu bar.
- Select an organization in the left menu bar.
- Select a template in the main pane. The view changes to Appliance view.
- Select the Configuration tab in the top menu bar.
- Select Services > Secure Access > Portal > Gateway Groups in the left menu bar.

- Click the + Add icon. The Add Gateway Groups popup window displays.
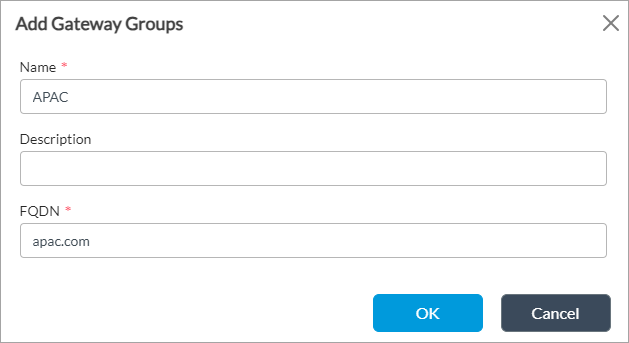
- Enter a name (here, APAC).
- Optionally, enter a description.
- Enter the FQDN for the server group.
- Click OK.
To associate a gateway with a gateway group:
- In Director view:
- Select the Configuration tab in the top menu bar.
- Select Templates > Device Templates in the horizontal menu bar.
- Select an organization in the left menu bar.
- Select a template in the main pane. The view changes to Appliance view.
- Select the Configuration tab in the top menu bar.
- Select Services > Secure Access > Portal > Gateways in the left menu bar.
- Click the + Add icon. The Add Gateways popup window displays.
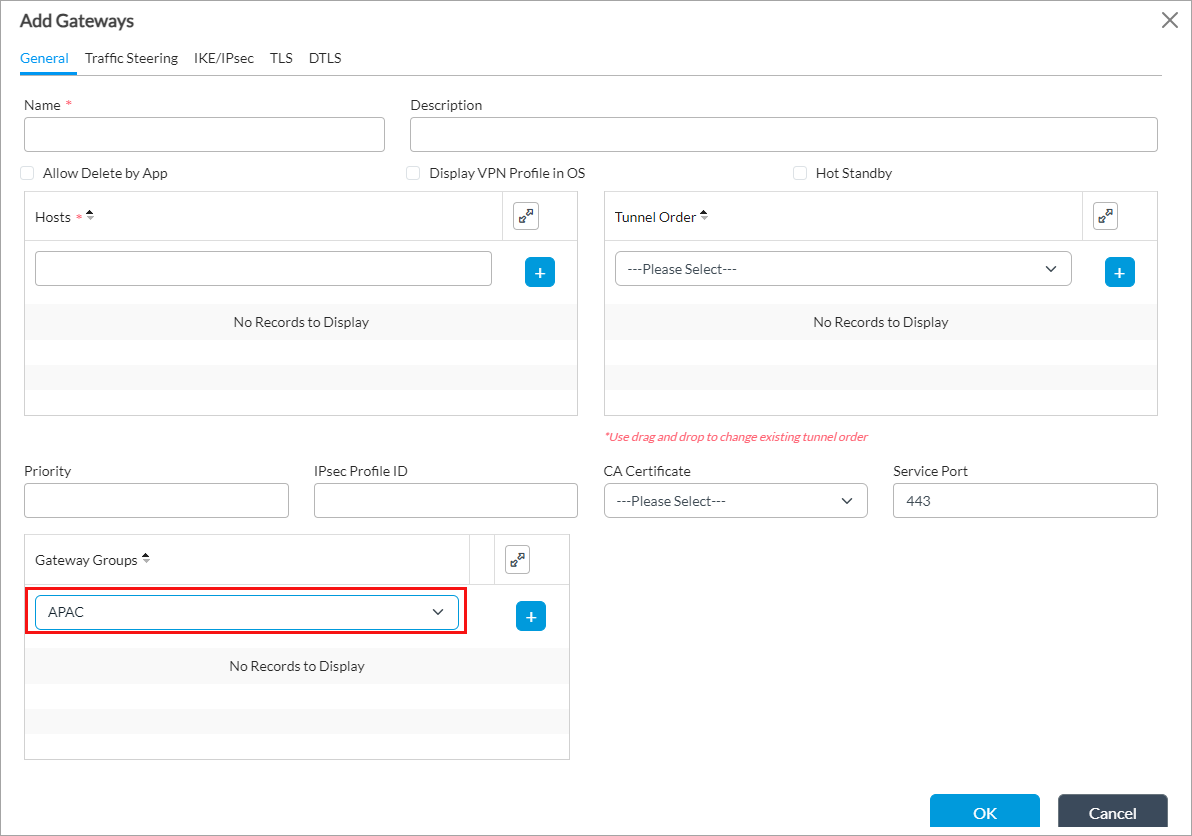
- Select the General tab.
- In the Gateway Groups field, select the gateway group to associate with the gateway, and then click the
 Add icon.
 - For information about configuring other fields on the Add Gateways popup window, see Configure the Versa Secure Access Service.
- Click OK.
Note that groups are displayed on the SASE client only if you configure gateway groups.
To select gateway groups from SASE client:
- In the SASE client home screen, click the Gateway drop-down list, and then select the group to which you want to connect.
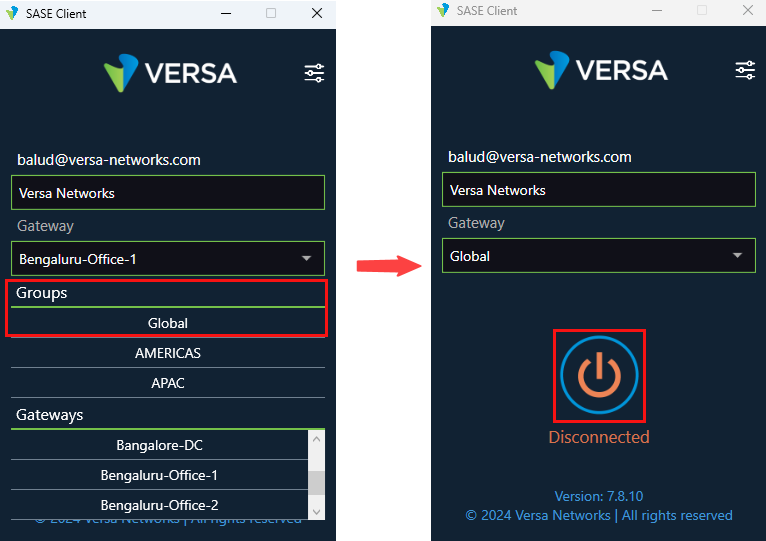
- Click the Connect button.
Enable Realtime EIP
Realtime endpoint information protection (EIP) continuously monitors and collects critical security-related information from specific items on a user’s endpoint device. It monitors key components such as anti-Malware, firewall, and customer registries and collects the information every 10 seconds. On detecting any change, the client sends the information to the gateway, which helps to ensure that the network security posture is always up-to-date and is proactive in responding to potential threats or configuration changes.
To enable realtime EIP collection:
- In the SASE client home screen, click the Settings icon.
- Click App Settings.
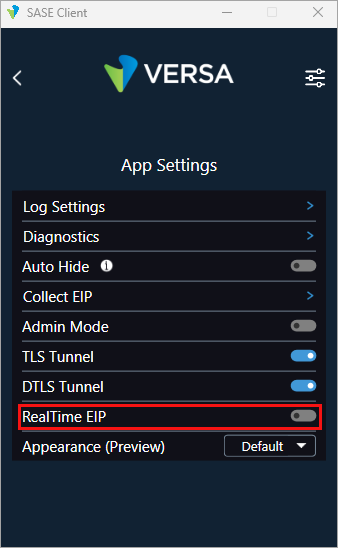
- Slide to toggle to the right to enable realtime EIP collection. By default, real-time EIP collection is disabled.
Enable Tamper Protection
For Windows only.
If enabled from the server side, tamper protection does not allow you to uninstall the client, delete the client account, or delete any files from the installation directory. Tamper Protection toggle button on the SASE client is enabled only if you enable tamper protection in the gateway profile associated with a SASE client.
To enable tamper protection for a secure access gateway profile associated with a client:
- In Director view:
- Select the Configuration tab in the top menu bar.
- Select Templates > Device Templates in the horizontal menu bar.
- Select an organization in the left menu bar.
- Select a template in the main pane. The view changes to Appliance view.
- Select the Configuration tab in the top menu bar.
- Select Services > Secure Access > Portal > Gateway Profiles in the left menu bar.
- Click the + Add icon or select an existing gateway profile. The Add/Edit Profiles popup window displays.
- Select the Client Controls tab.
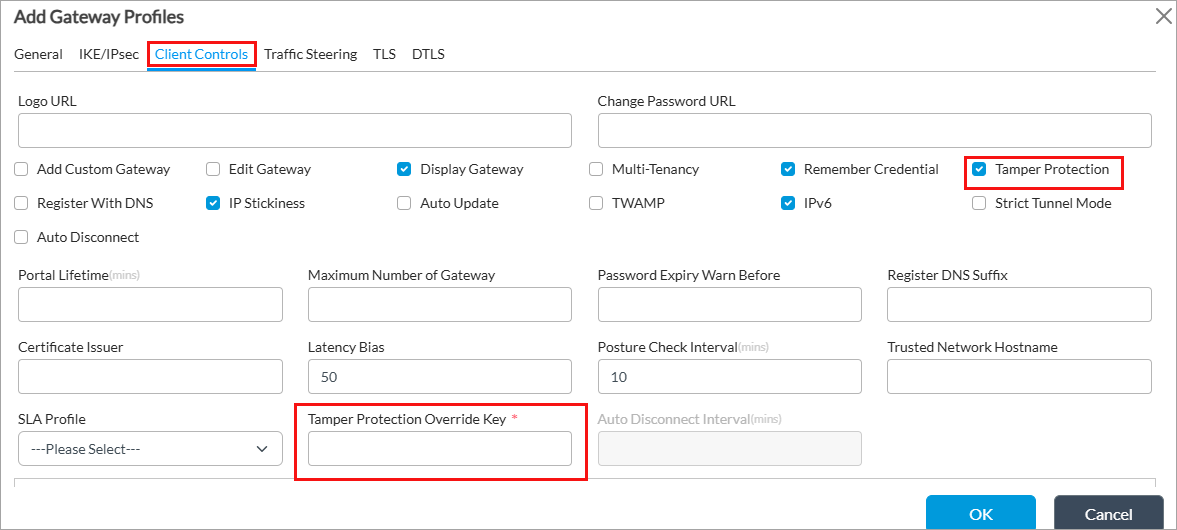
- Click Tamper Protection and then enter an authentication key in the Tamper Protection Override Key field that you use to disable this feature from the SASE client. For more information, see Configure Secure Access Gateway Profiles.
- Click OK.
To disable tamper protection from SASE client UI:
- In the SASE client home screen, click the Settings icon.
- In the Enterprise section, click the account for which you want to disable tamper protection.
- Click Account Details. The Account Details screen displays. Note that Tamper Protection is enabled only if the feature is enabled for the gateway profile of the client.

- To disable tamper protection, slide the Tamper Protection toggle button. A popup message displays for you to enter the override key that is set from the Add Gateway Profile > Client Controls tab from the server side.
- Enter the tamper protection override key and click Submit.
Disable Tamper Protection Using OTP
For Releases 7.9.2 and later, you can disable tamper protection using OTP. Admin users can generate OTP for client users by using the Versa Tamper Protection Generation tool. You can download the tool from this location. It does not require an installation and you can run the tool on a Windows 64-bit device.
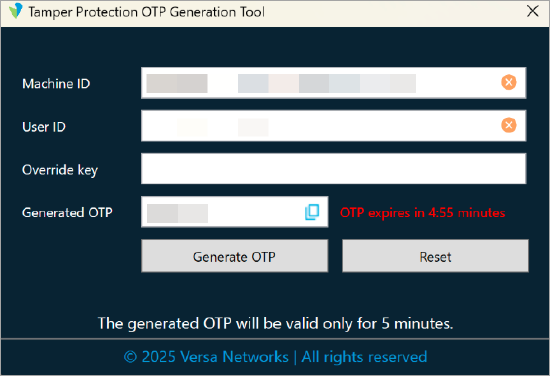
To generate an OTP from the Versa Tamper Protection Generation tool:
- Copy the Machine ID from the About screen of the client. For example:

- Open the Tamper Protection OTP Generation tool and enter the Machine ID.
- Enter the client User ID and tamper protection Override key. For more information about the Tamper override key, see Enable Tamper Protection above.
- Click Generate OTP, and then copy the OTP from the Generated OTP field to share with users. The OTP is valid for 5 minutes and a timer displays the time for OTP expiry.
To disable tamper protection using this OTP:
- In the SASE client home screen, click the
Settings icon.
- In the Enterprise section, click the account for which you want to disable tamper protection, and then select Account Details.
- When you click the Tamper Protection toggle button to disable it, the following screen displays.

- Click OTP, and then enter the OTP that your administrator shared.
- Click Submit.
Enable TLS and DTLS Tunnels
For Windows only.
When you enable a TLS or DTLS tunnel, the client tries to establish a tunnel based on the tunnel type order it receives from the portal. If the first attempt fails, the client tries to connect to the next tunnel type in the configuration order. For more information about enabling TLS and DTLS tunnels using the CLI, see Display and Execute Client Options.
To enable a TLS or DTLS tunnel:
- In the SASE client home screen, click the Settings icon.
- Click App Settings.

- Click the TLS Tunnel or DTLS Tunnel toggle button to enable these features. By default, TLS and DTLS tunnels are disabled.
Enable TWAMP
Two-Way Active Measurement Protocol (TWAMP) is a network performance measurement protocol used to assess the performance such as latency, jitter, and packet loss of IP networks,which accounts for sending and receiving ends of communication. You configure a TWAMP service level agreement (SLA) profile to define how a the SASE client responds to path degradation by setting performance benchmarks and enabling real-time performance monitoring.
To enable TWAMP for SASE client:
- Configure TWAMP logging:
- In Director view, select the Administration tab in the top menu bar.
- Select Appliances in the left menu bar.
- Click the appliance in the main pane. The view changes to Appliance view.
- Select the Configuration tab in the top menu bar.
- Select Networking > TWAMP > Light in the left menu bar.
- Select the LEF tab.
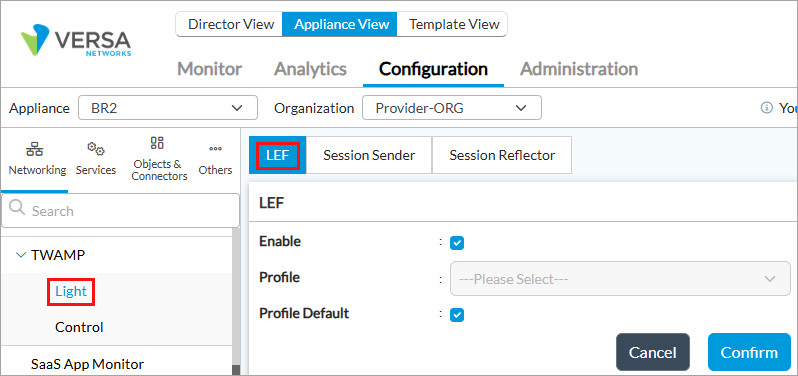
- Click Edit and then select Enable and an LEF profile. For more information, see Configure LEF.
- Configure a TWAMP session reflector session:
- Select the Session Reflector tab.
- Click Edit and enter the following information. Note that in a multi-tenant environment, you must configure TWAMP on the parent or provider organization.
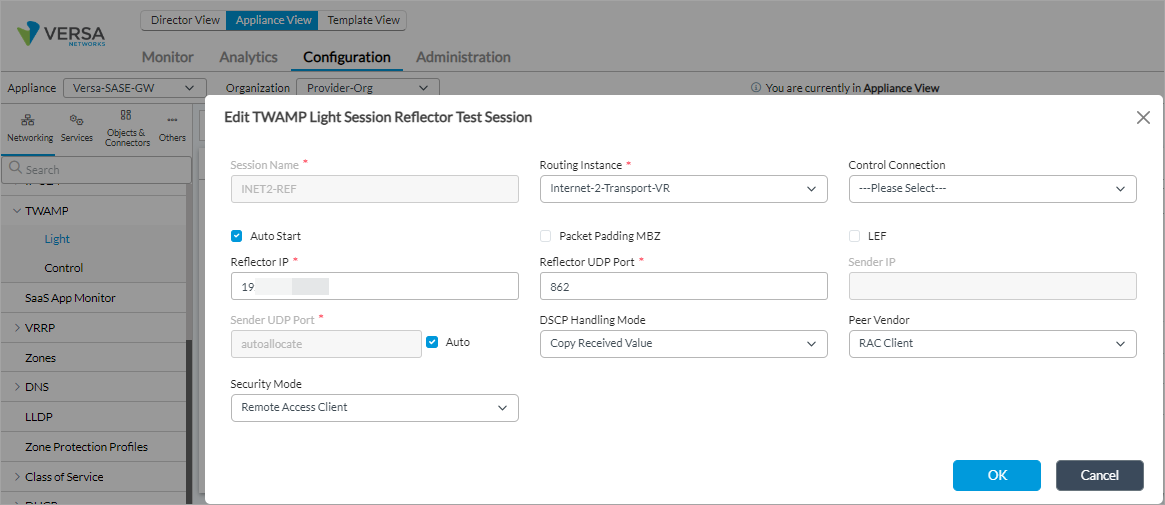
- Select the Routing Instance for the TWAMP light session.
- Enter the WAN interface IP address in the Reflector IP field.
- Enter 862 for Reflector UDP Port for TWAMP to work on the SASE client.
- Select Auto for Sender UDP Port, select RAC Client for Peer Vendor, and select Remote Access Client option for Security Mode
- Click OK.
- From Versa Director, Configure FQDNs of both WAN interfaces for the secure access portal gateway. For more information, see Configure Gateways.

- From Versa Director, configure a secure access portal SLA profile. For more information, see Configure SLA Profiles.

- Enable TWAMP and select the SLA profile you configured in Step 4 for the secure access portal gateway profile. For more information, see Configure Secure Access Gateway Profiles.

To view TWAMP statistics from the client:
- From the home screen, click Connection Status > Paths.

This display the available path/s:

- Click a path to view the condition of the path and other details.

If both paths are up and SLAs are met, the client displays the Path Condition as Good for both links and selects one link to send traffic to the gateway.
The client behaves in the following ways on configuring a TWAMP SLA profile:
- If the active WAN link degrades, client switches to the backup link.
- If the link that was degraded earlier becomes active, client does not preempt and stays on the current active link.
- If both links degrade, client stays on the same link.
Perform Diagnostics and Export Logs
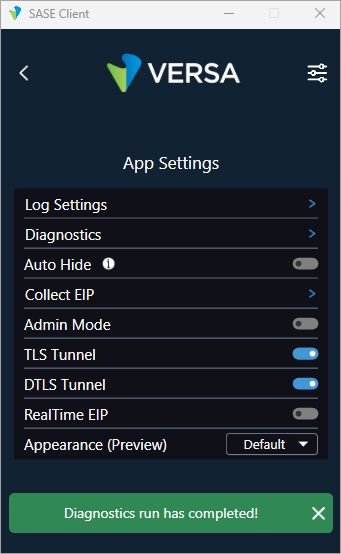
To perform diagnostics to automatically fix basic issues:
- In the SASE client home screen, click the Settings icon.
- Click App Settings and then click Diagnostics.

A message displays when the diagnostics complete. For example:
For issues that you cannot fix using Diagnostics, save the logs as a .zip file and share this file with Versa Networks Customer Support.
Before you save log files, select the severity of the logs to include:
- In the SASE client home screen, click the Settings icon.
- Click App Settings.
- Click Log Settings.
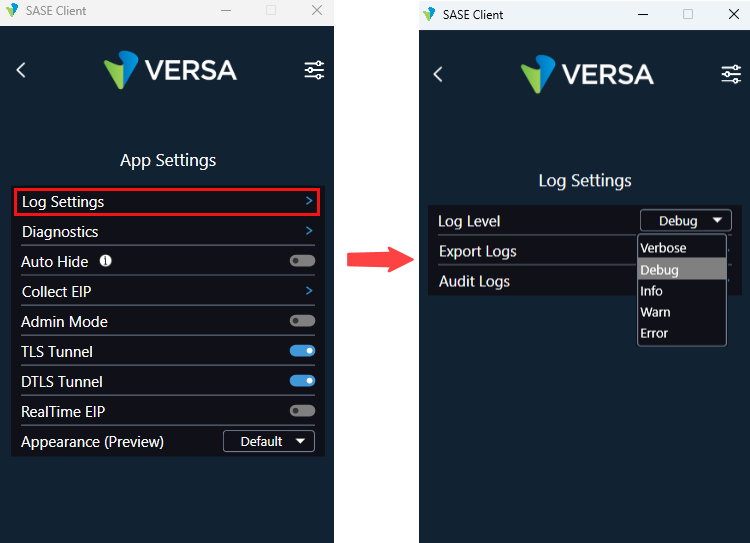
- In the Log Settings screen, click Log Level, and select a log severity level:
- Debug—Log application debug-level information.
- Error—Log error-level information.
- Info (default)—Log informational-level information. This is the default.
- Verbose—Log additional information during the interaction with the client user interface.
- Warn—Log warning-level information.
To save log files:
- In the App Settings screen, click Export Logs.

- Select a folder and save the log file on your computer. The saved log file is in .zip format.
Support for Automatic Software Updates
Automatic updates allow the SASE client software to download in the background so that users can stay connected during the download. Once the download is completed, a message prompts users to proceed with installation. Users have a 7-day grace period to install the update. If they do not install the update within the grace period, the client stops connecting to any gateway until the installation is completed.
To use automatic updates, you first enable automatic updates for the secure access gateway from Versa Director or Concerto for associated SASE clients. For more information, see Configure Secure Access Gateway Profiles for Director configuration, and Create a SASE Client Configuration for Secure Client-Based Access for Concerto configuration. You must then upload the latest client software on the auto-update server.
When you enable automatic updates for the gateway, the Software Updates screen shows the Automatic Updates toggle set to Enabled. Note that you cannot enable or disable this toggle from the client.
Silent Installation Process
The setting for the --silent_install CLI command (true or false) determines if the automatic software updates happens in the background or not.
When you issue the VersaSecureAccessClientConsole.exe client --silent_install true (default) CLI command:
- The Installer service performs the upgrade, which operates with SYSTEM privileges.
- The client UI does not display prompts or feedback about the installation, and the upgrade takes place in the background.
- This action does not requires Administrator credentials. Even a non-admin user can upgrade because the Installer service handles the process with elevated privileges.
When you issue the VersaSecureAccessClientConsole.exe client --silent_install false CLI command:
- The client performs the installation and not the Installer service.
- The client UI displays prompts and feedback about the installation progress, including a progress bar and status messages. For example:

- Prompts during the upgrade or installation display for both admin and non-admin users.
- If you are a non-admin user, provide the administrator credentials in the User Account Control screen to proceed with the installation, since the client does not have SYSTEM-level privileges. For example:

- Admin users can proceed without additional credential prompts, since they have the required privileges.
The table below briefly describes the differences between --silent_install true and --silent_install false CLI commands.
| Feature | silent_install=true (Default) | silent_install=false |
|---|---|---|
|
Executed by |
Installer Service (SYSTEM) |
Client (user-level process) |
|
UI Prompts |
None |
Progress bar and status messages |
|
Installation feedback |
Feedback is not displayed |
Constant feedback displays |
|
Admin user |
Prompts are not displayed |
Prompts display, no request for credentials |
|
Non-admin user |
No prompts or credentials request |
Prompts display; must enter admin credentials |
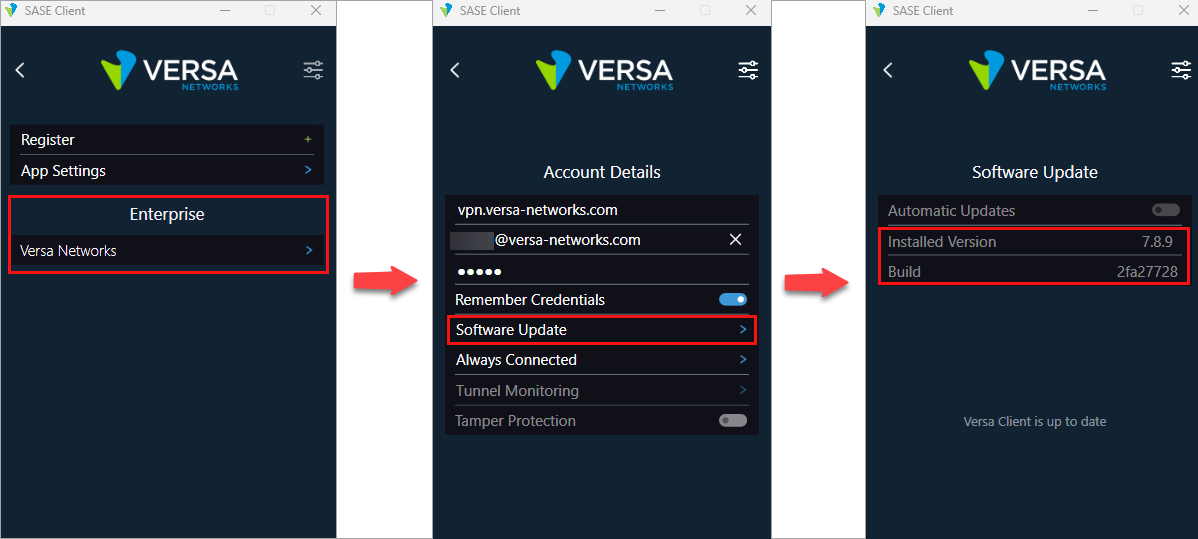
To verify software update information:
- In the SASE client home screen, click the
 Settings icon.
 - Select an enterprise, and then click Account Details > Software Update.

- On the Software Update screen, check the Automatic Updates setting. If the toggle is blue, automatic updates are enabled.
- To download the latest version of the client, click the Download <version> link.
The following sections describe the various workflows for automatic update, based on your selections.
Preferred Client Version Flow
In this scenario, the preferred SASE client version is configured on the gateway from Versa Director or Concerto and shared with the client. For more information about configuring the preferred client version:
- For Director, see Configure the Preferred Client Software Version.
- For Concerto, see Select the Preferred SASE Client Version.
This example uses Windows OS and the following client versions:
- Current client version—Release 7.9.5
- Preferred client version—7.10.1
Trigger for Auto Update
On receiving the preferred client version information, the client compares it with the current version. If the current version is different (later or earlier), the client enforces the preferred version and triggers automatic software updates flow:
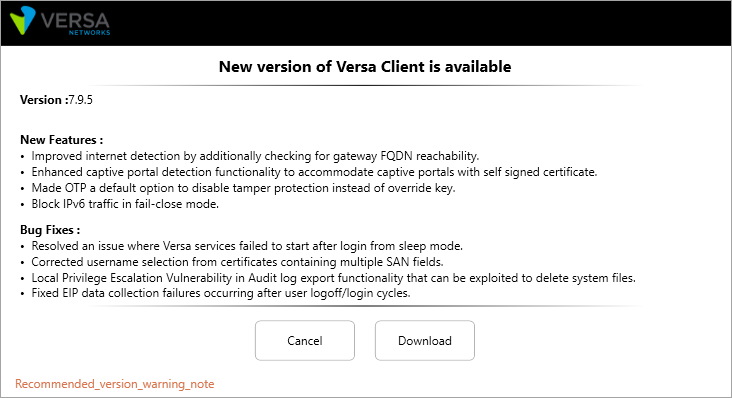
- The client displays a message that the recommended version is available. You must install this version before the date displayed. For example:

- If you click Download, a message displays after the new version is successfully downloaded.

- Next, the prompt to install the version displays.

- If you click Install Now, the installation begins immediately and the client transitions to the preferred version.
- If you click Remind Later, the installation is postponed and a reminder prompt displays each day of the 7-day grace period until you install the latest version.
- For the grace period flow, see First Connection of the Day Within Grace Period and Download Complete, Installation Pending—Within Grace Period below.
- For the post-grace period flow, see First Connection of the Day After Grace Period Expires and Download Complete, Installation Pending—After Grace Period below.
First Connection of the Day Within Grace Period
When a new client version is available and you connect to the client for the first time on any day within the 7-day grace period, the client displays a message that an update is available. For example:
- If you click Cancel, this prompt displays each time you connect until you download the latest version or the grace period expires. You can install the latest version on any day within the 7-day grace period.
- If you click Download, the download takes place in the background and you can continue to use the VPN connection. After the download, the following prompt displays:

- If you click Install Now, the client relaunches after installing the latest version.
- Installation follows the --silent_install process as described in Silent Installation Process, above.
- After installation, if Always On is enabled, the client reconnects automatically. If Always On is disabled, the client UI displays and users can connect manually.
- If you click Remind Later, the installation is postponed and a reminder prompt displays each day of the 7-day grace period until you install the latest version.
- If you click Install Now, the client relaunches after installing the latest version.
Download Complete, Installation Pending—Within Grace Period
In this scenario, you have downloaded the latest version, but not installed it, and you are within the grace period.
- When you connect the client for the first time each day within the 7-day grace period, the following prompt displays:

- If you click Install Now, the client relaunches after installing the latest version.
- Installation follows the --silent_install process as described in Silent Installation Process, above.
- After installation, if Always On is enabled, the client reconnects automatically. If Always On is disabled, the client UI displays and users can connect manually.
- If you click Remind Later, the installation is postponed and an installation prompt displays once every 24 hours, aligned with the next first connection of the day. This continues until you install the latest version. After the grace period expires, the connection proceeds as described in First Connection of the Day After Grace Period Expires, below.
First Connection of the Day After Grace Period Expires
If you do not download or install the latest version of the client within the grace period:
- When you try to connect the client after the 7-day grace period expires, the client displays the prompt to update. For example:

- The client mandates you to upgrade to the latest version, without which you are not allowed to connect to the gateway.
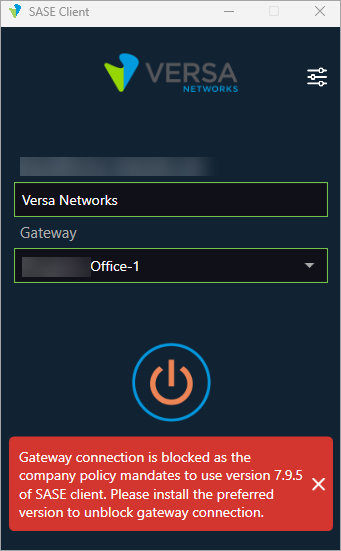
- If you click Cancel, the connect does not proceed and the following message displays:

- You cannot connect to the gateway unless you download and install the latest version. If you do not install the latest client version or click Cancel, the gateway connection is blocked. For example:
- Click Download to download the latest version. You cannot connect to the gateway during the download process.
- After the download, the Install Now option displays. The Remind Later option does not display as the grace period has expired.
- When you click Install Now, the client relaunches after installing the latest version.
- Installation follows the --silent_install process as described in Silent Installation Process above.
- After installation, if Always On is enabled, client reconnects automatically. If Always On is disabled, client UI displays and you can connect manually.
- If you click Cancel, the client blocks connection to the gateway and you cannot connect until you install the update.
Download Complete, Installation Pending—After Grace Period
In this scenario, you have downloaded the latest version, but not installed it, and the grace period has expired.
- When you try to connect, the client mandates you to upgrade to the latest version. You cannot connect to the gateway until you install the latest version.
- If you click OK, the Install Now prompt displays.
- Installation follows the --silent_install process as described in Silent Installation Process, above.
- If you click Cancel or close the installer, your connection remains blocked and prompts display repeatedly to install the latest version. You cannot connect to the gateway until you install the latest.
Support for IPsec Transforms and DH Groups
For Windows only.
Windows clients receive IPsec transform and Diffie-Hellman (DH) group values from the service-side configuration and map these values.
The following table describes the IPsec transform values that the client maps against the received configuration.
| Configuration | Cipher Transform Constants | Encryption Methods | Integrity Check Method |
|---|---|---|---|
|
esp-3des-md5 |
DES3 |
DES3 |
MD5 |
|
esp-3des-sha1 |
DES3 |
DES3 |
SHA1 |
|
esp-aes128-ctr-sha1 |
— |
— |
— |
|
esp-aes128-ctr-xcbc |
— |
— |
— |
|
esp-aes128-gcm |
GCMAES128 |
AES128 |
— |
|
esp-aes128-md5 |
AES128 |
AES128 |
MD5 |
|
esp-aes128-sha1 |
AES128 |
AES128 |
SHA1 |
|
esp-aes128-sha256 |
AES128 |
AES128 |
SHA256 |
|
esp-aes128-sha384 |
AES128 |
AES128 |
SHA384 |
|
esp-aes128-sha512 |
AES128 |
AES128 |
SHA384 |
|
esp-aes256-gcm |
GCMAES256 |
AES256 |
— |
|
esp-aes256-md5 |
AES256 |
AES256 |
MD5 |
|
esp-aes256-sha1 |
AES256 |
AES256 |
SHA1 |
|
esp-aes256-sha256 |
AES256 |
AES256 |
SHA256 |
|
esp-aes256-sha384 |
AES256 |
AES256 |
SHA384 |
|
esp-aes256-sha512 |
AES256 |
AES256 |
SHA384 |
|
esp-null-md5 |
None |
None |
MD5 |
The following table describes the DH group values that the client maps against the received configuration:
| Configuration | PFS Group | DH Group |
|---|---|---|
|
mod-none |
None |
None |
|
Mod1 |
PFS1 |
Group1 |
|
Mod2 |
PFS2 |
Group2 |
|
Mod5 |
PFS2048 |
Group14 |
|
Mod14 |
PFS2048 |
Group14 |
|
Mod15 |
ECP256 |
ECP256 |
|
Mod16 |
ECP256 |
ECP256 |
|
Mod19 |
ECP256 |
ECP256 |
|
Mod20 |
ECP384 |
ECP386 |
|
Mod21 (Currently not supported) |
— |
— |
|
Mod25 (Currently not supported) |
— |
— |
|
Mod26 (Currently not supported) |
— |
— |
Synchronize Account
You can synchronize client configuration with the SASE portal, even if the client is not connected to the network. Note that you can perform this action only when the client is not connected to VPN.
To synchronize your client account:
- In the SASE client home screen, click the Settings icon.
- In the Enterprise section, click the account for which to synchronize the client configuration with the SASE portal.

- In the Enterprise screen, click Sync Account.
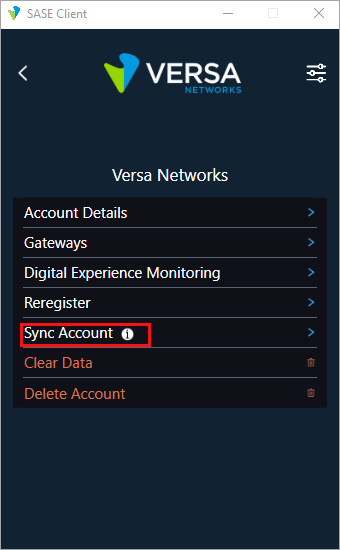
If the synchronization is successful, the following message displays.

Use Host Information for Policy Enforcement
The SASE client automatically extracts the OS type, OS version, and antivirus software information of a user's device, a process that requires no settings on the gateway server (using a Versa Director node). If a user device is a managed device and has a certificate with device ID, the client tries to access the certificate issued by the issuer, extracts the CommonName (CN) of the certificate, and provides this as the device ID.
To set the certificate issuer from a Versa Director node:
- In Director view:
- Select the Configuration tab in the top menu bar.
- Select Templates > Device Templates in the horizontal menu bar.
- Select an organization in the left menu bar.
- Select a template in the main pane. The view changes to Appliance view.
- Select the Configuration tab in the top menu bar.
- Select Services > Secure Access > Portal > Gateway Profiles in the left menu bar.
- Click the + Add icon. The Add Profiles popup window displays.
- Select the Client Controls tab.

- Enter the name of the certificate issuer.
- For more information about configuring other fields in the Add Gateway Profiles popup window, see Configure Secure Access Gateway Profiles in Configure the Versa Secure Access Service.
- Click OK.
View CA Certificates
For Android only.
You can view the following type of CA certificates from the SASE client:
- CA certificate used by the Android OS—By default, Android devices use global CA certificates.
- The certificates that you have imported to your device—All global root CA certificates are stored in the Android system keystore. Some organizations have their own root CA certificates that users must import before they can securely access application URLs within their organization. On Android devices, you can import certificates that are stored in Android user keystore and that are used by all applications.
- Application-local certificates, which are dynamically imported in the following instances:
- While synchronizing with an organization and fetching details of a gateway that has intermediate CA certificates, application-local certificates are imported to establish a tunnel successfully.
- While accessing an API, the SASE client dynamically downloads intermediate CA certificates (from the the authority information access [AIA] URL of domain certificate). When the certificate is invalid, the client verifies the certificate chain and, if it is valid, allows the request.
To view CA certificates:
- In the SASE client home screen, click the Settings icon.
- Click App Settings. Then, in the App Settings window, click CA Certificates.
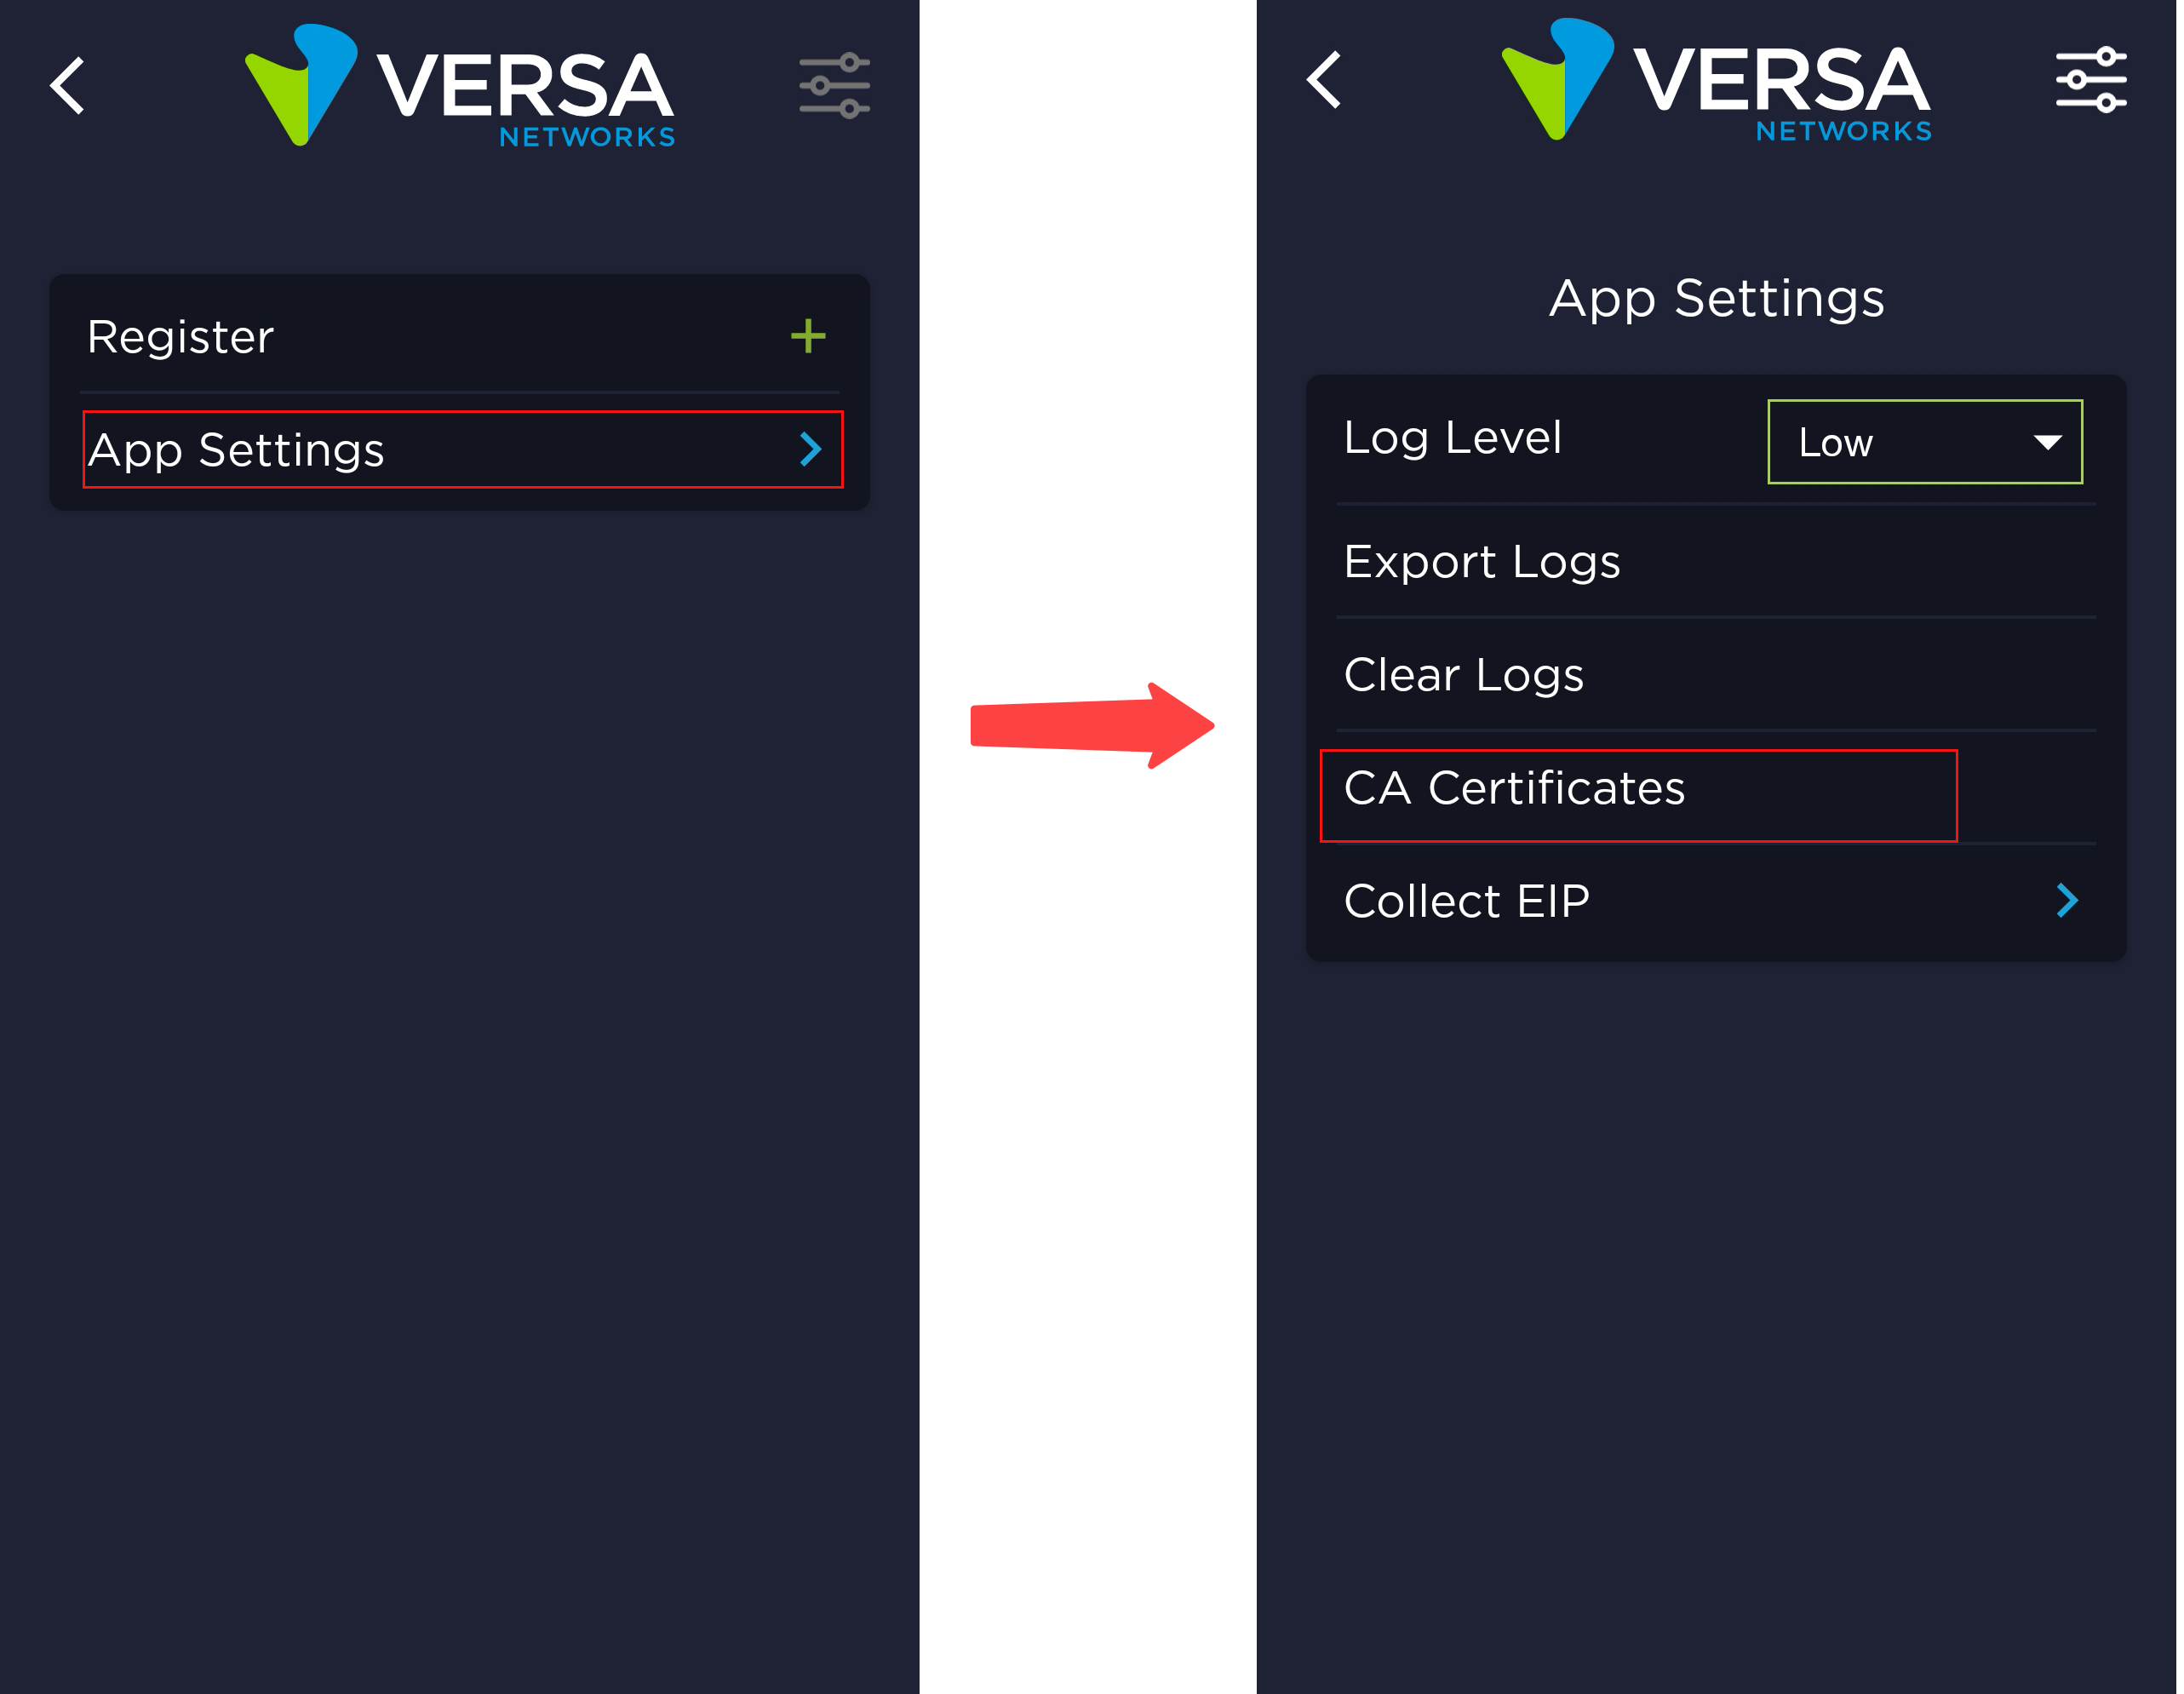
The App Local tab displays:

- Click the User and System tabs to view the user and application-local certificates:

View Client Version and Build
To view the client software version and build:
- In the SASE client home screen, click the Settings icon.
- Click Enterprise > Account Details > Software Update.
View Digital Experience Monitoring Settings
To periodically monitor the end-to-end network and application performance for an end-user device, you enable digital experience monitoring (DEM) on SASE clients. For more information, see Configure Digital Experience Monitoring.
To view the DEM settings for your client:
- In the SASE client home screen, click the Settings icon.
- In the Enterprise section, click the account for which you want to view DEM details.
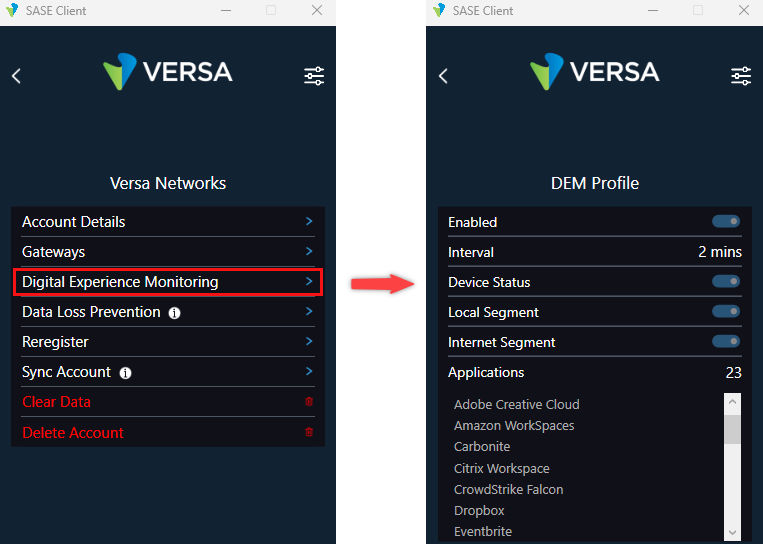
- Click Digital Experience Monitoring. The sample screenshot above shows that DEM monitoring is enabled for device health, local network performance, and internet performance, and it also displays the applications that are monitored. The SASE client sends these metrics to Versa Analytics. For more information, see View Digital Experience Monitoring Dashboards.
Enable SASE Client Features from the CLI (for Windows Clients)
On Windows clients, you can issue CLI commands from the SASE client's console to perform basic SASE client tasks and to troubleshoot SASE client issues.
To open the SASE client CLI console:
- Open the Windows command prompt.
- To start the SASE client CLI console, issue the following CLI commands:
C: cd C:\Program Files (x86)\Versa Secure Access
C:\Program Files (x86)\Versa Secure Access> VersaSecureAccessClientConsole.exe
For example:
C:\Program Files (x86)\Versa Secure Access> VersaSecureAccessClientConsole.exe
C:\Program Files (x86)\Versa Secure Access>VersaSecureAccessClientConsole.exe
263 [1] INFO Versa Secure Access (null) - Starting application in console mode. Version 7.5.9_6f38b04e
Run: VersaSecureAccessClientConsole.exe global --help, to get help for global options
Run: VersaSecureAccessClientConsole.exe help, to check supported Options Verb
- To display the VSA console CLI options, issue the following CLI command:
C:\Program Files (x86)\Versa Secure Access> VersaSecureAccessClientConsole.exe --help
VersaSecureAccessClientConsole 7.5.9.0

  global      (Default Verb)
  prelogon    Prelogon operations
  client      Configure Client options
  monitor     Monitor options
  service     Configure Service options
  help        Display more information on a specific command.
  version     Display version information.
- To display the SASE client software version, issue the following CLI command:
C:\VSA> VersaSecureAccessClientConsole.exe global --version
VersaSecureAccessClientConsole 7.5.9.0
The following sections describe how to display and execute global, pre-logon, client, monitor, and service CLI options from the Windows SASE client console. The monitor and service CLI options are supported in Releases 7.5.8 and later.
Note that if a configuration is supported on the VSA server, the corresponding CLI option is displayed as [Deprecated]. If the server does not support pushing these configurations, the client continues to support deprecated CLI commands.
Display and Execute Global Options
To view all the global options, issue the following CLI command:
C:\Program Files (x86)\Versa Secure Access> VersaSecureAccessClientConsole.exe global --help
For example:
C:\Program Files (x86)\Versa Secure Access>VersaSecureAccessClientConsole.exe global --help
VersaSecureAccessClientConsole 7.10.1.0

  --enable_split_dns          [Deprecated] Enable split DNS support
  --disable_split_dns         [Deprecated] Disable split DNS support
  --register_with_dns         [Deprecated] (true|false). Enable/Disable register with DNS
  --register_dns_suffix       [Deprecated] DNS Suffix to be used while registering with DNS. Used with
                              --register_with_dns. Ignored if --register_with_dns is false
  --network_outage_timeout    [Deprecated] Network outage timeout in seconds. (Range 30-3600)
  --uninstall_profiles        Remove all enterprise configurations
  --ip_stickiness             [Deprecated] (true|false). Enable/Disable IP stickiness
  --ip_stickiness_latency     [Deprecated] Latency diff (in %) to be considered in comparison with best. This value is
                              to be used along with ip_stickiness. Used with --ip_stickiness. Ignored if --ip_stickiness
                              is false
  --http_timeout              Timeout for http calls. (Range 30-300)
  --disable_ipv6              Disable IPV6. You must restart your computer for these changes to take effect.
  --enable_sso                (true|false). Enable/Disable Single sign-on.
  --enable_ipv6_tunnel        Enable tunnel to use IPV6 as ip layer.
  --help                      Display this help screen.
  --version                   Display version information.
--enable_split_dns
To enable split DNS support, issue the following CLI command:
C:\VSA> VersaSecureAccessClientConsole.exe global --enable_split_dns
For example:
C:\VSA> VersaSecureAccessClientConsole.exe global --enable_split_dns
324 [1] INFO Versa Secure Access (null) - Starting application in console mode. Version 7.5.9_6f38b04e
401 [1] INFO Versa Secure Access (null) - Enable DNS Split tunnel
991 [1] INFO Versa Secure Access (null) - Success!
To disable split DNS support, issue the following CLI command:
C:\VSA> VersaSecureAccessClientConsole.exe global --disable_split_dns
For example:
C:\VSA> VersaSecureAccessClientConsole.exe global --disable_split_dns
291 [1] INFO Versa Secure Access (null) - Starting application in console mode. Version 7.5.9_6f38b04e
330 [1] INFO Versa Secure Access (null) - Disable DNS Split tunnel
422 [1] INFO Versa Secure Access (null) - Success!
--register_with_dns
To register with a DNS server, issue the following CLI command:
C:\VSA> VersaSecureAccessClientConsole.exe global --register_with_dns true
For example:
C:\VSA> VersaSecureAccessClientConsole.exe global --register_with_dns true
386 [1] INFO Versa Secure Access (null) - Starting application in console mode. Version 7.5.9_6f38b04e
615 [1] INFO Versa Secure Access (null) - Enable Register IP with DNS with Suffix
872 [1] INFO Versa Secure Access (null) - Success!
To unregister from a DNS server, issue the following CLI command:
C:\VSA> VersaSecureAccessClientConsole.exe global --register_with_dns false
For example:
C:\VSA> VersaSecureAccessClientConsole.exe global --register_with_dns false
563 [1] INFO Versa Secure Access (null) - Starting application in console mode. Version 7.5.9_6f38b04e
628 [1] INFO Versa Secure Access (null) - Disable Register IP with DNS
--register_dns_suffix
To add the DNS suffix, issue the following CLI command. Note that you must issue this option with the --register_with_dns true option. If you issue the --register_with_dns false option, the --register_dns_suffix option is not accepted.
C:\VSA> VersaSecureAccessClientConsole.exe global --register_dns_suffix "domain-name" --register_with_dns true
For example:
C:\VSA> VersaSecureAccessClientConsole.exe global --register_dns_suffix "abc.com" --register_with_dns true
443 [1] INFO Versa Secure Access (null) - Starting application in console mode. Version 7.5.9_6f38b04e
505 [1] INFO Versa Secure Access (null) - Enable Register IP with DNS with Suffix abc.com
624 [1] INFO Versa Secure Access (null) - Success!
--network_outage_timeout
To set the network outage time, in seconds, issue the following CLI command:
C:\VSA> VersaSecureAccessClientConsole.exe global --network_outage_timeout timeout
For example:
C:\VSA> VersaSecureAccessClientConsole.exe global --network_outage_timeout 10
367 [1] INFO Versa Secure Access (null) - Starting application in console mode. Version 7.4.1_24cd434d
467 [1] INFO Versa Secure Access (null) - Starting application in console mode. Version 7.4.1_24cd434d
467 [1] INFO Versa Secure Access (null) - Starting application in console mode. Version 7.4.1_24cd434d
526 [1] INFO Versa Secure Access (null) - Set Network Outage Timeout
526 [1] INFO Versa Secure Access (null) - Set Network Outage Timeout
676 [1] INFO Versa Secure Access (null) - Success!
676 [1] INFO Versa Secure Access (null) - Success!
--uninstall_profiles
Use this option to reset the client to the default (clean) installed state.
To uninstall registered profiles, issue the following CLI command:
C:\VSA> VersaSecureAccessClientConsole.exe global --uninstall_profiles
--ip_stickiness
IP stickiness stores the tunnel IP address provided by a connection and requests the same IP address for subsequent connections to the same gateway. When connecting to the best gateway with IP stickiness enabled, the client chooses the previously connected gateway, if it is available in the optimal gateway list and if that gateway's latency is within the permitted range compared to the best.
To enable IP stickiness, issue the following CLI command:
C:\VSA> VersaSecureAccessClientConsole.exe global --ip_stickiness true
For example:
C:\VSA> VersaSecureAccessClientConsole.exe global --ip_stickiness true
289 [1] INFO Versa Secure Access (null) - Starting application in console mode. Version 7.5.9_6f38b04e
328 [1] INFO Versa Secure Access (null) - Set IP Stickiness
519 [1] INFO Versa Secure Access (null) - Success!
To disable IP stickiness, issue the following CLI command:
C:\VSA> VersaSecureAccessClientConsole.exe global --ip_stickiness false
For example:
C:\VSA> VersaSecureAccessClientConsole.exe global --ip_stickiness false
291 [1] INFO Versa Secure Access (null) - Starting application in console mode. Version 7.5.9_6f38b04e
331 [1] INFO Versa Secure Access (null) - Resets IP Stickiness
520 [1] INFO Versa Secure Access (null) - Success!
To customize the IP stickiness latency percentage difference compared against the best, issue the following CLI command:
C:\VSA> VersaSecureAccessClientConsole.exe global --ip_stickiness true --ip_stickiness_latency latency
For example:
C:\VSA> VersaSecureAccessClientConsole.exe global --ip_stickiness true  --ip_stickiness_latency 20
293 [1] INFO Versa Secure Access (null) - Starting application in console mode. Version 7.5.9_6f38b04e
332 [1] INFO Versa Secure Access (null) - Set IP Stickiness
523 [1] INFO Versa Secure Access (null) - Success!
--http_timeout
To specify a timeout value for HTTP calls, issue the following CLI command. The value range is 30 through 300 seconds.
C:\VSA> VersaSecureAccessClientConsole.exe global --http_timeout 60
--disable_ipv6
To disable IPv6 support, issue the following CLI command:
C:\VSA> VersaSecureAccessClientConsole.exe global --disable_ipv6
--enable_sso
You can enable SSO when you register the client to the portal. By default, SSO is disabled, so the user is prompted to enter credentials during SAML-based registration and reregistration. When you enable SSO, the client attempts a browser-based SSO using the Windows login credentials and tries to avoid prompting users for credentials.
To enable single sign-on (SSO), issue the following CLI command:
VSA>VersaSecureAccessClientConsole.exe global --enable_sso true
To disable SSO, issue the following CLI command:
C:\VSA>VersaSecureAccessClientConsole.exe global --enable_sso false
--enable_ipv6_tunnel
Note that the following commands require an administrator login.
To enable IPv6 and dual-stack IPsec tunnel, issue the following CLI command:
VSA>VersaSecureAccessClientConsole.exe global --enable_ipv6_tunnel
To disable, issue the following CLI command:
C:\VSA>VersaSecureAccessClientConsole.exe global --disable_ipv6_tunnel
Display and Execute Pre-Logon Options
To view the pre-logon options, issue the following CLI command:
C:\Program Files (x86)\Versa Secure Access> VersaSecureAccessClientConsole.exe prelogon --help
For example:
C:\Program Files (x86)\Versa Secure Access> VersaSecureAccessClientConsole.exe prelogon --help
VersaSecureAccessClientConsole 7.9.1.0
Copyright c  2020

  --prelogon_config                Prelogon configuration file path
  --portal_fqdn                    Sets the default Portal FQDN for prelogon registration. To reset use --portal_fqdn ""
  --enterprise_name                Sets the default 'Enterprise Name' for prelogon registration. To reset use --enterprise_name ""
  --enable_certonlyauth            true to set the authentication type restricted only to Device Certificate for prelogon registration and connect.
                                   To reset use --enable_certonlyauth false ""
  --trusted_root_ca_certificate    Trusted root certificate for Secure Access Service
  --disconnect_prelogon            Disconnect prelogon connection
  --help                           Display this help screen.
  --version                        Display version information.
Note that to issue the pre-logon command options, you must have administrator privileges and you must be at the administrator command prompt. Also, save the pre-logon file (JSON) and CA certificate in your computer before you run the first two commands.
--prelogon_config
The pre-logon configuration option allows users to log in to the organization's VPN from a locked screen. For more information, see Configure Pre-Logon for the Versa Secure Access Client.
To apply the pre-logon configuration, issue the following CLI command:
c:\VSA> VersaSecureAccessClientConsole.exe prelogon --prelogon_config json-filename
For example:
c:\VSA> VersaSecureAccessClientConsole.exe prelogon --prelogon_config C:\Pre-Logon\PreLogonConfig.json
479 [1] INFO Versa Secure Access (null) - Starting application in prelogon_config mode. Version 7.4.1_24cd434d
577 [1] DEBUG Versa Secure Access (null) - Prelogon configuration initiated
578 [1] DEBUG Versa Secure Access (null) - Verifying and Applying Prelogon Configuration
2092 [1] DEBUG Versa Secure Access (null) - Prelogon Configuration Applied Successfully!
--portal_fqdn
To set the default FQDN, issue the following command:
c:\VSA> VersaSecureAccessClientConsole.exe prelogon --portal_fqdn fqdn
--enterprise_name
To set the enterprise name FQDN, issue the following command:
c:\VSA> VersaSecureAccessClientConsole.exe prelogon --enterprise_name enterprise
--enable_certonlyauth
To enable certificate-only authorization, issue the following command:
c:\VSA> VersaSecureAccessClientConsole.exe prelogon --enable_certonlyauth true
--trusted_root_ca_certificate
Issue this command when the server uses private certificates and you want to add a root CA certificate. If the server uses trusted CA certificates, this command is optional.
To set the pre-logon configuration file path, issue the following CLI command:
c:\VSA> VersaSecureAccessClientConsole.exe prelogon --trusted_root_ca_certificate certificate-filename.cer
For example:
c:\VSA> VersaSecureAccessClientConsole.exe prelogon --trusted_root_ca_certificate C:\Certificate\VersaIntermediateCertificateAuthority1.cer
278 [1] INFO Versa Secure Access (null) - Starting application in prelogon_config mode. Version 7.4.1_24cd434d
417 [1] DEBUG Versa Secure Access (null) - Success!
--disconnect_prelogon
To disconnect the pre-logon VPN connection, issue the following CLI command:
C:\VSA> VersaSecureAccessClientConsole.exe prelogon --disconnect_prelogon
Display and Execute Client Options
To view the client options, issue the following CLI command:
C:\Program Files (x86)\Versa Secure Access> VersaSecureAccessClientConsole.exe client --help
For example:
C:\Program Files (x86)\Versa Secure Access>VersaSecureAccessClientConsole.exe client --help
2026-05-15 13:06:12,595 [1] INFO  - Starting application in console mode. Version 7.10.2_66ea4850d
2026-05-15 13:06:12,638 [1] DEBUG - Admin privilege not available.
VersaSecureAccessClientConsole 7.10.2.0
Copyright c  2026

  --display_default_logo                    (true|false). Enable/Disable default logo
  --hide_on_connect                         (true|false). Enable/Disable hide on connect
  --reconnect_interval                      [Deprecated] Delay between subsequent auto reconnect attempts in seconds
                                            (Range 1-10)
  --allow_alwayson_disconnect               [Deprecated] (true|false). Enable/Disable disconnecting always on profile
  --alwayson_reconnect_delay                [Deprecated] When always on profile is disconnected, reconnect will be
                                            attempted after specified timeDelay in minutes. (Range 1-30)
  --share_metrics_periodically              [Deprecated] (true|false). Enable/Disable sending periodic metrics info
  --post_metrics_interval                   [Deprecated] Interval between posting metrics info in minutes. (Range 1-30)
  --enable_fips_policy                      (true|false). Enable/Disable FIPS algorithm policy
  --enable_server_policy_alerts             (true|false). Enable/Disable CASB policy alerts from server
  --set_default_portal_fqdn                 Sets the default Portal FQDN for user registration. To reset use
                                            --set_default_portal_fqdn ""
  --set_default_enterprise_name             Sets the default enterprise name for user registration. To reset use
                                            --set_default_enterprise_name ""
  --set_default_username                    Sets the default username to be prefilled during registration. To reset use
                                            --set_default_username ""
  --restart_ipsec_service_on_disconnect     (true|false) Restart system's ipsec policy agent service on user disconnect
  --prefer_ie_browser_engine                (true|false) Forces to use IE browser for SAML authentication
  --sub_optimal_gateway_disconnect_delay    Time delay to auto disconnect sub optimal gateway in seconds.
  --enable_eip                              (true|false). Enable/Disable EIP ( Default is true)
  --enable_realtime_eip                     (true|false). Enable/Disable EIP ( Default is false). Note: If enable_eip is
                                            set to false, it will disable realtime as well
  --auto_update_defer_limit                 Max allowed limit to defer software auto update (Range 1-5)
  --auto_disconnect_interval                Time interval to auto disconnect tunnel if user authentication fails in
                                            minutes (Value >= 1 min)
  --reset_auto_disconnect_interval          Resets auto disconnect time interval. e.g. to use
                                            --reset_auto_disconnect_interval ""
  --auto_disconnect_reminder_time           Reminder will be shown to user before the specified time about tunnel auto
                                            disconnect in minutes. (Value >= 1 min)
  --reset_auto_disconnect_reminder_time     Resets auto disconnect reminder time. e.g. to use
                                            --reset_auto_disconnect_reminder_time ""
  --prefer_popout_browser                   (true|false) Application launches seperate pop out browser for IDP
                                            authentication
  --display_vpn_profile_in_os               (true|false). Allows VPN profile to be listed in Windows Network Settings (
                                            Default is false)
  --enable_auto_logon                       [Deprecated] (true|false). When enabled, logged in user information will be
                                            used for establishing vpn connection. This will be applied only when default
                                            enterpise_name, portal_fqdn and user_login_type value are set. ( Default is
                                            false)
  --logon_type                              [Deprecated] Sets the logon type to be used when AutoLogon flag is enabled.
                                            Possible values (1) - Email, (2) - Username
  --auto_register_max_retry_count           Maximum number of allowed auto register attempt. (Value >= 1 )
  --reset_auto_register_max_retry_count     Resets auto register retry count. e.g. to use
                                            --reset_auto_register_max_retry_count ""
  --prefer_gateway_assisted_tnd             (true|false). When enabled, gateway assisted trusted network detection will
                                            be given priority over trusted host name check
  --enable_tls_tunnel                       (true|false). When enabled, the client will attempt a TLS tunnel if
                                            configured in the gateway.
  --disable_custom_ip_resolution            (true|false). When enabled, the client will use the API request directly
                                            with FQDN instead of sending to a specific IP.
  --enable_dtls_tunnel                      (true|false). When enabled, the client will attempt a DTLS tunnel if
                                            configured in the gateway.
  --appearance                              (Light|Dark|Default) When set, the UI will change according to the theme set
  --reset_ssl_stats                         When provided, the client will attempt to reset SSL VPN connection
                                            statistics. Usage --reset_ssl_stats "{enterpriseName}"
  --fetch_username_from_certificate         To fetch username from personal certificate store e.g. To use
                                            --fetch_username_from_certificate true|false --cert_issuer <certificate
                                            issuer name> --username_field  CN | SAN --san_match_regex <regex>
  --add_user_cert_issuer                    Additional Certficate issuer names
  --remove_user_cert_issuer                 Remove Certficate issuer name
  --clear_auth_cookie_on_user_disconnect    (true|false). When enabled, user authentication cookie is cleared upon
                                            manual tunnel disconnect by user.
  --user_session_idle_timeout               Allowed idle ( no activity) time for user session to be inactive.(in
                                            minutes) (Value >= 1 min). 0 will reset idle time out
  --clear_auth_cookie_on_service_restart    (true|false). When enabled, user authentication cookie is cleared upon
                                            machine reboot or service restart.
  --use_system_browser                      (true|false). When enabled, system defaut browser will be used for
                                            authentication.
  --enable_eip_debug                        (true|false). When enabled, eip extensive debug logs with be collected.
  --heartbeat_timeout_interval              Heartbeat timeout interval for SSL VPN connection in minutes.
  --device_id                               Sets the device ID that MDM uses to manage this device. This value takes
                                            precedence over device ID retrieved from any other sources e.g. --device_id
                                            9908c957-7161-4235
  --select_cert_with_eku_id                If an EKU value is specified, the client selects the first matching
                                           certificate issued by a matching issuer with that EKU for authentication.
                                           e.g. --select_cert_with_eku_id  1 | 2 | 3, 1: Client Authentication
                                           (Default option), 2: Smart Card Logon, 3: Custom EKU OID (requires
                                           --custom_eku_oid)
  --allow_user_to_select_cert               When set to true, User will be prompted to choose a certificate for the
                                            device auth if there are more than 1 matching certificates. When set to
                                            false client will automatically pick the first matching certificate without
                                            prompting the user. Set to false by default.
  --disable_software_update                 (true|false). When set to true, User will not be allowed to manually update
                                            the new client version.
  --enable_tamper_protection_override_key   (true|false). When set to true, the user can disable TP using either the
                                            override key or OTP. Otherwise, disabling via OTP will be the default
                                            option.
  --silent_install                          (true|false). Enable/Disable silent app install during software upgrade.
                                            Default is true, app will be installed silently.
  --sync_account                            Executes Sync Account for the specified enterprise. To use, --sync_account
                                            <enterprise name>
  --help                                    Display this help screen.
  --version                                 Display version information.
--display_default_logo
To display the default logo in the SASE client interface, issue the following CLI command. Note that to issue the display and disable SASE client logo commands, you must have administrator privileges and you must be at the administrator command prompt.
c:\VSA> VersaSecureAccessClientConsole.exe client --display_default_logo true
For example:
c:\VSA> VersaSecureAccessClientConsole.exe client --display_default_logo true
276 [1] INFO Versa Secure Access (null) - Starting application in console mode. Version 7.4.1_24cd434d
311 [1] INFO Versa Secure Access (null) - Enable Display default logo
398 [1] INFO Versa Secure Access (null) - Success!
Disable the default logo:
c:\VSA> VersaSecureAccessClientConsole.exe client --display_default_logo false
For example:
c:\VSA> VersaSecureAccessClientConsole.exe client --display_default_logo false
302 [1] INFO Versa Secure Access (null) - Starting application in console mode. Version 7.4.1_24cd434d
336 [1] INFO Versa Secure Access (null) - Disable Display default logo
419 [1] INFO Versa Secure Access (null) - Success!
--hide_on_connect
Use the hide on connect option to automatically close the SASE client UI 10 seconds after a successful VPN connection. This command requires an administrator login.
To enable automatic closing of the SASE client, issue the following CLI command:
C:\VSA> VersaSecureAccessClientConsole.exe client --hide_on_connect true
For example:
C:\VSA>VersaSecureAccessClientConsole.exe client --hide_on_connect true
664 [1] INFO Versa Secure Access (null) - Starting application in console mode. Version 7.8.7_ce167b8e
714 [1] INFO Versa Secure Access (null) - Hide On Connect : True
To disable automatic closing of the SASE client UI, issue the following CLI command:
C:\VSA> VersaSecureAccessClientConsole.exe client --hide_on_connect false
For example:
C:\VSA>VersaSecureAccessClientConsole.exe client --hide_on_connect false
617 [1] INFO Versa Secure Access (null) - Starting application in console mode. Version 7.8.7_ce167b8e
662 [1] INFO Versa Secure Access (null) - Hide On Connect : False
--reconnect_interval
To configure the time between autoreconnection attempts, in seconds, issue the following CLI command. The range is 1 through 10 seconds.
C:\VSA> VersaSecureAccessClientConsole.exe client --reconnect_interval seconds
For example:
C:\VSA> VersaSecureAccessClientConsole.exe client --reconnect_interval 5
290 [1] INFO Versa Secure Access (null) - Starting application in console mode. Version 7.5.9_6f38b04e
329 [1] INFO Versa Secure Access (null) - Set Auto Reconnect interval
495 [1] INFO Versa Secure Access (null) - Success!
--allow_alwayson_disconnect
To enable disconnection of always on for a profile, issue the following CLI command. This command requires an administrator login.
C:\VSA> VersaSecureAccessClientConsole.exe client --allow_alwayson_disconnect true
For example:
C:\VSA> VersaSecureAccessClientConsole.exe client --allow_alwayson_disconnect true
327 [1] INFO Versa Secure Access (null) - Starting application in console mode. Version 7.5.9_6f38b04e
368 [1] INFO Versa Secure Access (null) - Configure disconnect always on preference.
855 [1] INFO Versa Secure Access (null) - Success!
To disable disconnection of always on for a profile, issue the following CLI command:
C:\VSA> VersaSecureAccessClientConsole.exe client --allow_alwayson_disconnect false
For example:
C:\VSA> VersaSecureAccessClientConsole.exe client --allow_alwayson_disconnect false
302 [1] INFO Versa Secure Access (null) - Starting application in console mode. Version 7.5.9_6f38b04e
341 [1] INFO Versa Secure Access (null) - Configure disconnect always on preference.
591 [1] INFO Versa Secure Access (null) - Success!
--alwayson_reconnect_delay
Use this command to enter the time, in minutes, between reconnection attempts when always on is disconnected for a profile. The range is 1 through 30 minutes.
To set the always on reconnect delay, issue the following CLI command:
C:\VSA> VersaSecureAccessClientConsole.exe client --alwayson_reconnect_delay minutes
For example:
C:\VSA> VersaSecureAccessClientConsole.exe client --alwayson_reconnect_delay 10
326 [1] INFO Versa Secure Access (null) - Starting application in console mode. Version 7.5.9_6f38b04e
371 [1] INFO Versa Secure Access (null) - Set AlwaysOn Delay Time
827 [1] INFO Versa Secure Access (null) - Success!
--share_metrics_periodically
To enable periodic metric sharing, issue the following CLI command. This command requires an administrator login.
C:\VSA>VersaSecureAccessClientConsole.exe client --share_metrics_periodically true
For example:
C:\VSA> VersaSecureAccessClientConsole.exe client --share_metrics_periodically true
300 [1] INFO Versa Secure Access (null) - Starting application in console mode. Version 7.5.9_6f38b04e
341 [1] INFO Versa Secure Access (null) - Configure periodic metric share preference.
749 [1] INFO Versa Secure Access (null) - Success!
To disable periodic metric sharing, issue the following CLI command:
C:\VSA> VersaSecureAccessClientConsole.exe client --share_metrics_periodically false
For example:
C:\VSA> VersaSecureAccessClientConsole.exe client --share_metrics_periodically false
308 [1] INFO Versa Secure Access (null) - Starting application in console mode. Version 7.5.9_6f38b04e
349 [1] INFO Versa Secure Access (null) - Configure periodic metric share preference.
761 [1] INFO Versa Secure Access (null) - Success!
--post_metrics_interval
Use this command to enter the time, in minutes, between posting metrics. The range is 1 through 30 minutes.
To set the interval for posting metrics, issue the following CLI command:
C:\VSA> VersaSecureAccessClientConsole.exe client --post_metrics_interval minutes
For example:
C:\VSA> VersaSecureAccessClientConsole.exe client --post_metrics_interval 5
316 [1] INFO Versa Secure Access (null) - Starting application in console mode. Version 7.5.9_6f38b04e
358 [1] INFO Versa Secure Access (null) - Configure send metrics interval
748 [1] INFO Versa Secure Access (null) - Success!
--enable_fips_policy
To enable the Federal Information Processing Standards (FIPS) algorithm policy, issue the following CLI command. This command requires an administrator login.
C:\VSA> VersaSecureAccessClientConsole.exe client --enable_fips_policy true
For example:
C:\VSA> VersaSecureAccessClientConsole.exe client --enable_fips_policy true
358 [1] INFO Versa Secure Access (null) - Starting application in console mode. Version 7.5.9_6f38b04e
398 [1] INFO Versa Secure Access (null) - Configure FIPS policy preference.
742 [1] INFO Versa Secure Access (null) - Success!
To disable the FIPS algorithm policy, issue the following CLI command:
C:\VSA> VersaSecureAccessClientConsole.exe client --enable_fips_policy false
For example:
C:\VSA> VersaSecureAccessClientConsole.exe client --enable_fips_policy false
360 [1] INFO Versa Secure Access (null) - Starting application in console mode. Version 7.5.9_6f38b04e
400 [1] INFO Versa Secure Access (null) - Configure FIPS policy preference.
2815 [1] INFO Versa Secure Access (null) - Success!
--enable_server_policy_alerts
To enable Cloud Access Security Broker (CASB) policy alerts from server, issue the following CLI command. This command requires an administrator login.
C:\VSA> VersaSecureAccessClientConsole.exe client --enable_server_policy_alerts true
For example:
C:\VSA> VersaSecureAccessClientConsole.exe client --enable_server_policy_alerts true
320 [1] INFO Versa Secure Access (null) - Starting application in console mode. Version 7.5.9_6f38b04e
359 [1] INFO Versa Secure Access (null) - Configuring server casb policy alerts display preference.
647 [1] INFO Versa Secure Access (null) - Success!
To disable CASB policy alerts from server:
C:\VSA> VersaSecureAccessClientConsole.exe client --enable_server_policy_alerts false
For example:
C:\VSA> VersaSecureAccessClientConsole.exe client --enable_server_policy_alerts false
305 [1] INFO Versa Secure Access (null) - Starting application in console mode. Version 7.5.9_6f38b04e
347 [1] INFO Versa Secure Access (null) - Configuring server casb policy alerts display preference.
538 [1] INFO Versa Secure Access (null) - Success!
--set_default_portal_fqdn
To set the default FQDN for user registration, issue the following CLI command. This command requires an administrator login.
C:\VSA> VersaSecureAccessClientConsole.exe client --set_default_portal_fqdn fqdn
For example:
C:\VSA> VersaSecureAccessClientConsole.exe client --set_default_portal_fqdn name.com
301 [1] INFO Versa Secure Access (null) - Starting application in console mode. Version 7.8.7_ce167b8e
341 [1] INFO Versa Secure Access (null) - Setting default portal FQDN: name.com
585 [1] INFO Versa Secure Access (null) - Successfully configured default portal FQDN!
To reset the default FQDN for user registration, issue the following CLI command:
C:\VSA> VersaSecureAccessClientConsole.exe client --set_default_portal_fqdn "fqdn"
--set_default_enterprise_name
To set the default enterprise name for user registration, issue the following CLI command. This command requires an administrator login.
C:\VSA> VersaSecureAccessClientConsole.exe client --set_default_enterprise_name "Versa Networks"
For example:
C:\VSA> VersaSecureAccessClientConsole.exe client --set_default_enterprise_name "Versa Networks"
718 [1] INFO Versa Secure Access (null) - Starting application in console mode. Version 7.8.7_d72e3e6f
796 [1] INFO Versa Secure Access (null) - Setting default Enterprise Name: Versa Networks
1031 [1] INFO Versa Secure Access (null) - Successfully configured default Enterprise Name!
--set_default_username
To set the default username for first time registration, issue the following CLI command. This command requires an administrator login.
C:\VSA> VersaSecureAccessClientConsole.exe client --set_default_username username
For example:
C:\VSA>VersaSecureAccessClientConsole.exe client --set_default_username martha
617 [1] INFO Versa Secure Access (null) - Starting application in console mode. Version 7.8.7_ce167b8e
661 [1] INFO Versa Secure Access (null) - Setting default Username: martha
1551 [1] INFO Versa Secure Access (null) - Successfully configured default Username for registration
--restart_ipsec_service_on_disconnect
To restart the IPsec policy agent service when a user disconnects, issue the following CLI command:
C:\VSA> VersaSecureAccessClientConsole.exe client --restart_ipsec_service_on_disconnect true
For example:
C:\VSA> VersaSecureAccessClientConsole.exe client --restart_ipsec_service_on_disconnect true
645 [1] INFO Versa Secure Access (null) - Starting application in console mode. Version 7.8.0_aa6f120a
686 [1] INFO Versa Secure Access (null) - Setting restart IPSec service on user disconnect to: True
1116 [1] INFO Versa Secure Access (null) - Successfully set IPSec service restart on user disconnect to: True!
To disable the restarting of the IPsec policy agent service when a user disconnects, issue the following CLI command:
C:\VSA> VersaSecureAccessClientConsole.exe client --restart_ipsec_service_on_disconnect false
For example:
C:\VSA> VersaSecureAccessClientConsole.exe client --restart_ipsec_service_on_disconnect false
648 [1] INFO Versa Secure Access (null) - Starting application in console mode. Version 7.8.0_aa6f120a
693 [1] INFO Versa Secure Access (null) - Setting restart IPSec service on user disconnect to: False
1104 [1] INFO Versa Secure Access (null) - Successfully set IPSec service restart on user disconnect to: False!
--prefer_ie_browser_engine
To use the Internet Explorer (IE) browser for SAML authentication, issue the following CLI command:
C:\VSA> VersaSecureAccessClientConsole.exe client --prefer_ie_browser_engine true
For example:
C:\VSA>VersaSecureAccessClientConsole.exe client  --prefer_ie_browser_engine true
662 [1] INFO Versa Secure Access (null) - Starting application in console mode. Version 7.8.0_aa6f120a
710 [1] INFO Versa Secure Access (null) - Use IE Engine as preferred browser control: True
1099 [1] INFO Versa Secure Access (null) - Successfully set IE as preferred browser engine!
To disable use of the Internet Explorer browser for SAML authentication, issue the following CLI command:
C:\VSA> VersaSecureAccessClientConsole.exe client --prefer_ie_browser_engine false
For example:
C:\VSA> VersaSecureAccessClientConsole.exe client  --prefer_ie_browser_engine false
657 [1] INFO Versa Secure Access (null) - Starting application in console mode. Version 7.8.0_aa6f120a
701 [1] INFO Versa Secure Access (null) - Use IE Engine as preferred browser control: False
1078 [1] INFO Versa Secure Access (null) - Successfully reset preferred browser engine to default value!
--sub_optimal_gateway_disconnect_delay
Use this command to configure the disconnect time for a non-optimal gateway. When connecting to a dynamic optimal gateway, the client establishes a new connection with a lower metric without disconnecting the old tunnel. The old, or non-optimal, tunnel automatically disconnects after 30 minutes. Automatic reconnection occurs only when the optimal gateway is disconnected.
To configure the sub-optimal gateway disconnect delay, issue the following CLI command:
C:\VSA> VersaSecureAccessClientConsole.exe client --sub_optimal_gateway_disconnect_delay delay-time-in-seconds
For example:
C:\VSA> VersaSecureAccessClientConsole.exe client --sub_optimal_gateway_disconnect_delay 10 seconds
574 [1] INFO Versa Secure Access (null) - Starting application in console mode. Version 7.8.0_aa6f120a
617 [1] INFO Versa Secure Access (null) - Set sub-optimal gateway auto disconnect delay
855 [1] INFO Versa Secure Access (null) - Success!
--enable_eip
Use this command to enable or disable endpoint information profile (EIP).
EIP is enabled by default for the SASE client. To disable EIP, issue the following CLI command:
C:\VSA> VersaSecureAccessClientConsole.exe client --enable_eip false
For example:
C:\VSA> VersaSecureAccessClientConsole.exe client --enable_eip false
575 [1] INFO Versa Secure Access (null) - Starting application in console mode. Version 7.8.0_aa6f120a
614 [1] INFO Versa Secure Access (null) - Turning OFF EIP feature.
887 [1] INFO Versa Secure Access (null) - Success!
887 [1] INFO Versa Secure Access (null) - Configure EIP collection preference.
925 [1] INFO Versa Secure Access (null) - Success!
To re-enable EIP, issue the following CLI command:
C:\VSA> VersaSecureAccessClientConsole.exe client --enable_eip true
For example:
C:\VSA> VersaSecureAccessClientConsole.exe client --enable_eip true
585 [1] INFO Versa Secure Access (null) - Starting application in console mode. Version 7.8.0_aa6f120a
666 [1] INFO Versa Secure Access (null) - Turning ON EIP feature.
933 [1] INFO Versa Secure Access (null) - Success!
933 [1] INFO Versa Secure Access (null) - Configure EIP collection preference.
986 [1] INFO Versa Secure Access (null) - Success!
--enable_realtime_eip
To enable real-time EIP, issue the following CLI command. Note that --enable_realtime_eip is disabled if you set --enable_eip to False. This command requires an administrator login.
C:\VSA> VersaSecureAccessClientConsole.exe client --enable_realtime_eip true
For example:
C:\VSA> VersaSecureAccessClientConsole.exe client --enable_realtime_eip true
682 [1] INFO Versa Secure Access (null) - Starting application in console mode. Version 7.8.7_ce167b8e
842 [1] INFO Versa Secure Access (null) - Turning ON EIP feature. DisableRealTimeEIPCollection.
1759 [1] INFO Versa Secure Access (null) - Success!
1761 [1] INFO Versa Secure Access (null) - Configure Realtime EIP collection preference.
1889 [1] DEBUG Versa Secure Access (null) - IsEIPSupported: True
--auto_update_defer_limit
Use this command to configure the maximum allowed limit, in days, to defer an automatic software update. The range is 1 through 5 days.
To set the auto update defer limit, issue the following CLI command. This command requires an administrator login.
C:\VSA> VersaSecureAccessClientConsole.exe client --auto_update_defer_limit 1 through 5
For example:
C:\VSA> VersaSecureAccessClientConsole.exe client --auto_update_defer_limit 3
575 [1] INFO Versa Secure Access (null) - Starting application in console mode. Version 7.8.0_aa6f120a
607 [1] INFO Versa Secure Access (null) - Set Auto Update defer limit
857 [1] INFO Versa Secure Access (null) - Success!
--auto_disconnect_interval
Use this command to configure the tunnel automatic disconnecter, in minutes. You configure this on the Versa Secure Access portal and then share the configuration with the SASE client during registration or reregistration. The value must be greater than or equal to 1. This command requires an administrator login.
C:\VSA> VersaSecureAccessClientConsole.exe client --auto_disconnect_interval
For example:
C:\VSA> VersaSecureAccessClientConsole.exe client --auto_disconnect_interval 2
628 [1] INFO Versa Secure Access (null) - Starting application in console mode. Version 7.8.7_ce167b8e
673 [1] INFO Versa Secure Access (null) - Set Auto Disconnect interval
1447 [1] INFO Versa Secure Access (null) - Success!
To reset the automatic disconnect interval, issue the following CLI command. This option is available for all registered enterprises. If you set the interval at the server and client CLI levels, the server configuration has preference.
C:\VSA> VersaSecureAccessClientConsole.exe client --reset_auto_disconnect_interval
--auto_disconnect_reminder_time
Use this option to configure the reminder time for automatic disconnection, in minutes. The value must be greater than or equal to 1. The default time is 15 minutes.
To configure the automatic disconnect reminder time, issue the following CLI command. This command requires an administrator login.
C:\VSA> VersaSecureAccessClientConsole.exe client --auto_disconnect_reminder_time time
For example:
C:\VSA> VersaSecureAccessClientConsole.exe client --auto_disconnect_reminder_time 20
582 [1] INFO Versa Secure Access (null) - Starting application in console mode. Version 7.8.7_ce167b8e
623 [1] INFO Versa Secure Access (null) - Set Auto Disconnect Reminder Time
917 [1] INFO Versa Secure Access (null) - Success!
To reset the automatic disconnect reminder time to the default value, issue the following CLI command:
C:\VSA> VersaSecureAccessClientConsole.exe client --reset_auto_disconnect_reminder_time
--prefer_popout_browser
To enable the display of a popup browser for SAML authentication, issue the following CLI command:
C:\VSA> VersaSecureAccessClientConsole.exe client --prefer_popout_browser true
For example:
C:\VSA> VersaSecureAccessClientConsole.exe client --auto_disconnect_reminder_time 20
582 [1] INFO Versa Secure Access (null) - Starting application in console mode. Version 7.8.7_ce167b8e
623 [1] INFO Versa Secure Access (null) - Set Auto Disconnect Reminder Time
917 [1] INFO Versa Secure Access (null) - Success!
To disable the display of a popup browser for SAML authentication, issue the following CLI command:
C:\VSA> VersaSecureAccessClientConsole.exe client --prefer_popout_browser false
For example:
C:\VSA> VersaSecureAccessClientConsole.exe client --prefer_popout_browser false
698 [1] INFO Versa Secure Access (null) - Starting application in console mode. Version 7.8.7_ce167b8e
745 [1] INFO Versa Secure Access (null) - Use pop out browser as preferred for web authentication: False
1205 [1] INFO Versa Secure Access (null) - Successfully reset pop out browser preference
--display_vpn_profile_in_os
To enable the listing of the VPN profile in the Windows network settings, issue the following CLI command. The default value is false. This command requires an administrator login.
C:\VSA> VersaSecureAccessClientConsole.exe client --display_vpn_profile_in_os true
For example:
C:\VSA> VersaSecureAccessClientConsole.exe client --display_vpn_profile_in_os true
578 [1] INFO Versa Secure Access (null) - Starting application in console mode. Version 7.8.7_ce167b8e
618 [1] INFO Versa Secure Access (null) - Display VPN Profile in OS : True
888 [1] INFO Versa Secure Access (null) - Successfully set "Display VPN Profile in OS" preference!
To disable the listing of the VPN profile in the Windows network settings, issue the following CLI command:
C:\VSA> VersaSecureAccessClientConsole.exe client --display_vpn_profile_in_os false
--auto_register_max_retry_count
Use this option to set the limit for the maximum number of attempts for automatic registration. The value must be greater than or equal to 1.
To set the maximum retry count, issue the following command. This command requires an administrator login.
C:\VSA> VersaSecureAccessClientConsole.exe client --auto_register_max_retry_count limit
For example:
C:\VSA> VersaSecureAccessClientConsole.exe client --auto_register_max_retry_count 5
614 [1] INFO Versa Secure Access (null) - Starting application in console mode. Version 7.8.7_ce167b8e
659 [1] INFO Versa Secure Access (null) - The requested operation requires elevation.
--reset_auto_register_max_retry_count
To reset the retry count for automatic registration, issue the following CLI command:
C:\VSA> VersaSecureAccessClientConsole.exe client --reset_auto_register_max_retry_count " "
--prefer_gateway_assisted_tnd
To prioritize gateway-assisted trusted network detection over trusted hostname-based network detection when both networks are configured, issue the following CLI command:
C:\VSA> VersaSecureAccessClientConsole.exe client --prefer_gateway_assisted_tnd true
For example:
C:\VSA> VersaSecureAccessClientConsole.exe client --prefer_gateway_assisted_tnd true
706 [1] INFO Versa Secure Access (null) - Starting application in console mode. Version 7.8.7_ce167b8e
751 [1] INFO Versa Secure Access (null) - Use gateway assisted trusted network detection: True
1212 [1] INFO Versa Secure Access (null) - Successfully set gateway assisted trusted network detection method as preferred!
To disable this prioritization, issue the following CLI command:
C:\VSA> VersaSecureAccessClientConsole.exe client --prefer_gateway_assisted_tnd false
--enable_tls_tunnel and --enable_dtls_tunnel
By default, TLS and DTLS tunnels are disabled. When you enable TLS Tunnel or DTLS tunnel, the client tries to establish a tunnel based on the tunnel type order it receives from the portal. If the first attempt fails, the client tries to connect to the next tunnel type in the configuration order. If you have administrator privileges, you can enable or disable these tunnels using the CLI:
To enable TLS tunnel, issue the following CLI command:
C:\VSA> VersaSecureAccessClientConsole.exe client --enable_tls_tunnel true
To disable TLS tunnel, issue the following CLI command:
C:\VSA> VersaSecureAccessClientConsole.exe client --enable_tls_tunnel true
To enable DTLS tunnel, issue the following CLI command:
C:\VSA> VersaSecureAccessClientConsole.exe client --enable_dtls_tunnel true
To disable DTLS tunnel, issue the following CLI command:
C:\VSA> VersaSecureAccessClientConsole.exe client --enable_dtls_tunnel true
--appearance
To change display options using the CLI, issue the following command (default, dark, light are the display options):
C:\VSA> VersaSecureAccessClientConsole.exe client --appearance default/light/dark
For example:
C:\Program Files (x86)\Versa Secure Access>VersaSecureAccessClientConsole.exe client --appearance light
1699 [1] INFO Versa Secure Access (null) - Starting application in console mode. Version 7.9.1_45ee8d413
2264 [1] INFO Versa Secure Access (null) - Setting preffered Theme : light
3428 [1] INFO Versa Secure Access (null) - Successfully configured the Theme: light
3428 [1] INFO Versa Secure Access (null) - Theme is reset successfully!
--reset_ssl_stats
To reset SSL VPN connection statistics of an enterprise, issue the following CLI command. Note that to issue this command, you must have administrator privileges and you must be at the administrator command prompt:
C:\VSA> VersaSecureAccessClientConsole.exe client --reset_ssl_stats
--add_user_cert_issuer
To add a new certificate issuer name, issue the following CLI command:
C:\VSA> VersaSecureAccessClientConsole.exe client --add_user_cert_issuer
To enable accepting multiple certificate issuers to retrieve usernames from a Smart Card certificate, see --fetch_username_from_certificate.
--remove_user_cert_issuer
To remove a new certificate issuer name, issue the following CLI command:
C:\VSA> VersaSecureAccessClientConsole.exe client --remove_user_cert_issuer
--clear_auth_cookie_on_user_disconnect
Clear authentication token when user manually disconnects tunnel or if it disconnects when the auto-disconnect interval expires:
To enable issue the following CLI command:
C:\VSA> VersaSecureAccessClientConsole.exe client --clear_auth_cookie_on_user_disconnect true
To disable, issue the following CLI command:
C:\VSA> VersaSecureAccessClientConsole.exe client --clear_auth_cookie_on_user_disconnect false
--user_session_idle_timeout
Clear authentication token when user attempts to connect after a session times out on exceeding the idle timeout interval. To enable, issue the following CLI command:
C:\VSA> VersaSecureAccessClientConsole.exe client --user_session_idle_timeout interval in seconds
To disable user session idle timeout, set interval to 0.
--clear_auth_cookie_on_service_restart
Clear authentication token when Versa service restarts (for example, system restart):
To enable, issue the following CLI command:
C:\VSA> VersaSecureAccessClientConsole.exe client --clear_auth_cookie_on_service_restart true
To disable, issue the following CLI command:
C:\VSA> VersaSecureAccessClientConsole.exe client --clear_auth_cookie_on_service_restart false
--use_system_browser
Allows you to use the system default browser for SAML authentication instead of the in-app browser. When you enable this, the client displays the system default browser to follow HTTP redirection to the IDP login URL:
To enable, issue the following CLI command:
C:\VSA> VersaSecureAccessClientConsole.exe client --use_system_browser true
To disable, issue the following CLI command:
C:\VSA> VersaSecureAccessClientConsole.exe client --use_system_browser false
--enable_eip_debug
Enable to collect extensive EIP debug logs:
To enable, issue the following CLI command:
C:\VSA> VersaSecureAccessClientConsole.exe client --enable_eip_debug true
To disable, issue the following CLI command:
C:\VSA> VersaSecureAccessClientConsole.exe client --enable_eip_debug false
--heartbeat_timeout_interval
To set the heartbeat timeout interval for SSL VPN connection in minutes, issue the following CLI command:
C:\VSA> VersaSecureAccessClientConsole.exe client --heartbeat_timeout_interval interval in minutes
--device_id
To pre-configure the default device ID for a device, issue the following CLI command:
C:\VSA> VersaSecureAccessClientConsole.exe client --device_id device-ID
--allow_user_to_select_cert
When set to True, user is prompted to choose a certificate for device authentication, if there are more than one matching certificates. If set to False, client automatically picks the first matching certificate without prompting the user. Set to False by default:
To enable, issue the following CLI command:
C:\VSA> VersaSecureAccessClientConsole.exe client --allow_user_to_select_cert true
To disable, issue the following CLI command:
C:\VSA> VersaSecureAccessClientConsole.exe client --allow_user_to_select_cert false
--select_cert_with_eku_id
To enable certificate authentication using extended key usage (EKU) match to improve smart logon validation, issue the following CLI command:
C:\VSA> VersaSecureAccessClientConsole.exe client --select_cert_with_eku_id [ 1 | 2 | 3 ]
Option 1 supports Client Authentication (default), option 2 supports Smart Card Logon, and option 3 support custom EKU.
--fetch_username_from_certificate
To fetch username from personal certificate store, issue the following CLI command:
C:\VSA> VersaSecureAccessClientConsole.exe client --fetch_username_from_certificate true|false --cert_issuer
certificate issuer name --username_field  CN | SAN --san_match_regex regex
--disable_software_update
To disable software updates in the client UI, issue the following CLI command:
C:\VSA> VersaSecureAccessClientConsole.exe client --disable_software_update true
--enable_tamper_protection_override_key
To enable tamper protection using override key (as well as OTP), issue the following CLI command:
C:\VSA> VersaSecureAccessClientConsole.exe client --enable_tamper_protection_override_key true
To disable this feature, issue the following CLI command:
C:\VSA> VersaSecureAccessClientConsole.exe client --enable_tamper_protection_override_key false
--silent_install
Automatic update supports silent client installation. In silent mode, the package installer GUI is not displayed to the user. The installation takes place in the background and the application relaunches after a successful installation.
To enable, issue the following CLI command:
C:\VSA> VersaSecureAccessClientConsole.exe client --silent_install true
To disable, issue the following CLI command:
C:\VSA> VersaSecureAccessClientConsole.exe client --silent_install false
--sync_account
To synchronize enterprise accounts, issue the following CLI command. Note that this command requires an administrator login.:
C:\VSA> VersaSecureAccessClientConsole.exe client --sync_account <enterprise-name>
Display and Execute Monitor Options
To view the monitor options, issue the following CLI command:
C:\Program Files (x86)\Versa Secure Access> VersaSecureAccessClientConsole.exe monitor --help
For example:
C:\Program Files (x86)\Versa Secure Access> VersaSecureAccessClientConsole.exe monitor --help
VersaSecureAccessClientConsole 7.8.0.0

  --tunnel_monitor                   [Deprecated] (true|false). Enable/Disable tunnel monitoring
  --tunnel_monitor_interval          [Deprecated] Tunnel monitor interval in seconds. (Range 10-600)
  --tunnel_monitor_retry_interval    [Deprecated] Interval between each retry for tunnel monitoring in seconds. (Range 1-5)
  --tunnel_monitor_retry_count       [Deprecated] Number of retry attempts before concluding the tunnel is down. (Range 1-5)
  --help                             Display this help screen.
  --version                          Display version information.
--tunnel_monitor
To enable tunnel monitoring, issue the following CLI command:
C:\VSA> VersaSecureAccessClientConsole.exe monitor --tunnel_monitor true
For example:
C:\VSA> VersaSecureAccessClientConsole.exe monitor --tunnel_monitor true
296 [1] INFO Versa Secure Access (null) - Starting application in console mode. Version 7.5.9_6f38b04e
343 [1] INFO Versa Secure Access (null) - Configure DNS monitoring.
511 [1] INFO Versa Secure Access (null) - Success!
To disable tunnel monitoring, issue the following CLI command:
C:\VSA> VersaSecureAccessClientConsole.exe monitor --tunnel_monitor false
For example:
C:\VSA> VersaSecureAccessClientConsole.exe monitor --tunnel_monitor false
294 [1] INFO Versa Secure Access (null) - Starting application in console mode. Version 7.5.9_6f38b04e
334 [1] INFO Versa Secure Access (null) - Configure DNS monitoring.
495 [1] INFO Versa Secure Access (null) - Success!
--tunnel_monitor_interval
To configure the tunnel monitoring interval, in seconds, issue the following CLI command. The range is 10 through 600 seconds.
C:\VSA> VersaSecureAccessClientConsole.exe monitor --tunnel_monitor_interval seconds
For example:
C:\VSA> VersaSecureAccessClientConsole.exe monitor --tunnel_monitor_interval 30
623 [1] INFO Versa Secure Access (null) - Starting application in console mode. Version 7.5.9_6f38b04e
930 [1] INFO Versa Secure Access (null) - Configure tunnel monitoring interval
1525 [1] INFO Versa Secure Access (null) - Success!
--tunnel_monitor_retry_interval
Use this option to configure the interval, in seconds, between each try before concluding the tunnel is down. The range is 1 through 5 seconds.
To configure the tunnel monitor retry interval, issue the following CLI command:
C:\VSA> VersaSecureAccessClientConsole.exe monitor --tunnel_monitor_retry_interval seconds
For example:
C:\VSA> VersaSecureAccessClientConsole.exe monitor --tunnel_monitor_retry_interval 4
321 [1] INFO Versa Secure Access (null) - Starting application in console mode. Version 7.5.9_6f38b04e
368 [1] INFO Versa Secure Access (null) - Configure DNS monitor retry interval.
716 [1] INFO Versa Secure Access (null) - Success!
--tunnel_monitor_retry_count
To configure the maximum number of retry attempts before concluding the tunnel is down, issue the following CLI command. The range is 1 through 5.
C:\VSA> VersaSecureAccessClientConsole.exe monitor --tunnel_monitor_retry_count retries
For example:
C:\VSA> VersaSecureAccessClientConsole.exe monitor --tunnel_monitor_retry_interval 4
321 [1] INFO Versa Secure Access (null) - Starting application in console mode. Version 7.5.9_6f38b04e
368 [1] INFO Versa Secure Access (null) - Configure DNS monitor retry interval.
716 [1] INFO Versa Secure Access (null) - Success!
Display and Execute Service Options
To view the service options, issue the following CLI command:
C:\Program Files (x86)\Versa Secure Access> VersaSecureAccessClientConsole.exe service --help
For example:
C:\Program Files (x86)\Versa Secure Access>VersaSecureAccessClientConsole.exe service --help
VersaSecureAccessClientConsole 7.8.7.0

VersaSecureAccessClientConsole 7.9.1.0

  --enable_apptunnel                                    (true|false). Enable/Disable App tunnel driver
  --fail_open_mode                                      [Deprecated] Set driver to fail open mode
  --fail_close_mode                                     [Deprecated] Set driver to fail close mode
  --restricted_access_fallback_duration                 [Deprecated] Duration in seconds for which Restricted Access
                                                        will be relaxed, when user disables Restricted Access.
                                                        Restricted Access would be enabled back after the duration
                                                        completes (Range: 5 - 600)
  --allow_domains                                       Allow domains/FQDNs in fail close mode. ex for domain:
                                                        .versa-networks.com, OR ".versa-networks.com .office365.com" ex
                                                        for FQDN: test.versa-networks.com, OR "test.versa-networks.com
                                                        test.office365.com"
  --reset_domains                                       Remove domains/FQDNs that were allowed in fail close mode. ex
                                                        for domain: .versa-networks.com, OR ".versa-networks.com
                                                        .office365.com" ex for FQDN: test.versa-networks.com, OR
                                                        "test.versa-networks.com test.office365.com"
  --allow_ips                                           Allow IP(s) in fail close mode, ex: 10.0.0.1, OR "10.0.0.1
                                                        10.0.0.2"
  --reset_ips                                           Remove IP(s) that was allowed in fail close mode. ex: 10.0.0.1,
                                                        OR "10.0.0.1 10.0.0.2"
  --strict_full_tunnel                                  (true|false) When connected to gateway in full tunnel mode, the
                                                        traffic may go through underlay if there are any routes through
                                                        underlay interface. By setting the the option to true, routes
                                                        through underlay will not be effective; the traffic will be sent
                                                        through underlay only if they match any of excluded domain,
                                                        excluded application, excluded subnets or trusted subnets. When
                                                        the option is set to false: The routes will influence traffic
                                                        through underlay or any other interface
  --trusted_subnets                                     Trusted subnets to be excluded in case of full-tunnel and semi
                                                        trusted modeEx: 192.168.1.0/24 OR "192.168.1.0/24
                                                        192.168.2.0/24"
  --reset_trusted_subnets                               Reset the trusted subnets which are excluded in case of
                                                        full-tunnel and semi trusted modeEx: 192.168.1.0/24 OR
                                                        "192.168.1.0/24 192.168.2.0/24"
  --clean_dns_nrpt_rule                                 Clean all stale DNS NRPT rules
  --exclude_subnets                                     Add one or more subnets to be excluded in case of full-tunnelEx:
                                                        192.168.1.0/24 OR "192.168.1.0/24 192.168.2.0/24"
  --reset_exclude_subnets                               Remove one or more subnets which are excluded in case of
                                                        full-tunnelEx: 192.168.1.0/24 OR "192.168.1.0/24 192.168.2.0/24"
  --apptunnel_bypass_application                        Command to add application(s) to Versa Client bypass list.The
                                                        traffic originated by these bypassed applications won't be
                                                        processed by Versa client.Use this command to Ex: "red.exe" OR
                                                        "blue.exe|black.exe|only white.exe"
  --apptunnel_bypass_application_reset                  Command to clear the list of applications that were bypassed
                                                        from Versa Client
  --apptunnel_list_bypassed_applications                Command to show the list of applications that were bypassed from
                                                        Versa Client
  --block_icmp_on_fail_close                            (true|false) Block ICMP Traffic in Fail-Close Mode

  --Allow_Excluded_Application_traffic_on_fail_close    (true|false) Allow Excluded Application Traffic in Fail-Close
                                                        Mode
  --exclude_service                                     Allows TCP/UDP traffic to be excluded for the specified Port and
                                                        IP when in full-tunnel.
                                                        Ex: Exclude based on Service and Ports: "TCP::1002" or
                                                        "TCP::1002:1003:1004"
                                                         Exclude based on Service with Ports and IP:
                                                         "TCP::1002|10.0.0.1, 10.0.0.2"
                                                         Exclude based on Service with Ports and IP Prefix:
                                                         "TCP::1002|10.0.0.1/24" or "TCP::1002|10.0.0.1/24,10.0.0.2/24"
                                                         or
                                                         "TCP::1002|10.0.0.1/24,10.0.0.2/24:1003|10.0.0.3/24,10.0.0.4/24
                                                         "
  --reset_exclude_service                               Removes TCP/UDP traffic exclusions which were added using
                                                        exclude_service command.
                                                        Ex: Remove exclusion based on Service and Ports: "TCP::1002" or
                                                        "TCP::1002:1003:1004"
                                                        Remove exclusion based on Service with Ports and IP:
                                                        "TCP::1002|10.0.0.1, 10.0.0.2"
                                                        Remove exclusion based on Service Ports and IP Prefix:
                                                        "TCP::1002|10.0.0.1/24" or "TCP::1002|10.0.0.1/24,10.0.0.2/24"
                                                        or
                                                        "TCP::1002|10.0.0.1/24,10.0.0.2/24:1003|10.0.0.3/24,10.0.0.4/24"
  --set_data_exfiltration_warning                       Data exfiltration warning to be displayed to the end user
  --help                                                Display this help screen.
  --version                                             Display version information.
--enable_apptunnel
Use this option to enable the application tunnel driver to enable application and domain-based traffic steering and fail-mode services. Note that to issue these commands, you must have administrator privileges and you must be at the administrator command prompt.
To enable the application tunnel driver for SASE client, issue the following CLI command:
C:\VSA> VersaSecureAccessClientConsole.exe monitor service --enable_apptunnel true
For example:
C:\VSA> VersaSecureAccessClientConsole.exe service --enable_apptunnel true
309 [1] INFO Versa Secure Access (null) - Starting application in console mode. Version 7.5.9_6f38b04e
350 [1] INFO Versa Secure Access (null) - Enable App Tunnel Driver
859 [1] INFO Versa Secure Access (null) - Success!
To disable the application tunnel driver for SASE client, issue the following CLI command:
C:\VSA> VersaSecureAccessClientConsole.exe monitor service --enable_apptunnel false
For example:
C:\VSA> VersaSecureAccessClientConsole.exe service --enable_apptunnel false
277 [1] INFO Versa Secure Access (null) - Starting application in console mode. Version 7.5.9_6f38b04e
315 [1] INFO Versa Secure Access (null) - Disable App Tunnel Driver
--fail_open_mode
To set the application tunnel driver to FAIL_OPEN mode for the client to allow all outgoing traffic when the client is not connected to a gateway, issue the following CLI command:
C:\VSA> VersaSecureAccessClientConsole.exe service --fail_open_mode
For example:
C:\VSA> VersaSecureAccessClientConsole.exe service --fail_open_mode
356 [1] INFO Versa Secure Access (null) - Starting application in console mode. Version 7.5.9_6f38b04e
412 [1] INFO Versa Secure Access (null) - Setting apptunnel driver mode to FAIL_OPEN
803 [1] INFO Versa Secure Access (null) - Success!
--fail_close_mode
To set the application tunnel driver to FAIL_CLOSE mode for the client to block all outgoing traffic (except ICMP, allowed domains, and IP addresses) when the client is not connected to a gateway, issue the following CLI command:
C:\VSA> VersaSecureAccessClientConsole.exe service --fail_close_mode
For example:
C:\VSA> VersaSecureAccessClientConsole.exe service --fail_close_mode
279 [1] INFO Versa Secure Access (null) - Starting application in console mode. Version 7.5.9_6f38b04e
316 [1] INFO Versa Secure Access (null) - Setting Apptunnel driver mode to FAIL_CLOSE
450 [1] INFO Versa Secure Access (null) - Success!
--restricted_access_fallback_duration
Use this option to configure the duration, in seconds, after which restricted access is enabled again. The range is 5 through 500 seconds. When a user enables restricted access, it is disabled for the specified amount of time and then re-enabled. Note that to issue this command, you must have administrator privileges and you must be at the administrator command prompt.
To configure the restricted access fallback duration, issue the following CLI command:
C:\VSA> VersaSecureAccessClientConsole.exe service --restricted_access_fallback_duration seconds
For example:
C:\VSA> VersaSecureAccessClientConsole.exe service --restricted_access_fallback_duration 120
278 [1] INFO Versa Secure Access (null) - Starting application in console mode. Version 7.5.9_6f38b04e
454 [1] INFO Versa Secure Access (null) - Success!
--allow_domains
Use this option to enable domain traffic in FAIL_CLOSE mode. You can specify the domains to be allowed if the tunnel is not connected and FAIL_CLOSE mode is enabled. Note that to issue the commands to enable or disable domains in FAIL_CLOSE mode, you must have administrator privileges and you must be at the administrator command prompt.
To allow domains in FAIL_CLOSE mode, issue the following CLI command:
C:\VSA> VersaSecureAccessClientConsole.exe service --allow_domains domain-name
For example:
C:\VSA> VersaSecureAccessClientConsole.exe service --allow_domains money.com
282 [1] INFO Versa Secure Access (null) - Starting application in console mode. Version 7.5.9_6f38b04e
321 [1] INFO Versa Secure Access (null) - Registering domain money.com to whitelist
536 [1] INFO Versa Secure Access (null) - Restarting Services...
615 [1] INFO Versa Secure Access (null) - Success!
--reset_domains
To disable or remove domains that were allowed in FAIL_CLOSE mode, issue the following CLI command:
C:\VSA> VersaSecureAccessClientConsole.exe service --reset_domains domain-name
For example:
C:\VSA> VersaSecureAccessClientConsole.exe" service --reset_domains money.com
278 [1] INFO Versa Secure Access (null) - Starting application in console mode. Version 7.5.9_6f38b04e
315 [1] INFO Versa Secure Access (null) - Unregistering domain money.com from whitelist
484 [1] INFO Versa Secure Access (null) - Restarting Services...
538 [1] INFO Versa Secure Access (null) - Success!
--allow_ips
Use this option to enable or allow IP addresses in FAIL_CLOSE mode. Note that to issue the commands to enable or disable IP addresses in fail close mode, you must have administrator privileges and you must be at the administrator command prompt.
To allow IP addresses in FAIL_CLOSE mode, issue the following CLI command:
C:\VSA> VersaSecureAccessClientConsole.exe service --allow_ips ip-address
For example:
C:\VSA> VersaSecureAccessClientConsole.exe service --allow_ips 10.10.10.10
279 [1] INFO Versa Secure Access (null) - Starting application in console mode. Version 7.5.9_6f38b04e
317 [1] INFO Versa Secure Access (null) - Registering IP 10.10.10.10 to whitelist
514 [1] INFO Versa Secure Access (null) - Restarting Services...
567 [1] INFO Versa Secure Access (null) - Success!
--reset_ips
To disable or remove IP addresses that were allowed in FAIL_CLOSE mode, issue the following CLI command:
C:\VSA> VersaSecureAccessClientConsole.exe service --reset_ips ip-address
For example:
C:\VSA> VersaSecureAccessClientConsole.exe" service --reset_ips 10.10.10.10
281 [1] INFO Versa Secure Access (null) - Starting application in console mode. Version 7.5.9_6f38b04e
318 [1] INFO Versa Secure Access (null) - Unregistering IP 10.10.10.10 from whitelist
533 [1] INFO Versa Secure Access (null) - Restarting Services...
588 [1] INFO Versa Secure Access (null) - Success!
--strict_full_tunnel
Configure strict full tunnel (administrator mode). When the client connects to a gateway in full tunnel mode, the traffic may go through underlay if there are routes through underlay interface. If you enable strict full tunnel, routes through underlay are not effective, and traffic is sent through underlay only if they match any of excluded domain, excluded application, excluded subnets, or trusted subnets. When you disable strict full tunnel, routes influence traffic through underlay or any other interface.
To enable strict full tunnel, issue the following CLI command:
C:\VSA> VersaSecureAccessClientConsole.exe service --strict_full_tunnel true
For example:
C:\VSA>VersaSecureAccessClientConsole.exe service --strict_full_tunnel true
591 [1] INFO Versa Secure Access (null) - Starting application in console mode. Version 7.8.0_aa6f120a
630 [1] INFO Versa Secure Access (null) - Set strict full tunnel: True
907 [1] INFO Versa Secure Access (null) - Success!
To disable strict full tunnel, issue the following CLI command:
C:\VSA> VersaSecureAccessClientConsole.exe service --strict_full_tunnel false
For example:
C:\VSA>VersaSecureAccessClientConsole.exe service --strict_full_tunnel false
571 [1] INFO Versa Secure Access (null) - Starting application in console mode. Version 7.8.0_aa6f120a
609 [1] INFO Versa Secure Access (null) - Set strict full tunnel: False
852 [1] INFO Versa Secure Access (null) - Success!
--trusted_subnets
You can configure trusted subnets that bypass the tunnel. In semitrusted mode, the SASE client establishes a tunnel to the SASE gateway even when a trusted host is reachable without the tunnel. You can use semitrusted mode in deployments in which the site or branch CPE does not have a secure tunnel connection to the SASE gateway. The client establishes a tunnel to the gateway for all traffic expect for traffic to trusted subnets.
To configure trusted subnets, issue the following CLI command:
C:\VSA> VersaSecureAccessClientConsole.exe service --trusted_subnets subnet
For example:
C:\VSA>VersaSecureAccessClientConsole.exe service --trusted_subnets 192.168.1.0/24
576 [1] INFO Versa Secure Access (null) - Starting application in console mode. Version 7.8.7_ce167b8e
618 [1] INFO Versa Secure Access (null) - Registering trusted subnets 192.168.1.0/24
891 [1] INFO Versa Secure Access (null) - Success!
To configure multiple trusted subnets, enclose the subnets in quotation marks; for example, "192.168.1.0/24 192.168.2.0/24".
--reset_trusted_subnets
To reset trusted subnets, issue the following CLI command:
C:\VSA> VersaSecureAccessClientConsole.exe service --reset_trusted_subnets subnet
For example:
C:\VSA> VersaSecureAccessClientConsole.exe service --reset_trusted_subnets 192.168.1.0/24
532 [1] INFO Versa Secure Access (null) - Starting application in console mode. Version 7.8.2_6ab2577f
569 [1] INFO Versa Secure Access (null) - Unregistering trusted subnets 192.168.1.0/24
817 [1] INFO Versa Secure Access (null) - Success!
--clean_dns_nrpt_rule
To clear all stale DNS name resolution policy table (NRPT) rules, issue the following CLI command:
C:\VSA>VersaSecureAccessClientConsole.exe service --clean_dns_nrpt_rule
For example:
C:\VSA> VersaSecureAccessClientConsole.exe service --clean_dns_nrpt_rule
652 [1] INFO Versa Secure Access (null) - Starting application in console mode. Version 7.8.0_aa6f120a
695 [1] INFO Versa Secure Access (null) - Clear DNS NRPT Rules
1513 [1] INFO Versa Secure Access (null) - Success!
--exclude_subnets
Use this option to exclude one or more subnets from a full tunnel. When you configure a full tunnel, all traffic redirects through the tunnel interface. When you exclude a subnet from a full tunnel, the subnet's traffic goes through the default underlay instead of over the tunnel.
To exclude subnets, issue the following CLI command:
C:\VSA> VersaSecureAccessClientConsole.exe service --exclude_subnets subnets
For example:
C:\VSA> VersaSecureAccessClientConsole.exe service --exclude_subnets 192.168.2.0/24
581 [1] INFO Versa Secure Access (null) - Starting application in console mode. Version 7.8.0_aa6f120a
620 [1] INFO Versa Secure Access (null) - Excluding subnets 192.168.2.0/24
984 [1] INFO Versa Secure Access (null) - Success!
--reset_exclude_subnets
To remove one or more subnets that have been excluded from a full tunnel, issue the following CLI command:
C:\VSA> VersaSecureAccessClientConsole.exe service --reset_exclude_subnets subnets
For example:
C:\VSA> VersaSecureAccessClientConsole.exe service --reset_exclude_subnets 192.168.2.0/24
546 [1] INFO Versa Secure Access (null) - Starting application in console mode. Version 7.8.2_6ab2577f
583 [1] INFO Versa Secure Access (null) - Reset excluded subnets 192.168.2.0/24
830 [1] INFO Versa Secure Access (null) - Success!
--apptunnel_bypass_application
Use this option to add applications to the bypass list of the SASE client so that the client does not process traffic that originates from the bypassed applications. For example, you can use red.exe, blue.exe, or black.exe to bypass these applications. Issuing this command requires admin login.
To add applications to the bypass list, issue the following CLI command:
C:\VSA> VersaSecureAccessClientConsole.exe service --apptunnel_bypass_application application-name
For example:
C:\VSA> VersaSecureAccessClientConsole.exe service --apptunnel_bypass_application black.exe
709 [1] INFO Versa Secure Access (null) - Starting application in console mode. Version 7.8.7_ce167b8e
929 [1] DEBUG Versa Secure Access (null) - executable name: black.exe
1676 [1] INFO Versa Secure Access (null) - Success!
--apptunnel_bypass_application_reset
To clear or reset the bypass list of applications, issue the following CLI command:
C:\VSA> VersaSecureAccessClientConsole.exe service --apptunnel_bypass_application_reset
--apptunnel_list_bypassed_applications
To display applications that the client bypasses, issue the following CLI command. This command requires an administrator login.
C:\VSA> VersaSecureAccessClientConsole.exe service --apptunnel_list_bypassed_applications
For example:
C:\VSA> VersaSecureAccessClientConsole.exe service --apptunnel_list_bypassed_applications
613 [1] INFO Versa Secure Access (null) - Starting application in console mode. Version 7.8.7_ce167b8e
677 [1] INFO Versa Secure Access (null) - ByPass Application List
ByPass application: black.exe
ByPass application: red.exe
ByPass application: blue.exe
743 [1] INFO Versa Secure Access (null) - Success!
--block_icmp_on_fail_close
To allow ICMP traffic in FAIL_CLOSE mode, issue the following CLI command. This command requires an administrator login.
C:\VSA> VersaSecureAccessClientConsole.exe service --block_icmp_on_fail_close true
For example:
C:\VSA> VersaSecureAccessClientConsole.exe service --block_icmp_on_fail_close true
605 [1] INFO Versa Secure Access (null) - Starting application in console mode. Version 7.8.7_ce167b8e
656 [1] INFO Versa Secure Access (null) - Set Block ICMP in Fail Close Mode: True
1044 [1] INFO Versa Secure Access (null) - Success!
To disable ICMP traffic in FAIL_CLOSE mode, issue the following CLI command:
C:\VSA> VersaSecureAccessClientConsole.exe service --block_icmp_on_fail_close false
--Allow_Excluded_Application_traffic_on_fail_close
To allow DNS traffic for excluded applications in FAIL-CLOSE mode, issue the following CLI command. This command requires an administrator login.
C:\VSA> VersaSecureAccessClientConsole.exe service --Allow_Excluded_Application_traffic_on_fail_close true
For example:
C:\VSA> VersaSecureAccessClientConsole.exe service --Allow_Excluded_Application_traffic_on_fail_close true
624 [1] INFO Versa Secure Access (null) - Starting application in console mode. Version 7.8.7_ce167b8e
673 [1] INFO Versa Secure Access (null) - Set Allow Excluded Application Traffic in Fail Close Mode: True
994 [1] INFO Versa Secure Access (null) - Success!
To disable DNS traffic for excluded applications in FAIL_CLOSE mode, issue the following CLI command:
C:\VSA> VersaSecureAccessClientConsole.exe service --Allow_Excluded_Application_traffic_on_fail_close false
--exclude_service
To exclude TCP/UDP traffic based on service, port number, and IP address when in full-tunnel mode, issue the following CLI command:
C:\VSA> Versa Secure Access>VersaSecureAccessClientConsole.exe service --exclude_service service-name
For example:
C:\VSA> VersaSecureAccessClientConsole.exe service --exclude_service TCP::1002
624 [1] INFO Versa Secure Access (null) - Starting application in console mode. Version 7.8.7_ce167b8e
1843 [1] INFO Versa Secure Access (null) - Exclude services is set: True
--reset_exclude_service
To remove or reset traffic exclusions, issue the following CLI command:
C:\VSA> Versa Secure Access>VersaSecureAccessClientConsole.exe service --reset_exclude_service service-name
For example:
C:\VSA> Versa Secure Access>VersaSecureAccessClientConsole.exe service --reset_exclude_service TCP::1002
Supported Software Information
VOS Releases 20.2.2 and later support all content described in this article, except:
- For Releases 21.2.1 and later, if TOTP authentication is required, a screen with a QR code displays; add support for Windows and MacOS clients.
SASE Client Releases 7.2.0 and later support all content described in this article.
Additional Information
Configure Digital Experience Monitoring
Configure Endpoint Information Profiles
Configure Pre-Logon for the Versa Secure Access Client
Configure User and Group Policy
Configure the Versa SASE Client To Select the Best Gateway
Configure the Versa Secure Access Service
Configure Versa SASE Clients
Enable SAML Authentication
Troubleshoot the SASE Client