Configure SASE Secure Client-Based Access Rules
![]() For supported software information, click here.
For supported software information, click here.
You use secure client-based access rules and profiles to manage Versa Secure Private Access (VSPA) client applications running on personal computers and mobile phones. You configure secure client-based access rules and apply them to secure access clients.
You can also configure policy rules for secure clientless access. See Configure SASE Secure Clientless Access Policy Rules for more information.
Note: For information about configuring secure client access profiles in Release 12.1.1 and earlier, see Configure SASE Secure Client Access Profiles in Release 12.1.1.
Note: You must configure the following SASE rules, profiles, and settings in the following order:
- Configure users and user groups first, and then publish them to the gateway. For more information, see Configure SASE User and Device Authentication and Publish a SASE Gateway.
- Configure site-to site tunnels. For more information, see Configure SASE Site-to-Site Tunnels.
- Configure secure client-based access profiles. For more information, see Configure SASE Secure Client-Based Access Profiles.
- Configure secure client-based access rules, as described in this article.
You do not need to configure the remaining SASE rules, profiles, and settings in any particular order.
Configure Client-Based Access Rules
To configure secure client-based access rules:
- Go to Configure > Secure Services Edge > Secure Access > Client-based Access > Policy Rules.
Note: In Releases 12.1.1 and earlier, the Secure Access folder was called Secure Client Access and Policy Rules was located directly under Secure Client Access (Configure > Security Service Edge > Secure Client Access > Policy Rules). In addition, you configured both client-based and clientless access from Secure Client Access > Policy Rules screens.

If you have not yet configured a client-based access policy rule, the following screen displays:

For information about configuring authentication profiles, see Configure User and Device Authentication. For information about configuring a secure client profile, see Configure SASE Secure Client-Based Access Profiles.
If you have already configured one or more client-based access policy rules, the Client-based Access Rules screen displays all configured secure client-based access rules.

- In the horizontal menu bar, you can perform the following operations.

Operation Description Add Create a new internet protection rule. This button is active when no existing rule is selected. Clone Clone the selected internet protection rule. When you select this option, the configuration wizard for the rule displays with the Review & Deploy screen selected. You can rename the default name of the cloned rule, if desired, then click Save.
Reorder Reorder the selected internet protection rule. A popup window similar to the following displays.
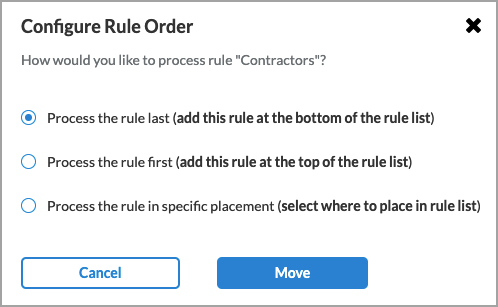
1. Select one of the three options:
- Process the rule last
- Process the rule first
- Process the rule in specific placement—A list of the existing rules displays. Click the position in the list where you want to place the rule.
2. Click Move.
Delete Delete the selected internet protection rule. A popup window similar to the following displays:

Click Yes to delete the internet protection rule, or click No to retain the rule.
Refresh Refresh the list of existing rules. - To customize which columns display, click Select Columns and then select or deselect the columns you want to display. Click Reset to return to the default columns settings.
The options are:- Operating System Versions
- Users & Groups
- EIP
- Device Compliance Status
- Source Geo Locations
- Source IP Address
- Traffic Action
- VPN & Gateway Groups
- Client-based Access Profile
- MFA Status
- VPN
- Client Controls
- EIP Agent
- Status
- Pre-Logon Configuration
Note: The Pre-Logon Configuration column only appears if you have enabled pre-logon in the tenant configuration. See Configure Pre-Logon for the Versa SASE Client and Configure SASE Tenants for more information.
- Click the
 Add icon to configure the policy rule.
 - The Create Client-based Access Rule screen displays. There are nine steps to configure for each client-based secure client-based access rule.

- Match Criteria:
- Operating System—Select the operating system to use with the rule.
- Users/User Groups—Define the users and user groups to which the secure client-based access rules apply.
- Endpoint Posture—Customize the Endpoint Information Profile (EIP), device compliance status, and the device/endpoint risk score.
- Source Geo Location and Source IP Address—Define which geographic locations and IP addresses can access the network.
- Actions:
- Traffic Action—Select which traffic to send to the Versa Cloud Gateway or directly to the internet, and which traffic to block and not sent to the Versa Cloud Gateway.
- Gateways—Select which gateway groups VSPA clients can use.
- Client Configuration—Configure multifactor authentication (MFA) and other client parameters.
- Agent Profile from EIP—Define the conditions that the SASE client uses to filter information from endpoint devices.
- Review & Configure—Review the new rule configuration, edit it if needed, and save the new rule.
See the sections below to configure secure client-based access rules.
Configure Operating Systems for a Secure Client-Based Access Rule
When you configure a secure client-based access rule, you can choose an operating system from one of the following categories: Android, Apple, Linux, or Windows. For each operating system category, you choose one or more versions of the operating system. These include predefined operating systems and custom operating systems. For information on creating a custom operating system, see Configure SASE User-Defined Objects.
The list below shows the predefined operating systems. If you create a custom operating system, it appears in the list for its category in the UI.
- Android
- Android
- Apple
- MacOS
- Mac OS X Server
- OS X
- iOS
- iPadOS
- Linux
- Cent OS
- Fedora
- FreeBSD
- Gentoo
- Linix Mint
- Open SUSE
- Slackware Linux
- Ubuntu
- Windows
- Windows 7
- Windows 8
- Windows 8.1
- Windows 10
- Windows 10 Mobile
- Windows 11
- Windows Server 2012
- Windows Server 2012 R2
- Windows Server 2016
- Windows Server 2019
- Windows Server 2022
- Windows Vista
- Windows XP
You can choose only one operating system category: Android, Apple, Linux, or Windows. When you select an operating system category, all versions are selected by default. You can deselect versions but you must have at least one selection.
To configure an operating system for a secure client-based access rule:
- In the Create Secure Client Access Rule screen, select Step 1, Operating System. The following screen displays.
Note that the list of Windows operating systems includes examples of custom operating systems.
- Click the
 Circle icon in one of the operating system cards to choose an operating system. By default, all versions of the operating systems are selected. For example, if you click the Circle icon in the Windows box, the screen displays the following:

- To deselect one or more Windows versions, click the boxes next to those versions. You can also click the box next to All Windows Operating Systems to deselect all versions, then you can click one or more versions to use in the rule. You must select at least one version.
- Click Next to go to the Users/User Groups screen.
Configure SASE Users and User Groups for Secure Client-Based Access
By default, secure client-based access rules are applied to all users and user groups. You can customize the users and user groups to which the access rule is applied.
To customize the users and user groups to which you apply a secure client-based access rule:
- In the Create Secure Client Access Rule screen, select Users/User Groups. By default, security enforcement rules are applied to all users, user groups and user device groups.

- To select specific users and/or user groups, click Customize in the Users and Groups pane. The following screen displays, with the Known Users user type selected by default.

- Click Selected Users to specify which users to include in the match list.
- The Users & Groups screen displays.

- Select the User Groups tab, and then select the name of the group to which to apply the rule in the Enable Rule drop-down list. The list of user groups is shown in the main pane.
- To create a new user group based on LDAP authentication, select an LDAP group profile, and then click + Add New User Group. In the Add User Group window, enter a user group name and a distinguished name (DN) in the fields provided.
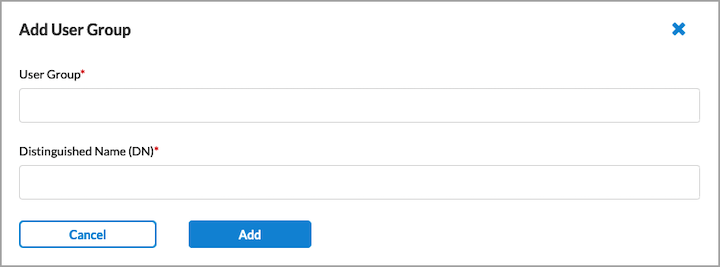
- Click Add.
- To select specific users, select the User Groups tab, and then select the names of the users in the Enable Rule drop-down list to which to apply the rule. The list of users is shown in the main pane. The following screen displays.

- To create a new user based on LDAP authentication, select an LDAP group profile, and then click
 Add New User. In the Add User window, enter a username and the user's work email in the fields provided.

- Click Add.
- Click Next to continue to the Device Risk Information screen.
Configure SASE Endpoint Posture Information for Secure Client-Based Access Rules
Endpoint posture allows you to select predefined and user-defined Endpoint Information Profiles (EIP) to include in the match criteria for secure client-based access rules. For information about configuring EIPs, see Configure Endpoint Information Profiles.
Endpoint posture also allows you to create additional match criteria by choosing a device compliance status to select devices that exhibit specific attributes that are used to determine the risk status of the device. You can also configure a device/endpoint risk score to attribute to the entities within the network’s policy rule. This score helps determine the credibility and the likelihood of activities being legitimate or malicious. These match criteria can then be used when creating policies and rules. For more information, see Configure Endpoint Detection and Response.
To configure endpoint posture information:
- In the Create Secure Client Access Rule screen, select Step 3, Endpoint Posture in the Create Secure Client Access Rule screen. In the Endpoint Posture screen, you can configure an Endpoint Information Profile (EIP), device compliance status options, and device/endpoint risk scores. If you are using third-party Unified Endpoint Management (UEM), formerly known as the Mobile Device Manager (MDM), use the device compliance status options to select one or more compliance statuses for a device.

Configure an EIP Profile
EIPs ensure that the endpoint devices that access the enterprise network maintain and adhere to enterprise security standards before they access enterprise network resources. EIPs collect information about the security status of the endpoint devices connecting to your networks. You then classify endpoints based on multiple types of endpoint posture information, defining rules to extract information from endpoint devices and then match the information to enforce security policy.
You can select existing user-defined or predefined EIPs, and you can also create new EIP profiles from this screen.
To configure an EIP profile:
- Click Customize in the Endpoint Information Profile (EIP) pane. The following screen displays.

- To customize which columns display, click Select Columns and then select or deselect the columns you want to display. Click Reset to return to the default columns settings.
- You can select a user-defined or predefined EIP profile.
- Under the User Defined tab, you can add an existing EIP profile or create a new EIP profile:
- To select an existing user-defined EIP:
- Click the User Defined tab.
- Click Add Existing EIP Profile.

- Select a profile, and then click Add. You can add multiple profiles.
- To create a new user-defined EIP profile:
- Click Create New EIP Profile under the User Defined tab in the Endpoint Information Profile (EIP) screen. The Create EIP Profile screen displays.

- To customize which columns display, click Select Columns and then select or deselect the columns you want to display. Click Reset to return to the default columns settings.

- Click the Add icon in the Rules tab to add a new rule.
- To customize which columns display, click Select Columns and then select or deselect the columns you want to display. Click Reset to return to the default columns settings.
The options are:- Category
- Objects
- User Defined Objects
- Predefined Objects
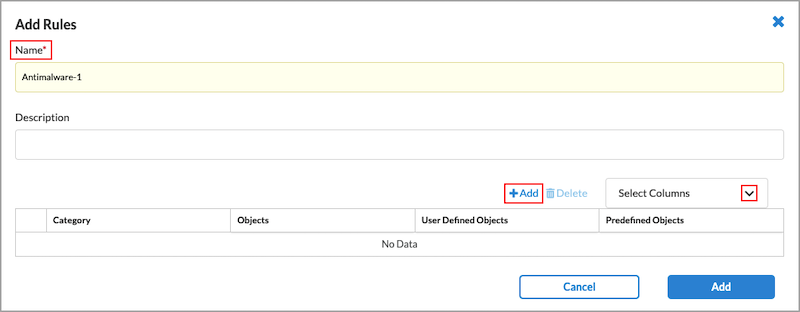
- Enter a name for the new rule in the Name field.
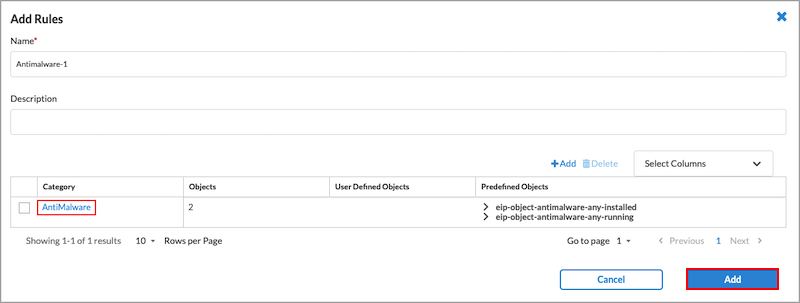
- Click the Add icon. In the Add EIP Object screen, enter information for the following fields.

Field Description Category Select an EIP object category. User Defined EIP Objects Select one or more user-defined EIP objects. Predefined EIP Objects Select one or more predefined EIP objects. - Click Add to add the new EIP object. The Add Rule screen displays.
- Click
- In the Add Rule screen, click Add in the lower right corner. The Create EIP Profile screen displays.
- In the Create EIP Profile screen, click Next to go to the Review & Submit screen.

- Review the configuration details.
- Click the
 Edit icon to make any need changes, then click Save to save the EIP profile. The Endpoint Information Profile (EIP) screen displays showing the new EIP profile.

- To select an existing user-defined EIP:
- Under the Predefined tab, you can add an existing EIP profile.

- To select an existing predefined EIP profile:
- Click the Predefined tab.
- Click Add Existing Profile. The Add Predefined EIP Profiles screen displays.

- Select a predefined EIP profile.
- Click the Add button. The Endpoint Information Profile (EIP) screen displays showing the selected predefined EIP profile.

- Under the User Defined tab, you can add an existing EIP profile or create a new EIP profile:
- Click the
 Back arrow to return to the Endpoint Posture screen.
Select the Compliance Status of a Device
By default, all device compliance statuses are selected.
To customize a device's compliance status:
- Go to the Endpoint Posture screen.
- In the Device Compliance Status box, click customize. The Device Compliance Status popup window displays with All Devices selected by default. You can customize the settings by selecting Managed Devices or Unmanaged Devices.

- If you are using Unified Endpoint Management (UEM), formerly known as the SASE Mobile Device Manager (MDM), click Managed Devices and select one or more of the compliance status boxes.

- Click the Back arrow to return to the Endpoint Posture screen.
Select the Device/Endpoint Risk Score
The device risk score helps determine the credibility and the likelihood of activities being legitimate or malicious. By default, all risk scores are selected. You can customize these settings to choose which level of risk to attribute to the entities within this network’s policy rule.
To customize the device/endpoint risk score:
- Go to the Endpoint Posture screen.

- In the Device/Endpoint Risk Score pane, click Customize. The Device/Endpoint Risk Score screen displays.

- Select one or more levels of risk to attribute to the entities within this network’s policy rule. This score helps determine the credibility and the likelihood of activities being legitimate or malicious. The options are:
- High Risk (80–100)
- Suspicious (60–80)
- Moderate Risk (40–60)
- Low Risk (20–40)
- Trustworthy (0–20)
- Click the Back arrow to return to the Endpoint Posture screen, or click Next to go to Step 4, Source Geographic Locations and Source IP Addresses.
Configure SASE Source Geographic Locations and Source IP Addresses for Secure Client-Based Access
By default, VSPA clients from all source geographic locations and all source IP addresses are allowed network access. You can also specify which VSPA client locations and source IP addresses are allowed access.
To customize VSPA client-based access based on source location and source IP address:
- In the Create Secure Client Access Rule screen, select Source Geo Location and Source IP Address. By default, all geographic locations are allowed access to the Versa secure client-based access.

- To allow access to the Versa secure client-based access from specific source locations, click Customize. The Source Geo Location screen displays.

- Click Clear All to remove all of the default source locations. (Because all locations are selected by default, they are not displayed).
- (For Releases 12.2.1 and later.) To customize the source location by country, state, or city, click the down arrow in the Country box. The Selected section lists the country, state, or city with name and location type.

- Select Country, and then select one or more countries from the list. The map changes to highlight the countries that are selected.
- Select State, and then enter the name of the state and select the state from the list.
- Select City, and then enter the name of the city and select the city from the list.
- To remove a location from the selected list, click the X next to the location type name.
- To remove all locations from the selected list, click Clear All.
- Click Back to customize the source IP addresses. The Source Geo Location & Source IP Address screen displays again. Note that to accept the default source IP addresses, click Next at the bottom of the screen.
- To change the source IP addresses to include, click Customize under Source IP Address. In the Source Traffic screen, enter information for the following fields.

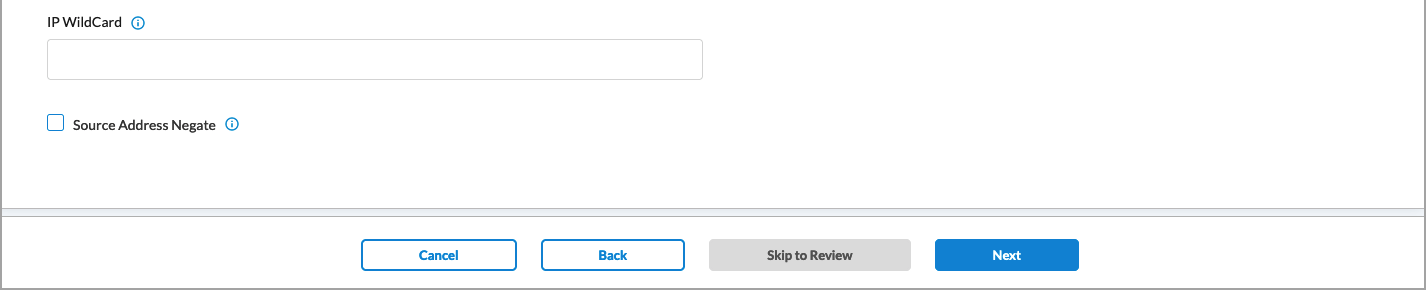
Field Description Source Address (Group of Fields) - Address Group
Click in the box, and then select one or more address groups. The address groups in the list are those defined in the User Defined Objects section.
If you want to provide one or more specific source IP addresses, you do not need to select an address group. Instead, use the IP Wildcard field to enter the IP address.
To create a new address group, click + Add New, and then enter information for the following fields:

- Click the Enter Addresses section and select the group Type. The type can be Subnet, IP range, IP wildcard, or IPv6 subnet.
- Based on the type selected, enter one of the following and press Return:
- Subnet: An IP address and subnet mask, for example, 10.2.1.0/24
- IP range: An IP address range, for example, 10.2.1.1-10.2.2.2
- IP wildcard: A specific IP addresses, for example, 192.68.0.56/255.255.0.255
- IPv6 subnet: A valid IPv6 subnet
- FQDN: A fully qualified domain name (FQDN)
- Dynamic Address: One or more address object names
- To add additional address group types, click the
 Plus icon. To remove an address group type, click the
  Minus icon.
 - Click Next.
- In the Name & Tags section, enter a name for the address group and any tags you want to associate with the group.

- Click Save.
IP Subnet Enter an IP subnet to include in the match list (for example, 10.0.0.0/24), then press Return. You can add additional IP subnets by entering the subnet and pressing Return for each one. IP Range Enter an IP address ranges to include in the match list (for example, 10.2.1.1-10.2.2.2), then press Return. You can add additional IP address ranges by entering the range and pressing Return for each one. IP Wildcard Enter an IP address and mask to include in the match list (for example, 192.68.0.56/255.255.0.255), then press Return. You can add additional IP addresses and masks by entering the it and pressing Return for each one. Source Address Negate Select to apply the rule to any source addresses except the ones in the Source Address field. - Click Next to go to the Traffic Action screen.
Configure SASE Traffic Action Rules for Secure Client-Based Access
You can use traffic-action rules to specify whether application-specific traffic should be sent to the Versa Cloud Gateway or directly to the internet, or whether the traffic should be blocked from being sent to the Versa Cloud Gateway. The available traffic-action options depend on the subscription type assigned to the tenant and to the type of operating system running. The subscription types are:
- Versa Secure Private Access (VSPA)—Enables breakout of specific custom applications to the internet
- Versa Secure Internet Access (VSIA)—Sends custom or predefined applications to the Versa cloud gateway; can also exclude routes so that certain traffic is not sent to the Versa cloud gateway
- Versa Secure Private Access (VSPA) and Versa Secure Internet Access (VSIA)—Allows you to configure actions available in both the VSPA and VSIA subscription types
The operating system types are:
- Windows—Supports all traffic actions by subscription type
- Apple—Supports all traffic actions by subscription type
- Android—Supports all traffic actions by subscription type
- Linux—Support the following traffic actions by subscription type:
- VSPA—Sends all private traffic over the tunnel to the Versa Cloud Gateway and all internet-bound traffic from the user device to the internet directly (split tunnel/Direct Internet Access)
- VSIA—Sends all traffic from the user device to the Versa Cloud Gateway; allows you to exclude routes so that certain traffic is not sent to the Versa cloud gateway.
- VSPA and VSIA—Sends all traffic from the user device to the Versa Cloud Gateway; allows you to exclude routes so that certain traffic is not sent to the Versa cloud gateway.
To configure traffic action rules for secure client-based access:
- In the Secure Client Access Rule List screen, click + Add to create a new rule. The Create Secure Client Access Rule screen displays.
- Select Step 5, Traffic Action. The following screen displays. The default settings are:
- Subscription type is Versa Secure Private Access (VSPA) and Versa Secure Internet Access (VSIA)
- Traffic action is Allow,
- Rule type is Breakout to Internet
You can customize these settings by entering information for the following fields.

Field Description Select subscription type for users matching this rule Click and then select a subscription type. Note that this option is visible only if you select the Allow traffic action. It is not visible if you select the Deny traffic action.
- Versa Secure Internet Access (VSIA)
- Versa Secure Private Access (VSPA)
- Versa Secure Private Access (VSPA) & Versa Secure Internet Access (VSIA). This is the default setting.
Deny Click to drop all traffic that matches the rule.
Note: If you select the Deny option, the Gateways, Client Configuration, and Agent Profile from EIP workflow steps are removed. The next workflow step becomes Review & Configure.
- Display Message after Connection is Blocked
Enter the message to display after the connection is blocked. Allow Click to send all traffic that matches the rule to pass. - Breakout to Internet
Click to send all private traffic over the tunnel to the VCG and all internet-bound traffic from the user device to the internet directly (split tunnel/Direct Internet Access). You can then select custom and predefined applications to send traffic for those applications over the tunnel to the VCG.
Note: This option is available for the following subscription types:
- Versa Secure Private Access (VSPA)
- Versa Secure Private Access (VSPA) and Versa Secure Internet Access (VSIA)
- Send Apps to Versa Cloud Gateway
Click to send all traffic from the user device to the VCG. You can then select custom and predefined applications to bypass the tunnel and be sent out directly to the internet from the user device.
Note: This option is available for the following subscription types:
Versa Secure Internet Access (VSIA)
Versa Secure Private Access (VSPA) and Versa Secure Internet Access (VSIA)Display Message after Successful Connection
Enter the message to display after the connection is successful. Predefined Applications Click the  Expand icon and select one or more predefined applications to send traffic for those applications over the tunnel to the VCG.
Excluded Routes
(For Releases 11.4.3 and later.) If you do not want to send specific traffic to the gateway, you can specify routes to exclude. Traffic that uses an excluded route is not sent to the gateway, even if you select Send Apps to Versa Cloud Gateway traffic action. To add routes to exclude, click the
Expand icon, and then enter one or more route prefixes.This field displays if you choose one of the following subscription types:
- Versa Secure Internet Access (VSIA)
- Versa Secure Private Access (VSPA) & Versa Secure Internet Access (VSIA)
- If you selected Deny as the traffic action for the rule, click Next to go to the Review and Configure screen. See Review and Configure SASE Secure Client-Based Access Rules.
- If you selected Allow as the traffic action for the rule, click Next to go to the Gateways workflow step.
Configure SASE Gateways for Secure Client-Based Access
By default, VSPA clients can use all available gateway groups to access the enterprise network. You can also customize the configuration to choose which gateway groups the VSPA clients can use.
When a tenant is provided with a new gateway, the gateway is not automatically added to existing secure access profiles. If the existing user requires access to the new gateway, the administrator must add the new gateway to existing profiles and republish the configuration to enable access.
To configure SASE gateway groups:
- In the Create Secure Client Access Rule screen, select Gateways. The following screen displays:

- In the Gateway Groups box, select one or more gateway groups. Note that you must select at least one gateway group. The gateways belonging to the selected gateway group display in the Gateways box to the right.
- In the Gateways box:
- Select a VPN. The screen then displays the available gateways for that VPN.
- Select one or more of the gateways, and then select a client address pool name. Each drop-down list contains the client IP address pools that are configured on the selected gateway.
- Click Next to go to the Client Configuration screen.
For information about configuring multiple VPNs and multiple client address pools, see Configure SASE Tenants.
Create a SASE Client Configuration for Secure Client-Based Access
By default, a SASE client is configured using the most common enterprise settings. You can customize the client configuration in the following ways:
- Choose a different secure client-based access profile or create a new secure client-based access profile.
- Enable/disable and configure multifactor authentication (MFA).
- Select the type of VPN to use, IPsec VPN or SSL VPN (for Releases 12.1.1 and later). For Releases 12.2.1 and later, you can also select DTLS.
- Choose which controls are available to SASE client users.
To customize a client configuration:
- In the Create Secure Client Access Rule screen, select Client Configuration.

- To specify a secure client-based access profile for the rule, click the down-arrow in the Secure Client Access Profile box, and then choose a profile. The Profile Details table displays. To add a new profile, click
 Add New Profile. See Configure SASE Secure Client-Based Access Profiles for more information about adding new profiles.
 - In the Profile Details table, click the Plus icon to view information about the route and DNS resolvers defined in the profile.

- To add a new profile, click Add New Profile. For more information, see Configure SASE Secure Client-Based Access Profiles.
- By default, MFA is disabled. To enable MFA, in the Create Secure Client Access Rule screen, click the slider. When MFA is enabled, the Customize option displays.

- Click Customize to change the MFA settings. In the Configure MFA screen, enter information for the following fields.
- Select Email OTP Authentication Service to enable one-time password authentication using email.

Field Description Message Enter a message to send using the email OTP authentication service. OTP Format Select a format for the one-time password:
- Alphabetic,
- Alphanumeric
- Numeric
One-time Password Length Enter the length of the password.
Default: 6
Range: 6 through 14Password Valid Enter how long the password is valid, in seconds
Default: 3 secondsRange: 1 through 3600 seconds
- Select Time-Based OTP (TOTP) Authentication Service to enable time-based authentication.

Field Description QR Code (For Releases 12.2.2 and later.) Send the QR code using SASE Client or email address:
- Send to Client—Click to send the QR code to SASE Client.
- Sent by Email—Click to send the QR code to the email address.
- Select Email OTP Authentication Service to enable one-time password authentication using email.
- Click Back to return to the Client Configuration screen.
- (For Releases 12.1.1 and later.) Select the VPN type: IPsec, SSL, or both. By default, Concerto uses IPsec as the VPN type. IPsec VPN defines the properties of the IPsec and IKE tunnels between tenants (organizations) and SD-WAN network devices. SSL VPN allows remote users to connect to Versa gateways using the Versa SASE client. The Versa proprietary SSL VPN protocol is based on Transport Layer Security (TLS) and Datagram Transport Layer Security (DTLS). You can choose either or both of these SSL VPN options.
(For Releases 12.2.1 and later.) If you select more than one VPN type, you can specify the order in which the Versa secure access client will use the VPN types, including the two types of SSL: TLS or DTLS.
The following screenshot shows the default VPN type selection (IPsec). To select advanced encryption algorithms when the VPN type is IPsec, see Configure SASE Client Encryption Algorithms.

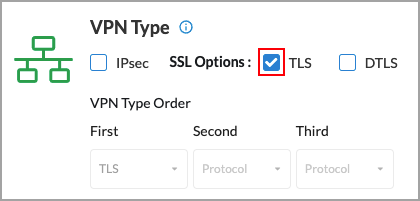
- To use only SSL, unselect IPsec and then select either TLS or DTLS. The following screen shows TLS selected.
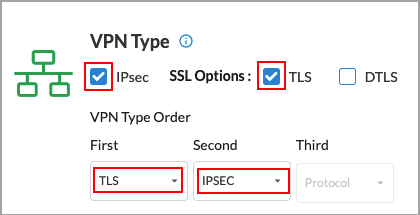
- To use both IPsec and SSL, you can use either or both types of SSL: TLS or DTLS. When you select two or more VPN types, you can specify the order in which the secure access client will use the VPNs. The following screen shows that IPsec and SSL TLS have been selected, and that the secure access client will use TLS first and IPsec second.
- The following screen shows that IPsec and SSL DTLS have been selected, and that the secure access client will use IPsec first and DTLS second.

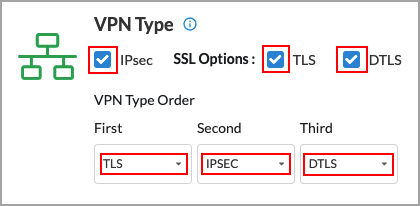
- The following screen shows that all three VPN types have been selected, and that the secure access client will use TLS first, IPsec second, and DTLS third.
- To use only SSL, unselect IPsec and then select either TLS or DTLS. The following screen shows TLS selected.
- By default, you have full control of the secure client gateways. Client controls are the configurations that control the Versa Client Application's (also called the SASE Client Application) behavior and permissions. Click Customize in the Client Controls box to change the the secure client gateway settings.

- In the Configure Client Controls screen, enter information for the following fields.

Field Description What client controls do you have Select one or more client controls:
- Allow Client Customization—Enable or disable the Edit Gateway tab.
- Remember Credentials—Enable or disable the remembering or credentials.
- Auto Update—(For Releases 11.4.1 and later.) Enable or disable automatic updating of the client. If enabled, the client automatically updates to the version you select. Click Edit Preferred Client Version to change the software version to which to automatically update the client. The Preferred Client Version window displays. For more information, see Select Preferred SASE Client Version, below.
Client Log URL Enter the URL to reach the client logo. Portal Lifetime (in Minutes) Enter the desired registration lifetime of the portal.
Range: 1 through 4294967295 minutes
Default: 1440 minutes
Certificate Issuer Enter the name of the entity that issued the certificate.
Note: If you do not enter the name of the certificate issuer, the Versa Secure Access client will not send a device ID while connecting to the gateways and the correct policy will not match.
Trusted Network Hostname Enter the hostname of the trusted accessible network. This option determines whether a SASE client is already behind a trusted VPN network. If so, connecting to the SASE gateway is bypassed. See Configure Detection of Trusted Networks for SASE Gateways. Trusted Routes (For Releases 11.4.3 and later.) Click the Trusted Routes down arrow to add routes that are trusted, and then enter one or more route prefixes. When you enable the TNH client configuration and it identifies that the user is in a trusted network, the trusted routes are locally offloaded from the SASE client tunnel and the client operates in semi-trusted mode. If the trusted routes are not populated, the client disables the tunnel for all prefixes in the trusted network and enters in full bypass mode. Advanced Settings (Group of Fields) - Tamper Protection
(For Releases 11.4.1 and later.) If enabled from the server side, you cannot uninstall the client, delete the client account, or delete any files from the installation directory. See Configure Tamper Protection.
To disable, click the Tamper Protection toggle button in the Account Details window and then enter the tamper protection authentication key. See Disable Tamper Protection From the SASE Client.
Note: Supported on Windows Client, version 7.8 and later.- Strict Tunnel Mode
(For Releases 11.4.1 and later.) Redirect all traffic through the tunnel. If disabled, specific traffic is routed through a tunnel and the rest is sent directly onto a WiFi or Ethernet interface. - Auto Disconnect Interval
(For Releases 11.4.1 and later.) Automatically disconnect tunnel after the configured autodisconnection interval.
Range: 1 through 65535 minutes
Default: 480 minutes
- Auto Disconnect Time
(For Releases 12.2.1 and later.) Automatically disconnect all VPNs and all users at the specified time each day.
Hours: 0 through 23
Minutes: 0 through 59
For example, if the select 17 hours and 30 minutes, all VPNs will be disconnected at 5:30 p.m. (1730 hours) each day.
- Always On
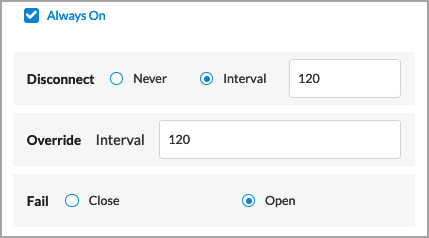
Enter information for the following fields:
- Disconnect—Enter a disconnect interval time.
- Range: 1 through 65535
- Default: 120
- Override Interval—Enter an override interval time.
- Range: 1 through 65535
- Default: 120
- Fail—Choose the action to take when the connection fails
- Close
- Open (default)
For more information, see Configure Always On.
Display Gateway Click to enable display of gateways on the SASE client UI. Tunnel Monitoring (Supported on Windows client version 7.6 and Mac client version 7.5)

Enter information for the following fields:
- Hosts—Enter one or more hosts to use for tunnel monitoring. Click the
 Add icon to add additional hosts.
 - Interval—Enter the tunnel monitoring interval, in seconds.
- Range: 1 through 255 seconds
- Default: 60 seconds
- Interval Retry—Enter the interval between tunnel monitoring retry attempts, in seconds.
- Range: 1 through 255 seconds
- Default: 10 seconds
- Connection Retry—Enter the number of connection retry attempts before concluding that the tunnel is down.
- Range: 1 through 255
- Default: 5
Registration with Domain Name System (DNS) (Supported on Windows client versions 7.6 and later)

Enter a DNS suffix to enable or disable DNS.
Range: 1 through 255
Default: None
Reconnect (Supported on Windows client version 7.6 and Mac client version 7.5)

Enter information for the following fields
- Interval—Interval between autoreconnect attempts, in seconds.
- Range: 1 through 255, in seconds
- Default: 10 seconds
- Retry Count—Number of autoreconnect retry attempts.
- Range: 1 through 255
- Default: 5
IP Address Stickiness (Supported on Windows client version 7.6 and Mac client version 7.5)
Click to enable IP address stickiness, which stores the tunnel IP address provided during a connection and requests the same IP address for subsequent connections to the same gateway. Two-Way Active Measurement Protocol (TWAMP) (Supported on Windows client version 7.6 and Mac client version 7.5)
Click to enable TWAMP, which is a standard protocol, defined in RFC 5357, to measure network performance for IP networks and can be used for SLA compliance checks. Endpoint Data Loss Prevention (DLP) (Release 12.2.1 and later.) Click to select endpoint DLP. Enter information for the following fields:

- Copy/Paste—Click the slider bar to detect copy from or paste to the clipboard (Windows only)
- Screenshot—Click the slider bar to detect a screenshot action (Windows only)
- USB—Detect data exfiltration through a USB
For more information, see Configure DLP Data Exfiltration.
Password Expiry Warn Before Enter the number of days before a password expiration warning is displayed.
Default: 10 days
Range: 1 through 255 days
- Click Next to go to the Agent Profile from EIP screen.
Configure EIP Agent Profiles for Secure Client-Based Access
EIP agent profiles define when the SASE client extracts information from endpoint devices. You associate predefined or custom EIP agents with secure client-based access rules to enforce EIP security. For more information, see Configure a Custom EIP Agent Profile.
To configure EIP agent profiles for secure client-based access rules:
- In the Create Secure Client Access Rule screen, select the Agent Profile from EIP tab.

- To associate an existing custom EIP agent profile with the secure client-based access rule:
- Select User Defined in the Type field.
- Select a custom profile under EIP Agent Profiles.
- To add a new EIP Agent Profile, click + Create New. The Create EIP Agent Profile screen displays. For more information, see Configure a Custom EIP Agent Profile.

- To associate a predefined EIP agent profile with the secure client-based access rule, select Predefined in the Type field, and then select a profile in the EIP Agent Profiles field.

- Click Next to go to the Review & Configure screen.
Review and Configure SASE Secure Client-Based Access Rules
The final step in configuring secure client-based access rules is to review the choices you have made, edit them if needed, and then deploy the new rule.
- In the Create Secure Client Access Rule screen, select Review and Configure, and then enter information for the following fields.

Field Description Name (Required) Enter a name for the rule. Description Enter a text description for the rule. Tags Enter one or more tags to help identify the rule. A tag is an alphanumeric text descriptor with no white spaces or special characters that you can use to search objects. You can specify multiple tags.
Rule is enabled Click the slider to enable the rule.

- If required, edit the configuration for a given section by clicking the Edit icon.
- Click Save to save the new secure client-based access rule.
Select the Preferred SASE Client Version
For Releases 11.4.1 and later.
You can automatically update the Versa SASE client for MacOS and Windows OS to a specific version. If you enable Auto Update on the Configure Client Controls screen, as described in Create a SASE Client Configuration for Secure Client-Based Access, above, you can select the preferred software version to use when updating the client. If you do not select a preferred software version, the client software is updated to the latest version.
To select the preferred SASE client version to use during an automatic update:
For Releases 12.2.1 and later:
- Go to Configure > Security Service Edge > Secure Access > Client-based Access > Settings.

- Select the Preferred Client Version tab:

For Releases 12.1.1 and earlier:
- Go to Configure > Secure Client Access > Preferred Client Version.
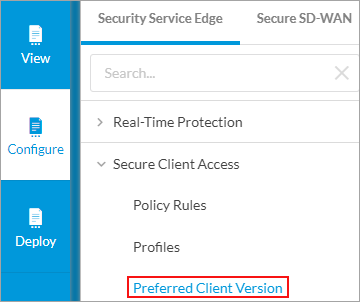
The Preferred Client Version window displays.
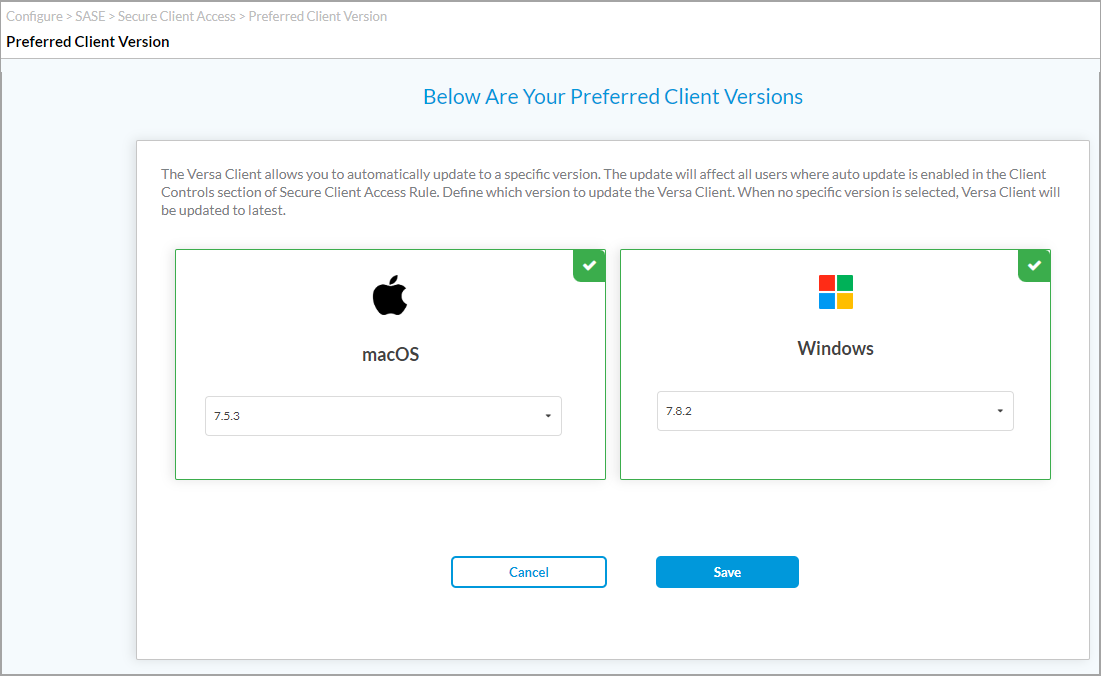
- Click the
 Select icon to select MacOS or Windows OS, and then select the SASE client software version.
 - Click Save.
Configure Banner Settings and Concurrent Login Limits Across Devices
For Releases 12.2.1 and later.
You can create a banner message that appears after a user logs in when connecting to a VPN using the Versa secure access client. Versa provides a default banner message that you can modify according to your organization's needs. You can also specify how often the banner is displayed after a user logs in. The banner is disabled by default.
You can also configure how many devices a single user can use to log in to the network concurrently. For example, a user might attempt to log in using a mobile phone, a laptop, and other devices concurrently.
To configure banner settings:
- Go to Configure > Security Service Edge > Secure Access > Client-based Access > Settings, and then select the Additional Settings tab. In the Banner Settings pane, enter information for the following fields.

Field Description Enabled The banner is disabled by default. To enable the banner, click the slider.

Frequency of Displaying Banner after Login Select how frequently the banner displays after a user logs in. The options are:
- Once Daily
- First Time Only
- Every Time
Message You can modify the default banner text according to your organization's needs. - Click Save.
To configure how many concurrent logins a user can have across all of their devices:
- Go to Configure > Security Service Edge > Secure Client Access > Settings, and then select the Additional Settings tab. In the Concurrent Logins Across Devices pane, enter information for the following fields.
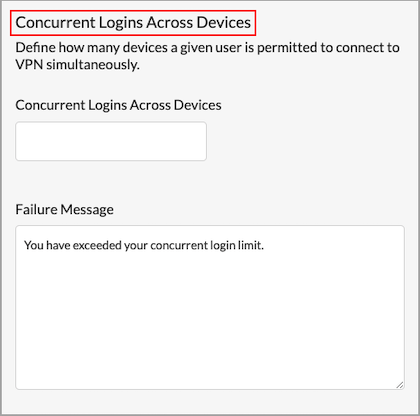
Field Description Concurrent Logins Across Devices Enter the number of concurrent logins allowed.
Range: 1 through 255
Default: 1
Failure Message Enter the message that displays if the user login attempts exceed the allowed number of concurrent logins.
- Click Save.
Supported Software Information
Releases 11.1.1 and later support all content described in this article, except:
- Release 11.4.1 adds support for the Auto Update, Tamper Protection, Strict Tunnel Mode, and Autodisconnect fields in Configure Client Controls screen; and Preferred Client Version under Secure Client Access menu.
- Release 11.4.3 adds support for specifying trusted and excluded routes when you configure traffic actions, supports SSL VPN, and allows you to download a pre-logon configuration file in secure client access policy rules.
- Release 12.2.1 adds support for selecting custom operating systems while configuring operating systems for a secure client-based access rule; allows you to configure a banner to display after a user logs in; allows you to configure how many concurrent logins a user can have across all of their devices; allows you to specify the order in which the Versa secure access client uses VPN types, including the two types of SSL VPNs: TLS or DTLS.
- Release 12.2.2 adds support for sending the QR code when enabling TOTP authentication service for multi-factor authentication; the Mobile Device Manager (MDM) was renamed Unified Endpoint Management (UEM), and moved under Partner Integrations.