Troubleshoot the SASE Gateway
![]() For supported software information, click here.
For supported software information, click here.
This article describes some of the issues that you may face with the SASE gateway and the steps to troubleshoot them.
Troubleshoot Registration Issues
SASE gateway registration may fail due to various issues with the local user, LDAP, SAML, and two-factor or multi-factor authentication. This section describes some of these scenarios and the verification methods to fix the issues.
Verify the FQDN for the Portal
To verify that the FQDN for the portal resolves to the correct SASE WAN IP address:
- Issue the nslookup CLI command, or ping the registration FQDN from your device.
- Ensure that the FQDN resolves to the WAN IP address of the SASE portal. For example:
C:\Users\user1\nslookup sj-sandbox.versa-test.net
Server: dns-hq-versa-networks.com
Address: 10.10.11.11
- If the FQDN does not resolve the SASE portal WAN IP address, add the valid DNS record in the DNS servers to resolve the FQDN that you use for registration.
Verify HTTP and HTTPS Packets
To verify that HTTP and HTTPS packets sent to the SASE portal are allowed:
- Check to make sure that your computer allows HTTP and HTTPS packets to the SASE portal. Also, make sure that the firewall on your computer is not blocking HTTPS and HTTPS packets in both directions to the SASE portal. To troubleshoot firewall issues, refer to the operating system documentation for your device.
- Run the tcpdump on the WAN interface of the SASE portal and check if packets sent by the SASE client are reaching the SASE portal. To run tcpdump:
- In Director view:
- Select the Administration tab in the top menu bar.
- Select Appliances in the left menu bar.
- Select an appliance in the main panel. The view changes to Appliance view.
- Select the Monitor tab in the top menu bar.
- Select an organization in the submenu bar.
- Click Run TCP Dump, and then enter information for the following fields.
- Interface—Select the required WAN interface.
- Filter—Enter "host <IP-address>" using the public IP address that your device uses to reach the internet, for example, "host 8.8.8.8".
To find the public IP address that your device uses, you can use a website such as ipchickent.com from your browser. - For information on configuring other parameters, see Use Network Monitoring Tools.

- Click Start to display the results in Latest Results.
- In Director view:
- Enable secure access and NGFW on the device owner organization (provider org).
- In Director view:
- Select the Administration tab in the top menu bar.
- Select Appliances in the left menu bar.
- Select a device name in the main panel. The view changes to Appliance view.
- Select an organization.
- Select the Configuration tab in the top menu bar.
- Select Others > Organization > Limits in the left menu bar.
- Select the provider organization name in the main pane. The Edit Organization Limit window displays. For more information, see Configure Organization Limits.

- Select the Services tab.
- In the Services section, click the + Add icon, and then select the nextgen-firewall and secure-access services.
- Click OK.
- In Director view:
- Configure a security access rule to allow access to the portal using the required match conditions. For more information, see Configure Next-Gen Firewall.
Verify Captive Portal Configuration
You must configure captive portal on the device owner (Provider) organization.
- Validate the captive portal configuration—There are two types of captive portal configurations: server certificate-based and CA certificate-based.
- To validate a captive portal based on server certificate, issue the show orgs org-services <provider-organization-name> security captive-portal CLI command. For example:
admin@Branch-1-cli(config)% show orgs org-services <corp-provider> security captive-portal
expiration-time 30;
service-endpoints {
    Internet-1-Transport-VR {
        http-port 80;
        https-port 443;
        ip-addresses [ 10.11.11.12 ];
        server-url .*.versa-networks.com;
        server-certificate zone1-vpn.versa-networks.crt;
}
Note that if the SASE portal WAN is behind NAT, you must configure the internal IP address (current assigned WAN IP address on WAN interface) of WAN in the IP address.
-
To validate a captive portal based on a CA certificate, issue the show orgs org-services <ca-certificate-issuer-name> security captive-portal CLI command. For example:
admin@SASE-Portal-cli(config)% show orgs org-services <Versa> security captive-portal
ssl-ca-certificate Versa-Networks-CA.crt;
service-endpoints {
    Internet-1-Transport-VR {
        http-port 80;
        https-port 443;
}
- To validate a captive portal based on server certificate, issue the show orgs org-services <provider-organization-name> security captive-portal CLI command. For example:
- If the captive portal configuration is server certificate-based, make sure the IP address matches the WAN on the portal.
- For a server certificate-based configuration, also make sure the server URL matches the subject CN and subjective alternative names.
Verify Captive Portal Certificate
Verify that the certificate loaded for captive portal is valid and loads correctly.
- To verify the certificate loads correctly, issue the following CLI command:
- show orgs org-services <device-owner-organization> crypto pki certificates <certificate-used-in-captive-portal>
- Verify that the certificate has not expired.
- Verify the subject CN and issuer.
- To verify the private key loads correctly, issue the following CLI command:
- show orgs org-services <device-owner-organization> crypto pki private-keys <private-key-used-for-certificate>
- To view the certificate that a captive portal uses:
- Go to Versa Session Management Daemon (VSMD) VTY from the VOS shell by issuing vsh connect vsmd command.
- Run the show ssl decryption-profiles brief command. The captive portal certificate should display as shown in the following example:
vsn-vcsn0> show ssl decryption-profiles brief
==============================================
Number of OCSP cache entry:                  0
==============================================
Number of ADDR to HOST mapping cached
----------------------------------------------
Tenant-ID     Count
1             0
2             0
==============================================

Decryption Profiles
----------------------------------------------
Tenant-ID Profile-Name             Profile-ID  Profile-Type      Certificate  Private-key
1         cportal_decrypt_profile  9111        versa-full-proxy  Yes          Yes
- If the certificate is loaded after captive portal configuration, you can delete and then add the captive portal configuration.
Verify SSL Handshake Completion
You can verify that the SSL handshake is completed by accessing the HTTPS link of the SASE portal.
To verify the SSL handshake is completed:
- Open a browser on the device on which the SASE client is installed.
- Paste the following URL:
- https://<FQDN of SASE portal>/secure-access/services/gateway?action=discover&ent_name=<enterprise-name>
- To resolve the certificate, click the Lock icon next to the URL and check if the certificate is valid. For example:

- If URL in point above does not work, run Wireshark on your device and check if the SSL handshake is successful. If not, go through the steps mentioned in Verify FQDN for Portal, Verify HTTP and HTTPS Packets, Verify Captive Portal Configuration, and Verify Captive Portal Certificate above.
- If this does not resolve the SSL handshake, enable SSL debug logs and check for errors in logs. To generate a log file, issue the following CLI command:
admin@Branch-1-cli(config)% set debug ssl all-flags level all send to file name /tmp/ssl.log
Verify Secure Access Portal Authentication Profiles
You can verify that the correct authentication profiles are associated with secure access portal registration.
To verify secure access portal authentication profiles:
- In Director view:
- Select the Configuration tab in the top menu bar.
- Select Templates > Device Templates in the horizontal menu bar.
- Select an organization in the left menu bar.
- Select a template in the main pane. The view changes to Appliance view.
- Select the Configuration tab in the top menu bar.
- Select Services > Secure Access > Gateway > General in the left menu bar. The following screen displays.

- Click the
 Edit icon. The Add Services window displays.
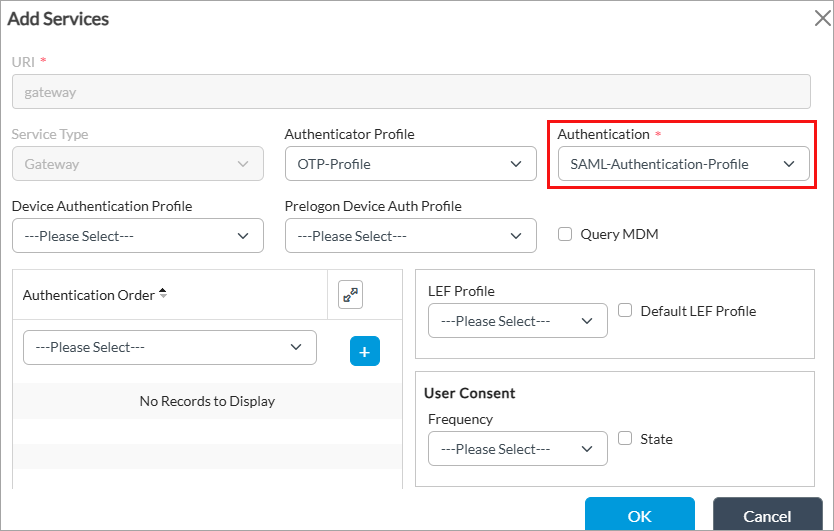
- Check the Authentication field to verify that the correct authentication profile is selected. For more information, see Configure the Versa Secure Access Service.
Check the authentication profile configuration and user identification based on the authentication mechanism used. The following example is for SAML authentication. For other authentication configurations, see VOS Security Configuration.
- In Director view:
- Select the Administration tab in the top menu bar.
- Select Appliances in the left menu bar.
- Select a device name in the main pane. The view changes to Appliance view.
- Select the Configuration tab in the top menu bar.
- Select Object and Connectors > Connectors > Users/Groups > SAML Profile in the left menu bar.

- Click the + Add icon to add a new SAML profile, or select an existing profile. The Add/Edit SAML Profile popup window displays. For more information, see Configure SAML Profiles.

To check the secure access session history:
- Go to VSMD VTY from the VOS shell by issuing the vsh connect vsmd command.
- Run the show saccess session history <portal/gateway> all command.
- Look for services such as portal and action. Copy the ID and run the show saccess session history <portal/gateway> id ID command to display more information.
Verify Local User Authentication
To verify that local users are configured correctly, see Configure a Local Database.
Verify LDAP Authentication
- To verify that the LDAP server is reachable from the SASE portal, run the ping CLI command for the routing instance where LDAP is configured:
admin@ DC-Branch-1-cli(config)% show orgs org-services Corp-Inline-Customer-1 user-identification ldap-profiles
Azure-AD {
    state                enabled;
    domain-name          versa-networks.com;
    ldap-base            "********";
    bind-dn              "********";
    bind-password        "********";
    server-type          active-directory;
    use-ssl              enabled;
    ssl-mode             ldaps;
    ca-cert              default;
    search-timeout       30;
    bind-timeout         30;
    servers {
        Azure-AD-Server {
            ip-address      40.40.42.36;
            port            636;
            routing-instances Internet-1-Transport-VR;
            fqdn            ldaps.versa-networks.com;
        }
    }
}
[ok][2025-09-13 19:12:23]
[edit]
admin@ DC-Branch-1-cli(config)% run ping ldaps.versa-networks.com routing-instance Internet-1-Transport-VR
ldaps.versa-networks.com (40.32.42.46)
PING 40.32.42.46 (40.32.42.46) 56(84) bytes of data.
^C
--- 40.78.82.36 ping statistics ---
3 packets transmitted, 0 received, 100% packet loss, time 2016ms
Ping may be blocked by the LDAP server but you must resolve the FQDN and requests must go through the routing instance based on which LDAP is configured.
- To verify if the SASE portal is connected to the LDAP server, run the show orgs org-services organization-name user-identification ldap-server-data users brief CLI command:
- This CLI must return domain users configured in LDAP. If it does not, you must troubleshoot the connectivity and authentication between the SASE portal and LDAP server. <Review Note: how is this trouble shooting done?>
- Verify that the LDAP server allows the source IP address of the SASE portal to reach LDAP.
- To check the connectivity to the LDAP server, run the ldapsearch command on Linux. For example:
- ldapsearch -H ldaps://LDAP-server-IP-Adresss> -D Domain -w password -b dc=xx,dc=yy,dc=zz,dc=zz -Z
- Validate the LDAP server configuration. For more information, see Configure a Gateway To Use an LDAP Server for User Authentication.
SAML Authentication Issues
To troubleshoot SAML authentication:
- Ensure that Network Time Protocol (NTP) is enabled on the SASE gateway and that the SASE client device time is synchronized. For more information, see Configure Time Settings.
- If you are not prompted for user name and password, check logs and the SAML URI in SASE client logs. To export SASE client logs, see Perform Diagnostics and Export Logs.
- Search the URL configured in the SAML profile on the portal in SASE client logs. You can view the SAML profile URL configuration from the Edit SAML Profile window. For more information, see Configure a SAML Profile.
For example:

- Copy the URL, paste it in your browser, and check if the login prompt displays. If the SAML URL does not work from your device, check the firewall rules of the device.
- Check the connectivity to the SAML server from your device.
- To check if SAML is configured correctly on the SASE portal, see Configure a SAML Profile.
Two-Factor or Multi-Factor Authentication Issues
If two-factor or multi-factor authentication (MFA) is enabled through external authentication, such as LDAP or Active Directory (AD), make sure that the email and phone number for your account are correctly configured on the external authentication servers.
On Microsoft AD server, you can find these details on the Attribute Editor tab. For example:

Troubleshoot Connection Issues
This section covers how to troubleshoot connection issues with the SASE gateway.
Verify Authentication Profile
To verify that the correct authentication profile is associated with your SASE gateway:
- In Director view:
- Select the Configuration tab in the top menu bar.
- Select Templates > Device Templates in the horizontal menu bar.
- Select an organization in the left menu bar.
- Select a template in the main pane. The view changes to Appliance view.
- Select the Configuration tab in the top menu bar.
- Select Services > Secure Access > Gateway > General in the left menu bar. The following screen displays.
- Click the Edit icon. The Add Services window displays.
- Check the Authentication field to make sure the correct authentication profile is selected. For more information, see Configure the Versa Secure Access Service.
Verify the Tunnel Password Profile is Associated with Gateway
If local authentication is enabled for secure access gateway, you should have an authenticator profile for one-time password (OTP) verification associated with the gateway.
To configure an authenticator profile:
- In Director view:
- Select the Administration tab in the top menu bar.
- Select Appliances in the left menu bar.
- Select a device name in the main panel. The view changes to Appliance view.
- Select the Configuration tab in the top menu bar.
- Select Objects & Connectors > Connectors > Users/Groups > Authenticator Profiles in the left menu bar.

- Click the + Add icon. The Add Authenticator Profiles window displays.

- Enter a name for the authenticator profile (here, OTP-profile).
- In the Authenticator Type field, select REST-based Authenticator Service to configure an OTP in the One-Time Password group of fields.
- Click Mobile to send an OTP to a mobile device.
- Click Email Address to send the OTP using email and to share a QR code to use to register the SASE client to the user's email address.
- For information about configuring other parameters, see Configure an Authenticator Profile.
- Click OK.
To associate the authenticator profile with your secure access gateway profile:
- In Director view:
- Select the Configuration tab in the top menu bar.
- Select Templates > Device Templates in the horizontal menu bar.
- Select an organization in the left menu bar.
- Select a template in the main pane. The view changes to Appliance view.
- Select the Configuration tab in the top menu bar.
- Select Services > Secure Access > Gateway > General in the left menu bar.

- Click the Edit icon. The Add Services window displays.

- In the Authenticator Profile field, select the authenticator profile you configured (here, OTP-profile).
- For information about configuring other parameters, see Configure a Secure Access Gateway.
- Click OK.
Verify IPsec Profile Certificate
You can verify that the certificate is loaded for the IPsec profile configured for SASE clients.
To verify the certificate is loaded:
- Go to VSMD VTY using the shell command vsh connect vsmd.
- To find the tenant ID where the IPsec profile is configured, run the show vsf tenant all brief command. For example:
vsm-vcsn0> show vsf tenant all brief
Tenant Name             Tenant ID
----------------------------------
Corp-Inline-Customer-1   1
Corp-Inline-Provider     2
- Run the show ipsec config <tenant-id> all command. The output must display certificate code done, as shown in the example below. Note that the output is truncated.
vsm-vcsn0> show ipsec config 1 all ####### Tenant 1 (Corp-Inline-Customer-1) config ######### Config Ref-Count: 10 Intf link Ref-Count: 10 Intf Addr Ref-Count: 10 ----------------------------------- VPN Name - split-tunnel-RAS, OBJ ID 10, VPN ID 10 VPN Type - RAS DHKey: Profile = [] Steering - CLIENT-IP-BASED VRF ID - Internet-1-Transport-VR(14) Tunnel VRF ID - Corp-Inline-Customer-1-LAN-VR(9) Tunnel Tenant Id - 1 VSN ID - 0 Loaded - Yes (0x0x7f09617b2e08) Crypto offload - Enabled (i.e. use if any hw-accel available) Revocation Check - None Local interface : vni-0/0.0 ------- Local Identity --------- Auth Type - Certificate Certificate-Authority - intermediate-1.crt Certificate - present Private key - present Certificate-status - Certificate decode done ID Type - FQDN ID - vpn.versa-networks.com Auth Domain : split-tun-authdom-1 - To check that the end entity certificate is issued by the CA chain, run the show orgs org-services <organization-name> crypto pki certificates <end-entity-certificate-name> CLI command. In the example below, the highlighted text shows that certificate is issued by CA chain.
admin@HE-DC-Branch-1-cli> show orgs org-services Corp-Inline-Customer-1 crypto pki certificates vpn.versa-networks.crt Certificate: Data: Version = x509v3 Serial num = 1003 Name = vpn.<certificate-name>.crt SHA1 hash = ***************** Priv-Key = <private-key>.key Signature Algorithm = sha256WithRSAEncryption Subject: Subject CN = <domain-name> Org Unit = Org Name = Versa Networks Inc. Locality = Fremont State = CA Country = US Validity: Not Before = <start-date and time> Not After = <expiry-date and time> Issuer: Issuer CN = Versa Intermediate Certificate Authority 1 Org Unit = Secure access, Org Name = Versa Networks Inc. Locality = San Jose State = CA Country = US - To verify that the CA chain is valid, run the show orgs org-services <organization name> crypto pki certificates CA <chain certificate> CLI command.
Verify IPsec Services
To verify if IKE and IPsec services are running on your device:
- For Windows, refer to Microsoft documentation about IKE and AuthIP errors.
- For Linux, refer to strongSwan documentation.
Verify IKE Negotiation
- Enable IKE and IPsec logs by issuing the following configuration commands:
- admin@Branch-1-cli(config)% set debug ike level debug-verbose
- admin@Branch-1-cli(config)% set debug ipsec all-flags level all
- Open the log file /var/log/versa/versa-ipsec-ctrl.log and search for 'Received' and 'Sending'. A successful handshake between the SASE client and SASE gateway looks similar to the following packet flow example:
- If the SASE gateway does not receive the SA init packet, check the firewall between the SASE client device and SASE gateway.
- If the SASE gateway receives the SA init packet, but the SASE client device does not receive the response, check the firewall between the SASE gateway and the device.
- If there are certificate issues, it fails after the SASE gateway sends CERTREQ.
- Check for errors in the /var/log/versa/versa-ipsec-ctrl.log file.
-
Received : [HDR, SA, KE, Nonce, N(REDIRECT_SUPPORTED), N(NAT_DETECTION_SOURCE_IP), N(NAT_DETECTION_DESTINATION_IP), N(FRAGMENTATION_SUPPORTED)]
Sending  : [HDR, SA, KE, Nonce, N(NAT_DETECTION_SOURCE_IP), N(NAT_DETECTION_DESTINATION_IP), N(HTTP_CERT_LOOKUP_SUPPORTED),
             N(FRAGMENTATION_SUPPORTED), CERTREQ, Vid, Vid]
Received : [HDR, IDi, N(INITIAL_CONTACT), N(MOBIKE_SUPPORTED), IDr, CP, N(ESP_TFC_PADDING_NOT_SUPPORTED), N(NON_FIRST_FRAGMENTS_ALSO), SA, TSi, TSr]
Sending  : [HDR, IDr, CERT, AUTH, EAP, Vid, Vid]
Received : [HDR, EAP]
Sending  : [HDR, EAP, Vid, Vid]
Received : [HDR, EAP]
Sending  : [HDR, EAP, Vid, Vid]
Received : [HDR, EAP]
Sending  : [HDR, EAP, Vid, Vid]
Received : [HDR, AUTH]
Sending  : [HDR, AUTH, CP, SA, TSi, TSr, N(ESP_TFC_PADDING_NOT_SUPPORTED), N(NON_FIRST_FRAGMENTS_ALSO), Vid, Vid]
Verify ESP Packets
To verify if ESP packets from the SASE client reach the SASE gateway:
- Run tcpdump on the SASE gateway WAN interface by filtering the public IP address of the SASE client, and check if the SASE gateway receives ESP packets. To find the public IP address of your computer, open a web browser and type https://ipchicken.com/.
Verify IKE and ESP Packets are Unmodified
If ISPs modify IKE and ESP packets between the SASE client and SASE gateway, the SASE client and SASE gateway drop these packets. Check the SASE client device and SASE gateway packets to verify that the actual packets are not modified.
Best Gateway Selection Issues
This section describes issues in selecting the best SASE gateway and how to avoid them.
Enable Versa Private TLV Infomation
To avoid issues in selecting the best SASE gateway, ensure that you enable Versa private TLV information in the multiprotocol BGP (MP-BGP) instance.
To enable Versa private TLV information:
- In Director view:
- Select the Administration tab in the top menu bar.
- Select Appliances in the left menu bar.
- Select an appliance in the main pane. The view changes to Appliance view.
- Select the Configuration tab in the top menu bar.
- Select Networking > Virtual Routers in the left menu bar.
- Click the + Add icon. The Configure Virtual Router window displays.
- Select the BGP tab in the left menu bar. The main pane displays a list of the BGP instances that are configured.
- Click the + Add icon. The Add BGP Instance window displays.
- Select the Versa Private TLV tab. For more information, see Enable BGP Versa Private TLVs.

- Click Announce Local to enable gateways or hub-controller nodes (HCN) to support selection of the best gateway.
- Click Announce Remote only if the gateways and hub-controller nodes are not in a full-mesh topology.
- Click OK. For more information about selecting the best gateway, see Configure the Versa SASE Client To Select the Best Gateway.
Verify Optimal Gateway Status
To verify the optimal gateway status, check if the optimal-gateway status is true for the required secure access session.
- To display the secure access sessions, run the show saccess session history all | grep <user-name> CLI command. For example:
vsm-vcsn0> show saccess session history all | grep user-name
879   1   112.100.10.10   gateway   discover     200   user@abc.com
880   1   112.100.10.11   gateway   autoprelogin 200   user@abc.com
881   1   112.200.10.12   gateway   discover     200   user@abc.com
- To check the if the optimal gateway status in a session is true, issue the show saccess history id <session-id> | grep optimal-gateway command. In the example below, the session id is 880 and optimal-gateway displays 'true'. Note that the output has been truncated.
vsm-vcsn0> show saccess session history id 880 | grep optimal-gateway
<versa-secure-access mandatory="true" version="1.0">
  <prelogin mandatory="true">
    <code>200</code>
    <message>success</message>
  </prelogin>
  <gateway mandatory="true">
    <actions mandatory="true">
      <prelogin>prelogin</prelogin>
      <login>login</login>
      <otp-gen>otp_gen</otp-gen>
      <otp-verify>otp_verify</otp-verify>
      <metrics>metrics</metrics>
      <discover-gateway>discover_gateway</discover-gateway>
    </actions>
  </gateway>
  <optimal-gateway>true</optimal-gateway>
- If optimal-gateway is 'false', check that the Versa private TLV is enabled as explained in the first point above. Run the following VSMD VTY commands to confirm all SASE gateway information is learnt and shared between them. To connect to VSMD VTY, run the Linux shell command vsh connect vsmd:
- show vsm sdwan site-information all 0. For example:
vsm-vcsn0> show vsm sdwan site-information all 0
+-----------+-----------------------------------+-------------------+-------------------------+------------+--------+----------------------------+--------+--------+----+
| Tenant ID | Site Name                         | WAN-IP(s)       | Tenant-Name-List      | Site Type  | Flags  | Co-ordinates        | CPU(%) | MEM(%) | REGION  |
+-----------+-----------------------------------+-------------------+-------------------------+------------+--------+----------------------------+--------+--------+-----+
| 1         | Site 1                            | [IP-1]          | [tenant-name]         | Branch     | -      | [location]          | 3      | 16     |         |
| 1         | Site 2                            | [IP-2]          | [masked-name]         | Branch     | -      | [location]          | 3      | 14     |         |
| 1         | Site 3                            | [IP-3]          | [masked-name]         | Branch     | -      | [location]          | 2      | 42     |         |
| 1         | Site 4                            | [IP-4]          | [masked-name]         | Branch     | -      | [location]          | 2      | 32     |         |
| 1         | Site 5                            | [IP-5]          | [masked-name]         | Branch     | -      | [location]          | 5      | 21     |         |
| 1         | Site 6                            | [IP-6]          | [masked-name]         | Branch     | -      | [location]          | 2      | 32     |         |
| 1         | Site 7                            | [IP-7]          | [masked-name]         | Branch     | -      | [location]          | 4      | 25     |         |
+-----------+-----------------------------------+-------------------+-------------------------+------------+--------+----------------------------+--------+--------+-----+
- show vsm sdwan domain-information all 0. For example:
vsm-vcsn0> show vsm sdwan domain-information all 0
+---------------------------+-----------+-----------------------------------+-------+
| Domain Name        | Tenant ID | Site Name                  | Tenant Name   |
+---------------------------+-----------+-----------------------------------+-------+
| [domain-1]         | 1         | [site-1]                   | [tenant]      |
| [domain-1]         | 1         | [site-2]                   | [tenant]      |
| [domain-1]         | 1         | [site-3]                   | [tenant]      |
| [domain-1]         | 1         | [site-4]                   | [tenant]      |
| [domain-2]         | 1         | [site-1]                   | [tenant]      |
| [domain-2]         | 1         | [site-2]                   | [tenant]      |
| [domain-3]         | 1         | [site-1]                   | [tenant]      |
| [domain-4]         | 1         | [site-2]                   | [tenant]      |
| [domain-5]         | 1         | [site-3]                   | [tenant]      |
| [domain-6]         | 1         | [site-4]                   | [tenant]      |
| [domain-7]         | 1         | [site-5]                   | [tenant]      |
| [domain-8]         | 1         | [site-6]                   | [tenant]      |
| [domain-9]         | 1         | [site-7]                   | [tenant]      |
| [domain-10]        | 1         | [site-8]                   | [tenant]      |
| [domain-11]        | 1         | [site-9]                   | [tenant]      |
+---------------------------+-----------+-----------------------------------+-------+
- show vsm sdwan site-information all 0. For example:
IKE or IPsec Flaps
Versa Networks recommends the following configurations for IKE and IPsec in secure access and IPsec VPN profiles due to rekey issues on Windows or MacOS:
admin@HE-DC-Branch-1-cli(config)% show orgs org-services Corp-Inline-Customer-1 ipsec vpn-profile split-tunnel-RAS
vpn-type     remote-access-server;
local-auth-info {
    auth-type certificate;
    cert-name vpn.versa-networks.crt;
    ca-chain intermediate-1.crt;
}
local {
    interface-name vni-0/0.0;
}
routing-instance     Internet-1-Transport-VR;
tunnel-routing-instance Corp-Inline-Customer-1-LAN-VR;
ipsec {
    force-nat-t disable;
    mode tunnel;
    encryption-algorithms [ 3des aes128 aes128-ctr aes128-gcm aes256 aes256-gcm ];
    hash-algorithms       [ md5 xcbc sha1 sha256 sha384 sha512 ];
    pfs-groups            [ mod-none mod1 mod2 mod5 mod14 mod15 mod16 mod19 mod20 mod21 mod25 mod26 ];
    anti-replay enable;
    life {
        duration 12600;
    }
}
ike {
    version v2;
    groups                [ mod1 mod2 mod5 mod14 mod15 mod16 mod19 mod20 mod21 mod25 mod26 ];
    encryption-algorithms [ 3des aes128 aes256 ];
    hash-algorithms       [ md5 sha1 sha256 sha384 sha512 ];
    lifetime 21600;
    auth-domain     split-tun-authdom;
}
address-pools {
    address-range 172.30.57.1-172.57.1.254;
    netmask 255.255.255.0;
    accessible-subnets 10.0.0.0/8;
    dns internal {
        nameserver [ 10.48.0.99 ];
        domain [ versa-networks.com ];
}
}
remote-auth-type     eap;
ras-id               split-tunnel;
remote-auth-eap-type mschap-v2;
[ok][2021-07-02 14:49:21]
[edit]
admin@HE-DC-Branch-1-cli(config)%
admin@HE-DC-Branch-1-cli(config)% show orgs org-services Corp-Inline-Customer-1 secure-access servers
Fremont {
    priority 100;
    ipsec-profile-id split-tunnel;
    host {
        fqdn vpn.versa-networks.com;
    }
    tunnel-authentication {
        x509-cert intermediate-1.crt;

    }
    traffic-steering {
        split-tunnel enabled;
        routes [ private_ip ];
    }
    captive-portal {
        url https://vpn.versa-networks.com/secure-access/services/gateway;
        https enabled;
        certificate {
        ca-cert intermediate-1.crt;
    }
    version 0.0.1;
    }
    ike {
        dpd-timeout 30;
        pfs-group mod2;
        lifetime 28800;
        ike-transform 3des-sha1;
        ike-version v2;
    }
    ipsec {
        pfs-group mod2;
        lifetime 3600;
        ipsec-transform esp-3des-sha1;
    }
    client-auth-type eap;
    client-auth-eap-type mschap-v2;
    dns-resolvers [ versa-networks.com ];
    app-delete disabled;
 }
[ok][2021-07-02 14:49:53]
[edit]
admin@HE-DC-Branch-1-cli(config)% show orgs org-services Corp-Inline-Customer-1 secure-access profiles
default-servers {
    traffic-steering {
    split-tunnel enabled;
    routes [ private_ip ];
    }
    ike {
        dpd-timeout 30;
        pfs-group mod2;
        lifetime 28800;
        ike-transform 3des-sha1;
        ike-version v2;
    }
    ipsec {
        pfs-group mod2;
        lifetime 3600;
        ipsec-transform esp-3des-sha1;
    }
    dns-resolvers [ versa-networks.com ];
    servers [ Fremont ];
    client-controls {
        add-custom-gateway  enabled;
        edit-gateway        enabled;
        multi-tenancy       enabled;
        remember-credential enabled;
        change-password-url https://https://10.40.46.248:9182/vnms/secure/access/localuser;
        portal-lifetime 1440;
        }
}
Troubleshoot SASE Gateway Traffic Issues
This section describes how to troubleshoot scenarios in which traffic does not work through the SASE gateway.
Verify the Gateway FQDN
To verify that your organization's SASE gateway FQDN resolves without any conflicts:
- In Director view:
- Select the Administration tab in the top menu bar.
- Select Appliances in the left menu bar.
- Select a device name in the main panel. The view changes to Appliance view.
- Select an organization.
- Select the Configuration tab in the top menu bar.
- Select Others > Organization > Limits in the left menu bar. The main pane displays the associated organizations.
- Click an organization name in the main pane. The Edit Organization Limit window displays.

- In the General tab, check the Gateway FQDN field for the SASE gateway FQDN, and add or update as required.
- For information about configuring other parameters, see Configure Organization Limits.
- Click OK.
To check if the FQDN resolves to the IP address, run the nslookup CLI command. For example:
C:\Users\user-name> nslookup
Default Server:  dns-hq.versa-networks.com
Address:  10.10.11.111

> server 8.8.8.8
Default Server:  dns.google
Address:  8.8.8.8

> vpn.versa-networks.com
Server:  dns.google
Address:  8.8.8.8

Non-authoritative answer:
Name:    vpn.versa-networks.com
Address: 200.20.60.81
Check Firewall Rules on the SASE Gateway
To check firewall rules on the SASE gateway to allow traffic coming through the Versa Secure Access (VSA) tunnel, configure firewall rules on the SASE gateway to allow traffic from SASE client. Use the predefined ‘remote-client’ zone to match all traffic coming over the VSA tunnel.
To configure firewall rules on the SASE gateway:
- In Director view:
- Select the Administration tab in the top menu bar.
- Select Appliance in the left menu bar.
- Select the device in the main pane. The view changes to Appliance view.
- Select the Configuration tab in the top menu bar.
- Select Services > Next Gen Firewall > Security > Policies in the left menu bar, and then select the Rules tab.
- Click the
 Add icon to define rules for the policy. The Add Rule window displays.

- Select the Source tab.
- In the Source Zone field, click the icon, and then select the predefined zone 'remote-client'.
- Select the Enforce tab, and then select any security profile based on your requirement. For more information, see Configure Access Policy Rules (ACL Rules).
- Click OK.
Verify Traffic Sent to the Customer Site
To verify traffic sent to the customer site:
- If the customer site is directly connected over LAN on SASE gateway, issue tcpdump to verify that traffic is leaving the LAN, and filter the source by the tunnel IP address of the SASE client.
- If the customer site is connected over SD-WAN, verify that traffic is going over the SD-WAN tunnel to remote SD-WAN devices.
- If the customer site is connected over a site-to-site IPsec tunnel, verify that traffic is sent out of the IPsec tunnel to the customer site router. For more information, see Configure Site-to-Site Tunnels.
Verify the Reverse Route from the Customer Site
You can NAT all traffic from the SASE client to the pool IP address, or route it without any NAT. Verify that there is a reverse route in the customer site router for traffic sourced and sent to the customer site.
Supported Software Information
Releases 21.2.1 and later support all content described in this article.
Additional Information
Configure the Versa SASE Client To Select the Best Gateway
Troubleshoot the SASE Client