Configure and Activate Multitenant RAC/RAS Devices with HA
![]() For supported software information, click here.
For supported software information, click here.
This article provides step-by-step procedures for configuring and activating a multitenant high availability (HA) device. A managed service provider (MSP) can configure and active a remote access client (RAC) or remote access service (RAS) HA device on supported Versa Networks hardware appliances.
Note that only an operator can add a private (SASE) gateway, multitenant, or multitenant RAC/RAS gateway for a provider organization. An MSP must contact Versa Customer Support to add a SASE or multitenant device. For more information, see Add Devices Using Titan Portal.
To configure and activate a multitenant HA device, you do the following:
- Create a site using two identical software licenses.
- Create a multitenant RAC/RAS device configuration for the site. When you save the device configuration, it is stored in the Titan cloud portal. You should configure WAN interfaces, and add or change any required LAN and WAN ports, before deployment; you cannot do so after you activate the SASE gateway, multitenant, or multitenant RAC/RAS gateway.
- Deploy the device configuration to the Versa Controller node, to inform the Controller node that the configuration exists.
- Activate the appliance.
Create an HA Site for the Multitenant RAC/RAS Gateway
To create a multitenant RAC/RAS HA site for the CSG700 series, CSG1000 series, CSG2500 model, CSG5000 model, and other supported Versa Networks hardware appliances:
- Log in to Titan Portal as an MSP.
- Enter your username and password, and then click Login.
- In the Organizations dashboard, click the MSP organization in the grid.

- Click Configure in the left menu bar to display the Configure dashboard.
- Click one of the license package icons to display the available license packages.
- CSG700 Series
- CSG1000 Series
- CSG2000 Series
- CSG5000 Series
- cCSG Series
- vCSG Series
- To add the site to the honeycomb, select a license package from the list and drag it onto the dashboard, or click on Map View, and drag and drop the license package to automatically fill in the information.

- In the New Site: Configuration window, select a region and then click Continue.

- Enter information for the following fields, and then click Save.

Field Description Site Name Enter a name for site. Address Enter the street address, zip code, city, state, and country.Enter the street address, zip code, city, state, and country. Latitude and Longitude - Autogenerate—Click the Autogenerate toggle to enable the determination of latitude and longitude coordinates automatically.
- Manual—Click the Manual toggle to enable the determination of latitude and longitude coordinates manually. This is the default.
Topology Click to configure the site role:
- Configure as Hub—Configure the device as a hub in a hub-and-spoke topology.
- Configure as Hub Controller—Configure the device as a hub controller in a hub-and-spoke topology. This device takes up a dual role of a hub and a Controller node. This function is typically required when branches are connected to a private MPLS network that has no direct access to the Versa Networks–hosted Controller node in the public internet. Note that Hub Controller is not available in HA mode.
HA Mode Click to configure two appliances in a high availability (HA) pair. For more information, see Configure and Activate a High Availability Site. Service (Group of Fields) Enter the information for Site A and Site B. - Service Type
Displays the type of the device. - Device Name
Enter a name for the device. A user cannot change the device name after creating the device. - Device Model
Enter the device model. - Serial Number
Enter the serial number of the device, which is printed on the bottom of the CSG appliance. - Image Version
(Optional.) Select the Versa Operating SystemTM (VOSTM) software version of the device. The user must select the software version before deploying the device. For a SASE gateway or multitenant gateway, and remote access VPN deployments, the VOS software version must be 21.3.x or higher. Contact Versa Networks Customer Support before you upgrade a SASE gateway, multitenant gateway, or remote access VPN devices. If a SASE gateway, multitenant gateway, or remote access VPN devices are up and running with the latest Release 21.3.x version, and if you undeploy and reactivate the same devices, you must perform a software upgrade for these devices because the devices come up running the latest Release 21.2.x version. If the devices are up and running older versions of Release 21.2.x, you must upgrade the devices to the latest Release 21.3.x version. - Service Add-ons
Select the services to add to the site. - Install the HA wiring on each router, with wires for the WAN1, cross-connect interface, and Virtual Route Redundancy Protocol (VRRP). For more information, see Install High Availability Wiring.
Configure a Multitenant RAC/RAS Gateway for an HA Device
- In the Organizations dashboard, click the MSP organization in the grid.
- In the Configure dashboard, hover over the device in the honeycomb and click Configure to open the site information window.
- In the Network > LAN > Ethernet and WiFi Ports screen, select a LAN port in the menu to the right of Quick Picks.

- Click the HA Cross-Connect Port toggle to enable the HA cross-connect port.

- Click the WAN box to display the Network > WAN screen.

- Select a WAN interface and enter information for the following fields.

Field Description Remote Access VPN Interface Click the toggle switch to enable remote access VPN. FQDN Enter the fully qualified domain name (FQDN) of the device. The FQDN cannot be changed after activation of the device. You must deactivate or undeploy the device and start over again to change the FQDN. If any tenants are attached to the device, delete the tenants before deactivating or undeploying the device. Network Address For remote access VPN, you must configure at least one WAN port on the device with a static IP address, which is used to terminate the remote clients. - Address
Enter a static IP address to use to terminate the remote clients. - Gateway
Enter the IP address of the gateway. - Click the LAN box to open the Network > LAN > Ethernet Ports screen.

- Click the VLAN Tagging toggle to enable the VLAN in the multitenant RAC/RAS gateway LAN interface to connect the server. A user must enable VLANs on all required LAN ports for multitenant RAC/RAS gateway before the device is deployed and activated. A user cannot enable VLANs after activating a multitenant RAC/RAS gateway.

- Click Select VLAN ID and then click the
 icon.
icon.

- In the Add VLAN ID popup window, enter information for the following fields.

Field Description VLAN Name (Required) Enter a name for the virtual LAN. VLAN ID (Required) Enter a name for the virtual LAN. MTU (Required) Enter the maximum transmission unit size, in bytes, of the largest protocol data unit that the port can receive or transmit. Note that in Release 10.0, you cannot change the default MTU value.
Range: 72 through 9000 bytes
Default: 1500 bytesIP Address - IP Address/Mask (Required)
Enter the IP address and prefix length. The prefix length must be /25. Multiple IP Addresses Click to enter multiple IP addresses and subnet masks. The maximum number of IP addresses allowed is 4. Multiple IP addresses and subnet masks are available only with static IP configuration. To use DHCP server or DHCP relay, select the single IP Address/Subnet Mask. - IP Address/Mask (Required)
Enter the IP address and prefix length, and then click the
 Add icon. To delete an IP address/mask, click the
  Minus icon.
VRRP Click the slider to enable VRRP. - Virtual IP Address
Enter a valid IPv4 address. The virtual IP address and VLAN IP address/mask must be in the same IP subnet. - Priority
Enter the priority to assign to the interface. The interface with the higher or highest priority becomes the VRRP active router.
When you configure a VRRP priority value, be aware that value can be reduced by various objects that VRRP can track, such as interfaces, routes, monitor objects, and HA state. When you choose a priority value, you must make sure that you account for a worst-case scenario so that the priority never goes below 0. As an example, consider a VRRP group that is configured on the interface LAN1Port0 (vni-0/0.0) with priority of 200 and that is tracking the interface LAN1Port1 (vni-0/1.0), which has a priority cost of 20. When the LAN1Port1 (vni-0/1.0) goes down, its priority cost is subtracted from the configured priority of 200. As a result, the current (dynamic) priority becomes (200 – 20), or 180. In this example, the LAN1Port1 (vni-0/1.0) interface is the tracking object.
Range: 1 through 255
Default: 100
DHCP Server Click to configure DHCP server settings and DHCP client options. For more information, see Configure DHCP Settings and Configure Custom DHCP Options. DHCP Relay Click to configure DHCP relay settings. For more information, see Configure DHCP Relay Settings. Bandwidth (Group of Fields) You can configure uplink bandwidth and downlink bandwidth on the LAN interface or per VLAN (subinterface). Values entered in Kbps and Gbps are automatically converted to Mbps. - Uplink Bandwidth
Enter the actual uplink bandwidth purchased from the service provider. The uplink bandwidth is the traffic from the branch to the outside network.
Range:- In Kbps—1000 through 40000000 Kbps
- In Mbps—1 through 40000 Mbps
- In Gbps—0.001 through 40 Gbps
- Downlink Bandwidth
Enter the actual downlink bandwidth purchased from the service provider. The downlink bandwidth is the traffic from the outside network to the branch.
Range:
- In Kbps—1000 through 40000000 Kbps
- In Mbps—1 through 40000 Mbps
- In Gbps—0.001 through 40 Gbps
- Click
 and then click Continue.
 - Create and save the configuration for each device separately.
- Click Save, and then click the down arrow next to Save to display the Deploy popup window.
- Click Deploy, and then choose an activation method. Note that you can deploy a multitenant device the same way you deploy a normal device, and you can activate it using the global ZTP, WiFi, and Versable methods. To deploy and activate a device, see Deploy a Device Configuration and Activate an Appliance.
- Activate each device using the method selected in the previous step. You must activate each device separately.
Note: In a cloud gateway service, locking and unlocking devices are not supported, and you cannot reassign, add, or delete a LAN or WAN interface after the port is activated. Also, you cannot undeploy and redeploy the multitenant RAC/RAS gateway service after it is activated. To redeploy a cloud gateway service, you must first deactivate the gateway.
Install Certificates for Remote Access
A certificate authority (CA) is an entity that issues digital certificates that are used to verify the ownership of a public key. The digital certificates allow a party to trust the signature that is made by a private key that corresponds to the certified public key.
After a Titan device requests a certificate from a CA server, the CA server issues the certificate. You then need to upload the certificate to the CA database so that it can be used for verification.
Note: You do not need to install certificates if you are deploying a multitenant device without RAC/RAS.
Before you upload a CA certificate, you must upload a key file with the extension .key.
The key file, certificate file, and CA chain file that you import to the private SASE gateway or multitenant RAC/RAS must have the same name as the FQDN of the SASE gateway, multitenant RAC/RAS gateway, or remote access VPN device. For example, if the gateway FQDN is SASEQA1test.com, the filenames must be as follows:
- Key filename—SASEQA1test.com.key
- Certificate filename—SASEQA1test.com.crt
- CA chain filename—ca.SASEQA1test.com.crt (The CA chain filename is a combination of root CA and intermediate CA.)
To upload a key file:
- Locate the device in the grid, and then click the 3-dot icon in the Action column to display the available actions.

- Click Upload/Download CA Certificates and then click Upload Key.

- In the Add Key popup window, enter the following information.

- Enter a key name and password.
- Click Browse File to select the key file to upload. The file must be in .key format.
- Click System Key to store the key file at system level for the cloud gateway service and remote access VPN. Selecting this option is mandatory. Note that you must select System Key after you upload the key file.
- Click Add.
- Click Upload CA Certificates, and then click Upload Certificate.

- In the Add CA Certificate popup window, enter the following information.

- Enter a certificate name.
- Select the key file name.
- Click Browse File to select the CA certificate file to upload. The file must be in .crt, .cer, or .pem format.
- Click System Certificate to store the certificate file at system level for the gateway and remote access VPN. Selecting this option is mandatory. Note that you must select System Certificate after you upload the certificate file.
- Click Add. The certificate filename displays.
- Click the
 icon to download the file.
- Click Upload CA Certificates and then click Upload CA Chain.

- In the Add CA Chain popup window, enter the following information.

- Enter a CA chain name.
- Click Browse File to select the CA chain file to upload. The file must be in .crt format.
- Click System CA Chain to store the CA chain file at system level for the SASE or multitenant (RAC/RAS) gateway and remote access VPN. Selecting this option is mandatory. Note that you must select System CA Chain after you upload the CA chain file.
- Click Add.
Manage Captive Portal Ports
To configure captive portal ports:
- Click Configure in the left menu bar to open the Configure dashboard.
- Hover over the device in the honeycomb, and click Configure to open the site information window.
- Select the Miscellaneous tab, and then click the Manage Captive Portal link.

- In the Captive Portal Port Number popup window, enter information for the following fields and then click Continue. You must configure all WAN ports with a WAN port captive portal configuration.

Field Description Network Name (Required) Click Please Select. In the Network Name popup window, click a WAN network. HTTP Enter the HTTP port number to use to redirect captive portal pages over HTTP. The default port is 44990. For WAN ports used for remote access VPN, use port 80. HTTPS Enter the HTTPS port number to use to redirect captive portal pages over HTTPS. The default port is 44991. For WAN ports used for remote access VPN, use port 443. - Click Continue. For more information, see Configure Miscellaneous Parameters.
Manage Multitenant License for a Tenant
An MSP can onboard a multitenant or multitenant RAC/RAS gateway to a tenant using the cloud gateway option. For more information, see Add a Cloud Gateway and Add a Multitenant or Multitenant RAC/RAS Gateway to a Device.
To manage multitenant gateway licenses and devices in the Titan Inventory:
- Log in to Titan Portal as an MSP.
- Enter your username and password, and then click Login.
- In the Organizations dashboard, click the MSP organization in the grid.
- Click the Inventory icon in the left menu bar to open the Inventory dashboard.
- Select Multitenant Gateway in the Device Type field.

Add a Multitenant RAC/RAS Gateway Service
An MSP, a store admin, or a reseller provider organization can select cloud gateway services and order the VSPA and VSIA services. You can select available multitenant RAC/RAS gateway and advanced services such as VLAN and port details. Note that you can select cloud gateway services as a multitenant RAC/RAS gateway to get the service. If you have already added a multitenant RAC/RAS gateway, then you cannot select the cloud gateway option.
After you order cloud gateway service for a tenant, you can upgrade the service tier, users, or bandwidth. For more information, see Upgrade or Renew SASE Gateway Licenses.
If a store admin adds a tenant to a SASE gateway, the tenant onboarding progress can be viewed from the task list of the individual organization, not from the store admin organization task list.
To add a multitenant RAC/RAS gateway service:
- In the Organizations dashboard, locate the organization in the grid, click the 3-dot icon, and then click Add Devices.
- In the Add Device Details popup window, click the Cloud Gateway button.
- Select gateway type Multitenant RAC/RAS, and then enter information for the following fields.
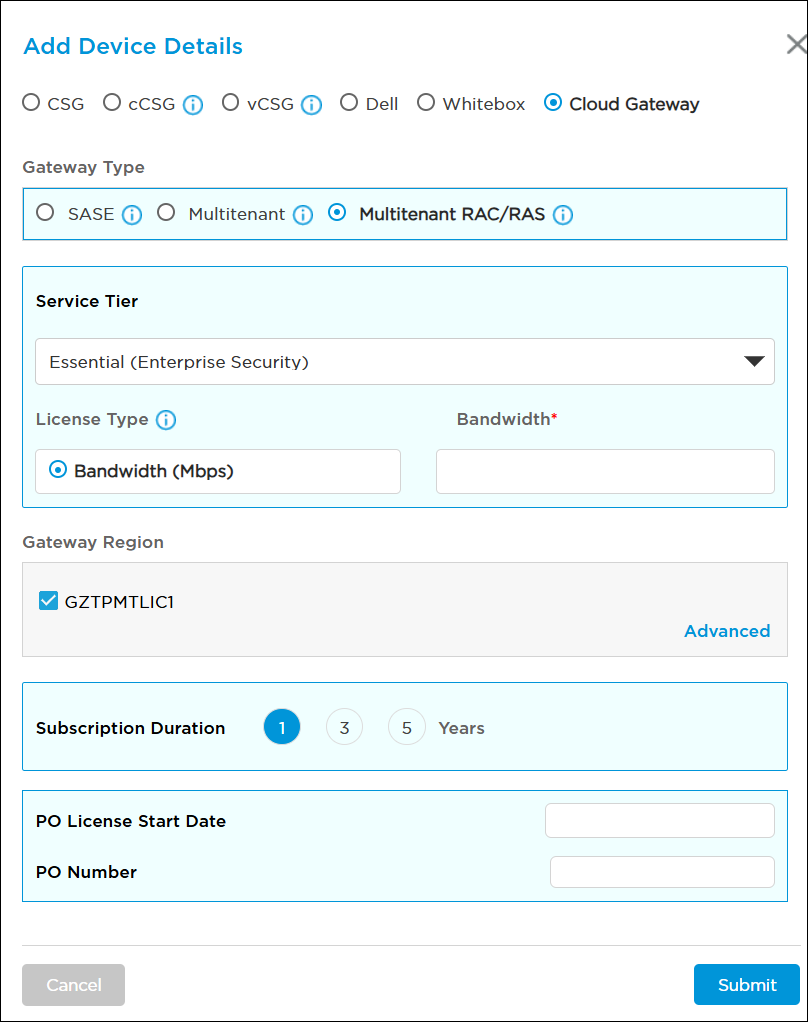
Field Description Service Tier Select the service tier:
- Essential (enterprise security)
- Professional (advanced security)
- Secure Application Optimization
License Type Select the license type.
- Bandwidth (Mbps)
Select the license type based on bandwidth. - Bandwidth (Required)
Enter the maximum bandwidth for the device. The bandwidth can be allocated per tenant until the maximum bandwidth is used. Gateway Region Select the multitenant RAC/RAS gateway regions. You must deploy and activate all gateways with the similar LAN port numbers. Otherwise, the system configures the tenant on the first available LAN port.
Click the Advanced option to enter the VLAN and port details for the multitenant RAC/RAS gateway services. If you do not select any VLAN ID, the organization ID is used as the VLAN ID.

Subscription Duration Click the length of the subscription:
- 1 year
- 3 years
- 5 years
PO License Start Date Enter the purchase order license start date. PO Number Enter the purchase order number. - Click Submit.
Configure a VLAN Profile and VRRP for Multitenant RAC/RAS Gateway Tenants
The Virtual Router Redundancy Protocol (VRRP) is a network protocol used to provide high availability (HA) by creating a virtual IP address that multiple routers share. VRRP allows you to have one or more backup routers when you are using a statically configured router on a LAN. If the active, or master, router fails, a backup router takes over and continues to forward packets. For VRRP, you configure a virtual IP address, that is shared among two or more routers. One router is designated the master and the others are backup routers. If the master router fails, the virtual IP address is mapped to the IP address of one of the backup routers.
The virtual IP address serves as a default gateway for hosts on a LAN. If the primary router fails, a backup router takes over the virtual IP address, ensuring uninterrupted connectivity for devices. VRRP helps enhance network reliability and minimize downtime by providing a seamless transition between active and standby routers.
When an active router goes down, VRRP switches over to a backup router in 3 seconds. If all the WAN connections of an active router go down, VRRP switches over to a backup router in 22 seconds.
If you disable VRRP, ensure that you change the IP address in the subnet, and then commit the change to having duplicate IP addresses when you publish the configuration.
Before you configure VRRP for an existing multitenant RAC/RAS gateway, you must configure an IP SLA monitor in Versa Director with the following parameters. For more information, see Configure IP SLA Monitor Objects. Titan Portal creates IP SLA monitor automatically when a user deploys and activates a new multitenant RAC/RAS gateway. If you do not have access to Versa Director, contact Versa Customer Support.
- Name—Name the IP SLA monitor LAN.
- Monitor Type—Select ICMP for the type of packets to send to the IP address.
- Routing Instance—Select the routing instance as Provider LAN-VR routing instance.
- IP address—By default, Titan Portal supports LAN monitor IP address 8.8.8.8. If required, user can change the IP address in Versa Director, and commit the configuration.
Virtual routing and forwarding (VRF) is a multisegmented network topology that is part of the organization's VPN. A VRF allows you to configure and maintain more than one instance of the routing and forwarding table in the same router. To configure routing, you must associate a VRF with a specific LAN port.
To use custom VRFs for a tenant in the multitenant RAC/RAS gateway device, you must lock the tenant device (branch, hub, or spoke), create and attach a custom VRF to the LAN port for the tenant, and then publish the configuration. When you publish the configuration, the custom VRF displays in the multitenant RAC/RAS gateway device for the MSP to add the custom VRF for the tenant. For more information, see Configure LAN Connections.
Only an MSP can attach custom VRFs to the multitenant RAC/RAS gateway device for a tenant and attach it to the default LAN port. The default LAN port is the port for which the default VLAN is associated when you order the multitenant RAC/RAS gateway services for tenants. This LAN port is the default interface configured with the default VRF.
An MSP can create a new VLAN with a custom VRF when configuring the LAN profile and Ethernet from the tenant-level. An MSP can select the custom VRF on the multitenant RAC/RAS gateway tenant in the tenant modification mode. You can select different tenants in a provider organization and select different VRFs to the tenants. Note that a custom VRF cannot be added to a provider organization.
After the VRF option is enabled for a tenant organization, an administrator cannot disable it using the create or edit organization window. By default, one VRF is created with the name of the organization and all the initial LAN ports are associated with this VRF. You cannot delete the default LAN-VRF after it is created.
Note: An MSP, store administrator, or a provider must contact Versa Customer Support to delete a multitenant RAC/RAS gateway tenant with a custom VRF configured.
An MSP or a customer must contact Versa Customer Support to delete a custom VRF associated with the multitenant RAC/RAS gateway.
To configure VRRP on a multitenant RAC/RAS gateway LAN interface:
- Log in to Titan Portal as a store admin, MSP, or reseller.
- Enter your username and password, and then click Login.
- In the Organizations dashboard, click the MSP provider organization in the grid.

- In the Configure dashboard, hover over the device in the honeycomb and click Configure.

- In the configuration window, click Tenant, select the tenant on which to configure VRRP, and then click Continue.

- Click the LAN box to open the Network > LAN screen.

- Click LAN Profiles to configure a VLAN profile and VRRP.

- In the Network > LAN > LAN Profiles > VLAN Profile screen, enter information for the following fields.

Field Description VLAN Name (Required) Enter a name for the virtual LAN. VLAN ID (Required) Enter a virtual LAN identifier.
Range: 0 through 4094
Default: None
MTU Enter the maximum transmission unit size, in bytes, of the largest protocol data unit that the port can receive or transmit. Note that in Release 10.0, you cannot change the default MTU value.
Range: 72 through 9000 bytes
Default: 1500 bytesVRF (Required) Select a VRF instance. You must add the VRF only to the default LAN port for which default VLAN is associated when you order the multitenant RAC/RAS gateway services for a tenant. To create a custom VRF, see Configure LAN Connections.
An MSP, store administrator, or a provider must contact Versa Customer Support to delete a multitenant RAC/RAS gateway tenant with a custom VRF configured.
IP Address - IP Address/Mask (Required)
Enter the IP address and prefix length. The prefix length must be /25. Multiple IP Addresses Click to enter multiple IP addresses and subnet masks. The maximum number of IP addresses allowed is 4. Multiple IP addresses and subnet masks are available only with static IP configuration. To use DHCP server or DHCP relay, select the single IP Address/Subnet Mask. - IP Address/Mask (Required)
Enter the IP address and prefix length, and then click the
 Add icon. To delete an IP address/mask, click the
  Minus icon.
VRRP Click the slider to enable VRRP. Virtual IP Address
Enter a valid IPv4 address. The virtual IP address and VLAN IP address and mask must be in the same IP subnet. Priority
Enter the priority to assign to the interface. The interface with the higher or highest priority becomes the VRRP active router.
When you configure a VRRP priority value, be aware that value can be reduced by various objects that VRRP can track, such as interfaces, routes, monitor objects, and HA state. When you choose a priority value, you must make sure that you account for a worst-case scenario so that the priority never goes below 0. As an example, consider a VRRP group that is configured on the interface LAN1Port0 (vni-0/0.0) with priority of 200 and that is tracking the interface LAN1Port1 (vni-0/1.0), which has a priority cost of 20. When the LAN1Port1 (vni-0/1.0) goes down, its priority cost is subtracted from the configured priority of 200. As a result, the current (dynamic) priority becomes (200 – 20), or 180. In this example, the LAN1Port1 (vni-0/1.0) interface is the tracking object.
Range: 1 through 255
Default: 100
Bandwidth (Group of Fields) You can configure uplink bandwidth and downlink bandwidth on the LAN interface or per VLAN (subinterface). Values entered in Kbps and Gbps are automatically converted to Mbps. - Uplink Bandwidth
Enter the actual uplink bandwidth purchased from the service provider. The uplink bandwidth is the traffic from the branch to the outside network.
Range:
- In Kbps—1000 through 40000000 Kbps
- In Mbps—1 through 40000 Mbps
- In Gbps—0.001 through 40 Gbps
- Downlink Bandwidth
Enter the actual downlink bandwidth purchased from the service provider. The downlink bandwidth is the traffic from the outside network to the branch.
Range:
- In Kbps—1000 through 40000000 Kbps
- In Mbps—1 through 40000 Mbps
- In Gbps—0.001 through 40 Gbps
-
Click Add VLAN and then click Publish.
To enable VRRP in an existing VLAN profile:
- Navigate to Network > LAN > LAN Profiles > VLAN Profile.
- In the VLAN Tags section, select the VLAN profile on which to enable VRRP, and then enter information for the following fields.

Field Description VRRP Click the VRRP slider to enable VRRP. Virtual IP Address Enter a valid IPv4 address. The virtual IP address and VLAN IP address and mask must be in the same IP subnet. Priority Enter the priority to assign to the interface. The interface with the higher or highest priority becomes the VRRP active router.
Range: 1 through 255
Default: 100
- Click Update VLAN, and then click Publish.
Add Multiple VLANs for Multitenant RAC/RAS Gateway Tenants
An MSP, a store admin, or a reseller with provider organization can activate a private gateway device and purchase multitenant RAC/RAS gateway services (cloud gateway) for customers.
- Log in to Titan Portal as an MSP.
- In the Organization dashboard, select the organization.
- In the Configure dashboard, click Configure.
- In the configuration window, click Tenant, select the Tenant, and then click Continue.
- Click the LAN box to open the Network > LAN > Ethernet Ports screen.

- Click the VLAN Tagging toggle to enable VLAN in multitenant RAC/RAS gateway LAN interface to connect the server.

- Click Select VLAN ID and then click the
 icon.
icon.

- In the Add VLAN ID popup window, enter information for the following fields.

Field Description VLAN Name (Required) Enter a name for the virtual LAN. VLAN ID (Required) Enter the virtual LAN ID.
Range: 0 through 4094MTU (Required) Enter the maximum transmission unit size, in bytes, of the largest protocol data unit that the port can receive or transmit. Note that in Release 10.0, you cannot change the default MTU value.
Range: 72 through 9000 bytes
Default: 1500 bytesVRF (Required) Click the VRF list, and then select a VRF instance. You must add the VRF only to the default LAN port for which default VLAN is associated when you order the multitenant RAC/RAS gateway services for a tenant. To create a custom VRF, see Configure LAN Connections.
An MSP, store admin, or a provider must contact Versa Customer Support to delete a multitenant RAC/RAS gateway tenant with a custom VRF configured.
IP Address - IP Address/Mask (Required)
Enter the IP address and prefix length. The prefix length must be /25. Multiple IP Addresses Click to enter multiple IP addresses and subnet masks. The maximum number of IP addresses allowed is 4. Multiple IP addresses and subnet masks are available only with static IP configuration. To use DHCP server or DHCP relay, select the single IP Address/Subnet Mask. - IP Address/Mask (Required)
Enter the IP address and prefix length, and then click the  Add icon. To delete an IP address/mask, click the
  Minus icon.

VRRP Click the slider to enable VRRP. Virtual IP Address Enter a valid IPv4 address. The virtual IP address and VLAN IP address must be in the same IP subnet. Priority Enter the priority to assign to the interface. The interface with the higher or highest priority becomes the VRRP active router.
When you configure a VRRP priority value, be aware that value can be reduced by various objects that VRRP can track, such as interfaces, routes, monitor objects, and HA state. When you choose a priority value, you must make sure that you account for a worst-case scenario so that the priority never goes below 0. As an example, consider a VRRP group that is configured on the interface LAN1Port0 (vni-0/0.0) with priority of 200 and that is tracking the interface LAN1Port1 (vni-0/1.0), which has a priority cost of 20. When the LAN1Port1 (vni-0/1.0) goes down, its priority cost is subtracted from the configured priority of 200. As a result, the current (dynamic) priority becomes (200 – 20), or 180. In this example, the LAN1Port1 (vni-0/1.0) interface is the tracking object.
Range: 1 through 255
Default: 100
DHCP Server Click to configure DHCP server settings and DHCP client options. For more information, see Configure DHCP Settings and Configure Custom DHCP Options. DHCP Relay Click to configure DHCP relay settings. For more information, see Configure DHCP Relay Settings. Bandwidth (Group of Fields) You can configure uplink bandwidth and downlink bandwidth on the LAN interface or per VLAN (subinterface). Values entered in Kbps and Gbps are automatically converted to Mbps. - Uplink Bandwidth
Enter the actual uplink bandwidth purchased from the service provider. The uplink bandwidth is the traffic from the branch to the outside network.
Range:
- In Kbps—1000 through 40000000 Kbps
- In Mbps—1 through 40000 Mbps
- In Gbps—0.001 through 40 Gbps
- Downlink Bandwidth
Enter the actual downlink bandwidth purchased from the service provider. The downlink bandwidth is the traffic from the outside network to the branch.
Range:
- In Kbps—1000 through 40000000 Kbps
- In Mbps—1 through 40000 Mbps
- In Gbps—0.001 through 40 Gbps
- Click
 and then click Continue.
 - To add multiple VLANs to the tenant, repeat Steps 6 through 8.
Renew or Upgrade Multitenant RAC/RAS Gateway Licenses
You must renew a multitenant RAC/RAS gateway license before the license expires. If a license has expired, the Configure and Inventory dashboards display the site with license expired status and the network configuration window displays in purple and has read access only. You must renew the license to make any changes to the device configuration.


To renew a multitenant RAC/RAS gateway license in the Titan Inventory:
- Log in as an MSP and select the tenant organization.
- Click the Inventory icon in the left menu bar to open the Inventory dashboard.
- Select Multitenant Gateway in the Device Type field.
- Click Renewal.

- In the Renewal popup window, enter the number of days to renew the license.
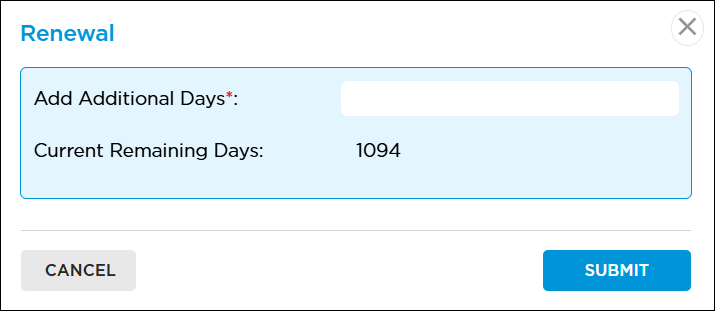
- Click Submit.
To upgrade a multitenant RAC/RAS gateway license in the Titan Inventory:
- Log in as an MSP and select the tenant organization.
- Click the Inventory icon in the left menu bar to open the Inventory dashboard.
- Select Multitenant Gateway in the Device Type field.
- Click Upgrade.

- In the Upgrade popup window, enter the following information.

Field Description Available Gateway Select the Available Gateway. Click Advanced option to enter the VLAN ID and port details for the multitenant RAC/RAS gateway services. If you do not select any VLAN ID and port, the organization ID is taken as the VLAN ID and the first LAN port is taken as the port by default. If you are adding a new gateway to a tenant, you must enter the same tenant VLAN ID for the gateway.
VSIA and RAC/RAS Bandwidth (Group of Fields) - Service Tier
Select the tenant service tier to which to upgrade.
- New Bandwidth (Mbps)
Enter the maximum bandwidth for the device, in megabits per second (Mbps). - Click Submit.
Supported Software Information
Releases 11.3 and later support all content described in this article.