Configure and Activate a Site
![]() For supported software information, click here.
For supported software information, click here.
This article provides a step-by-step procedure to configure and activate a Versa CSG300, CSG700, CSG1000, or CSG2000 series appliances in a Titan portal for sites that have a single CSG appliance. It also describes other procedures you can perform to manage appliances and sites.
After you activate a device, you can display live status information, view device analytics, and monitor individual device status from the Live Monitoring, Analytics, and Monitor dashboards. For more information, see Manage Device Analytics and Monitor Device Status.
Configure and Activate a Site
To configure and activate a site with a single CSG300, CSG700, CSG1000, or CSG2000 series appliance, perform the following steps, which are described in this section:
- Create a site using a software license.
- Create a device configuration for the site.
- Deploy the device configuration.
- Activate the appliance.
Note that after you activate a device, the configuration screen displays a Publish option in place of the Save option. Publish saves the configuration in the Titan cloud portal and the appliance. Procedures in this article use Save and Publish interchangeably.
Create a Site
This section provides the step-by-step procedure to create a site for CSG150, CSG300, CSG700, CSG1000, CSG2000, and CSG5000 series appliances.
It is recommended that you choose the site topology type before saving the device configuration. To change the topology after saving, you must undeploy the configuration, change the topology, and then redeploy the configuration.
Note that you cannot change the license type after creating the site. If you need to correct the license type, you must remove the site and then recreate it.
To create a site for an appliance:
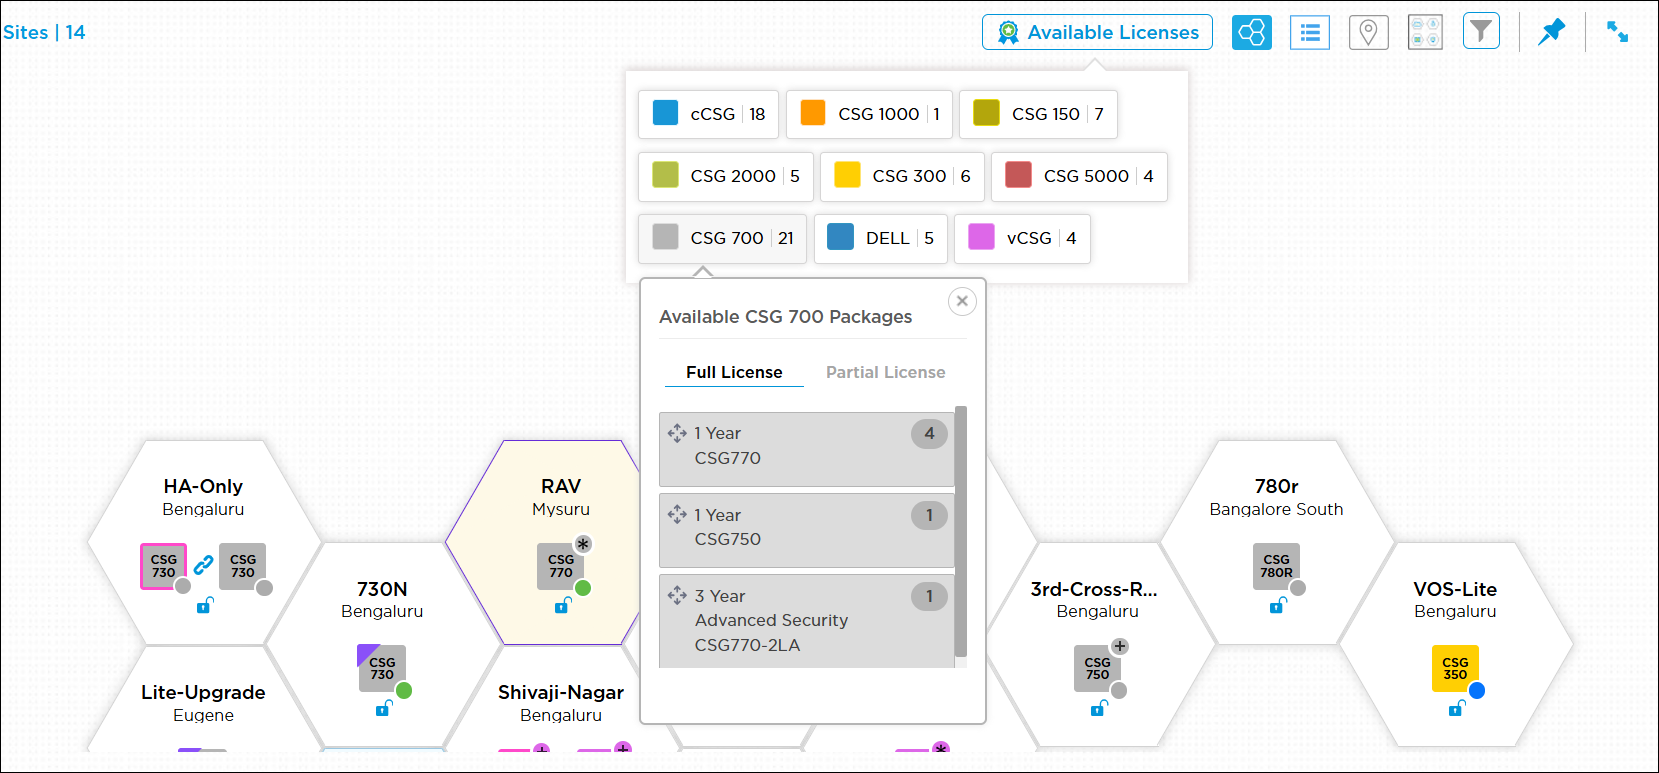
- Click Configure in the left menu bar to open the Configure dashboard.
- Click one of the license package icons to display available license packages:
- CSG150 Series
- CSG300 Series
- CSG700 Series
- CSG1000 Series
- CSG2000 Series
- CSG5000 Series
Licenses use the following naming conventions.
Name Description None No WiFi or LTE WLA WiFi and LTE WLA-4GP WiFi, LTE, and 4-port copper Gigabit Ethernet PoE ports 2LA No WiFi, 2 LTE 2LA-4GP No WiFi, 2 LTE, and 4-port copper Gigabit Ethernet PoE ports
- To add the site to the honeycomb, drag the license package onto the dashboard.

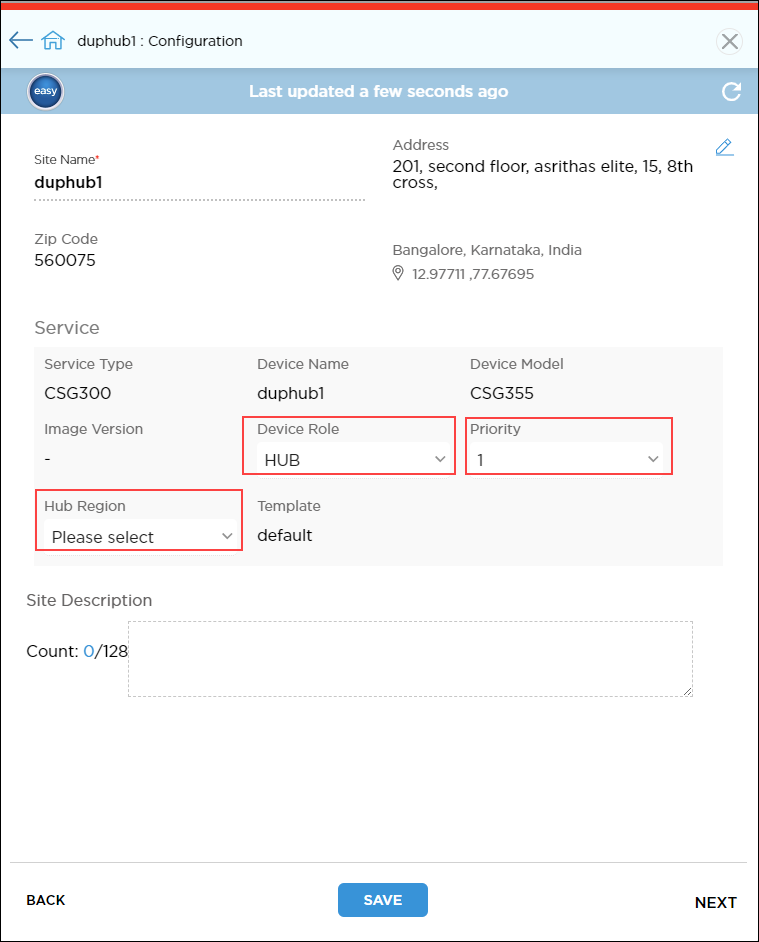
- In the New Site Configuration window, enter information for the following fields.

Field Description Site Name Enter a name for the site. Address Enter the site's street address, zip code, city, state, and country. Latitude and Longitude - Autogenerate—Click the Autogenerate toggle to automatically determine the latitude and longitude coordinates of the device.
- Manual—Click the Manual toggle to enter the latitude and longitude coordinates manually. This is the default.
Device Group Select the device group that inherits the device configuration from another device. Topology Click to configure the site role:
- Configure as Hub—Configure the device as a hub in a hub-and-spoke topology.
- Configure as Hub-Controller—Configure the device as a hub-controller in a hub-and-spoke topology. This device takes up a dual role of a hub and a Controller node. This function is typically required when branches are connected to a private MPLS network that has no direct access to the Versa Networks–hosted Controller node in the public internet.
- Configure as Spoke—A hub must already be configured to configure a spoke.
- Full Mesh—Configure the device as part of a full-mesh topology
HA Mode Click to configure two appliances in a high availability (HA) pair. For more information, see Configure and Activate a High Availability Site. Service (Group of Fields) - Service Type
Displays the type of the device. - Device Name
Enter a name for the device. You cannot change the device name after creating the device. - Device Model
Enter the device model. - Serial Number
Enter the serial number of the device, which is printed on the bottom of the CSG appliance. - Image Version
Select the Versa Operating SystemTM (VOSTM) software version of the device.

When you create a new device, the latest version of the VOS software image is selected by default. When you activate a device, the device upgrades to the latest VOS software image on Ubuntu 18.04 (Bionic). Note that the VOS software on Ubuntu 14.04 (Trusty) is not compatible with VOS version 22.1.4 or later. You must upgrade all Titan devices to Ubuntu 18.04 (Bionic).
You must select the software version before you deploy the device because you cannot edit the field after the device is deployed.
Select Please Select option to activate the device with the preferred VOS version running Ubuntu 14.04 (Trusty) on Versa Director. If the preferred version is not available, the device is activated with the latest software version available on the system (device). The device does not attempt to upgrade and uses the version currently installed. After activation, contact Versa Networks customer support to upgrade the device to Ubuntu 18.04 (Bionic).
For deployed devices, the Image Version field displays the VOS software version that you have selected when deploying the device.
For an existing SASE gateway, multitenant, or remote access VPN device that is already deployed, the VOS software version must be 22.1.4 or later. Before you upgrade a SASE gateway, multitenant, or remote access VPN device, contact Versa customer support.
For a new multitenant or remote access VPN device, select the Latest Version from the Image Version drop-down list when deploying the device. This automatically upgrades the device to the latest VOS software version available, if the device is running an older version of VOS software.
- Device Role
Displays the site role selected for a device. - Priority
For hub and hub-controller topologies, select the priority of the hub or hub-controller device. - Hub Region
For hub and hub-controller topologies, select the region in which to place hub or hub-controller device. - Spoke Group
For a spoke topology, select the spoke group. - Service Add-ons
Select the services to add to the site. Site Description Enter a text description for the site. The description can be a maximum of 128 characters. Note that for HA devices, the site description is common for both primary and secondary devices. - Click the down arrow next to Deploy to display the Save popup.

- Click Save. Titan Portal saves the new site information in the Titan cloud and creates a honeycomb for the site.
Modify a Site Topology
After you create and activate a site, you can change the site topology type on demand in the site configuration window for deployed and activated devices. You can select from the following type changes:
- Full mesh to hub
- Full mesh to spoke
- Hub to full mesh
- Hub to spoke
- Spoke to full mesh
- Spoke to hub
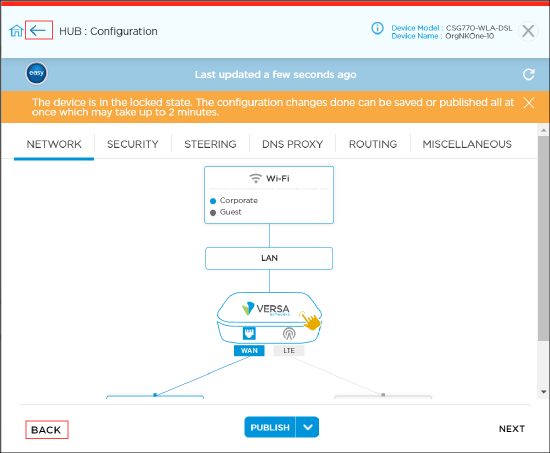
You first lock the device, and then you change the topology and its associated fields and publish the changes. Note that you do not need to undeploy or deactivate a device to change the site topology.
To lock the device, click the enable lock mode option in the honeycomb view in the Titan Portal home screen. The lock icon displays only if the device is deployed. A blue lock icon indicates that the device is unlocked, and a red lock icon indicates that the device is locked. After you publish the changes to Titan Portal, you then unlock the device.
To change the topology type for a site:
- Click Configure in the left menu bar to open the Configure dashboard.
- If the device is deployed or activated, lock it in the device honeycomb in Configure Dashboard.
- Click the
 Lock icon in the honeycomb to lock the device.

- Enter a reason for enabling lock mode in the Enable lock mode popup window, and then click Yes.

- Click the
- Hover over the device in the honeycomb, and then click Configure to open the site information window.

- In the site configuration popup window, click Back or the backward arrow icon.

- In the site information screen, enter information for the following fields.
Field Description Device Role
Select Full Mesh, Hub, or Spoke. Priority
For hub and hub-controller topologies, select the priority of the hub or hub-controller device. Hub Region
For hub and hub-controller topologies, select the region in which to place hub or hub-controller device. Spoke Group
For a spoke topology, select the spoke group. - Click Save.
- Click the
 icon in the honeycomb to unlock the device, and then click Yes.
Change a Device Template
After you create and activate a device, you can change the template on demand in the site configuration window for deployed and activated devices. Note that changing a template resets all existing device configuration and replaces the configuration with the selected template. If you change a template, you must configure the WAN network DHCP or static IP addresses before you redeploy or publish the device configuration as per the new template selected to avoid the network outages.
To change the template, you first lock the device. To lock the device, click the enable lock mode option in the honeycomb view in the Titan Portal home screen. The lock icon displays only if the device is deployed. A blue lock icon indicates that the device is unlocked, and a red lock icon indicates that the device is locked. Then, you change the template and its associated configuration and publish the changes. After you publish the changes to Titan Portal, you then unlock the device.
If you change the template for a remote access VPN device, you must configure the FQDN, IPsec tunnel address pool, and captive portal before you publish the configuration.
To change the template for a site:
- Click Configure in the left menu bar to open the Configure dashboard.
- If the device is deployed or activated, lock it in the device honeycomb in Configure Dashboard.
- Click the
 Lock icon in the honeycomb to lock the device.
 - Enter a reason for enabling lock mode in the Enable lock mode popup window, and then click Yes.
- Click the
- Hover over the device in the honeycomb, and then click Configure to open the site information window.

- In the site configuration popup window, click Back or the backward arrow icon.

- In the site information screen, click the Template field and select a template.

- In the Caution popup window, click Continue, and then click Next.

- Click the WAN icon to open the Network > WAN screen. Enter the required information, and then click Publish or Re-deploy.
- The popup window displays a message to review the WAN configuration. Click Continue.

- To unlock the device:
- Click the Lock icon in the honeycomb to unlock the device.
- In the popup window, click Yes.

- Click the
The following video describes how to create a site for CSG appliances.
Create a Device Configuration
To create a device configuration for the site, see the configuration procedures in Configure Security and Configure Traffic Steering.
When you save the device configuration, it is stored in the Titan cloud portal.
Deploy a Device Configuration
After you have created a site, you can create and deploy its device configuration. Deploying the device configuration copies the configuration information to the Versa Director and informs the Versa Controller that the configuration exists. After the configuration is deployed, any changes you save are automatically copied to the Versa Director.
You can deploy a device configuration from any Configuration window by clicking Deploy at the bottom of the window. After you deploy the configuration, the Deploy option no longer displays.
Note that you should configure WAN interfaces before deploying the device configuration.
To deploy the device configuration:
- From the bottom of any configuration window, click Deploy.

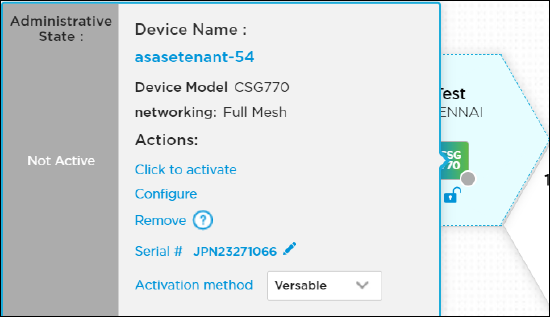
- In the Activation popup, select the activation method:
- Versable—Activate the appliance using Versable from a mobile phone running the Titan Mobile app.
- GZTP—Activate the appliance over the internet using Titan Portal or Titan Mobile.
- WiFi—For appliances that support WiFi, use WiFi to activate from a laptop using Titan Portal or from a mobile phone running the Titan Mobile app.

- For GZTP activation, click the pencil icon then enter the appliances serial number if it is not shown.

- Click Continue. A confirmation message displays.
Activate the Appliance
Activation validates the appliance, downloads its configuration, and allows traffic to begin flowing through it. You can activate the device using the Versable, GZTP, or WiFi method. To activate an appliance using GZTP or WiFi, see Activate an Appliance. To activate an appliance using Versable, see Activate Using Versable.
Edit a Site
Sites are locations or offices of a provider and its customers. For a deployed and activated devices, you can edit the address of the site. You first lock the device, and then you edit the site address and publish the changes. The address is updated on the honeycomb view and in the map view of the site, and on Versa Director.
To edit a site:
- Click Configure in the left menu bar to open the Configure dashboard.
- If the device is deployed or activated, lock it in the device honeycomb in Configure Dashboard.
- Hover over the device in the honeycomb, and click Configure to open the site information window.
- In the site configuration popup window, click Back or the backwards arrow icon.
- In the site information screen, click the Edit icon. Edit the site address, and then click Publish.

- Click the
icon in the honeycomb to unlock the device, and then click Yes.
Verify Device Status
The state of the device displays on the customer dashboard. To view the state of the device, hover over the device in the honeycomb. You can deploy a maximum of two devices per site.

Device status is categorized by color, as described in the following table
| Status Color | Description |
|---|---|
| Green | Device is active and reachable. |
| Grey | Device is not active. |
| Orange | Device is not deployed. |
| Red | Device is down. |
| Yellow | Device is out of sync with the configuration on the Director node and Titan. |
To verify that a device is active and that its operational state is up:
- Click Configure in the left menu bar to open the Configure dashboard.
- Hover over a site in the honeycomb and verify that the Administrative State is Active.
- In the Actions column, verify that the Configure link is active. To view details about the configuration, click Configure.

- Click Monitor in the left menu bar to open the Monitor dashboard.
- Hover over a site in the honeycomb and verify that that the Operation State is Up and that the device and Versa Director status are in sync.

- In the Actions column, do the following:
- Click Monitoring Dashboard to view Networking, Security, and Device status in the Monitor window. See Monitor Device Status.
- Click Advance Monitoring to view the status from Versa Director. See Monitor a Device from a Director Node.
- Click Reboot Device to reboot the device.
- Click Restart Services to restart the Titan device services.
- Click Sync Configuration to sync the configuration changes from the device to Versa Director and Titan Dashboard.
Make Changes After Deployment or Activation
Some items cannot be changed after deployment or activation. In those cases, you must undeploy and redeploy the device configuration, or deactivate (remove) and then recreate the site, as described in the sections below
Note: You must wait 5 minutes after undeploying a device configuration before redeploying. Titan must sync internal data structures when you undeploy; if this process is not complete you will receive an error message when you attempt to activate the appliance.
For the following configuration changes, you must undeploy a device configuration and then redeploy it, for both activated and unactivated devices:
- Add an additional WAN interface to the site, for example, if a system has only one WAN interface and you need to configure an additional one.
- Remove a WAN interface. For example, if a system is configured for two WAN ports and you need only one port and do not choose to use the turn-off function of the port, you must undeploy the configuration to remove the WAN port.
- Change a site from being a single device to an HA pair.
- Change a WAN interface from internet to MPLS, or vice versa.
- Enable or disable the gateway feature on a WAN interface.
- Enable PPPoE on an already-deployed WAN interface.
For the following configuration changes, you must deactivate (remove) the site and then recreate it:
- Change the appliance model for a location.
- Remove a site from the system.
Undeploy a Device Configuration
Undeploying a device removes the configuration from the Versa Director. The saved device configuration is still present in the Titan cloud portal, and you can still change settings and redeploy. You undeploy a device configuration from the Inventory dashboard. For more information, see Perform Inventory-Related Actions.
Note that undeploying preserves the site and configuration information and the device license remains associated with the site, while deactivating a device (removing a site) deletes the device's configuration information and returns the device license to inventory.
Note: You must wait for 5 minutes after you undeploy a configuration before you redeploy and activate a device so that Titan has time to synchronize internal data structures. If the synchronization process is not complete, an error message displays when you try to activate the device.
Remove a Site
You can remove a site using the device-options card in the honeycomb or from the Inventory dashboard; see Perform Inventory-Related Actions. You can remove a site before deployment, after deployment, or after activation. To remove high availability sites, you use the device-options card to remove either one of the sites.
To remove a site using its device options card:
- From the Configure dashboard, hover over the device for the site to be removed.
- Click Remove on the options card for the device. A confirmation message displays, the site is removed from the honeycomb, and the device licenses used by the site are placed back in inventory.
Supported Software Information
Releases 11.3 and later support all content described in this article.