Activate an Appliance
![]() For supported software information, click here.
For supported software information, click here.
After you have deployed an appliance's configuration, you can activate the appliance. During the activation process, the appliance is authenticated and its configuration is copied from the Versa Controller. This article discusses activation using GZTP and WiFi with URL-based ZTP. For information about Versable activation, see the Titan Mobile documentation.
Titan uses the activation method that you chose during deployment. However, after deployment, you can switch activation methods. To switch between the WiFi and Versable methods, see Change the Activation Method, below. To switch between GZTP and one of the other two methods, you must undeploy and then redeploy the configuration. For more information, see Undeploy a Device Configuration.
Note: All CSG appliances must be running at least VOS Release 20.2.1 for Release 20.2.1-based regions. Upon activation, all CSG appliances are automatically upgraded to Release 20.2.1 if they are not at the minimum software revision level. Note that the upgrade process can take as long as 1 hour depending on connectivity, latency, and the available WAN bandwidth. To avoid disruption or delay, it is recommended that you upgrade the software on CSG appliances before activating them. For assistance, contact your Versa Titan reseller or Versa Networks account team.
Change the Activation Method
To change the activation method for a device:
- From the Configure dashboard, hover over the device to view its options card.
- Click the Activation method to display a drop-down menu, and then select WiFi or Versable.

To switch between GZTP and one of the other two methods, you must undeploy and redeploy the device configuration. For more information, see Undeploy a Device Configuration.
Activate an Appliance Using WiFi with URL-based ZTP
If an appliance model supports WiFi, you can activate it using URL-based ZTP. If an appliance does not support WiFi, connect a LAN cable to Port 2 and connect the other end to a laptop to activate the device.
Before you activate an appliance using WiFi with URL-based ZTP:
- Ensure that WAN port 0 is connected to the internet and that the power is turned on.
- If you are planning to use LTE for internet connectivity backup, ensure that you insert the SIM card in the appliance SIM slot.
To activate an appliance using WiFi with URL-based ZTP:
- On a laptop, connect to WiFi on the appliance using the following SSID and password:
- SSID—VERSA-ZTP-WiFi
- Password—VR00M123
- Click Configure in the left menu bar to open the Configure dashboard.
- Hover over the device to view its options card, and then click Click to Activate.

- In the Activate Device window, click Activate.

- The Web-UI Device Management portal displays in a browser tab. Click Start Activation.

- Wait while the system configures the device. You can view the progress in the Web-UI Device Management portal.

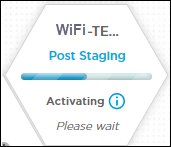
- Wait approximately 30 minutes for the activation to complete. The activation process proceeds through the following stages, which you can track using the messages icon:
- Staging Started—When you click Click to Activate, the appliance activation progress bar displays the status Staging Started, and the VOS software activates the appliance.

- Post Staging—When the appliance creation process starts in Titan Director, the appliance activation progress bar displays the status Post-Staging.

- Rebooting—After the appliance creation is successful, the appliance activation progress bar displays the status Rebooting, because the appliance reboot after it is created in Director.

- Connecting Device—When the appliance is up and has established a connection in Versa Director, the appliance activation progress bar displays the status Connecting Device.

- Device Activated—When the appliance is activated, the appliance activation progress bar displays the status Device Activated.

- Staging Started—When you click Click to Activate, the appliance activation progress bar displays the status Staging Started, and the VOS software activates the appliance.
-
Click the
 message icon to track the activation progress in each stage. The following is an example of an appliance activation message during different activation stages. You can also track the activation status from the Titan dashboard Task menu.
Description Device (Device name = checkbulk-2) activation Messages Titan Director 3:11:16 PM [ 2Factor Auth is skipped. ] 3:11:16 PM Connecting to appliance... 3:11:23 PM Setting up appliance... 3:11:28 PM Applying initial configuration 3:11:52 PM Security Files successfully uploaded to appliance. 3:11:52 PM checkbulk-2 is rebooting after applying template:{ checkbulk-2 } 3:11:53 PM Successfully Set Current Time. 3:11:54 PM Successfully Created Branch Appliance. UUID = ea26726c-98d5-49b7-90c8-fb41296afe0a Titan Monitor Service 3:11:24 PM ZTP started poststaging to apply staging template checkbulk-2 on device checkbulk-2 with serialNumber: checkbulk-2 3:12:09 PM ZTP poststaging completed successfully 3:15:09 PM Device checkbulk-2 connected to Versa Director successfully via controller controller1 after applying post-staging template Titan Backend 3:10:11 PM Device activation initialized successfully with activation method(Wi-Fi). 3:15:09 PM Waiting for the interface to come up and publish cloud profile 3:20:46 PM Successfully updated device cloud profiles 3:20:51 PM Successfully updated device spack version(Version = 2009) 3:20:51 PM Device activation completed successfully -
After a device is activated, the device displays a green circle. Hover over the device to view its options card, which indicates the administrative state as activated. To check the appliance's status, go to the Monitor option in the Titan dashboard.

-
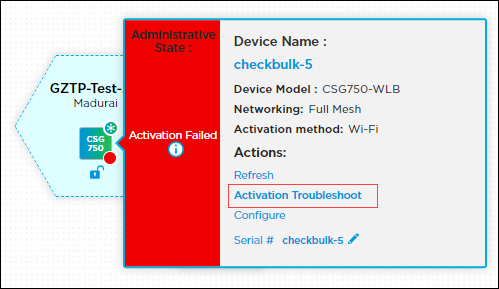
If an appliance activation is not successful, the device displays a red circle. Hover over the device to view its options card, which indicates the administrative state as activation failed.

- When the activation completes, the device reboots, and you are redirected back to the Titan device Configure dashboard, where you can verify device activation status. For more information, see Verify Device Status.
The following video describes the Titan WiFi activation methods.
Troubleshoot Issues with WiFi with URL-based ZTP Activation
If an appliance does not successfully establish a connection or if appliance activation is not successful, you are prompted to try again or contact Versa technical support. Hover over the device to view its options card. Click the ![]() icon to check the reason for the appliance activation failure.
icon to check the reason for the appliance activation failure.

To troubleshoot device activation in the popup window:
- Click Configure in the left menu bar to open the Configure dashboard.
- In the Configure dashboard, hover over the device to view its options card. Click Activation Troubleshoot.

- Follow the instructions in the Activation Troubleshoot popup window.

- Click OK.
- If activation is unsuccessful, click Refresh in Honeycomb to start activation again. Before you click Refresh, ensure that the appliance is switched on and that the WAN link is up and running.
- If, after multiple attempts, the activation continues to fail, click Contact Support.
Activate an Appliance Using GZTP
You can activate an appliance using GZTP.
Before you activate the appliance:
- Deploy the device on the Titan Portal dashboard.
- On the appliance, make sure that WAN1 Port 0 (vni-0/0), WAN2 Port 1 (vni-0/1), or LTE is connected to the internet.
- Keep the power turned off on the device until deployment is completed so that GZTP Versa Director needs the initial configuration of the device.
- If you are planning to use LTE for internet connectivity backup, make sure that the SIM card is inserted in the device.
To activate an appliance using GZTP:
- After the device is deployed, turn on the power.
- Click Configure in the left menu bar to open the Configure dashboard.
- In the Configure dashboard, hover over the device to view its options card. Click Click to Activate.

- In the Activate Device window, click Activate.

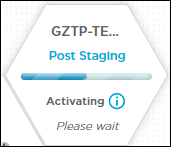
- Wait approximately 30 minutes for the activation to complete. The activation process proceeds through the following stages, which you can track using the messages icon:
- Staging Started—In this stage, Titan checks whether the appliance has been created in GZTP Director and fetches the appliance creation task. If the appliance creation failed for any reason, appliance activation fails. If appliance created is not initiated, Titan waits for 10 minutes and then appliance activation fails. In this case, check the WAN connection and reboot the appliance. After 2 minutes, click the Refresh button in Honeycomb and activate the appliance again.

- Post Staging—If create appliance process started in Titan Director, the appliance activation progress bar displays the status Post-Staging.

- Rebooting—After the appliance creation is successful, the appliance activation progress bar displays the status Rebooting, because the appliance reboot after it is created in Director.

- Connecting Device—When the appliance is up and the connection established in Versa Director, the appliance activation progress bar displays the status Connecting Device.


- Staging Started—In this stage, Titan checks whether the appliance has been created in GZTP Director and fetches the appliance creation task. If the appliance creation failed for any reason, appliance activation fails. If appliance created is not initiated, Titan waits for 10 minutes and then appliance activation fails. In this case, check the WAN connection and reboot the appliance. After 2 minutes, click the Refresh button in Honeycomb and activate the appliance again.
- Click the
 message icon to track the activation progress in each stage. The following is an example of an appliance activation message during different activation stages. You can also track the activation progress from the Titan dashboard Task menu also.
Description
Device (Device name = checkbulk-3) activation Messages

Gztp Director
1:53:19 PM    [ 2Factor Auth is skipped. ]
1:53:24 PM    Connecting to appliance...
1:53:40 PM    Setting up appliance...
1:54:01 PM    Applying initial configuration
1:54:15 PM    checkbulk-3-versatitan-qa is rebooting after applying template:{ TITAN-STAGING }
1:54:17 PM    Successfully Set Current Time.
1:54:17 PM    Successfully Created Branch Appliance. UUID = 17d1cfb8-6ac1-40f4-abc2-8bc583261b81

Titan Director
1:57:32 PM    [ 2Factor Auth is skipped. ]
1:57:32 PM    Connecting to appliance...
1:57:38 PM    Setting up appliance...
1:57:43 PM    Applying initial configuration
1:58:15 PM    Security Files successfully uploaded to appliance.
1:58:15 PM    checkbulk-3 is rebooting after applying template:{ checkbulk-3 }
1:58:17 PM    Successfully Set Current Time.
1:58:17 PM    Successfully Created Branch Appliance. UUID = 202d0ecc-9326-475e-a9da-08d0c618c841

Titan Monitor Service
1:57:39 PM    ZTP started poststaging to apply staging template checkbulk-3 on device checkbulk-3 with serialNumber: JAB20414612
1:58:24 PM    ZTP poststaging completed successfully
2:01:24 PM    Device checkbulk-3 connected to Versa Director successfully via
              controller controller1 after applying post-staging template

Titan Backend
1:57:39 PM    Device activation initialized successfully with activation method(GZTP).
2:01:24 PM    Waiting for the interface to come up and publish cloud profile
2:07:11 PM    Successfully updated device cloud profiles
2:07:15 PM    Successfully updated device spack version(Version = 2009)
2:07:15 PM    Device activation completed successfully
- After a device is activated, the device displays a green circle. Hover over the device to view its options card, which indicates the administrative state as activated. To check the appliance's status, go to the Monitor option in the Titan dashboard.

- If an appliance activation is not successful, the device displays a red circle. Hover over the device to view its options card, which indicates the administrative state as activation failed.

Troubleshoot Issues with GZTP Activation
If the appliance does not successfully establish connection or if appliance activation is not successful, you are prompted to try again or contact Versa technical support. Hover over the device to view its options card and click the ![]() icon to check the reason for the appliance activation failure.
icon to check the reason for the appliance activation failure.

To troubleshoot device activation in the popup window:
- Click Configure in the left menu bar to open the Configure dashboard.
- In the Configure dashboard, hover over the device to view its options card. Click Activation Troubleshoot.

- Follow the instructions in the Activation Troubleshoot popup window.

- Click OK.
- If activation is unsuccessful, click Refresh in Honeycomb to start activation again. Before you click Refresh, ensure that the appliance is switched on and that the WAN link is up and running.
- If, after multiple attempts, the activation continues to fail, click Contact Support.
Activate an Appliance with a PPPoE Interface
To activate an appliance with a PPPoE-enabled circuit on the WAN:
- The appliance must be running the latest version of VOS software, and it must match the VOS software version on the Versa Director.
- You must use the mobile app with the Versable or WiFi (using URL-based ZTP) activation method to activate the appliance. The GZTP activation method is not supported.
In many deployments, activation of an appliance over a PPPoE WAN circuit does not work for appliances that were shipped from the factory with an older version of the VOS software. To complete the activation and upgrade for these appliances, you need another DHCP-enabled WAN circuit or LTE. You can achieve this in one of the following ways:
- If the device has a PPPoE WAN circuit and an additional DHCP-enabled WAN or LTE circuit that does not use PPPoE, you use the additional DHCP-enabled WAN circuit to activate and upgrade the branch.The PPPoE WAN circuit can be used after the device activation and upgrade.
- If the device has only a PPPoE WAN circuit, you must have an additional temporary WAN circuit that is not PPPoE-based to use for the device activation and upgrade. The temporary WAN circuit can be DHCP-enabled Ethernet or LTE. If the additional WAN link is not available for activation, contact Versa Networks Customer Support.
To configure an additional temporary WAN circuit on the device:
- Configure a DHCP-enabled Ethernet WANT1(Port 0) circuit. For more information, see Configure WAN Connections.
- Deploy the device and connect the DHCP-enabled WAN1(Port0) to the device. For more information, see Deploy a Device Configuration.
- Start the activation and upgrade process. For more information, see Activate an Appliance.
- Monitor the status until the device is up. Ensure that an IP address is assigned on WAN1Port 0. For more information, see Verify Device Status.
After the device activation and upgrade complete, you can lock the device, remove the additional WAN link configuration, and configure WAN1 as the PPPoE WAN circuit. Ensure that WAN1 receives an IP address, which may take up to 5 minutes. For more information, see Edit WAN or LTE Interfaces in an Active Device.
The appliance is upgraded during the activation process, which may take 30 minutes or more depending on the bandwidth of the WAN link. Do not disconnect the device until the upgrade process is complete. You can monitor the device upgrade status from the Titan Monitor page.
Supported Software Information
Releases 11.2 and later support all content described in this article.
