Configure SASE Private Application Protection Rules
![]() For supported software information, click here.
For supported software information, click here.
SASE private application protection rules are firewall rules that you configure to define protection for custom applications. You configure these protection rules on a per-tenant basis. Private application protection is similar to internet protection, except that private application protection applies only to custom applications. You cannot configure private application protection for predefined applications or for application groups.
Private application protection rules consist of match criteria and enforcement actions. You can configure the following match criteria and enforcement actions:
- Applications—Match criteria based on individual applications, groups of applications, categories of applications, predefined URL categories (such as business and economy, computer and internet security, and entertainment and arts), and predefined reputations (such as high and low risk).
- User groups—Match criteria based on individual users or groups of users.
- Geolocation—Match criteria based on the geographic location of the source or destination traffic.
- Network Layer 3 and Layer 4—Match criteria based on the IP address of the source and destination traffic or on custom or predefined protocol-based services.
- Security enforcement—Security enforcement actions that are applied to traffic that matches the match criteria. You can allow, deny, or reject the traffic, and you can also create custom security enforcement profiles.
After you configure match criteria and security enforcement actions, you review and deploy the private protection rule.
Note that you must configure the SASE rules, profiles, and settings in the following order:
- Configure users and groups first and publish them to the gateway. For more information, see Configure User and Device Authentication.
- Configure site-to-site tunnels. For more information, see Configure SASE Site-to-Site Tunnels.
- Configure secure client access profiles and rules. For more information, see Configure SASE Secure Client Access Rules.
You do not need to configure the remaining SASE rules, profiles, and settings, including the rules for protecting private applications discussed in this article, in any particular order.
To configure private application protection, you must first create one or more private applications under Configure > Settings > User-Defined Objects > Applications. For more information, see Configure SASE User-Defined Objects. After you have created a private application, you create a private application rule in much the same way that you configure an internet protection rule.
When you begin to configure your first private application protection policy, the following screen displays to guide you through the procedure:

To configure private application protection rule match criteria:
- Go to Configure > Real-Time Protection > Private Application Protection.

The Private Application Protection Rules List screen displays all the private application protection rules that are already configured.

- In the horizontal menu bar, you can perform the following operations.

Operation Description Add Create a new internet protection rule. This button is active when no existing rule is selected. Clone Clone the selected private application protection rule. If you select this option, the configuration wizard for the rule displays with the Review & Deploy screen selected. You can rename the default name of the cloned rule, if desired, then click Save.
Reorder Reorder the selected private application protection rule. A popup window similar to the following displays.

1. Select one of the three options:
- Process the rule last
- Process the rule first
- Process the rule in specific placement—A list of the existing rules displays. Click the position in the list where you want to place the rule.
2. Click Move.
Delete Delete the selected private application protection rule. A popup window similar to the following displays.

Click Yes to delete the internet protection rule, or click No to retain the rule.
Propagate Propagate SSE changes to object configurations to any entity that uses that object in multiple SASE subtenants. Refresh Refresh the list of existing rules. - To customize which columns display, click Select Columns and then click to select or deselect the columns you want to display. Click Reset to return to the default columns settings.
The options are:
—Applications
—Users and Groups
—Device Groups
—Endpoint Posture
—Source & Destination
—Services
—Schedule
—Source
—Destination
—Security Enforcement
—Status
—Creation Date
—Last Modified
- Proceed to the next section to configure application filtering match criteria.
Configure SASE Application Filtering for Private Application Protection Rules
Private application protection rules are firewall rules for private applications, and they are applied on a per-tenant basis. Private application protection is similar to internet protection, except that it applies only to custom applications. For information about creating custom applications and application groups, see Configure SASE User-Defined Objects.
To configure application filtering for private applications:
- In the Private Application Protection Rules List screen, click + Add to create a rule. The Create Private Application Protection Rule screen displays, with the Application Group tab selected by default. All private applications are included in the match list by default, which means that all private applications are matched by this rule.

- To accept the default, click Next to continue to the next match criteria, Users & Groups.
- To configure the private application groups on which to filter, click the Application Group tab. The Applications screen displays, and the Application Group tab is selected by default. Any previously configured application groups display.

- Select the application groups to include in the match list, or type the name of the application group in the search box and then select it from the search results. In the following example, the application group ProductivityGroup is selected. To remove an application group from the list, click the X next to the application group name in the search box.

- Click the Applications tab in the submenu. The following screen displays.

- Select the applications to include in the match list, or type the name of the custom application in the search box and then select it from the search results.
- Click Back to return to the Applications screen, or click Next to continue to the next match criteria, Step 2, Users & Groups.
Configure SASE Users and User Groups, User Confidence Bands, and User Device Groups for Private Application Protection Rules
You create user and user group security rules to detect the users and user groups who are using applications on your network. These rules help to identify users who may have transferred files or transmitted threats. User and user group rules identify users based on their name or role rather than their IP address. In Releases 12.2.2 and later, you can also select the user confidence bands and user device groups to include in the match criteria.
To configure users and groups, user confidence bands, and user devices groups match criteria:
- In the Create Private Application Protection Rule screen, select Step 2, User & Groups. By default, all users and groups, user confidence bands, and user device groups are included in the match.

- To accept the defaults, click Next to continue to Step 3, Geolocation match criteria.
- To change the users and groups to include in the match list, click Customize in the Users & Groups box. The Users & Groups screen displays with All Users selected by default.

- You can choose the following user types to include in the match list:
- All Users—Apply the security policy to all users, whether whether they are authenticated (known) or not authenticated (unknown)
- Selected Users—Apply the security policy to users or groups from IdP that you select
- Known Users—Apply the security policy to all authenticated users
- Unknown Users—Apply the security policy only to users that are not authenticated
- If you choose Selected Users, the following screen displays. You can choose user groups, individual users, or both user groups and users to include.

- Select the group profile to use from the drop-down list.
- Select the User Groups tab, and then select the user groups to include in the match list, or type the name of a user group in the search box and then select it from the search results.
- To create a user group based on LDAP authentication, select an LDAP group profile, and then click + Add New User Group. In the Add User Group window, enter a user group name and a distinguished name (DN).
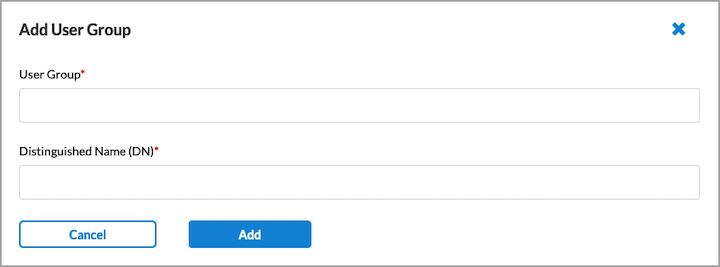
- Click Add. The new user group is added to the list of user groups.
- Select the Users tab. The following screen displays.

- Select the group profile.
- Select the Users tab, and then select the users to include in the match list, or type the name of a user in the search box and then select it from the search results.
- To create a new user based on LDAP authentication, select an LDAP group profile, and then click + Add New User. In the Add User window, enter a username and the user's work email in the fields provided.

- Click Add. The new user is added to the list of users.
- Click the
 Back arrow to return to the main Users & Groups screen, or click Next to continue to Step 3, Endpoint Posture match criteria.
Configure Endpoint Posture for Private Application Protection Rules
Endpoint posture allows you to select predefined and user-defined Endpoint Information Profiles (EIP) to include in the match criteria for private application protection rules. For information about configuring EIPs, see Configure Endpoint Information Profiles.
Endpoint posture also allows you to create additional match criteria by choosing a device/endpoint risk score to attribute to the entities within the network’s policy rule. This score helps determine the credibility and the likelihood of activities being legitimate or malicious. These match criteria can then be used when creating policies and rules. For more information, see Configure Endpoint Detection and Response.
To select EIPs to include in internet protection rule match criteria:
- In the Create Private App Protection Rule screen, select Step 3, Endpoint Posture. The following screen displays. By default, all endpoint devices and device/endpoint risk scores are applied to your security enforcements.

- To customize an EIP, click Customize in the EIP pane. The following screen displays.

- To create a new EIP profile, click
 Create New EIP Profile. For more information, see Configure Endpoint Information Profiles.
 - To add a user-defined EIP, select the User Defined tab, then click Add Existing EIP Profile. In the Add User Defined EIP Profiles popup window, select an EIP profile from the drop-down list.

- Click Add. You can add additional user-defined EIP profiles as shown above.
- To add a predefined EIP profile, select the Predefined tab in the Endpoint Information Profile (EIP) screen, then click Add Existing EIP Profile. In the Add Predefined EIP Profiles popup window, select an EIP profile from the drop-down list.

- Click Add. You can add additional predefined EIP profiles as shown above.
- Click the Back arrow to return to the Endpoint Posture screen.
To configure a device/endpoint risk score:
- In the Endpoint Posture screen, click Customize in the Device/Endpoint Risk Score pane. The following screen displays.

- Select one or more entity risk scores from the list. The options are:
- High Risk (80–100)
- Suspicious (60–80)
- Moderate Risk (40–60)
- Low Risk (20–40)
- Trustworthy (0–20)
- Click the Back arrow to return to the Endpoint Posture screen, or click Next to go to Step 4, Geo Locations.
Configure SASE Geographic Location Private Application Protection Rules
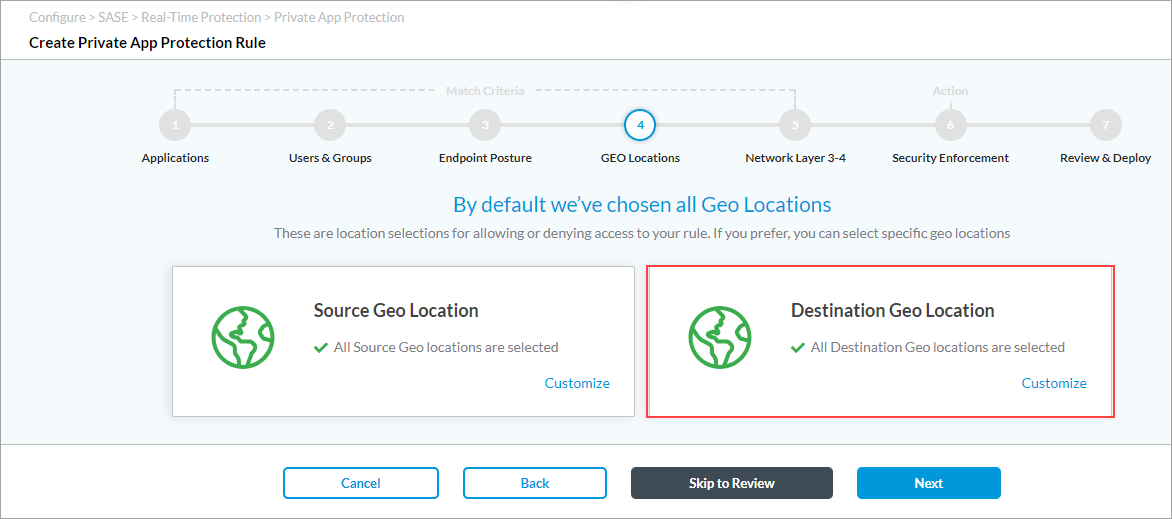
Versa SASE provides a list of predefined regions that you can use to create filter profiles based on geographic location for both source and destination. By default, all source and destination locations are included in the match list. This means that no filtering is done based on location and traffic flows to all destinations. You can customize the location by selecting the country, state, and city to include in the match list.
To configure geographic location private application protection rules:
- In the Create Private Application Protection Rule screen, select Step 4, Geo Locations.

- To accept the default, click Next to continue to Step 5, Network Layer 3-4 match criteria.
- To change the source geographic locations to include in the match list, click Customize in the Source Geo Location box. The following screen displays.

- Click Clear All to remove any already selected source locations. (Because all locations are selected by default, they are not displayed).
- (For Releases 12.2.1 and later.) To customize the geographic location by country, state, or city, click the down arrow in the Country box. The Selected section lists the country, state, or city with name and location type.

- Select Country, and then select one or more countries from the list. The map changes to highlight the countries that are selected.
- Select State, and then enter the name of the state and select the state from the list.
- Select City, and then enter the name of the city and select the city from the list.
- To remove a location from the selected list, click the X next to the location type name.
- To remove all locations from the selected list, click Clear All.
- In the Source Geo Location screen, click Back to go to Step 4, Geo Locations screen.

- To customize the destination geographic locations to include in the match list, click Customize under Destination Geo Location. The Destination Geo Location screen displays.
- Click Clear All to remove all the default destination locations. (Because all locations are selected by default, they are not displayed).
- Repeat Steps 5 to 7 to change the destination geographic locations.
- Click Next to go to Step 5, Network Layer 3-4 screen, or click Back to return to the Step 4, Geo Locations screen.
Configure SASE Network Layer 3 and Layer 4 Criteria for Private Application Protection Rules
You can create private application protection rule criteria based on the following:
- Services (Layer 4)
- Source and destination of the traffic (Layer 3)
- Schedules
To configure network rules based on these three match criteria:
- In the Create Internet Protection Rule screen, select Step 5, Network Layer 3-4. By default, all Layer 4 services and all source and destination traffic is included in the match, and no schedules have been configured.

- To accept the default settings, click Next to continue to Step 6, Security Enforcement.
Customize Services Match Criteria
You can configure private application protection rules to filter traffic according to the network service being provided. By default, all network services are selected, which means that security enforcement rules are applied to the traffic of all network service types. If desired, you can specify the services to which to apply security enforcement rules.
To customize match criteria based on Layer 4 services:
- In the main Network Layer 3-4 screen, click Customize in the Services box. The Services popup window displays. By default, all services are listed.

- In the All Services box, click the down arrow to select either Predefined or User-Defined services. The list of services is updated to display the selected services.
- To add a new user-defined service, click Add User Defined. The following screen displays.

- Select a protocol or a port number. The available options are AH, ESP, TCP, UDP, ICMP, or 0 through 255. If you select TCP, UDP, or TCP and UDP, the following popup window displays.
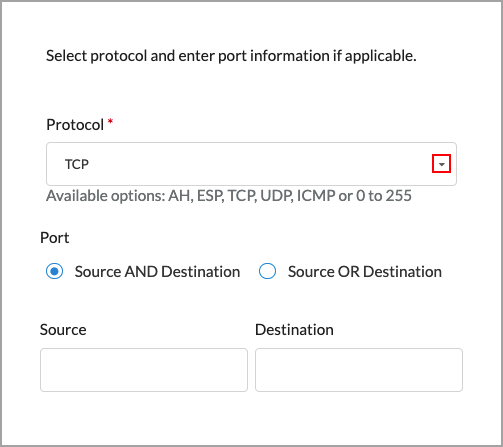
- Under Port, select either Source AND Destination or Source OR Destination, as follows:
- Source AND Destination—Select both a source port number and a destination port number (range 0 through 255)
- Source OR Destination—Select either a source port number or a destination port number (range 0 through 255)
- Click Next to to the Name and Tags step, then enter the following information.

Field Description Name Enter a name for the rule. Description (Optional) Enter a description of the rule. Tags (Optional) Add one or more tags. A tag is an alphanumeric text descriptor with no spaces or special characters. You can specify multiple tags added for the same object. The tags are used for searching the objects. Edit Click the  Edit icon to make any needed changes to your selections.
 - Click Save to save the new service. You can then select the service in the drop-down list. For information about creating user-defined services, see Configure SASE User-Defined Objects.
- In the Services screen, select the Layer 4 services to include in the rule, then click the Back arrow icon to return to the Network Layer 3-4 screen. From this screen you can customize source and destination information and configure policy schedules.
Customize Source and Destination Match Criteria
To customize source and destination information:
- Click Customize in the Source & Destination (Layer 3) box. In the Source & Destination (Layer 3) screen, select Source Address tab, and then enter information for the following fields. Note that in Releases 11.3.2 and earlier, you configure the source and destination on a single screen.

Field Description Negate Source Address Select to apply the rule to any source addresses except the ones in the Source Address field. IP Subnet Enter a list subnets to include in the match list, for example, 10.2.1.0/24. Separate the subnets with commas. IP Range Enter a list of IP addresses or ranges to include in the match list, for example, 10.2.1.1–10.2.2.2. Separate the IP addresses or ranges with commas. IP Wildcard Enter a list IP addresses and masks to include in the match list, for example, 192.68.0.56/255.255.0.255. Separate the IP addresses and masks with commas. VPN Name (For Releases 12.2.1 and later.) Select the VPN through which the IP address is reachable. - To create an address group, click the
icon in the Source Address tab. In the Enter Addresses section, enter information for the following fields. You configure the address groups in the User-Defined Objects section. To configure one or more specific source IP addresses, you do not need to create an address group. Instead, use the IP Wildcard field to enter the IP addresses.
Field Description Type Select the type of IP address to match and the value to match. The name of the Address/Prefix field changes depending on the value you select in the Type field.
- Dynamic Address
- FQDN
- IP Range
- IP Wildcard
- IPv6 Subnet
- Subnet
- Subnet
Enter one or more IP addresses and subnet masks, for example, 10.2.1.0/24. Separate the subnets with commas. - IP Range
Enter one or more IP addresses within the IPv4 address range specified in the IPv4 Range field, for example, 10.2.1.1–10.2.2.2. Separate the IP addresses or ranges with commas.
- IP Wildcard
Enter one or more wildcard masks for specific IP addresses, for example, 192.68.0.56/255.255.0.255. Separate the IP addresses or masks with commas. - IPv6 Subnet
Enter one or more IP addresses and subnet masks within the IPv6 subnet range specified in the IPv6 subnet.Separate the IP addresses and subnet masks with commas.
- FQDN
Enter one or more IP addresses returned in a DNS query that resolves the fully qualified domain name (FQDN) into an IP address. The FQDN cannot contain any wildcard characters. - Dynamic Address
Enter a dynamic address object, which is a container for an IP address list that can change dynamically. - Address Files
(For Releases 12.2.1 and later.) When you select the Address Files type, select an address file. For more information, see Manage Files and Folders.
To add a new address file:
- Click Add new file.
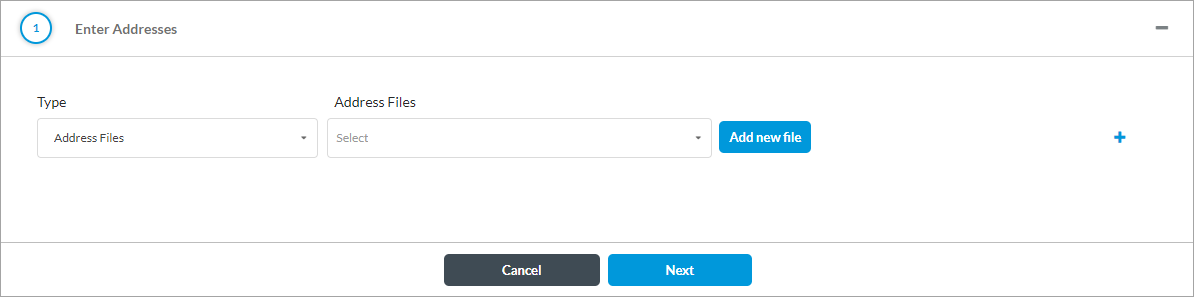
- In the Upload File popup window, click Browse and select an address file to upload. The file must be in CSV format.

- Click Upload.
- To add IP address types, click the
 Plus icon. To remove an address type, click the
  Minus icon.
 - Click Next. In the Name and Tags section, enter a name (required) and, optionally, tags.
- Click Save.
- Select the Destination Address tab, and then enter information for the following fields.

Field Description Negate Destination Address Select to apply the rule to any destination addresses except the ones in the Destination Address field. IP Range Enter a list of IP addresses or ranges to include in the match list, for example, 10.2.1.1–10.2.2.2. Separate the IP addresses or ranges with commas. IP Subnet Enter a list subnets to include in the match list, for example, 10.2.1.0/24. Separate the subnets with commas. IP Wildcard Enter a list IP addresses and masks to include in the match list, for example, 192.68.0.56/255.255.0.255. Separate the IP addresses and masks with commas. Negate Destination Address Select to apply the rule to any destination addresses except the ones in the Destination Address field. - To create an address group, perform Step 2 through Step 5.
- Select the Source Zones & Sites tab, and then enter information for the following fields.

Field Description Source Zone Select one or more source zones to include in the match list. User-defined zones, such as zones for IPsec and GRE tunnels, also display in this list, and you can select them. By default, three source zones are available:
- Internet—Select if traffic comes from the internet.
- SD-WAN Zone—Select if traffic comes from an SD-WAN device.
- VSA Application—Select if traffic comes from a VSA client application.
Source Sites Select one or more source sites to include in the match list. - Select the Destination Zones & Sites tab, and then enter information for the following fields.

Field Description Destination Zone Select one or more destination zones to include in the match list. User-defined zones, such as zones for IPsec and GRE tunnels, also display in this list, and you can select them. By default, three destination zones are available:
- Internet—Select if traffic goes to the internet.
- SD-WAN Zone—Select if traffic goes to an SD-WAN device.
- VSA Application—Select if traffic goes to a VSA client application.
Destination Sites Select one or more destination sites to include in the match list. - Click Back to return to the Network Layer 3-4 screen. On this screen, you configure network services and create policy schedules.
- Click Next to continue to Step 6, Security Enforcement rules.
Configure Schedules for SASE Private Application Protection Rules
Security policy rules are in effect on all days and at all times. You can define a schedule to limit a security policy so that it is in effect only at specific times. You can also create schedules to limit when to apply private application protection rules to filter traffic. You then apply the schedule to the desired policy and rule. No default schedules are configured.
To create schedules for when to apply private application protection rules to filter traffic:
- In the Network (Include or Exclude) Layer 3-4 step, click Customize in the Schedule box. The Schedule screen displays.
- Under Schedule Hours, select a schedule.

- If no schedules exist or if you want to create a new schedule, click + Add New to create a schedule to set the time and frequency at which the rule is in effect. In Enter Schedule Details, enter information for the following fields.
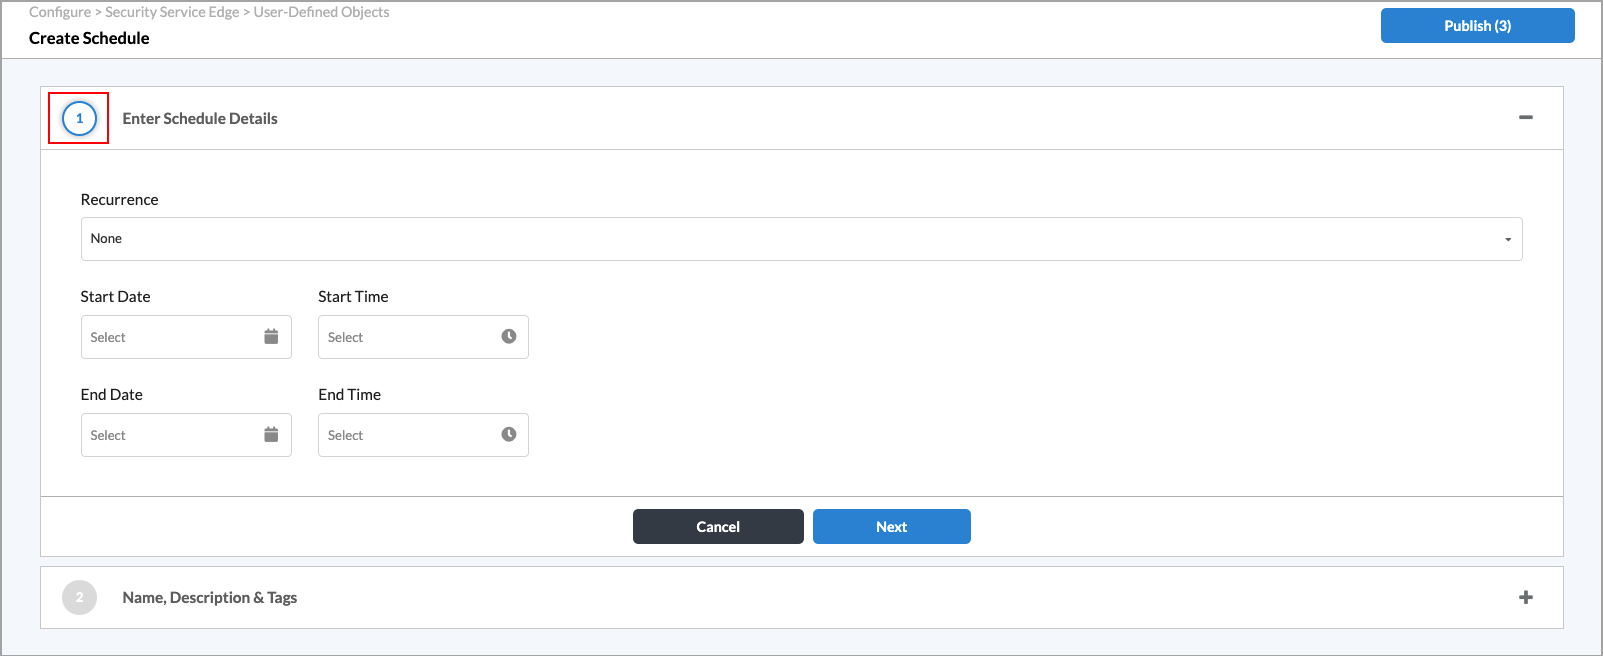
Field Description Recurrence Select how often the policy is in effect:
- Daily
- None
- Weekly
All Day If you select Daily or Weekly, click the slider to have the policy be in effect all day.

Start Time If you do not select All Day, enter the start time for the policy. End Time If you do not select All Day, enter the stop time for the policy. Days of the Week If you select Weekly, select the days of the week for the policy to be in effect.

- Click Next. The Name and Tags screen displays.
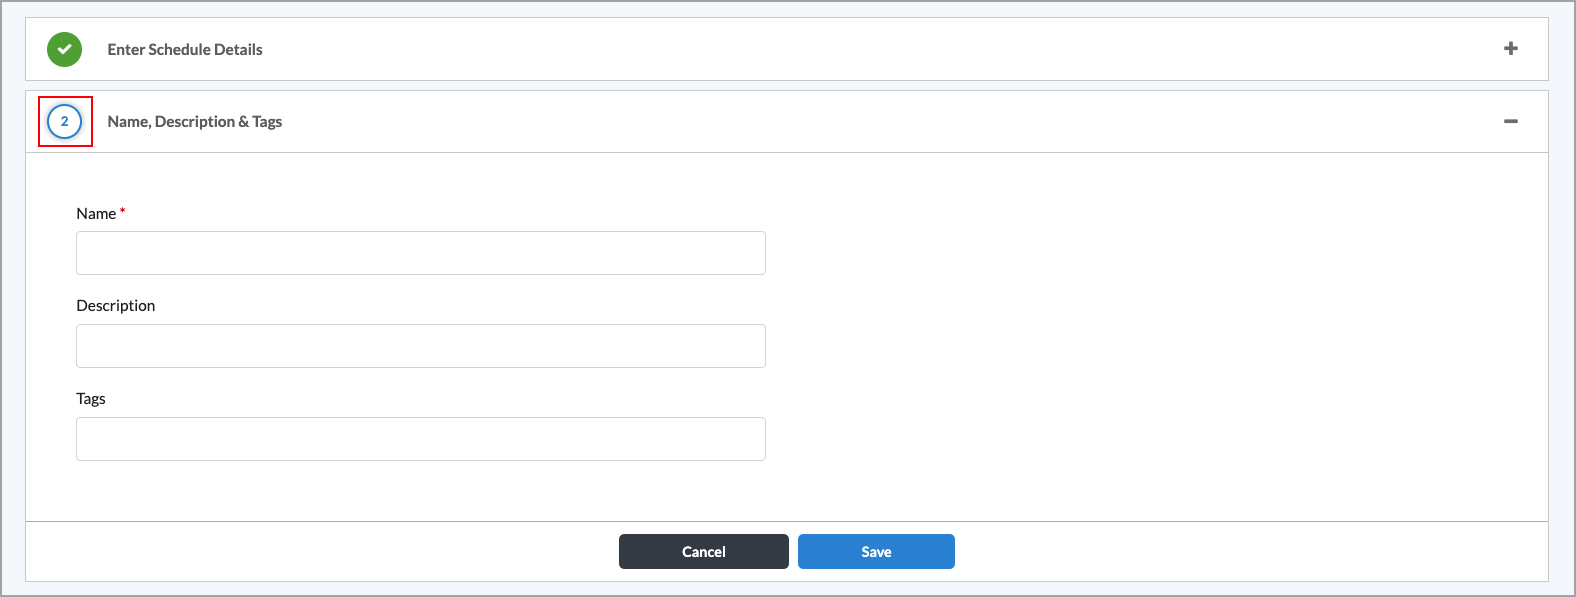
- Enter a name for the schedule and, optionally, a description and tags. A tag is an alphanumeric text descriptor with no spaces or special characters. You can specify multiple tags added for the same object. The tags are used for searching the objects.
- Click Save.
Configure Security Enforcement Actions for SASE Private Application Protection Rules
You configure Versa SASE security enforcement rules to define the actions to take on traffic that meets previously defined match conditions and to define the security enforcement actions to apply to matching traffic. The following screen shows the available security enforcement actions.

You can apply either one security enforcement action or one security enforcement profile to matching traffic.
You can select the following security enforcement actions:
- Allow—Allow all traffic that matches the rule to pass unfiltered.
- Deny—Drop all traffic that matches the rule.
- Reject—Drop the session and send a TCP reset (RST) message or a UDP ICMP port unreachable message.
You can choose a predefined security enforcement profile to allow or reject traffic, or you can create a customized version of any of the predefined profiles. The following are the predefined security enforcement profiles:
- Intrusion protection system (IPS)—For more information, see Configure an IPS Profile for Private Application Protection Rules.
- Malware protection—For more information, see Configure a Malware Protection SASE Profile for Private Application Protection Rules.
- URL Filtering—For more information, see Configure Custom URL-Filtering Profiles.
By default, each security enforcement profile has a predefined VersaEasy configuration. You can use the predefined VersaEasy configurations, or you can customize each profile.
Note: The malware protection and IPS profiles display only if the tenant to which you want to apply the profile is subscribed to the SWG and VSA professional services.
Configure a URL-Filtering Profile for SASE Private Application Protection Rules
By default, Versa SASE provides a predefined security enforcement policy for URL filtering. You can customize the predefined URL-filtering protection profile.
In addition to using predefined URL-filtering profiles, you can create custom URL-filtering profiles and associate them with internet protection rules. For more information, see Configure Custom URL-Filtering Profiles.
To configure a URL-filtering protection profile:
- In the Security Enforcement screen > Filtering Profiles tab, select URL Filtering in the Profiles section to enable the preselected EasyURLFiltering security enforcement policies.
Note: In Release 12.2.2, the URL Filtering Profile screens were moved under the new Filtering Profiles tab. In prior releases, URL Filtering screens were located under the Secure Web Gateway (SWG) tab.
By default, the EasyURLFiltering policies provide URL filtering for the following types of websites:- Adult and pornography
- Games
- Web advertisements

- To change the default settings, click the down arrow. For more information, see Configure Custom URL-Filtering Profiles.

- Select one of the user-defined or VersaEasy™ URL filters to enable only that filter. Select EasyURLFiltering to restore the default URL filtering.
Note: The GenAI_Firewall implicit profile is new in Release 12.2.1. Implicit rules are predefined in Concerto. You can use them without modification, or you can clone and modify an implicit rule.

- Select other profiles to customize, or click Next to continue to Step 7, Review and Deploy.
Configure a Malware Protection Profile for SASE Private Application Protection Rules
Malware is malicious software that is specifically designed to disrupt computers and computer systems. There are many types of malware, including computer viruses, worms, Trojan viruses, spyware, adware, and ransomware. Among the things malware can do is leak private information, gain unauthorized access to information or systems, and deprive users of access to information.
By default, Versa SASE provides a predefined security enforcement policy to protect against malware. You can customize the malware protection profile.
Note: The malware protection profiles display only if the tenant to which you want to apply the profile is subscribed to the SWG and VSA professional services.
To customer a malware protection profile in a private application protection rule:
- In the Create Private Application Protection Rule screen, select Step 5, Security Enforcement.
Note: In Release 12.2.2, the Malware Protection Profile screens were moved under the new Malware Protection & IPS tab. In prior releases, Malware Protection screens were located under the Secure Web Gateway (SWG) tab.

- To enable the preselected Easy Malware Protection security enforcement policies, click the Malware Protection box. By default, this profile blocks the following types of malware:
- Adware
- Ransomware
- Spyware
- Trojans
- Unwanted applications
- Viruses
- Worms
- Click the down arrow to display other options.

- To send email alerts about the following malware in both the upload and download directions, select Scan Email Traffic:
- imap
- mapi
- pop3
- smtp
- To deny the following malware in both the upload and download directions, select Scan Web Traffic:
- ftp
- http
- To restore the default Easy Malware Protection settings, select Easy Malware Protection.
- Select another profile to customize, or click Next to go to the Step 6, Review and Deploy screen.
Configure an IPS Profile for SASE Private Application Protection Rules
The intrusion protection system (IPS) mitigates security vulnerabilities by responding to inappropriate or anomalous activity. Responses can include dropping data packets and disconnecting connections that are transmitting unauthorized data.
By default, Versa SASE provides a predefined IPS enforcement policy. You can also customize the IPS profile.
Note: The IPS profile displays only if the tenant is subscribed to the SWG and VSA professional services.
To configure an IPS profile in a private application protection rule:
- Select Step 5, Security Enforcement screen in the Create Private Application Protection Rule screen.
Note: In Release 12.2.2, the Intrustion Protection System (IPS) Profile screens were moved under the new Malware Protection & IPS tab. In prior releases, IPS screens were located under the Secure Web Gateway (SWG) tab.

- To enable the preselected EasyIPS security enforcement policies, click the Intrusion Protection System (IPS) box. By default, the following vulnerabilities are blocked from all servers and clients:
- High severity and medium+ confidence attacks
- Medium+ CVSS (common vulnerability scoring system) and medium+ confidence attacks
- To change the default settings, click the down arrow.

- To enable a filter, select one of the IPS filters.
- To override a predefined IPS profile, you can click the down arrow in the Predefined IPS Profile Override field and select a user-defined IPS profile.
- To restore the default IPS filtering settings, select EasyIPS.
- Click Next to go to the Step 6, Review and Deploy screen.
Configure a DLP Profile for Private Application Protection Rules
To oversee, track, and report all data transactions in the network and to scan all content that passes through an organization's ports and protocols to ensure data security in the organization you associate a DLP profile with a SASE private application protection rule. DLP provides a set of tools and processes for detecting and preventing data breaches, cyber exfiltration, and unwanted destruction of sensitive data. You use DLP to protect and secure an organization's data and to comply with regulations. To create DLP profiles, see Configure Offline Data Loss Prevention.
To associate a DLP profile with a SASE private application protection rule:
- In the Security Enforcement screen, select Profiles, and then select the Data Loss Prevention (DLP) tab.

- Click the slider to enable DLP, and then choose a DLP profile.
Note: The GenAI_DLP implicit profile is new in Release 12.2.1. Implicit rules are predefined in Concerto. You can use them without modification, or you can clone and modify an implicit rule.

- Click Next to continue to Step 6, Review and Deploy.
Configure an RBI Profile for Private Application Protection Rules
To enforce remote browser isolation, you create one or more private application protection rules with the required match conditions and associate the RBI profile with the rule.
To associate a remote browser isolation profile with a private application protection rule:
- In the Security Enforcement screen, select Profiles, and then select the Remote Browser Isolation (RBI) tab.

- Click the slider bar to enable Remote Browser Isolation.

- Select User Defined or Predefined.
- Click a profile to associate the profile with the rule.
- Click Next to go to the Review and Deploy step.
Review and Deploy Private Application Protection Rules
The final step in configuring a private application protection rule is to review the choices you have made, edit them if needed, and then deploy the new rule.
To review and deploy a private application protection rule:
- Select Step 6, Review and Deploy in the Create Private Application Protection Rule screen, and then enter information for the following fields.

Field Description Name (Required) Enter a name for the rule. The name can be a maximum of 63 characters and can include any alphanumeric characters, underscores, and hyphens. Description Enter a description for the rule. Tags Enter a text string or phrase to associate with the rule. A tag is an alphanumeric text descriptor with no white spaces or special characters that you can use to search rules. You can enter multiple tags. Rule is Enabled Click the slide bar to enable the rule:

Click the slide bar again to disable the rule:

- Click Save to deploy the private application protection rule.
Supported Software Information
Releases 11.1.1 and later support all content described in this article, except:
- Release 11.4.1 provides separate tabs for Source Address, Destination Address, Source Zones and Sites, and Destination Zones and Sites for SASE Source and Destination Traffic Private Application Protection Rules.
- Release 12.1.1 allows you to clone Private Application Protection Rules.
- Release 12.2.1 adds support to customize geolocations by country, region, and city, and supports VPN name option to include in the source address match list.
- In Release 12.2.2, under the Security Enforcement tab, the Secure Web Gateway (SWG) subtab was renamed Filtering Profiles and a new Malware Protection & IPS subtab was created, which contains the Malware Protection and Intrusion Protection System (IPS) profiles.
Additional Information
Configure SASE Internet Protection Rules
Configure SASE Secure Client Access Rules