Integrate Versa SASE with CrowdStrike Falcon
![]() For supported software information, click here.
For supported software information, click here.
Endpoint detection and response (EDR) is a cybersecurity technology that provides continuous monitoring, real-time threat detection, and automated response capabilities for endpoint devices including laptops, mobile devices, and internet of things (IoT) systems. CrowdStrike™ is a leading EDR platform that delivers behavioral analysis, threat hunting, and rapid incident response through continuous endpoint surveillance and intelligent threat correlation.
The integration of Versa Unified Endpoint risk scoring with Crowdstrike Falcon's Zero Trust Assessment (ZTA) creates a dynamic security framework where endpoint security posture directly influences network access policies. This enables the Versa SASE platform to make real-time, risk-based access decisions that automatically adjust network permissions based on endpoint threat intelligence and security compliance status.
This integration enhances security in the following ways:
- Detects malicious activity through CrowdStrike EDR at the endpoint and enforces Versa SASE security policies.
- Enforces in-transit network security policies using the CrowdStrike overall assessment for end-to-end security enforcement.
- Performs security actions through Versa SASE, such as:
- Allow, block, or redirect to a captive portal.
- Run a network IPS scan.
- Trigger a network sandbox or isolate to a remote browser session.
- Check for sensitive data leakage.
- Builds better correlations with network logs through CrowdStrike Next-Gen-SIEM/XDR.
The Versa Unified Entity Risk Profile uses CrowdStrike’s ZTA composite risk score as input in security policy enforcement for internet applications, secure access policies, and private applications. Versa Networks derives a unified entity risk score from the following:
- Endpoint attributes, such as operating system and browser versions, using Versa Endpoint Information Profiles (EIP). For more information, see Configure Endpoint Information Profiles.
- Versa User Entity Behavior Analytics (UEBA) based on Versa Analytics logs and insights. For more information, see Configure User and Entity Behavior Analytics (UEBA).
- Third-party inputs from:
- EDRs such as CrowdStrike.
- Vulnerability management products such as Tenable and Defender.
- Compliance status from Unified Endpoint Managers (UEMs) such as Ivanti and Intune. For more information, see Configure SASE Unified Endpoint Management for Ivanti Neurons and Configure SASE Unified Endpoint Management for Microsoft Intune.
Versa SASE queries the ZTA APIs every 10 minutes (by default) based on the security posture assessment interval, which you can modify within a range of 10 minutes through 24 hours. For more information, see Configure Endpoint Detection and Response, below.
The architecture diagram below shows the components involved in the integration of CrowdStrike Falcon with Versa SASE.

Versa SASE includes the following components for the CrowdStrike integration:
- Management plane—Uses Versa Concerto to configure security policies based on risk scores.
- Control plane—The building block that controls how users connect to Versa SASE and performs CrowdStrike integration. This includes the Versa Controller that communicates with Versa Messaging Service (VMS) to share logs with Versa Analytics.
- Data plane—The layer that enforces security policies in the network. Versa Advanced Security Cloud (ASC) in the data plane receives ZTA scores from CrowdStrike or other third-parties, and continuously evaluates the endpoint posture.
- Users connect to Versa SASE using the Versa SASE client installed on user devices, branch edge devices running Versa Operating SystemTM (VOSTM), such as Versa CSG devices, or cloud edge deployment such as AWS running VOS.
- Versa Analytics integrates with CrowdStrike Falcon Next-Gen SIEM to stream and receive logs. For more information, see Versa Analytics and CrowdStrike NG-SIEM Integration.
This article describes how to:
- Configure the Unified Entity Risk profile
- Configure entity risk bands for security policies and rules
- Configure EDR
- Assess ZTA scores from CrowdStrike
- Enforce protection based on unified risk score
- View device and user score logs and statistics
Configure a Unified Entity Risk Profile
The unified entity risk profile in Concerto allows you to weigh the importance of different categories of device risk. You do this by assigning a weighting value, given as a percentage, for each category. If you have multiple products in a category, you can also specify the weight given to each product within the category. Concerto sends the unified entity risk profile configuration to the ASC, which assigns weights to scores received from various sources such as EDRs, vulnerability and threat management (VTMs), and UEMs. The ASC then calculates the unified entity risk score and distributes it to SASE gateways through VMS.
You can create only one profile per tenant. Once you configure a profile, you cannot add another profile or clone the existing profile. Once configured, you can use the entity risk scores when you configure policies and rules. You can see the results of these calculations on the View tab.
To configure a unified entity risk profile:
- Go to Configure > Security Service Edge > Profiles and Connectors > Unified Entity Risk Profile.

The following screen displays:

- Click the + Add icon. The Add Unified Entity Risk Profile screen displays. Note that you can only configure one unified entity risk profile. If you have already configured a unified entity risk profile, the Add icon is grayed out.

- Enter a name for the unified entity risk profile in the Name field.
- For the EDR category, enter a weighting percentage, between 0 and 100. The sum of the four categories must equal 100 percent. Within each category, specify the weight for the individual applications in the category, between 0 and 100. The sum of the individual application weights in each category must equal 100 percent. In the following example, the property weight for the EDR category is 50 percent and in the EDR category, the property weight for the CrowdStrike application is 100 percent.

- Click Save to create the entity risk profile.
Configure Entity Risk Bands for Security Policies and Rules
You can configure the entity risk score to attribute a specific weight to CrowdStrike's ZTA risk score. You can then use this score as an input for Versa unified endpoint risk profiles to enforce network policy rules. This score helps determine the credibility and the likelihood of activities being legitimate or malicious. You can use this risk score while creating security policies and rules for internet applications, secure access policies, and private applications. CrowdStrike’s trust score which is part of its ZTA, is integrated into Versa’s unified entity risk score framework. Versa’s score ranges from 0 to 100, with 100 indicating the highest risk level, and these ranges are used to define entity risk bands.
To configure an entity risk score:
- Go to Configure > Security Service Edge > Real-Time Protection > Internet Protection.

- In the Internet Protection Rules List screen, click + Add to create a rule. The Create Internet Protection Rule screen displays.
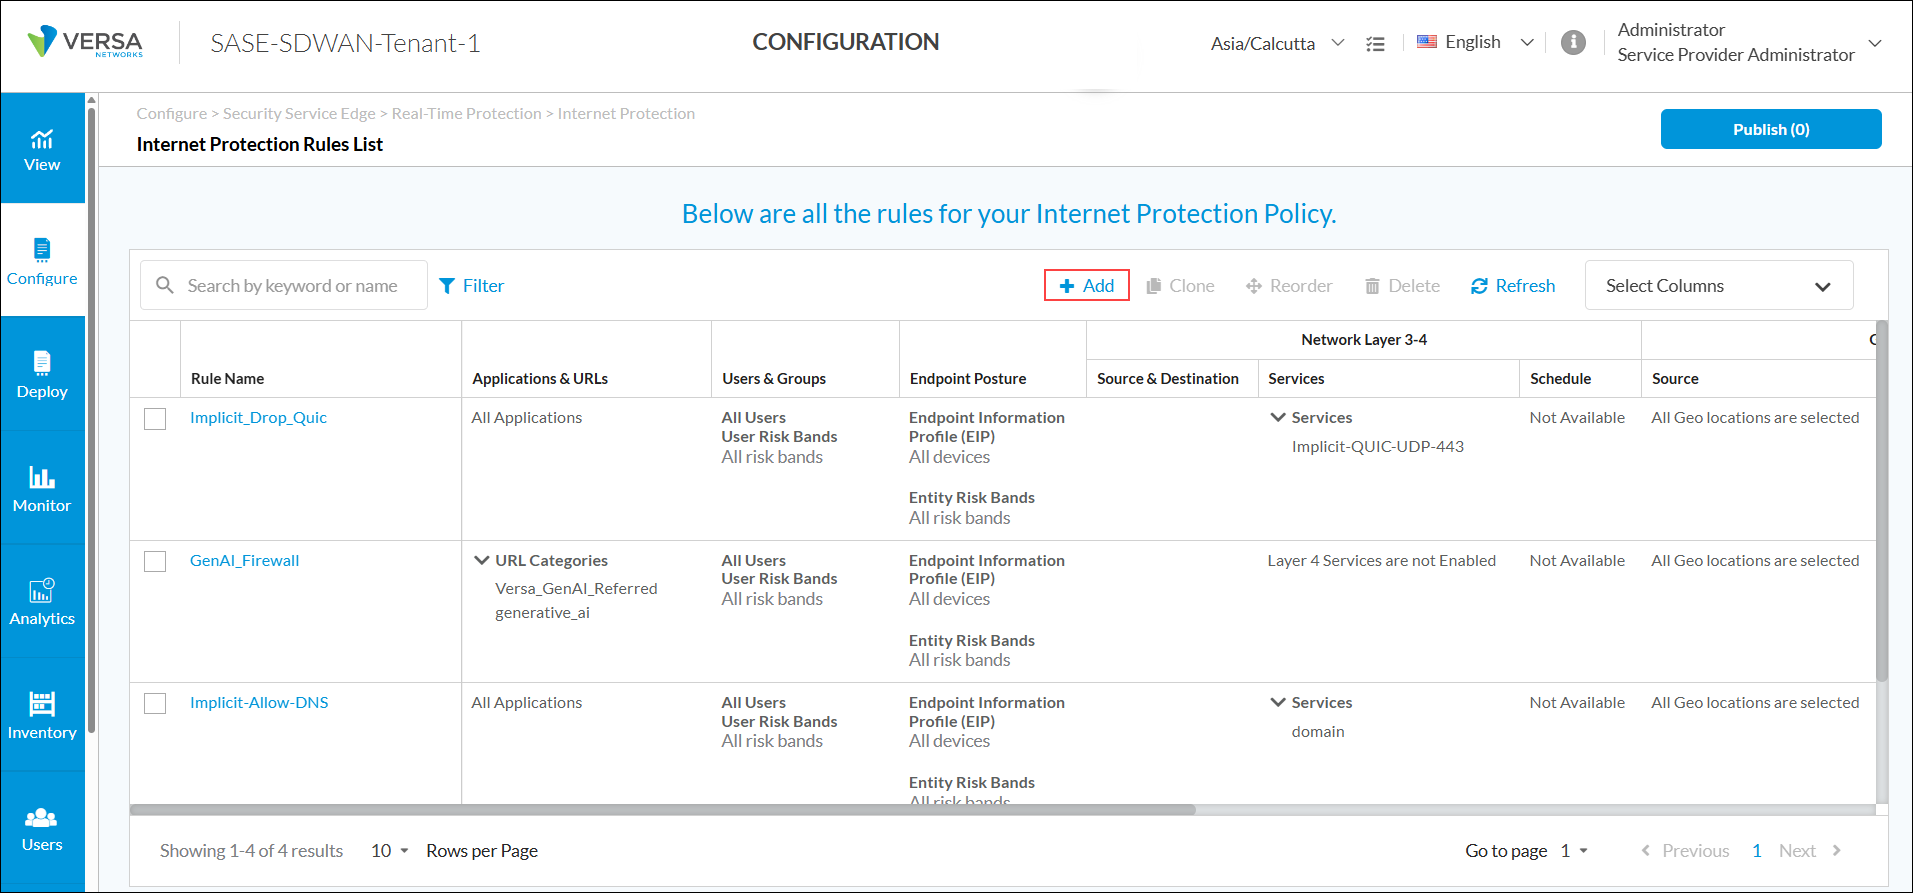
- Select step 3, Endpoint Posture, and then click Customize in the Entity Risk Bands section.

- In the Entity Risk Bands field, select one or more entity risk scores from the list. The options are:
- High Risk (81–100)
- Suspicious (61–80)
- Moderate Risk (41–60)
- Low Risk (21–40)
- Trustworthy (0–20)

- Select step 7, Review and Deploy, and click Save to deploy the new internet protection rule.
Configure EDR
EDR is a cybersecurity technology that monitors and responds to threats coming from endpoint devices such as laptops, mobile phones, and IoT devices. EDR primarily detects advanced threats that can evade front-line defenses and successfully enter the network environment. By collecting and aggregating data from endpoints and other sources, EDR can identify suspicious behavior and alert administrators to eliminate the threat before it spreads.
Note: Before configuring EDR on Concerto, you must create an account with CrowdStrike and configure the EDR service to integrate with Concerto.
To configure EDR on Concerto:
- Go to Configure > Security Service Edge > Partner Integration > Endpoint Detection & Response.

- The following screen displays with the CrowdStrike tab selected by default.
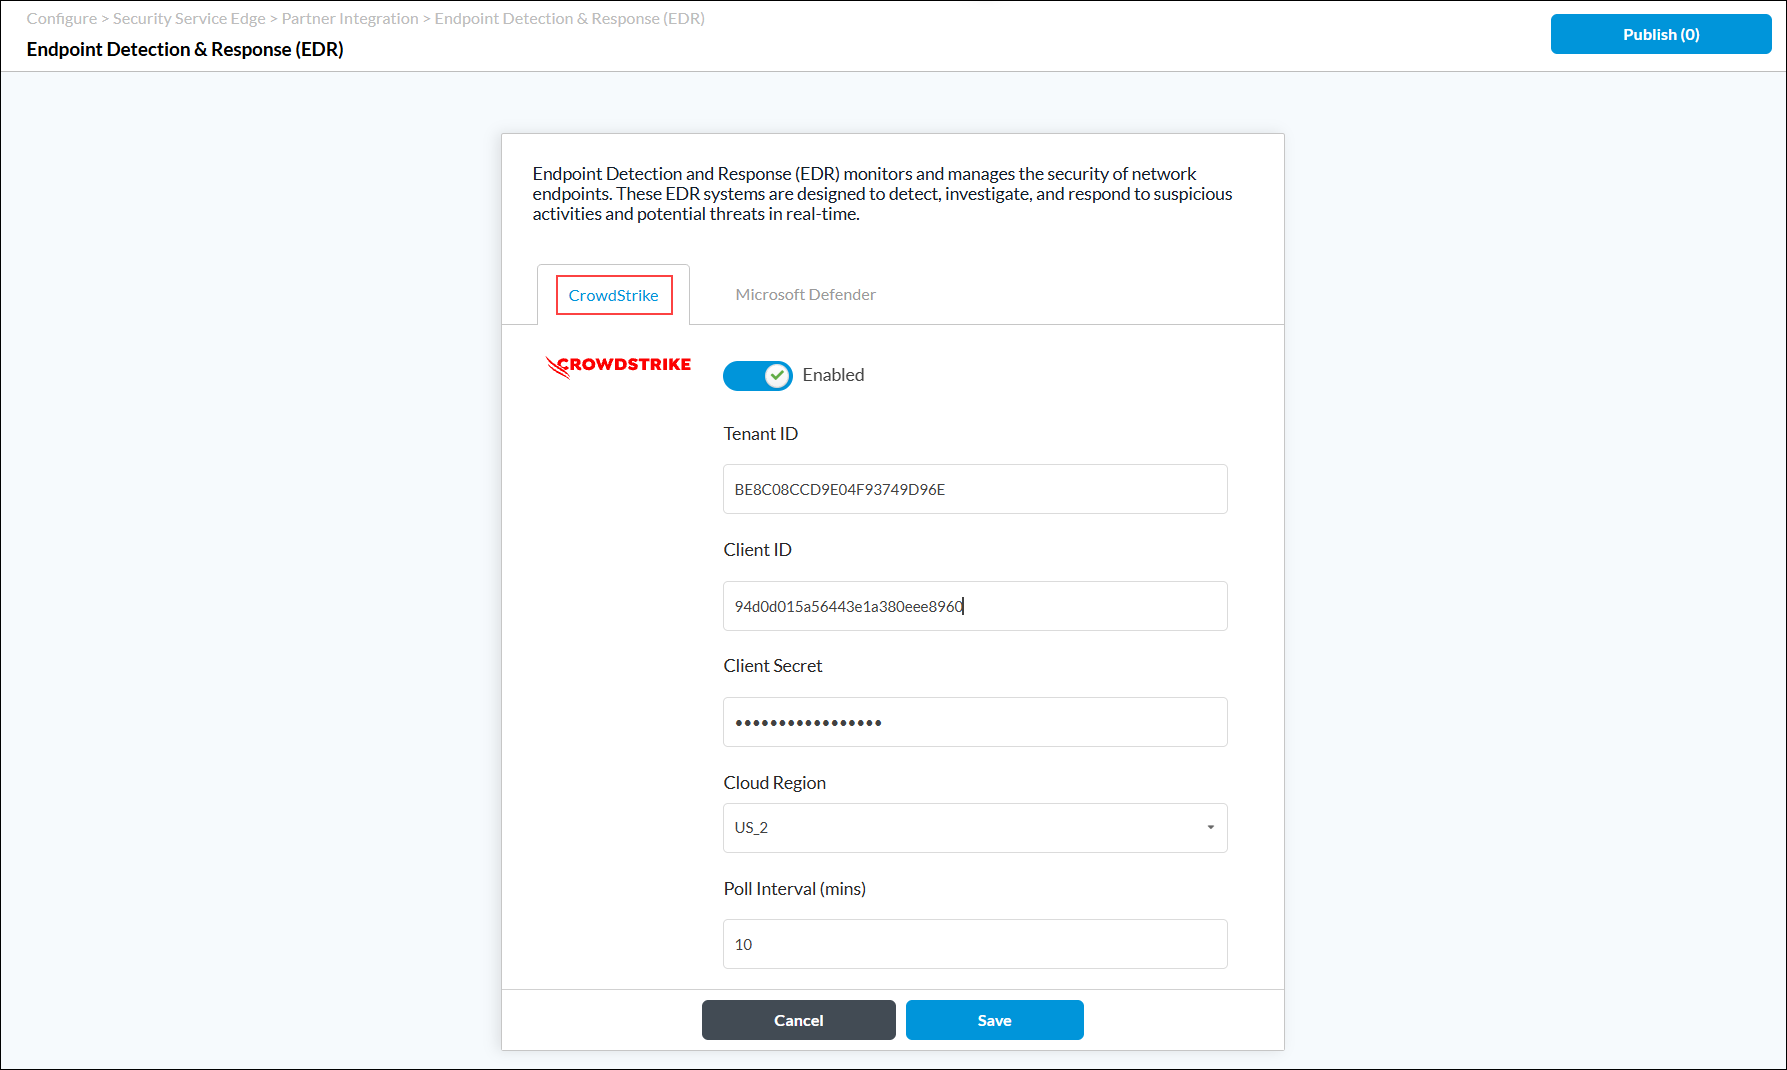
- Enter information for the following fields.
Field Description Enabled Click the slider to enable the CrowdStrike EDR vendor. Tenant ID Enter the tenant ID that was generated by the EDR vendor. Client ID Enter the client ID that was generated by the EDR vendor. Client Secret Enter the client secret that was generated by the EDR vendor. Cloud Region Enter the region of the CrowdStrike instance. Poll Interval Enter the time, in minutes, between polling actions.
Range: 10 through 1440 seconds
Default: 10
- Click Save.
View the ZTA Score for a Host from CrowdStrike
The ZTA dashboard includes the security posture information of all hosts and detailed information of each assessed host. The assessment by host table in the dashboard includes an OS assessment, a sensor assessment, and an overall assessment for each host, and the host details table provides more information about the security posture for each host.
To access the ZTA dashboard:
- Go to Host setup and management > Manage endpoints > Zero trust assessment.

- In the ZTA dashboard, scroll down to view the assessment by host information. The overall assessment score is a combination of operating system and sensor assessment. This score is taken as input from CrowdStrike Falcon to Versa SASE.

- To filter the hosts by Windows platform and to view the Windows assessment attributes, select the Customer ID, and then select the Platform to Windows.

- To view detailed information about the security posture of a host, click on the Host ID in the assessment by host table. The host details table displays.

- To view detailed information about the security posture of a host, click on the Host ID in the assessment by host table. The host details table displays.
- To filter the hosts by MAC platform and to view the MAC assessment attributes, select the Customer ID, and then select the Platform to MAC.

- To view detailed information about the security posture of a host, click on the Host ID in the assessment by host table. The host details table displays.

- To view detailed information about the security posture of a host, click on the Host ID in the assessment by host table. The host details table displays.
CrowdStrike APIs
You can use the following CrowdStrike APIs to retrieve the device ID, device details, and ZTA:
- Get device ID—GET /devices/entities/devices/v2
- Get device details—GET /devices/entities/devices/v2?ids=<ids>
- Get ZTA—GET /zero-trust-assessment/entities/assessments/v1
Enforce Protection Based on Unified Risk Score
You can configure secure client-based access rules and internet protection rules that use the risk scores of users or devices to control traffic. This allows you to deny or authenticate traffic from users who have high risk scores and allow trustworthy or low-risk traffic. For CrowdStrike, Versa Networks supports the following predefined EIP profiles and objects that you can use in security rules:
- eip-profile-endpoint_security-software-crowdstrike and eip-object-endpoint_security-software-crowdstrike—Check if CrowdStrike EDR agent is installed and running.
- eip-profile-endpoint_security-crowdstrike and eip-object-endpoint_security-crowdstrike—Check for CrowdStrike EDR
This section describes the following configuration examples to:
- Configure client-based access policy rules to deny or allow user traffic based on entity risk score band. In this example, we configure a rule to deny and a rule to allow traffic. For example, you can configure a rule that routes connections from employees (such as contractors) with a high or suspicious unified risk score, when using specific devices (for example, Windows OS), to the SASE gateway for additional authentication and inspection. Also, you can configure rules to allow traffic from users who have risk scores that are trustworthy or low-risk. You apply these to endpoint devices, such as laptops and mobile phones that run the Versa SASE client, and apply these traffic actions to traffic originating from these devices.
- Configure an internet protection rule to control user traffic based on entity risk score band. In this example, we configure a rule for users connected to the SASE gateway to do the following:
- Ask before connecting to website for games, gambling, and sports.
- Block all social media network access.
- Justify access to financial services sites.
- Configure a private application protection rule to reject non-web applications such as RDP, VNC, and SSH from high-risk and suspicious users.
Note that traffic from an entity placed under protection rules due to a high-risk score is not subject to scrutiny once the score improves to a satisfactory range.
Configure Secure Client Access Rules Based on Risk Score
This section describes how to configure two rules, one to deny and one to allow, for traffic based on risk score. For a SASE connection, if the user risk score is not in the allowed range, that user is denied permission to connect to the gateway.
To configure a secure client-based access rule to deny traffic based on risk score:
- Go to Configure > Secure Services Edge > Secure Access > Client-based Access > Policy Rules.

- Click the
 Add icon to configure the policy rule or select an existing rule. The Create/Edit Client-based Access Rule screen displays.
 - Select step 1, Operating System. The following screen displays.

- Select the operating system (here, Windows).
- Select step 3, Endpoint Posture. The following screen displays. This example uses a predefined Endpoint Information Profile and device/endpoint risk score as match criteria.

- Under Entity Risk Bands, click Customize. The following screen displays.

- Select the risk bands as match criteria for the rule. Here, we select the risk banks above 40 [High Risk (81–100), Suspicious (61–80), and Moderate Risk (41–60)].
- Select step 5, Traffic Action. The following screen displays.

- Select Deny to drop all traffic that matches the rule. Note that if you select the Deny option, the workflow steps for Gateways, Client Configuration, and Agent Profile from EIP are removed. The next workflow step becomes Review & Configure.
- Enter the message to display when the connection is blocked.
- For information about configuring other parameters, see Configure SASE Secure Client-Based Access Rules.
- Select step 6, Review and Configure.
- When adding a rule, enter a name for the rule.
- If required, click the
 Edit icon for any section to edit the configuration.
 - Click Save to save the secure client-based access rule.
- When the rule in this example (r07-win-eip-crowdstrike-above40-reject) is applied to a user in an entity risk bank above 40, the user is denied access to the SASE gateway when attempting to connect using the Versa SASE client.
To configure a secure client-based access rule to allow traffic based on risk score:
This rule allows traffic from users or devices that have risk score below 41.
- Go to Configure > Secure Services Edge > Secure Access > Client-based Access > Policy Rules.
- Click the
 Add icon to configure the policy rule or select an existing rule. The Create/Edit Client-based Access Rule screen displays.
 - Select Step 1, Operating System. The following screen displays.

- Select the operating system (here, Windows).
- Select Step 3, Endpoint Posture. The following screen displays.
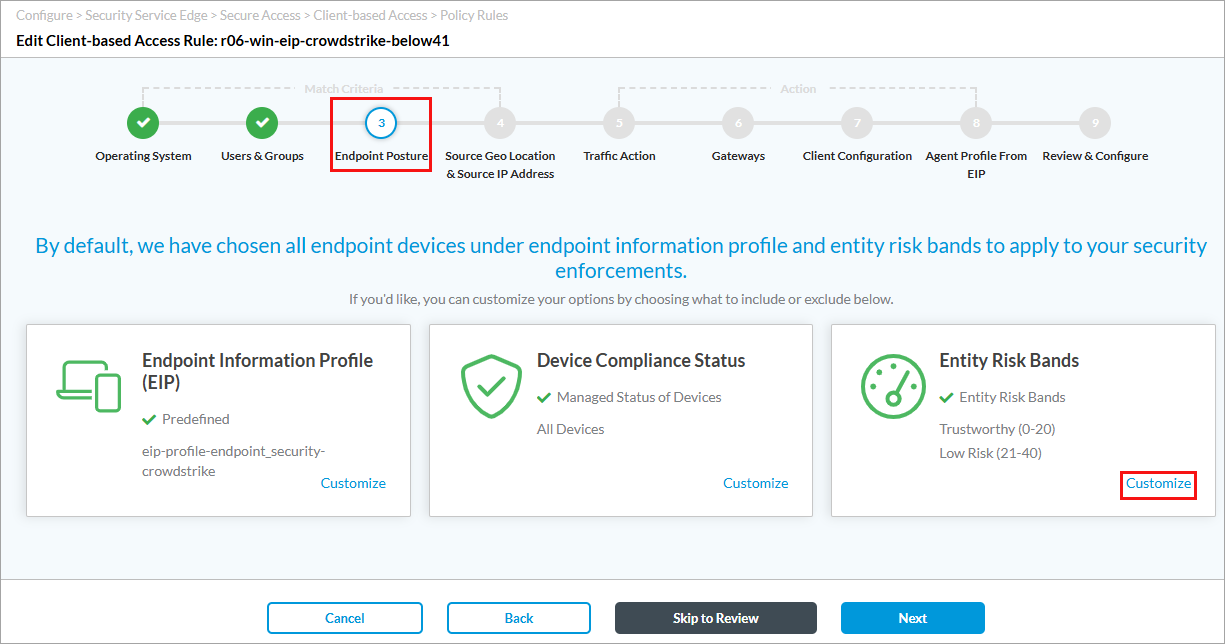
- Under Entity Risk Bands, click Customize. The following screen displays.

- Select the risk bands as match criteria for the rule. Here, we select the risk bands above Trustworkty (0–20) and Low Risk (21–40).
- Select Step 5, Traffic Action. The following screen displays.

- Select Allow to allow all the traffic that matches the rule criteria.
- For information about configuring other tabs and parameters, see Configure SASE Secure Client-Based Access Rules.
- Select Step 9, Review and Submit.
- When adding a rule, enter a name for the rule.
- If required, edit the configuration for a given section by clicking the
 Edit icon.
 - Click Save to save the secure client-based access rule.
Configure Internet Protection Rules Based on Risk Score
Similar to secure access client access rules, you can configure internet protection rules to allow, deny, or authenticate traffic based on user or device risk scores.
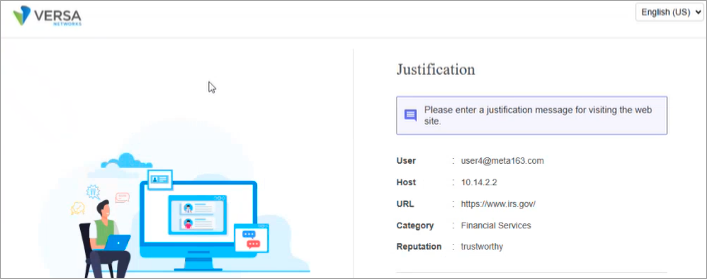
In this section, we configure a sample internet protection rule for users who meet the criteria when connected to the SASE gateway: prompt before allowing access to gaming, gambling, and sports websites, block all social media access, and provide justification to access financial services sites.
To configure internet protection rule match criteria:
- Go to Configure > Real-Time Protection > Internet Protection.
- In the Internet Protection Rules List screen, click + Add to create a rule or select an existing rule. The Create/Edit Internet Protection Rule screen displays.
- Select Step 3, Endpoint Posture. The following screen displays.

- Under Entity Risk Bands, click Customize and select the required risk band. Here, we select Moderate (41-60), Suspicious (61-80), and High Risk (81-100).
- Select Step 5, Network Layer 3-4. The following screen displays.

- Here, under Source and Destination (Layer 3), we select Internet, SD-WAN Zone, and Versa Client under Destination Zone.
- Select Step 6, Security Enforcement. The following screen displays.

- Click Security Profiles and select the required profile. Here, we select a user-defined URL Filtering profile, which has a default action Allow, and for has these actions for the following URL categories:
- Ask—Games, gambling, Sports
- Block—Social network
- Justify—Financial services
For more information, see Configure Custom URL-Filtering Profiles.
- For information about configuring other tabs and parameters, see Configure SASE Internet Protection Rules.
- Select Review and Deploy.
- When adding a rule, enter a name for the rule.
- To modify the information in a section, click the
 Edit icon, then make changes to the configuration.
 - Click Save.
After you deploy this rule, when a user who matches the rule criteria is connected to the SASE gateway via SASE client and tries to:
- Access a games, gambling, or sports website, the following captive portal screen asking for confirmation displays:

- Access a social media site or application, the following captive portal screen blocking the social network displays:
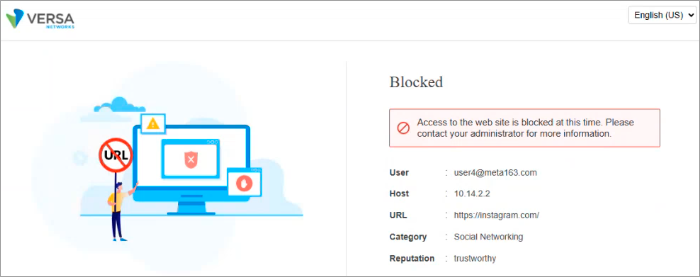
- Access a financial service, the following captive portal screen asking for justification displays:
Configure Private Application Protection Rules Based Risk Score
This section describes how to configure a private application protection rule to deny access to non-web applications (here, RDC, RealVNC, and SSH) to users whose entity risk bands fall under high risk or suspicious. For more information, see Configure SASE Private Application Protection Rules.
To configure a private application rule based on risk score:
- Go to Configure > Real-Time Protection > Private Application Protection. The Private Application Protection Rules List screen displays.
- Click + Add to create a rule or select an existing rule. The Create Private Application Protection Rule screen displays, with the Application Group tab selected by default.

- Click the Applications tab in the submenu and select the applications to which to deny (for this rule) access to users. Here, we select RDP, RealVNC, and SSH.
- Select Step 3, Endpoint Posture. The following screen displays.

- Under Entity Risk Bands, click Customize and select the risk bands as match criteria for the rule. Here we select High Risk (81-100) and Suspicious (61-80).
- Select Step 6, Security Enforcement. The following screen displays.

- Select Reject to deny access to users to the selected non-web private applications to users who match the entity risk band criteria.
- For information about configuring other tabs and parameters, see Configure SASE Private Application Protection Rules.
- Select Review and Deploy.
- When adding a rule, enter a name for the rule.
- To modify the information in a section, click the
 Edit icon, then make changes to the configuration.
 - Click Save.
View Risk Score-Based Logs and Statistics
You can view entity risk scores, EIP user profile logs, and rule logs from the View tab in Concerto to monitor and analyze entity risk score-based traffic updates.
To view entity risk score:
- To view information about security risk scores, select View > Dashboard > Security > Entity Risk Score. For more information, see View Risk Score Information.
For example:

To monitor entity risk score, go to Monitor > Appliance > Services > NGFW > Entity Risk Score. For more information, see Monitor Concerto Orchestrator.
For example:

To view EIP log profiles for the secure access client-based rules you configure for CrowdStrike:
- Go to View > Dashboard > Secure Access > Logs > Endpoint Information Profiles Log > Logs. For more information, see View Concerto Security Dashboards.
For example, the following image displays the EIP user profile logs for the profile eip-profile-endpoint_security_crowdstrike:

To view firewall information for internet protection rules based on risk score:
- Go to View > Dashboard > Security > Internet Protection > Firewall Overview. For more information, see View Internet Protection Information.
For example, the following image shows the rule usage information for a few risk score-based rules (highlighted):

Supported Software Information
Releases 12.2.2 and later support all content described in this article.
Additional Information
Configure Custom URL-Filtering Profiles
Configure SASE Internet Protection Rules
Configure SASE Private Application Protection Rules
Configure SASE Secure Client-Based Access Rules
Monitor Concerto Orchestrator
Versa Analytics and CrowdStrike NG-SIEM Integration
View Concerto Security Dashboards
