Configure Certificate-Based Authentication for SASE Clients
![]() For supported software information, click here.
For supported software information, click here.
Certificate-based authentication is a secure method to validate the identity of users and devices. Versa SASE supports user-based and device-based certificate authentication. When you enable certificate-based authentication, the gateway initiates a request to the SASE client for users to provide their certificates during client portal registration and gateway connection. This article describes how to configure certificate-based user authentication and device authentication for the SASE client.
Before You Begin
Before you configure certificate-based authentication for the SASE client:
- Generate the root certificate authority (CA) key and CA certificate.
- Create the client certificate file.
- Generate the key and CSR for the client.
- Generate the client certificate signed by a CA.
- Convert the .crt file to a Personal Information Exchange (.pfx) file for the client certificate.
- Import the client certificate to the client device.
- Upload the root CA chain certificate to the device (this CA certificate validates the SASE client certificate).
Generate the CA Key, CA Certificate, and Client Certificate
This section describes how to generate a CA key, CA certificate, and SASE client certificate using OpenSSL on any Linux system. You can create a certificate, get it signed by a CA, and then use it on a Director node. For more information, see Create and Manage Certificates.
You can skip the following steps if you have already generated CA and SASE client certificates or if you use other methods to generate certificates.
To generate a CA key, CA certificate, and SASE client certificate:
- Generate the root CA key:
openssl genrsa -aes256 -out root-ca.key 4096
- Generate the CA certificate using the root CA key:
openssl req -new -x509 -sha256 -days 3650 -key root-ca.key -out root-ca-cert.pem
- Create the cert.conf file with the following values. In the sample configuration here, commonName is alice-cert, which is same as the user name:
cat cert.conf

#authorityKeyIdentifier = keyid,issuer:always
distinguished_name = req_distinguished_name
req_extensions      = v3_req
x509_extensions = usr_cert

prompt = no

[ req_distinguished_name ]
countryName = US
stateOrProvinceName = VA
localityName = Reston
organizationName = Versa Networks
commonName = alice-cert

[ v3_req ]
extendedKeyUsage = clientAuth, emailProtection
basicConstraints = CA:FALSE
keyUsage = critical, digitalSignature, keyEncipherment
[ usr_cert ]
basicConstraints = CA:FALSE
nsCertType = client, email
nsComment = "OpenSSL Generated Client Certificate"
keyUsage = critical, digitalSignature, keyEncipherment
extendedKeyUsage = clientAuth, emailProtection
subjectKeyIdentifier = hash
authorityKeyIdentifier = keyid,issuer
- Generate a certificate signing request (CSR) for the client certificate:
openssl req -out Client.csr -newkey rsa:2048 -nodes -keyout Client-Cert.key -config cert.conf -extensions 'v3_req'
- Generate the client certificate signed by the CA:
openssl x509 -req -in Client.csr -CA root-ca-cert.pem -CAkey root-ca.key -out Client-Cert.crt -CAcreateserial -days 730 -sha256 -extfile cert.conf -extensions 'usr_cert'
- Convert the .crt file to a .pfx file. Here, we use the name AliceClient-Cert.pfx:
openssl pkcs12 -inkey Client-Cert.key -in Client-Cert.crt -export -out AliceClient-Cert.pfx -passin pass:password123 -passout pass:password123
Import the Client Certificate to a Windows OS Client Device
To import the client certificate that you created in Generate the CA Key, CA Certificate, and Client Certificate, above, to a client device that is running Windows OS:
- Navigate to where you saved the client certificate, and then double-click it. The Certificate Import Wizard displays.

- For certificate-based user authentication, select Current User, or for device authentication, select Local Machine. Here, we select Current User.
- Click Next.
- In the File to Import window, click the Browse button, and then select the client certificate file.

- Click Next. If the file is password-protected, the Private Key Protection screen displays.

- In the password field, enter the name of the password file, and then click Next. The Certificate Store window displays.
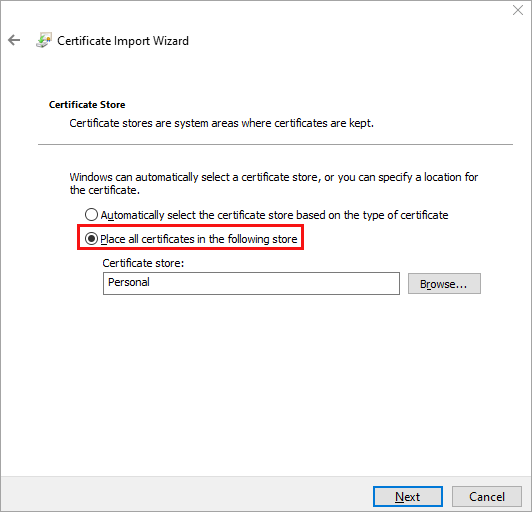
- Select Place all Certificates in the Following Store option, and then click Browse. The Select Certificate Store popup window displays.
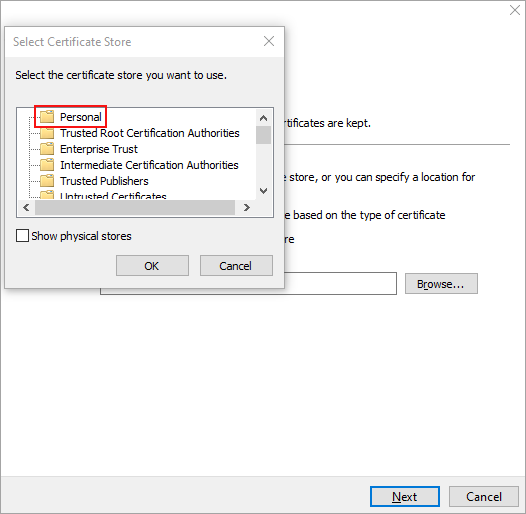
- Select Personal, and then click OK.
- Click Next. The Completing the Certificate Import Wizard window displays.

-
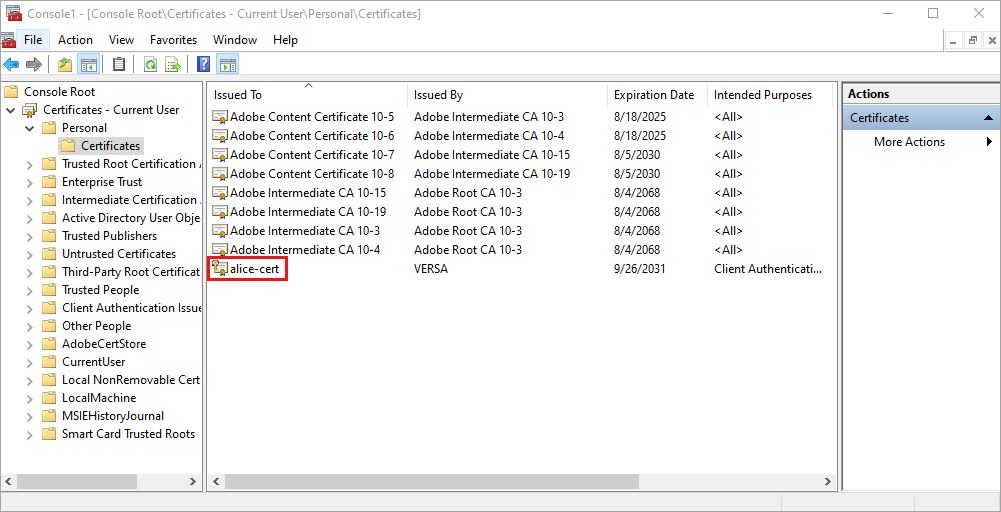
Click Finish to import the certificate. The certificate displays under Personal > Certificates.
Import the Client Certificate to an iOS Client Device
Before you import the client certificate that you created in Generate the CA Key, CA Certificate, and Client Certificate, above, on an iOS device, you must download it from your email or from the appropriate server.
To import the client certificate to a client device that is running iOS:
- To view the downloaded client certificate on your device, go to Settings > Profile Downloaded.

- To install the certificate on your device, click Profile Downloaded. The Install Profile window displays the client certificate.

- Click Install. The following message displays.

- Click Install. The installed certificate displays.

- Click Done.
After you import the client certificate, you must trust the certificate so that the registration does not fail. To trust the certificate:
- Click General > About > Certificate Trust Settings. The Certificate Trust Settings window displays.

- In the Enable Full Trust for Root Certificates field, click the toggle for the Versa SASE client certificate, and then click Continue.
To view the client certificate from the SASE client, select Troubleshoot > CA Certificates.

For information about importing the client certificate on a MacOS device, see Import the CA Certificate.
Upload the CA Certificate to the Device
To upload the root CA certificate to the device:
- In the Director view:
- Select the Configuration tab in the top menu bar.
- Select Devices > Devices in the horizontal menu bar.
- Select an organization in the left menu bar.
- Select a Controller or Versa Operating SystemTM (VOSTM) device in the dashboard. The view changes to Appliance view.
- Select the Configuration tab in the top menu bar.
- Select Objects & Connectors > Objects > Custom Objects > CA Chains in the left menu bar.

- Select the Director tab, and then click Upload File to upload the .crt file. The Upload CA Chain to Director popup window displays.
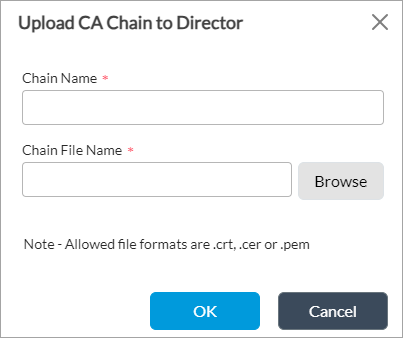
- In the Chain Name field, enter a name for the chain.
- In the Chain Filename field, enter the name of the chain file to upload, or click Browse to select the file to upload to the Director node.
- Click OK to upload the file.
- Select the Appliance tab.

- Click Upload File. The Upload CA Chain File to Appliance popup window displays.

- In the name field, select the name of the CA chain file (here, rootca-cert.pem) to upload to the VOS device.
- Click OK to upload the file to the VOS device. The CA chain file displays on the Appliance tab.

Configure Certificate-Based User Authentication
To configure certificate-based user authentication, you do the following:
- Configure a certificate authentication profile.
- Configure an authentication method for the certificate authentication profile.
- Associate the authentication method with the authentication profile.
- Associate the authentication profile with a secure access portal and secure access gateway.
- Modify the organization limit to add the certificate service host name under domain names.
Configure a Certificate Authentication Profile
You configure a certificate authentication profile and use it in an authentication profile.
To configure a certificate authentication profile:
- In Director view:
a. Select the Administration tab in the top menu bar.
b. Select Appliances in the left menu bar.
c. Select a device name in the main pane. The view changes to Appliance view. - Select the Configuration tab in the top menu bar.
- Select Object and Connectors > Connectors > Users/Groups > Certificate Authentication Profile in the left menu bar.

- Click Add. In the Add/Edit Certificate Authentication Profile popup window, enter information for the following fields.

Field Description Name (Required) Enter a name for the certificate authentication profile. Description Enter a description for the certificate authentication profile. Server Certificate (Required) Select the server certificate for certificate authentication. Server Hostname (Required) Enter a hostname to start certificate authentication service. Ensure that this fully qualified domain name (FQDN) is different from the FQDN of the SASE gateway. Server Port (Required) Enter the port number to start certificate authentication service. You can enter 443 or any other private port number.
Client CA Chain (Required) Select the root CA chain that you uploaded in Upload the CA Certificate to the Device to authenticate the client certificate. Routing Instances (Required) Click the
 Add icon and select the routing instance to reach the certificate authentication server.
Server Addresses Enter the WAN-VR IP address to start certificate authentication service. Username Field Select the field that the VOS software uses to validate a name match in the client certificate:
- Alternative-name Email
- Subject Alternative-name Principal Name
- Subject Common-nameSubject
- For more information about the other fields in the Add/Edit Certificate Authentication Profile popup window, see Configure a Certificate Authentication Profile in Configure User and Group Policy.
- Click OK.
Configure an Authentication Method for Certificate Authentication Profile
To configure an authentication method for the certificate authentication profile you configured in Configure a Certificate Authentication Profile, above:
- In Director view:
- Select the Administration tab in the top menu bar.
- Select Appliances in the left menu bar.
- Select a device name in the main panel. The view changes to Appliance view.
- Select the Configuration tab in the top menu bar.
- Select Object and Connectors > Connectors > Users/Groups > Authentication Methods in the left menu bar.

- Click Add. The Add Authentication Methods popup window displays.

- Enter a name for the authentication method.
- Under Authentication Method, select Certificate Authentication Profile in the Method field.
- In the Certificate Authentication Profile field, select the profile (here, Client-Cert-Auth-Profile) that you created in Configure a Certificate Authentication Profile, above.
- Click OK.
Associate the Authentication Method with the Authentication Profile
- In Director view:
- Select the Administration tab in the top menu bar.
- Select Appliances in the left menu bar.
- Select a device name in the main panel. The view changes to Appliance view.
- Select the Configuration tab in the top menu bar.
- Select Objects & Connectors > Connectors > Users/Groups > Authentication Profiles in the left menu bar.

- Click Add. The Add Authentication Profiles popup window displays.
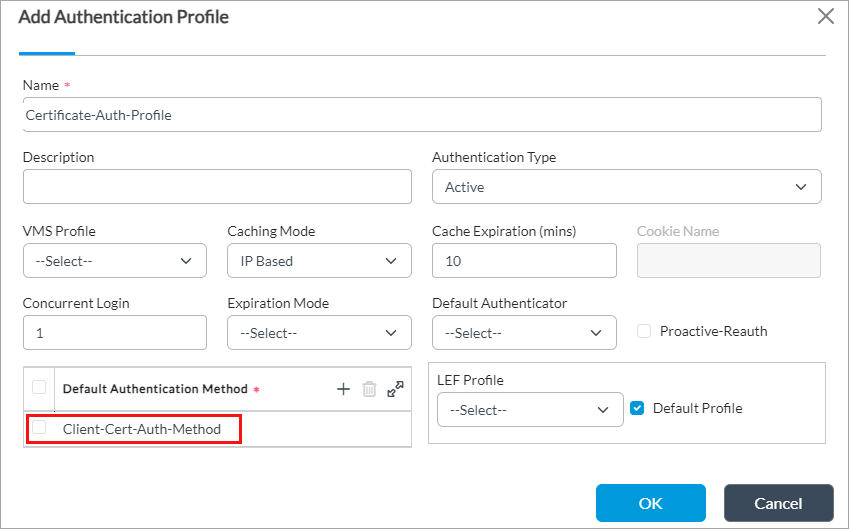
- Enter a name for the authentication profile.
- In the Default Authentication Method field, click + and then select the authentication method (here, Client-Cert-Auth-Method) that you added in Associate the Certification Authentication Profile with the Authentication Method, above.
- For information about configuring other parameters, see Configure an Authentication Profile in Configure User and Group Policy.
- Click OK.
Associate the Authentication Profile with the Secure Access Portal
- In Director view:
- Select the Configuration tab in the top menu bar.
- Select Templates > Device Templates in the horizontal menu bar.
- Select an organization in the left menu bar.
- Select a template in the main pane. The view changes to Appliance view.
- Select the Configuration tab in the top menu bar.
- Select Services > Secure Access > Portal > General in the left menu bar.

- Click the
 Edit icon. The Add Services popup window displays.

- In the Authentication field, select the certificate authentication profile (here, Client-Cert-Auth-Profile) that you added in Configure a Certificate Authentication Profile, above.
- For information about configuring other parameters, see Configure a Secure Access Gateway in Configure the Versa Secure Access Service.
- Click OK.
Associate the Authentication Profile with the Secure Access Gateway
- In Director view:
- Select the Configuration tab in the top menu bar.
- Select Templates > Device Templates in the horizontal menu bar.
- Select an organization in the left menu bar.
- Select a template in the main pane. The view changes to Appliance view.
- Select the Configuration tab in the top menu bar.
- Select Services > Secure Access > Gateway > General in the left menu bar.

- Click the Edit icon. The Add Services popup window displays.

- In the Authentication field, select the certificate authentication profile (here, Client-Cert-Auth-Profile) that you added in Configure a Certificate Authentication Profile above.
- For information about configuring other parameters, see Configure a Secure Access Portal in Configure the Versa Secure Access Service.
- Click OK.
Modify the Organization Limit to Associate the Server Hostname with the Domain Name
To modify organization (tenant) limits:
- In Director view:
- Select the Administration tab in the top menu bar.
- Select Appliances in the left menu bar.
- Select a device name in the main panel. The view changes to Appliance view.
- Select an organization.
- Select the Configuration tab in the top menu bar.
- Select Others > Organization > Limits in the left menu bar. The main pane displays the organizations associated with the Controller node.

- Select the General tab.

- In the Domain Names field, click + and then select the host (here, ny-gw1.versa.local) that you added in the Server Hostname field in Configure a Certificate Authentication Profile, above.
- For information about configuring other parameters, see Configure Organization Limits.
- Click OK.
Configure Certificate-Based Device Authentication
To configure certificate-based device authentication, you do the following:
- Create a certificate authentication profile. For more information, see Configure a Certificate Authentication Profile, above.
- Modify the organization limit to add a certificate service hostname under domain names. For more information, see Modify the Organization Limit to Associate the Server Hostname with the Domain Name, above.
- Associate a certificate authentication profile with the secure access portal and with the secure access gateway.
Associate Certificate Authentication Profile with Secure Access Portal
- In Director view:
- Select the Configuration tab in the top menu bar.
- Select Templates > Device Templates in the horizontal menu bar.
- Select an organization in the left menu bar.
- Select a template in the main pane. The view changes to Appliance view.
- Select the Configuration tab in the top menu bar.
- Select Services > Secure Access > Portal > General in the left menu bar.
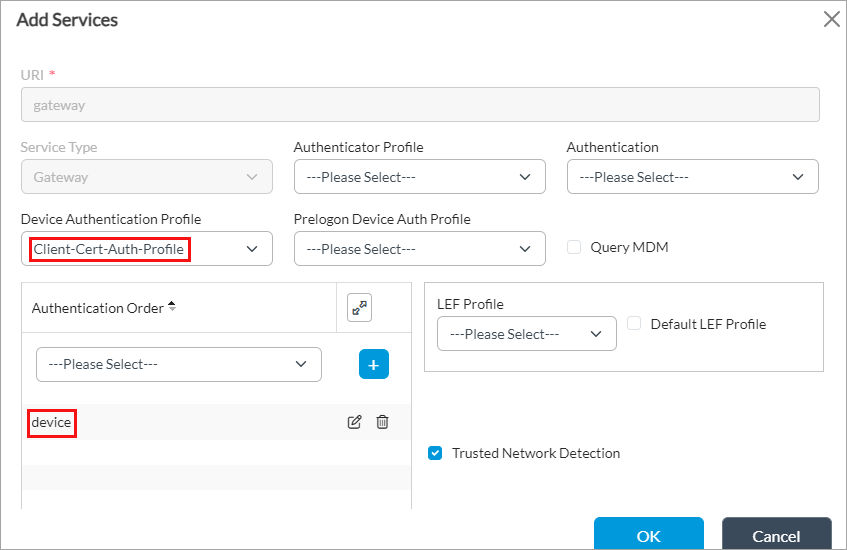
- Click the Edit icon. The Add Services popup window displays.

- In the Device Authentication Profile field, select the certificate authentication profile (here, Client-Cert-Auth-Profile) that you added in Configure a Certificate Authentication Profile, above.
- In the Authentication Order field, select Device Authentication, and then click the
 Add icon. The device option displays. Versa SASE supports multifactor authentication, so to authenticate users, also select User Authentication.
 - For information about configuring other parameters, see Configure a Secure Access Gateway in Configure the Versa Secure Access Service.
- Click OK.
Associate the Certificate Authentication Profile with the Secure Access Gateway
- In Director view:
- Select the Configuration tab in the top menu bar.
- Select Templates > Device Templates in the horizontal menu bar.
- Select an organization in the left menu bar.
- Select a template in the main pane. The view changes to Appliance view.
- Select the Configuration tab in the top menu bar.
- Select Services > Secure Access > Gateway > General in the left menu bar.
- Click the Edit icon. The Add Services popup window displays.
- In the Device Authentication Profile field, select the certificate authentication profile (here, Client-Cert-Auth-Profile) that you added in Configure a Certificate Authentication Profile, above.
- In the Authentication Order field, select Device Authentication, and then click the Add icon. The device option displays. Versa SASE supports multifactor authentication, so to authenticate users, also select User Authentication.
- For information about configuring other parameters, see Configure a Secure Access Portal in Configure the Versa Secure Access Service.
- Click OK.
Verify SASE Client Registration and Gateway Connectivity
To verify certificate-based authentication after you configure certificate-based device and user authentication for the SASE client:
- Download the Versa SASE client. For more information, see Install and Configure Versa SASE Clients.
- Click Register in the Versa SASE Client home screen. The Register screen displays.

- Enter the gateway FQDN, tenant name, and username.
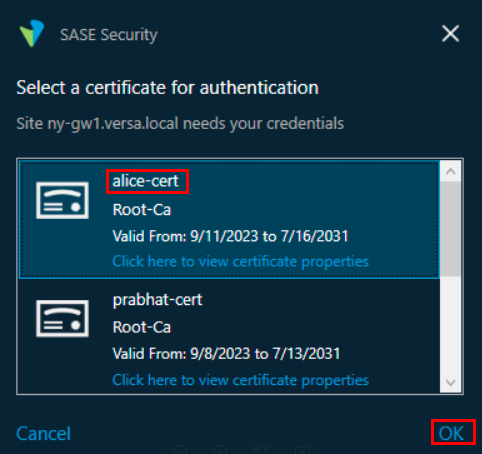
- If there are multiple certificates on the device, the SASE Security window displays all of them. Select the appropriate certificate (here, alice-cert), and then click OK. If there is only one certificate, the SASE client automatically selects that certificate, and the following window does not display.
- If authentication is successful, the following window displays.

- After you register the SASE client, select the gateway or group FQDN to log in. If certificate-based authentication is configured on the VOS SASE gateway, the Select a Certificate for Authentication popup window displays.

- Select the certificate (here, alice-cert) that you want to use for the device or user authentication, and then click OK. The connection status window displays on successful connection.

Supported Software Information
Releases 22.1.1 and later support all content described in this article.