Install and Use a Terminal Server Agent
This article describes how to install and use a terminal server agent.
After you install a Versa terminal server agent on a Windows Server, the agent starts sending user events to the associated VOS device. The terminal service agent performs the following functions:
- Intercept user login and logout events.
- Report to the VOS device the mappings of the user IP address to the port.
- Intercept a user's data flow and assigns the source port from the port range allocated to that user.
Install the Terminal Server Agent
You can install the Versa terminal server agent as a standalone component or as a software package on a Windows Server device. You can install the component on Windows Server 2019. For hardware requirements, see the Windows Server 2019 documentation.
You can silently install the Versa terminal server agent from the CLI , or you can download the VersaTSA.exe file and install the terminal server agent using the installation wizard.
Install the Terminal Server Agent Using the Installation Wizard
To install the Versa terminal server agent using the installation wizard, you download the VersaTSA.exe file.
Before you install the Versa terminal server agent using the installation wizard, ensure the following:
- If you have configured SAML authentication on the Windows server device, install Microsoft Edge WebView2 Runtime before you register the Versa terminal server agent. The Versa terminal server agent uses WebView2 to browse the SAML authentication URL internally.
- Copy the VersaTSA.exe file to the Windows server device from the following link: https://versanetworks.app.box.com/s/83g84wklcgq7k2uy292qfdyjusym12p7
To install the Versa terminal server agent on a device using the installation wizard:
- Double-click the VersaTSA.exe file.
- The Select Component screen displays, with the Versa Terminal Server Agent selected by default.

- Click Next.
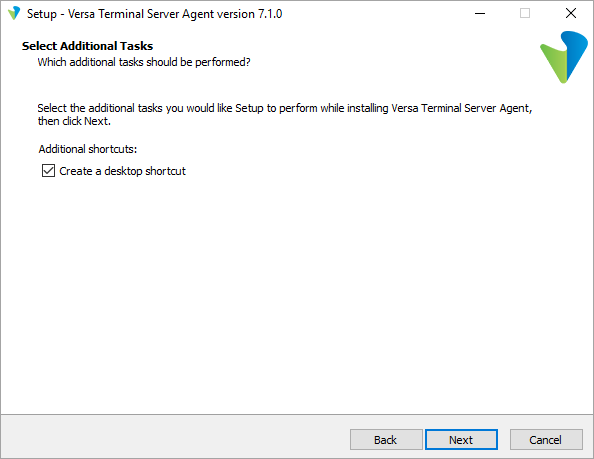
- In the Select Additional Tasks window, click Create a Desktop Shortcut if required, and then click Next.
- In the Ready To Install window, click Install, and then click Finish in the next screen.


After you click Finish, the terminal server agent launches.
FQDN for the TSA Agent
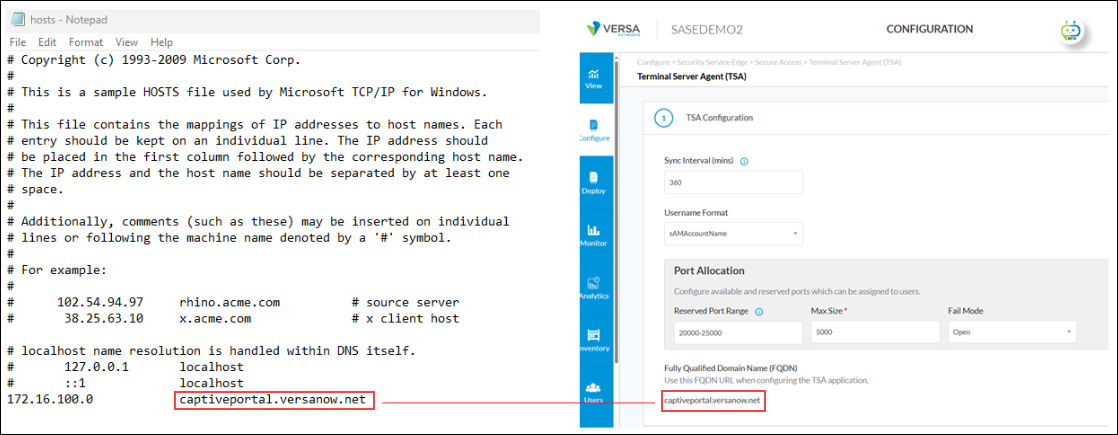
To get the fully qualified domain name (FQDN) URL to register with the TSA server, use any of the following two options:
- Use the FQDN displayed in the SSE portal during TSA profile creation, and create an entry in your local network DNS server to resolve the private TVI (this is usually the first IP address of SASE client IP pool). This IP address will be reachable over the SD-WAN overlay tunnel in an SD-WAN site, or over the IPsec tunnel in a non-SD-WAN site.
- Use the SSE portal FQDN (the same used by the SASE client). This resolves to the public IP address of SASE gateways displayed in the SSE portal during TSA profile creation and create an entry in your local network DNS server to resolve to the private TVI.
Ensure the terminal server can resolve the FQDN URL with the TVI interface assigned to the SSE gateway VPN pool either by a DNS server or with a manual local host entry. In the example below, a local host entry is used to resolve the URL with the TVI interface IP address.
Register with the TSA Server
To register the terminal server agent with the terminal server agent server:
- Double-click the agent shortcut on the desktop to open the terminal server agent.
- Select Register in left menu bar and then click Register +.
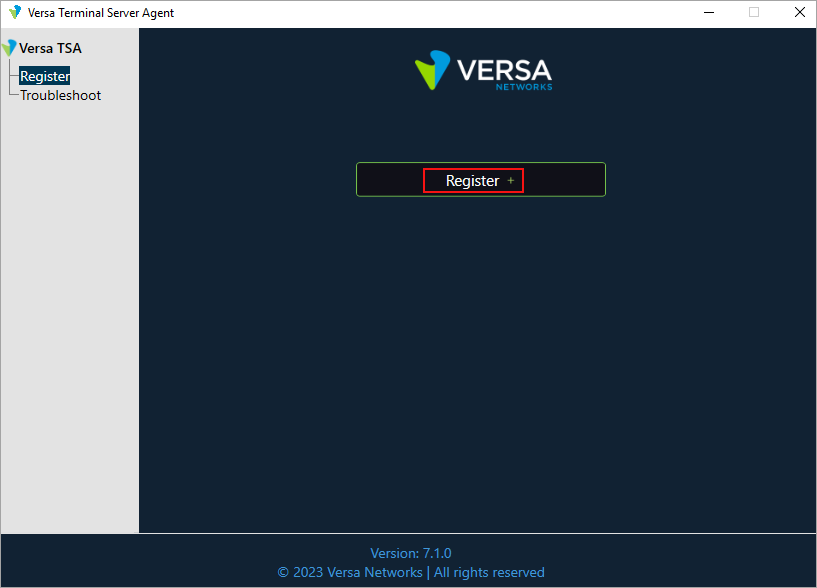
- In the Register screen, enter information for the following fields:
- Portal FQDN (Required)—Enter the fully qualified domain name (FQDN) of the Versa terminal service agent portal.
- Enterprise Name (Required)—Enter the name of the enterprise.
- User ID (Optional)—Enter the user identifier. The ID epends on the value configured on the server.

- Click Submit. If the registration is successful, a screen similar to the following displays:

View the TSA Configuration
To view details about the terminal service agent configuration, open TSA and then click Configuration in the left menu bar. The following configuration information displays. Note that the values displayed are configured on the Versa Director, and on the terminal service agent they are view-only. For more information, see Configure a Terminal Server Agent.

| Field | Description |
|---|---|
| Source Port Range | Displays the source port allocation range for user sessions |
| Reserved Port Range | Displays the reserved port allocation range for user sessions. |
| User's Start Port Size | Displays the initial port allocation size for each user. |
| User's Max Port Size | Displays the maximum port allocation size for each user. |
| Port Allocation Fail Mode | Displays the action that the agent uses to block flows when the user exhausts their allocated ports:
|
| Sync Interval | Displays how often, in minutes, to synchronize the configuration with the server. |
| Fail Mode | Displays the traffic mode if the terminal server agent server connection fails:
|
| User Name Format |
Select the username format to have the terminal server agent recognize:
|
To update the information, click Refresh.
Delete a TSA Configuration
To register a terminal service agent with different user details or to reregister the same user with different credentials, you must delete the terminal service agent configuration.
To delete a terminal service agent configuration:
- Open TSA, and then click Configuration in the left menu bar.
- Click Delete Configuration. The following message displays.

- Click Delete to confirm deletion.
Synchronize the TSA Configuration
To synchronize terminal service agent to synchronize the agent with updated server details:
- Open TSA, and then click Configuration in the left menu bar.
- Click Sync Configuration. The following message displays.

- Click Sync to synchronize the TSA configuration.
Monitor User and Port Information
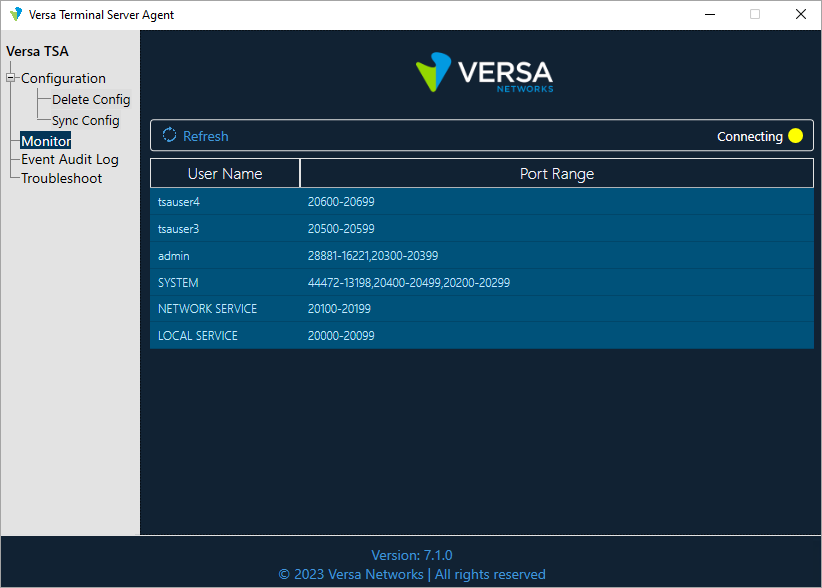
To monitor user and port information, open TSA, and then click Monitor in the left menu bar. The main screen displays the following connection status information:
- Connected (green)—Displays when the terminal service agent is connected to the server. If the status is Connected, the terminal service agent continues to report current user port assignments to the server. For example:

- Connecting (orange)—Displays when the terminal service agent is connecting to the server. For example:
- Disconnected (red)—Displays when the terminal service agent is disconnected from the server. For example:

The Monitor screen also displays the user names and the port range assigned to each user. In this example, there are two users (oscar1 and oscar2) connected to the terminal server. Note that the TSA monitor tab can identify both users, and it shows the port range allocated to each user.

Click Refresh to update the information.
View Event Audit Logs
- Open TSA, and then click Event Audit Log in the left menu bar. The main screen displays the user name, event name, port ranges used by each user for each event, and date and time of the event.

- Click Refresh to update the information.
- To save the event logs, click Export.
- Select a folder and save the log file on your computer. The log file is saved in JSON (.json) format.
Select Log Level and Export Logs
To save log files, you first select the severity of the logs to include and then you export the logs.
To select the log level:
- Open TSA, and then click Troubleshoot in the left menu bar.

- Click Log Level, and select a log severity level:
- Debug—Log application debug-level information.
- Error—Log error-level information.
- Info (default)—Log informational-level information. This is the default.
- Verbose—Log additional information during the interaction with the client user interface.
- Warn—Log warning-level information.
To save log files:
- In the Troubleshoot screen, click Export Logs.

- Select a folder and save the log file on your computer. The log file is saved in .zip format.
Supported Software Information
Releases 12.2.1 and later support all content described in this article.