Configure SASE TLS Decryption
![]() For supported software information, click here.
For supported software information, click here.
Transport Layer Security (TLS) decryption is an industry-standard protocol that is used to provide a secure communications channel between clients (end devices) and servers (destination sites) over the internet. TLS decryption uses two mechanisms to secure traffic:
- Handshake protocol—Authenticates the client and server devices at both ends of a secure communications channel, negotiates cryptographic modes and parameters, and establishes shared keying material used to negotiate the security parameters of a connection. The handshake protocol then sends messages to the TLS record protocol.
- Record protocol—Takes transmitted messages from the handshake protocol, fragments the data into manageable blocks, protects the records, and transmits the result. The data received is verified, decrypted, reassembled, and then delivered to higher-level clients.
Note: You must configure the following SASE rules, profiles, and settings in a specific order:
- Configure users and groups, and then publish them to the gateway. For more information, see Configure User and Device Authentication.
- Configure site-to-site tunnels. For more information, see Configure SASE Site-to-Site Tunnels.
- Configure secure client access profiles and rules. For more information, see Configure SASE Secure Client-Based Access Rules.
The remaining SASE rules, profiles, and settings do not need to be configured in a specific order.
Configure TLS Decryption Rules
To configure TLS decryption rules:
- Go to Configure > TLS Decryption > Policy Rules.

The TLS Decryption Rules List screen displays all current rules.

Note: Release 12.2.1 supports three new built-in TLS decryption rules: DoNotDecrypt-LegalLiability, StandardInspect, and RiskyWebsites. Built-in rules are predefined in Concerto. You can use them without modification, or you can clone and modify them. The rules are automatically generated when you publish a tenant. You can treat them as you would any user-defined rule; you can modify, reorder, move, and delete the rule. If you delete a built-in rule and then republish the tenant, the rule is created again in the disabled state.
- To customize which columns display, click Select Columns and click the columns select or deselect the columns you want to display. Click Reset to return to the default columns settings. The options are:
- Decryption Profile
- Bypass URL Filtering Profile
- Applications & URLs
- Users & Groups
- Endpoint Posture
- Source & Destination
- Services
- Schedule
- Status
- Click + Add to add a TLS decryption rule. The Create TLS Decryption Rule screen displays. In the first step, Decryption Enforcement, enter information for the following fields.

Field Description Decrypt and Inspect the Traffic (Group of Fields) Select to decrypt and inspect all traffic. - Use the following decryption profile
Select a decryption profile. - + Add New
Click to add a decryption profile. To create a profile, see Create a TLS Decryption Profile. - URL Filtering Action Override (optional)
Select a URL filtering profile to override the current profile. - Bypass Certificate-Pinned Traffic
Enable this option to dynamically bypass TLS decryption for certificate-pinned applications for the logged in users. Do Not Decrypt (Group of Fields) Select how to bypass decryption of the traffic. - Do not decrypt but do inspect the traffic
Do not decrypt the traffic but inspect the traffic to identify, classify, and inspect the traffic for threats. Select a profile. - Do not decrypt and do not inspect the traffic
Click to allow traffic from certain trusted sites to not be inspected. - Click Next to go to the second step, Applications & URLs. By default, all applications, URLs, and reputations are included in the match, which means that all applications, URLs, and reputations are matched by this rule. To accept the default settings, click Next to continue to Step 3, Users & Groups.

The screen displays all custom and predefined application groups. Note that you can create internet protection rules based on either applications or URL categories and reputations, but not both. To match both applications and URL categories or reputations, create two separate internet protection rules. ClickAdd New to add a new application category. See the Configure Application Categories section in Configure SASE User-Defined Objects.
- To create a TLS decryption rule based on applications, select the user-defined and/or predefined application groups to include in the match list, or type the name of the application group in the search box and select it from the search results. The application group is added to the search bar. In the following example, the predefined application groups Adobe-Apps and Box-Apps are selected. To remove an application, click X next to the application in the search box.

- Click the Applications tab in the submenu. The following screen displays.

- Select the user-defined and/or predefined applications to include in the match list, or type the name of the application in the search box and then select it from the search results. The application is added to the search bar. To remove an application, click X next to the application in the search box.
Note: In Release 12.2.1 and later, deprecated predefined applications are not displayed. If you had already configured a rule in Releases 12.1.1 and earlier that included a now-deprecated application in its match criteria, and then try to edit that rule, an error message similar to the following is displayed.

- Click the Application Category tab in the submenu. The following screen displays.

- Select the user-defined and/or predefined application categories to include in the match list, or type the name of the application category in the search box and then select it from the search results. The application category is added to the search bar. To remove an application category, click X next to the application category in the search box.
- To create a TLS decryption rule based on URL categories and reputations, click the URL Categories & Reputations tab in the top menu. The following screen displays.

- In the URL Categories and Reputation fields, select one or more URL categories and reputations to include in the internet protection rule. The URL category and reputation are added to the respective search bar. To remove a URL category or reputation, click X next to the name in the search box.
- Click Next to go to the next step, Users & Groups. The Users & Groups screen displays. By default, security enforcement is applied to all users, user groups, and user device groups. To accept the default, click Next to go to the next step, Endpoint Posture.

- To change the users and groups settings, click Customize in the Users & Groups box. The Users & User Groups screen displays with All Users selected by default.

- You can choose the following user types to include in the match list:
- All Users—Apply the security policy to all users, whether whether they are authenticated (known) or not authenticated (unknown)
- Selected Users—Apply the security policy to users or groups from IdP that you select
- Known Users—Apply the security policy to all authenticated users
- Unknown Users—Apply the security policy only to users that are not authenticated
- If you choose Selected Users, the following screen displays. You can choose user groups, individual users, or both user groups and users to include.

- In the Enable TLS Decryption for the following matched users or user groups field, select one or more users or user groups profile.
- Under the User Groups tab, select the user groups to include in the match list, or type the name of a user group in the search box and then select it from the search results.
- Click the Users tab in the submenu. The following screen displays.
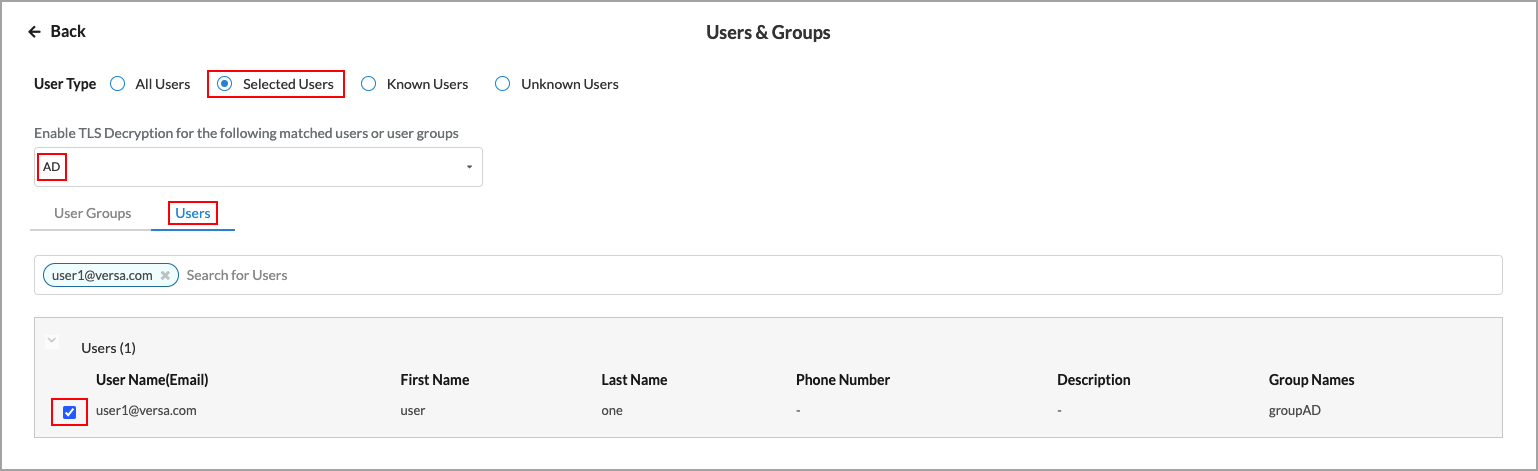
- In the Enable TLS Decryption for the following matched users or user groups field, select one or more users profiles.
- Under the Users tab, select the users to include in the match list, or type the name of a user in the search box and then select it from the search results.
- Click
 Back arrow to return to the main Users & Groups screen.

By default, security enforcement is applied to all user device groups. To accept the default, click Next to go to the next step, Endpoint Posture.
- To change the user device groups settings, click Customize in the Users Device Groups box. The following screen displays.

- Select one or more user device groups to include in the rule.
- Click the Back arrow to return to the main Users & Groups screen, or click Next to continue the next step, Endpoint Posture. The following screen displays.

Endpoint posture allows you to select predefined and user-defined Endpoint Information Profiles (EIP) to include in the match criteria for TLS decryption rules. For information about configuring EIPs, see Configure Endpoint Information Profiles.
Endpoint posture also allows you to create additional match criteria by choosing a device/endpoint risk score to attribute to the entities within the network’s policy rule. This score helps determine the credibility and the likelihood of activities being legitimate or malicious. These match criteria can then be used when creating policies and rules. For more information, see Configure Endpoint Detection and Response.
- To select EIPs to include in TLS decryption rule, click Customize in the Endpoint Information Profile (EIP) box. The following screen displays.

- To create a new EIP profile, click
 Create New EIP Profile. For more information, see Configure Endpoint Information Profiles.
 - To add a user-defined EIP, select the User Defined tab, then click Add Existing EIP Profile. In the Add User Defined EIP Profiles popup window, select one or more EIP profiles from the drop-down list.

- Click Add.
- To add a predefined EIP profile, select the Predefined tab in the Endpoint Information Profile (EIP) screen, then click Add Existing EIP Profile. In the Add Predefined EIP Profiles popup window, select one or more EIP profiles from the drop-down list.

- Click Add.
- Click the Back arrow to return to the Endpoint Posture screen.

- By default, all device/endpoint risk scores are applied to the security enforcements. To choose which risk score to apply, click Customize in the Device/Endpoint Risk Score box. The following screen displays.

- Select one or more entity risk scores from the list. The options are:
- High Risk (80–100)
- Suspicious (60–80)
- Moderate Risk (40–60)
- Low Risk (20–40)
- Trustworthy (0–20)
- Click Next or click the Back arrow to return to the Endpoint Posture screen, then go to the Network Layer 3-4 step. The following screen displays.

By default, all Layer 4 services and all source and destination traffic are included in TLS rule. There are no default schedules.
- To change the services to include in the rule, click Customize in the Services box. The following screen displays.

- Click to select one or more of the services in the table, or use the search box to locate the service. To add a custom service, click Add User-Defined. The following screen displays.

- Select a protocol or a port number. The available options are AH, ESP, TCP, UDP, ICMP, or 0 through 255. If you select TCP, UDP, or TCP and UDP, the following popup window displays.

- Under Port, select either Source AND Destination or Source OR Destination, as follows:
- Source AND Destination—Select both a source port number and a destination port number (range 0 through 255)
- Source OR Destination—Select either a source port number or a destination port number (range 0 through 255)
- Click Next to to the Name and Tags step, then enter the following information.

Field Description Name Enter a name for the rule. Description (Optional) Enter a description of the rule. Tags (Optional) Add one or more tags. A tag is an alphanumeric text descriptor with no spaces or special characters. You can specify multiple tags added for the same object. The tags are used for searching the objects. Edit Click the  Edit icon to make any needed changes to your selections.
 - Click Save to save the new service. You can then select the service in the drop-down list.
- Click the Back arrow to return to the Network Layer 3-4 main screen.

- To change the source and destination traffic to include in the match list, click Customize under Source & Destination (Layer 3). The following screen displays any previously configured source address.

- Enter information for the following fields.
Field Description IP Subnet Enter the IP subnet of the source address, such as 10.1.1.0/24. You can enter multiple subnets. IP Range Enter the IP range of the source address, such as 10.1.1.1-10.1.2.1. You can enter multiple ranges. IP Wildcard Enter the IP wildcard of the source address, such as 192.168.0.56/0.0.0.255. You can enter multiple wildcards. VPN Name Select the VPN name of the source address. Negate Source Address Select to apply the rule to any source addresses except the ones in the Source Address field. Add Address Group Click the Add icon to add an address group. See Configure SASE User-Defined Objects for more information. - Click the Destination Address tab change the destination address information. The fields are the same as those for the Source Address tab, as shown above.
- Click the Source Zone & Sites tab. The following screen displays.

- Select a source zone. There are two default zones: Versa Client and SD-WAN Zone. Select Versa Client if traffic comes from a Versa Secure Access (VSA) client application, and select SD-WAN Zone if traffic comes from an SD-WAN device.
- Select a source site. There is one default site: USA.
- Click the Destination Zone & Sites tab. The following screen displays, with the Internet destination zone pre-selected.

- Select a destination zone. There are two default zones: Internet and SD-WAN Zone. Select Internet if traffic is going to the internet, and select SD-WAN Zone if traffic is going to an SD-WAN device.
- Select a destination site. There is one default site: USA.
- Click the Back arrow to return to the Network Layer 3-4 main screen.

- To customize schedules, click Customize under Schedule. The following screen displays.

- Click the drop-down list to select a schedule. If no schedules are listed, create one by clicking Add New. For more information, see Configure SASE User-Defined Objects.
- Click Next to go to the Review & Validate screen, then enter the following information.

Field Description Name Enter a name for the new rule. Description Enter a description of the new rule. Tags Enter one or more tags for the new rule. A tag is an alphanumeric text descriptor with no spaces or special characters that is used for searching rules. You can specify multiple tags. Rule is enabled Click the slider to enable the rule (default).

Click the slider again to disable the rule.

Edit Click the Edit icon to make any changes to the configuration. - Click Save to create the TLS decryption rule.
Create a TLS Decryption Profile
When you configure TLS decryption for a tenant, the VOS device behaves as an SSL proxy, and it generates a TLS/SSL certificate for each HTTPS URL that the tenant tries to access (for example, https://example.com). The certificate allows the VOS device to inspect the data flow and take any necessary actions. To optimize the SSL proxy behavior, the VOS device uses the same generated public–private key pair for certificates issued across domains. This key pair is generated for each configured decryption profile, and hence is unique for each tenant.
To create a TLS decryption profile:
- Go to Configure > TLS Decryption > Profiles.

The TLS Decryption Profiles List screen displays all current profiles.
Note: Release 12.2.1 supports two new implicit TLS decryption profiles: Standard and Strict. Implicit profiles are predefined in Concerto. You can use them without modification, or you can clone and modify an implicit profile.

- Click + Add New to add a TLS decryption profile. The Create TLS Decryption Profile screen displays with the first step, Profile Type, selected by default. Decryption enforces security policies on encrypted traffic to help prevent malicious content from entering the network and to protect sensitive data disguised as encrypted traffic from leaving the network. You can configure a decryption profile with SSL inspection and policy enforcement information.

- Select a decryption profile or an inspection profile:
- Decryption Profile—Applies both decryption and inspection protocols that you can associate with your decryption rules.
- Inspection Profile—Applies only inspection protocols that you can associate with your decryption rules.
- Click Next to go to Step 2, Certificate Setup.

- Click Next to accept the default certificate authority (CA). To use a different CA, select one of the previously uploaded certificates, or click + Add New to configure a new CA. In the Certificates popup window, enter information for the following fields.

Field Description Certificate Type Click CA Certificate. Default slide Click the slider to have the added CA certificate to be the default CA certificate.
Certificate Name Enter a name for the certificate. Upload File Click to upload a CA certificate file. Add Click to add the new certificate. - Click Next to go to Step 3, Inspection Options.


Field Description Certificate Validation (Group of Fields) - Verify with OCSP
Select to use the Online Certificate Status Protocol (OCSP) to verify a server certificate. - Block Unknown Certificates
Select to block SSL sessions whose certificate status is unknown. - Response timeout (seconds) for an OCSP request
Enter how long, in seconds, before an OCSP request times out.
Default: 5 seconds
Range: 1 to 255 seconds
Server Certificate Actions (Group of Fields) - When the certificate expires, do the following:
Select an action to take when the certificate expires.
- When the certificate is received from an untrusted issuer, do the following
Section an action to take when a certificate is received from an untrusted issuer. - Restrict Certificate Extension
Click to choose whether to restrict the certificate key usage extensions to either digital signature or key encipherment. SSL or TLS Protocol Checks (Group of Fields) - When the negotiated SSL or TLS protocol between the client and server uses an unsupported key length, do the following:
Select an action to take when SSL or TLS between the client and server uses an unsupported key length. - Minimum Supported RSA Key Length
Enter the minimum supported RSA key length, in bits.
Default: 1024 bit
Range: 512 bits or longer
- When the negotiated SSL or TLS protocol between the client and server uses an unsupported cipher, do the following:
Select an action to take when SSL or TLS between the client and server uses an unsupported cipher. - When the negotiated SSL or TLS protocol between the client and server uses an unsupported protocol version, do the following:
Select an action to take when SSL or TLS between the client and server uses an unsupported protocol version. - Click Next to go to Step 4, Decryption Options, and then enter information for the following fields.


Field Description Transport Layer Security (TLS) Version Support (Group of Fields - Minimum and maximum version of TLS that is supported
Use the slider to select the minimum and maximum TLS version that is supported. If you select a version that is not TLS 1.3, select one or more key exchange algorithms for the SSL connection.
- Key Exchange Algorithms
Select one or more key exchange algorithms:
- ECDHE—Elliptic-Curve Diffie-Hellman Key Exchange
- RSA—Rivest-Shamir-Adleman algorithm.
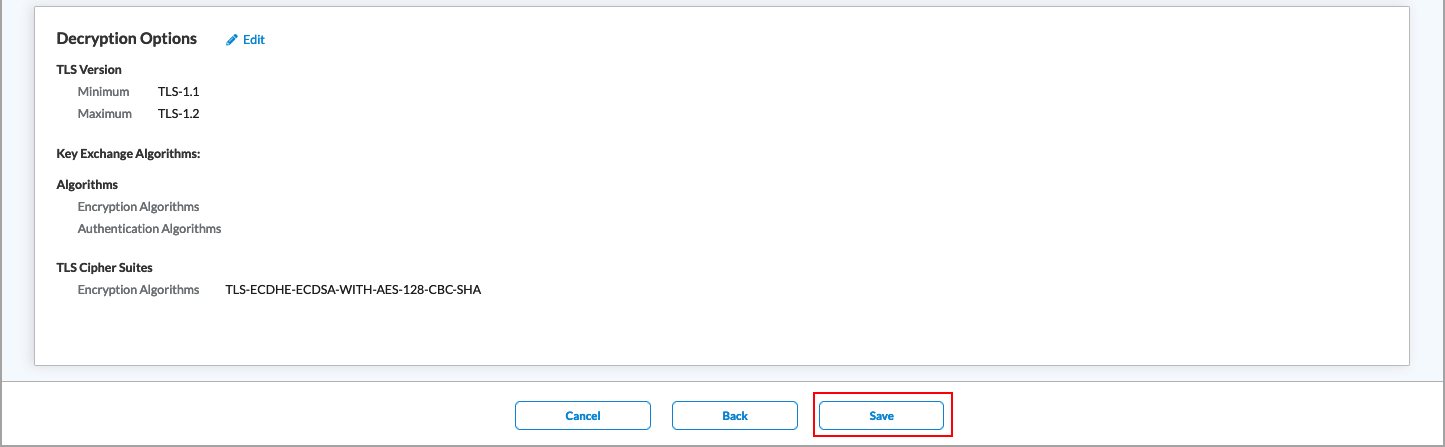
Advanced Click to configure algorithms and TLS cipher suites. Algorithms Select which encryption and authentication algorithms to use. TLS Cipher Suites Displays the TLS cipher suites selected depending on the algorithms. - Click Next to go to Step 5, Review & Validate, and then enter information for the following fields.


Field Description General (Group of Fields) - Name
Enter a name for the TLS decryption profile. - Description
Enter a text description for the profile. - Tags
Enter one or more tags. A tag is an alphanumeric text descriptor with no spaces or special characters that is used for searching profiles. You can specify multiple tags. - Review the Certificate Setup, Inspection Options, and Encryption Option sections.
- To change any of the information, click the
 Edit icon in the section and then make the required changes.
 - Click Save to save the new TLS decryption profile.
Certificate Pinning and SSL Decryption Exclusions
Certificate pinning is a security mechanism to prevent man-in-the-middle (MITM) attacks. It enhances the security of SSL/TLS connections to establish a secure and encrypted communication channel between a client, such as a desktop or a mobile application, and a server.
Certificate pinning associates the digital certificate or public key of a server with the client application. It does not rely solely on the default trust provided by CAs. When a client connects to a server, it checks the server certificate against a copy of the stored certificate or public key. If there is no match, the connection terminates, which ensures that only trusted certificates are accepted. This adds an additional security layer for mobile and web applications.
Versa Networks offers a predefined list of applications that are excluded from SSL inspection to prevent issues caused by certificate pinning. For more information, see SSL Decryption Exclusion List, below.
SSL Decryption Exclusion List
The table below includes the hostnames of applications that bypass SSL inspections due to certificate pinning.
| Hostname | Description |
|---|---|
|
.*.whatsapp.net |
whatsapp: pinned-cert |
|
kdc.uas.aol.com |
aim: client-cert-auth |
|
bos.oscar.aol.com |
aim: client-cert-auth |
|
.*.agni.lindenlab.com |
second-life: client-cert-auth |
|
.*.onepagecrm.com |
onepagecrm: pinned-cert |
|
update.microsoft.com |
ms-update: client-cert-auth |
|
.*.update.microsoft.com |
ms-update: client-cert-auth |
|
activation.sls.microsoft.com |
ms-product-activation: client-cert-auth |
|
yuuguu.com |
yuuguu: client-cert-auth |
|
.*.softether.com |
packetix-vpn: client-cert-auth |
|
.*.tpncs.simplifymedia.net |
simplify: pinned-cert |
|
tpnxmpp.simplifymedia.net |
simplify: pinned-cert |
|
.*.table14.fr |
winamax: client-cert-auth |
|
.*.gotomeeting.com |
gotomeeting: client-cert-auth |
|
.*.live.citrixonline.com |
gotomeeting: client-cert-auth |
|
.*.mozilla.org |
For mozilla update, no appid: client-cert-auth |
|
lr.live.net |
live-mesh,live-mesh-remote-desktop, live-mesh-sync: client-cert-auth |
|
anywhere2.telus.com |
For call anywhere, no appid: client-cert-auth |
|
accounts.mesh.com |
live-mesh,live-mesh-remote-desktop,live-mesh-sync: client-cert-auth |
|
storage.mesh.com |
live-mesh,live-mesh-remote-desktop,live-mesh-sync: client-cert-auth |
|
.*.sharpcast.com |
sugarsync: client-cert-auth |
|
auth2.triongames.com |
rift: client-cert-auth |
|
.*.zumodrive.com |
zumodrive: pinned-cert |
|
.*.urlcloud.paloaltonetworks.com |
paloalto-wildfire-cloud: client-cert-auth |
|
.*.wildfire.paloaltonetworks.com |
paloalto-wildfire-cloud: client-cert-auth |
|
.*.telex.cc |
telex: client-cert-auth |
|
.*.icloud.com |
icloud: pinned-cert |
|
.*.onlive.com |
onlive: pinned-cert |
|
.*.wetransfer.com |
wetransfer: client-cert-auth |
|
www.rooms.hp.com |
hp-virtual-rooms: client-cert-auth |
|
novafusion.ea.com |
ea-fifa: client-cert-auth |
|
fesl.ea.com |
ea-fifa: client-cert-auth |
|
courier.push.apple.com |
apple-push-notifications: pinned-cert |
|
courier.sandbox.push.apple.com |
apple-push-notifications: pinned-cert |
|
.*.courier.sandbox.push.apple.com |
apple-push-notifications: pinned-cert |
|
.*.pgiconnect.com |
web-browsing: client-cert-auth |
|
sap.mymeetingroom.com |
web-browsing: client-cert-auth |
|
.*.logmein.com |
logmein: pinned-cert |
|
.*.*.logmein.com |
logmein: pinned-cert |
|
.*.itwin.com |
itwin: client-cert-auth |
|
notify.mql5.com |
metatrader: client-cert-auth |
|
updates.metaquotes.net |
metatrader: client-cert-auth |
|
.*.vudu.com |
vudu: pinned-cert |
|
login.kaseya.net |
kaseya: client-cert-auth |
|
.*.one.ubuntu.com |
ubuntu-one: client-cert-auth |
|
.*.cloudmosa.com |
puffin: pinned-cert |
|
.*.las.citrixonline.com |
gotomeeting: client-cert-auth |
|
.*.sjc.citrixonline.com |
gotomeeting: client-cert-auth |
|
.*.ord.citrixonline.com |
gotomeeting: client-cert-auth |
|
.*.iad.citrixonline.com |
gotomeeting: client-cert-auth |
|
authentication.citrixonline.com |
gotomeeting: client-cert-auth |
|
.*.osdimg.com |
gotomeeting: client-cert-auth |
|
.*.ams.citrixonline.com |
gotomeeting: client-cert-auth |
|
g2m.egw.citrixonline.com |
gotomeeting: client-cert-auth |
|
g2ac.egw.citrixonline.com |
gotoassist: client-cert-auth |
|
.*.servers.citrixonline.com |
gotomeeting: client-cert-auth |
|
.*.fra.citrixonline.com |
gotoassist: client-cert-auth |
|
.*.atl.citrixonline.com |
gotoassist: client-cert-auth |
|
.*.las2b.citrixonline.com |
gotowebinar: client-cert-auth |
|
.*.launch.gotowebinar.com |
gotowebinar: client-cert-auth |
|
.*.citrixonlinecdn.com |
gotoassist: client-cert-auth |
|
.*.itunes.apple.com |
itune-base,itunes-appstore,apple-appstore,itunes-m: pinned-cert |
|
itunes.apple.com |
itune-base,itunes-appstore,apple-appstore,itunes-m: pinned-cert |
|
.*.airddroid.com |
airdroid: client-cert-auth |
|
portal.aws.amazon.com |
amazon-aws-console: client-cert-auth |
|
connectivity.amazonworkspaces.com |
amazon-workspace: pinned-cert |
|
nds.norton.com |
norton-zone: client-cert-auth |
|
www.nortonzone.com |
norton-zone: client-cert-auth |
|
zpi.nortonzone.com |
norton-zone: client-cert-auth |
|
login.norton.com |
norton-zone: client-cert-auth |
|
.*.bitdefender.com |
bitdefender: client-cert-auth |
|
.*.bitdefender.net |
bitdefender: client-cert-auth |
|
.*.pathviewcloud.com |
pathview: client-cert-auth |
|
secure.logmeinrescue.com |
logmeinrescue: pinned-cert |
|
.*.rooms.hp.com |
hp-virtual-rooms: client-cert-auth |
|
secure.hp-ww.com |
hp-virtual-rooms: client-cert-auth |
|
.*.line.naver.jp |
naver-line: client-cert-auth |
|
.*.line-apps.com |
naver-line: client-cert-auth |
|
.*.gc.apple.com |
apple-game-center:client-cert-auth |
|
.*.wdcdn.net |
wiredrive: client-cert-auth |
|
.*.wiredrive.com |
wiredrive: client-cert-auth |
|
meetfinch.com |
finch: client-cert-auth |
|
.*.usefinch.com |
finch: client-cert-auth |
|
.*.vagrantcloud.com |
vagrant: client-cert-auth |
|
appguru.com |
appguru: client-cert-auth |
|
.*.silentcircle.com |
silent-circle: client-cert-auth |
|
.*.silentcircle.net |
silent-circle: client-cert-auth |
|
www.tumblr.com |
tumblr-posting: client-cert-auth |
|
ecure.echosign.com |
adobe-echosign: client-cert-auth |
|
.*.securewebportal.net |
e-folder: client-cert-auth |
|
.*.mzstatic.com |
apple-appstore: pinned-cert |
|
.*.dropcam.com |
dropcam: client-cert-auth |
|
www.origin.com |
battlefield2: client-cert-auth |
|
.*.postlm.com |
browsec: client-cert-auth |
|
.*.postls.com |
browsec: client-cert-auth |
|
two.postls.com |
browsec: client-cert-auth |
|
.*.ntrsupport.com |
ntr-support: client-cert-auth |
|
crypto.cat |
cryptocat: client-cert-auth |
|
.*.periscope.tv |
periscope: client-cert-auth |
|
owner-api.teslamotors.com |
tesla-car-app: client-cert-auth |
|
.*.dochub.com |
dochub-base,dochub-uploading: client-cert-auth |
|
.*.meerkatapp.co |
meerkat: client-cert-auth |
|
.*.informaticaondemand.com |
informatica-cloud: client-cert-auth |
|
.*.informaticacloud.com |
informatica-cloud: client-cert-auth |
|
.*.logentries.com |
surveymonkey: pinned-cert |
|
webrootcloudav.com |
webroot-secureanywhere: client-cert-auth |
|
cloud.webroot.com |
webroot-secureanywhere: client-cert-auth |
|
.*.ess.apple.com |
apple-messages,itunes-base: pinned-cert |
|
gsa.apple.com |
apple-messages,itunes-base: pinned-cert |
|
gsas.apple.com |
apple-messages,itunes-base: pinned-cert |
|
sso.8x8.com |
8x8: pinned-cert |
|
vm.8x8.com |
8x8: pinned-cert |
|
discordapp.com |
discord: pinned-cert |
|
.*.whispersystems.org |
signal: pinned-cert |
|
.*.snapchat.com |
snapchat:pinned-cert |
|
.*.wbx2.com |
cisco-spark: pinned-cert |
|
.*.ciscospark.com |
cisco-spark:pinned-cert |
|
.*.mobile.yandex.net |
yandex-maps:pinned-cert |
|
.*.agent.datadog.com |
datadog: client-cert-auth |
|
events-sjc.egnyte.com |
egnyte: client-cert-auth |
|
avl-egnyte-auth-service.egnyte.com |
egnyte: client-cert-auth |
|
.*.kakao.com |
kakaotalk: pinned-cert |
|
.*.wire.com |
wire: pinned-cert |
|
.*.xhoot.com |
wire: pinned-cert |
|
.*.tresorit.com |
tresorit: pinned-cert |
|
.*.vortex-win.data.microsoft.com |
windows-defender-atp-endpoint: pinned-cert |
|
SevilleCloudGateway-PRD.trafficmanager.net |
windows-defender-atp-endpoint: pinned-cert |
|
mobile.surveymonkey.com |
surveymonkey: pinned-cert |
|
.*.acompli.net |
outlook-web-online: pinned-cert |
|
.*.coinbase.com |
coinbase: client-cert-auth |
|
.*.ol.epicgames.com |
fortnite: pinned-cert |
|
.*.cellcrypt.com |
cellcrypt: pinned-cert |
|
api.assembla.com |
assembla: pinned-cert |
Supported Software Information
Releases 11.1.1 and later support all content described in this article, except:
- Release 12.2.1 supports the new implicit rules DoNotDecrypt-LegalLiability, StandardInspect, and RiskyWebsites, and also support the new implicit profiles Standard and Strict; deprecated predefined applications are not displayed in the Concerto UI screens..