Configure Email Protection in Concerto
![]() For supported software information, click here.
For supported software information, click here.
Email protection detects, prevents, and responds to cyberattacks that are delivered through outbound and inbound email. Common types of email attacks include:
- Malicious email attachments, which can be executable files, documents that contain a malicious macro, or malicious code hidden inside other file types.
- Malicious URLs, which are URLs that link to web-hosted malware.
Versa Networks email protection technology provides protection for email that uses cloud-hosted email exchanges, such as Gmail, O365, or a custom exchange). When outbound or inbound email is received on the cloud-hosted email exchanges, it is forwarded to a Versa SMTP proxy. The SMTP proxy maps the email to tenant-specific security enforcement policies, such as Data Loss Prevention and Advanced Threat Protection. You can configure enforcement policy actions to forward, redact, drop, quarantine, put on legal hold, or send notifications about email received by the SMTP proxy. An inspected header is added to the email, which can then be routed through the same Gmail or O365 exchange, or through any other configured message transfer agent (MTA).
You can configure one proxy per domain for each email service. If you use multiple email services, you can configure a proxy for each service that you use.
You configure email protection by doing the following:
- Configure email protection proxies
- Configure email protection policy rules
Configure Email Protection Proxies
To configure email protection proxies:
- Go to Configure > Security Service Edge > Advanced Security > Email Protection > Proxies.

The following screen displays.

- To customize which columns display, click Select Columns, and then click the columns to select or deselect the ones that you want to display. Click Reset to return to the default column display settings.
The options are:- Email Service
- Sender Email Domains
- Receiver Email Domains
- Azure Tenant ID
- Message Transfer Agent (MTA) Hotspot
- MTA IP/FQDN
- Click the
 Add icon to create a new email protection proxy.

- Select step 1, Proxy and Mail Transfer Service Setup, and then enter information for the following fields.
Note the following:- To uniquely identify the incoming email to a tenant, you must configure either the Sender Email Domains and Sender Domain Profiles fields, or the Receiver Email Domains and Receiver Email Domain Profiles fields.
- If you want the proxy to process only outgoing email from an enterprise, then configure only the Email Sender’s Domains and Email Sender’s Domain Profiles fields.
- Similarly, if you want the proxy to handle only incoming email to a domain, then configure only the Email Receiver Domains and Email Receiver Domain Profiles fields.
Field Description Email Service Select the email service for the tenant. The options are:
- Microsoft Exchange
- Google Gmail
- Custom
Sender Email Domains Enter one or more email domains from which incoming email will be processed by the proxy. Sender email domains map to the email sender’s domain. For example, for an email sent by user “Alice@example.com,” the sender email domain is “example.com.”
Incoming email from other domains will not be handled by the proxy, and the proxy will send an error to the sender.
Azure Tenant ID (For the Microsoft Exchange email service only.) Enter the Azure tenant ID. Sender Domain Profiles Select the sender domain profile for the tenant. Receiver Email Domains Enter one or more receiver email domains to which incoming email will be processed by the proxy. Receiver email domains map to the email recipient’s domain. For example, for an email sent to “bob@test.com,” the receiver email domain is “test.com.”
Receiver email to other domains will not be handled by the proxy, and the proxy will send an error to the sender.
Receiver Domain Profiles Select the receiver domain profile for the tenant. Domain Administrator Email (Required) Enter the email address of the domain administrator who will receive notifications. MTA Host Port Enter the mail transport agent (MTA) host port number to use to connect to the outgoing mail transfer service. MTA Host IP Address or FQDN (Required) Enter the IP address or FQDN of the MTA host that will connect to the outgoing mail transfer service. - Click Next to go to step 2, Enter Name, Descriptions and Tags, and then enter information for the following fields.

Field Description Name (Required) Enter a name for the email protection proxy. Description Enter a description of the proxy. Tag Enter a tag, and then press Enter. You can add multiple tags. A tag is an alphanumeric text descriptor with no spaces or special characters that you use for searching objects. -
Click Save to create the email protection proxy.
Configure Email Protection Policy Rules
To configure email protection policy rules:
- Go to Configure > Security Service Edge > Advanced Security > Email Protection > Policy Rules.

The following screen displays.

- To customize which columns display, click Select Columns, and then click the columns to select or deselect the ones you want to display. Click Reset to return to the default columns settings. The available columns are:
- Security Enforcement
- Include (Sender Users & Groups)
- Exclude (Sender Users & Groups)
- Include (Receiver Users & Groups)
- Exclude (Receiver Users & Groups)
- Status
- Email Content
- Notifications
- Click the Add icon to create an email protection rule. The following screen displays, with step 1, Users and User Groups, selected by default.
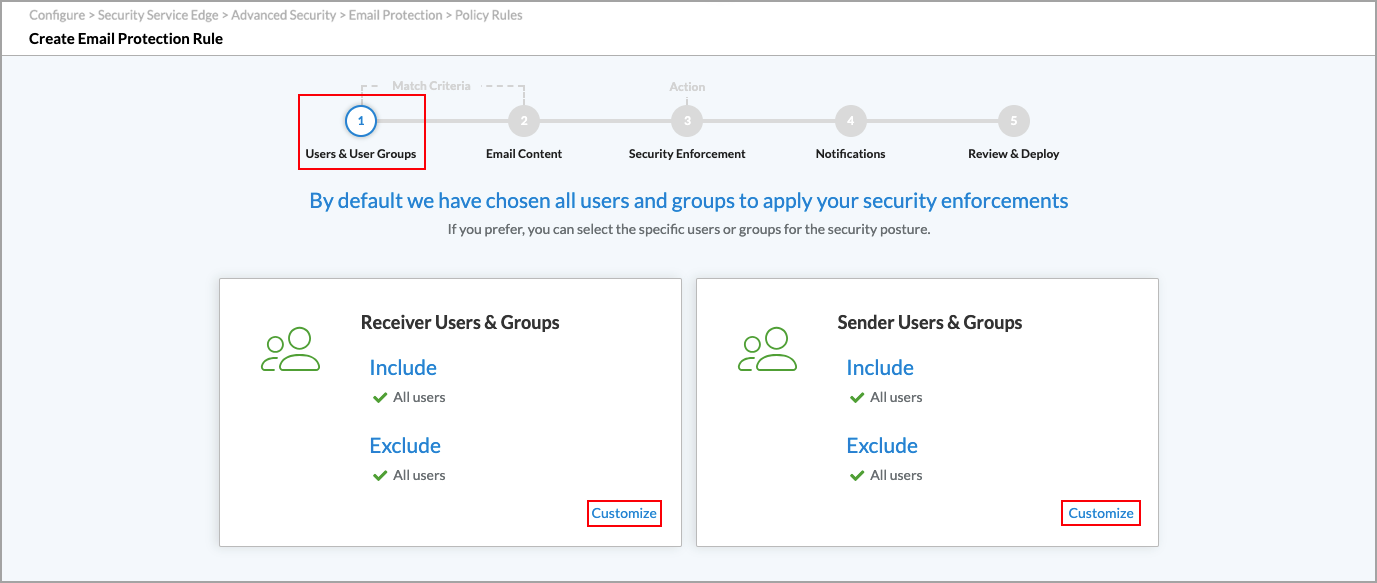
- All receiver and sender users and groups are included by default. To select which receiver users and groups to include or exclude, click Customize in the Receiver Users and Groups box. The following screen displays.

- Select Include > User Groups.
- Under User Source, you can select a user group profile.
- Select one or more receiver user groups to include in the rule.
- To create a new user group, click Add New User Group. The following popup window displays.

- Enter a name and a distinguished name (DN) for the user group. The DN uniquely identifies the user group.
- Click Add.
- Click the User subtab. The following screen displays.

- Under User Source, you can select a user group profile.
- Select one or more receiver users to include in the rule.
- To create a new user, click Add New User. The following popup window displays.
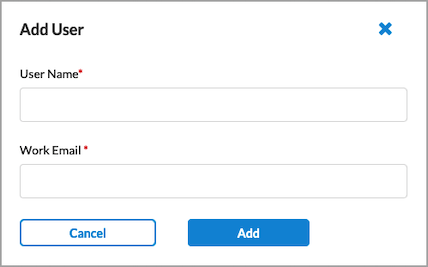
- Enter a name and a work email for the user.
- Click Add.
- Click the User Profiles subtab. You can use a User profiles to apply the rule to multiple users without having to select them individually. The following screen displays.

- Select one or more receiver user profiles to include in the rule.
- To create a new user profile, click Add New User Profile. In the New User Profiles popup window, enter information for the following fields.

- Enter a name for the profile in the Profile Name field.
- (Optional) Enter a description.
- Enter a name for the user in the User field.
- Click Add. The user is added to the Available list. You can add additional users to the list. You can click Remove to remove the user from the list.

- Click the Internal–External subtab in the Create Email Protection Rule screen. The following screen displays.

- Select one of the following internal and external user settings:
- None
- Internal
- External
- Both
- Click the Domains tab. The screen displays any previously configured domains.
- Select a domain to add to the rule.

- Click Add New Domain to add a new domain. The Add Domain popup window displays.

- Enter a domain name, then click Add.
- Click the Domain Profiles tab. The following screen displays any previously configured domain profiles.

- Select a domain profile to add to the rule. You can use a domain profile to apply the rule to multiple domains without having to select them individually.
- To create a new domain profile, click Add New Domain Profile. The following screen displays.
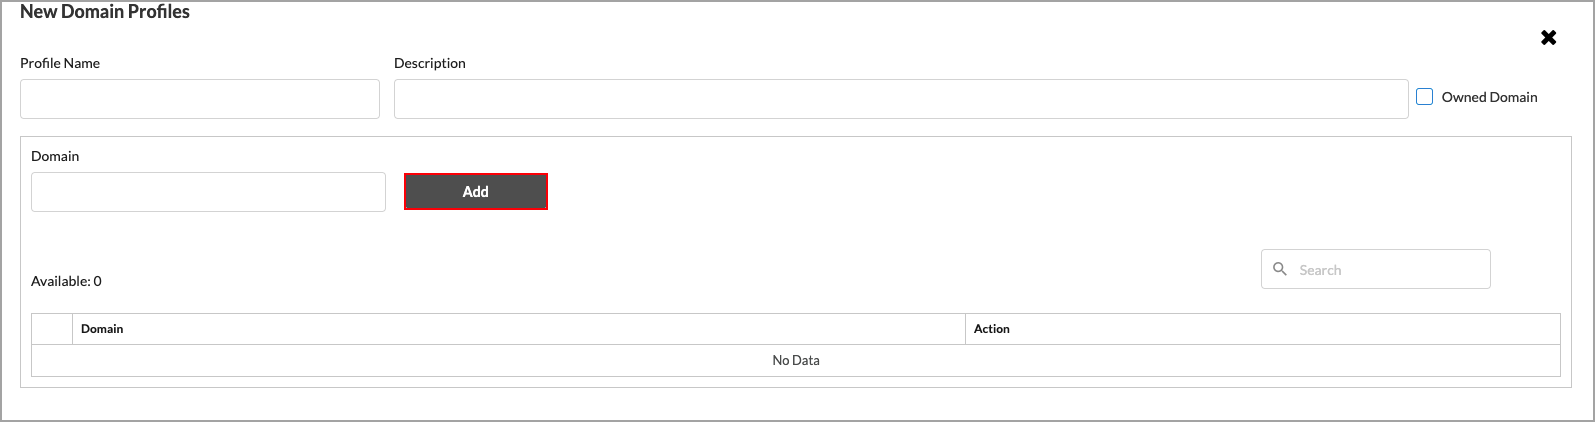
- In the Profile Name field, enter a name for the domain profile.
- (Optional) Enter a description for the profile.
- (Optional) Click Owned Domain. Note that this field is not used for email protection.
- In the Domain field, enter a valid domain name, such as versa-networks.com.
- Click Add. The domain profile appears in the Available list.

- Click Remove to remove a domain profile from the list.
- When you have finished adding or removing domain profiles, click Submit.
- Select the Exclude tab to specify the users and groups to exclude from the rule.

Note: The subtabs under the Exclude tab are the same as the subtabs under the Include tab. See Steps 5 through 32 for information about these subtabs.
- Click the
 Back arrow to return to step 1, Users and Groups, in the Create Email Protection Rule screen.
- All sender users and groups are included by default. Click Customize in the Sender Users and Groups box to select which sender users and groups to include or exclude.
Note: The screens to customize the sender users and groups are the same as the screens to customize the receiver users and groups. See Steps 5 through 32 for information about these screens.
- Click the Back arrow to return to step 1, Users & Groups, and then click Next to go to step 2, Email Content. The following screen displays.

- Select which type of email content to protect. The options are:
- Email Body
- Email Attachment
- Email Header
- All
- Click Next to go to step 3, Security Enforcement. The following screen displays. You can choose one or more predefined or user-defined DLP or ATP profiles that include criteria to allow or reject traffic.

- Select either Data Loss Prevention or Advanced Threat Protection, and then choose a profile to apply to the email protection rule.
- Click Next to go to step 4, Notifications. Enter information for the following fields.

Field Description Allow Select a notification setting for allowed traffic. The options are:
- None
- Sender
- Receiver
- Sender and Receiver
Redact/Replace Select a notification setting for when traffic is redacted or replaced. The options are:
- None
- Sender
- Receiver
- Sender and Receiver
Deny Select a notification setting for denied traffic. The options are:
- None
- Sender
- Receiver
- Sender and Receiver
-
Click Next to go to step 5, Review and Deploy.

- Review the configuration and click the
 Edit icon to make changes as needed.
 - Click Save to create the new email protection rule.
Examples of Email Protection Using SMTP Proxies
You can use SMTP proxy as a service to scan outgoing and incoming emails over SMTP.
In this solution, an email is received by a cloud email service, such as Microsoft O365 Exchange or Gmail. The email is then transmitted to the Versa Advanced Security Cloud (ASC) cluster and handled by the SMTP proxy integrated into your SMTP workflow. The Versa SMTP proxy verifies the contents of the email against real-time protection policies and acts on any DLP or ATP violations, based on the policy configuration. The email is then passed to an upstream MTA that looks up the DNS of the recipient's email domain and sends the email to the recipient’s server.
As a part of your larger DLP strategy, Versa outbound email protection (DLP and/or ATP) lets you use the same security policy tools that you use across inline channels, such as inline web DLP, endpoint DLP, or SaaS security API DLP. This eliminates the need for different DLP point solutions and the operational overhead involved in maintaining those solutions. Versa outbound email protection also lets you enforce your security policy at a granular level, so that a single email containing sensitive or malicious information can be blocked for one recipient and allowed for another.
The requirements for this service are as follows:
- The Versa SMTP proxy must be able to access an upstream MTA, such as Gmail, MS-Exchange, or ProofPoint.
- The upstream MTA must not require an authentication mechanism to be set up. The upstream MTA must have an option to configure a whitelist of IP addresses from which it can receive SMTP connect requests.
- TLS is enforced and used as mode of transport and communication between the Versa SMTP proxy and the MTAs for both incoming and outgoing email.
Use Cases
The current solution can apply configurable security policies to perform the following on outbound and inbound email:
- Data Loss Prevention (DLP)
- Block/reject action on confidential data
- Redaction
- Quarantine, Legal-Hold, Forensic
- URL rewrite to redirect to Versa Remote Browser Isolation (RBI) or obfuscate the URL
- Advanced Threat Protection (ATP)
- Sandboxing
- Malware detection
Versa ASC SMTP proxy can integrate and work with Gmail, Microsoft O365, and custom exchanges, as long as they work with STLS and use the SMTP protocol.
Configure Versa SMTP Proxy for Gmail
Configuring the Versa SMTP proxy for Gmail comprises the following:
- Configure Gmail to forward email to the Versa ASC SMTP proxy
- Configure Gmail to receive email from the Versa ASC SMTP proxy
Configure Gmail to Forward Email to the Versa ASC SMTP Proxy
- Sign in to the Google admin console using enterprise login credentials: https://admin.google.com.
- Navigate to Apps > Google Workspace > Gmail.

- Add a new host (Versa ASC SMTP proxy). Click Hosts, and then add a new route.

- In the add route pop up window, and enter information for the following fields:
- Single host—Enter the FQDN of the Versa ASC and set the port to default = 25
- Options—Require mail to be transmitted via a secure (TLS) connection (recommended)

- Add a compliance rule to forward outbound email to Versa ASC server.
- Navigate to the “Compliance” rule to redirect email from Google exchange to the Versa ASC server.
- On the Compliance page, in the Content compliance section, click “Add another rule”. The Add Setting window appears.
- In the Add Setting window:
- Enter a description for the compliance rule.
- In the "Email messages to affect" section, select Outbound (note that this can be set to inbound based on requirements).
- In the "Add expressions that describe the content that you want to search for in each message" section:
- Select "If ANY of the following match the message" from the drop-down menu.
- Click Add. The Add setting window appears.
- In the Add setting window, select Advanced content match from the drop-down menu.
- In the Location section, select “Headers+Body” from the drop-down menu.
- In the Match type section, select "Not Contains text" from the drop-down menu and in content field enter “x-nn-versa-inspected”
- Click Save.
- In the Route section, select “Change the route” and in the drop-down select the host that was added in Step 3.
- In the Encryption section select “Require secure transport (TLS)”.
- Scroll down and click Show options, then, in the "Account types to affect section," select all options (Users, Groups, and Unrecognized/catch-all).
- Click Save.


Configure Gmail to Receive Email from the Versa ASC SMTP Proxy
- On the main Gmail admin page, click Routing, and then click Add Rule.

- Provide a name for the SMTP relay service.
- In the Add/Edit Setting window, enter information for the following fields:
- Allowed senders—Only addresses in my domain (note that for inbound email processing from any external email sender, select Any addresses).
- Authentication—Only accept mail from specified IP addresses. Add the outgoing IP addresses retrieved from the Versa ASC to the rule.
- Encryption—Require TLS encryption.
- Click Save.

Configuring Versa SMTP Proxy with Microsoft O365
To configure the Versa SMTP proxy for Microsoft O365, you do the following:
- Configure Microsoft O365 to forward email to the Versa ASC SMTP proxy.
- Configure Microsoft O365 to receive email from the Versa ASC SMTP proxy.
Configure Microsoft O365 to Forward Email to the Versa ASC SMTP Proxy
- Login to the Microsoft O365 admin portal at https://admin.exchange.microsoft.com/#/.
- Set up connectors under Mail Flow.
- Go to Mail Flow > Connectors in the left navigation panel.
- On the Connectors page, click Add a connector.
- In the "Connection from" section, select Office 365, and in the "Connection to" section, select Partner organization, then click Next.

- Specify a name (for example, Outbound-to-Versa-ASC) and an optional description, deselect the "Turn it on" checkbox, then click Next.

- On the Use of connector page, select "Only when I have a transport rule set up that redirects messages to this connector," then click Next.

- On the Routing page, select "Route email through these smart hosts," specify the Versa ASC FQDN, then click the
 Plus icon to add the smart host server. Click Next.

- On the Security restrictions page, select "Issued by a trusted certificate authority (CA)," then select the "Add the subject name or subject alternative name (SAN) matches this domain name" checkbox. Enter the domain for the Versa ASC where the SMTP proxy server is located (for example, *.versa-asc.net), then click Next.

- On the Validation email page, enter a validation email address for the smart host server, then click the Plus icon to add the email address.
- Click Validate to validate the connection to the smart host server. The validation for the email address may fail because mail flow rules are not yet in place. However, before you continue setting up the connector, ensure that the connectivity is successful.

- Click Next. If you receive a confirmation message because the test email was not transmitted successfully, click Yes to proceed.
- Review the connector settings, then click Create connector.

- In the "Connection from" section, select Office 365, and in the "Connection to" section, select Partner organization, then click Next.
- Configure a mail flow rule to send email to Versa ASC. After setting up the connector for the Versa ASC server, you must configure a mail flow rule to forward email to the Versa SMTP proxy, as follows:
- Go to Mail Flow > Rules, and click on Add a rule, select the “Create a New Rule” option.

- Name: Enter a name for the transport rule.
- Apply this rule if: Select the recipient in the first drop-down menu, then "is external/internal" from the second drop-down menu. In the "Select recipient location" panel that opens, select "Outside the organization" from the drop-down menu and click Save.
- Do the following: "Select Redirect the message to," then select the following connector from the second drop-down menu. In the select connector panel that opens, select the send connector you created earlier, then click Save.
- Except if: To ensure that mail flow rules are configured correctly and that already-inspected email is not returned to the Versa ASC server for inspection, you need to add an exception. To add an exception:
- In the "Except if" drop-down menu, select "The message headers...," then select "Includes any of these words."
- For the specify header name value, enter "X-nn-versa-inspected."
- Click "Enter words" to specify the value for the header. The "Specify words or phrases" panel appears.
- For the "Specify words or phrases value," enter “true” and click Add, then click Save.
- (Optional) Click the Add icon and follow the prompts to specify any necessary exceptions to the rule (for example, if you want to exempt specific members of your organization from email content inspection).
- Click Next.
- On the "Set rule settings page," ensure that Rule mode is set to Enforce, specify other settings for the rule as needed (severity, activation dates, etc.), then click Next.
- Review the rule settings, then click Finish.
- A confirmation page appears.
- Click Done.
- You return to the Rules page and the new rule appears in the list.
- Go to Mail Flow > Rules, and click on Add a rule, select the “Create a New Rule” option.
Configure Microsoft O365 to Receive Email from the Versa ASC SMTP Proxy
To create a connector to receive processed email from the Versa ASC server:
- Sign in to the admin exchange center: https://admin.exchange.microsoft.com/#/.
- In the left menu bar, go to Mail flow > Connectors. The Connectors page appears.
- On the Connectors page, click Add a Connector. The Add a connector panel opens.
- Select "Your organization's email server" as the from connection, and then click Next.

- Specify a name (for example, Versa-ASC-O365) and an optional description, and then disable "Retain Internal Exchange email headers". Note that the connector can be switched by selecting “Turn-it-on”.

- Click Next.
- On the "Authenticating sent email" page, select "By verifying that the IP address of the sending server matches one of the following IP addresses which belong exclusively to your organization," and fill in the public IP addresses of the Versa ASC cluster.
- Click the Add icon, and then click Next.

- Review the connector settings, and then click Create connector.

View Email Protection Summary Information
To view email protection summary information, see the View SMTP-Proxy Email Protection Information section in the View Concerto Security Dashboards article.
Supported Software Information
Releases 12.2.1 and later support all content described in this article.