Configure Cloud Applications to Use with API-Based Data Protection
![]() For supported software information, click here.
For supported software information, click here.
Versa API-based data protection (API-DP) secures SaaS and IaaS applications using APIs provided by cloud services. To use API-DP, you register with the SaaS and IaaS applications, and then use OAuth 2.0 to obtain access to the information. Objects in motion (real-time objects) and objects at rest are scanned, and policy-based control is enforced. Real-time information relating to the various objects is sent as events (such as file upload and user login activity) to Versa services running in the cloud. Data associated with different objects is scanned, analyzed, and categorized by processing the object data through security policies such as data loss prevention (DLP), cloud access security broker (CASB), and malware sandboxing. Scheduled jobs can scan objects periodically. Vulnerable data can be redacted, encrypted, quarantined, and deleted.
To use API-DP, you create an API data protection policy to identify any policy violations, and then you configure an API connection and instance for each supported cloud application.
To configure all cloud applications in Versa Concerto, you navigate to the following screen in the Concerto UI:
- (For Release 12.2.2 and later) Configure > Security Service Edge > Profiles and Connectors > Saas and IaaS Connectors.

- (For Release 12.2.1 and earlier) Configure > Security Service Edge > Profiles and Connectors > Application Connectors.

Note: Some application instances require configuration, and others do not. However, in all cases you need to configure a connector in Concerto.
This article describes how to configure these cloud applications so that you can use them with API-DP.
You can use API-DP with the SaaS and IaaS cloud applications in the following table. The table shows the supported SaaS and IaaS applications and the content types and activities they support.
| Application | Content Type | Data at Rest |
Event- Based |
Shared Links |
Supported Activities |
|---|---|---|---|---|---|
| SaaS Applications | |||||
| Asana | Workspaces, projects, milestones, tasks, subtasks, comments, messages, attachments | Yes | Yes | NA | file-attach comment |
| Box | Files, folders, comments | Yes | Yes | Yes | file-share file-upload file-delete comment |
| Cisco Webex Teams | Files, messages | No | Yes | NA | space-join meeting-join file-send message-send |
| Citrix ShareFile | Files, folders | Yes | Yes | Yes | file-share file-upload file-delete |
| Confluence | Pages, blogs, comments, attachments | Yes | Yes | NA | file-attach content-activity |
| Dropbox | Files, folders | Yes | Yes | Yes | file-share file-upload file-delete |
| Egnyte | Files, folders | Yes | Yes | Yes | file-share file-upload file-delete |
| GitHub | Repository, branch, files | Yes | Yes | NA | user-add repository-visibility-change file-commit file-delete |
| GitLab | Project, branch, files | Yes | Yes | NA | user-add project-visibility-change file-commit file-delete |
| Gmail | Email content, attachments | Yes | Yes | NA | message-body-send file-attachment-send message-body-receive file-attachment-receive |
| Google Drive | Files, folders | Yes | Yes | Yes | connected-apps file-share file-upload file-delete |
| Jira | Projects, issues, issue summary, description, comments, attachments | Yes | Yes | NA | file-attach content-activity |
| Microsoft OneDrive | Files, folders | Yes | Yes | Yes | file-share file-upload file-delete |
| Microsoft Outlook | Email content, attachments | Yes | Yes | NA | message-body-send file-attachment-send message-body-receive file-attachment-receive |
| Microsoft SharePoint | Files, folders | Yes | Yes | Yes | file-share file-upload file-delete |
| Microsoft Teams | Messages in channel and direct messaging, attachments handled by Microsoft OneDrive | Yes | Yes | NA | chat-join team-join message-send |
| Microsoft Yammer |
Communities, storylines, posts, comments, replies, attachments handled by Microsoft Sharepoint |
Yes |
Yes |
NA |
content-activity |
| Notion |
Pages, database, bookmark, bulleted list item, callout, code, equation, file, headings, image, numbered list item, paragraph, PDF, quote, toggle blocks |
Yes |
Yes |
NA |
file-attach content-activity |
| Salesforce | Files, attachments, libraries, Chatter posts, comments | Yes | Yes | NA | file-share file-upload content-activity file-delete |
| ServiceNow | Incident table and attachments | Yes | Yes | NA | file-attach content-activity |
| Slack | Channels, groups, DMs, messages, files | Yes | Yes | NA | channel-join message-send file-send |
| Trello | Workspaces, boards, lists, cards, comments, attachments |
Yes |
Yes |
NA |
file-attach content-activity |
|
Workplace from Meta |
Groups, posts, chat, files, events, knowledge library, notes, comments |
Yes |
Yes |
NA |
file-attach content-activity |
|
Zendesk |
Comment, attachment |
Yes |
Yes |
NA |
file-attach comment |
| Zoom | Messages and transcript | No | Yes | NA | meeting-join channel-join message-send file-send |
| IaaS Applications | |||||
| Amazon Web Services | S3 buckets, files, folders | Yes | Yes | NA | file-upload file-delete |
| Google Cloud Platform | Projects, buckets, files, folders | Yes | Yes | NA | file-upload file-delete |
| Microsoft Azure | Storage accounts, containers, blobs | Yes | Yes | NA | file-upload file-delete |
| Oracle Cloud Infrastructure |
Regions, compartments, buckets, objects |
Yes |
Yes |
NA |
file-upload file-delete |
Asana API-Based Data Protection
This section describes how to configure the Asana application for API-DP.
Create the Asana Application for API-Based Data Protection
- Log in to the Asana application with admin credentials at https://app.asana.com/-/login.
- Click the drop-down list in the top right corner, and then click Settings.

- Click Apps in the top menu bar of the settings window, and then click Manage Developer Apps.

- Click Create New App in the new window. Enter the name, check the use cases, and agree to the terms and conditions.

- Click Create App.
Configure the Asana Application for API-Based Data Protection
- In the application window at https://app.asana.com/0/my-apps/<app-client-id>/settings, select OAuth in the left menu bar, and then configure the callback URL in the Redirect URLs field.

- Select Manage Distribution, and then click Any Workspace.

Configure Asana Webhooks Manually
Webhooks are automatically established and managed, but you can manage them manually.
To configure webhooks manually:
- Obtain the resource ID of interest by going to https://developers.asana.com/reference/rest-api-reference. Select the desired resource on the right, and then select Get Multiple for the resource (here, workspaces). You need to use a valid access token.

Note: It is often necessary to start with parent resources to locate a specific resource identifier. The organizational level is as follows:
Workspace- Projects
- Section
- Tasks
- Subtasks
- Milestones
- Subtasks
- Attachments
- Tasks
- Section
- Users
- Section
- Tasks
- Subtasks
- Milestones
- Subtasks
- Tasks
- Attachments
If the parent ID is unknown, you can trace backward up the tree to find a resource ID. You need to find the token only for the workspace IDs.
- Section
- Projects
- Using the ID of the resource, establish a webhook on https://developers.asana.com/reference/createwebhook. To do this, enter the resource ID and target URL under “Body params->data” and then click “Try it!”. Larger resources, such as workspaces, may need filtering into their sub-resources; that is, Workspace filtered into its projects.

Configure an Asana Connector
To configure an Asana connector:
- In the Versa Concerto portal, select a tenant under Tenants in the left menu bar.
- Go to Configure > Profile and Connectors > SaaS and IaaS Connectors. The following screen displays.

- Select the SaaS tab, select Asana in the left column, then click the
 Add icon. The Add Instance – Asana screen displays.

- Specify the Instance name and Admin email, then select the required services.
Field Description Instance Name (Required)
Enter the name of the instance.
Admin Email (Required)
Enter the email address of the Asana administrator account.
Retro Scan
Select to scan and protect all the files and objects that are present on Asana at the time of connector creation.
Warning: Event-based policies will apply to all the existing data, delete action is irrevocable. Deleted data cannot be restored.
- Start After
Enter the time required to grant access and configure policies and rules for this instance before starting the retroactive scan. - Unit Type
Select the unit of measure for the Start After time, in hours or minutes. Services
Select the services for which this instance will be used.
- API Based Data protection: Scan and protect content
Confirm
Select to indicate that the steps mentioned in the previous section to configure the Asana account have been followed.
- Click Submit. The instance displays in the main pane.
- In the Access column, click Grant Access to start the OAuth 2.0 process, which grants the application access to the Versa API-DP cloud.

This opens a login prompt for the Asana account. Use administrator credentials to log in and grant access. Webhooks for existing workspaces will be automatically established during this OAuth process.
Box API-Based Data Protection
This section describes how to configure the Box application for API-DP.
Configure Box for API-Based Data Protection
Note:
- All steps should be performed from the Admin Account
- Shield Detection Rules help you keep an eye on your Box account for enhanced security. If you have activated the Malicious Content detection rule, turn off the "Restrict download of malicious content" option in the Admin Console (Admin Console -> Shield -> Detection Rules -> Malicious Content). If this option is on, Versa will not be able to scan your files

Note: The minimum license required for Box is Box Plus.
To configure a new instance for Box:
- Login to Box using administrator credentials, then navigate to the Admin Console.
- Click Integrations in the left menu bar.
- Select the Platform Apps Manager tab, and then click Add Platform App.

- Enter client IDs llr69xaxc0hhgj1tjrjfvfakseo14sj6 and x3v80p6m1do1ynkf3l0wzm9ud90mxftu.
- Click Next and Authorize. The screen displays entries for Prod-Versanow-Skill and Versa JWT Connector.

- Select the User Authentication Apps tab, and then click Add Platform App.
- Enter client ID pb7ww11ovrjotq1oimr930i5ft1jh8po.
- Click Next and Authorize. An entry for Versa API-DP Box OAuth2 Connector displays.

- Change the URL from /master/custom-apps/userauth to /master/skills.
- Click Add Skill.

- In the Add Custom Skill screen, enter Client ID llr69xaxc0hhgj1tjrjfvfakseo14sj6, and then click Next .

- Select the content that you want to configure, and then click Next.

- Select All content in your company, and then click Next.
- Click Enable to complete the Box configuration.
If you plan to revoke or delete an instance, after you revoke the instance from Concerto, follow the steps below to complete the removal process:
- Login to the box using the same admin credentials you used when granting access.
- Go to the Admin console.
- Click Apps in the left menu.
- Select Custom App Manager.
- Disable the Prod-Versanow-Skill and Versa JWT Connector applications using the More option (“...”) in the application entry.

- Similarly, under User Authentication Apps, disable Versa API-DP Box OAuth2 Connector.
- Change the URL to /master/skills.
- Click Prod-Versanow-Skill.
- Click Delete. If you are unable to delete, click Disable.

Configure a Box Connector
To configure a connector for Box in Versa Concerto:
- In the Versa Concerto portal, select a tenant under Tenants in the left menu bar.
- Go to Configure > Profiles and Connectors > Saas and IaaS Connectors.
The following screen displays.

- Select the SaaS tab, select Box in the left column, then click the Add icon. The Add Instance — Box window displays.
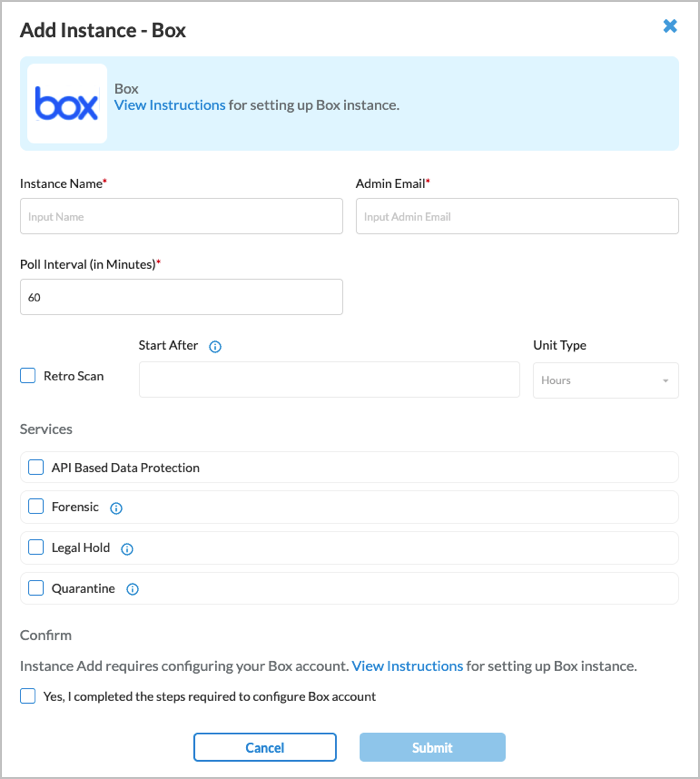
- Enter information for the following fields.
Field Description Instance Name (Required) Enter a name for the instance. Admin Email (Required) Enter an email address of the Box administrator account. Poll Interval (in Minutes) (Required) Enter the poll interval.
Range: 15 through 1440 minutes
Default: 60
Retro Scan (Group of Fields)
Click to scan and protect all the files that are present on Box at the time of connector creation.
Warning: Event-based policies will apply to all the existing data, delete action is irrevocable. Deleted data cannot be restored.
- Start After
Enter the time required to grant access and configure policies and rules for this instance before starting the retroactive scan.
Range: 1 through 14 (hours), 15 through 1440 (minutes)
Default: None
- Unit Type
Select the unit of measure for the Start After time, in hours or minutes. Services Select the services for which the instance is used.
- API-Based Data Protection—Scan and protect content.
- Forensic—Use this instance for forensics.
- Legal Hold—Use this instance for legal hold.
- Quarantine—Use this instance for quarantine files.
Confirm Click to confirm that the steps required to configure the Box account are complete. - Click Submit. The new instance is added to the Box application and displays in the Application Connectors > SaaS screen.

- In the main pane, select Grant Access to start the OAuth2 process of granting access to the Versa API data protection cloud.
A popup window showing the login prompt for the Box account displays.

- Use the Administrator credentials to login. The next screen shows the permissions that the Versa service requires to scan and monitor the Box account.
- Click Grant Access to Box to complete the Box connector configuration.
Cisco Webex Teams API-Based Data Protection
This section describes how to configure the Cisco Webex Teams application for API-DP.
Configure Cisco Webex Teams for API-Based Data Protection
To configure a new instance for Webex:
- Sign into Webex Developer and Go to https://developer.webex.com/my-apps/new/integration. In the New Integration screen, enter information for the following fields.

Field Description Integration name Enter the name of the integration as it will appear in Webex. Icon Upload your own icon or select a Webex default icon. Icons must be exactly 512x512px in JPEG or PNG format. App Hub Descriptor Enter information about the application, up to 1024 characters. Redirect URI(s) Enter one or more URIs that a user will be redirected to when completing an OAuth grant flow. -
Click Create Integration. The following screen displays.

-
Store the Client ID and Client Secret for later use.
Configure a Cisco Webex Connector
To configure a Cisco Webex connector in Versa Concerto:
- In the Versa Concerto portal, select a tenant under Tenants in the left menu bar.
- Go to Configure > Profile and Connectors > SaaS and IaaS Connectors. The following screen displays.

- Select the SaaS tab, select Cisco Webex Teams in the left menu bar, and then click the Add icon. The Add Instance — Cisco Webex Teams window displays.

- Enter information for the following fields.
Field Description Instance Name (Required) Enter a name for the instance. Admin Email (Required) Enter the email address of the Cisco Webex administrator account. Organization Name Enter the name of the Cisco Webex Teams organization. Poll Interval (in Minutes) (Required) Enter the poll interval.
Range: 15 through 1440 minutes
Default: 60
Retro Scan
Click to scan and protect all the files that are present on Webex at the time of connector creation.
Warning: Event-based policies will apply to all the existing data, delete action is irrevocable. Deleted data cannot be restored.
- Start After
Enter the time required to grant access and configure policies and rules for this instance before starting the retroactive scan.
Range: 1 through 14 (hours), 15 through 1440 (minutes)
Default: None
- Unit Type
Select the unit of measure for the Start After time, in hours or minutes. Services Select the services to use for the instance.
- API-Based Data Protection—Scan and protect content
Confirm Click to confirm that the steps required to configure the Cisco Webex account are complete. - Click Submit.
- After adding the instance, select Grant Access to the new instance to start the OAuth2 process of granting access to the Versa API data protection cloud. This opens the login prompt for the Cisco Webex Teams account. Use the administrator credentials to log in and grant access.
Citrix ShareFile API-Based Data Protection
This section describes how to configure the Citrix ShareFile application for API-DP.
Configure Citrix ShareFile for API-Based Data Protection
To configure a new instance for Citrix Sharefile.
- Go to https://api.sharefile.com/apikeys. The Your API Keys screen displays
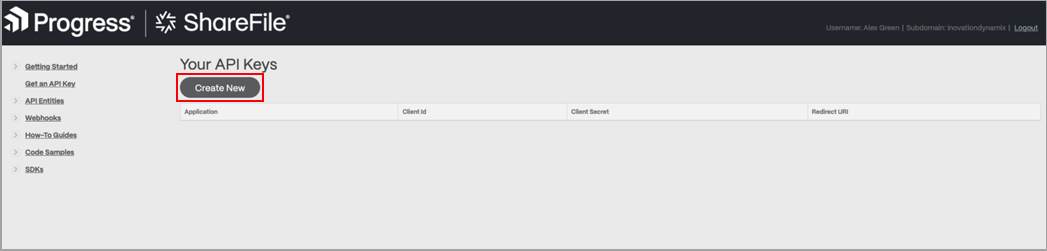
- Click Create New. The API Key Generator screen displays.
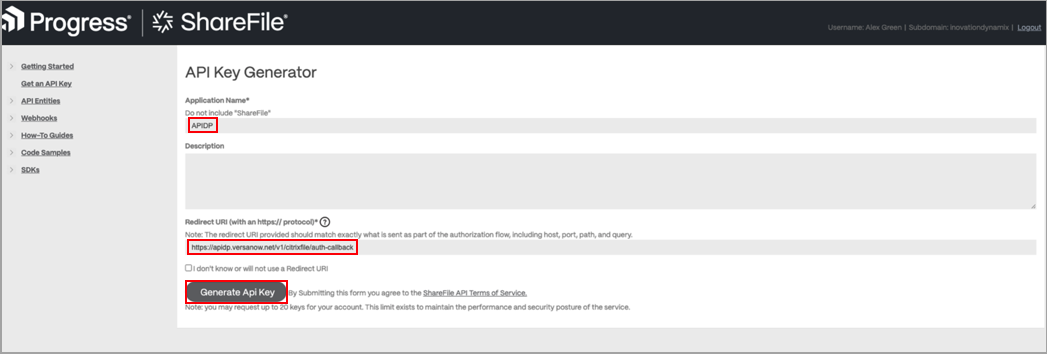
- Enter an application name and the redirect URL, then click Generate Api Key.

- Store the Client ID and Client Secret for later use.
Configure a Citrix ShareFile Connector
To configure a Citrix ShareFile connector in Versa Concerto:
- In the Versa Concerto portal, select a tenant under Tenants in the left menu bar.
- Go to Configure > Profile and Connectors > SaaS and IaaS Connectors. The following screen displays.

- Select SaaS tab, select Citrix ShareFile in the left menu bar, and then click the Add icon. The Add Instance — Citrix ShareFile screen displays.

- Enter information for the following fields.
Field Description Instance Name (Required) Enter a name for the instance. Admin Email (Required) Enter an email address of the Citrix ShareFile administrator account. Poll Interval (in Minutes) (Required) Enter the poll interval.
Range: 15 through 1440 minutes
Default: 60
Retro Scan
Click to scan and protect all the files that are present on Citrix ShareFile at the time of connector creation.
Warning: Event-based policies will apply to all the existing data, delete action is irrevocable. Deleted data cannot be restored.
- Start After
Enter the time required to grant access and configure policies and rules for this instance before starting the retroactive scan.
Range: 1 through 14 (hours), 15 through 1440 (minutes)
Default: None
- Unit Type
Select the unit of measure for the Start After time, in hours or minutes. Services Select the services to use for the instance.
- API-Based Data Protection—Scan and protect content
- Forensic—Use this instance for forensics
- Legal Hold—Use this instance for legal hold
- Quarantine—Use this instance for quarantine files
Confirm Click to confirm that the steps required to configure the Citrix ShareFile account are complete. - Click Submit.
- After the instance is added, select Grant Access to start the OAuth2 process of granting access to the Versa API data protection cloud. This opens a login prompt for the Citrix ShareFile account. Use the administrator credentials to log in and grant access.
Confluence API-Based Data Protection
This section describes how to configure the Confluence application for API-DP.
Configure Confluence for API-Based Data Protection
To configure Confluence for API-DP:
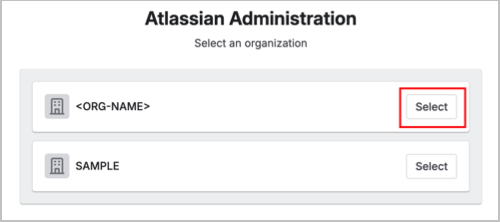
- Go to https://www.atlassian.com/ and select your organization.
- From the left menu, go to Apps > Sites and choose the site where you want to install the application.

- In the left menu, select Site Settings > Access requests > Connected apps.

- In the Connected apps screen, select Settings in the submenu.

- Under the Development mode section, click on Enable Development mode, and enable it.

- Click Install a private app in the top-right corner.

- In the Install private app popup window:
- Choose Confluence from the first dropdown menu.
- Copy and paste the App Descriptor URL (provided on connector) into the “App descriptor URL” field.
- Click Install app to complete the installation.

- After initiating the installation process, allow some time for the application to be installed and configured. Once completed, the process is finished.
- If you plan to revoke or delete an instance, after you revoke the instance, perform the following steps to ensure that the instance has been completely removed.
- Log in to your Atlassian account.
- Remove access from the Atlassian account settings:
- Go to Settings > Atlassian Account Settings > Connected Apps.
- Locate Versa-APIDP-Confluence, and then click Remove Access.

- Uninstall the Versa Networks–Confluence Event Watcher application:
- Follow steps 1, 2 and 3 to navigate to the Connected apps section.
- Locate Versa Networks–Confluence Event Watcher and click View app details.

- Click the Uninstall button in the top-right corner to uninstall the application.

Configure a Confluence Connector
To configure a Confluence connector in Versa Concerto:
- In the Versa Concerto portal, select a tenant under Tenants in the left menu bar.
- Go to Configure > Profile and Connectors > SaaS and IaaS Connectors. The following screen displays.

- Select the SaaS tab, select Confluence in the left column, then click the Add icon. The Add Instance — Confluence screen displays.

- Enter information for the following fields.
Field Description Instance Name (Required) Enter a name for the instance. Admin Email (Required) Enter an email address of the Confluence administrator account. Poll Interval (in Minutes) Enter the amount of time between polling events.
Range: 15 through 1440 minutes
Default: 60 minutes
Site URL (Required) Enter the URL of the site. Retro Scan
Click to scan and protect all the files that are present on Confluence at the time of connector creation.
Warning: Event-based policies will apply to all the existing data, delete action is irrevocable. Deleted data cannot be restored.
- Start After
Enter the time required to grant access and configure policies and rules for this instance before starting the retroactive scan.
Range: 1 through 14 (hours), 15 through 1440 (minutes)
Default: None
- Unit Type
Select the unit of measure for the Start After time, in hours or minutes. Services Select the services to use for the instance.
- API-Based Data Protection—Scan and protect content
App Descriptor URL Click the  Eye icon to show the app descriptor URL.
Confirm Click to confirm that the steps required to configure the Confluence account are complete. - Click Submit.
- After the instance is added, select Grant Access to start the OAuth2 process of granting access to the Versa API data protection cloud. This opens a login prompt for the Confluence account. Use the administrator credentials to log in and grant access.
Dropbox API-Based Data Protection
This section describes how to configure the Dropbox application for API-DP.
Configure Dropbox for API-Based Data Protection
For Dropbox, no configuration is required.
Configure a Dropbox Connector
To configure a Dropbox connector in Versa Concerto:
- In the Versa Concerto portal, select a tenant under Tenants in the left menu bar.
- Go to Configure > Profile and Connectors > SaaS and IaaS Connectors. The following screen displays.

- Select the SaaS tab, select Dropbox in the left column, and then click the Add icon. The Add Instance — Dropbox screen displays.

- Enter information for the following fields.
Field Description Instance Name (Required) Enter a name for the instance. Admin Email (Required) Enter an email address of the Dropbox administrator account. Poll Interval (in Minutes) Enter the amount of time between polling events.
Range: 100 through 1440 minutes
Default: 150 minutes
Retro Scan
Scan and protect all the files that are present on Dropbox at the time of connector creation.
Warning: Event-based policies will apply to all the existing data, delete action is irrevocable. Deleted data cannot be restored.
- Start After
Enter the time required to grant access and configure policies and rules for this instance before starting the retroactive scan.
Range: 1 through 14 (hours), 15 through 1440 (minutes)
Default: None
- Unit Type
Select the unit of measure for the Start After time, in hours or minutes. Services Select the services to use for the instance.
- API-Based Data Protection—Scan and protect content.
- Forensic—Use this instance for Forensics.
- Legal hold—Use this instance for Legal hold.
- Quarantine—Use this instance for quarantine files.
Confirm Click to confirm that the steps required to configure the Dropbox account are complete. - Click Submit.
- After the instance is added, select Grant Access to start the OAuth2 process of granting access to the Versa API data protection cloud. Use Dropbox Administrator credentials to log in and grant access.
Egnyte API-Based Data Protection
This section describes how to configure the Egnyte application for API-DP.
Configure Egnyte for API-Based Data Protection
To configure a new instance for Egnyte:
- Go to https://developers.egnyte.com/member/register, and enter the required information.


- Click Register. You will receive an email at the address you entered during registration.
- Click the link in the email.
- Sign in at https://developers.egnyte.com/apps/mykeys. The My API Keys screen displays.

- Store the Key and Secret for later use.
Configure an Egnyte Connector
To configure an Egnyte Connector in Versa Concerto:
- In the Versa Concerto portal, select a tenant under Tenants in the left menu bar.
- Go to Configure > Profile and Connectors > SaaS and IaaS Connectors. The following screen displays.

- Select the SaaS tab, select Egnyte in the left column, then click the Add icon.The Add Instance — Egnyte screen displays.
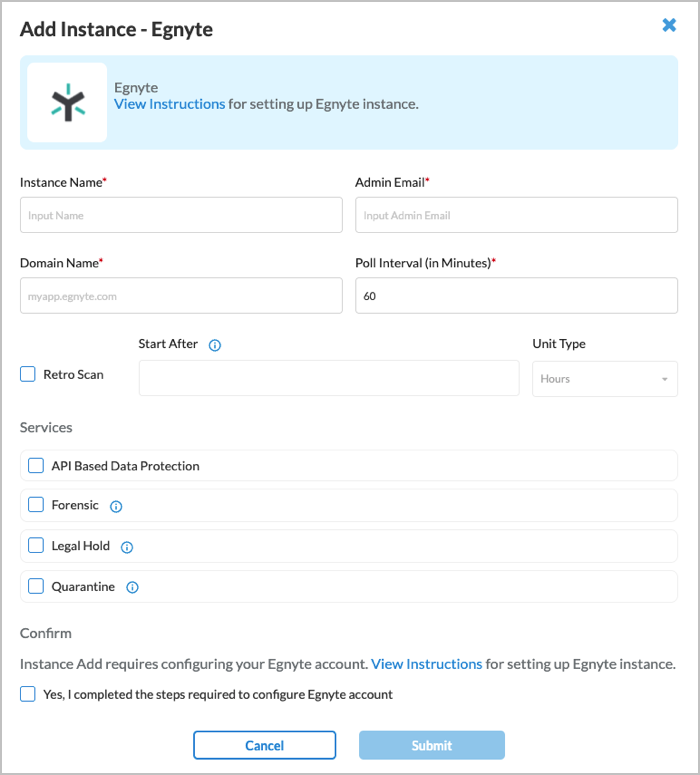
- Enter information for the following fields.
Field Description Instance Name (Required) Enter a name for the instance. Admin Email (Required) Enter an email address of the Egnyte administrator account. Domain Name (Required) Enter the name prefix used in Egnyte domain name. Poll Interval (in Minutes) Enter the amount of time between polling events.
Range: 15 through 1440 minutes
Default: 150 minutes
Retro Scan
Scan and protect all the files that are present on Egnyte at the time of connector creation.
Warning: Event-based policies will apply to all the existing data, delete action is irrevocable. Deleted data cannot be restored.
- Start After
Enter the time required to grant access and configure policies and rules for this instance before starting the retroactive scan.
Range: 1 through 14 (hours), 15 through 1440 (minutes)
Default: None
- Unit Type
Select the unit of measure for the Start After time, in hours or minutes. Services Select the services to use for the instance.
- API-Based Data Protection—Scan and protect content.
- Forensic—Use this instance for forensics.
- Legal hold—Use this instance for Legal hold.
- Quarantine—Use this instance for quarantine files.
Confirm Click to confirm that the steps required to configure the Egnyte account are complete. - Click Submit.
- After the instance is added, select Grant Access to start the OAuth2 process of granting access to the Versa API data protection cloud. Use Egnyte Administrator credentials to log in and grant access.
Google Drive API-Based Data Protection
This section describes how to configure the Google Drive application for API-DP.
Configure Google Drive for API-Based Data Protection
To configure a new instance for Google Drive:
- Log in to the Google Drive Admin console using administrator credentials.

- Select Security > Access and Data Control > API controls in the left menu bar, and then click Manage Domain-wide Delegation.

- In the Domain-wide Delegation screen, click Add New.

- In the popup window, enter information for the following fields.

Field Description Client ID Add client ID 113866028843424440405. Scopes Add the following scopes. When entering multiple scopes, separate each scope with a comma.
- https://www.googleapis.com/auth/admin.datatransfer
- https://www.googleapis.com/auth/admin.directory.customer
- https://www.googleapis.com/auth/admin.directory.domain.readonly
- https://www.googleapis.com/auth/admin.directory.group
- https://www.googleapis.com/auth/admin.directory.group.member
- https://www.googleapis.com/auth/admin.directory.group.member.readonly
- https://www.googleapis.com/auth/admin.directory.group.readonly
- https://www.googleapis.com/auth/admin.directory.user
- https://www.googleapis.com/auth/admin.directory.user.readonly
- https://www.googleapis.com/auth/admin.directory.user.security
- https://www.googleapis.com/auth/admin.reports.audit.readonly
- https://www.googleapis.com/auth/cloud-platform
- https://www.googleapis.com/auth/drive
- https://www.googleapis.com/auth/drive.activity.readonly
- https://www.googleapis.com/auth/drive.appdata
- https://www.googleapis.com/auth/drive.file
- https://www.googleapis.com/auth/drive.metadata
- https://www.googleapis.com/auth/drive.metadata.readonly
- https://www.googleapis.com/auth/drive.photos.readonly
- https://www.googleapis.com/auth/drive.readonly
- https://www.googleapis.com/auth/userinfo.email
- https://www.googleapis.com/auth/userinfo.profile
- openid
- Click Authorize.
Configure a Google Drive Connector
To configure a Google Drive connector in Versa Concerto:
- In the Versa Concerto portal, select a tenant under Tenants in the left menu bar.
- Go to Configure > Profile and Connectors > SaaS and IaaS Connectors. The following screen displays.

- Select the SaaS tab, select Google Drive in the left column, then click the Add icon. The Add Instance — Google Drive screen displays.

- Enter information for the following fields.
Field Description Instance Name (Required) Enter a name for the instance. Admin Email Enter the email address of the Google administrator account. Poll Interval (in Minutes) Enter the amount of time between polling events.
Range: 15 through 1440 minutes
Default: 60 minutes
Retro Scan Click to scan and protect all the files that are present on Google Drive at the time of connector creation.
Warning: Event-based policies will apply to all the existing data, delete action is irrevocable. Deleted data cannot be restored.
- Start After
Enter the time required to grant access and configure policies and rules for this instance before starting the retroactive scan.
Range: 1 through 14 (hours), 15 through 1440 (minutes)
Default: None
- Unit Type
Select the unit of measure for the Start After time, in hours or minutes. Services Select the services to use for the instance.
- API-Based Data Protection—Scan and protect content.
- Forensic—Use this instance for forensics.
- Legal Hold—Use this instance for legal hold.
- Quarantine—Use this instance for quarantine files.
Confirm Click to confirm that the steps required to configure the Google Drive account are complete. - Click Submit.
- After adding the instance, select Grant Access to start the OAuth2 process of granting access to the Versa API data protection cloud. This opens a login prompt for the Google account.

-
Use Google Drive Administrator credentials to log in. The next screen shows the permissions that the Versa service requires to scan and monitor the Google Drive account. Click Accept to grant access to the Google Drive account.

Google Gmail API-Based Data Protection
This section describes how to configure the Google Gmail application for API-DP.
Configure Gmail for API-Based Data Protection
To configure a new instance for Gmail:
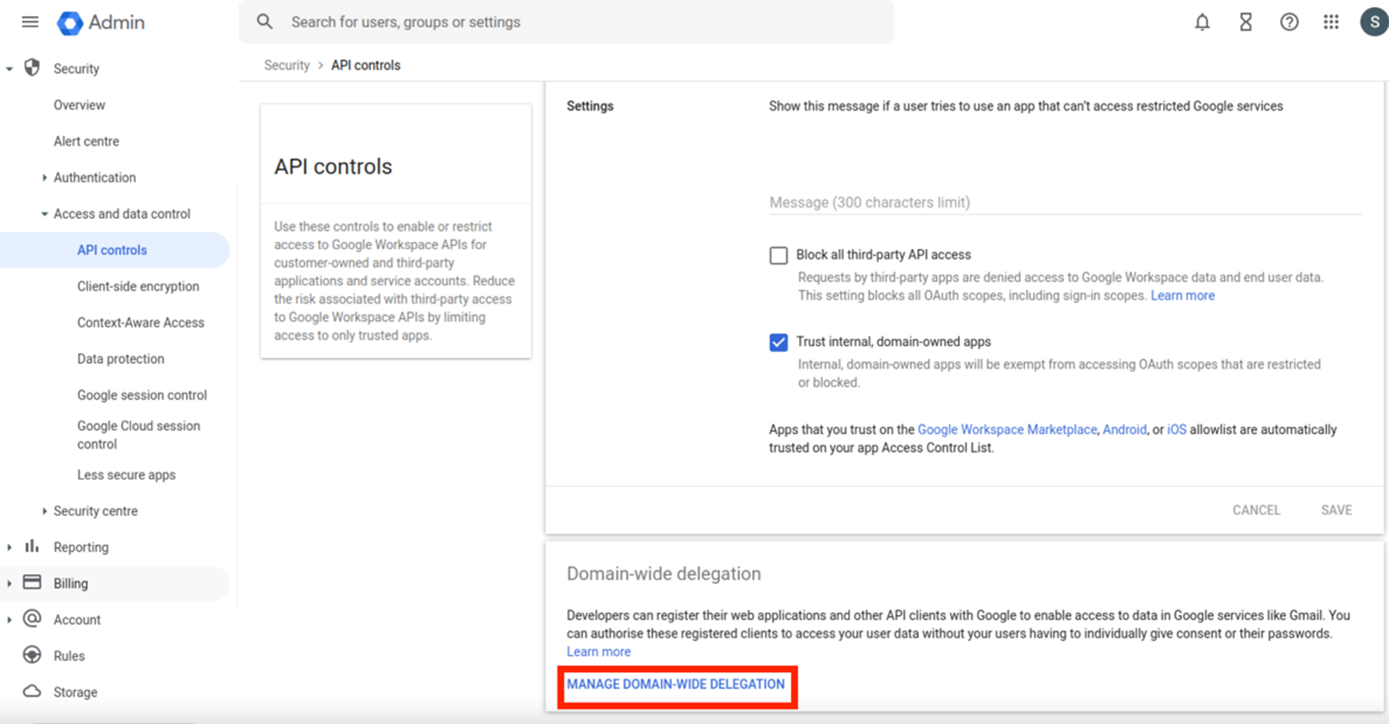
- Login to https://admin.google.com as an administrator.
- Click Security > Access and data control > API controls in the left menu bar.

- In the API controls screen, click Manage Domain-wide Delegation, as shown below.
- In the API Clients Label, click Add New, and then enter information for the following fields.
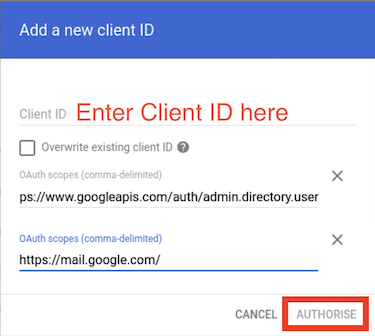
Field Description Client ID Enter the client ID 110816354392558509688. OAuth Scopes Enter the following two OAuth scopes, separated by a comma.
- https://mail.google.com/
- https://www.googleapis.com/auth/admin.directory.user
- https://www.googleapis.com/auth/admin.directory.domain
- Click Authorize.
Configure a Gmail Connector
To configure a Gmail connector in Versa Concerto:
- In the Versa Concerto portal, select a tenant under Tenants in the left menu bar.
- Go to Configure > Profile and Connectors > SaaS and IaaS Connectors. The following screen displays.

- Select the SaaS tab, select Google Gmail in the left column, then click the Add icon. The Add Instance — Gmail screen displays.

- Enter information for the following fields.
Field Description Instance Name (Required) Enter a name for the instance. Admin Email (Required) Enter an email address of the Google administrator account. Poll Interval (in Minutes) Enter the amount of time between polling events.
Range: 60 through 1440 minutes
Default: 120 minutes
Services Select the services to use for the instance.
- API Based Data Protection—Scan and protect content.
Confirm Click to confirm that the steps required to configure the Google Gmail account are complete. - Click Submit.
- After the instance is added, select Grant Access to start the OAuth2 process of granting access to the Versa API data protection cloud. Use Google Administrator credentials to log in and grant access (ensure that all permissions are selected).
GitHub API-Based Data Protection
This section describes how to configure the GitHub application for API-DP.
Configure GitHub for API-Based Data Protection
To configure a new instance for GitHub:
- Browse to https://github.com/apps/versa-api-dp
- Click Install.

- Select the organization on which to install GitHub.
- Grant permission to all or selected repositories, and then click Install.
If you plan to revoke/delete an instance, once after revoke is done, please follow the steps below to uninstall the Versa–API–DP Notifier app:
- Login to your GitHub account.
- Navigate to the settings of the organization to which you granted access, then go to Third-party Access > GitHub Apps.
- Locate Versa-API-DP, click on Configure, and then select Uninstall.

Configure a GitHub Connector
To configure a GitHub connector in Versa Concerto:
- In the Versa Concerto portal, select a tenant under Tenants in the left menu bar.
- Go to Configure > Profile and Connectors > SaaS and IaaS Connectors. The following screen displays.

- Select the Saas tab, select GitHub in the left column, and then click the Add icon. The Add Instance — GitHub screen displays.

- Enter information for the following fields.
Field Description Instance Name (Required) Enter a name for the instance. Admin Email (Required) Enter an email address of the GitHub administrator account. Organization Name (Required) Enter the name of the organization. Poll Interval (in Minutes) Enter the amount of time between polling events.
Range: 15 through 1440 minutes
Default: 60 minutes
Retro Scan Click to scan and protect all the files that are present on GitHub at the time of connector creation.
Warning: Event-based policies will apply to all the existing data, delete action is irrevocable. Deleted data cannot be restored.
- Start After
Enter the time required to grant access and configure policies and rules for this instance before starting the retroactive scan.
Range: 1 through 14 (hours), 15 through 1440 (minutes)
Default: None
- Unit Type
Select the unit of measure for the Start After time, in hours or minutes. Services Select the services to use for the instance.
- API Based Data Protection—Scan and protect content.
Confirm Click to confirm that the steps required to configure the GitHub account are complete. - Click Submit.
- After the instance is added, select Grant Access to start the OAuth2 process of granting access to the Versa API data protection cloud. Use GitHub Administrator credentials to log in and grant access.
GitLab API-Based Data Protection
This section describes how to configure the GitLab application for API-DP.
Configure GitLab for API-Based Data Protection
To configure a new instance for GitLab:
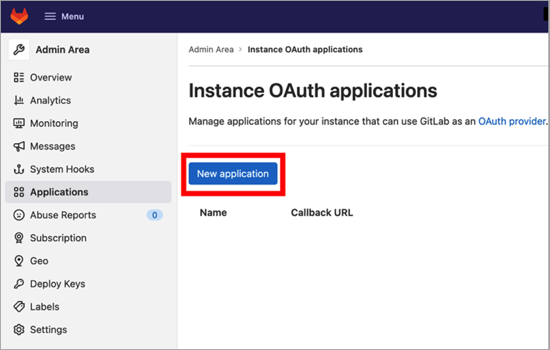
- Login to GitLab as an administrator.
- Click the Menu icon and select Admin.

- In the Admin Area left menu bar, select Applications, and then click New Application.
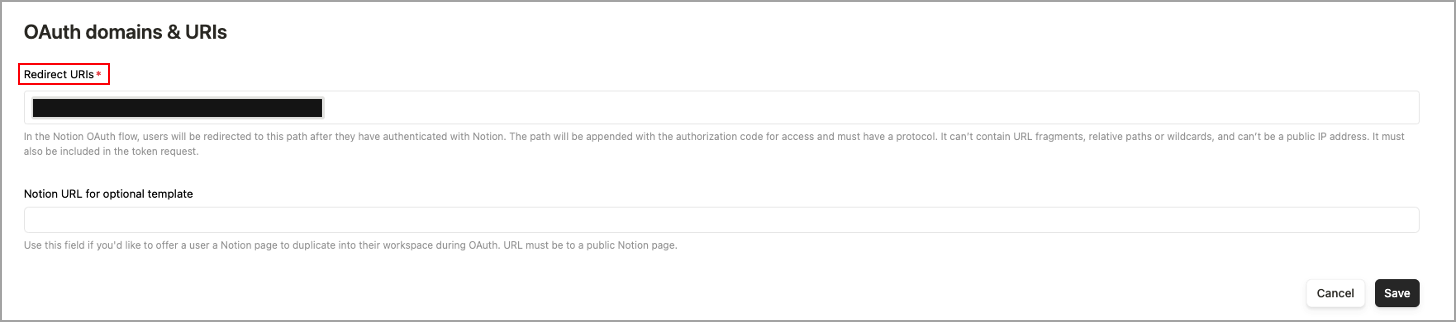
- In the Add New Application popup window, enter information for the following fields.

Field Description Name Enter a name for the application. Redirect URI Enter the redirect URI. Trusted Not applicable. Confidential Select confidential. Scopes Click the checkbox to select all scopes. - Click Save application.
- Note down the application ID and click the Copy icon to copy the secret value. Save this information to use when you create the GitLab connector.

Configure a GitLab Connector
To configure a GitLab connector in Versa Concerto:
- In the Versa Concerto portal, select a tenant under Tenants in the left menu bar.
- Go to Configure > Profile and Connectors > SaaS and IaaS Connectors. The following screen displays.

- Select the SaaS tab, select GitLab in the left column, then click Add. The Add Instance — GitLab screen displays.

- Enter information for the following fields.
Field Description Instance Name (Required) Enter a name for the instance. Admin Email (Required) Enter an email address of the GitLab administrator account. Client ID (Required) Enter the client ID. Client Secret (Required) Enter the client secret. Domain Name (Required) Enter the domain name of the GitLab instance. For example, gitlab.companyname.com. Poll Interval (in Minutes) Enter the amount of time between polling events.
Range: 15 through 1440 minutes
Default: 60 minutes
Retro Scan Click to scan and protect all the files that are present on GitLab at the time of connector creation.
Warning: Event-based policies will apply to all the existing data, delete action is irrevocable. Deleted data cannot be restored.
- Start After
Enter the time required to grant access and configure policies and rules for this instance before starting the retroactive scan.
Range: 1 through 14 (hours), 15 through 1440 (minutes)
Default: None
- Unit Type
Select the unit of measure for the Start After time, in hours or minutes. Services Select the services to use for the instance.
- API-Based Data Protection—Scan and protect content.
Redirect URI Click the Show icon to show the redirect URI.Confirm Click to confirm that the steps required to configure the GitLab account are complete. - Click Submit.
- After the instance is added, select Grant Access to start the OAuth2 process of granting access to the Versa API data protection cloud. Use GitLab Administrator credentials to log in and grant access.
Jira API-Based Data Protection
This section describes how to configure the Jira application for API-DP.
Configure Jira for API-Based Data Protection
To configure Jira for API-DP:
- Go to http://atlassian.com and select your organization.
- In the left menu bar, go to Apps > Sites and choose the site where you want to install the application.
- In the left menu, select Site Settings > Access requests > Connected apps.
- In the Connected apps screen, select Settings in the submenu.
- Under the Development mode section, click on Enable Development mode, and enable it.
- Click Install a private app in the top-right corner.
- In the Install private app popup window:
- Choose Jira from the first dropdown menu.
- Copy and paste the App Descriptor URL (provided on connector) into the “App descriptor URL” field.
- Click Install app to complete the installation.

- After initiating the installation process, allow some time for the application to be installed and configured. Once completed, the process is finished.
- If you plan to revoke or delete an instance, after you revoke the instance, perform the following steps to ensure that the instance has been completely removed.
- Log in to your Atlassian account.
- Remove access from the Atlassian account settings:
- Go to Settings > Atlassian Account Settings > Connected Apps.
- Locate Versa-APIDP-Jira, and then click Remove Access.

- Uninstall the Versa Networks–Jira Event Watcher application:
- Follow steps 1, 2 and 3 to navigate to the Connected apps section.
- Locate Versa Networks–Jira Event Watcher and click View app details.

- Click the Uninstall button in the top-right corner to uninstall the application.

Configure a Jira Connector
To configure a Jira connector in Versa Concerto:
- In the Versa Concerto portal, select a tenant under Tenants in the left menu bar.
- Go to Configure > Profiles and Connectors > SaaS and IaaS Connectors. The following screen displays.

- Select the SaaS tab, select Jira in the left menu bar, then click the Add icon. The Add Instance – Jira window displays.

- Enter information for the following fields.
Field Description Instance Name (Required) Enter a name for the instance. Admin Email (Required) Enter the email address of the Jira administrator account. Poll Interval (in Minutes) (Required) Enter the amount of time between polling events.
Range: 15 through 1440 minutes
Default: 60 minutes
Site URL (Required) Enter the URL for the site. Retro Scan Click to scan and protect all the files that are present on Jira at the time of connector creation.
Warning: Event-based policies will apply to all the existing data, delete action is irrevocable. Deleted data cannot be restored.
- Start After
Enter the time required to grant access and configure policies and rules for this instance before starting the retroactive scan.
Range: 1 through 14 (hours) or 15 through 1440 (minutes)
Default: None
- Unit Type
Select the unit of measure for the Start After time, in hours or minutes. Services Select the services to use for the instance.
- API-Based Data Protection—Scan and protect content.
App Descriptor URL Click the Show icon to display the App Descriptor URL.Confirm Click to confirm that the steps required to configure the Jira account are complete. - After adding the instance, click Grant Access to start the OAuth 2.0 process of granting access to the Versa API-DP cloud. This will open a login prompt for the Jira account. Use administrator credentials to log in and grant access.
Microsoft OneDrive API-Based Data Protection
This section describes how to configure the Microsoft OneDrive application for API-DP.
Configure Microsoft OneDrive for API-Based Data Protection
For Microsoft OneDrive, no configuration is required.
Configure a Microsoft OneDrive Connector
To configure a Microsoft OneDrive connector in Versa Concerto:
- In the Versa Concerto portal, select a tenant under Tenants in the left menu bar.
- Go to Configure > Profile and Connectors > SaaS and IaaS Connectors. The following screen displays.

- Select the SaaS tab, select Microsoft OneDrive in the left menu bar, then click the Add icon. The Add Instance — Microsoft OneDrive screen displays.

- Enter information for the following fields.
Field Description Instance Name (Required) Enter a name for the instance. Admin Email (Required) Enter the email address of the Microsoft OneDrive administrator account. Poll Interval (in Minutes) (Required) Enter the amount of time between polling events.
Range: 15 through 1440 minutes
Default: 60 minutes
Retro Scan Click to scan and protect all the files that are present on Microsoft OneDrive at the time of connector creation.
Warning: Event-based policies will apply to all the existing data, delete action is irrevocable. Deleted data cannot be restored.
- Start After
Enter the time required to grant access and configure policies and rules for this instance before starting the retroactive scan.
Range: 1 through 14 (hours) or 15 through 1440 (minutes)
Default: None
- Unit Type
Select the unit of measure for the Start After time, in hours or minutes. Services Select the services to use for the instance.
- API-Based Data Protection—Scan and protect content.
- Forensic—Use this instance for Forensics.
- Legal Hold—Use this instance for legal hold.
- Quarantine—Use this instance for quarantine files.
Confirm Click to confirm that the steps required to configure the Microsoft OneDrive account are complete. - Click Submit.
- After adding the instance, select Grant Access to start the OAuth2 process of granting access to the Versa API data protection cloud. This will open the login prompt for the Microsoft account.

-
Use Microsoft OneDrive Administrator credentials to log in. The next screen shows the permissions that the Versa service requires to scan and monitor the OneDrive account. Click Accept to grant access to Microsoft OneDrive account.

Microsoft Outlook API-Based Data Protection
This section describes how to configure the Microsoft Outlook application for API-DP.
Configure Microsoft Outlook for API-Based Data Protection
For Microsoft Outlook, no configuration is required.
Configure a Microsoft Outlook Connector
To configure a Microsoft Outlook connector in Versa Concerto:
- In the Versa Concerto portal, select a tenant under Tenants in the left menu bar.
- Go to Configure > Profile and Connectors > SaaS and IaaS Connectors. The following screen displays.

- Select the SaaS tab, select Microsoft Outlook in the left menu bar, then click the Add icon. The Add Instance Microsoft Outlook screen displays.

- Enter information for the following fields.
Field Description Instance Name (Required) Enter a name for the instance. Admin Email (Required) Enter the email address of the Microsoft Outlook administrator account. Poll Interval (in Minutes) (Required) Enter the amount of time between polling events.
Range: 60 through 1440 minutes
Default: 120 minutes
Services Select the services to use for the instance.
- API-Based Data Protection—Scan and protect content.
Confirm Click to confirm that the steps required to configure the Microsoft Outlook account are complete. - Click Submit.
- After the instance is added, select Grant Access to start the OAuth2 process of granting access to the Versa API data protection cloud. This opens a login prompt for the Microsoft account. Use Microsoft Administrator credentials to log in and grant access.
Microsoft SharePoint API-Based Data Protection
This section describes how to configure the Microsoft SharePoint application for API-DP.
Configure Microsoft SharePoint for API-Based Data Protection
For Microsoft SharePoint, no configuration is required.
Configure a Microsoft SharePoint Connector
To configure a Microsoft SharePoint connector in Versa Concerto:
- In the Versa Concerto portal, select a tenant under Tenants in the left menu bar.
- Go to Configure > Profile and Connectors > SaaS and IaaS Connectors. The following screen displays.

- Select the SaaS tab, select Microsoft SharePoint in the left menu bar, then click the Add icon. The Add Instance — Microsoft Office 365 Sharepoint Sites screen displays.

- Enter information for the following fields.
Field Description Instance Name (Required) Enter a name for the instance. Admin Email (Required) Enter an email address of the Microsoft SharePoint administrator account. Poll Interval (in Minutes) (Required) Enter the amount of time between polling events.
Range: 15 through 1440 minutes
Default: 60 minutes
Retro Scan Click to scan and protect all the files that are present on Microsoft SharePoint at the time of connector creation.
Warning: Event-based policies will apply to all the existing data, delete action is irrevocable. Deleted data cannot be restored.
- Start After
Enter the time required to grant access and configure policies and rules for this instance before starting the retroactive scan.
Range: 1 through 14 (hours) or 15 through 1440 (minutes)
Default: None
- Unit Type
Select the unit of measure for the Start After time, in hours or minutes. Services Select the services to use for the instance.
- API Based Data Protection—Scan and protect content.
- Forensic—Use this instance for forensics.
- Legal Hold—Use this instance for legal hold.
- Quarantine—Use this instance for quarantine files.
Confirm Click to confirm that the steps required to configure the Microsoft SharePoint account are complete. - Click Submit.
- After adding the instance, select Grant Access to start the OAuth2 process of granting access to the Versa API data protection cloud. This opens a login prompt for the Microsoft account.

-
Use Microsoft SharePoint Administrator credentials to log in. The next screen shows the permissions that the Versa service requires to scan and monitor the Microsoft SharePoint account. Click Accept to grant access to Microsoft SharePoint account.

Microsoft Teams API-Based Data Protection
This section describes how to configure the Microsoft Teams application for API-DP.
Configure Microsoft Teams for API-Based Data Protection
For Microsoft Teams, no configuration is required.
Configure a Microsoft Teams Connector
To configure a Microsoft Teams connector in Versa Concerto:
- In the Versa Concerto portal, select a tenant under Tenants in the left menu bar.
- Go to Configure > Profile and Connectors > SaaS and IaaS Connectors. The following screen displays.

- Select the SaaS tab, select Microsoft Teams in the left menu bar, then click the Add icon. The Add Instance — Microsoft Teams screen displays.

- Enter information for the following fields.
Field Description Instance Name (Required) Enter a name for the instance. Admin Email (Required) Enter an email address of the Microsoft Teams administrator account. Poll Interval (in Minutes) (Required) Enter the amount of time between polling events.
Range: 60 through 1440 minutes
Default: 120 minutes
Services Select the services to use for the instance.
- API-Based Data Protection—Scan and protect content.
Confirm Click to confirm that the steps required to configure the Microsoft Teams account are complete. - Click Submit.
- After adding the instance, select Grant Access to start the OAuth2 process of granting access to the Versa API data protection cloud. This opens a login prompt for the Microsoft account. Use Microsoft Teams Administrator credentials to log in and grant access.
Microsoft Yammer API-Based Data Protection
This section describes how to configure the Microsoft Yammer application for API-DP.
Configure Microsoft Yammer for API-Based Data Protection
Note: Create a new user with administrator privileges and an application to track all activity with that user account. The new admin should be added to all communities over the network to monitor them. The new admin should never unfollow any user.
For Microsoft Yammer, no configuration is required.
Configure a Microsoft Yammer Connector
To configure a Microsoft Yammer connector in Versa Concerto:
- In the Versa Concerto portal, select a tenant under Tenants in the left menu bar.
- Go to Configure > Profile and Connectors > SaaS and IaaS Connectors. The following screen displays.

- Select the SaaS tab, select Microsoft Yammer in the left menu bar, then click the Add icon. The Add Instance — Microsoft Yammer screen displays.

- In the Add Instance window, enter information for the following fields.
Field Description Instance Name (Required) Enter a name for the instance. Admin Email (Required) Enter an email address of the Microsoft Yammer administrator account. Poll Interval (in minutes) (Required) Enter the amount of time between polling events.
Range: 15 through 1440 minutes
Default: 60 minutes
Services Select the services to use for the instance.
- API-Based Data Protection—Scan and protect content.
Confirm Click to confirm that the steps required to configure the Microsoft Yammer account are complete.
After adding the instance, click Grant Access to start the OAuth 2.0 process of granting access to the Versa API-DP cloud. This opens a login prompt for the Viva Engage (Yammer) account. Use administrator credentials to log in and grant access.
Notion API-Based Data Protection
This section describes how to configure the Notion application for API-DP.
Configure Notion for API-Based Data Protection
For Notion, no configuration is required at the Cisco Webex account.
To create a new integration:
- Select ellipses (three horizontal dots) in the upper right corner of the Add connections > Manage connections screen.

- Select My connections in the left menu bar, then click Develop or manage integrations.

- In the Integrations screen, select + New integration, and then give the new integration a name.

- In the New integration screen, enter the information below.

- Set the Type to Public.
- Enter the company name.
- Connect to one workspace and fill out the necessary information.
- In the OAuth & URIs screen, set the redirect URI.
- Client ID is under Secrets.

Note: A newly added page/database will not automatically connect to the integration. It needs to be manually added to integration.
- Click Save.
Configure a Notion Connector
To configure a Notion connector in Versa Concerto:
- In the Versa Concerto portal, select a tenant under Tenants in the left menu bar.
- Go to Configure > Profile and Connectors > SaaS and IaaS Connectors. The following screen displays.

- Select the SaaS tab, select Notion in the left column, then click the Add icon. The Add Instance — Notion screen displays.

- Enter information for the following fields.
Field Description Instance Name (Required) Enter a name for the instance. Admin Email (Required) Enter an email address of the Notion administrator account. Poll Interval (in Minutes) (Required) Enter the amount of time between polling events.
Range: 15 through 1440 minutes
Default: 60 minutes
Retro Scan Click to scan and protect all the files that are present on Notion at the time of connector creation.
Warning: Event-based policies will apply to all the existing data, delete action is irrevocable. Deleted data cannot be restored.
- Start After
Enter the time required to grant access and configure policies and rules for this instance before starting the retroactive scan.
Range: 1 through 14 (hours) or 15 through 1440 (minutes)
Default: None
- Unit Type
Select the unit of measure for the Start After time, in hours or minutes. Services Select the services to use for the instance.
- API-Based Data Protection—Scan and protect content.
Confirm Click to confirm that the steps required to configure the Notion account are complete. - After adding the instance, click Grant Access to start the OAuth 2.0 process of granting access to the Versa API-DP cloud. This opens a login prompt for the Notion account. Use administrator credentials to log in and grant access.
Salesforce API-Based Data Protection
This section describes how to configure the Salesforce application for API-DP.
Configure Salesforce for API-Based Data Protection
There are two parts to configure Salesforce for API-DP:
- Ensure the administrator account used has sufficient privileges.
- Install the Versa Networks–Event Watcher app to send an alert when any changes are made to the objects.
Ensure the Administrator Account Uses Sufficient Privileges
- In Salesforce, go to setup, navigate to the Administration tab, and select Users > Profiles.

- Clone a user profile with an active Salesforce license and name it Versa APIDP.

- Open the new profile, and then click Edit.
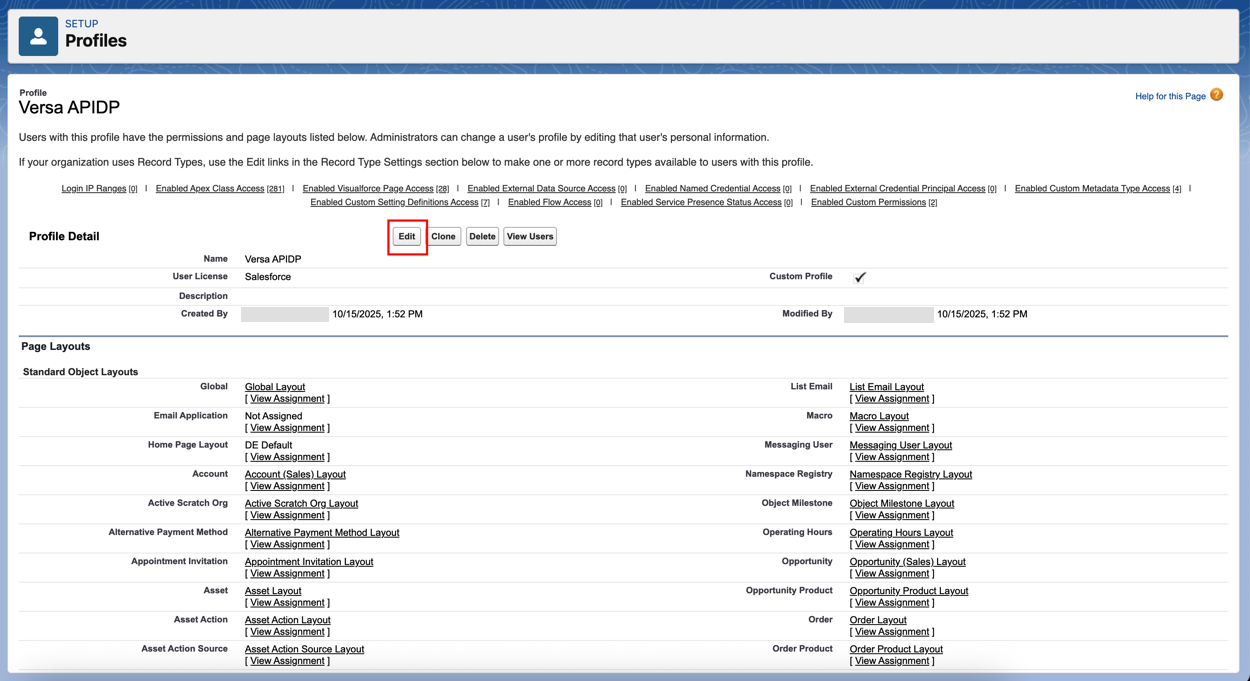
- Ensure that the following items are checked:
- API Enabled
- Manage Chatter Messages and Direct Messages
- Manage Salesforce CRM Content
- Manage Users
- Modify All Data
- Query All Files
- View All Data
- Go back to Administration, and then select Users > Users.

- Click the edit option on the user account you plan to connect.
- Set the profile you created earlier and make sure that that the Salesforce CRM Content User check box is selected.

You can now use this account to connect Salesforce for API Data protection.
Install the Versa Networks–Event Watcher Application
Install the Versa Networks–Event Watcher application to send an alert when any changes are made to the objects:
Note: Available only for Enterprise, Performance, Unlimited, and Developer Editions. For all other editions, events are pulled through polling.
- To install the application, use the appropriate link:
- Production / Development environment: https://login.salesforce.com/packaging/installPackage.apexp?p0=04taj0000005Ewn
- Sandbox environment: https://test.salesforce.com/packaging/installPackage.apexp?p0=04taj0000005Ewn
- Install the Versa Networks–Event Watcher application for the required users.

- Click Install to start the installation process.
- When the popup window appears, click the Continue button to proceed with the installation.

- Wait for the installation to complete.
- Click Done once the installation is complete.

If you plan to revoke or delete an instance, after you revoke the instance, perform the following steps to uninstall the Versa Networks–Event Watcher application:
- Log in to your Salesforce account.
- Go to Setup and navigate to PLATFORM TOOLS > Apps > Packaging > Installed Packages.
- Locate Versa Networks–Event Watcher and click Uninstall.
Configure a Salesforce Connector
To configure a Salesforce connector in Versa Concerto:
- In the Versa Concerto portal, select a tenant under Tenants in the left menu bar.
- Go to Configure > Profiles and Connectors > SaaS and IaaS Connectors. The following screen displays.

- Select the SaaS tab, select Salesforce in the left column, then click the Add icon. The Add Instance — Salesforce window displays.

- Enter information for the following fields.
Field Description Instance Name (Required) Enter a name for the instance. Admin Email (Required) Enter an email address of the Salesforce administrator account. Poll Interval (in Minutes) (Required) Enter the amount of time between polling events.
Range: 15 through 1440 minutes
Default: 60 minutes
Retro Scan Click to scan and protect all the files that are present on Salesforce at the time of connector creation.
Warning: Event-based policies will apply to all the existing data, delete action is irrevocable. Deleted data cannot be restored.
- Start After
Enter the time required to grant access and configure policies and rules for this instance before starting the retroactive scan.
Range: 1 through 14 (hours) or 15 through 1440 (minutes)
Default: None
- Unit Type
Select the unit of measure for the Start After time, in hours or minutes. Services Select the services to use for the instance.
- API-Based Data Protection—Scan and protect content.
Confirm Click to confirm that the steps required to configure the Salesforce account are complete. - Click Submit.
- After adding the instance, select Grant Access to start the OAuth2 process of granting access to the Versa API-DP cloud. This opens a login prompt for the Salesforce account. Use Salesforce Administrator credentials to log in and grant access.
ServiceNow API-Based Data Protection
This section describes how to configure the ServiceNow application for API-DP.
Configure ServiceNow for API-Based Data Protection
To configure a new instance for ServiceNow:
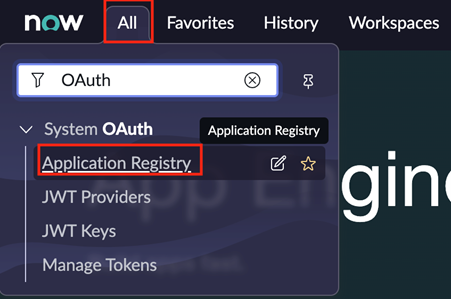
- Login to the ServiceNow instance using an administrator account.
- Select All and search for OAuth. Select Application Registry under System OAuth
- Select New in the top right corner to create a new OAuth app.
- Select “New Inbound Integration Experience”.

- Click on New Integration and select the “OAuth - Authorization code grant” option.

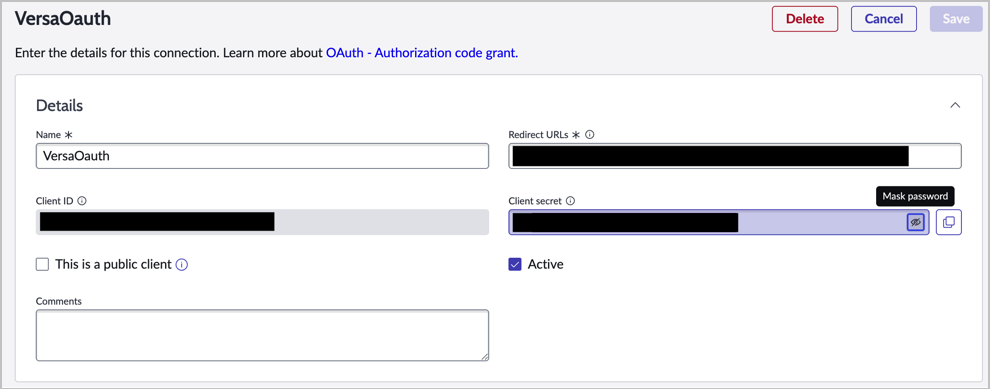
- Create an OAuth app with the information for the following fields, then click Submit.

Field Description Details (Group of Fields) - Name
Enter a name for the OAuth app. - Client Secret
Enter a strong, random password, or use the one that ServiceNow creates. - Redirect URL
Copy the Redirect URL value from the connector. Advanced Options (Group of Fields) - Access Token Lifespan
Enter 3600. - Refresh Token Lifespan
Enter 25920000. - Select the newly created app.

- Click the lock icon near the client secret option. A blue text block displays that contains the client secret. Copy and store the client ID and client secret for use later during the configuration process.
Configure a ServiceNow Connector
To configure a ServiceNow connector in Versa Concerto:
- In the Versa Concerto portal, select a tenant under Tenants in the left menu bar.
- Go to Configure > Profile and Connectors > SaaS and IaaS Connectors. The following screen displays.

- Select the SaaS tab, select ServiceNow in the left column, then click the Add icon. The Add Instance ServiceNow screen displays.

- Enter information for the following fields.
Field Description Instance Name (Required) Enter a name for the instance. Admin Email (Required) Enter the email address of the ServiceNow administrator account. Client ID (Required) Client ID of the OAuth app created. Client Secret (Required) Client secret of the OAuth app created. Domain Name (Required) Enter the subdomain portion of the ServiceNow URL. For example, companyname.servicenow.com Retro Scan Click to scan and protect all the files and other objects that are present on ServiceNow at the time of connector creation.
Warning: Event-based policies will apply to all the existing data, delete action is irrevocable. Deleted data cannot be restored.
- Start After
Enter the time required to grant access and configure policies and rules for this instance before starting the retroactive scan.