Configure API-Based Data Protection Policies for IaaS
![]() For supported software information, click here.
For supported software information, click here.
Versa Networks API-based data protection (API-DP) protects and secures organization data that resides in software as a service (SaaS) and infrastructure as a service (IaaS) applications. To configure API-DP in Versa Concerto, you create an API-DP policy under a tenant. The policy contains a set of rules, and you can configure rules that are event-based (based on an event generated by the SaaS or IaaS applications) or schedule-based (the rule triggers on a specific date or time). A scheduled-based rule scans the objects at rest, which is referred to as a retro scan.
Each rule contains two parts. The first part of the rule categorizes the SaaS or IaaS object on which to apply the policy. The second part defines the actions to take on the SaaS or IaaS objects that match the rules.
This article describes how to create event-based and schedule-based API-DP policy rules for IaaS.
Configure an Event-Based IaaS API-DP Policy Rule
- Go to Configure > Security Service Edge > Advanced Security > API-Based Data Protection > Policy Rules.

- Select IaaS > Event Based. The following screen displays.

- To customize which columns display, click Select Columns, and then click the columns to select or deselect the ones that you want to display. Click Reset to return to the default column display settings. The options are:
- Selected Application Instance
- Action
- Security Profiles
- Notification Profile
- Status
- Click the
 Add icon. The following screen displays with step 1, Provider selected by default.

- Click a provider name. In the example screenshot above, AWS is selected.
- Click Next to go to step 2, Instance. The screen displays any previously configured instances. You can select a previously configured instance, or you can create a new instance.

- To create a new instance, click the Add icon to display the Add Instance screen for the IaaS provider you selected in Step 4. Then, follow the procedure for the provider you selected:
- AWS—Enter information for the following fields, and then click Submit.

Field Description Instance Name (Required) Enter a name for the instance. Admin Email (Required) Enter the email address of the Amazon Web Services administrator account. Services Select the services to use for the instance.
- API Based Data Protection—Scan and protect content.
- Forensic—Use this instance for forensics.
- Legal Hold—Use this instance for legal hold.
- Quarantine—Use this instance for quarantine files.
Provider Information (Group of Fields) - AWS Account Number
Enter organization AWS account number. - Versa IAM Role
Enter role name created by Cloud Formation Template (CFT) as described above. - External ID
Enter external ID generated by CFT. Retro Scan Click to scan and protect all the files that are present on Amazon S3 at the time of connector creation. - Start After
Enter the time required to grant access and configure policies and rules for this instance before starting the retroactive scan.
Range: 1 through 100
Default: None
- Unit Type
Select the unit of measure for the Start After time, in hours or minutes. Confirm Click to confirm that the steps required to configure the AWS account are complete.
- Microsoft Azure—Enter information for the following fields, and then click Submit.

Field Description Instance Name (Required) Enter a name for the instance. Admin Email (Required) Enter the email address of the Microsoft Azure administrator account. Services Select the services to use for the instance.
- API Based Data Protection—Scan and protect content.
- Forensic—Use this instance for forensics.
- Legal hold—Use this instance for legal hold.
- Quarantine—Use this instance for quarantine files.
Subscription ID Enter the Microsoft Azure subscription ID obtained during the configuration. Directory ID (Tenant ID) Enter the Microsoft Azure directory ID of the tenant obtained during the configuration. Client ID Enter the Microsoft Azure application ID obtained during the configuration. Client Secret Enter the client secret value. Retro Scan Click to scan and protect all the files that are present on Microsoft Azure at the time of connector creation. Confirm Click Yes to confirm that you have completed the steps required to configure the Microsoft Azure account.
- Google Cloud Platform—Enter information for the following fields, and then click Submit.

Field Description Instance Name (Required) Enter a name for the instance. Admin Email (Required) Enter the email address of the Google Cloud Platform administrator account. Services Select the services to use for the instance.
- API Based Data Protection—Scan and protect content.
- Forensic—Use this instance for forensics.
- Legal hold—Use this instance for legal hold.
- Quarantine—Use this instance for quarantine files.
Provider Information (Group of Fields) - Project ID (Required)
Enter the project ID where the service account was created. - Upload the Private Key JSON File (Required)
Upload the private key JSON file generated for the service account. Click Browse to select the private JSON key file from your local system. Retro Scan Click to scan and protect all the files that are present on Google Cloud Platform storage at the time the connector was created. Confirm Click Yes to confirm that you have completed the steps required to configure the Google Cloud Platform account. - Oracle Cloud Infrastructure—Enter information for the following fields, and then click Submit.

Field Description Instance Name (Required) Enter a name for the instance. Admin Email (Required) Enter the email address of the Oracle Cloud Infrastructure administrator account. Services Select the services to use for the instance.
- API Based Data Protection—Scan and protect content.
- Forensic—Use this instance for forensics.
- Legal hold—Use this instance for legal hold.
- Quarantine—Use this instance for quarantine files.
Config File Contents of the admin's configuration file, containing basic authentication details. Upload the Private Key File Click Browse to upload the private key JSON file of the administrator. Retro Scan Click to scan and protect all the files that are present on Oracle Cloud Infrastructure at the time of connector creation. Confirm Click Yes to confirm that you have completed the steps required to configure the Oracle Cloud Infrastructure.
- AWS—Enter information for the following fields, and then click Submit.
- Select an Instance.

- Click Next to go to step 3, Security Profiles. The following screen displays.

- Select one of the following options:
- Click Allow to allow all traffic that matches the rule to pass through. If you select this option, go to Step 14.
- Click Profiles to choose one or more predefined or user-defined profiles, then select the Advanced Threat Protection (ATP) tab.

- Click the slider bar to enable ATP profiles. Any configured ATP profiles display.

- Select an ATP profile.
- (Optional) Click Create New to create a new ATP profile. The following screen displays with step 1, ATP Rules selected by default. Currently configured ATP actions are listed.

- Select an ATP rule from the list, or click the Add icon to configure a new ATP rule.
- If you are adding a new ATP rule:
- For Match Criteria, click Select All to include all file types, or select specific file types from the drop-down list. Then, select the type of file transfer direction: Both, Download, or Upload.

- Click Next to go to step 2, Actions. The following screen displays.

- Select one of the following tabs:
- Global—This tab displays the current global settings. In the Pending Action pane, select which action to take on a file while waiting for the file to be evaluated in the cloud. Click Send to Additional/Advanced ATP Services to send the files to be evaluated by additional ATP services, such as AI/ML, static analysis, multiAV, and dynamic analysis.
- Custom—This tab allows you to customize the settings for actions, timeout, and notifications. For certain settings, you also select a quarantine profile. For information about quarantine profiles, see Configure Quarantine Profiles.
If you select the Custom tab, enter information for the following fields.

Field Description ATP Actions (Group of Fields) - Clean
Select the action to take when a file is determined to be clean: Allow, Alert, Block, or Reject.
- Suspicious
Select the action to take when a file is determined to be suspicious: Allow, Alert, Block , Reject, or Quarantine. If you select the Quarantine option, also select a profile from the Quarantine Profile drop-down list.
- Malicious
Select the action to take when a file is determined to be suspicious: Allow, Alert, Block , Reject, or Quarantine. If you select the Quarantine option, also select a profile from the Quarantine Profile drop-down list.
Timeout (Group of Fields) Select a timeout action from the list: Allow, Alert, Block, or Reject.
- Quarantine Profile
Select a profile from the Quarantine Profile drop-down list. - Duration to Wait Before Timeout
Number of seconds to wait before timing out. Notifications Select a notification profile. Pending Action Choose which action to take on a file until the sandbox rules are available from the cloud. The actions are:
- Allow and scan first time
- Block
- Wait until timeout
Send to Additional/Advanced ATP Services Disabled by default. Click the slider bar to send the files to be evaluated by ATP services such as AI/ML, static analysis, multiAV, and dynamic analysis.
- For Match Criteria, click Select All to include all file types, or select specific file types from the drop-down list. Then, select the type of file transfer direction: Both, Download, or Upload.
- Click Next to go to step 3, Review and Submit.

- Enter information for the following fields.
Field Description Rule Name Enter a name for the ATP rule. Description (Optional) Enter a description of the rule. Rule is Enabled Click the slider bar to enable the rule. - Review the configuration on your screen. To edit the values, click the
 Edit icon.
 - Return to the Review and Submit screen, then click Save. The new ATP profile is added to the list of available profiles on the Security Profiles screen.
- Select an ATP rule from the list, or click the
- Click Next to go to step 4, Notification Profile.

- To select a notification profile, click Select Profile. The Notification Profile popup window displays.

- Select a profile, and then click Add. Concerto returns to the main Notification profile screen, which displays the selected notification profile. Click Replace Profile to replace the notification profile with a different one.
To add a new notification profile, click Add. For more information, see Configure Notification Profiles.

- Click Next to go to step 5, Review & Deploy, and enter information for the following fields.

Field Description Name (Required)
Enter a name for the policy rule. Description (Optional) Enter a description of the rule. Tags (Optional) Enter one or more tags. A tag is an alphanumeric text descriptor with no spaces or special characters. You can specify multiple tags added for the same object. The tags are used for searching the objects. Rule is Enabled The policy rule is enabled by default. Click the slider bar to disable the rule.

- Review the configuration details. To edit the values, click the Edit icon for the section.
- Click Save to create the new IaaS event-based policy rule.
Configure a Schedule-Based IaaS API Data Protection Policy Rule
- Go to Configure > Security Service Edge > Advanced Security > API Based Data Protection > Policy Rules.

- Select IaaS > Schedule Based. The following screen displays.

- To customize which columns display, click Select Columns, and then click the columns to select or deselect the ones that you want to display. Click Reset to return to the default column display settings. The options are:
- Selected Application
- Objects of Interest
- Schedule
- Action
- Security Profiles
- Notification Profile
- Status
- To edit a previously configured schedule-based profile, click the profile name and then go to Step 18, below, which displays the Review & Deploy screen, in which you can make updates to the profile.
- To add a new profile, click the Add icon. The following screen displays.

- Select a Provider, then click Next to go to step 2, Objects of Interest.
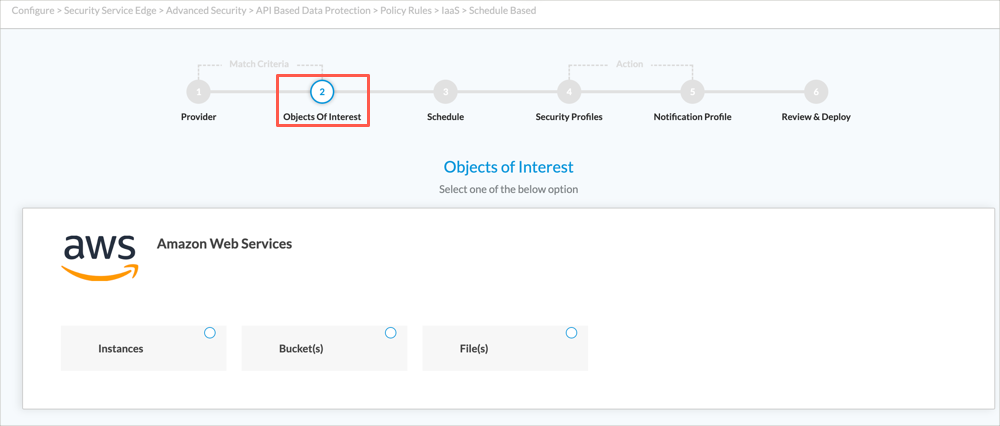
- Select the type of objects of interest for the profile, as listed in the following table.
IaaS Provider Objects of Interest AWS - Instance—Click, then select a previously configured instance. Click the Add icon to add a new instance.
- Buckets—Click, then select a previously configured instance.
- Files—Click, then select a previously configured instance and bucket.
Google Cloud Platform - Instance—Click, then select a previously configured instance. Click the Add icon to add a new instance.
- Buckets—Click, then select a previously configured instance.
- Files—Click, then select a previously configured instance and bucket.
Microsoft Azure - Instances—Select a previously configured instance. Click the Add icon to add a new instance.
- Storage Accounts—Select a previously configured instance to display a list of buckets, then select a bucket.
- Containers—Select a previously configured instance and storage account to display a list of buckets, then select a bucket.
- Files—Select a previously configured instance, storage account, and container to display a list of files, then select a file.
Oracle Cloud Infrastructure - Instances—Select a previously configured instance. Click the Add icon to add a new instance.
- Compartment—Select a previously configured instance.
- Buckets—Click, then select a previously configured instance and compartment.
- Files—Click, then select a previously configured instance, compartment, and bucket.
- Instance—Click, then select a previously configured instance. Click the
- Select a Provider, then click Next to go to step 2, Objects of Interest.
- Click Next to go to step 3, Schedule.

- Select a scan type. Depending on which option you choose, enter the required information. The options are:
- Non Recurring Time—Enter the Start Date and Start Time
- Hourly—Enter the Start Date, Start Time, and End Date
- Daily—Enter the Start Date, Start Time, and End Date
- Weekly—Select the how many weeks elapse between scans (Every field), the day of the week to execute the scan, the Start Date, Start Time, and End Date
- Monthly—Select the how many months elapse between scans (Every field), the Start Time, and End Date
- Click Next to go to step 4, Security Profiles.
- To allow all traffic that matches the rule to pass through, select Allow. If you select this option, go to Step 13.

- To choose a predefined or user-defined profile, select Profiles, then select the Advanced Threat Protection (ATP) tab.

- Click the slider bar to select an ATP profile. Any previously configure ATP profiles display.

- (Optional) Click Create New to create a new ATP profile. The following screen displays, with the existing rules listed in the table.
- To select an existing rule, click the box to the left of the rule name and then go to Step 11x.
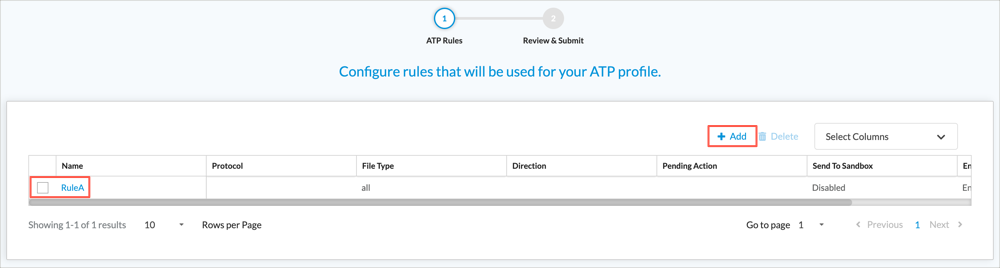
- To add a new rule, click the Add icon. The following screen displays.

- Select an ATP rule from the list, or click the Add icon to configure a new ATP rule.
- If you are adding a new ATP rule:
- For Match Criteria, click Select All to include all file types, or select file types from the drop-down list. Then, select the type of file transfer direction: Both, Download, or Upload.

- Click Next to go to step 2, Actions. The following screen displays.

- Select one of the following tabs:
- Global—This tab displays the current global settings. In the Pending Action pane, select which action to take on a file while waiting for the file to be evaluated in the cloud. Click Send to Additional/Advanced ATP Services to send the files to be evaluated by additional ATP services, such as AI/ML, static analysis, multiAV, and dynamic analysis.
- Custom—This tab allows you to customize the settings for actions, timeout, and notifications. For certain settings, you also select a quarantine profile. For information about quarantine profiles, see Configure Quarantine Profiles.
If you select the Custom tab, enter information for the following fields.

Field Description ATP Actions (Group of Fields) - Clean
Select the action to take when a file is determined to be clean: Allow, Alert, Block, or Reject.
- Suspicious
Select the action to take when a file is determined to be suspicious: Allow, Alert, Block , Reject, or Quarantine. If you select the Quarantine option, also select a profile from the Quarantine Profile drop-down list.
- Malicious
Select the action to take when a file is determined to be suspicious: Allow, Alert, Block , Reject, or Quarantine. If you select the Quarantine option, also select a profile from the Quarantine Profile drop-down list.
Timeout (Group of Fields) Select a timeout action from the list: Allow, Alert, Block, or Reject.
- Quarantine Profile
Select a profile from the Quarantine Profile drop-down list. - Duration to Wait Before Timeout
Number of seconds to wait before timing out. Notifications Select a notification profile. Pending Action Choose which action to take on a file until the sandbox rules are available from the cloud. The actions are:
- Allow and scan first time
- Block
- Wait until timeout
Send to Sandbox Disabled by default. Click the slider bar to enable the Send to Sandbox option.
- For Match Criteria, click Select All to include all file types, or select file types from the drop-down list. Then, select the type of file transfer direction: Both, Download, or Upload.
- Ensure that the correct tab for your configuration (either Global or Custom) displays on the screen, then click Next to go to step 3, Review and Submit.

- Enter information for the following fields.
Field Description Rule Name Enter a name for the ATP rule. Description (Optional) Enter a description of the rule. Rule is Enabled Click the slider bar to enable the rule. - Review the configuration on your screen. To edit the values, click the Edit icon.
- Click Save to save the ATP rule. Concerto returns to the ATP Profile screen, with the newly added rule displayed.

- Click the box to the left of an ATP rule to select the rule.
- Click Next to go to step 2, Review and Submit.

- Enter a name for the profile.
- Review the configuration on your screen. To edit the values, click the Edit icon.
- Click Save to save the ATP profile and return to the Security Profiles screen.

- To select an existing rule, click the box to the left of the rule name and then go to Step 11x.
- In the Security Profiles screen, select an ATP profile.
- Click Next to go to step 5, Notification Profile.

- To select a notification profile, click Select Profile. The Notification Profile popup window displays.

- (Optional) To add a new notification profile:
- Click +Add to display the New Notification Profile popup window.
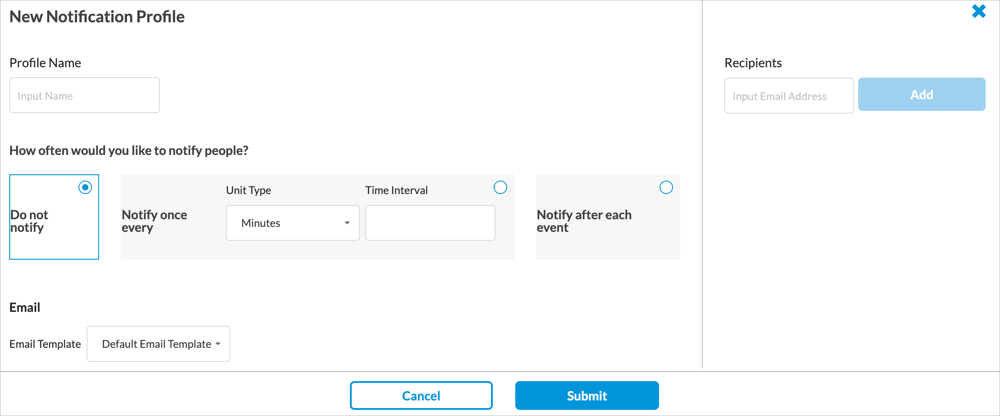
- Enter information for the following fields.
Field Description Profile Name Enter a name for the notification profile. How Often Would You Like to Notify People Select one of the following options:
- Do Not Notify—Do not send notifications.
- Notify Once Every—Send notifications periodically. Select a time unit type and enter a time interval.
- Notify After Each Event—Send a notification after each event.
Email Template Select an email template. Recipients Click the field to activate. Enter an email address, then click Add. You can repeat this process to enter multiple recipients. - Click Submit to add the profile and return to the Notification Profile popup window. The new notification profile displays in the table.
- Click +Add to display the New Notification Profile popup window.
- Click the radio button to the left of a notification profile, then select the
 Add icon. Concerto returns to the main Notification Profile screen.
 - Click Next to go to step 7, Review & Deploy.
- Enter the following information.

Field Description Name (Required)
Enter a name for the policy rule. Description (Optional) Enter a description of the rule. Tags (Optional) Enter one or more tags. A tag is an alphanumeric text descriptor with no spaces or special characters. You can specify multiple tags added for the same object. The tags are used for searching the objects. Rule is Enabled The policy rule is enabled by default. Click the slider bar to disable the rule.
- Review the configuration details, and click the Edit icon to edit a particular section.
- Click Save to save the new IaaS schedule-based policy rule.
Supported Software Information
Releases 11.1.1 and later support all content described in this article, except:
- Release 12.2.1 adds support for the Forensic, Legal Hold, and Quarantine services.