Configure Custom DNS-Filtering Profiles
![]() For supported software information, click here.
For supported software information, click here.
Domain Name System (DNS) filtering allows you to control access to websites, webpages, and IP addresses, to provide protection from malicious websites, such as known malware and phishing sites.
You can create custom profiles that you can use when configuring internet protection rules. You associate custom DNS filtering profiles with devices that are connected to a Secure Web Gateway (SWG) and that need to send traffic to the internet. DNS filtering processes any traffic that matches an internet protection rule in a DNS-filtering profile. Any logs that are generated are sent to the logging profile associated with the DNS profile.
In a DNS-filtering profile you can configure the following components to use to filter DNS requests:
- Deny lists—Define the URLs and IP addresses of DNS requests for which access is blocked, and define the action to take when a URL or an IP address matches. Deny lists are sometimes referred to blacklists.
- Allow lists—Define the URLs and IP addresses of DNS requests to which to explicitly allow access. Allow lists are sometimes referred to as whitelists.
- Query-based actions—Define rules for DNS operation codes (opcodes), which are the commands that are sent to DNS servers to have them perform an action.
- Reputation-based actions—Define how to handle DNS requests from newly observed website domains.
To configure custom DNS-filtering profiles:
- Go to Configure > Security Service Edge > Real-Time Protection > Profiles.

The following screen displays:

- Select the DNS Filtering tab under Filtering Profiles.
Note: In Release 12.2.2, the Secure Web Gateway (SWG) tab was renamed Filtering Profiles.
- To customize which columns display, click Select Columns and then click the columns to select or deselect the ones you want to display. Click Reset to return to the default column display settings.

- Click + Add to create a rule. The Create DNS Filtering screen displays, and the Deny and Allow List step is selected. By default, all fields are configured. To customize DNS-filtering actions, enter information for the following fields. Note that if the traffic matches both a deny list and an allow list, the action in the deny list takes precedence.

Field Description Deny List (Group of Fields)
Choose the domains and actions to deny (block). - Action
Select the action to take for domain names or IP addresses when denying (blocking) incoming DNS requests:
- Alert—Allow the DNS response and generate an entry in the DNS filtering log in Versa Analytics.
- Allow—Allow the DNS response without generating an entry in the DNS filtering log in Versa Analytics.
- Drop Packet—The browser waits for a response from the DNS server and then drops the packet. It is not possible to determine whether the packet was dropped because of a delayed response from the DNS server or because a firewall blocked access to the website.
- Drop Session—The browser waits for a response from the server and drops the session. It is not possible to determine whether the session was dropped because of a delayed response from the DNS server or because a firewall blocked access to the website.
- Reject—Send an ICMP unreachable message back to the client.
- Sinkhole—Return a false IP address to the URL, thus blocking a DNS sinkhole. A DNS sinkhole spoofs DNS servers to prevent the resolution of the hostnames associated with URLs. This action can help you identify infected hosts in a network if a firewall is unable to find the original source IP address of DNS request sender. Sinkhole malware DNS queries create responses to the client host queries directed at malicious domains and try to connect to a sinkhole IP address instead of connecting to malicious domains. You can check the traffic logs to identify infected hosts.
- Patterns
Click the  Add icon to add a domain name or an IP address to deny. You can specify a fixed string or a Perl-Compatible Regular Expression (PCRE). Note that if the pattern matches the same domain name or IP address in a deny list and an allow list, the action in the deny list takes precedence. Click the Add icon again to add more patterns. Click the
 Delete icon to delete a pattern.
- Strings
Enter a complete string for matching a domain name or IP address to block. Note that if the string matches the same domain name or IP address in a deny list and an allow list, the action in the deny list takes precedence. Allow List (Group of Fields)
Choose the domains and actions that you want to allow. - Patterns
Click the Add icon to add a domain name or an IP address to allow. You can specify a fixed string or a Perl-Compatible Regular Expression (PCRE). Note that if the pattern matches the same domain name or IP address in a deny list and an allow list, the action in the deny list takes precedence. Click the Add icon again to add more patterns. Click the Delete icon to delete a pattern.- Strings
Enter a complete domain name for matching a domain name or IP address to allow. You can add multiple comma-separated strings. Note that if the string matches the same domain name or IP address in a deny list and an allow list, the action in the deny list takes precedence. - Enable Logging
Click to log information about the allowed domain names and IP addresses. - Click Next to go to the Query-Based Actions screen, to define rules for DNS operation codes (opcodes), which are commands that are sent to the DNS server to have it perform an action.

- Click the
 Add icon, and in the Add Query-Based Actions popup window, enter information for the following fields.

Field Description Name (Required)
Enter a name for the query-based action. Action Select the action to take on the DNS request:
- Alert—Allow the DNS response and generate an entry in the DNS filtering log in Versa Analytics.
- Allow—Allow the DNS response without generating an entry in the DNS filtering log in Versa Analytics.
- Drop Packet—The browser waits for a response from the DNS server and then drops the packet. It is not possible to determine whether the packet was dropped because of a delayed response from the DNS server or because a firewall blocked access to the website.
- Drop Session—The browser waits for a response from the server and drops the session. It is not possible to determine whether the session was dropped because of a delayed response from the DNS server or because a firewall blocked access to the website.
- Reject—Send an ICMP unreachable message back to the client.
- Sinkhole—Return a false IP address to the URL, thus blocking a DNS sinkhole. A DNS sinkhole spoofs DNS servers to prevent the resolution of the hostnames associated with URLs. This action can help you identify infected hosts in a network if a firewall is unable to find the original source IP address of DNS request sender. Sinkhole malware DNS queries create responses to the client host queries directed at malicious domains and try to connect to a sinkhole IP address instead of connecting to malicious domains. You can check the traffic logs to identify infected hosts.
Request Type Select the type of DNS opcode to which the rule applies:
- IQuery—Send a request for an inverse DNS query command.
- Notify—Send a request for a DNS notify command.
- Query—Send a request for a DNS query command.
- Status—Send a request for a DNS status command.
- Update—Send a request for a DNS update command.
For each request type, you must enter additional information, as described in the following steps.
- For the IQuery request type, enter information for the following fields.
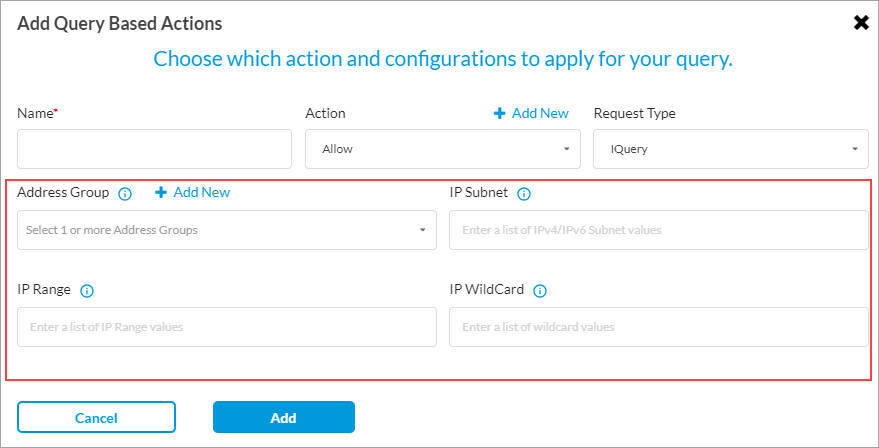
Field Description Address Group Select one or more address groups. IP Subnet Enter a list of IPv4 or IPv6 subnet values. IP Range Enter a list of IP address ranges. IP Wildcard Enter a list of IP address wildcard values. - For the Notify or Status request type, click the Add icon to add zone names.

- For the Query request type, enter information for the following fields.

Field Description Number of Additional Records Enter the number of additional records and select one of the following operators:
- equal-to
- greater-than
- less-than
- not-equal-to
Number of Questions
Enter the number of questions and select one of the following operators:
- equal-to
- greater-than
- less-than
- not-equal-to
Query Type
Select the query type. Domain Names
Enter the domain name. Click the Add icon to add more domain names. -
For the Update request type, enter information for the following fields.

Field Description Number of Zone Records Enter the number of zone records and select one of the following operators:
- equal-to
- greater-than
- less-than
- not-equal-to
Number of Prerequisite Records Enter the number of prerequisite records and select one of the following operators:
- equal-to
- greater-than
- less-than
- not-equal-to
Number of Additional Records Enter the number of additional records and select one of the following operators:
- equal-to
- greater-than
- less-than
- not-equal-to
Number of Update Records Enter the number of update records and select one of the following operators:
- equal-to
- greater-than
- less-than
- not-equal-to
Domain Name Click the
Add icon to add domain names.
- Click Next to go to the Reputations Based Action screen, to define how to handle DNS requests from newly observed website domains. Enter information for the following fields.

Field Description Newly Observed Domains (Group of Fields) Configure how to handle requests from newly observed domains. - Duration
How long to wait, in hours, before taking the configured action on a newly observed domain.
Range: 1 through 168 hours
- Action
Action to take on the newly observed domain:
-
Alert—Allow the DNS response and generate an entry in the DNS filtering log in Versa Analytics.
-
Allow—Allow the DNS response and do not an entry in the DNS filtering log in Versa Analytics.
-
Drop Packet—Have the browser wait for a response from the DNS server and then drop the packet. It is not possible to determine whether the packet was dropped because of a non-responsive DNS server or because a firewall blocked access to the website.
-
Drop Session—Have the browser waits for a response from the server and then drop the session. It is not possible to determine whether the session was dropped because of a non-responsive DNS server or because a firewall blocked access to the website
-
Reject—Send an ICMP unreachable message back to the client.
-
Sinkhole—Return a false IP address to the URL, thus blocking a DNS sinkhole. A DNS sinkhole spoofs DNS servers to prevent the resolution of the hostnames associated with URLs. This action can help you identify infected hosts in a network if a firewall is unable to find the original source IP address of DNS request sender. Sinkhole malware DNS queries create responses to the client host queries directed at malicious domains and try to connect to a sinkhole IP address instead of connecting to malicious domains. You can check the traffic logs to identify infected hosts.
DNS Tunneling (For Releases 12.2.1 and later.) Configure how to handle DNS tunnels. - Action
Select the action to take when DNS tunneling is detected:
- Allow All Tunnels—Allow the DNS response and do not generate an entry in the DNS filtering log in Versa Analytics.
- Block Suspicious Tunnels—Block the DNS response and generate an entry in the DNS filtering log in Versa Analytics. No response page is displayed, and the user cannot continue with the website.
- Sinkhole Suspicious Tunnels—Return a false IP address to the URL, thus blocking a DNS sinkhole. A DNS sinkhole spoofs DNS servers to prevent the resolution of the hostnames associated with URLs. This action can help you identify infected hosts in a network if a firewall is unable to find the original source IP address of DNS request sender. Sinkhole malware DNS queries create responses to the client host queries directed at malicious domains and try to connect to a sinkhole IP address instead of connecting to malicious domains. You can check the traffic logs to identify infected hosts.
IP-Filtering and URL-Filtering Profiles (Group of Fields)
Choose the profiles to apply to the session. - IP-Filtering Profile
Select an IP-filtering profile to use to evaluate the resolved IP addresses and destination DNS server associated with the domain. The action taken based on the IP-filtering profile applies to the session. You can select predefined and custom IP-filtering profiles. For more information, see Configure Custom IP-Filtering Profiles. - URL-Filtering Profile
Select the URL-filtering profile to use to evaluate domain names and common names in DNS request and response messages. The action taken based on the URL-filtering profile applies to the session. You can select predefined and custom URL-filtering profiles. For more information, see Configure Custom URL-Filtering Profiles.
- Click Next to go to the Review and Submit screen.

- In the General section, enter a name for the DNS-filtering profile and, optionally, a description and tags.
- For all other sections, review the information. If you need to make changes, click the
 Edit icon.
 - Click Save.
To delete a file DNS profile, select the profile in the DNS Filtering tab and click the ![]() Delete icon.
Delete icon.
Supported Software Information
Releases 11.2.1 and later support all content described in this article, except:
- Release 12.2.1 adds support for configuration of tunnel detection parameters in a DNS-filtering profile.
- In Release 12.2.2, the Secure Web Gateway (SWG) tab was renamed Filtering Profiles.
Additional Information
Configure Custom URL-Filtering Profiles
Configure SASE Internet Protection Rules