Configure Application Reverse Proxy
![]() For supported software information, click here.
For supported software information, click here.
Application reverse proxy protects against data loss and malware when unmanaged devices access your enterprise cloud and resources. This enables enterprises to provide secure software as a service (SaaS) and private application access to clientless users and devices. Application reverse proxy protects SaaS and private applications from direct access from unmanaged devices that do not use Versa SASE client and try to connect to Versa Cloud Gateways (VCGs).
Using Concerto, you configure SaaS and private applications, and configure rules based on user or group privileges and geography. You can then use these policy rules for security posture.
You can configure a SaaS application with a third-party identity provider, such as Okta, Azure AD, PingIdentity, or OneLogin, using Security Assertion Markup Language (SAML), which directs the user to the identity provider (IdP) for user authentication. After the IdP authenticates users, it directs the traffic to that application's reverse proxy to enforce real-time protection policies specific to that application for the user. After authentication, the user can log in to a portal that displays the applications that the user is authorized to access.
For private applications, reverse proxy acts as a gatekeeper for traffic to applications such as web, SSH, or remote desktop protocol (RDP). By controlling access at the proxy level, you can enforce strict authentication and authorization policies before users can access sensitive resources. In this scenario as well, SAML directs the users to an IdP for authentication.
This article describes how to:
- Configure SaaS and private application reverse proxy
- Configure clientless application policy rules
- Configure IdP and SaaS applications
- View logs for application reverse proxy logs
Configure SaaS Application Reverse Proxy
You configure SaaS application reverse proxy on Versa Concerto, which supports the following reverse proxy flows:
- SaaS application-initiated flow—You configure the SaaS application with VCG as the IdP. When a user accesses a SaaS application, the SaaS provider (for example, box.com) redirects the endpoint to the Versa IdP broker, which applies policies before redirecting the endpoint to its actual IdP (such as Azure AD or Okta). After authentication, the IdP shares an assertion with the Versa IdP broker. Then, it validates the SAML response and redirects the endpoint to the application reverse proxy. The VOS software ensures that the Versa reverse proxy comes in the path to SaaS application and enforces zero-trust network access (ZTNA), secure web gateway (SWG), cloud access security broker (CASB), data loss prevention (DLP), and other security features.
- IdP-initiated flow—You configure the SaaS application to authenticate the user directly with the third-party IdP. When the user tries to access a SaaS or private application, as the user is already authenticated by the IdP, it presents the SAML assertion to the Versa IdP broker (that is, the assertion consumer service (ACS) URL points to the Versa IdP broker. The ACS URL is an endpoint on a service provider that receives a SAML response from the IdP). The IdP then redirects the user to the Versa reverse proxy, which comes in the path of the SaaS application and enforces ZTNA, SWG, CASB, DLP, and other security features.
- IdP-redirected flow—When a user accesses a SaaS application directly, the user is prompted for IdP (Azure or Okta) authentication. After successful authentication, it redirects the user to Versa IDP broker. After SAML response validation, user is redirected to the application reverse proxy for enforcement of real-time protection policies for that application.
This section describes how to set up application reverse proxy to integrate with an IdP and a sanctioned SaaS application provider.
To configure application reverse proxy for SaaS applications:
- Go to Configure > Security Service Edge > Secure Access > Clientless Access > Application Reverse Proxy.

The Application Reverse Proxy screen displays with the SaaS Applications tab selected by default.

- Click the
 Add icon to add a SaaS application. The Add SaaS Application Reverse Proxy screen displays.
 - In Step 1, Settings, enter information for the following fields.

Field Description Application Select an application from the drop-down list for which you want to grant access (here, Salesforce). The predefined applications are:
- Box
- Dropbox
- Office
- Salesforce
Identity Provider (IdP) URL Enter the location to submit the SAML authentication request. This is the location of the IdP service that authenticates and authorizes user access to protected resources. ACS URL Enter the location to submit SAML assertion. This is the location where the service provider's security software receives and processes SAML response messages containing user authentication information from the IdP. Identity Provider (IdP) Certificate Select the IdP certificate for authentication. The IdP uses this digital certificate to sign SAML messages in Single Sign-On (SSO). You can download it from the IdP SSO service endpoint, or the IdP can share it through email or other means. For more information, see Step 5 in Configure Okta for User Web Portal Authentication below. - Add New
Click to add a new IdP certificate. Note that the certificate must be in .crt, .cer, or .pem format.

- Enter the CA chain name.
- Click Upload File to upload the certificate from your local device.
- Click Add.
- Click Next, and then enter the name of the application. You can also enter a description and tags.

- Click Save.
Configure Private Application Reverse Proxy
Private application reverse proxy provides secure and controlled access to internal applications or services from external networks. By configuring a private application reverse proxy, you enable users or systems outside the private network to access certain applications securely, without directly exposing them to the internet.
To configure a private application reverse proxy:
- Go to Configure > Security Service Edge > Secure Access > Clientless Access > Application Reverse Proxy. The Application Reverse Proxy screen displays.

- Select the Private Applications tab.
- Click the Add icon to add an application. The Add Private Application Reverse Proxy screen displays.
- In Step 1, Settings, enter the following information.

Field Description Application URL Enter the URL to access the private application. For example, www.marketing.companyname.com. Application Display Name Enter the name of the application to display on the applications portal. If not specified, the name from the review page is used. Application Logo URL Enter the URL from where to display the logo on the applications portal. The URL must include the complete path to the image file hosted on your enterprise network and must be accessible from SSE gateways without requiring authentication. If not configured, the application displays the default logo. URL Pattern Enter the FQDN or pattern to match for the proxy. For example, marketing.company.com; intranet.company.com. Use HTTP Click and enable the toggle button if the application is hosted over HTTP. Rewrite URL Click and enable the toggle button to allow modifying the URL or the headers of a request before passing it to the backend server. It is recommended that you keep this enabled. Private Application Certificate Select or upload a certificate for the private application. If Rewrite URL is disabled, the certificate's SAN must contain the FQDN of the proxied application. If it is enabled, the SAN must contain the FQDN of the SSE service provider domain. - Add New
Click to add a new IdP certificate. The file you upload must be in .zip format and must contain a key file and a certificate file. The key file must have the .key extension. There is no restriction on the certificate file extension.
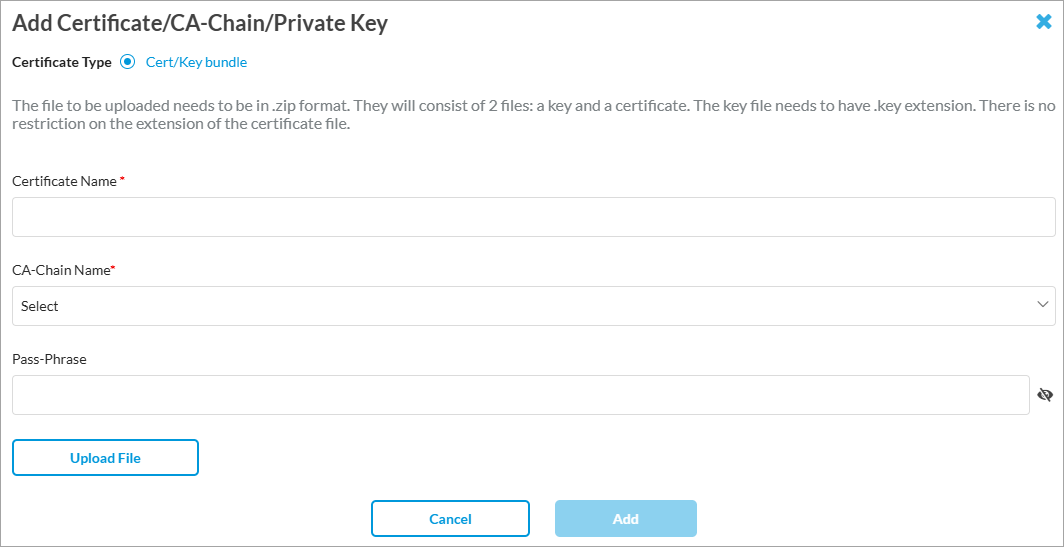
- Enter a name for the certificate.
- Select a CA-Chain name.
- (Optional) Enter the pass phrase for the certificate.
- Click Upload File to upload the file from your local device.
- Click Add.
Identity Provider (IdP) URL Enter the location to submit the SAML authentication request. This is the location of the IdP service that authenticates and authorizes user access to protected resources. ACS URL Enter the location to submit SAML assertion. This is the location where the service provider's security software receives and processes SAML response messages containing user authentication information from the IdP. Identity Provider (IdP) Certificate Select the digital certificate for authentication that the IdP uses to sign SAML messages in single sign-on (SSO). You can download it from the IdP SSO service endpoint, or the IdP can share it through email or other means. For more information, see Step 5 in Configure Okta for User Web Portal Authentication below. - Click Next, then enter the name of the application. You can also enter a description and tags.

- Click Save.
Configure Clientless Application Policy Rules
Before you configure policy rules for application reverse proxy, you must configure an authentication profile and at least one application reverse proxy as described in Configure SaaS Application Reverse Proxy and Configure Private Application Reverse Proxy, above.
You must also configure a SAML authentication profile before you configure an application reverse proxy policy rule.
To configure a clientless application policy rule:
- Go to Configure > Security Service Edge > Secure Access > Clientless Application Access > Policy Rules.

If you have not configured a reverse proxy, the following screen displays. Note that if you have not configured an authentication profile, Create Authentication Profile is enabled. To add a policy rule, click Let's Go.

The following screen displays if you have configured an authentication profile, at least one application reverse proxy, and an access rule. This screen displays the web portal URL that a clientless user uses to access SaaS and private applications.

- Click + Add. The Create Clientless Application Access Rule screen displays with User and Groups selected by default. By default, all users and user groups are included in the match, which means that no filtering is done on the basis of users and user groups.
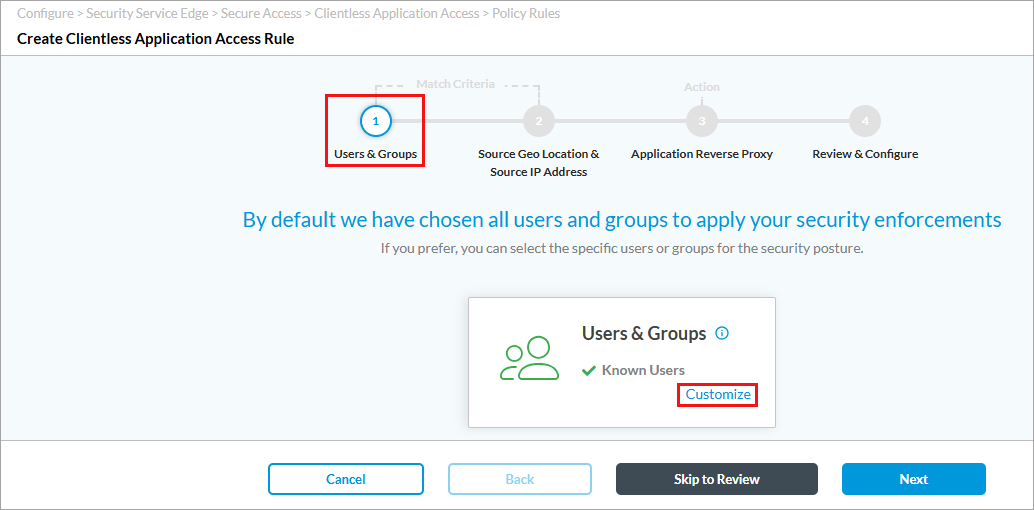
- To accept the default, click Next to continue to Source Geo Location and Source IP Address match criteria. Go to Step 9 for more information.
- To change the users and user groups to include in the match list, click Customize. The following screen displays with Known Users selected by default.

- To accept the default, click Next to continue to Source Geo Location and Source IP Address match criteria.
- To select users and user groups, select Selected Users. The following screen displays.

- Select a user and device authentication profile, and then select a group or groups from the groups associated with the profile. Note that if you select an LDAP-based user and device authentication profile, you have an option to add user groups or users. For other type of profiles, you can select the user groups or users already associated with the profile, as shown in the screenshot above for a SAML-based profile. For more information, see Configure User and Device Authentication.
- If you select an LDAP-based user and device authentication profile, the User Groups tab displays the + Add New User Group option:
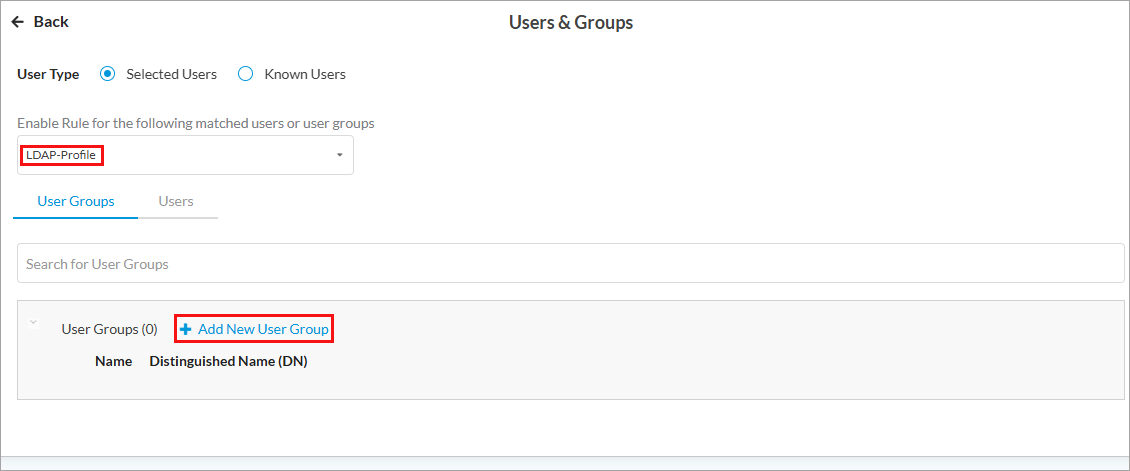
- To add a user group, click + Add New User Group.
- In the Add User Group window, enter a user group name and a distinguished name (DN).

- Click Add.
- If you select an LDAP-based user and device authentication profile, the User Groups tab displays the + Add New User Group option:
- To add users, select the Users tab in the Users and Groups screen. Similar to the Groups tab, if you select an LDAP-based user and device authentication profile, you have an option to add users. For other type of profiles, you can select the users already associated with the profile, as shown in the following screenshot for a RADIUS-based profile. For more information, see Configure User and Device Authentication.

- If you select an LDAP-based user and device authentication profile, the Users tab displays + Add New User:

- To add a user, click + Add New User.
- In the Add User window, enter the user name and an official email address for the user.

- Click Add.
- If you select an LDAP-based user and device authentication profile, the Users tab displays + Add New User:
- Click Next to continue to Source Geo Location and Source IP Address match criteria. The following screen displays. By default, all source and destination geographic locations are included in the match list, which means that no filtering is done based on geographic location and so traffic flows to all destinations.

- To accept the default, click Next to continue to Application Reverse Proxy. Go to Step 10 for more information.
- To change the source geographic locations to include in the match list, click Customize under Source Geolocation. The following screen displays.

- In the Select Country field, select one or more countries. The map changes to highlight the countries you select. You can allow or deny access to Versa SASE client for the locations you select.
- To change the source IP addresses to include in the match list, click Customize under Source IP Address. The following screen displays. Enter information for the following fields.
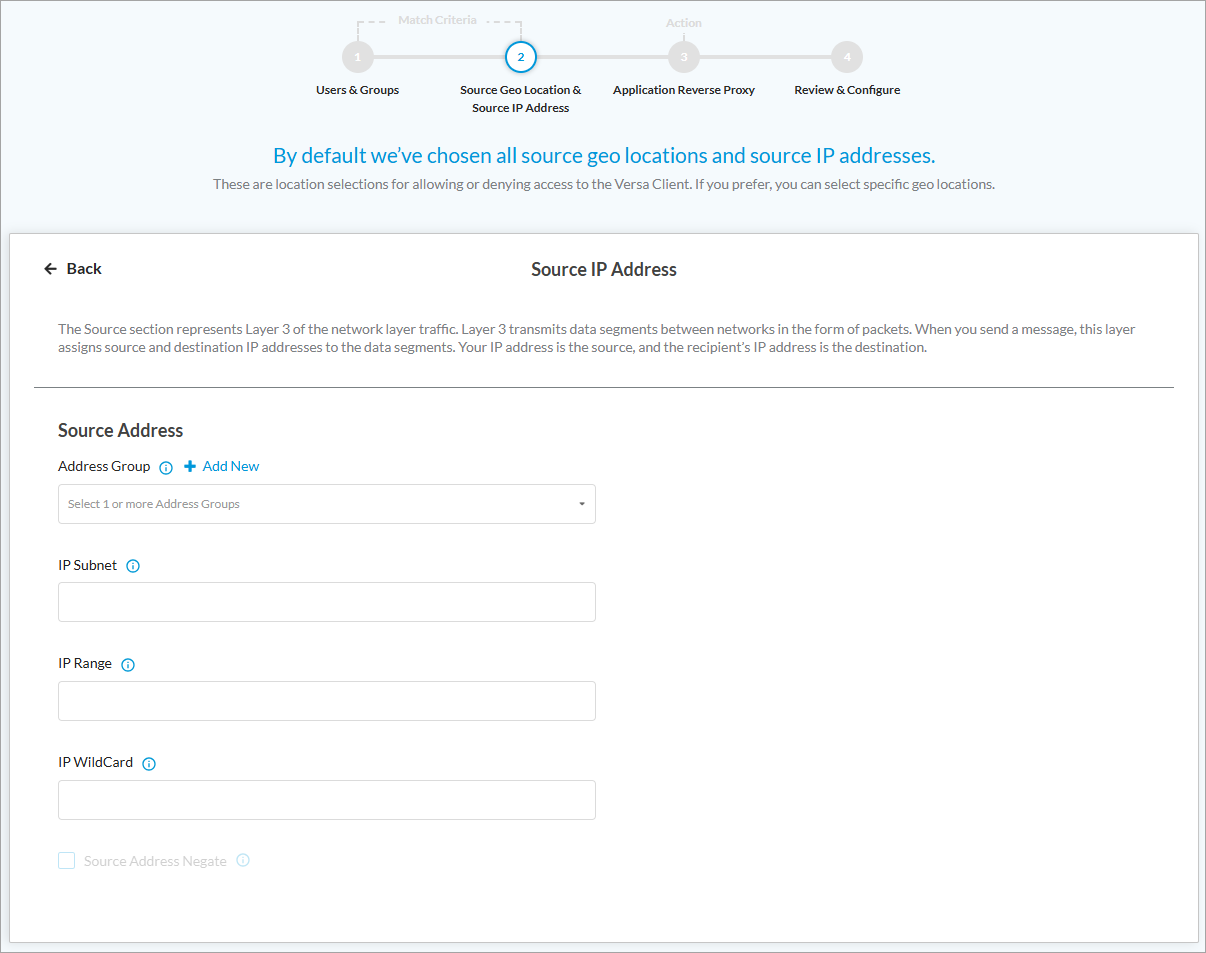
Field Description Address Group Select an IP address group or click + Add New to add an address group. The Create Address Group window displays.

- Enter the required values and click Next.
- Enter a name for the address group and click Save.
IP Subnet Enter a list of IPv4 or IPv6 subnets. IP Range Enter a list of IP address ranges. IP Wildcard Enter a list of IP address wildcard values. Source Address Negate Select to apply the rule to any source addresses except the configured addresses. - Click Back to return to the previous screen.
- Click Next to continue to Application Reverse Proxy. The following screen displays.

- Click Customize to select SaaS or private application reverse proxies to associate with the rule. The following screen displays.

- Select the application reverse proxies.
- To add a SaaS or private application reverse proxy, click + Add SaaS Application or + Private Applications. For more information, see Configure SaaS Application Reverse Proxy and Configure Private Application Reverse Proxy above.
- Click Next to go to the Review and Configure screen.

- In the General section, enter a name for the rule. You can also enter a description and tags for the rule.
- By default, the rule is enabled. To disable the rule, slide the Rule is Enabled toggle button.
- Click the Edit icon next to any section to make changes.
- Click Save.
Configure IdP and Service Provider for SaaS Applications
The following sections describe how to configure IdP authentication and SaaS service provider settings for SaaS application reverse proxy.
Configure IdP Authentication
After you configure the captive portal and reverse proxy settings, when a user tries to access the portal to access a SaaS or private application, the user is directed to the IdP for authentication. Here, we use Okta as an example.
After you configure IdP authentication, configure a SAML profile using IdP SSO and certificate details as described in Configure a SAML Authentication Profile, below.
Configure Okta for User Web Portal Authentication
- Log on to the Okta portal.
- On the Okta homepage, click Applications in the left menu. The Applications window displays.
- Configure the SAML parameters in the SAML Settings window:

- Copy the SSO URL that you enter in the ACS URL field in the SaaS Application Reverse Proxy or Add Private Application Reverse Proxy windows as described in Configure SaaS Application Reverse Proxy and Configure Private Application Reverse Proxy, respectively, above.
- Navigate to Applications > Applications menu for SAML setup instructions.

- Click Download Certificate to download the Okta IDP certificate. You can use this certificate when you create an SaaS or Private application reverse proxy. For more information, see Step 2 in Configure SaaS Application Reverse Proxy and Step 3 in Configure Private Application Reverse Proxy above.
- Copy the IdP SSO URL and use it as the IdP URL when you configure a SaaS/private application reverse proxy from the Concerto node.
Configure a SAML Authentication Profile
- Go to Configure > Security Service Edge > User and Device Authentication > Profiles. The Authentication Profiles screen displays.
- To create a new profile, click + Add. The Add User and Device Authentication Profile screen displays.

- Select SAML, and then click Get Started. The following screen displays.

- Select the SAML type (here, Okta). The fields are the same for all types of SAML.
- In the Single Sign-On URL field, enter the SSO URL you entered while configuring Okta SAML in Step 5 of Configure IdP Authentication, above.
- In the Identity Provider Certificate field, select the certificate you downloaded in Step 8 of Configure IdP Authentication, above.
- For information about configuring other parameters, see Configure User and Device Authentication.
- Click Next and save the profile from the Review and Submit screen.
Configure Okta for SaaS Application Authentication
- Log on to the Okta portal and configure a SAML 2.0 Application. For more information, see Configure Okta for User Web Portal Authentication, above.

- Enter the Single Sign On URL and Audience Restriction for your organization, similar to the example in the screenshot above. For SSO details, refer to Configure SaaS Application Reverse Proxy, above.
- Use the IdP SSO URL, Versa Login URL, and SAML signing certificate details for the required SaaS application (here, Salesforce) from the Application Reverse Proxy > SaaS Applications tab. For more information, see Configure SaaS Application Reverse Proxy, above.

- Download the Okta IdP certificate as described in Step 8 of Configure Okta for Application Reverse Proxy Authentication, above, and upload the certificate in Concerto as described in Step 2 of Configure SaaS Application Reverse Proxy, above.
- Copy the IdP SSO URL and use it as the IdP URL SaaS application reverse proxy from Concerto.
Configure a SaaS Service Provider
This section describes how to configure Salesforce SSO settings for clientless SaaS application access.
To configure Salesforce SaaS for application access:
- From the Salesforce Home screen, select Identity > Single Sign-On Settings from the left menu.

- In the Issuer field, enter the Okta (IdP) attribute as described in Configure Okta for SaaS Application Authentication, above.
- In the Request Signing Certificate field, upload the Okta IdP certificate that you downloaded as described in Step 8 of Configure Okta for Application Reverse Proxy Authentication, above.
- Click Save.
Example: Clientless User Login to Web Portal
This section shows an example of how a user can navigate to the Web portal to access available SaaS and private applications.
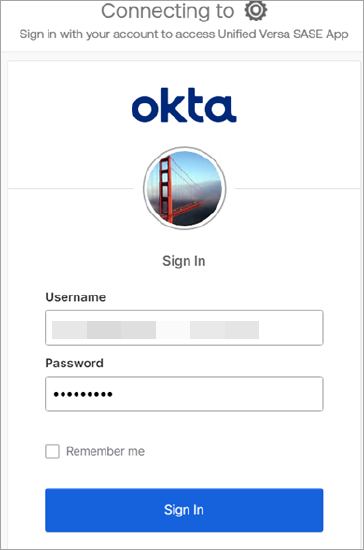
- User uses the URL, for example: https://tenant.myapps.demo.versanow.net/userportal/applications.html. Here, the tenant can be your company name, and versanow.net is the Versa root domain.
- The user is redirected to the IdP portal for login as shown in the following screenshot.
After the user logs in, the application portal displays the SaaS and private applications that the user has privileges to access. The following example shows that the user has access to Salesforce (SaaS service provider), the company's private application, RDP, and SSH applications (this is a sample screenshot and the portal display depends on your company's portal settings):

- If the user clicks on Go to Salesforce, the Salesforce homepage displays.

- Similarly, the user can access RDH and SSH applications by clicking on the relevant link.
- If the user tries to perform an action on a private application for which there is no permission, the action is blocked and a message displays. For example, the following image displays when a user tries to upload files without having the required privileges.

View Application Reverse Proxy Logs
You can view data loss prevention (DLP) logs for blocking of user actions based on application reverse proxy rules.
To view the DLP logs, go to Analytics > Dashboard > DLP:

You can also view files that were blocked from upload or download.
To view files that were blocked from upload or download, go to Analytics > Dashboard > Logs > Threat Detection > Anti Virus:

Supported Software Information
Releases 12.2.1 and later support all content described in this article.