Configure DoS Protection
![]() For supported software information, click here.
For supported software information, click here.
You can configure Versa Operating SystemTM (VOSTM) devices to detect and mitigate denial-of-service (DoS) attacks. A DoS attack is an attempt to disrupt network services and deny network access by overloading unnecessary traffic using multiple sources.
Note: Protection against DoS attacks is resource intensive, so use it only for critical systems and enable it only for the subnet or subset of servers that need to be protected.
When a malicious entity launches DoS attack on a customer's network infrastructure, a high volume of traffic floods the network with the intent of exhausting the hardware and software resources. As a result, the network becomes unavailable for its intended users. DoS attack attempts include:
- Divert high-volume traffic from multiple sources to the network
- Create unnecessary TCP sessions
- Flood the network
- Scan ports
- Sweep the host
- Attack the network with packet-based methods
To defend against such attacks, you configure DoS protection policy and profiles to detect and prevent zone-based or endpoint-based DoS attacks.

In a DoS policy, you can match the following criteria:
- Source zone
- Destination zone
- Source address
- Destination address
- IP headers
- TCP and UDP services
- Time of day
You use the match criteria to separate the incoming traffic into fine-grained traffic streams. For example, you can specify criteria to match all traffic originating from the internet and destined to a specific web server. As another example, you can specify criteria to match all traffic originating from within an enterprise that is destined towards to a data center resource like a file server.
To apply DoS protection, you define DoS protection profiles, and then you reference the profile in a DoS protection policy. DoS protection profiles monitor thresholds for various protocols based on an endpoint-classified or aggregate basis. The Versa security appliance monitors the traffic rate for the various traffic protocols that matches the above match criteria and enforces the mitigation actions when the configured thresholds exceed. For TCP SYN flood, the enforcement actions allow for allow, alert, random early drop or TCP SYN cookies. There are two types of protection profiles:
- Aggregate DoS profile
- Classified DoS profile
A DoS protection profile provides detailed control for denial-of-service (DoS) protection policies. A DoS protection profile specifies the threshold rate of incoming packets and the action the firewall takes to protect against the DoS attack. The DoS protection profile is attached to the DoS protection policy rule, which establishes the matching criteria for packets that are subject to Deny, Allow, or Protect actions.
A DoS policy allows you to control the number of sessions between interfaces, zones, addresses and region. You can configure the DoS protection profile to define the flood thresholds for these protocols:
- ICMP
- ICMPv6
- Other IP
- SCTP
- TCP
- UDP
The DoS protection profile specifies:
- Maximum number of sessions.
- Profile type—Type of DoS protection profile:
- Aggregate profile—Applies the thresholds in the DoS protection profile to all the packets that match the rule criteria with which this profile is associated.
- Classified Profile—Applies the threshold configured in the profile to all the packets that match the classification criteria.
- Classification key—For a classified profile, the classification key allows you to classify the attack based on the source IP address, the destination IP address, or both the source and destination IP addresses.
An aggregate DoS protection profile monitors the thresholds configured for various protocols for all the traffic that matches the rule in the DoS policy. The aggregate DoS profile is useful to defend against DoS attacks targeted across an entire subnet (instead of endpoints based on specific IP addresses) and the source of the DoS traffic spans a wide range of IP addresses.
In a classified DoS profile, you set the classification key to source and destination IP address to monitor the thresholds based on a per-source and destination IP address basis. The rate at which packets are received is tracked per-protocol, per-source-and-destination-IP-address. You use classified DoS profiles to defend against DoS attacks targeted against specific endpoint hosts, based on the destination IP address or to narrow down the source of the DoS traffic to a few source IP addresses.
- If the DoS profile is configured as classified type then the thresholds configured for the various protocols are monitored based on the classification key for the traffic that matches the rule in the DoS policy.
- If the classification key is set to source IP address then the thresholds are monitored based on a per-source-IP-address. The rate at which packets are received is tracked per-protocol, per-source-IP-address.
- If the classification key is set to destination IP address then the thresholds are monitored based on a per-destination-IP-address basis. The rate at which packets are received is tracked per-protocol, per-destination-IP-address.
Configure a DoS Protection Profile
- In Director view:
- Select the Configuration tab in the top menu bar.
- Select Templates in the horizontal menu bar.
- Select an organization in the left menu bar.
- Select a template from the dashboard. The view changes to Appliance view.
- Or, in Director view:
- Select the Administration tab in the top menu bar.
- Select Appliance in the left menu bar.
- Select the device from the main pane. The view changes to Appliance view.
- Select the Configuration tab in the top menu bar.
- Select Services > Next-Gen Firewall > DoS > Profiles in the left menu bar, or select Services > Stateful Firewall > DoS > Profiles in the left menu bar, and then select an entity from the Organization list.

- Click the
 Add icon. In the Add DoS Profile window, enter information for the following fields.

Field Description Name (Required) Enter a name for the aggregate DoS protection profile. Description Enter a text description for the profile. Tags Enter a keyword or phrase that allows you to filter the profile. This is useful when you have many profiles and want to view those that are tagged with a particular keyword. Type Select the type of profile:
- Aggregate Profile—Applies the thresholds in the DoS protection profile to all the packets that match the rule criteria with which this profile is associated.
- Classified Profile—Applies the threshold configured in the profile to all the packets that match the classification criteria.
Classification Key For a classified profile, select the key to classify the attack:
- Destination IP Only—Apply the DoS profile on the destination IP address of the attack.
- Source IP Only—Apply the DoS profile on the source IP of the attack.
- Source and Destination IP—Apply the DoS profile on both the source and destination of the attack.
Max Sessions Enter the maximum number of sessions to allow for traffic that meets the DoS protection rule to which this DoS profile is applied.
Range: 1 through 4194304
Flood Protection (Group of Fields) - Protocol and Enable
Click Enable on the desired line to enable flood protection for that protocol - Alarm Rate
Enter the threshold rate at which to generate a DoS alarm, in packets per second.
Range: 1 through 20000000 packets per second
Default: 100000 packets per second
- Active Rate
Enter the threshold rate at which to activate a DoS response, in packets per second.
Range: 1 through 20000000 packets per second
Default: 100000 packets per second
- Maximal Rate
Enter the threshold rate of incoming packets, in packets per second. When this threshold is exceeded, all packets are dropped.
For aggregate DoS protection profile, this limit applies to all the traffic processed by the DoS protection rule with which this DoS protection profile is associated.
For classified DoS protection profile, this limit applies to the traffic on a classified basis (based on the source IP address, destination IP address, or both), for the traffic processed by the DoS protection rule with which this DoS protection profile is associated.
Range: 1 through 20000000 packets per second
Default: 100000 packets per second
- Drop Period
Enter the duration, in seconds, when offending packets are dropped. Traffic dropped during this time is not counted when triggering an alert.
Range: 1 through 18000 seconds
Default: 300 seconds
- Actions
Select the action to take when the active rate threshold is breached:
- Random Early Drops—Randomly drop packets.
- SYN Cookies—Generate an acknowledgment, and ensure that the connection is not dropped during a SYN flood attack. This is the default.
Default: SYN Cookies
- Click OK.
Configure a DoS Protection Policy
To configure a DoS policy, you create rules to match the incoming traffic. For traffic that matches different rules of the DoS policy, you apply aggregate or classified DoS profiles, or both.
Configure a DoS Policy
- In Director view:
- Select the Administration tab in the top menu bar.
- Select Appliances in the left menu bar.
- Select a device name in the main panel. The view changes to Appliance view.
- Select the Configuration tab in the top menu bar.
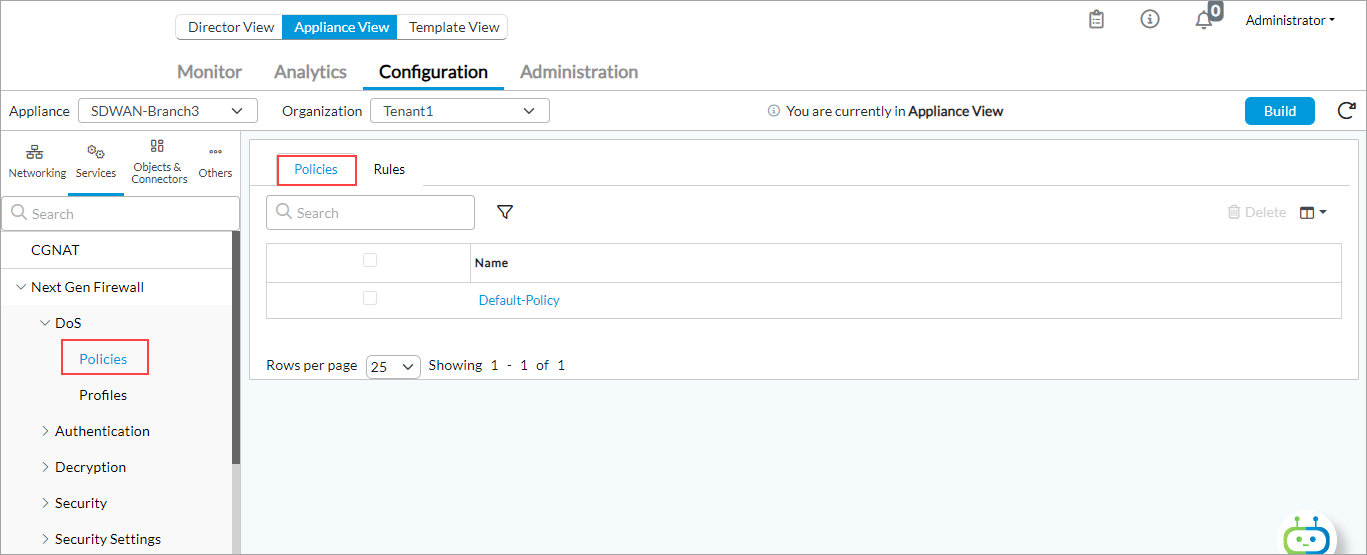
- Select Services > Next Gen-Firewall > DoS > Policies in the left menu bar, or select Services > Stateful Firewall > DoS > Policies in the left menu bar, and then select an entity from the organization list.

- Select the Policies tab, and then click the
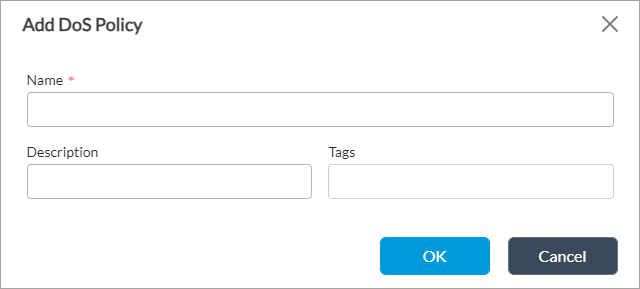
 Add icon. In the Add DoS Policy popup window, enter information for the following fields.

Field Description Name (Required) Enter a name for the DoS protection policy. Description Enter a text description for the DoS protection policy. Tags Enter a keyword or phrase that allows you to filter the policy name. Tags are useful when you have many policies and want to view those that are tagged with a particular keyword. - Click OK
Configure DoS Policy Rules
A DoS policy consists of a set of rules, where each rule specifies the traffic match criteria and the action to take on matching traffic. The rules are evaluated in order, starting with the first rule. When traffic matches a rule, that rule's action is taken, and no more rules are evaluated.
To create an aggregate DoS protection policy rule:
- In Director view:
- Select the Administration tab in the top menu bar.
- Select Appliances in the left menu bar.
- Select a device name in the main panel. The view changes to Appliance view.
- Select the Configuration tab in the top menu bar.
- Select Services > Next-Gen Firewall > DoS in the left menu bar, and select an entity from the Organization list.
- Select the Rules tab and click the
 Add icon. The Add DoS Rule popup window displays.
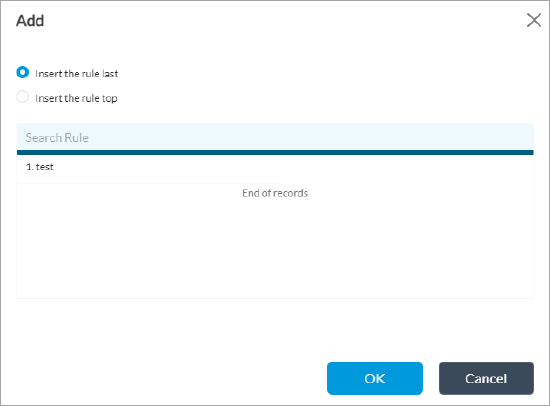
 - (For Releases 21.2.1 and later.) If you have already added one or more rules, the Configure Rule Order popup window displays.
- Select where you want to insert the policy rule, either at the beginning or end of the existing rules.

- If you select a rule and then click the Add icon, the Configure Rule Order popup window displays the following options:

- Select the order to insert the rule (at the beginning or end bottom of the existing rules, or before or after the selected rule).
- Click OK. The Add DoS Rule popup window displays.
- Select where you want to insert the policy rule, either at the beginning or end of the existing rules.
- Select the General tab and enter information for the following fields.

Field Description Name (Required) Enter a name for the DoS rule. Description Enter a text description for the DoS rule. Tags Enter a keyword or phrase that allows you to filter the rule name. This is useful when you have many rules and want to view those that are tagged with a particular keyword. Disable Rule Click to disable the decryption rule. - Select the Source tab to define the source zone and the source address of the incoming (source) traffic to which the DoS rule applies. Enter information for the following fields.

Note that in Releases 21.2 and earlier, the Source and Destination information was on the same tab.
Field Description Source Zone Select the source zone, to apply the rule to traffic originating from any interfaces in that zone. Click the
 Add icon to add zones. Click
  New Zone to create a new zone.
Source Address Select the source address, to apply the rule to traffic originating from a specific IP address. Click
 New Address Group to create a new address group. Click
  New Address to create a new address.
Source Address Negate Click to match any source addresses except the configured addresses. Region (For Releases 22.1.2 and later.) Click the  Add icon, and then select a region. To create a region, see Create a Region.
State (For Releases 22.1.2 and later.) Click the  Add icon, and then select a state.
City (For Releases 22.1.2 and later.) Click the  Add icon, and then select a city.
Source Location Negate Click to select any source locations except the configured source locations. Custom Geo Circle (For Releases 22.1.2 and later.) Click the  Add icon, and then select a custom geographic circle. A geographic circle consists of a point and the area enclosed by a circle drawn around that point. You specify the point by its latitude and longitude coordinates, and you specify the size of the circle by a distance. To configure a custom geographic circle, see Configure Custom Geographic Circles.
 - Select the Destination tab to define the destination zone and the destination address of the outgoing (destination) traffic to which the DoS rule applies. Enter information for the following fields.

Field Description Destination Zone Select the destination zone, to apply the rule to traffic arriving from any interfaces into that zone. Click the
 Add icon to add more destination zones. Click + New Zone to create a new zone.
Destination Address Select the destination address, to apply the rule to traffic arriving from a specific IP address. Click the  Add icon to add more destination addresses. Click + New Address to create a new address. Click + New Address Group to create a new address group.
Destination Address Negate Click to match any destination addresses except the configured addresses. Region (For Releases 22.1.2 and later.) Click the  Add icon, and then select a region. To create a region, see Create a Region
State (For Releases 22.1.2 and later.) Click the  Add icon, and then select a state.
City (For Releases 22.1.2 and later.) Click the  Add icon, and then select a city.
Destination Location Negate Click to select any destination locations except the configured destination locations. Custom Geo Circle (For Releases 22.1.2 and later.) Click the  Add icon, and then select a custom geographic circle. A geographic circle consists of a point and the area enclosed by a circle drawn around that point. You specify the point by its latitude and longitude coordinates, and you specify the size of the circle by a distance. To configure a custom geographic circle, see see Configure Custom Geographic Circles.
 - Select the Header/Schedule tab to defined match criteria based on the contents of the IP packet header and to set a time at which to apply the policy. Enter information for the following fields.

Field Description IP (Group of Fields) - IP Version
Select the IP version:
- IPv4
- IPv6
- IP Flags
Select whether data packets can be fragmented: - Don't Fragment
- More Fragments
- DSCP
Click the  Add icon to add a differentiated services code point (DSCP) value.
TTL (Group of Fields) - Condition
Select the TTL condition to use for the match.The TTL is the number of hops that a packet can travel before it is discarded and indicates the lifespan of a packet. The condition can be one of the following boolean values: - Equal to
- Greater than or equal to
- Less than or equal to
- Value
Enter the value for the TTL. Others (Group of Fields) - Schedules
Select a schedule to set the time and frequency at which the rule is in effect. Click + Schedule to create a new schedule.
- + Schedule
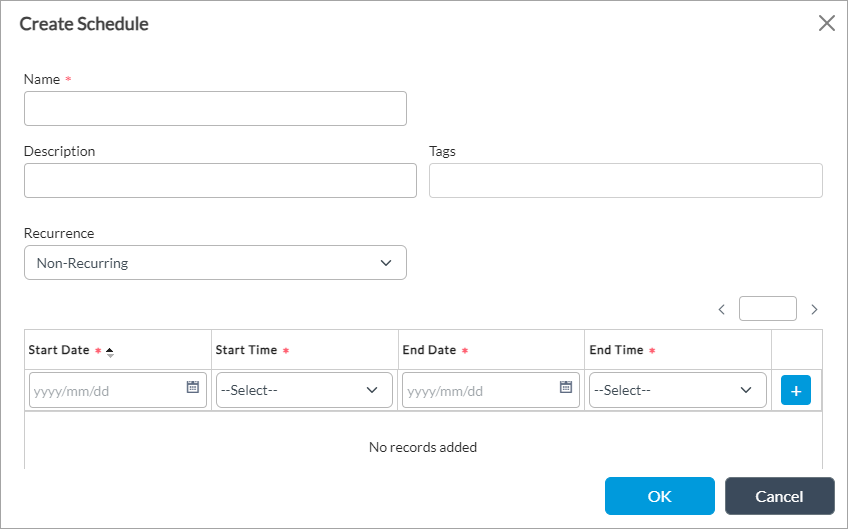
Click to create a schedule. In the Create Schedule popup window, enter information for the following fields.

- Name (Required)—Enter a name for the schedule.
- Description—Enter a description for the schedule.
- Tags—Enter a keyword or phrase that allows you to filter the schedule name.
- Recurrence—Select Non-Recurring (for a one-time schedule), Daily, or Weekly.
- State Date, Start Time, End Date, and End Time (Required)—Enter or select the starting and ending date and time for the schedule. Then click the
 Add icon.
Then, click OK.
For more information, see Configure Schedule Objects.
Services (Group of Fields) - Service List
Select the services to allow or block. Click the  Add icon to select a service from the drop-down list. The list includes predefined and user-defined services. A service is defined based on the destination address and port.
- + Service
Click to create a service. In the Add Service popup window, enter information for the following fields.

- Name (Required)—Enter a name for the service.
- Description—Enter a description for the service.
- Tags—Enter a keyword or phrase that allows you to filter the service name.
- Protocol (Required)—Click and enter a protocol name in the second Protocol field.
- Protocol Value—Click and enter a protocol number in the second Protocol Value field.
- Port Range—Click and in the second Port field, enter a source or destination port number.
- Source/Destination Port—Click and enter a port number in the Source Port and Destination Port fields.
- ICMP—Click to enter ICMP Type and ICMP Code fields.
Then, click OK.
For more information, see Configure Service Objects.
- Select the Enforce tab to define the actions to take on the packets that match the rule. Enter information for the following fields.

Field Description Action Setting Select an action to take for packets that match the DoS protection policy rule:
- Allow—Permit the packets.
- Deny—Drop the packets.
- Protect—Enforce protection on the packets defined in the DoS protection profile that match the rule. These packets are compared with the configured threshold rates to determine whether to trigger an alarm, activate another action, or drop a packet when the threshold rate is exceeded.
DDos Profile (Group of Fields) - Aggregate Profile
Select an aggregate profile that you configured in Configure a DoS Protection Profile, above. Click + Add New to add a new DoS profile. - Classified Profile
Select the classified profile that you configured in Configure a DoS Protection Profile, above. Click + Add New to add a new DoS profile. Logging Setting (Group of Fields)
- LEF Profile
Select a LEF profile. DoS logs are forwarded to the active collector of the LEF profile. For information about configuring a LEF profile, see Configure Log Export Functionality. For information about associating a LEF profile to the configuration of a feature or service, see Apply Log Export Functionality. - Default Profile
Click to have the profile be the default LEF profile. - Click OK.
Display DoS Policy Statistics
To view statistics about the number of packets that have matched a DoS policy rule and hence had a policy action taken on them:
- Select the Administration tab in the top menu bar.
- Select Appliances in the left menu bar.
- Select a device name in the main panel. The view changes to Appliance view.
- Select the Monitor tab in the top menu bar.
- Select the Provider Organization > Services tab.
- Select NGFW > DoS Policies and select a DoS policy from the drop-down. The DoS policy statistics display.

- Click a rule name to view its configuration.

Monitor DoS Threats
To monitor the DoS threats that are occurring in your network, view DoS threat monitoring reports:
- In Director view, select the Analytics tab from the top menu bar. The view changes to Analytics view.
- Select Home
> Security > Threats in the left menu bar to view the security threats dashboard. For more information, see Security Dashboard.
- Select the DoS tab to display information about the top DoS threats.

- Drill down to display detailed DoS logs matching the drill key.

- Select Home
> Logs > DoS in the left menu bar to display DoS threat logs.
Supported Software Information
Releases 20.2 and later support all content described in this article, except:
- Releases 21.2.1 and later support configuring rule order for DoS policy rules.
