Configure DNS Filtering
![]() For supported software information, click here.
For supported software information, click here.
Domain Name System (DNS) filtering allows you to control access to websites, webpages, and IP addresses, to provide protection from malicious websites, such as known malware and phishing sites.
To use DNS filtering, you create a DNS-filtering profile and then associate it with an access policy. In a DNS-filtering profile you can configure the following components to use to filter DNS requests:
- Deny lists—Define the URLs and IP addresses of DNS requests for which access is blocked, and define the action to take when a URL or an IP address matches. Deny lists are sometimes referred to blacklists.
- Allow lists—Define the URLs and IP addresses of DNS requests to which to explicitly allow access. Allow lists are sometimes referred to as whitelists.
- Query-based actions—Define rules for DNS operation codes (opcodes), which are the commands that are sent to DNS servers to have them perform an action.
- Reputation-based actions—Define how to handle DNS requests from newly observed website domains.
- Detection of DNS tunneling—Define parameters for identifying DNS tunneling, which is a type of cyberattack that encodes the data from other programs or protocols in DNS queries and responses. An attacker can create a command-and-control channel with the infected device, extract data (information) from the infected device, and then insert malware or other data into the infected device using only DNS query and DNS response.
View the Predefined DNS-Filtering Profile
Versa provides a predefined DNS-filter profile called Versa Recommended profile. This profile includes IP filtering to block bad traffic and the Versa Recommended URL filter, which is called Corporate. For more information, see View Predefined URL-Filtering Profiles.
To view the predefined DNS-filtering profile:
- In Director view:
- Select the Administration tab in the top menu bar.
- Select Appliances in the left menu bar.
- Select a device name in the main panel. The view changes to Appliance view.
- Select the Configuration tab in the top menu bar.
- Select Objects and Connectors > Objects > Predefined > DNS Filters in the left menu bar.

- Click Versa Recommended to view details of the DNS filtering profile. The Edit DNS Filter popup window displays.

Create a DNS-Filtering Profile
- In Director view:
- Select the Configuration tab in the top menu bar.
- Select Devices > Devices in the horizontal menu bar.
- Select an organization in the left menu bar.
- Select the device in the main pane. The view changes to Appliance view.
- Select the Configuration tab in the top menu bar.
- Select Services > Next-Gen Firewall > Security > Profiles > DNS Filtering in the left menu bar.

- Click the + Add icon. In the Add DNS Filter popup window, enter information for the following fields.

Field Description Name
Enter a name for the DNS filter profile.
LEF Profile Select the LEF profile to use to log the actions related to DNS filtering. Either select a LEF profile in this field, or select the Default Profile box. For information about applying a LEF profile to a feature or service, see Apply Log Export Functionality.
Default Profile Click to use the default LEF profile. For information about configuring a default LEF profile, see Configure Log Export Functionality. - Select the Deny List tab to configure URLs and IP addresses of DNS requests for which access is blocked. Enter information for the following fields.
Field Description Deny List Actions
Select the action to take for domain names or IP addresses when denying (blocking) incoming DNS requests:
- Alert—Allow the DNS response and generate an entry in the DNS filtering log in Versa Analytics.
- Allow—Allow the DNS response without generating an entry in the DNS filtering log in Versa Analytics.
- Block—Block the DNS response and generate an entry in the DNS filtering log in Versa Analytics. No response page is displayed, and the user cannot continue with the website.
- Drop Packet—The browser waits for a response from the DNS server and then drops the packet. It is not possible to determine whether the packet was dropped because of a delayed response from the DNS server or because a firewall blocked access to the website.
- Drop Session—The browser waits for a response from the server and drops the session. It is not possible to determine whether the session was dropped because of a delayed response from the DNS server or because a firewall blocked access to the website.
- Reject—Send an ICMP unreachable message back to the client.
- Sinkhole—(For Releases 22.1.3 and later.) Return a false IP address to the URL, thus blocking a DNS sinkhole. A DNS sinkhole spoofs DNS servers to prevent the resolution of the hostnames associated with URLs. This action can help you identify infected hosts in a network if a firewall is unable to find the original source IP address of DNS request sender. Sinkhole malware DNS queries create responses to the client host queries directed at malicious domains and try to connect to a sinkhole IP address instead of connecting to malicious domains. You can check the traffic logs to identify infected hosts.
You can enable deny actions in DNS filtering using either predefined or user-defined actions. For user-defined actions, the action type must be either DNS or All. For more information, see Configure User-Defined Actions.
Pattern
Click the
 Add icon to add a regular expression (regex) for matching a domain name or an IP address to block. Note that if the pattern matches the same domain name or IP address in a deny list and an allow list, the action in the deny list takes precedence.
Strings
Click the
 Add icon to add a complete string for matching a domain name or IP address to block. Note that if the string matches the same domain name or IP address in a deny list and an allow list, the action in the deny list takes precedence.
 -
Select the Allow List tab to configure URLs and IP addresses of DNS requests for which access is explicitly allowed. Enter information for the following fields.

Field Description Enable Logging Click to log information about the allowed domain names and IP addresses. Pattern Click the
 Add icon to add a regular expression (regex) pattern for matching a domain name or an IP address to allow. Note that if the pattern matches the same domain name or IP address in a deny list and an allow list, the action in the deny list takes precedence.
Strings
Click the
 Add icon to add a complete domain name for matching a domain name or IP address to allow. Note that if the string matches the same domain name or IP address in a deny list and an allow list, the action in the deny list takes precedence.
 -
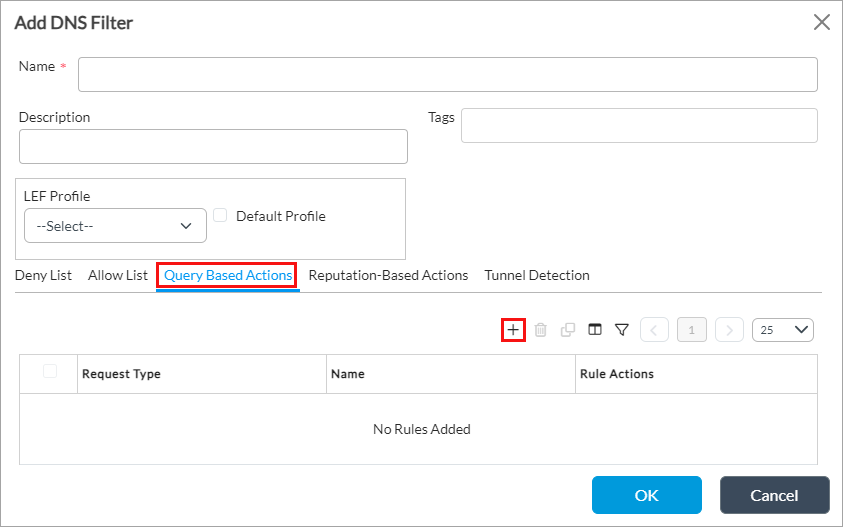
Select the Query-Based Actions tab to define rules for DNS operation codes (opcodes), which are commands that are sent to have the DNS server perform an action.
-
Click the + Add icon, and in the Add Query-Based Actions popup window, enter information for the following fields.

Field Description Name Enter a name for the query-based action. Rule Actions Select the action to take on the DNS request:
-
Alert—Allow the DNS response and generate an entry in the DNS filtering log in Versa Analytics.
-
Allow—Allow the DNS response and do not generate an entry in the DNS filtering log in Versa Analytics.
-
Block—Block the DNS response and generate an entry in the DNS filtering log in Versa Analytics. No response page is displayed, and the user cannot continue with the website.
-
Drop Packet—The browser waits for a response from the DNS server and then drops the packets. It is not possible to determine whether the packet was dropped because of a delayed response from the DNS server or because a firewall blocked access to the website.
-
Drop Session—The browser waits for a response from the server and drops the session. It is not possible to determine whether the session was dropped because of a delayed response from the DNS server or because a firewall blocked access to the website.
-
Reject—Send an ICMP unreachable message back to the client.
-
Sinkhole—(For Releases 22.1.3 and later.) Return a false IP address to the URL, thus blocking a DNS sinkhole. A DNS sinkhole spoofs DNS servers to prevent the resolution of the hostnames associated with URLs. This action can help you identify infected hosts in a network if a firewall is unable to find the original source IP address of DNS request sender. Sinkhole malware DNS queries create responses to the client host queries directed at malicious domains and try to connect to a sinkhole IP address instead of connecting to malicious domains. You can check the traffic logs to identify infected hosts.
You can enable query-based actions in DNS filtering either predefined or user-defined. For more information, see Configure User-Defined Actions.
You can configure multiple rules.
Request Type Select the type of DNS opcode to which the rule applies:
- IQuery—Send a request for an inverse DNS query command.
- Notify—Send a request for a DNS notify command.
- Query—Send a request for a DNS query command.
- Status—Send a request for a DNS status command.
- Update—Send a request for a DNS update command.
For each request type, you must enter additional information, as described in the following steps.
-
-
For the IQuery request type, enter information for the following fields.

Field Description V4 (Group of Fields) Click to send an inverse query to IPv4 addresses and address groups. - Address
Click the  Add icon and select an IPv4 address record.
- Address Group
Click the  Add icon and select an IPv4 address group record.
V6 (Group of Fields) Click to send an inverse query to IPv6 addresses and address groups. - Address
Click the  Add icon and select an IPv6 address record.
- Address Group
Click the  Add icon and select an IPv6 address group record.
 -
For the Query request type, enter information for the following fields.
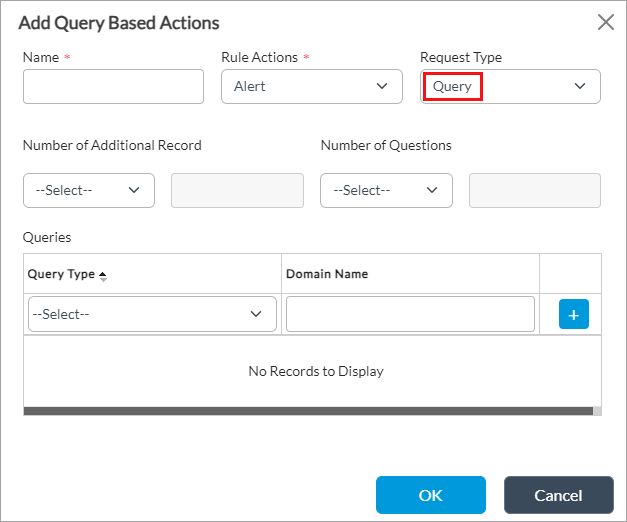
Field Description Number of Additional Records Enter the number of additional records and select one of the following operators:
- equal-to
- greater-than
- less-than
- not-equal-to
Number of Questions
Enter the number of questions and select one of the following operators:
- equal-to
- greater-than
- less-than
- not-equal-to
Queries (Group of Fields) - Query Type
Select the query type. - Domain Name
Enter the domain name. -
For the Notify or Status request type, click the + Add icon to add zone names.


-
For the Update request type, enter information for the following fields.

Field Description Number of Zone Records Enter the number of zone records and select one of the following operators:
- equal-to
- greater-than
- less-than
- not-equal-to
Number of Prerequisite Records Enter the number of prerequisite records and select one of the following operators:
- equal-to
- greater-than
- less-than
- not-equal-to
Number of Additional Records Enter the number of additional records and select one of the following operators:
- equal-to
- greater-than
- less-than
- not-equal-to
Number of Update Records Enter the number of update records and select one of the following operators:
- equal-to
- greater-than
- less-than
- not-equal-to
Domain Name Click the
 Add icon to add domain names.
 -
Select the Reputation-Based Actions tab to define how to handle DNS requests from newly observed website domains. Enter information for the following fields.

Field Description Newly Observed Domains (Group of Fields) Configure how to handle requests from newly observed domains. - Duration
Enter the time period (in hours) that identifies a newly observed domain. This value is compared to the number of hours between the time that the DNS request was received and the time that the domain was first observed:
- If the configured duration value is higher, the domain is newly observed and is subject to the action in the Action field.
- If the configured duration value is lower, the DNS request from the domain is allowed.
Range: 1 through 168 hours
- Action
Action to take on the newly observed domain:
-
Alert—Allow the DNS response and generate an entry in the DNS filtering log in Versa Analytics.
-
Allow—Allow the DNS response and do not generate an entry in the DNS filtering log in Versa Analytics.
-
Block—Block the DNS response and generate an entry in the DNS filtering log in Versa Analytics. No response page is displayed, and the user cannot continue with the website.
-
Drop Packet—Have the browser wait for a response from the DNS server and then drop the packet. It is not possible to determine whether the packet was dropped because of a non-responsive DNS server or because a firewall blocked access to the website.
-
Drop Session—Have the browser waits for a response from the server and then drop the session. It is not possible to determine whether the session was dropped because of a non-responsive DNS server or because a firewall blocked access to the website
-
Reject—Send an ICMP unreachable message back to the client.
-
Sinkhole—(For Releases 22.1.3 and later.) Return a false IP address to the URL, thus blocking a DNS sinkhole. A DNS sinkhole spoofs DNS servers to prevent the resolution of the hostnames associated with URLs. This action can help you identify infected hosts in a network if a firewall is unable to find the original source IP address of DNS request sender. Sinkhole malware DNS queries create responses to the client host queries directed at malicious domains and try to connect to a sinkhole IP address instead of connecting to malicious domains. You can check the traffic logs to identify infected hosts.
You can enable reputation-based actions in DNS filtering either predefined or user-defined actions. For more information, see Configure User-Defined Actions.
IP Filtering Select an IP-filtering profile to use to evaluate the resolved IP addresses and destination DNS server associated with the domain. The action taken based on the IP-filtering profile applies to the session. URL Filtering Select the URL-filtering profile to use to evaluate domain names and common names in DNS request and response messages. The action taken based on the URL-filtering profile applies to the session.
- (For Releases 22.1.3 and later.) Select the Tunnel Detection tab, and then enter information for the following fields.
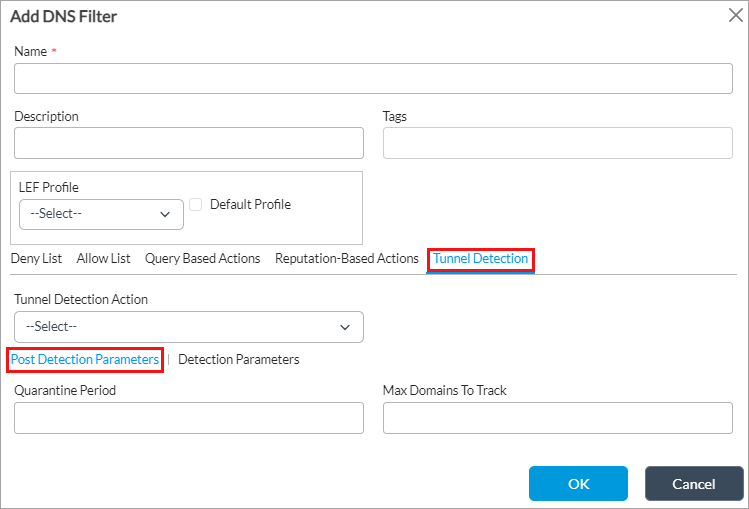
Field Description Tunnel Detection Action Action to take when DNS tunneling is detected:
- Allow—Allow the DNS response and do not an entry in the DNS filtering log in Versa Analytics.
- Alert—Allow the DNS response and generate an entry in the DNS filtering log in Versa Analytics.
- Block—Block the DNS response and generate an entry in the DNS filtering log in Versa Analytics. No response page is displayed, and the user cannot continue with the website.
- Drop Packet—Have the browser wait for a response from the DNS server and then drop the packet. It is not possible to determine whether the packet was dropped because of a non-responsive DNS server or because a firewall blocked access to the website.
- Drop Session—Have the browser waits for a response from the server and then drop the session. It is not possible to determine whether the session was dropped because of a non-responsive DNS server or because a firewall blocked access to the website
- Reject—Send an ICMP unreachable message back to the client.
- Sinkhole—(For Releases 22.1.3 and later.) Return a false IP address to the URL, thus blocking a DNS sinkhole. A DNS sinkhole spoofs DNS servers to prevent the resolution of the hostnames associated with URLs. This action can help you identify infected hosts in a network if a firewall is unable to find the original source IP address of DNS request sender. Sinkhole malware DNS queries create responses to the client host queries directed at malicious domains and try to connect to a sinkhole IP address instead of connecting to malicious domains. You can check the traffic logs to identify infected hosts.
Post-Detection Parameters (Tab) - Quarantine Period
Enter how long to quarantine a domain after a DNS tunnel has been detected.
Default: 14400 minutes (24 hours)- Maximum Domains To Track
Enter the maximum number of domains to track for DNS tunneling.
Default: 128 - Select the Detection Parameters, and enter information for the following fields.

Field Description Frequency-Based Detection
Click to detect DNS tunneling based on the number of requests, the number of subdomains per base domain, and the number of DNS requests for uncommon DNS request types. For more information, see Step 16, below. Invalid Character Detection
Click to detect DNS tunneling based on the invalid (non-RFC) characters that are present in the DNS requests. When you enable invalid character-based detection, the configured action is taken directly on the DNS requests when the non-RFC character is found in the FQDN. Also note that these domains are not quarantined. - On the Tunnel Detection tab, if you select the Detection Parameters tab and click Frequency-Based detection, configure parameters for detecting the frequency of DNS tunneling based on the frequency of the DNS requests. Enter information for the following fields.

Field Description Maximum Domains To Track
Enter the maximum number of domains to track in parallel for DNS tunneling.
Default: 16384Maximum IP To Track Enter the maximum number of source IP addresses per domain to track for DNS tunneling.
Default: 32Detection Window
Set the length of time window to use to detect DNS tunneling.
Default: 10 minutesRepetitive FQDN Limit
Enter the maximum number of repeating DNS requests for an FQDN per source that are allowed within the detection time window.
Default: 400Uncommon Requests Limit
Enter the maximum number of uncommon DNS requests per source that are allowed within the detection time window.
Default: 80URL Reputation
Set the URL reputation to ignore tunnel detection for FQDNs having a URL reputation that is higher than what configured:
- Low risk
- High risk
- Moderate risk. This is the default.
- Suspicious
- Trustworthy
Default: Moderate risk
Include Domains
Click and then click the  Add icon to add user-defined domains to include in the top-level domain database.
Exclude Domains
Click and then click the  Add icon to add user-defined domains to exclude from the top-level domain database.
Common Query Types
Click and then click the
 Add icon to select the DNS resource record (RR) types to query:
- A—Host address
- A6—A6
- AAAA—IPv6 address
- AFSDB—AFS database location
- ALL—All resource record types
- APL—Address prefix list
- ATM—ATM address
- CERT—Certificates
- CNAME—Canonical name for an alias
- DHCID—DHCP ID
- DNSKEY—DNS key
- DS—Delegation signer
- EID—Endpoint identifier
- GPOS—Geographical position
- HINFO—Host information
- HIP—Host identity protocol
- ISDN—ISDN address
- ISECKEY*—IPsec key
- IXFR—Incremental transfer
- KEY—Security key
- KX—Key exchanger
- LOC—Location information
- MAILA—Mail agent route records
- MAILB—Mailbox-related route records (MB, MG, or MR)
- MB—Mailbox domain name
- MD—Mail destination
- MF—Mail forwarder
- MG—Mail group member
- MINFO—Mailbox or mail list information
- MX—Mail exchange
- NAPTR—Naming authority pointer
- NIMLOC—Nimrod locator
- NINFO—Identical to TXT RR [RR56]
- NS—Authoritative name server
- NSAP-PTR—Domain name pointer for an NSAP style
- NSEC—Authenticated denial of existence
- NSEC3—Authenticated denial of existence
- NSEC3PARAM—NSEC3 parameters
- NULL—Null resource record
- NXT—Next domain
- OPR
- PTR—Domain name pointer
- PX—X.400 mail mapping information
- RKEY—Record key
- RP—Responsible person
- RRSIG—Resource resource digital signature
- RT—Route through
- SIG—Security signature
- SINK—Kitchen sink
- SOA—Marks the start of a zone of authority
- SPF—Sender policy framework
- SRV—Server selection
- SSHFP—SSH key fingerprint
- TALINK—Trusted anchor link
- TKEY—Transaction key
- TSIG—Transaction signature
- TXT—Text strings
- WKS—Well-known service description
- X25—X.25 PSDN address
Default: A, AAAA, and A6
Global Average FQDN Size
Enter the global mappings on which to detect DNS tunneling based on the average size of the subdomain and the maximum number of subdomains per base domain. You can configure up to six mappings.
- Average Size, Maximum FQDNs
Configure global mapping for the average size of the subdomain and the maximum number of subdomains per base domain. You can configure up to six mappings. The following are the default values:
- FQDN size—1, maximum number of FQDNs—250
- FQDN size—20, maximum number of FQDNs—200
- FQDN size—30, maximum number of FQDNs—150
- FQDN size—40, maximum number of FQDNs—100
- FQDN size—50, maximum number of FQDNs—50
- FQDN size—60, maximum number of FQDNs—30
Per-IP Average FQDN Size Enter per-single-source IP address mappings on which to detect DNS tunneling based on the average size of the subdomains and number of subdomains from single source IP address. You can configure up to six mappings. Average Size, Maximum FQDNs Configure the average size of the subdomains and the maximum number of subdomains from a single source IP address mapping. You can configure up to six mappings. The following are the default values:
- FQDN size—1, maximum number of FQDNs—200
- FQDN size—20, maximum number of FQDNs—160
- FQDN size—30, maximum number of FQDNs—120
- FQDN size—40, maximum number of FQDNs—80
- FQDN size—50, maximum number of FQDNs—50
- FQDN size—60, maximum number of FQDNs—30
- Click OK.
- Enable DNS filtering in the security access policy rule to enforce DNS filtering. For more information, see Configure Access Rules in Configure NGFW.
Apply a DNS-Filtering Profile in an Access Policy
You can apply a predefined or custom DNS-filtering profile to a rule in a security access policy. To define and configure a security access policy, see Configure Security Access Policy Rules.
To apply a DNS-filtering profile to an access policy rule:
- In Director view:
- Select the Administration tab in the top menu bar.
- Select Appliances in the left menu bar.
- Select a device name in the main panel. The view changes to Appliance view.
- Select the Configuration tab in the top menu bar.
- Select Services > Next-Gen Firewall > Security > Policies in the left menu bar, and select the Rules tab.

- Select an access policy rule. The Edit Rule popup window displays.
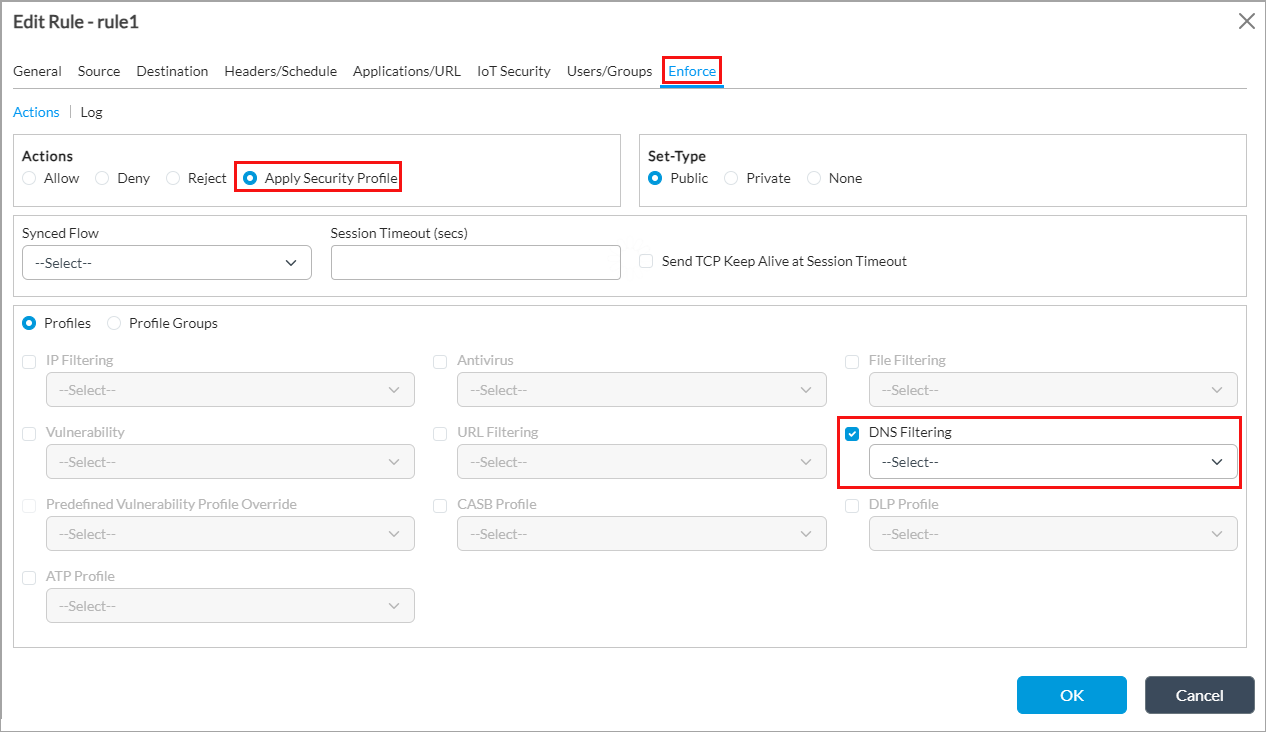
- Select the Enforce tab.
- In the Actions group of fields, click Apply Security Profile.
- Click Profiles, and then click DNS Filtering and select the DNS-filtering profile profile to use for the access policy rule. The list displays the predefined and custom antivirus profiles. For more information about predefined DNS filtering profile, see View Predefined DNS Filtering Profile above.
- If you have created profile groups, click Profile Groups, and then click DNS Filtering and select the DNS-filtering profile profile to use for the access policy rule. The list displays the predefined and custom DNS-filtering profiles. For more information, see Configure Security Profile Groups.
- Click OK.
Monitor DNS Filtering
To monitor the DNS filtering that you associate with an access policy, you view the statistics about where and when the policy is used. For more information, see Monitor VOS Device Services.
To monitor DNS-filtering profiles:
- In Director view:
- Select the Administration tab in the top menu bar.
- Select Appliances in the left menu bar.
- Select a device name in the main panel. The view changes to Appliance view.
- Select the Monitor tab in the top menu bar.
- Select a tenant in the left menu bar.
- Select the Services tab.
- Select NGFW > DNS Filtering. The DNS filtering statistics display.

Display DNS-Filtering Threat Logs
To display the DNS-filtering threat logs:
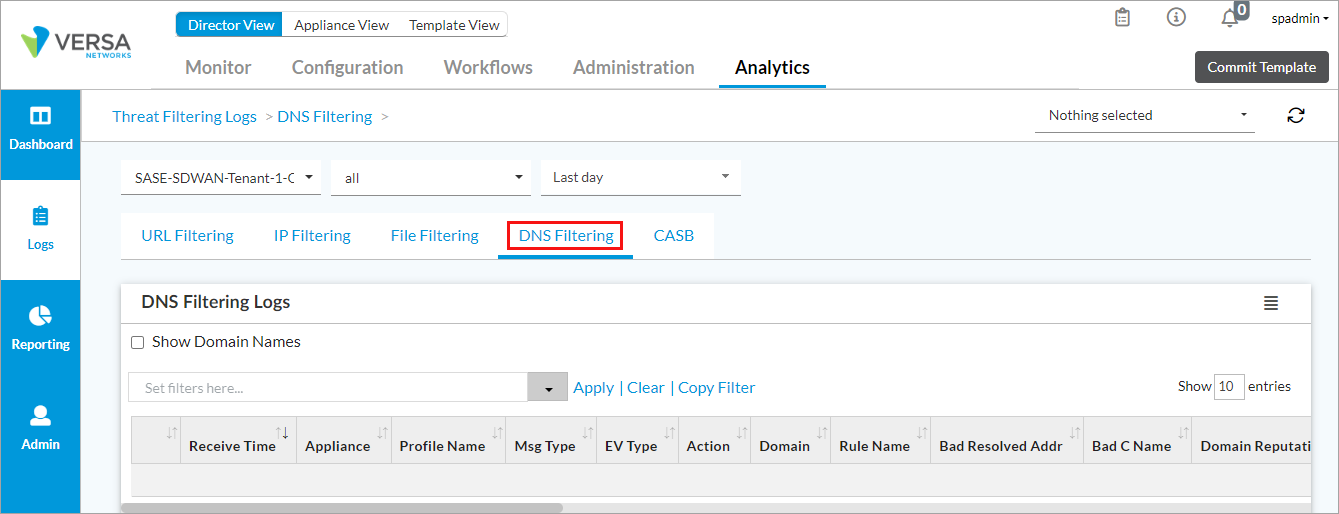
- In Director view, select the Analytics tab from the top menu bar. The view changes to Analytics view.
- Select Home > Logs > Threat Filtering in the left menu bar.
- Select the DNS Filtering tab to display information about the DNS filtering threat logs.
Supported Software Information
Releases 20.2 and later support all content described in this article, except:
- Releases 22.1.3 and later allow configuration of tunnel detection parameters in a DNS-filtering profile and the sinkhole action.
Additional Information
Apply Log Export Functionality
Configure DNS Proxy
Configure DNS Servers
Configure IP Filtering
Configure Log Export Functionality
Configure NGFW
Configure Security Profile Groups
Configure Stateful Firewall
Configure URL Filtering
Configure User and Group Policy
Configure User-Defined Actions
Monitor VOS Device Services
