Configure DHCP Snooping
![]() For supported software information, click here.
For supported software information, click here.
You can configure Dynamic Host Control Protocol (DHCP) snooping on Layer 2 devices to identify and monitor unauthorized DHCP servers and prevent them from offering IP addresses to DHCP clients.
DHCP snooping classifies ports as either trusted or untrusted. A trusted port is one that is identified as having legitimate DHCP servers attached to it and is thus allowed to send DHCP requests and acknowledgements. An untrusted port is one that can only forward DHCP requests. By default, Layer 2 ports are untrusted. You must configure them to be DHCP trusted ports.
When you configure an incoming port as a DHCP trusted port, the port accepts DHCP response and acknowledgement (ACK) packets from the DHCP server. If the incoming port is not a trusted port, DHCP snooping does not forward DHCP server packets to clients. Instead, the port drops the packets and raises an alarm.
DHCP snooping inspects DHCP messages sent from untrusted hosts and builds a DHCP snooping table (also called a binding table), which lists the bindings between IP addresses and MAC addresses. The switch then uses the entries in the DHCP snooping table to filter DHCP server messages from untrusted ports so that it can protect the integrity of legitimate DHCP servers.
A Versa Operating System™ (VOS™) device validates all DHCP packets that it receives from both the client and DHCP server before forwarding them to the DHCP server.
Enable Layer 2 Services
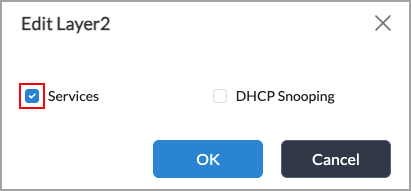
Before you configure DHCP snooping, you must enable Layer 2 services at the organization level.
To enable Layer 2 services:
- In Director view:
- Select the Administration tab in the top menu bar.
- Select Appliances in the left menu bar.
- Select an appliance in the main pane. The view changes to Appliance view.
- Select Configuration in the top level menu.
- Select Others > Organization > Settings in the left menu bar.

-
Click the
 Edit icon in the Layer 2 pane. The Edit Layer 2 popup window displays.

- Click Services.
- Click OK.
Configure DHCP Snooping for a Virtual Switch
For Releases 22.1.4 and later.
You can configure DHCP snooping for virtual switches and bridge domains. If you configure DHCP snooping for both, the bridge domain configuration takes precedence.
To configure DHCP snooping for a virtual switch:
- In Director view:
- Select the Administration tab in the top menu bar.
- Select Appliances in the left menu bar.
- Select a device name in the main panel. The view changes to Appliance view.
- Select the Configuration tab in the top menu bar.
- Select Networking > Virtual Switches in the left menu bar. The main pane displays a list of virtual switches that are already configured.

- Click the
 Add icon. In the Configure Virtual Switch popup window, select the Virtual Switch Details tab, and then enter information for the following fields.

Field Description DHCP Snooping (Group of Fields) - Enable
Click to enable or disable DHCP snooping. - Verify MAC Address
Click to enable or disable MAC address verification. If you enable MAC address verification, if the switch receives a packet on an untrusted interface and the source MAC address and the DHCP client hardware address do not match, the packet is dropped. The source MAC address is in the Ethernet packet header, and the client hardware address is a field in the DHCP packet payload. - To configure DHCP snooping for a bridge domain, click the
 Add icon in the Bridge Domains field. The Add Bridge Domains popup window displays.

- Enter the information as described in Step 4, above.
- Click OK.
For more information about configuring virtual switches, see Configure a Virtual Switch with Bridge Domains and Bridge Interfaces.
Configure a DHCP Trusted Interface
- In Director view:
- Select the Administration tab in the top menu bar.
- Select Appliances in the left menu bar.
- Select a device name in the main panel. The view changes to Appliance view.
- Select the Configuration tab in the top menu bar.
- Select Networking > Interfaces in the left menu bar. The following screen displays.

- Select the ENet tab in the horizontal menu, and then click an enet interface. The Edit ENet Interface screen displays.

- Select the General tab, and then click DHCP Trusted.
- Click OK.
Monitor DHCP Snooping
For Releases 22.1.4 and later.
- In Director view, select the Monitor tab in the top menu bar.
- Select an organization in the Organization field.
- Select the Devices tab in the horizontal menu bar.
- Select a device in the main pane.
- Select the Networking tab in the horizontal menu bar, and then select DHCP Snooping. Select the Statistics tab to view DHCP snooping statistics. If you select the Statistics tab, a screen similar to the following displays.

- Select the Binding tab to view binding information.

Supported Software Information
Releases 22.1.3 and later support all content described in this article, except:
- Release 22.1.4 adds support for configuring DHCP snooping at the virtual switch and bridge domain levels; adds support for monitoring DHCP snooping.
