Configure IP Filtering
![]() For supported software information, click here.
For supported software information, click here.
Traffic passing through the network may have IP addresses that are associated with a bad reputation and that may cause security risk to your network. To block IP addresses based on IP address reputation and IP address metadata such as geolocation, you can configure IP address–filtering profiles and then associate them with security policy.
Versa Operating SystemTM (VOSTM) devices provide predefined IP reputations that you can use to create IP address–filtering profiles.
You can filter and control traffic based on IP address in the following ways:
- Security access policy enforcement based on address objects with fully qualified domain names (FQDNs)—You can define address objects based on the FQDN by specifying source and destination IP address objects in the match criteria in a security policy rule. The VOS device queries the DNS server for the domain names and caches the resolved IP addresses. When the VOS device processes traffic, the IP address matching is done using the cached resolved IP addresses. This type of filtering minimizes latency associated with real-time DNS lookups, thus improving performance.
- Security access policy enforcement based on address objects with dynamic addresses—You can define an address object based on dynamic addresses by specifying a dynamic source and destination IP address object in the match criteria in a security policy rule. The VOS device does not perform any operations on its own to resolve the dynamic address objects to IP addresses. Instead, the VOS device depends on an external mechanism that pushes the most accurate IP address list that corresponds to the dynamic object to the VOS device. This external mechanism makes a REST API call to the Director node, which then pushes the updates to the VOS device. When a VOS device is processing traffic, it matches IP addresses using the translated IP addresses that are part of the dynamic address object. This type of filtering minimizes latency associated with real-time DNS lookups, thus improving performance.
- IP filtering based on the reputation associated with an IP address and its geolocation—You can filter traffic based on IP reputation and IP address metadata (that is, geolocation). Versa Networks provides an IP reputation feed that is updated both daily and in real time. Additionally, you can populate an IP filtering profile with IP address deny lists or allow lists (sometimes called blacklists and whitelists) by using a custom script or an automated script that invokes REST APIs on the Director node.
IP address filters are based on the following IP address attributes:
- IP reputation—You can create IP-filtering profiles with the following predefined IP reputations:
- BotNets
- Denial of service
- Phishing
- Proxy
- Reputation
- Scanners
- Spam sources
- Web attacks
- Windows exploits
- Geolocation—Versa Networks provides a list of predefined regions that you can use to create IP-filtering profiles based on geolocation.
You define IP-filtering profiles to filter traffic based on the IP address attributes. Each IP-filtering profile object can specify the following:
- Allow lists for IP addresses
- Deny lists for IP addresses
- DNS reverse lookup configurations
- Rules for geolocation-based actions
- Rules for IP reputation–based actions
You can match the IP address based on the following match criteria:
- Destination IP address
- Source IP address
- Source and destination IP address
- Source or destination IP address
You can enforce the following actions when a session's IP address matches the conditions in an IP-filtering profile:
- Allow
- Alert
- Drop packet
- Drop session
- Reset
You can also configure custom actions in an IP-filtering profile.
View Predefined IP Reputations
- In Director view:
- Select the Configuration tab in the top menu bar.
- Select Devices > Devices in the horizontal menu bar.
- Select an organization in the left menu bar.
- Select a device name in the main panel. The view changes to Appliance view.
- Select the Configuration tab in the top menu bar.
- Select Objects and Connectors > Objects > Predefined > IP Reputations to view the list of predefined reputations. The following table describes the predefined IP reputations.

IP Reputation Description Botnets Networks of private computers infected with malicious software and controlled as a group without the owner's knowledge. This category includes botnet command-and-control (C&C) software and infected zombie machines controlled by the bot's originator (the bot master). Denial of Service Type of cyberattack in which a device is flooded so that it cannot perform its normal operations. his category includes DoS, distributed denial of service (DDoS), anomalous syn flood attacks, and anomalous traffic detection. Network This IP reputation is deprecated and is visible only for backward compatibility. Phishing Fraudulent practice of sending emails purporting to be from reputable companies to induce people to reveal personal information, such as passwords and credit card numbers. This category includes IP addresses that hosting phishing sites and other kinds of fraud activities such as click fraud and gaming fraud. Proxy IP addresses that provide proxy services. Reputation Deny access from IP addresses known to be infected with malware. This category also includes IP addresses that have low webroot reputation index scores. This category prevents access from sources that have been identified as malware distribution points. Scanners All reconnaissance such as probes, host scanning, domain scanning, and password brute-force attacks. Spam Sources Tunneling spam messages through a proxy, anomalous SMTP activities, and forum spam activities. Web Attacks Cross-site scripting, iFrame injection, SQL injection, cross-domain injection, and domain password brute-force attacks. Windows Exploits Active IP addresses that offer or distribute malware, shell code, rootkits, worms, and viruses. - To display the reputation of an IP address, click the
 Look Up Support icon. In the Look Up URL popup window, enter information for the following fields.
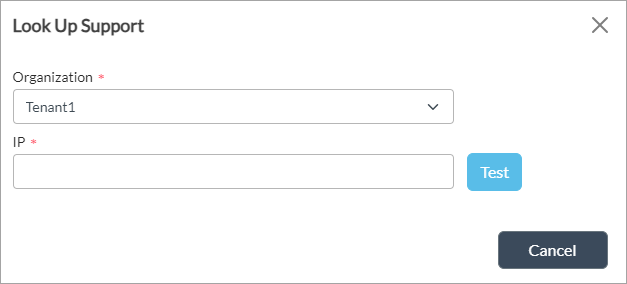
Field Description Organization Select the organization for which you want to look up the IP address. URL Enter the IP address whose reputation to look up. - Click Test. The Look Up Support popup window displays information about the IP address, including its reputation and geographical location. For example:

- Click Cancel.
View Predefined IP-Filtering Profiles
Versa provides a number of predefined IP-filtering profiles. The profile called Versa Recommended Profile includes filtering for destination IP addresses for botnets, DoS, phishing, proxy, reputation, scanners, spam sources, web attacks, and Windows exploits.
To view the predefined IP-filtering profiles:
- In Director view:
- Select the Configuration tab in the top menu bar.
- Select Devices > Devices in the horizontal menu bar.
- Select an organization in the left menu bar.
- Select a device name in the main panel. The view changes to Appliance view.
- Select the Configuration tab in the top menu bar.
- Select Objects and Connectors > Objects > Predefined > IP-Filtering Profile to view the list of predefined IP-filtering profiles. The following table describes the predefined IP-filtering profiles.

Field Description Block DoS Apply reputation-based actions for the botnets, DoS, network, reputation, and scanners. Block Bad Traffic Apply reputation-based actions for the botnets, DoS, network, phishing, proxy, reputation, scanners, spam sources, web attacks, and Windows exploits. Block Bots Apply reputation-based actions for the botnets, DoS, network, reputation, and scanners. Block Scanners Apply reputation-based actions for the scanners. Block Spam Apply reputation-based actions for the spam sources. Block Window Exploits Apply reputation-based actions for the Windows exploits. Web Protection Apply reputation-based actions for the botnet, DoS, phishing, reputation, spam sources, and web attacks. Versa Recommended Profile Apply reputation-based actions for destination IP addresses for botnets, DoS, phishing, proxy, reputation, scanners, spam sources, web attacks, and Windows exploits.
Configure Custom IP Filters and Profiles
You can configure IP filters with actions that allow you to customize messages on captive portal pages or set an override PIN. You apply the filters when you configure custom IP-filtering profiles.
Configure Custom IP Filters
To configure a custom IP filter, create a captive portal action and then associate it with an IP-filtering profile:
- In Director view:
- Select the Configuration tab in the top menu bar.
- Select Devices > Devices in the horizontal menu bar.
- Select an organization in the left menu bar.
- Select a device name in the main panel. The view changes to Appliance view.
- Select the Configuration tab in the top menu bar.
- Select Configuration > Objects & Connectors > Custom Objects > User Defined Actions in the left menu bar.
- Click the
Add icon. In the Add Action popup window, enter information for the following fields.
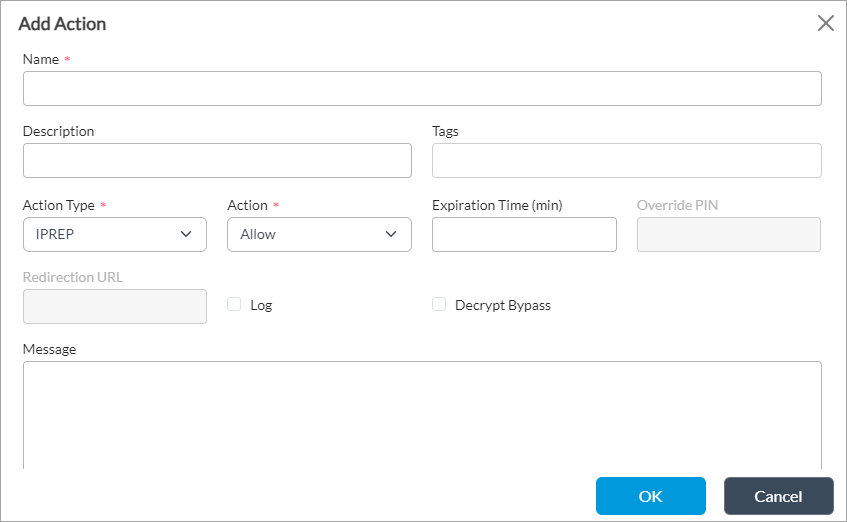
Field Description Name Enter a name for the IP-filtering action. The name is an alphanumeric string and can contain underscores (_) and hyphens (-). It cannot contain spaces or other special characters. Description Enter a text description for the IP-filtering action. Tags Enter a keyword or phrase that allows you to filter the IP-filtering action. This is useful when you have many actions and want to view those that are tagged with a particular keyword.
Action Type Select the action to take when the page is redirected:
- All
- IP reputation (IPREP)
Action Select the action to take when a user is redirected to a captive portal:
- Allow—Allow the IP address and do not generate an entry in the IP-filtering log.
- Ask—The browser presents an information page that prompts the user to either cancel the operation by clicking Cancel or continue with the operation by clicking OK (for HTTP and HTTPS).
- Block—Block the IP address and generate an entry in the IP-filtering log. No response page is displayed, and the user cannot continue with the website.
- Custom redirection—The browser redirects the user to the specified URL. Session information such as the URL requested by the user, the IP address of the HTTP/HTTPS request, and URL-filtering profile to process are included in the redirected URL to the web server that hosts the redirected URL page. After the redirection occurs, the external web server, not the VOS device, handles the captive portal functionality. You can customize the session information parameters that are passed to the web server. For more information, see Modify Captive Portal Settings.
- Drop packet—The browser waits for a response from the server and then drops the packets. It is not possible to determine whether the packet was dropped because of a delayed response from the server or because a firewall blocked access to the website.
- Drop session—The browser waits for a response from the server and drops the session. It is not possible to determine whether the session was dropped because of a delayed response from the server or because a firewall blocked access to the website.
- Inform—The browser presents an information page that prompts the user to continue after clicking OK (for HTTP and HTTPS).
- Justify—The browser presents an information page that prompts the user to either cancel the operation by clicking Cancel or continue with the operation after entering a justification message and clicking OK (for HTTP and HTTPS).
- Override—The browser prompts the user to enter a PIN (4 to 6 digits). This action generates an entry in the URL-filtering log.
- Reset client—The host responds by sending a TCP Reset packet to the client, and the browser displays an error message indicating that the connection has been reset. It is not possible to determine whether the web server reset the connection or the firewall reset the session.
- Reset client and server—The host responds by sending a TCP Reset packet to both the client and server, and the browser displays an error message indicating that the connection has been reset. It is not possible to determine whether the web server reset the connection or the firewall reset the session.
- Reset server—The host responds by sending a TCP Reset packet to the server. The browser waits for a response from the server and then drops the session. It is not possible to determine whether the session was dropped because of a delayed response from the server or because a firewall blocked access to the website.
Log Click to log IP-filtering actions. If you do not enable logging, the custom message that you enter in the Message field is not displayed in the Analytics log display. Expiration Time Enter how often to redirect a user to the captive portal, in minutes. When a user first enters an IP address and is redirected to a captive portal page, the VOS device creates a cache entry, which expires after a global expiration time. While the cache entry is active, the device does not enforce the captive portal action, and users can view the webpage at the initial URL and at all URLs that belong to the same URL category, without seeing the captive portal page, with one exception. If the captive portal action is Block, all URLs are redirected to the Block page, regardless of the expiration time. For more information about the global expiration time setting, see Modify Captive Portal Settings.
Range: 1 through 65535 minutes
Default: 30 minutesOverride PIN For the Override action, enter the PIN value, which is a 4-, 5-, or 6-digit number. Redirection URL For the Custom Redirection action, enter the URL to which to redirect the user.
Decrypt Bypass Click to disable SSL encryption for matching traffic, to allow you to define websites that are not subject to decryption. Message Enter a message to display on the captive portal page. - Click OK.
Configure Custom IP-Filtering Profiles
When the predefined IP-filtering profiles do not meet your needs, you can configure custom profiles.
To configure a custom IP-filtering profile:
- In Director view:
- Select the Configuration tab in the top menu bar.
- Select Devices > Devices in the horizontal menu bar.
- Select an organization in the left menu bar.
- Select a device name in the main panel. The view changes to Appliance view.
- Select the Configuration tab in the top menu bar.
- Select Services > Next-Gen Firewall > Security > Profiles > IP Filtering in the left menu bar.
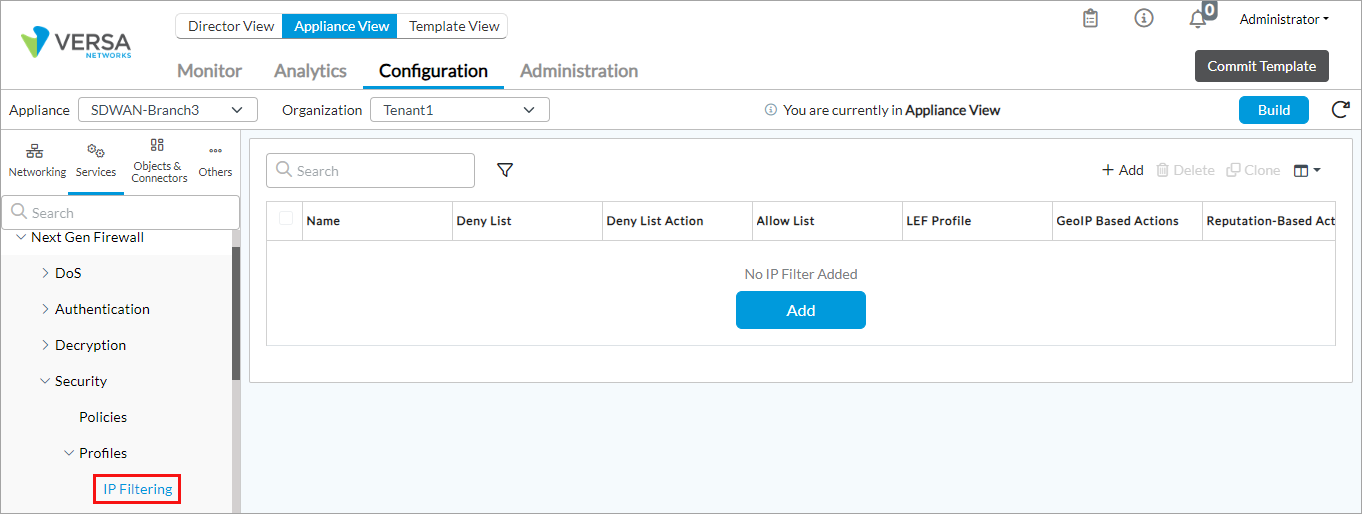
- Click the + Add icon. In the Add IP Filter popup window, enter information for the following fields.

Field Description Name Enter a name for the IP-filtering profile.
Value: Text string from 1 through 255 characters
Default: NoneDescription Enter a text description for the IP-filtering profile.
Value: Text string from 1 through 255 characters
Default: NoneTags Enter a keyword or phrase to filter the IP-filtering profile name. Tags are useful when you have many profiles and want to view those that are tagged with a particular keyword.
Value: Text string from 1 through 255 characters.
Default: NoneDefault Action Select the default action for this profile. This action is enforced when you do not configure any deny list, allow list, geographic IP-based action, or reputation-based action. The following are the predefined actions:
- Alert—Allow the IP address, and generate an entry in the IP-filtering log.
- Allow—Allow the IP address, and do not generate an entry in the IP-filtering log.
- Drop Packet—The browser waits for a response from the server and then drops the packets. It is not possible to determine whether the packet was dropped because of a delayed response from the server or because a firewall blocked access to the website.
- Drop Session—The browser waits for a response from the server and drops the session. It is not possible to determine whether the session was dropped because of a delayed response from the server or because a firewall blocked access to the website.
- Reject—Send an ICMP unreachable message back to the client and resets the connection to the server.
For custom filters, select an IP-filtering action that you configured in Configure Custom IP Filters, which are displayed under User Defined.
LEF Profile Select an LEF profile to register IP-filtering logs for this profile. Logs are sent to the active collector of the LEF profile. For information about configuring a LEF profile, see Configure Log Export Functionality. For information about associating a LEF profile with a feature or service, see Apply Log Export Functionality. Default Profile Click to use the default LEF profile instead of the LEF profile from the previous field. For information about configuring a default LEF profile, see Configure Log Export Functionality. Prioritize URL Reputation Click to prioritize the URL reputation over the IP reputation. Instead of blocking the traffic in IP filtering based on reputation, traffic is further evaluated with URL filtering. URL reputation correlates with an actual website. When you configure an IP-filtering profile that blocks traffic based on IP reputation, some legitimate websites may be blocked. When the URL reputation meets the threshold you select in the Allow URL Reputation field, prioritizing URL reputation overrides the IP Reputation Action. For prioritizing of the URL reputation to work, for HTTP and HTTPS traffic, ensure that the security policy with which you associate the IP-filtering profile includes a URL-filtering profile for the HTTP/HTTPS traffic. For non-HTTP/HTTPS traffic, enable address reverse lookup, as discussed in Step 13, below. Allow URL Reputation When you use Prioritize URL Reputation, select the priority to assign to the URL reputation when traffic is evaluated:
- High risk (Priority 4)
- Moderate risk (Priority 3)
- Low risk (Priority 2)
- Suspicious (Priority 1)
- Trustworthy (Priority 0)—Ignore a website that is labeled as one with a bad reputation, or ignore an HTTP/SSL URL reputation check that indicates a bad IP reputation.
- Select the Deny List tab, and enter information for the following fields.
Field Description Deny List Actions Select the action to enforce when the IP-filtering profile encounters an IP address that is configured in deny list IP address or IP address group. The following are the predefined actions:
- Alert—Allow the IP address, and generate an entry in the IP-filtering log.
- Allow—Allow the IP address, and do not generate an entry in the IP-filtering log.
- Drop Packet—The browser waits for a response from the server and then drops the packets. It is not possible to determine whether the packet was dropped because of a delayed response from the server or because a firewall blocked access to the website.
- Drop Session—The browser waits for a response from the server and drops the session. It is not possible to determine whether the session was dropped because of a delayed response from the server or because a firewall blocked access to the website.
- Reject—Send an ICMP unreachable message back to the client and resets the connection to the server.
For custom filters, select an IP-filtering action that you configured in Configure Custom IP Filters, which are displayed under User Defined.
Match Type Select the match criteria for the IP address:
- Destination IP address
- Source IP address
- Source and destination IP address
- Source or destination IP address
IP Address Select to enforce the action for an individual IP address. Click  to add an IP address. The Add Address popup window displays. For more information, see Configure Address Objects.
IP Address Group Select to enforce the action for a group of IP addresses. Click  to add a group of IP addresses. The Add Address Group window displays. For more information about adding address group objects, see Configure Address Objects. For more information about uploading address files from the Add Address Group window, see Upload Address Files.
 - Click OK.
- Select the Allow List tab and enter information for the following fields.

Field Description Enable Logging Select to enable LEF logging of the allow-listed IP addresses. Match Type Select the match criteria for the IP address:
- Destination IP address
- Source IP address
- Source and destination IP address
- Source or destination IP address
IP Address Select to enforce the action for an individual IP address. Click  to add an IP address. The Add Address popup window displays. For more information, see Configure Address Objects.
IP Address Group Select to enforce the action on a group of IP addresses. Click  to add a group of IP addresses. The Add Address Group window displays. For more information about adding address group objects, see Configure Address Objects. For more information about uploading address files from the Add Address Group window, see Upload Address Files.
 - Click OK.
- Select the Geo IP-Based Actions tab.

- Click the + Add icon to add actions for geographical reputation-based IP filtering. In the Add Geo IP-Based Action popup window, enter information for the following fields.

Field Description Name Select the name of the geographical reputation-based IP-filtering profile. Action Select the action to enforce when the IP-filtering profile encounters an IP address or IP address group that has an unacceptable geographical reputation. The following are the predefined actions:
- Alert—Allow the IP address, and generate an entry in the IP-filtering log.
- Allow—Allow the IP address, and do not generate an entry in the IP-filtering log.
- Drop Packet—The browser waits for a response from the server and then drops the packets. It is not possible to determine whether the packet was dropped because of a delayed response from the server or because a firewall blocked access to the website.
- Drop Session—The browser waits for a response from the server and drops the session. It is not possible to determine whether the session was dropped because of a delayed response from the server or because a firewall blocked access to the website.
- Reject—Send an ICMP unreachable message back to the client and resets the connection to the server.
For custom filters, select an IP-filtering action that you configured in Configure Custom IP Filters, which are displayed under User Defined.
Match Type Select the match criteria for the IP address:
- Destination IP address
- Source IP address
- Source and destination IP address
- Source or destination IP address
Regions Select a geographical region.
- Click OK.
- Select the Reputation-Based Actions tab.

- Click the + Add icon. In the Add Reputation-Based Action popup window, enter information for the following fields.
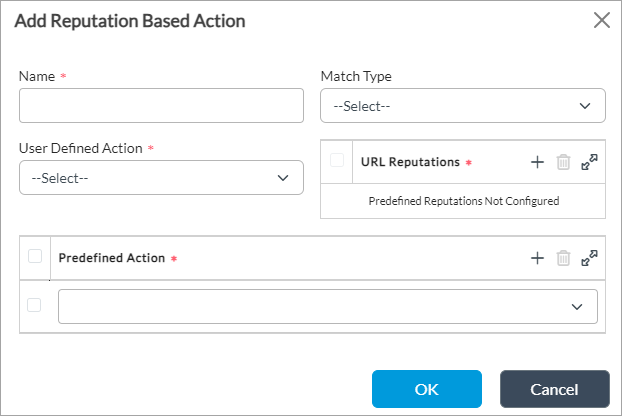
Field Description Name Select the name of the IP reputation-based IP-filtering profile. Action Select the action to enforce when the IP-filtering profile encounters an IP address or IP address group that has an unacceptable reputation. The following are the predefined actions:
- Alert—Allow the IP address, and generate an entry in the IP-filtering log.
- Allow—Allow the IP address, and do not generate an entry in the IP-filtering log.
- Drop Packet—The browser waits for a response from the server and then drops the packets. It is not possible to determine whether the packet was dropped because of a delayed response from the server or because a firewall blocked access to the website.
- Drop Session—The browser waits for a response from the server and drops the session. It is not possible to determine whether the session was dropped because of a delayed response from the server or because a firewall blocked access to the website.
- Reject—Send an ICMP unreachable message back to the client and resets the connection to the server.
For custom filters, select an IP-filtering action that you configured in Configure Custom IP Filters, which are displayed under User Defined.
Match Type Select the match criteria for the IP address:
- Destination IP address
- Source IP address
- Source and destination IP address
- Source or destination IP address
Reputations Click the
 Add icon and select a reputation:
- Botnets
- Denial of service
- Phishing
- Proxy
- Reputation
- Scanners
- Spam sources
- Web attacks
- Windows exploits
- Click OK.
- Select the Address Reverse Lookup tab to configure address reverse lookup, which performs a reverse lookup of an IP tuple (source IP address and destination IP address) and can then apply a URL-filtering profile on the reverse lookup domain. You can use this in conjunction with host reputation-based actions for non-HTTP or non-HTTPS traffic (for example, FTP traffic). Enter information for the following fields.
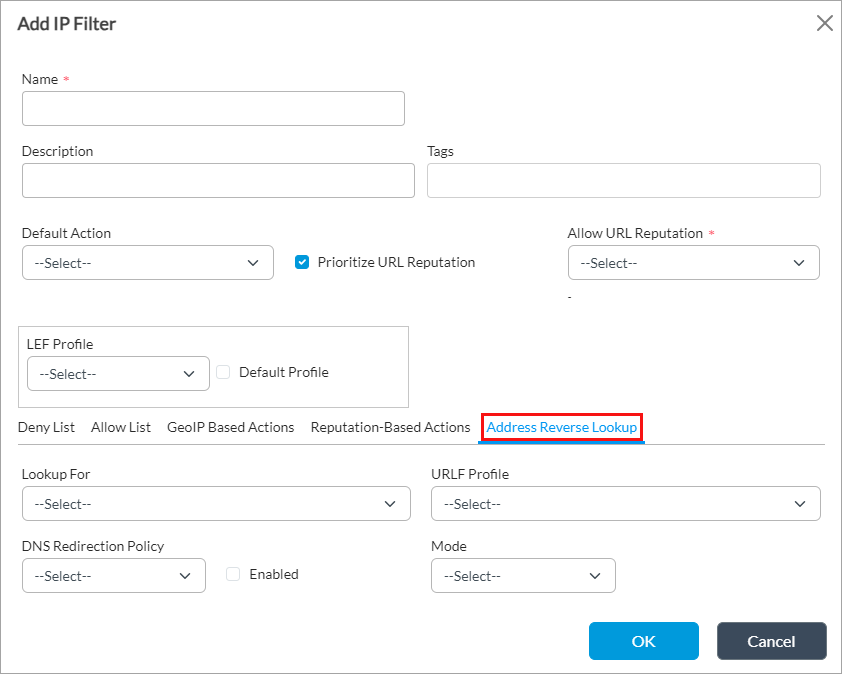
Field Description Lookup For Select the address type on which to perform a reverse lookup:
- Destination IP address
- Source IP address
- Source and destination IP address
URLF Profile Select the URL-filtering profile to associate with IP address reverse lookup.
- Click OK.
Apply an IP-Filtering Profile to an Access Policy
- In Director view:
- Select the Configuration tab in the top menu bar.
- Select Devices > Devices in the horizontal menu bar.
- Select an organization in the left menu bar.
- Select a device name in the main panel. The view changes to Appliance view.
- Select the Configuration tab in the top menu bar.
- Select Services > Next-Gen Firewall > Security > Policies in the left menu bar, and select the Rules tab.

- Select a security access policy rule in the table in the main pane. The Edit Rule popup window displays.

- Select the Enforce tab
- In the Actions group of fields, click Apply Security Profile.
- Click Profiles, and then click IP Filtering and select the IP-filtering profile to use for the access policy rule. The drop-down list displays the predefined and custom IP filtering profiles.
- If you have created profile groups, click Profile Groups, and then click IP Filtering and select the IP-filtering profile to use for the access policy rule. The drop-down list displays the predefined and custom IP -iltering profiles. For more information, see Configure Security Profile Groups.
- Click OK.
Monitor IP-Filtering Policies
You monitor IP-filtering policies to view the traffic flow details when a policy is used. For more information, see Monitor Device Services.
To monitor IP-filtering policies:
- In Director view:
- Select the Administration tab in the top menu bar.
- Select Appliances in the left menu bar.
- Select a device name in the main panel. The view changes to Appliance view.
- Select the Monitor tab in the top menu bar.
- Select the Provider Organization > Services tab.
- Select NGFW > IP Filtering and select User-Defined or Predefined in the drop-down list. The IP-filtering policy statistics displays.

Analyze IP-Filtering Threats
To monitor the IP-filtering threats that are occurring in your network, view IP filtering threat monitoring reports:
- In Director view, select the Analytics tab in the top menu bar. The view changes to Analytics view.
- Select Home
> Security > Threats in the left menu bar to view the security threats dashboard. For more information, see Security Dashboard.
- Select the IP tab to display information about the top IP-filtering actions.
- Drill down to display detailed IP logs matching the drill key.
- Select Home
> Logs > Threat Filtering in the left menu bar. Select the IP Filtering tab in the main pane.
Supported Software Information
Releases 20.2 and later support all content described in this article.
