Configure DHCP
![]() For supported software information, click here.
For supported software information, click here.
The Dynamic Host Configuration Protocol (DHCP) is a network management protocol used in IP networks to dynamically distribute IP address and other network configuration parameters for interfaces and services.
DHCP uses a client-server model. A DHCP server allows client devices to request IP addresses and networking parameters automatically, reducing the need for a network administrator or user to configure these settings manually. A DHCP relay agent is a device forwards DHCP messages between DHCP servers and clients when the DHCP clients and the DHCP server are located in different subnets.
You can configure a Versa Operating SystemTM (VOSTM) device to be a DHCP server (sometimes referred to as a local DHCP server) and to be a DHCP relay agent. You can also configure global DHCP properties that apply to local DHCP servers.
This article describes how to configure DHCP globally and how to configure a DHCP server and DHCP relay.
Configure DHCP Server Profiles
To configure a DHCP server, you first configure a profile to define the properties of the server, and then associate the profile with the server. You can also associate the profile with a global DHCP server to configure default profiles (for lease and options profiles only).
You can configure the following types of DHCP server profiles:
- DHCP lease profile
- DHCP options profile
- DHCP static mapping profile
- DHCP address pool
The following sections describe how to configure each type of profile.
Configure a DHCP Lease Profile
In a DHCP lease profile, you configure how long a dynamically assigned IP address is active, and you configure information about generating log messages. You can configure a DHCP profile for both DHCPv4 and DHCPv6. You can associate a DHCP lease profile with the global DHCP server and with a local DHCP server.
To configure a DHCP lease profile:
- In Director view:
- Select the Configuration tab in the top menu bar.
- Select Devices > Devices in the left menu bar.
- Select an organization in the left menu bar.
- Select a device in the main pane. The view changes to Appliance view.
- Select the Configuration tab in the top menu bar.
- Select Networking > DHCP > Server > Lease Profiles in the left menu bar, and then select either the V4 or V6 tab in the horizontal menu bar.

- Click the
 Add icon. In the Add Lease Profile popup window, enter information for the following fields.

Field Description Lease Profile Name (Required) Enter a name for the lease profile. Description Enter a text description for the lease profile. Tags Enter a keyword or phrase that allows you to filter the lease profiles. This is useful when you have many profiles and want to view those that are tagged with a particular keyword. Lifetime (seconds) Enter how long the lease profile is valid, in seconds.
Range: 60 through 31536000 seconds
Default: 3600 seconds
Preferred Lifetime (For IPv6 only.) Enter how long a valid address is in the preferred state and can be used without any restrictions. Renew Timer Enter the time during which a client can renew the lease profile. You can configure the renew timer to be less than or equal to 50 percent of the valid lifetime.
Range: 60 through 31536000 seconds
Default: 900 seconds
Rebind Timer Enter the time during which a rebind request can be sent by a client after a period of inactivity. The rebind timer can be configured <= 80 percent of the valid lifetime.
Range: 60 through 31536000 seconds
Default: 2800 seconds
Low Threshold
Enter the lower value below which to log usage.
Range: 20 through 80 percent
Default: 80 percent
High Threshold
Enter the upper value above which to log usage.
Range: 20 through 95 percent
Default: 95 percent
- Click OK. The main pane displays the lease profile that you configured.
Configure a DHCP Options Profile
In an options profile, you define the DHCP options that the DHCP server uses when allocating IPv4 or IPv6 addresses to DHCP clients.
To configure a DHCP options profile:
- In Director view:
- Select the Configuration tab in the top menu bar.
- Select Devices > Devices in the left menu bar.
- Select an organization in the left menu bar.
- Select a device in the main pane. The view changes to Appliance view.
- Select the Configuration tab in the top menu bar.
- Select Networking > DHCP > Server > Options Profile in the left menu bar, and then select the V4 or V6 tab in the horizontal menu bar.

- Click the
 Add icon. In the Add Options Profile popup window, select the General tab, and then enter information for the following fields.
For IPv4:
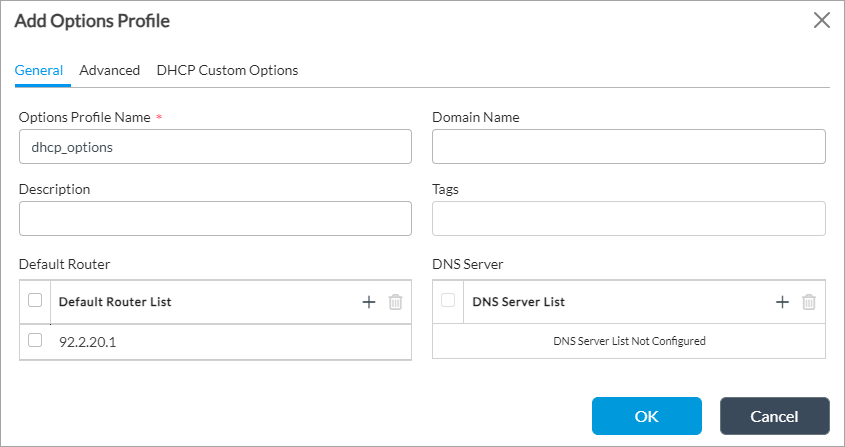
For IPv6:

Field Description Options Profile Name (Required) Enter a name for the options profile. Domain Name (For IPv4 only.) Enter the name of the domain from which addresses are allocated. Description Enter a text description for the options profile. Tags Enter a keyword or phrase that allows you to filter the options profile. Tags are useful when you have many profiles and want to view those that are tagged with a particular keyword. Default Router (For IPv4 only.) Click the  Add icon to add the router for DHCP clients to use to forward data packets.
DNS Server Click the  Add icon to add the DNS server address information.
 - For IPv4 only, select the Advanced tab, and then enter information for the following fields.
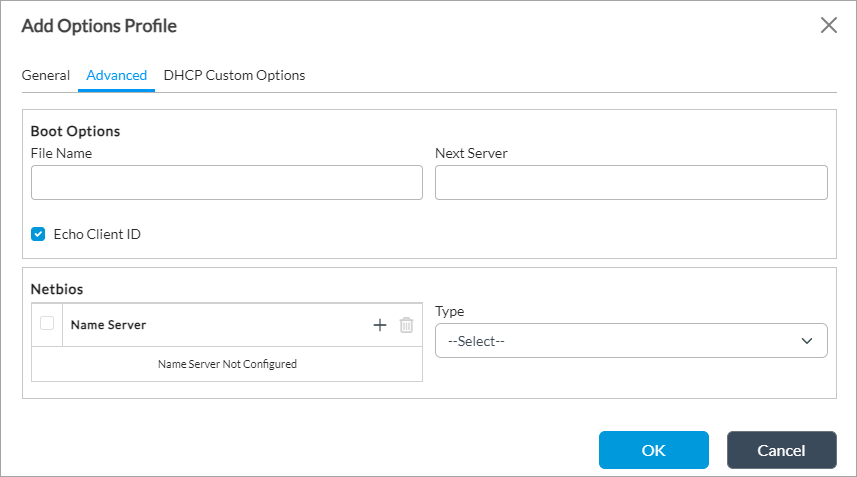
Field Description Boot Options (Group of Fields) - Filename
Enter the name of the file to use to boot the DHCP client. - Next Server
Enter the IP address of the next server in the boot sequence. - Echo Client ID
Click to add the client ID information. NetBIOS (Group of Fields) - Name Server
Enter the IP address of the Windows Name Internet Server (WINS) to use for name resolution. - Type
Select the node type of name resolution:
- b—Broadcast. A b-node client sends the destination name in a broadcast message.
- h—Hybrid. An h-node client unicasts the destination name to the WINS server.
- m—Mixed. An m-node client broadcasts the destination name.
- p—Peer to peer. A p-node client sends the destination name in a unicast message to the WINS server.
- Select the DHCP Custom Options tab, then click the
 Add icon.
 - In the Add DHCP Custom Options popup window, enter information for the following fields. Note that VOS devices support all the IANA DHCP/BOOTP options, that is, options 1 through 255. For more information about the options, see the IANA DHCP/BOOTP webpage.
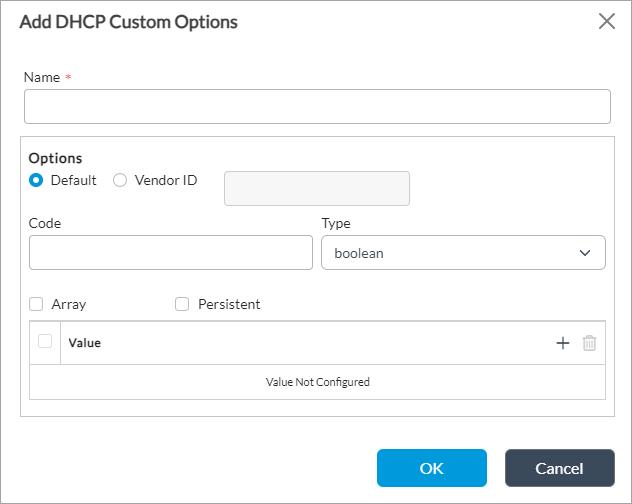
Field Description Name (Required) Enter a name for the custom option. Options (Group of Fields) - Default
Click to have this option be the default. If you select this option, the Vendor ID option is grayed out. - Vendor ID
Click when vendor information is exchanged between the DHCP server and client, and then enter the vendor information. If you select this option, the Code option is grayed out. Code Enter the code to assign to the option. Type Select the value type corresponding the option code:
- boolean
- fqdn
- ipv4-address
- ipv6-address
- string
- unit8
- unit16
- unit32
- hex-string
Array Click to include the DHCP custom option in all DHCP messages. Persistent Click to include the DHCP custom option in all DHCP messages. Value Click the  Add icon to enter a value to assign to the option.
 - Click OK to save the DHCP custom options.
- Click OK in the Add Options Profiles popup window. The main pane displays the options profile that you configured.
IPv4:

IPv6:

Configure a Static Mapping Profile
- In Director view:
- Select the Configuration tab in the top menu bar.
- Select Devices > Devices in the left menu bar.
- Select an organization in the left menu bar.
- Select a device in the main pane. The view changes to Appliance view.
- Select the Configuration tab in the top menu bar.
- Select Networking > DHCP > Server > Static Mapping Profile in the left menu bar, then select the V4 or V6 tab in the horizontal menu bar.

- Click the
 Add icon. The Add Static Mapping Profile popup window displays.
- If you selected the V4 tab, enter information for the following fields.

Field Description Name (Required) Enter a name for the profile. Subnet Mask (Required) Enter the subnet mask from which to allocate the IP addresses. MAC IP List (Group of Fields) - MAC Address
Enter the MAC address of the network interface card (NIC). - IP Address
Enter the IPv4 address that corresponds to the MAC address. -
 Add icon
Click to add the MAC–IP address mapping. You can enter multiple mappings. - If you selected the V6 tab, enter information for the following fields.
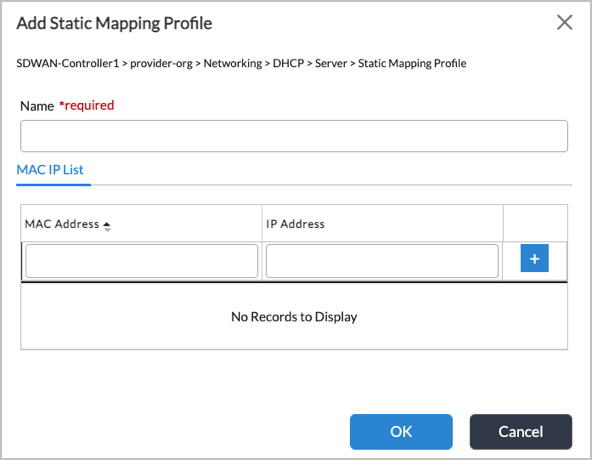
Field Description Name (Required) Enter a name for the profile. MAC IP List (Group of Fields) - MAC Address
Enter the MAC address of the network interface card (NIC). - IP Address
Enter the IPv6 address that corresponds to the MAC address.
 Add icon
Click to add the MAC–IP address mapping. You can enter multiple mappings.
- If you selected the V4 tab, enter information for the following fields.
- Click OK.
Configure an IP Address Pool
You can configure DHCPv4 and DHCPv6 to dynamically allocated IP address from a specific pool of IP addresses. The DHCP server then assigned only these addresses to clients that request an IPv4 or IPv6 address.
A DHCPv6 server can be either a stateful or a stateless server. A stateful DHCPv6 server provides both IPv6 address and other information, such as a DNS server list and a domain name, to hosts. If you are configuring a stateful DHCPv6 server, you configure an address pool. A stateless DHCPv6 server does not provide IPv6 addresses, but provides only other information. If you are configuring a stateless DHCPv6 server, you do not need to configure an address pool.
To configure an address pool:
- In Director view:
- Select the Configuration tab in the top menu bar.
- Select Devices > Devices in the left menu bar.
- Select an organization in the left menu bar.
- Select a device in the main pane. The view changes to Appliance view.
- Select the Configuration tab in the top menu bar.
- Select Networking > DHCP > Server > Address Pools in the left menu bar. The following screen displays.

- Select the V4 or V6 tab in the horizontal menu bar, then click the
 Add icon
- If you select the v4 tab, the following Add Address Pool popup window displays.
- Enter information for the following fields.

Field Description Name (Required) Enter a name for the pool. Description Enter a text description for the address pool. Tags Enter a keyword or phrase that allows you to filter the address pool. Tags useful when you have many address and want to view those that are tagged with a particular keyword. Subnet Mask Enter the subnet mask from which to allocate the IP addresses. Server Identifier Enter the IP address of the DHCP server. Lease Profile Select the lease profile to assign to the address pool. To create a lease profile, see Configure a DHCP Lease Profile, above. Options Profile Select the options profile to assign to the address pool. To create an options profile, see Configure a DHCP Options Profile, above. - Select the Addresses tab, the click the
 Add icon. The Add Addresses screen displays.

- To add an IPv4 address/prefix, select IPv4 Address/Prefix and enter information for the following fields.
Field Description IPv4 Address/Prefix (Required) Enter an IPv4 address or prefix. Subnet Mask Enter a subnet mask. Default Route Enter the default route. - To add an IPv4 range, click the IPv4 Range button and enter information for the following fields.

Field Description Begin Address (Required) Enter an IPv4 address for the beginning of the address range. End Address (Required) Enter an IPv4 address for the end of the address range. Subnet Mask Enter a subnet mask. Default Route Enter the default route. - To exclude one or more IPv4 addresses from the pool, click the Exclude Addresses tab in the Add Address Pool screen, then click the
 Add icon.

- If you select the IPv4 Address/Prefix button, enter information for the following fields:

- IPv4 Address/Prefix (Required)
- IPv4 Address/Prefix (Required)
- If you select the IPv4 Range button, enter information for the following fields:

- Begin Address (Required)
- End Address (Required)
- Click OK.
- In the Add Address Pool screen, click OK.
- Enter information for the following fields.
- If you select the V6 tab in the DHCP > Server > Address Pools screen, the following Add Address Pool popup window displays.
- Enter information for the following fields.
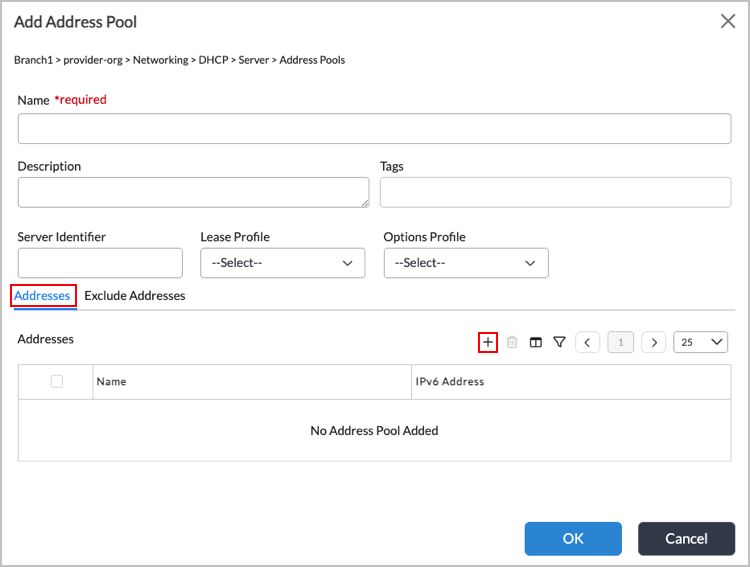
Field Description Name (Required) Enter a name for the pool. Description Enter a text description for the address pool. Tags Enter a keyword or phrase that allows you to filter the address pool. Tags useful when you have many address and want to view those that are tagged with a particular keyword. Server Identifier Enter the IP address of the DHCP server. Lease Profile Select the lease profile to assign to the address pool. To create a lease profile, see Configure a DHCP Lease Profile, above. Options Profile Select the options profile to assign to the address pool. To create an options profile, see Configure a DHCP Options Profile, above. - Select the Addresses tab, the click the
 Add icon. The Add Addresses screen displays.

- To add an IPv6 address/prefix, select IPv6 Address/Prefix and enter information for the following field.
Field Description IPv6 Address/Prefix (Required) Enter an IPv6 address or prefix.
- To add an IPv6 range, click the IPv4 Range button and enter information for the following fields.
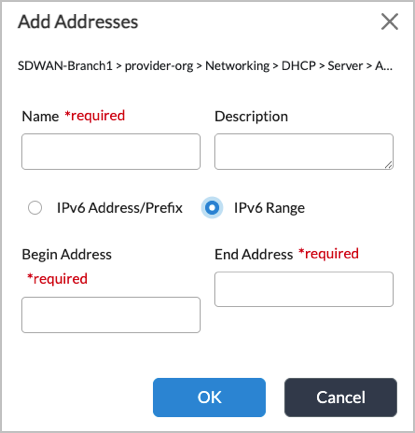
Field Description Begin Address (Required) Enter an IPv6 address for the beginning of the address range. End Address (Required) Enter an IPv6 address for the end of the address range. - To exclude one or more IPv6 addresses from the pool, click the Exclude Addresses tab in the Add Address Pool screen, then click the
 Add icon.
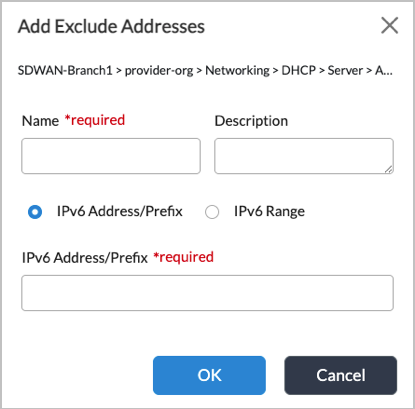
- Select the IPv6 Address/Prefix button and enter the IPv6 address or prefix.
- To exclude a range of IPv6 address from the pool, select IPv6 Range. then click the
 Add icon.

Field Description Begin Address (Required) Enter an IPv6 address for the beginning of the address range. End Address (Required) Enter an IPv6 address for the end of the address range. - Click OK.
- Enter information for the following fields.
- If you select the v4 tab, the following Add Address Pool popup window displays.
Configure Global DHCP Properties
When you configure a VOS device to be a DHCP server, the server uses global DHCPv4 and DHCPv6 properties if you do not configure server-specific settings.
To configure global DHCP properties:
- In Director view:
- Select the Configuration tab in the top menu bar.
- Select Devices > Devices in the left menu bar.
- Select an organization in the left menu bar.
- Select a device in the main pane. The view changes to Appliance view.
- Select the Configuration tab in the top menu bar.
- Select Networking > DHCP > Global in the left menu bar.

- Click the
 Edit icon. In the Edit DHCPv4/v6 Global popup window, enter information for the following fields.
IPv4:

IPv6:

Field Description Server Identifier Enter the IP address of the DHCP server. Default Lease Profile Select the DHCP lease profile to use as the default. To create a lease profile, see Configure a DHCP Lease Profile, above. Default Options Profile Select the DHCP options profile to use as the default. To create a lease profile, see Configure a DHCP Options Profile, above. Logging (Group of Fields) - Select LEF Profile
Select the global log export functionality (LEF) profile to use for DHCP logs. Logs are sent to the active collector of the LEF profile. For information about configuring a LEF profile, see Configure Log Export Functionality. For information about associating a LEF profile with the configuration of a feature or service, see Apply Log Export Functionality. - Default Profile
Click to have the LEF profile be the default profile. - Log Unmatched Requests
Click to generate a log of DHCP client requests that do not fulfill the matching criteria configured in the server. - Click OK.
Configure DHCP Lease Parameters
When you configure a VOS device as a DHCP server, DHCP lease information is stored in a local database on the device. By default, the device performs lease database cleanup at midnight every day and there is a maximum of 4 database entries per client. You can modify the defaults.
For devices configured in active-standby high availability (HA) pairs, the lease database is automatically synchronized between the devices in the pair. For Releases 22.1.3 and later, you can enable lease database synchronization for active-active HA pairs. To do this, you specify the IP addresses of interfaces and the routing instance used to perform the synchronization.
To configure DHCP lease database parameters:
- In Director view, select Administration > Appliances, and then select the DHCP server device. The view changes to Appliance view.
- In Appliance view, select Configuration > Others > System > Configuration > Configuration.

- In the main pane, scroll down to the DHCP Parameters pane and click the Edit icon. The Edit DHCP Parameters popup window displays.

- Enter information for the following fields.
Field Description Lease Database Cleanup Interval Frequency at which the lease DHCP database is cleaned up, in seconds.
Default: 86,400
Range: 300 through 604,800
Lease Database Cleanup Time
Time of day when the lease DHCP database is cleaned up, in hours and minutes.
Default: Midnight (00:00)
Lease Database Max Entries per Client Maximum number of entries per client in the lease database.
Default: 4
Range: 1 through 128
Lease Database Synchronization
(Group of Fields)(Releases 22.1.3 and later.) The following parameters apply only to active-active HA pairs. - Local IP
IP address of the interface on the current device in the HA pair, which you selected in Step 1.
- Remote IP
IP address of the interface on the other device in the HA pair. - Routing Instance
Routing instance to use for syncing the DHCP lease database.
- For VOS devices configured in an HA pair, follow Steps 1 through 4 for both devices in the pair.
Configure a VOS Device To Be a DHCP Server
To configure a VOS device to be DHCP server, you configure DHCP properties, including the following:
- IP address of the DHCP server
- Lease information
- DHCP options and option match information
- Static and dynamic address mapping information
To configure a VOS device to be a DHCP server:
- In Director view:
- Select the Configuration tab in the top menu bar.
- Select Devices > Devices in the left menu bar.
- Select an organization in the left menu bar.
- Select a device in the main pane. The view changes to Appliance view.
- Select the Configuration tab in the top menu bar.
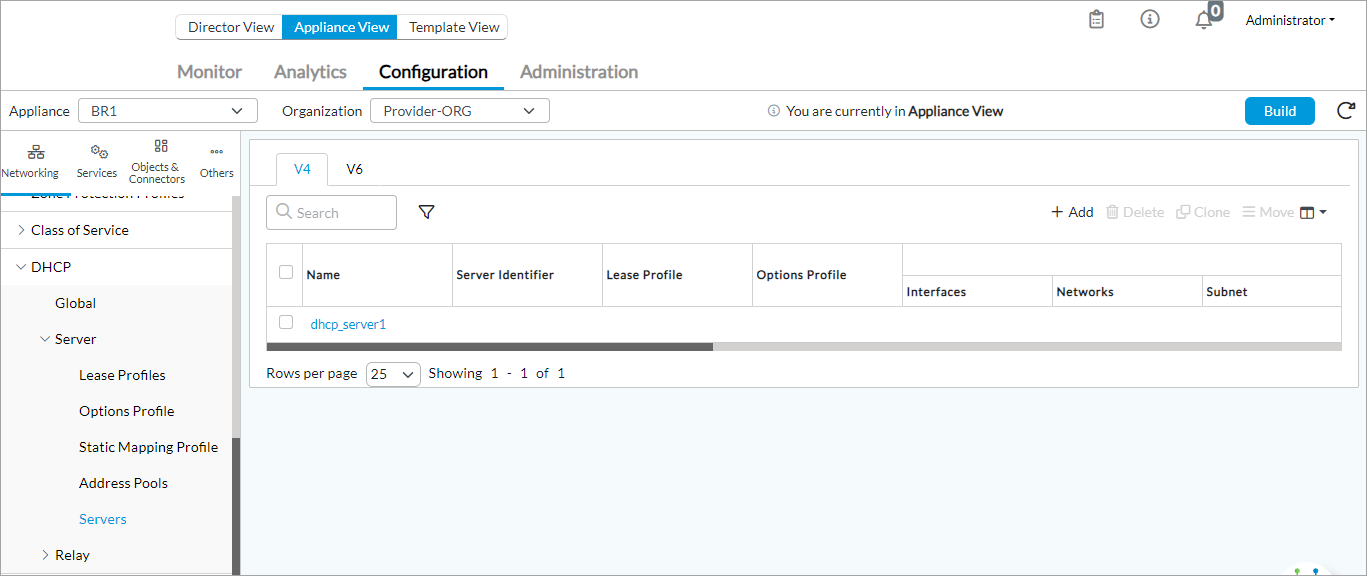
- Select Networking > DHCP > Server > Servers in the left menu bar, and then select the V4 or V6 tab in the horizontal menu bar.

- Click the
 Add icon. In the Add DHCP Server popup window, select the General tab, and then enter information for the following fields.

Field Description Name (Required) Enter a name for the DHCP server. Description Enter a text description for the DHCP server. Tags Enter a keyword or phrase that allows you to filter the server information. Tags useful when you have many servers and want to view those that are tagged with a particular keyword. Server Identifier Enter the IP address of the DHCP server. Lease Profile Select the lease profile to associate with the DHCP server. If you do not select a lease profile, the server uses the default lease profile configured at the DHCP Global level. For more information, see Configure DHCP Global Properties, above. Options Profile Select the options profile to associate with the DHCP server. If you do not select an options profile, the server uses the default options profile configured at the DHCP Global level. For more information, see Configure DHCP Global Properties, above. - Select the Match tab to configure the match conditions. The DHCP server responds to DHCP client requests based on the following match conditions:
- Client identifier
- Client name
- DHCP options
- Hardware address
- Interfaces and networks
- IPv4 subnet prefix
- Enter information for the following fields.

Field Description Interfaces/Networks Select the interface or network on which to match the client request, or click the  Add icon to add an interface or a network to the list.
Client Name Select the name of the client from which DHCP messages are matched, or click the  Add icon to add client name to the list.
Client Identifier Select the name of the client, or click the  Add icon to add client identifier to the list.
IPv4 Subnet Prefix (For IPv4 only.) Enter IPv4 subnet prefix to match. Hardware Address Click, and then enter the hardware address to match, or click the  Add icon to add a hardware address to the list.
From Mapping File Click, and then enter the name of the file to use to map IP address to hardware addresses, or click the  Add icon to add a mapping file to the list.
From Mapping Profile Click, then and enter the name of the mapping profile to use to select clients, or click the  Add icon to add a mapping profile to the list.
 - Click OK.
- Select the Address Allocation tab to configure the IP address mode, and then enter information for the following fields.

Field Description Static Click to have the DHCP server allocate a fixed IP address to clients. Dynamic Click to have the DHCP server dynamically allocate IP addresses to clients. Static (Group of Fields) - IPv4 Address
- IP Address
- Subnet Mask
Click to use a static IP address. Then, in the IP Address and Subnet Mask fields, enter the address and its subnet mask. - From Mapping File
- Filename
Click to have the DHCP server allocate IP addresses from a mapping file. Then, in the Filename field, enter the name of the file containing the address mapping.
The address mapping file is a text file, with one entry per line. Each entry has the following format:
- mac-address,ip-address,subnet-mask
For example:
- 52:0a:28:b5:67:02,172.18.12.150,255.255.255.0
To use a mapping file that is on the local device, create the file in the /opt/versa/var/dhcpd/organization-name directory. For the file, ensure that the owner and group are versa:versa and that the file access mode is 664.
- From Mapping Profile
- Static Mapping Profile
Click to have the DHCP server allocate IP addresses from a mapping profile. Then, in the Static Mapping Profile field, select the name of the profile.
Dynamic (Group of Fields) - Address Pool
Select the address pool from which to allocate IP addresses to clients. Ping Settings (Group of Fields)
Click to check whether an IP address is already in use before offering it to a client. This checking avoids address conflicts. One use case is to determine whether a client has mistakenly configured on a laptop a static address that is taken from the dynamic DHCP address pool.
When you enable this option, when the DHCP server receives a DHCP Discover packet from a client, the server performs a probe, sending ping messages to the IP address it plans to offer to the client and then waiting a short time to hear whether it receives any reply messages. If the ping is successful and the DHCP server receives reply messages, this means that the IP address is already in use, and the DHCP server chooses a different IP address to assign to the client. If the ping fails, the IP address is not already in use, and the server assigns it to the client in a DHCP Offer packet.
By default, when a VOS device is a DHCP server, it maintains the DHCP active lease table and does not offer any duplicate addresses to the client.
- Count
Enter the number of ping packets to send. - Delay
Enter the time delay between ping packets. - Click OK.
- Select the Option tab, and then enter information for the following fields.

Field Description New Allocations Click to log requests from clients for the allocation of an IP address. Renewals Click to log requests from clients that are to renew the allocated IP address. DHCP Option Match Information Click the
 Add icon to add DHCP Option Match Information, then enter informaiton for the following fields.
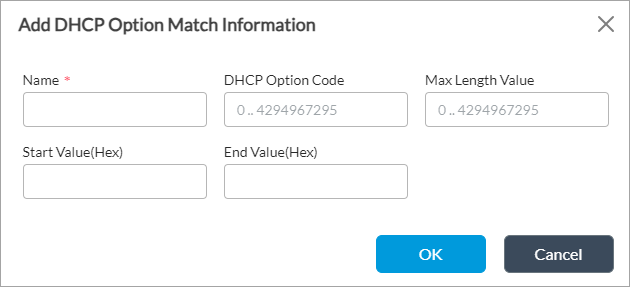
- Name—Enter a name for the match option.
- DHCP Option Code—Enter a DHCP option code. Note that VOS devices support all the IANA DHCP/BOOTP options, that is, options 1 through 255. For more information about the options, see the IANA DHCP/BOOTP webpage.
- Range: 0 through 4294967295
- Default: None
- Max Length Value—Enter the maximum length of the DHCP option value.
- Range: 0 through 4294967295
- Default: None
- Start Value (Hex)—Enter the starting value for a range of DHCP option values, in hexadecimal.
- End Value (Hex)—Enter the ending value for a range of DHCP option values, in hexadecimal.
- Click OK. The main pane displays the DHCP servers that you configured.
Configure the VOS Device To Be a DHCP Relay Agent
You can configure a VOS device to be a DHCP relay agent. A DHCP relay agent is positioned between the DHCP server and DHCP clients, and it forwards DHCP messages from the clients to the DHCP server.
To configure a DHCP relay agent, you first configure a DHCP relay agent profile, and then you configure the DHCP relay agent itself.
Configure a DHCP Relay Agent Profile
In the DHCP relay agent profile, you define the following information:
- IP address of the DHCP server to which messages are forwarded
- Router to use to route messages to the DHCP server
- Action to perform on the relay information in the DHCP messages from clients
To configure a DHCP relay agent profile:
- In the Director view:
- Select the Configuration tab in the top menu bar.
- Select Devices > Devices in the horizontal menu bar.
- Select an organization in the left menu bar.
- Select a device in the main pane. The view changes to Appliance view.
- Select the Configuration tab in the top menu bar.
- Select Networking > DHCP > Relay > Relay Profiles in the left menu bar. The main pane displays the relay profiles that are already configured.

- Select the V4 or V6 tab, and then click the
 Add icon. The Add Relay Profile popup window displays.
- For IPv4, enter information for the following fields, then go to Step 5 to add forwarding information:
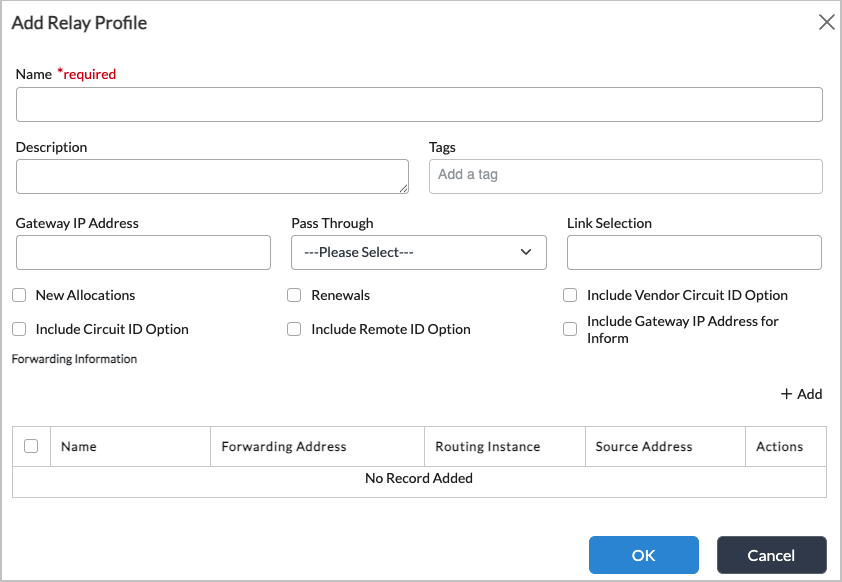
Field Description Name (Required) Enter a name for the relay agent profile. Description Enter a text description for the relay agent profile. Tags Enter a keyword or phrase that allows you to filter the relay profiles. Tags are useful when you have many profiles and want to view those that are tagged with a particular keyword. Gateway IP Address Enter the IP address of the LAN interface that receives DHCP requests from a client. Note that if VRRP is enabled, the VRRP VIP address is used as gateway IP address.
Pass Through Select the action to take on the relay information in the message:
- Drop—Remove the relay information from the message and forward it.
- Keep—Retain the information and forward the message.
- Replace—Replace the relay information of other servers with the current relay agent information and forward the message.
Link Selection Allow the relay agent to specify the subnet from which the DHCP server should allocate addresses to the client, overriding the gateway IP address (giaddr) normally used by the server. New Allocations (For Releases 22.1.3 and earlier.) Select to send notifications to Analytics for new IP allocations. Renewals (For Releases 22.1.3 and earlier.) Select to send notifications to Analytics for renewals. Include Vendor Circuit ID Option
Select to append the vendor-specific Layer 2 circuit-id-sub-option of relay agent information option (82) to relayed packets. Include Circuit ID Option Select to append the circuit-id sub-option of relay agent information option (82) to relayed packets. Include Remote ID Option Select to append the remote-id sub-option of relay agent information option (82) to relayed packets. Include Gateway IP Address Option for Inform Select to include the gateway IP address (giaddr) in the DHCP INFORM requests. - For IPv6, enter a name for the relay profile, then go to Step 5 to add forwarding information.

- For IPv4, enter information for the following fields, then go to Step 5 to add forwarding information:
- In the Forwarding Information section for both IPv4 and IPv6, configure the DHCP server information to use to forward client messages. Click the
 Add icon, and then enter information for the following fields.
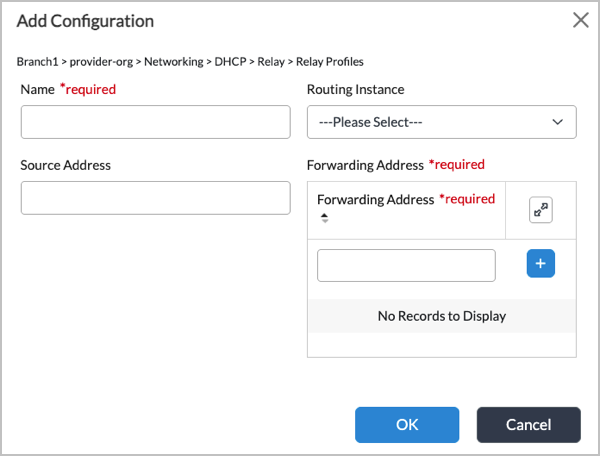
Field Description Name (Required) Enter a name for the DHCP server. Routing Instance Select the routing instance to use to reach the DHCP server. Source Address Enter the IP address of the source. Forwarding Address (Required) Click the  Add icon, and select the IP address of the DHCP server.
 - Click OK.
Configure a DHCP Relay Agent
- In Director view:
- Select the Configuration tab in the top menu bar.
- Select Devices > Devices in the left menu bar.
- Select an organization in the left menu bar.
- Select a device in the main pane. The view changes to Appliance view.
- Select the Configuration tab in the top menu bar.
- Select Networking > DHCP > Relay > Relay in the left menu bar.

- Select the V4 or V6 tab, and then click the
 Add icon. In the Add Relay popup window, select the General tab, and then enter information for the following fields.

Field Description Name (Required) Enter a name for the DHCP relay agent. Description Enter a text description for the DHCP relay agent. Tags Enter a keyword or phrase that allows you to filter the relay. Tags are useful when you have many relays and want to view those that are tagged with a particular keyword. - Select the Match tab to configure criteria based on which the DHCP messages are selected for forwarding to the DHCP server. The relay agent forwards packets based on the following match conditions. For field descriptions, see Configure a VOS Device To Be a DHCP Server, above.
- Interfaces and networks
- Client name
- Client identifier
- Hardware address
- From Mapping File
- DHCP Option Match Information
- Click the
 Add icon to add an interface or network, client name, and client identifier. Note that the IPv4 Subnet Prefix field displays only if you select the V4 tab.

- In the DHCP Option Match Information field, click the
 icon, and then enter information for the following fields. For field descriptions, see Configure a VOS Device To Be a DHCP Server, above.

- Select the Relay Settings tab, and then select the relay profile associated with the DHCP relay agent.

- Click OK.
Supported Software Information
Releases 20.2 and later support all content described in this article, except:
- Releases 22.1.3 adds the Subnet Mask and Default Route fields in the Add Address Pool > Add Addresses popup window. You can synchronize the DHCP lease database for active-active pairs.
- Release 22.1.4 adds support for the "hex-string" in the DHCP Custom Options screen, relay agent profile options for Link Selection, Include Circuit ID, Include Remote ID, and Include Vendor Circuit ID.
- Release 23.1.1 adds IPv6 support for static mapping profiles and DCHP relay.
