
Configure Cloud URL Lookup
 For supported software information, click here.
A Versa Operating SystemTM (VOSTM) device that is running the premium SPack has an embedded URL database of more than 2 million categorized domain names. If a URL category or reputation information is not available in the VOS device's database, you can configure real-time cloud URL lookup to request this information from a cloud server, which has a database of more than 2 billion categorized URLs. You enable cloud URL lookup when you configure global URL-filtering. For more information, see Configure URL Filtering.
This article describes how to configure cloud URL lookup in the following scenarios:
- Cloud URL lookup is using a single WAN link on the device.
- Cloud URL lookup is using redundant WAN links.
Configure Cloud URL Lookup For a Single WAN Link
To configure cloud URL lookup using a single WAN link on the device, you do the following:
- Configure SNAT pools for the cloud URL lookup.
- Configure a cloud profile for cloud URL lookup.
- Configure DNS servers on the VOS device. For more information, see Configure DNS Servers.
- Configure DNS proxy on the VOS device for the transport selected in the SNAT pool.
Configure a SNAT Pool
To request URL information from the cloud, the VOS devices must know which networks or interfaces to use. Source NAT (SNAT) is one method to use to configure these resources on the VOS device.
To configure a SNAT pool for cloud URL lookup:
- In Director view:
- Select the Configuration tab in the top menu bar.
- Select an organization in the horizontal menu bar.

- To make the SNAT settings permanent, select Templates > Device Templates in the horizontal menu bar, and then select the template name in the main pane. The view changes to Appliance view.
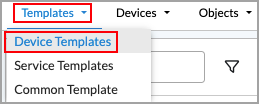
- To change the configuration temporarily for a device, select Devices > Device in the horizontal menu bar, and then select the device name in the main pane. The view changes to Appliance view.

- Select Objects & Connectors > Objects > SNAT Pool in the left menu bar.
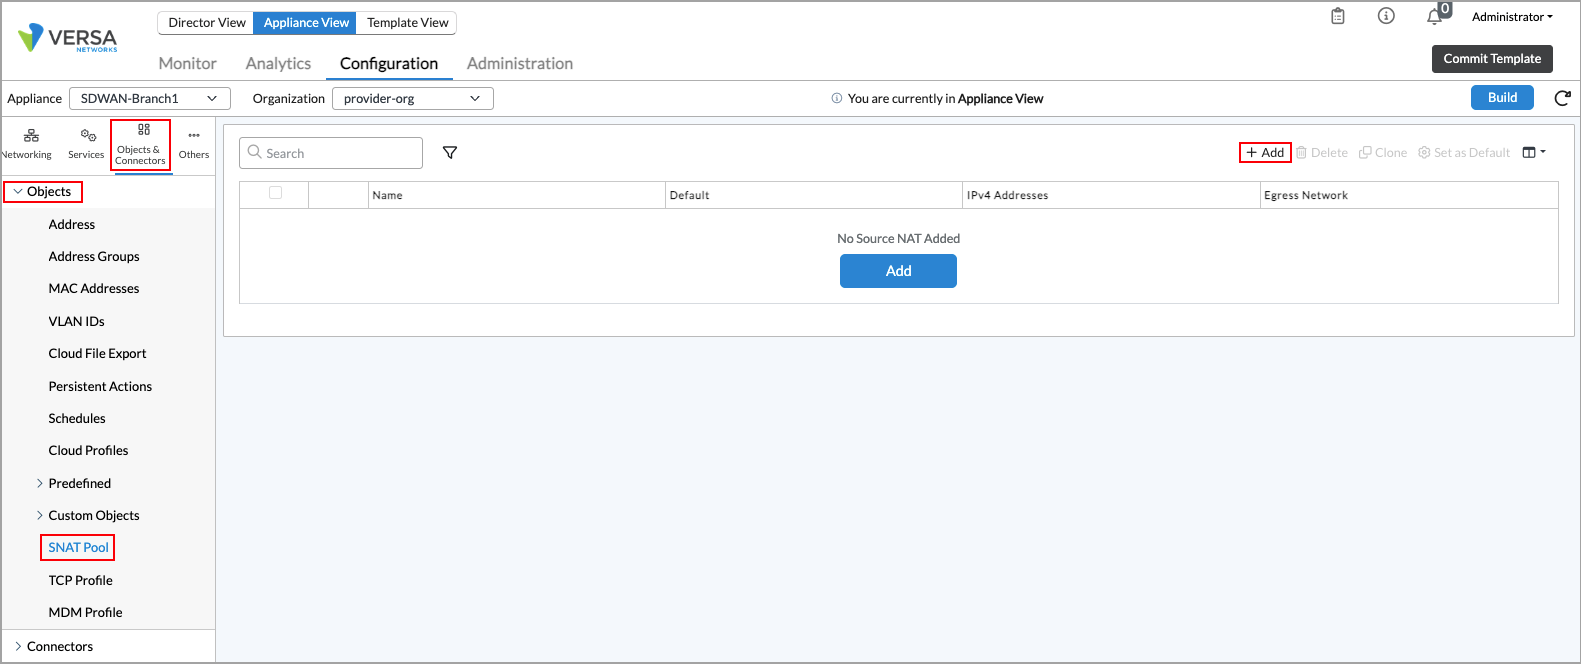
- Click the
 Add icon. In the Add SNAT Pool window, enter information for the following fields.

Field Description Name Enter a name for the SNAT pool. Description Enter a text description for the SNAT pool. Tags Enter a keyword or phrase that allows you to filter the SNAT pool name. Tags are useful when you have multiple pool names and you want to view those that are tagged with a particular keyword. Routing Instance Select the routing instance to associate with the SNAT pool. Typically, you select one of the WAN VRFs, such as Internet-Transport-VR.
IPv4 Addresses (Tab) Configure an IPv4 SNAT pool to use for cloud lookup requests. You can use either individual static IPv4 addresses or a range of IPv4 addresses, but you cannot use both.
Note that for an SNAT pool you can configure either IPv4 addresses or egress networks, but not both.
- Static IPv4 Address
Click the Add icon, and enter an IPv4 static address to add to the SNAT pool.- IPv4 Address Range
Enter the address range of the SNAT pool:
- Low—Enter the lowest IPv4 address in the SNAT pool address range.
- High—Enter the highest IPv4 address in the SNAT pool address range.
Egress Networks (Tab) 
In the Egress Network table, click the
Add icon and select an egress network to use for cloud URL lookup requests.Note: When you configure an SNAT pool for a single WAN link, you can configure either IPv4 addresses or egress networks, but not both.
- Click OK.
Configure a Cloud Profile
To enable cloud URL lookup on a VOS device, you must configure a cloud profile to look up information about the URL on a cloud server. For more information, see Configure a Cloud Profile.
To configure a cloud profile for cloud URL lookup:
- In Director view:
- Select the Configuration tab in the top menu bar.
- Select an organization in the Organization field.
- To have the global URL-filtering settings be permanent, select Templates > Device Templates in the horizontal menu bar. Then select the device name or post-staging template name in the main pane. The view changes to Appliance view.
- To have the global URL-filtering settings apply to an individual device, select Devices > Device in the horizontal menu bar. Then select the device name in the main pane. The view changes to Appliance view.
- Select Objects & Connectors > Objects > Cloud Profiles in the left menu bar.

- Click the Add icon. In the Add Cloud Profile window, enter information for the following fields.

Field
Description Name
Enter a name for the cloud profile.
Description
Enter a text description for the cloud profile.
Connection Pool
Enter the maximum number of simultaneous connections to the SSL cloud server. Ten connections are generally enough for cloud URL lookup.
Range: 1 to 100000Default: None
Timeout
Enter the maximum timeout period to wait for a response from the SSL cloud server, in seconds.
Range: 1 through 4294967295 seconds
Default: 120 seconds
Activation
Click to activate the cloud-lookup profile. If you do not activate the cloud-lookup profile, the cloud profile is not used.
Source NAT Pool
Select the SNAT pool you configured in Configure a SNAT Pool, above.
DNS Redirection Policy You do not need to select a DNS redirection policy for cloud URL lookup. Type
Select URLF Cloud Profile.
- Click OK.
Configure DNS Proxy for the Transport Selected in the SNAT Pool
- In Director view:
- Select the Administration tab in the top menu bar.
- Select Appliances in the left menu bar.
- Select a device name in the main panel. The view changes to Appliance view.
- Select the Configuration tab in the top menu bar.
- Select Networking > DNS > Settings in the left menu bar. The main pane displays the DNS Settings pane.

- Click the
 Edit icon. In the Edit DNS Settings window, enter the following information.

Field Description Routing Instance Select the routing instance to use to reach the DNS server. Default Resolver Redirection Policy Select the default resolver redirection policy to resolve domains. IPv4/IPv6 Address Click the Add icon, then enter the IPv4 or IPv6 address of the DNS server. You can enter multiple IP addresses.IP to Domain Cache (Group of Fields) - Enabled
Click to enable caching of IP address to domain lookup information. - Cache Size
Enter the maximum number for cache entries. - Maximum TTL (seconds)
Enter the maximum time-to-live value, in seconds. - Click OK.
Configure Cloud URL Lookup for Redundant WAN Links
There are additional steps required to configure cloud URL lookup to leverage two WAN links instead of one. To configure cloud URL lookup for redundant WAN links, you do the following:
- Configure a SNAT pool
- Configure a cloud profile
- Configure a DNS forwarder in DNS settings
- Configure a CGNAT rule
- Configure security access rules
The SNAT pool and DNS forwarder can only be linked to a single routing instance. However, with redundant WAN links, there are multiple transport virtual routers (VRs). Therefore, the recommended approach is to associate these elements with the LAN VR, which provides direct internet access over the redundant WAN links. Besides adjusting the routing instance association, this may require some additional configuration updates for CGNAT and security policies, as traffic originated from router itself may require different treatment than transit traffic.
Configure a SNAT Pool
The SNAT pool configuration for redundant WAN links is similar to the single WAN link configuration. The difference is that LAN-VR should be selected as the routing instance, and the network associated with the LAN interface should be the egress network.
To configure a SNAT pool for cloud URL lookup with redundant WAN links:
- In Director view:
- Select the Configuration tab in the top menu bar.
- Select Templates in the horizontal menu bar.
- Select an organization in the left navigation bar.
- Select a template in the main pane. The view changes to Appliance view.
- Select Objects & Connectors > Objects > SNAT Pool in the left menu bar.
- Click Add. In the Add SNAT Pool window, enter information for the following fields.
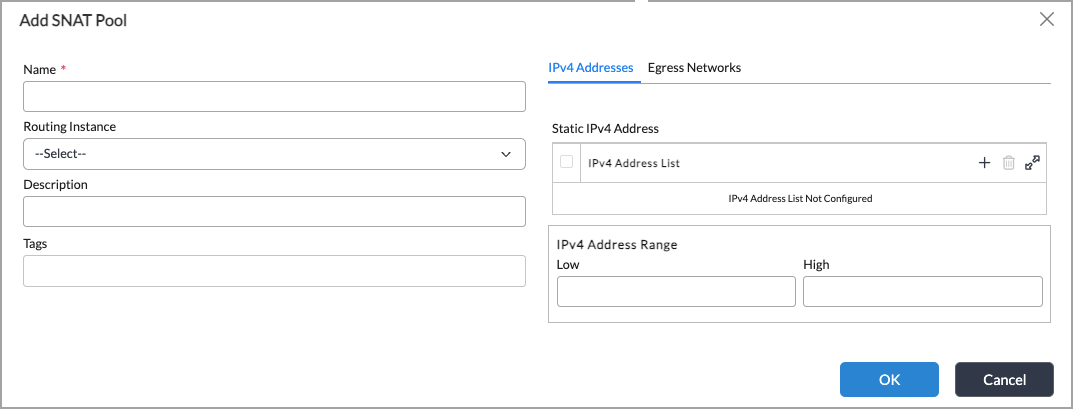
Field Description Name Enter a name for the SNAT pool. Description Enter a text description for the SNAT pool. Tags Enter a keyword or phrase that allows you to filter the SNAT pool name. Tags are useful when you have multiple pool names and you want to view those that are tagged with a particular keyword. Routing Instance Select the LAN-VR as the routing instance to associate with the SNAT pool.
Egress Networks (Tab) Click the Egress Network tab, and then click the
 Add icon.
For redundant WAN links, select the network associated with the LAN interface as the egress network to use for cloud lookup requests.
- Click OK.
Configure a Cloud Profile
Configure a cloud profile and associate it with the SNAT pool configured above. To enable cloud URL lookup on a VOS device, you must configure a cloud profile to look up information about the URL on a cloud server. For more information, see Configure a Cloud Profile.
To configure a cloud profile for cloud URL lookup with redundant WAN links:
- In Director view:
- Select the Configuration tab in the top menu bar.
- Select Templates in the horizontal menu bar.
- Select an organization in the left navigation bar.
- Select a template in the main pane. The view changes to Appliance view.
- Select Objects & Connectors > Objects > Cloud Profiles in the left menu bar.
- Click Add.
- In the Add Cloud Profile window, enter information for the following fields.
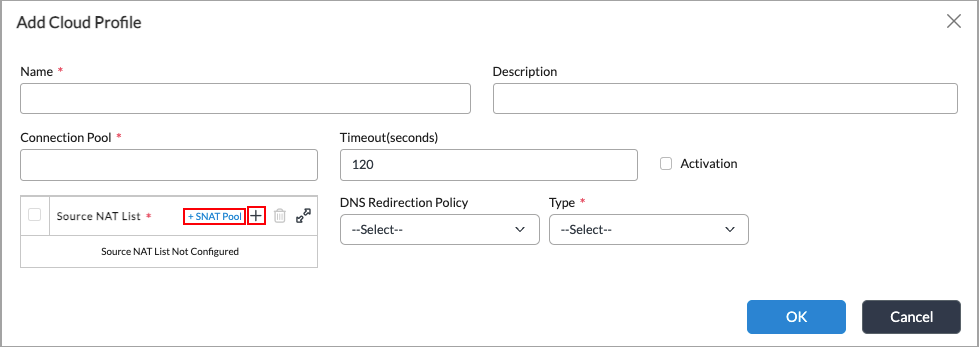
Field
Description Name
Enter a name for the cloud profile.
Description
Enter a text description for the cloud profile.
Connection Pool
Enter the maximum number of simultaneous connections to the SSL cloud server. Ten connections are typically enough for cloud URL lookup.
Range: 1 to 100000Default: None
Timeout
Enter the maximum timeout period to wait for a response from the SSL cloud server, in seconds.
Range: 1 through 4294967295 seconds
Default: 120 seconds
Activation
Click to activate the cloud-lookup profile. If you do not activate the cloud-lookup profile, the cloud profile is not used.
Source NAT Pool
Click + SNAT Pool and select the SNAT pool that you configured in Configure a SNAT Pool, above.
DNS Redirection Policy You do not need to select a DNS redirection policy for cloud URL lookup. Type
Select URLF Cloud Profile.
- Click OK.
Configure DNS Forwarder in DNS Settings
To look up the URL of a cloud server, you must configure a DNS forwarder.
- In Director view:
- Select the Configuration tab in the top menu bar.
- Select Templates in the horizontal menu bar.
- Select an organization in the left navigation bar.
- Select a template in the main pane. The view changes to Appliance view.
- Select the Configuration tab in the top menu bar.
- Select Networking > DNS > Settings in the left menu bar.
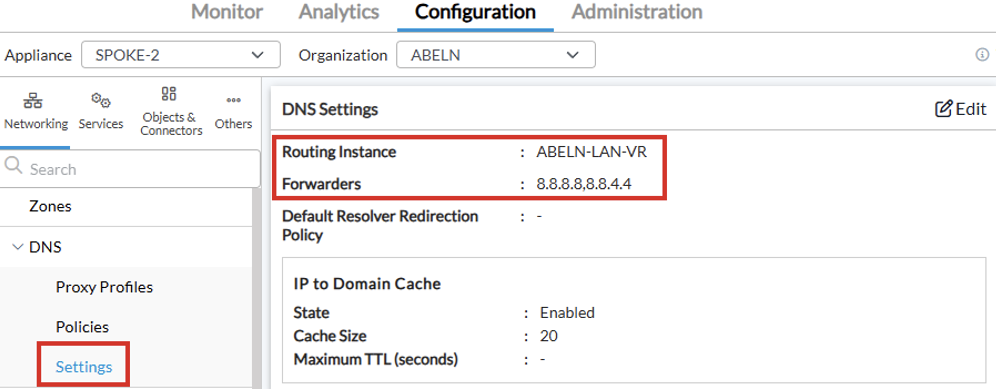
- Click the Edit icon in the DNS Settings section. The Edit DNS Settings window displays.
- In the Routing Instance field, select the LAN-VR.

- In the IPv4/IPv6 Address table, click the Add icon.
- Enter the address of the DNS server to use as the DNS forwarder, and then click the Add icon. You can add more than one server address.

- To remove a DNS address, click the
 Delete icon.
 - Click OK.
Configure CGNAT Rules
When initiated from LAN-VR, the DNS and cloud URL lookup sessions do not match the standard CGNAT rules created for direct internet access (DIA). These rules, created by the workflow, use the destination zone L-ST-LAN as match criteria. You must create two more CGNAT rules for that traffic, using the source zone W-ST-*-LAN-VR-INET as match criteria.
To configure the CGNAT rules:
- In Director view:
- Select the Configuration tab in the top menu bar.
- Select Templates in the horizontal menu bar.
- Select an organization in the left navigation bar.
- Select a template in the main pane. The view changes to Appliance view.
- Select the Configuration tab in the top menu bar.
- Select Services > CGNAT in the left menu bar.

- Select the Rules tab, and then click Add.
- In the Add CGNAT Rule window, enter a name for the rule in the Name field.
- Select the Match tab. The following window displays.
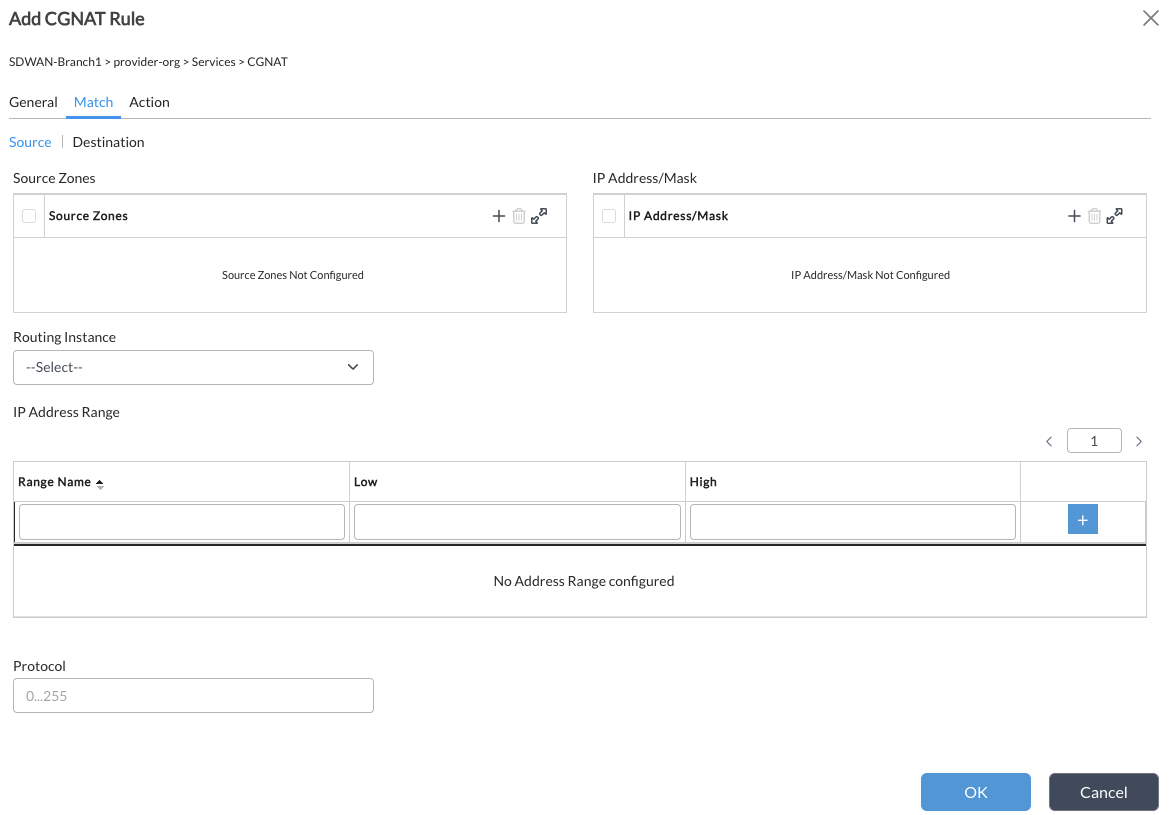
- In the Source Zones section, click the Add icon.
- Click the Source Zones field and select W-ST-*-LAN-VR-INET-1.
- Select the Action tab. The following window displays.

- In the NAT Mode field, select NAPT-44.
- In the Source Pool field, select DIA-Pool-INET-1. This is the default NAT Pool name created for DIA.
- Configure additional rule parameters, as needed. For more information, see Configure CGNAT Rules.
- Click OK.
- Click Add to create the second CGNAT rule.
- In the Add CGNAT Rule window, enter a name for the rule in the Name field.
- Select the Match tab.
- In the Source Zones section, click the Add icon.
- Click the Source Zones field and select W-ST-*-LAN-VR-INET-2.
- Select the Action tab.
- In the NAT Mode field, select NAPT-44.
- In the Source Pool field, select DIA-Pool-INET-2.
- Configure additional rule parameters, as needed. For more information, see Configure CGNAT Rules.
- Click OK. Both rules display on the Rules tab.
Configure Security Access Rules
When initiated from LAN-VR, the system DNS and cloud URL lookup sessions would match the standard security access rule Allow_From_Trust. This rule is created for DIA by the workflow and matches by source zone W-ST-*-LAN-VR-INET. If an organization has more strict access rules, they may not allow system DNS and cloud URL lookup. In this case, you can add the following rules:
- A rule that permits traffic from source zones W-ST-*-LAN-VR-INET to system DNS forwarders, configured earlier in this article.
- A rule that permits cloud lookup traffic as HTTP and HTTPS traffic from source zones W-ST-*-LAN-VR-INET to the following URLs:
- urm.versanow.net—Used by VOS releases 22.1.3 with SPack 2177 and later.
- service.brightcloud.com—Used by earlier VOS releases.
To configure security access rules:
- In Director view:
- Select the Configuration tab in the top menu bar.
- Select Templates in the horizontal menu bar.
- Select an organization in the left navigation bar.
- Select a template in the main pane. The view changes to Appliance view.
- Select the Configuration tab in the top menu bar.
- Select Services > Next Gen Firewall > Security > Policies in the left menu bar.
- Select the Rules tab, and then click the Add icon.

- If there are rules already configured, you must select where you want to insert the new rule. Select to insert the new rule at the top, and then click Continue.
- In the Add Rules window, enter a name for the rule in the Name field.
- Select the Source tab.
- In the Source Zone section, click the Add icon to activate the drop-down list, and select the following zones:
- W-ST-*-LAN-VR-INET-1
- W-ST-*-LAN-VR-INET-2

- Select the Destination tab.
- In the Destination Address section, click + New Address.

- In the Add Address window, enter the IP address of the system DNS forwarder that you configured in Configure DNS Forwarder in DNS Settings, above.

- Click OK to add the address.
- Configure additional rule parameters, as needed. For more information, see the Configure a Security Access Policy section in Configure Next-Gen Firewall.
- Click OK to add the rule.
- Click Add to create the second rule.
- In the Add Rule window, enter a name for the rule in the Name field.
- Select the Source tab.
- In the Source Zones section, click the Add icon and select the following source zones:
- W-ST-*-LAN-VR-INET-1
- W-ST-*-LAN-VR-INET-2
- Select the Headers/Schedule tab.
- In the Services section, click the Add icon and select the HTTP and HTTPS services.

- Select the Applications/URL tab.
- In the URL Category List section, click + New URL Category.

- In the Add URL Category window, enter a name for the custom URL category in the Name field.
- Select the URL Strings tab, and enter the following information:
- In the String field, enter "urm.versanow.net".
- In the Reputation field, select "trustworthy".
- Click the
 icon.
icon.
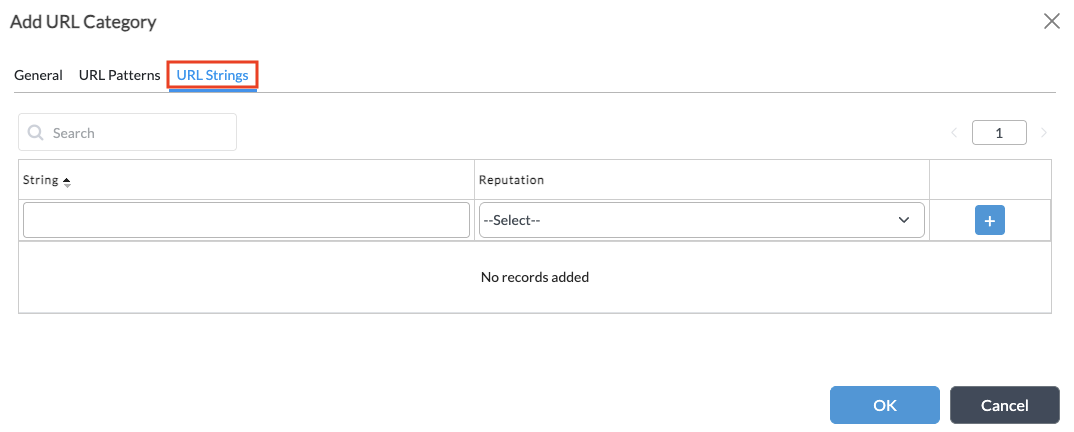
- For Releases 22.1.2 and earlier with SPack 2177, enter an additional string:
- In the String field, enter "service.brightcloud.com".
- In the Reputation field, select "trustworthy".
- Click the icon.
- Click OK to add the URL category.
- Configure additional rule parameters, as needed. For more information, see the Configure a Security Access Policy section in Configure Next-Gen Firewall.
- Click OK to add the rule.
Cloud URL Lookup Verification and Troubleshooting
Cloud URL lookup function depends on several components—system DNS forwarders, SNAT pools, and in certain scenarios, security access policy and CGNAT rules—it is important to understand how to verify and troubleshoot the entire cloud URL lookup operation.
Verify Cloud URL Lookup
You can generate a cloud URL lookup request to verify that cloud URL lookup is working as expected,
To generate a cloud URL lookup request:
- In Director view:
- Select the Administration tab in the top menu bar.
- Select Appliances in the left menu bar.
- Select a device name in the main panel. The view changes to Appliance view.
- Select the Configuration tab in the top menu bar.
- Select Objects & Connectors > Objects > Custom Objects > URL Categories in the left menu bar.
- Click Look Up URL in the top right corner.

- In the Look Up URL window, select the organization for which Cloud URL lookup is configured, and then enter the URL for verification.

- In the Cloud Lookup section, check the Status field to verify that the cloud URL lookup was successful. If the cloud URL lookup was not successful, see Troubleshoot Cloud URL Lookup, below.
Troubleshoot Cloud URL Lookup
To troubleshoot cloud URL lookup, check the monitoring statistics for the cloud profile.
To view cloud profile statistics:
- In Director view:
- Select the Monitor tab in the top menu bar.
- Select the organization in the horizontal menu bar
- Select the Devices tab, and click on the device name for which you want to view statistics.

- On the device tab, select Services > NGFW > SSL Cloud.

- On the SSL Cloud tab, find the cloud profile in the Profile Name column, and check for the following issues:
- Scenario 1—Counters are not increasing.
- Scenario 2—The sslcld-snat-resolved-cnt counter is far less than the sslcld-snat-req-sent-cnt, and not increasing.
- Scenario 3—The sslcld-dns-failure-cnt counter is not increasing.
- Scenario 4—The sslcld-syn-request-timeout-cnt counter is increasing, while the sslcld-dns-failure-cnt counter is not increasing.
- Continue to the following sections to troubleshoot these issues.
Scenario 1
If the counters for the cloud profile are not increasing, make sure that the cloud profile and NGFW settings are configured correctly.
To check the configuration:
- In Director view:
- Select the Configuration tab in the top menu bar.
- Select Templates in the horizontal menu bar.
- Select an organization in the left navigation bar.
- Select a template in the main pane. The view changes to Appliance view.
- Select the Configuration tab in the top menu bar.
- Select Objects & Connectors > Objects > Cloud Profiles in the left menu bar. The main pane displays a list of configured cloud profiles.
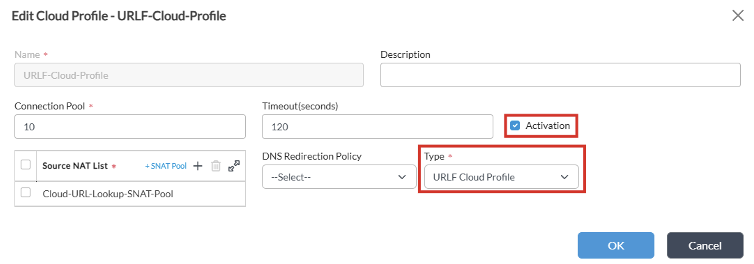
- Click the cloud profile name. The Edit Cloud Profile window displays.
- Check the values for the following fields:
- Activation—The checkbox should be selected.
- Type—The type should be URLF Cloud Profile.
- Click OK.
- Select Services > Next Gen Firewall > Security Settings > URL Filtering.
- Check the values for the following fields:
- Cloud Lookup Profile—Make sure the correct profile is selected.
- Enable Cloud Lookup—The checkbox should be selected.

- Click OK.
Scenario 2
If the sslcld-snat-resolved-cnt counter is far less than the sslcld-snat-req-sent-cnt counter, and is not increasing, this indicates a problem with the SNAT pool. Check the SNAT pool configuration to make sure the SNAT pool is associated with the correct routing instance and egress network, which are expected used for sending cloud URL lookup requests.
To check the configuration:
- In Director view:
- Select the Configuration tab in the top menu bar.
- Select Templates in the horizontal menu bar.
- Select an organization in the left navigation bar.
- Select a template in the main pane. The view changes to Appliance view.
- Select the Configuration tab in the top menu bar.
- Select Objects & Connectors > Objects > SNAT Pool in the left menu bar.
- Click the SNAT pool that you want to verify. The Edit SNAT Pool window displays.
- Check the Routing Instance field to make sure the SNAT pool is associated with the correct routing instance.
- Click the Egress Network tab, and check to make sure the SNAT pool is associated with the correct egress network.
Scenario 3
If the sslcld-dns-failure-cnt counter is increasing, this indicates a problem with DNS resolution of the cloud URL database server. Check the DNS forwarder configuration to make sure the DNS forwarders are associated with the correct routing instance.
To check the configuration:
- In Director view:
- Select the Configuration tab in the top menu bar.
- Select Templates in the horizontal menu bar.
- Select an organization in the left navigation bar.
- Select a template in the main pane. The view changes to Appliance view.
- Select the Configuration tab in the top menu bar.
- Select Networking > DNS > Settings in the left menu bar.
- Check to make sure the DNS forwarders are configured and have the correct routing instance, as shown below.
Scenario 4
If the sslcld-syn-request-timeout-cnt counter is increasing, while the sslcld-dns-failure-cnt counter is not increasing, this indicates a problem with connectivity to the cloud URL resource https://urm.versanow.net or http://service.brightcloud.com (for releases prior to 22.1.3 with Spack 2177).
To troubleshoot connectivity to the cloud URL resources:
- Check the SNAT pool configuration to make sure the SNAT pool is associated with the correct routing instance and egress network. See Scenario 2, above.
- Verify connectivity to https://urm.versanow.net or (for releases prior to 22.1.3 with Spack 2177) http://service.brightcloud.com resources from the routing instance where the SNAT pool is configured.
- For cloud URL lookup with redundant WAN links, in which the SNAT pool associated with LAN-VR, you may need to to verify additional CGNAT and security access rules. See Configure CGNAT Rules and Configure Security Access Rules, above.
Supported Software Information
Releases 20.2 and later support all content described in this article.
Note: For VOS Releases 22.1.3 and later with SPack version 2177 or later, URL cloud lookup requests are sent to https://urm.versanow.net and not to the cloud lookup provider supported in Release 22.1.3 and earlier. Versa URM is a Versa Networks in-house cloud lookup platform that consolidates data from multiple sources.