Deploy a Branch in AWS
![]() For supported software information, click here.
For supported software information, click here.
This article describes how to configure a branch in AWS to automate instantiation, configuration, and monitoring of a Versa Operating SystemTM (VOSTM) branch in the AWS Virtual Private Cloud (VPC).
AWS Prerequisites for cCSG for Versa Titan
This section describes the prerequisites for deploying a cCSG in your AWS VPCs through the Versa Titan dashboard.
Before you begin, perform the following tasks on AWS.
- Create an AWS VPC, and then mount to the internal gateway to reach the internet.
- Ensure that an Amazon Machine Image (AMI) is present, running Release 20.2.x, depending on the Versa Director being used. Provide the AWS account ID to Versa support so they can image into your account.
- Collect the LAN subnet information for the VPC. Note that you must configure the cCSG LAN interfaces to match the AWS environment networks prior to deployment of the virtual device.
IAM Policy for CMS Connector
When you perform authentication using a CMS connection, you must use the following IAM policy so that the CMS connector functions on AWS:
{
    "Version": "2012-10-17",
    "Statement": [
        {
            "Effect": "Allow",
            "Action": [
                "ec2:DescribeAddresses",
                "ec2:DescribeInstances",
                "ec2:MonitorInstances",
                "ec2:DescribeRegions",
                "ec2:DescribeVpcAttribute",
                "ec2:DescribeSecurityGroups",
                "ec2:DescribeImages",
                "ec2:DescribeNetworkInterfaces",
                "ec2:DescribeAvailabilityZones",
                "ec2:DescribeVpcs",
                "ec2:DescribeAccountAttributes",
                "ec2:AssociateAddress",
                "ec2:DisassociateAddress",
                "ec2:DescribeNetworkInterfacePermissions",
                "ec2:DescribeSubnets",
                "ec2:AllocateAddress",
                "ec2:ReleaseAddress",
                "ec2:DescribeKeyPairs"
            ],
            "Resource": "*"
        },
        {
            "Effect": "Allow",
            "Action": [
                "ec2:TerminateInstances",
                "ec2:CreateTags",
                "ec2:RunInstances",
                "ec2:DeleteNetworkInterface",
                "iam:ListInstanceProfiles",
                "ec2:ModifyNetworkInterfaceAttribute",
                "ec2:StopInstances",
                "ec2:ModifyInstanceAttribute",
                "ec2:ReplaceIamInstanceProfileAssociation",
                "ec2:CreateVolume",
                "ec2:CreateNetworkInterface",
                "ec2:DeleteVolume",
                "iam:PassRole",
                "ec2:StartInstances",
                "ec2:DisassociateIamInstanceProfile",
                "ec2:CreateSecurityGroup",
                "ec2:DeleteSecurityGroup",
                "ec2:AssociateIamInstanceProfile"
            ],
            "Resource": [
                "arn:aws:iam::*:instance-profile/*",
                "arn:aws:iam::*:role/*",
                "arn:aws:ec2:*:*:subnet/*",
                "arn:aws:ec2:*:*:instance/*",
                "arn:aws:ec2:*:*:volume/*",
                "arn:aws:ec2:*:*:security-group/*",
                "arn:aws:ec2:*:*:network-interface/*",
                "arn:aws:ec2:*:*:key-pair/*",
                "arn:aws:ec2:*::image/*"
            ]
        }
    ]}
Create an IAM Role
For information about IAM and how to create and allocate specific IAM privileges, refer to the following AWS guides:
- https://docs.aws.amazon.com/IAM/latest/UserGuide/resources.html#resources-iam-and-other-services
- https://docs.aws.amazon.com/AWSEC2/latest/UserGuide/security-iam.html
- https://docs.aws.amazon.com/AWSEC2/latest/UserGuide/iam-roles-for-amazon-ec2.html
To create an IAM role:
- Login to your AWS account.

- Click AWS IAM Credentials tab, and then click the Create access key.

If you have created an access key earlier, you must keep the access key ID and secret access key values. This information is required when you create the CMS connector in the Versa Titan dashboard. - Create an AWS VPC. For more information, see https://docs.aws.amazon.com/vpc/latest/userguide/vpc-getting-started.html.

You can create a VPC or use an existing VPC that has the CIDR and any subnets associated to it. If you create a new VPC, assign a CIDR block or blocks to the VPC. For Versa Titan cCSG, it is not required to create specific subnets from your CIDR blocks to instantiate an EC2 instance. This process is automated from Versa Titan using CloudFormation templates. For more information on AWS VPCs, see the following: - Select Your VPCs in the left navigation pane to view information about your VPC.

The LAN and WAN interfaces of your cCSG must be allocated or assigned an IP address that is within your CIDR block. - Select Route Tables in the left navigation pane. Then click Routes tab to display the route information.

- Select Internet Gateways in the left navigation pane. Then click Create Internet gateway and enter the following information.

Field Description Name tag Creates a tag with a key of name and a value that you specify. Tags - optional Enter a tag value for the following:
- Key
- Value - optional
- To associate an internet gateway to VPC, select Attach to VPC from the Actions drop-down list.

- In the Available VPCs field, enter the VPC name. The VPC will display only if it is not attached to an internet gateway.

- Click Attach Internet gateway.
- To add a default route to internet gateway, select Route Tables in the left navigation pane. Then click Edit Routes.

- In the Edit Routes page, click Add route and enter the route information.
- Click Save Routes.
- Send the AWS account information to Versa Support Team to get your VOS Amazon Machine Image (AMI).
- Copy the AMI to the relevant region.

Configure a Branch in AWS
This section describes how to configure a branch in AWS to automate instantiation, configuration, and monitoring of a VOS branch in the AWS Virtual Private Cloud (VPC).
To configure a branch in AWS:
- Click the Org Settings icon in the left menu bar to open the org settings dashboard, and then click Cloud Account at the top of the screen.
In Titan Portal, click the Inventory icon in the left menu bar to display the Inventory dashboard. Then click +Cloud Account to display the Add Cloud Account window.

- In the Add Cloud Account popup window, enter information for the following fields..

Field Description Cloud Type Enter the cloud type AWS. CMS Name (Required) Enter a name for the CMS. Access Key ID (Required) Enter the access key ID for the CMS account. Secret Key (Required) Enter the secret key for the CMS account. - Click Add.
- Wait for 3 minutes until the CMS account displays. A license is now available from the Configure dashboard. The CMS account displays in the CMS Accounts section. To delete an account, click the
 icon.
icon. - Click Configure to display the Configure dashboard, then click the cCSG icon on the bottom of the dashboard to display available licenses. Select the license you just created, and then drag and drop it onto the dashboard to create a new honeycomb. The New Site: Configuration window displays automatically.

- In the New Site: Configuration window, enter information for the following fields, and then click Next.

Field Description Site Name Enter a name for your site. CMS Flavor Select AWS. CMS Name Select the CMS name, which is the cloud account that is configured in the inventory section. Connector Select the CMS connector. Region Select the region, that is the VPC in which you are deploying the cCSG. This must be the same VPC and region that you created earlier. Instant type Select the instance type for cCSG:
- cCSG-Medium—4 vCPU
- cCSG-Large—8 vCPE
- cCSG-XL—16 vCPU
Key pair Select the AWS key pair. Image Select the AMI that you received from Versa Networks. VPC Network Select the VPC network in which the cCSG EC2 instance is created. Role/Instant Profile Select the IAM role. Availability Zone Select the availability zone. Device Group Enter a device group name. By default, Versa Titan uses the syntax ORG-NAME-LICENSE-# as the device name. Topology Click to enable the use of topologies: - Full Mesh —Configure any-to-any site communication. This is the default.
- Hub—Configure the device as a hub in a hub-spoke topology
- Hub controller—Configure the device as a hub controller in a hub-spoke topology.This device takes up a dual role of a hub and a controller.This function is typically required when branches are connected to a private MPLS network that has no direct access to the Versa hosted controller on the public internet.
- Spoke—Configure the device as a hub in a hub-spoke topology. In a hub-spoke topology, the spoke devices are configured by default in a full mesh. To change the spoke topology to spoke-to-spoke via hub or spoke-to-hub only, contact Versa Titan Support team. This change needs to be done before the first branch configuration is created.
Service (Group of Fields) - Service Type
Displays the type of the device. - Device Name
Enter a name for the device. You cannot change the device name after you have created the device. - Device Model
Enter the device model. - Image Version
Select the VOS software version running on the device. You must select the software version before deploying the device, because you cannot edit this field after the device is deployed. - Click the LAN icon. You must configure the cCSG LAN interfaces to match the AWS environment networks.

- Click the Ethernet and WiFi Ports box.
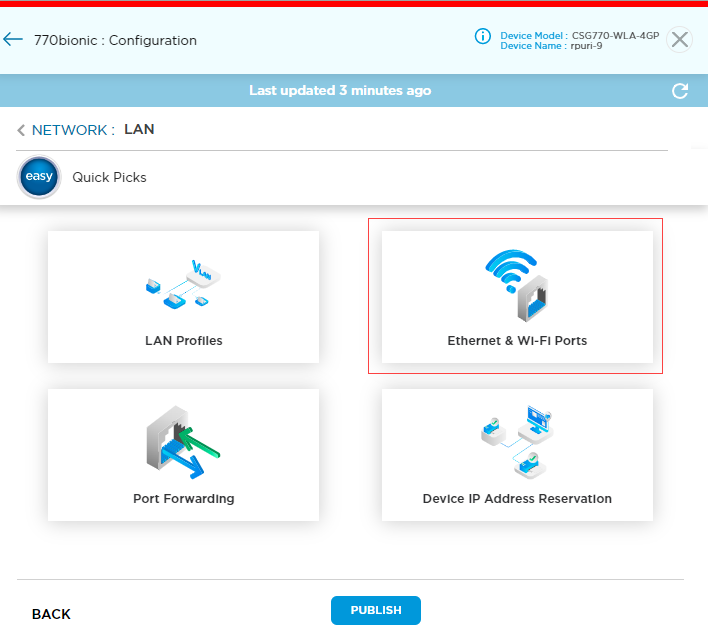
- Enter the DHCP subnet and range information, and then click Save. The New Site: Configuration screen displays again.

- Click the down arrow, and then click Deploy. Wait 5 minutes, and then refresh the screen. Deploying an AWS configuration automatically activates the site.

- The Administrative state color circle turns green to indicate that the site is active. Hover over the device icon to display device information, name, and actions.

Verify AWS Branch Deployment
To verify and confirm the deployment and activation of AWS branch:
- Browse to AWS console.
- Click CloudFormation > Stacks.

- Click CloudFormation stack name.
- Click Events tab and then click refresh button to check the status.

If you see an error, failure, or rollback, check the CloudFormation logs and contact Versa Titan Support. - Click Resources tab to view various subnets that CloudFormation stack creates.

- Click the Template tab to view the template parameters.

- Navigate to AWS Console > Instances to verify that the EC2 instance is created.

- Click the EC2 instance named after the device name of your cCSG site for EC2 instance information.

Supported Software Information
Releases 11.3 and later support all content described in this article.