Configure Custom File-Filtering Profiles
![]() For supported software information, click here.
For supported software information, click here.
On Versa Operating SystemTM (VOSTM) devices, you can use file filtering to reduce the risk of attacks from unwanted and malicious files, thus decreasing an attacker's ability to attack your organization by protecting against virus and vulnerabilities that are associated with various types of files. File filtering is performed based on the file type and the hash of the file.
You can configure file filtering to block the transfer of potentially dangerous files and types of files (that is, files associated with specific applications), files of specific sizes, files associated with specific protocols, and files traveling in a particular direction. You can configure SHA-based hash lists of files to mark potentially dangerous files for denying (sometimes called blacklisting) and to mark safe files for allowing (sometimes called whitelisting). You can configure file filtering to perform reputation-based file hash lookups on a cloud server.
Deny list, allow list, and cloud lookup file-filtering scans calculate the SHA-256 and SHA-384 sums of the file. You can configure a deny or a allow to match the SHA-256 and SHA-384 sums.
To configure file filtering, you create a file-filtering profile that defines rules for filtering files that enter and leave the network. The rules define match conditions and actions to take when a file does or does not meet the match conditions. You associate file filtering profiles with devices that are connected to a Secure Web Gateway (SWG) and that need to send traffic to the internet.
The file-filtering process is performed in the following sequence:
- Scan the early bytes of an incoming file and identify the file type.
- Calculate the SHA-256 or SHA-384 sum (or both) of the file and check whether it matches a deny list or an allow list entry.
- If a deny list entry matches, take the action configured in the deny list rule.
- If no deny list entry matches, check the allow list entries.
- If an allow list entry matches, take the action configured in the allow list rule.
- If no deny list or allow list entries match, check the configured rules.
- Search the configured rules to check whether the file type, file size, protocol, and direction match one of the rules.
- If a match occurs, take the appropriate rule action.
- If no match occurs, perform a cloud lookup.
- Perform a cloud lookup, sending the hash of the file, to check the file's reputation.
- If the hash of the file is found, take the configure action. A hash can indicate that the file is clean, malicious, or suspicious.
- If the file matches none of these, take the default action defined in the file-filtering profile.
To configure custom file-filtering profiles:
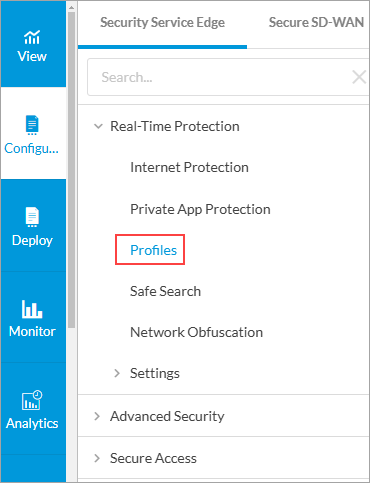
- Go to Configure > Secure Services Edge > Real-Time Protection > Profiles.
The following screen displays:

- Select the Filtering Profiles > File Filtering tab.
Note: In Release 12.2.2, the Secure Web Gateway (SWG) tab was renamed Filtering Profiles.
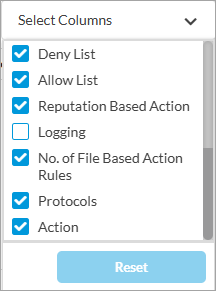
- To customize which columns display, click Select Columns and then click the columns to select or deselect the one you want to display. Click Reset to return to the default column display settings.
- Click
 Add to create a profile. The Create IP Filtering screen displays, and the Deny and Allow List step selected. By default, all fields are configured. To customize IP filtering actions, enter information for the following fields. Note that if the traffic matches both a deny list and an allow list, the action in the deny list takes precedence.

Field
Description Deny List (Group of Fields)
Configure a SHA-based list of files to deny. - Action
Select the default action to take when a file is detected in the deny list:
- Alert—Allow the file to pass and, if a LEF profile is configured, log the action.
- Block—Do not allow the file to pass and, if a LEF profile is configured, log the action.
- Reject—Reset the connection to the server and client and, if a LEF profile is configured, log the action.
- SHA256
Click the
Add icon to specify the SHA-256 hash value of a denied file. You can associate more than one hash value with a file for the deny list check.- SHA384
Click the
Add icon to specify the SHA-384 hash value of a denied file. You can associate more than one hash value with a file for the deny check.Allow List (Group of Fields)
- SHA256
Click the
Add icon to specify the SHA-256 hash value of an allowed file. You can associate more than one hash value with a file for the allow list check.- SHA384
Click the
Add icon to specify the SHA-384 hash value of an allowed file. You can associate more than one hash value with a file for the allow list check.- Enable Logging
Select to store logs for allowed files.
- Click Next to go to the File-Based Action screen, to configure file-filtering rules for file properties, such as file type, file size, protocol, and direction.

- Click Add icon, and in the Add File-Based Action popup window, enter information for the following fields.

Field Description File-Based Action Name
Enter a name for the file action.
Description
Enter a text description for the file action.
Action
Select the default action to take on a file:
- Alert—Allow the file to pass and, if a LEF profile is configured, log the action.
- Allow—Allow the file to pass without logging the action.
- Block—Do not allow the file to pass and, if a LEF profile is configured, log the action.
- Reject—Reset the connection to the server and client and, if a LEF profile is configured, log the action.
File Size
Enter a file size. Any file larger than this size is filtered.
Value: 1 through 4294967295
Default: None
Select the type of protocols to filter
Select the protocols to associate with the file transfer. You can select multiple protocols.
Select files
Select the file type on which to apply the file filter. You can select multiple file types or click Select All to select all files.
Select the direction of the traffic to filter
Select the direction in which to apply the both (download and upload) file filter.
- Click Add.
- Click Next to go to the Reputation-Based Action screen to configure file-filtering rules for cloud-based hash lookups. Enter information for the following fields.

Field
Description Reputation Based Action
Select the default action to take on a file:
- Alert—Allow the file to pass and, if a LEF profile is configured, log the action.
- Allow—Allow the file to pass without logging the action.
- Block—Do not allow the file to pass and, if a LEF profile is configured, log the action.
- Reject—Reset the connection to the server and client and, if a LEF profile is configured, log the action.
Cloud Lookup
Click to enable cloud lookup state of a file for its reputation.
- Click Next to go to the Files and Protocols screen, to select the default action to perform when there is no matching criteria. Enter information for the following fields.

Field Description File Decompression (Group of Files)
Configure file decompression. Note that file filtering can decompress only .gzip files. - File Decompression
Click to decompress the files being filtered and to place them into subdirectories. - Maximum Number of Subdirectories
(For Releases 12.2.1 and earlier). Enter the maximum number of subdirectories. Note that a .gzip file can be decompressed only into a single subdirectory.
Range: 1 through 10
Default: 1
Specify the action
Select the action to take when the maximum number of decompression subdirectories is reached:
-
Alert
-
Allow
-
Block
-
Reject
- Protocol
Select one or more protocols to filter the files:
-
FTP
-
HTTP
-
IMAP
-
MAPI
-
POP3
-
SMTP
- Click Next to go to the Action screen, and enter information for the following fields.

Field
Description Action
Select the default action to take on a file:
- Alert—Allow the file to pass and, if a LEF profile is configured, log the action.
- Allow—Allow the file to pass without logging the action.
- Block—Do not allow the file to pass and, if a LEF profile is configured, log the action.
- Reject—Reset the connection to the server and client and, if a LEF profile is configured, log the action.
Cloud Lookup
(For Releases 12.2.1 and earlier). Click to enable cloud lookup of a file for its reputation.
Enable Logging
(For Releases 12.2.1 and earlier). Click to store logs.
- Click Next to go to the Review and Submit screen.

- In the General section, enter a name for the File filtering profile and, optionally, a description and tags.
- For all other sections, review the information. If you need to make changes, click the
 Edit icon.
 - Click Save.
To delete a file filtering profile, select the profile in the File Filtering tab and click the ![]() Delete icon.
Delete icon.
Supported Software Information
Releases 11.2.1 and later support all content described in this article, except:
- In Release 12.2.2, the Secure Web Gateway (SWG) tab was renamed Filtering Profiles.
Additional Information
Configure Custom URL-Filtering Profiles
Configure SASE Internet Protection Rules