Configure SD-WAN Malware Protection Policies
![]() For supported software information, click here.
For supported software information, click here.
You can configure malware protection policies to detect and prevent malware threats. You then associate the policies with basic or standard master profiles. For more information, see Configure Profiles.
Note that when you configure master profiles and subprofiles, malware protection policies are referred to as antivirus policies.
To configure a malware protection policy:
- In Tenant view, go to the Configure lifecycle in the left menu bar.

- Select Secure SD-WAN > Profile Elements > Policies > Security >Malware Protection.
- If you have not yet configured a malware protection policy, the following screen displays. Click Create Malware Protection Profile to display the Add Malware Protection Profile screen. Continue with Step 4.

- If you have configured one or more malware policies, the Malware Protection Profile screen displays the policies that are already configured.

- If you have not yet configured a malware protection policy, the following screen displays. Click Create Malware Protection Profile to display the Add Malware Protection Profile screen. Continue with Step 4.
- In the horizontal menu bar, you can select one of the following operations.
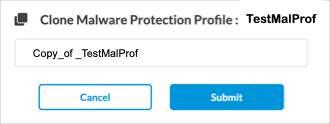
Operation Description + Add Create a new malware protection policy. This button is active when no existing profile is selected. Clone Clone the selected malware protection policy. A popup window similar to the following displays.

Rename the default name of the cloned policy (here, Copy_of_TestMalProf), if needed, and then click Submit.
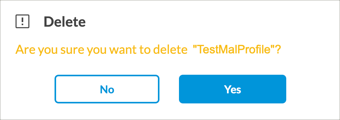
Delete Delete the selected malware protection policy. A popup window similar to the following displays.

Click Yes to delete the policy, or click No to retain the profile.
Refresh Refresh the list of existing policies. More Actions Perform an action on the selected malware protection policy:
- Compare Versions—View the differences between two versions of a policy.
- Disable Auto Delete—Disable the automatic deletion of the policy (auto deletion is enabled by default). For more information, see Configure Automatic Deletion of SD-WAN Object Versions.
- Propagate—Propagate changes made to a profile to any entities that use the policy. For more information, see Propagate Object Configuration Changes.
- View References—View the objects that refer to the selected policy. For more information, see View References to Objects in the Configuration Hierarchies.
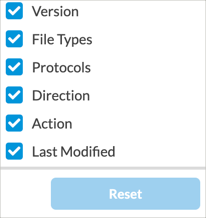
Select Columns To select the columns that you want to display, click the down arrow. To return to the default column selection, click Reset.

The column headings are:- Action
- Direction
- File Types
- Last Modified
- Protocols
- Version
- Click
 Add to create a new malware protection policy. A policy consists of one or more match criteria, an action, and permissions. The following screen displays.

- In Step 1, File Type and Protocol, select the protocols to scan for malware. Use the search box to find specific protocol types. Check the Select All box to select all protocol types.

- Select the types of files to scan for malware. Use the search box to find specific file types. Check the Select All box to select all file types.

- Scroll to the bottom of the screen, and then click the direction of the traffic on which to perform the malware scan.
- Click Next to go to Step 2, Enforcement. You can define the default enforcement actions to take on traffic that meets the previously selected match conditions. The following screen displays the available enforcement actions.

- Select the action to enforce when traffic matches the protocols, file types, and traffic direction you selected in Step 1, File Types and Protocol:
- Alert—Allow the file to pass and log the action.
- Allow—Allow the file to pass without logging the action.
- Deny—Do not allow the file to pass and log the action. This is the default.
- Recommended Action—FTP and HTTP traffic is set to Deny. Email traffic (SMTP, IMAP, POP3, and MAPI) is set to Alert.
- Reject—Reset the connection to the server and client, and log the action.
- Click Next to go to Step 3, Permissions. You can select malware protection policy permissions for each Concerto role.

- Enter information for the following fields.
Field Description Enterprise Administrator Select a malware policy permission for user accounts with the Enterprise Administrator role:
- Edit—User can view and change malware policies.
- Hide—User cannot view malware policies.
- Read—User can view malware policies.
Default: Edit
Service Provider Administrator Select a malware policy permission for user accounts with the Service Provider Administrator role:
- Edit—User can view and change malware policies.
- Hide—User cannot view malware policies.
- Read—User can view malware policies.
Default: Edit
Service Provider Operator Select a malware policy permission for user accounts with the Service Provider Operator role:
- Edit—User can view and change malware policies.
- Hide—User cannot view malware policies.
- Read—User can view malware policies.
Default: Read
Enterprise Operator Select a malware policy permission for user accounts with the Enterprise Administrator role:
- Edit—User can view and change malware policies.
- Hide—User cannot view malware policies.
- Read—User can view malware policies.
Default: Read
- Click Next to go to Step 4, Review and Submit.
- In the General box, enter a name for the malware protection policy. You can also enter a text description for the policy and one or more tags. A tag is an alphanumeric text descriptor with no spaces or special characters. You can specify multiple tags added for the same object. The tags are used for searching the objects.
- Review the settings you have selected. Click the
 Edit icon to change a setting, as needed.
 - Click Save to create the malware protection policy.
Supported Software Information
Releases 12.1.1 and later support all content described in this article.
