Create Application-Steering Templates
![]() For supported software information, click here.
For supported software information, click here.
You use configuration templates, simply called templates, to create baseline configurations that you can distribute automatically across many Versa Operating SystemTM (VOSTM) devices. You use workflows to create templates to configure VOS devices, application steering, spoke groups, and services chains. In Versa Director, you configure all these templates using Workflows > Template menus.
You use application-steering templates to create traffic categories, which are also called buckets, and to define rules for the handling the traffic that fall into those buckets. You associate service templates with an organization.
Create Application-Steering Templates
To create an application-steering template:
- In Director view, select the Workflows tab in the top menu bar.
- Select Template > Application Steering in the horizontal menu bar.

- Click the
 Add icon. Enter information for the following fields.

Field Description Template Name (Required) Enter a name for the application-steering template. Organization (Required) Select the organization to which to apply the application-steering template. - To modify the default configuration, click the
 Edit icon in the Real Time, Business Critical, Default, and Low Priority sections and make the necessary changes. Note that if you are modifying an existing application-steering template, you can modify all parameters except the template name and organization. Also note that if you make any changes to a traffic category or a rule, you click Save or Deploy to save them.
 - Click Save or Deploy.
Add a Traffic Category
Traffic categories are also known as buckets, where you can categorize rules. A rule cannot exist outside of a bucket.
- In the Director view, select the Workflows tab in the top menu bar.
- Select Template > Application Steering in the horizontal menu bar.

- Click an application name in the main pane. The following screen displays:

- Click the
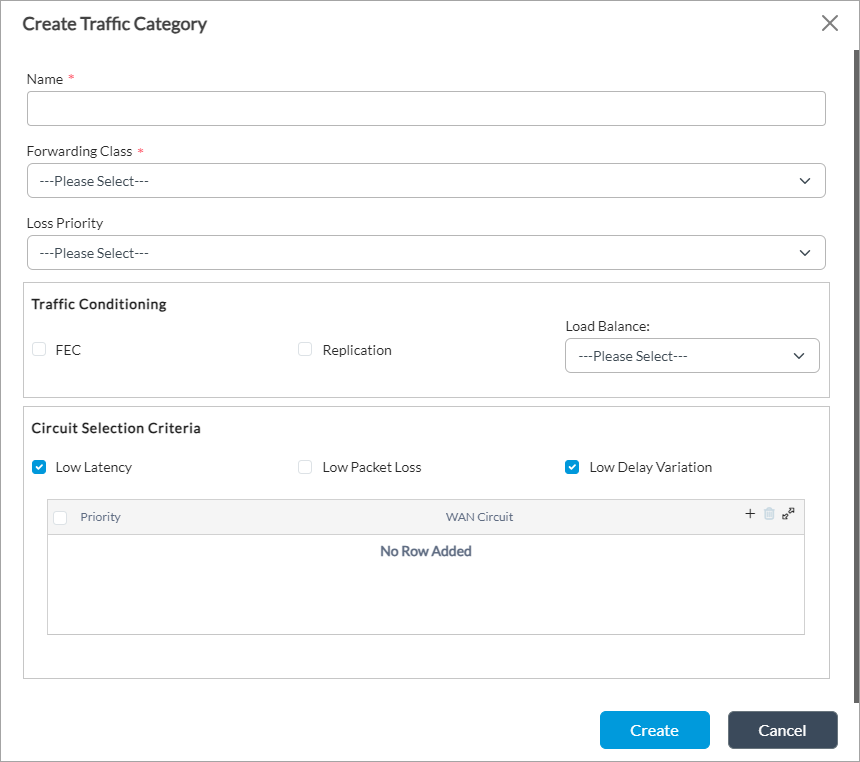
 Add Traffic Category button. The Create Traffic Category screen displays. Enter information for the following fields.

Field Description Name (Required) Enter a name for the traffic category. Forwarding Class (Required) Select the forwarding class. Loss Priority Select the priority for dropping packets: - High
- Low
Traffic Conditioning (Group of Fields) - FEC
Click to enable forward error correction, for handling packet loss. - Replication
Click to replicate packets in the traffic flow. - Load Balance
Select how to load-balance traffic: - Per flow
- Per packet
Circuit Selection Criteria (Group of Fields) - Low Latency
Click to select a circuit that is optimized to process a high volume of data traffic with minimal delay (latency). Low-latency circuits support operations that require near real-time access to rapidly changing data. - Low Packet Loss
Click to select a circuit with low packet loss. - Low Delay Variation
Click to select a circuit with low delay variation between packets. Priority Select the priority of the WAN circuit. WAN Circuit Select the WAN circuit to use. - Click Create.
To edit a traffic category, select an organization and then click the edit icon for the category.
Add a Rule
A rule is a set of guidelines that must be followed by the network packets. Under Workflows, you can define rule for various traffic categories.
- In the Director view, select the Workflows tab in the top menu bar.
- Select Template > Application Steering in the horizontal menu bar.
- Click the
 Add icon for a specific traffic category (bucket) to add a rule for that category.

- Enter information in the Name and Description fields.
- Click Create.
Reorder Rules and Traffic Categories
To change the order of rules in a traffic category, drag and drop the rule to the desired location. To move a rule across traffic categories, drag the rule from a bucket and drop it into the desired bucket.
Supported Software Information
Releases 20.2 and later support all content described in this article.
