Configure Dynamic VLAN Assignment Using 802.1X Authentication
![]() For supported software information, click here.
For supported software information, click here.
You can configure a Versa Operating System™ (VOS™) device to use a RADIUS authentication server to dynamically assign VLANs to bridge ports using the 802.1X authentication. After a port is authenticated using 802.1X device authentication, the authentication server assigns a VLAN to the port.
You can configure dynamic VLAN assignment on Layer 2 VNI interfaces that are also 802.1X authenticator interfaces.
The 802.1X supplicant type can be one of the following:
- Single—Authenticate only the first end device. All other end devices that connect to the port later are allowed access without any further authentication. The subsequent devices effectively piggyback on the first end device’s authentication.
- Single-secure—Allow only one end device to connect to the port at a time. No other end device can connect until the first device logs out.
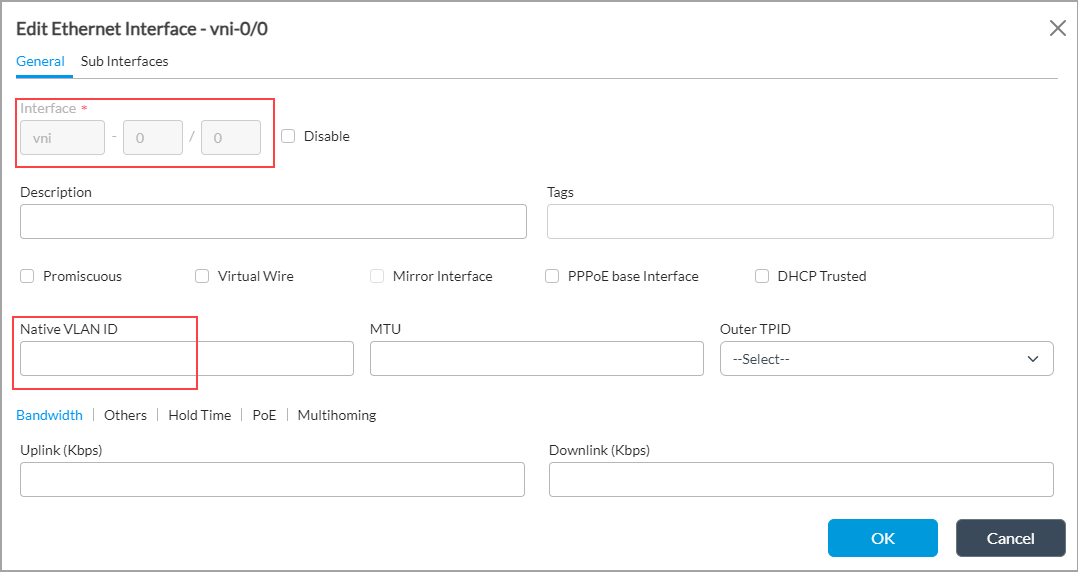
- Multiple—Allow multiple end devices to connect to the port. Each end device is authenticated individually. You can configure multiple mode only on bridge interfaces that are in trunk mode. You configure the trunk interface with member VLANs, a native VLAN ID, which is one of the VLANs in the trunk interface, and 802.1X settings.
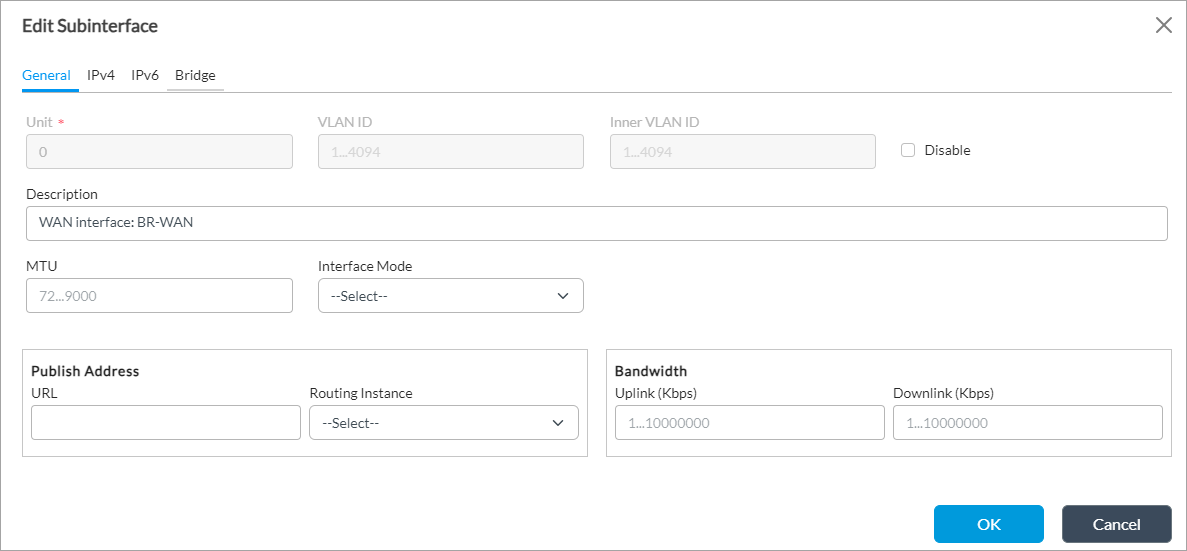
For Layer 2 trunk ports, you can configure only unit 1 of the interface as an 802.1X interface.
Before you configure dynamic VLAN assignment, you must create an access bridge (Layer 2) interface that has the same VLAN ID (802.1X setting). (For more information, see Configure Access Interfaces in the Configure Layer 2 Forwarding article.) Then, based on the interface's 802.1X authentication, the VLAN ID changes from its starting value to dynamic VLAN ID. To display information about the change and the dynamic VLAN ID for the interfaces, issue the show interface detail CLI command.
When you remove the 802.1X authentication configuration from the Layer 2 access interface, the initial or user-configured 802.1X VLAN ID takes effect for the interface.
VOS devices support the following 802.1X VLAN assignments:
- Authentication default VLAN ID—If 802.1X device authentication succeeds and if RADIUS dynamic VLAN is disabled, or if VLAN information is not received from the RADIUS server, the authentication default VLAN ID is assigned to interface.
- Guest VLAN ID—The guest VLAN provides limited access for devices that have failed authentication or that are nonresponsive end devices that are not 802.1X-enabled. If no device authenticates using 802.1X authentication, the guest VLAN ID is assigned to the interface.
- RADIUS dynamic VLAN—VLAN assignment is done based on the response from the RADIUS server authentication server. The RADIUS server must return the following attributes to the VOS device:
- Tunnel-Type (Type 64) set to VLAN (13)
- Tunnel-Medium-Type (Type 65) set to 802 (6)
- Tunnel-Private-Group-ID (Type 81) set to VLAN ID
Before you configure dynamic VLANS using the 802.1X authentication, ensure that you familiar with the following:
- How to configure 802.1X authentication on VNI interfaces. For more information, see Configure IEEE 802.1X Device Authentication.
- How to configure Layer 2 interfaces. For more information, see Configure Layer 2 Forwarding.
Configure Dynamic VLANs using the 802.1X Authentication Flow
To configure dynamic VLAN assignment using 802.1X authentication, you do the following:
- Configure a RADIUS server.
- Configure an authentication profile that includes the RADIUS server you configured.
- Configure the dynamic VLAN assignment.
Configure a RADIUS Server
- In Director view:
- Select the Configuration tab in the top menu bar.
- Select Devices > Devices in the horizontal menu bar.
- Select a device name in the main panel. The view changes to Appliance view.
- Select Others > Organization > RADIUS Servers in the left menu bar.

- Click the
 Add icon. In the Add RADIUS Servers popup window, enter information for the following fields.
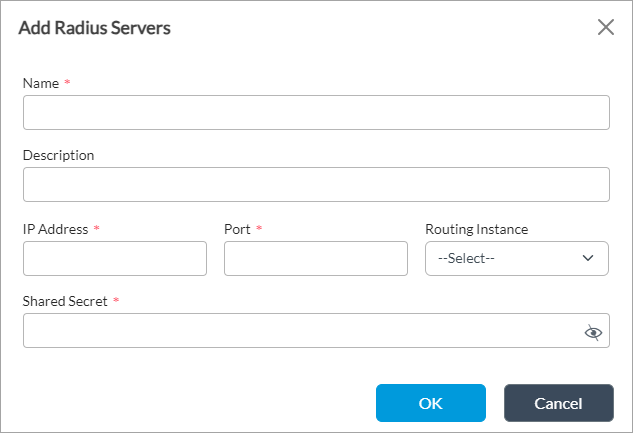
Field Description Name (Required) Enter a name for the RADIUS server. Description Enter a description for the RADIUS server. IP Address (Required) Enter the IP address of RADIUS server.
Port (Required) Enter the port to connect to on the RADIUS server. Routing Instance Select a routing instance to use to reach the RADIUS server. Shared Secret (Required) Enter the shared secret password for the RADIUS server. - Click OK.
Configure an Authentication Profile
- In Director view:
- Select the Configuration tab in the top menu bar.
- Select Devices > Devices in the horizontal menu bar.
- Select a device name in the main panel. The view changes to Appliance view.
- Select Others > Organization > Authentication Profile in the left menu bar.

- Click the Add icon. In the Add Authentication Profile popup window, select the General tab and enter information for the following fields.

Field Description Name (Required) Enter a name for the authentication profile. Type (Required) Select an authentication type:
- Local
- RADIUS
Description Enter a description for the local or RADIUS server. Trusted Certificate Database (Required) For local authentication type, select the trusted certificate database to use to verify and confirm the authority of the server certificate. Certificate (Required) For local authentiction type, select a certificate to use to authenticate the server. Radius Server (Required) Click the
Add icon, and then select the RADIUS server. To add a new RADIUS server, click + New RADIUS Server. See Configure a RADIUS Server. - Click OK.
Configure Dynamic VLAN Assignment
To dynamically assign VLANs to bridge access ports using the 802.1X device authentication flow:
- In Director view:
- Select the Administration tab in the top menu bar.
- Select the Appliances in the left menu bar.
- Select a device name in the main panel. The view changes to Appliance view.
- Select the Configuration tab in the top menu bar.
- Select Others > Organization > dot1x > Authentication Control in the left menu bar, and then select the dot1x tab in the horizontal menu bar.

- Click the
 Edit icon. In the dot1x popup window, enter information for the following fields.

Field Description Authentication Profile (Required) Select an authentication profile. Interface Name (Required) Select an interface name. Quiet Period Enter how long the interface waits after a failed authentication attempt before trying to authenticate a user again.
Range: 0 through 600 seconds
Default: None
No Reauthentication Click to disable periodic reauthentication of users. Reauthentication Interval Enter the interval at which to reauthenticate the user. By default, a user is reauthenticated at each configured interval.
<Range: 10 through 86400 seconds
Default: None
Retries Enter how many times to try to authenticate the port after an initial failure. The port remains in a wait state during the quiet period after the authentication attempt.
Range: 1 through 10
Default: 2
Role Select the interface role:
- Authenticator—Interface acts as the authenticator
- Supplicant—Interface acts as a supplicant
Default: None
Supplicant Select the type of supplicant:
- Multiple—Allow multiple end devices to connect to the port. Each end device is authenticated individually. Multiple mode is supported only on bridge interfaces in trunk mode.
- Single—Authenticate only the first end device. All other end devices that connect to the port later are allowed access without any further authentication. The subsequent devices effectively piggyback on the first end device’s authentication.
- Single-secure—Allow only one end device to connect to the port at a time. No other end device can connect until the first device logs out.
Default: None
Enable Dynamic VLAN Click to enable dynamic VLANs. Enable RADIUS Dynamic VLAN Click to enable RADIUS dynamic VLANs. Auth Default VLAN ID Enter the ID for the default VLAN.
Range: 0 through 4094
Default: None
Guest VLAN ID Enter the ID for the guest VLAN.
Range: 0 through 4094
Default: None
 Add Icon
Click to add the interface to the 802.1X profile. - Click OK.
Configuration Examples
The examples in this section show how to configure a multiple supplicant and a single supplicant.
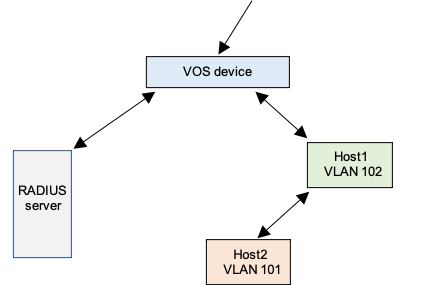
The following figure illustrates single-supplicant mode. Here, there is only one host (single supplicant) in the topology, Host1. You configure the interface in access mode with a VLAN ID of dot1x.


The following figure illustrates multiple-supplicant mode. Here, there are two hosts in the topology, Host1 and Host2. Host1 is assigned to one VLAN (here, VLAN ID 102), and Host2 is assigned to a different VLAN (here, VLAN ID 101). The RADIUS server assigns the VLAN ID based on the client authentication. You configure the 802.1X interface in trunk mode, and you enable multiple-supplicant mode. You also configure the interface with a native VLAN that is same as the guest VLAN.

You can display the configuration and VLAN information as follows:
- In Director view, select Administration > Appliances and then select the device name.
- In Appliance view, select Configuration > Others > Organization > dot1x > Authentication Control and select the dot1x tab.
Supported Software Information
Releases 21.2.1 and later support all content described in this article.
Additional Information
Configure IEEE 802.1X Device Authentication
Configure Layer 2 Forwarding