Migrate Concerto Release 13.1.1
![]() For supported software information, click here.
For supported software information, click here.
This article describes how to install, migrate, and upgrade a Concerto cluster to Release 13.1.1 (Noble) (Ubuntu 24.04) from Bionic hosts.
The Concerto upgrade software is available in AMI, ISO, and QCOW2 formats. You install a Concerto node on bare-metal servers using the ISO file, or create a virtual machine using the AMI or QCOW2 file. To install Concerto nodes in cluster mode, create a Concerto instance for each of the nodes using the Concerto ISO or QCOW2 image. Each node must have two network interfaces:
- One interface for northbound communication, which allows access to the portal UI from the internet. On the northbound interface, configure firewalls to allow only TCP ports 80 and 443 to be used to access the portal UI from the internet.
- One interface for southbound communication, which is used for Docker overlay communications and for communication with Versa Director and Versa Analytics nodes.
You cannot upgrade an existing cluster directly to Release 13.1.1 using the bin file due to an operating system upgrade from Bionic to Noble. To upgrade an existing Concerto cluster to Release 13.1.1, you must use one of the following methods, and then migrate the database from the backup taken from Release 12.x:
- Deploy new nodes (VMs or bare-metal servers) and create a new cluster
- Reinstall the existing bare-metal servers using the 13.1.1 ISO image
These methods are described in the following sections.
Upgrade Concerto Cluster from Bionic to Release 13.1.1 Using New Hosts
This section describes the upgrade method for migrating a Concerto Bionic cluster to Concerto Release 13.1.1 (Noble) cluster using new hosts. If you have resources to provision new physical or virtual machines, you can deploy a separate Concerto Noble cluster using the AMI, ISO, or QCOW2 image, assign different IP addresses, and migrate the data from the existing cluster.
The following figure shows the upgrade process from Concerto Bionic to Concerto 13.1.1 with new hosts. In a 3-node deployment, Node 1 acts as the primary cluster, Node 2 as the secondary cluster, and Node 3 as the arbiter.

The Concerto Noble cluster becomes the new production environment after migration and validation, ensuring a secure, scalable, and upgraded Concerto deployment.
Upgrade Concerto Cluster from Bionic to Release 13.1.1 with Existing Hosts
The following figure shows the upgrade process from Concerto Bionic to Concerto 13.1.1 (Noble) with existing nodes for a multi-node setup. This method reuses the same nodes and IP addresses, and upgrades existing nodes using the Arbiter node as the migration node.
If the Concerto node is deployed on a physical server, you must reinstall the server using the Concerto 13.1.1 ISO image and configure the same IP address.

In this deployment model, the arbiter node (Node 3) is upgraded first from Bionic to Noble, and it becomes a temporary single-node cluster. Then, the primary and secondary nodes are upgraded from Bionic to Noble into a new cluster with Node 1 as Primary cluster, Node 2 as Secondary cluster, and Node 3 as Arbiter.
System Requirements
Before you migrate to Concerto 13.1.1, make sure your system meets the following requirements.
Minimum Supported Software Releases
To migrate to Release 13.1.1, the Concerto devices must be running Releases 12.2.1 or later.
Data backups from Concerto Releases 12.1 and earlier do not support migration to Release 13.1.1 directly. To migrate Concerto from Releases 12.1 and earlier to Release 13.1.1, you must use the following sequence:
- Upgrade Concerto to Release 12.2.2
- Take a backup of Release 12.2.2
- Use the backup to migrate to Release 13.1.1
Firewall Requirements
Hardware Requirements
Prerequisites
Before you begin the upgrade and migration to Concerto Release 13.1.1, complete the following tasks to ensure the upgrade and migration process is successful with limited downtime.
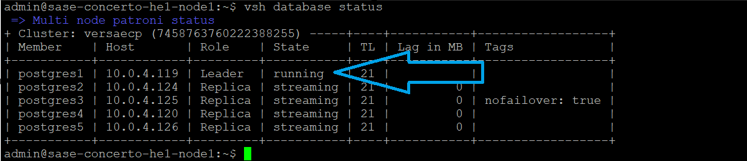
- To find the primary cluster node from which to take the database backup, issue the vsh database status command. In the example below, the database backup is taken from the postgres1 node, which is the leader node.
- To take the database backup of the primary cluster node, issue the vsh database backup create command.
vsh database backup create
The following sample output shows the database backup file is saved in the /var/versa/ecp/archives directory.

- Destroy the current node or cluster, or create a new host or cluster with the provided QCOW2 image.
- To check the difference between the last published configuration and the unpublished configuration, and to publish configuration from the Concerto production node, see Publish SASE Gateways.
- Run the following commands on the Concerto node to troubleshoot Versa Concerto and its various services:
Check Item Command/Action View the system routing table, verify network paths and the default gateway. route -n ifconfig Verify hardware resources for the new node. free -h View the filesystem name. df -kh View the status of Concerto services. vsh status Display basic build details about the installed Concerto software. vsh system details Display the current status of a multinode deployment. vsh cluster info View the current OS SPack version installed on Concerto. vsh system osspack info cat /etc/hosts cat /etc/network/interfaces List all the Docker services in the cluster. docker service ls List all containers running on the system. docker container ls docker node ps List all Docker images loaded on the system. docker image ls
Install Concerto Release 13.1.1
To install Concerto Release 13.1.1:
- Download the Concerto Release 13.1.1 QCOW2 image from the https://builds.versa-networks.com/versa-concerto/qcow2/ location.
- To unpack the Concerto QCOW2 image, issue the sudo tar -xvjf image-name command. For example:
sudo tar -xvjf versa-concerto-a121c5a-13.1.1.qcow2.tbz2
The QCOW2 image is unpacked as concerto-20260417-191445-a121c5a-13.1.1.qcow2.
- (Optional) To increase the disk size on the QCOW2 image, issue the following command.
sudo qemu-img resize <path> <image-name> +<size>G
For example, to increase the disk size for the concerto-20260114-072043-4326ec5-13.1.1-noble.qcow2 image to 250 GB, issue the following command:
sudo qemu-img resize /home/versa/concerto-20260114-072043-4326ec5-13.1.1-noble.qcow2 +250G
- To verify the expanded disk size, issue the following command.
sudo qemu-img info <path> <image-name>
For example, the following sample output shows the disk size is 250 GB, an increase of 170 GB over the original 80 GB. The disk size reflects actual host usage and does not change until the guest writes data.
sudo qemu-img info /home/versa/concerto-20260114-072043-4326ec5-13.1.1-noble.qcow2
/home/versa/concerto-20260114-072043-4326ec5-13.1.1-noble
file format: qcow2
virtual size: 250G
disk size:
cluster_size:
- To create and provision the VM, issue the following command. While provisioning the VM, you must allocate 4 CPU cores and 8 GB RAM.
virt-install
The following example uses 16 GB RAM and 8 CPU cores.
virt-install
--name concerto-noble-1311
--memory 16384
--vcpus 8
--disk path=concerto-20260114-072043-4326ec5-13.1.1-noble.qcow2, format=qcow2
--import
--os-variant ubuntu18.04
--graphics none &
- To login to the shell, use the following shell initial login credentials. The default password is only applied for the first time login. You can change the username and password. Contact Versa customer support team for the default login credentials.
virsh console concerto-noble-1311
- To ensure the OS utilizes the VM disk size if the disk size is increased:
To use the newly allocated disk space, issue the following command.
sudo growpart <disk-name>
For example:
sudo growpart /dev/vda 1
To resize the expanded file system to match the new disk size, issue the following command.
sudo resize2fs <disk-name>
For example:
sudo resize2fs /dev/vda1
To find the filesystem name, use the df -h command. For example:
df -h

Filesystem      Size  Used Avail Use%  Mounted on
/dev/vda1       246G  4.2G  242G   2%  /
tmpfs           3.9G     0  3.9G   0%  /dev/shm
tmpfs           783M  1.1M  782M   1%  /run
/dev/vda15      105M  6.1M   99M   6%  /boot/efi
- To assign a static IP address for an existing VM or for a new VM, edit the Netplan configuration file and update the file with the custom settings. You assign a unique non-duplicate IP address.
vi /etc/netplan/50-cloud-init.yaml

network:
  version: 2
  ethernets:
    eth0:
      addresses:
        - <ip address>/<prefix>
      routes:
        - to: default
          via: <gateway>
      nameservers:
        search: [ <domain name> ]
For example:
vi /etc/netplan/50-cloud-init.yaml

network:
  version: 2
  ethernets:
    eth0:
      addresses:
        - 10.70.207.171/16
      routes:
        - to: default
          via: 10.70.0.1
      nameservers:
        search: [ versa-networks.com ]
- To save the Netplan configuration file and exit the editor, issue the following command.
[ESC] :wq
- To apply the network configuration changes, run the following commands:
To check that the configuration is correct and confirm the configuration temporarily, issue the netplan try command. Press the Enter key before the timeout period (120 seconds). If you do not press the Enter key for 120 seconds, the configuration automatically reverts to the previous configuration.
sudo netplan try
To apply the configuration permanently after confirming the correct configuration, issue the following command:
sudo netplan apply
- To configure DNS settings permanently, edit the resolved.conf file. Do not use the /etc/resolv.conf file.
sudo vi /etc/systemd/resolved.conf
Uncomment and set the DNS line under [Resolve] and update the DNS server IP addresses to match your network DNS servers. You can enter multiple DNS servers separated with a space.
DNS=<server-ip-address> <server-ip-address>
For example:
DNS=8.8.8.8 1.1.1.1
Restart the service to apply changes.
sudo systemctl restart systemd-resolved
- To configure the hostname of the Concerto node, issue the hostnamectl set-hostname command. For a multi-node cluster, all nodes must have unique hostnames.
sudo hostnamectl set-hostname hostname
For example:
sudo hostnamectl set-hostname Concerto-1
Map that hostname to IP address 127.0.1.1 in the /etc/hosts file:
sudo vi /etc/hosts
For example:
127.0.1.1 Concerto-1
To save the the configuration and exit the editor, issue the following command.
[ESC] :wq
Reboot the cluster node.
sudo reboot
- To initialize the cluster for a single node setup or for multi-node set up, run the vsh cluster init command and enter the required information. Set static IP addresses and unique host names for the nodes before initializing the cluster. If required, provision more nodes for the cluster for a multi-node setup.
vsh cluster init

[sudo] password for admin:
ARE YOU SURE, YOU WANT TO INITIALIZE THE CONCERTO SETUP? OLD CONFIGS WILL BE DELETED - Y/N: Y
Enter the number of nodes needed for the cluster: 3
--------------------------------------------------------------------------------
Enter the IP address for node 1: 10.70.196.49
Enter the Public/External IP address or FQDN for node 1 [Press enter to reuse the node IP]:
Enter the username for node 1: admin
Enter the password for node 1:
Select the node type:
1. Primary
2. Secondary
3. Arbiter
Select the value: 1
Configure PGSQL:
1. Yes
2. No
Select the value: 1
concerto-noble-1311
--------------------------------------------------------------------------------
Enter the IP address for node 2: 10.70.196.50
Enter the Public/External IP address or FQDN for node 2 [Press enter to reuse the node IP]:
Enter the username for node 2: admin
Enter the password for node 2:
Select the node type:
1. Primary
2. Secondary
3. Arbiter
Select the value: 2
Configure PGSQL:
1. Yes
2. No
Select the value: 1
concerto-noble-1311
--------------------------------------------------------------------------------
Enter the IP address for node 3: 10.70.196.51
Enter the Public/External IP address or FQDN for node 3 [Press enter to reuse the node IP]:
Enter the username for node 3: admin
Enter the password for node 3:
Select the node type:
1. Primary
2. Secondary
3. Arbiter
Select the value: 3
Configure PGSQL:
1. Yes
2. No
Select the value: 1
concerto-noble-1311
Enter the number of replicas of core services to run in the cluster [Press enter to use default settings]:
Does every node in the cluster have the same, ssh and sudo password? If yes some script will not prompt for passwords for each node in the cluster (Y/n): Y
Enter the docker gateway bridge network to be used in the cluster [Press enter to use default settings ("172.18.0.0/16")]:
- Take a database backup of each node, the primary node first, followed by the secondary node and arbiter node.
vsh database backup create
- Login to Concerto portal using the default credentials. Contact Versa customer support team for the default login credentials.
- To use Concerto 13.1.1, change the default password and login with a new password.
Migrate Concerto from Release 12.2.x to Release 13.1.1
To migrate Concerto from Release 12.2.x to Release 13.1.1, you must copy the database backup files from the old Concerto node to the new host. For minimum supported software information, see Minimum Supported Software Releases.
To migrate to Release 13.1.1:
- Copy the database backup files from the old VM to the /var/versa/ecp/archives directory on the new host.
For example:
scp /var/versa/ecp/archives dbexport_2026-01-09_00-00-08_concerto-20260108-221756-741ece3-13.1.1_Nightly.pgsql.tgz
admin@10.70.207.171: /var/versa/ecp/archives
- To check the database backup file on the new host, issue the ls -latrh command
/var/versa/ecp/archives$ ls -latrh
total 38M

-rwxrwxr-x 1   999 versa  236 Jan  9 00:00 builds.tgz
-rwxrwxr-x 1   999 versa  38M Jan  9 00:00 dbexport_2026-01-09_00-00-08_concerto-20260108-221756-741ece3-13.1.1_Nightly.pgsql.tgz
- To restore and migrate the database backup file, issue the following command, where filename is the name of the backup file to restore. The services will start automatically after a successful migration.
vsh database backup restore <filename> --migrate true
For example:
vsh database backup restore dbexport_2026-01-09_00-00-08_concerto-20260108-221756-741ece3-13.1.1_Nightly.pgsql.tgz --migrate true
- To apply restored certificates, issue the vsh restart command.
vsh restart
- Log in to Concerto portal, and verify the release is 13.1.1.
Post-Migration Validation Checklist
To verify the upgrade and migration to Release 13.1.1, do the following:
- Log in to Concerto portal, and verify the release.
- To check the migration status, click the
 Tasks icon on the Concerto Home screen top menu bar. To display details about a task, click the
  Arrow icon.
 - To check the difference between the last published configuration and the unpublished configuration and to publish configuration from the Concerto production node, see Publish SASE Gateways.
- To discover the Director cluster associated with Concerto Portal, see Install Concerto in Releases 12.2.2 and Earlier.
Supported Software Information
Releases 13.1.1 and later support all content described in this article.