Manage Templates
![]() For supported software information, click here.
For supported software information, click here.
This article describes how to configure and manage device templates, service templates, and the Versa endpoint client template. Note that the endpoint client template configuration is common across an organization and all devices in the organization. You cannot configure it for individual devices.
You can use configuration templates to deploy configurations across an organization or across devices in an organization. Versa Portal supports three types of templates:
- Device template—A device template lets you configure, store, use, and reuse the configuration on a device, and perform mass publishing. A default template is available and you can clone, rename, and make changes to the default template based on your requirements.
- Service template—Service templates are service-specific configurations that can be used to configure certain services. They can then be applied to device configurations to enable the services. You can make mass configuration changes using a service template. The changes are not stored in the service template after publishing. Initially, the device list will be empty; devices will appear after you have published. Reload the device list or refresh the page to see the updated device list.
- Versa Endpoint Client Template—When you use an endpoint client template, you can attach a VRF to terminate an IPsec tunnel. If you have SASE gateway and remote access VPN services in the same organization, when you publish the VRF configuration, it publishes only to the remote access VPN.
Default Configuration Templates
Titan Portal provides a default configuration. When you create a new site, Titan populates the site's device configuration with the values from the default configuration. You can edit or clone the default template using the organization settings menu in the left menu bar in the Titan dashboard. All sites created after you save the changes use the new values. You can select the new configuration template when you configure a new site.


You can edit defaults for WiFi, networking, security, and steering. For more information, see Configure WiFi, Configure Security, and Configure Traffic Steering. Titan Portal uses only the settings that apply to a device. For example, if a device does not support WiFi, Titan Portal ignores the WiFi settings when creating a site. You cannot edit the LAN or LTE defaults.
Note: When you onboard a new site, the default configuration is applied by default to all sites. If you update the default configuration, it is not automatically applied to a site that has already been created on the dashboard.
To reset a device configuration to the default values, use Easy Quick Picks. See Easy Quick Picks.
Manage Device Templates
An enterprise admin can clone the default template and save the configuration in a new template. You can add and publish the device template configuration to multiple devices that are associated with the template, an operation referred to as a mass publish. When you perform a mass publish, the device Miscellaneous tab configuration is replaced with the template Miscellaneous tab configuration. You can perform a mass publish to publish a configuration to devices, but you cannot use it to publish a configuration to SASE or to a multitenant gateway. Also, mass publish does not support DNS proxy.
When you clone a device template, you have the option to clone the configuration to another template with devices. When you do this, you select a topology, and all the devices associated with that topology are listed. You can select a topology in the Template Type option to create topology-specific templates to access the complete set of configuration options for that topology. For example, a template created using the Spoke topology allows steering with SD-WAN and DIA. If the template type is not configured correctly, the DIA steering option will not appear in the UI.
It is highly recommended that you do not delete or make changes to the WAN and LAN configuration from a device template, to avoid outages. Instead, perform these operations on the individual devices.
You must not delete the default rules from the device templates when performing a mass publish. If you do this, the Easy Quick Picks feature does not function correctly. If any default rules are removed, use the following procedures to restore the functionality:
- Lock the device using the enable lock mode option in the honeycomb view in the Titan Portal > Configure page.
- Switch the template to the default template.
- Publish the configuration.
- Clone the device and create a new template.
Any new rules you create in mass publish are automatically placed at the top of the rule list at the device level.
To edit or clone the default configuration template:
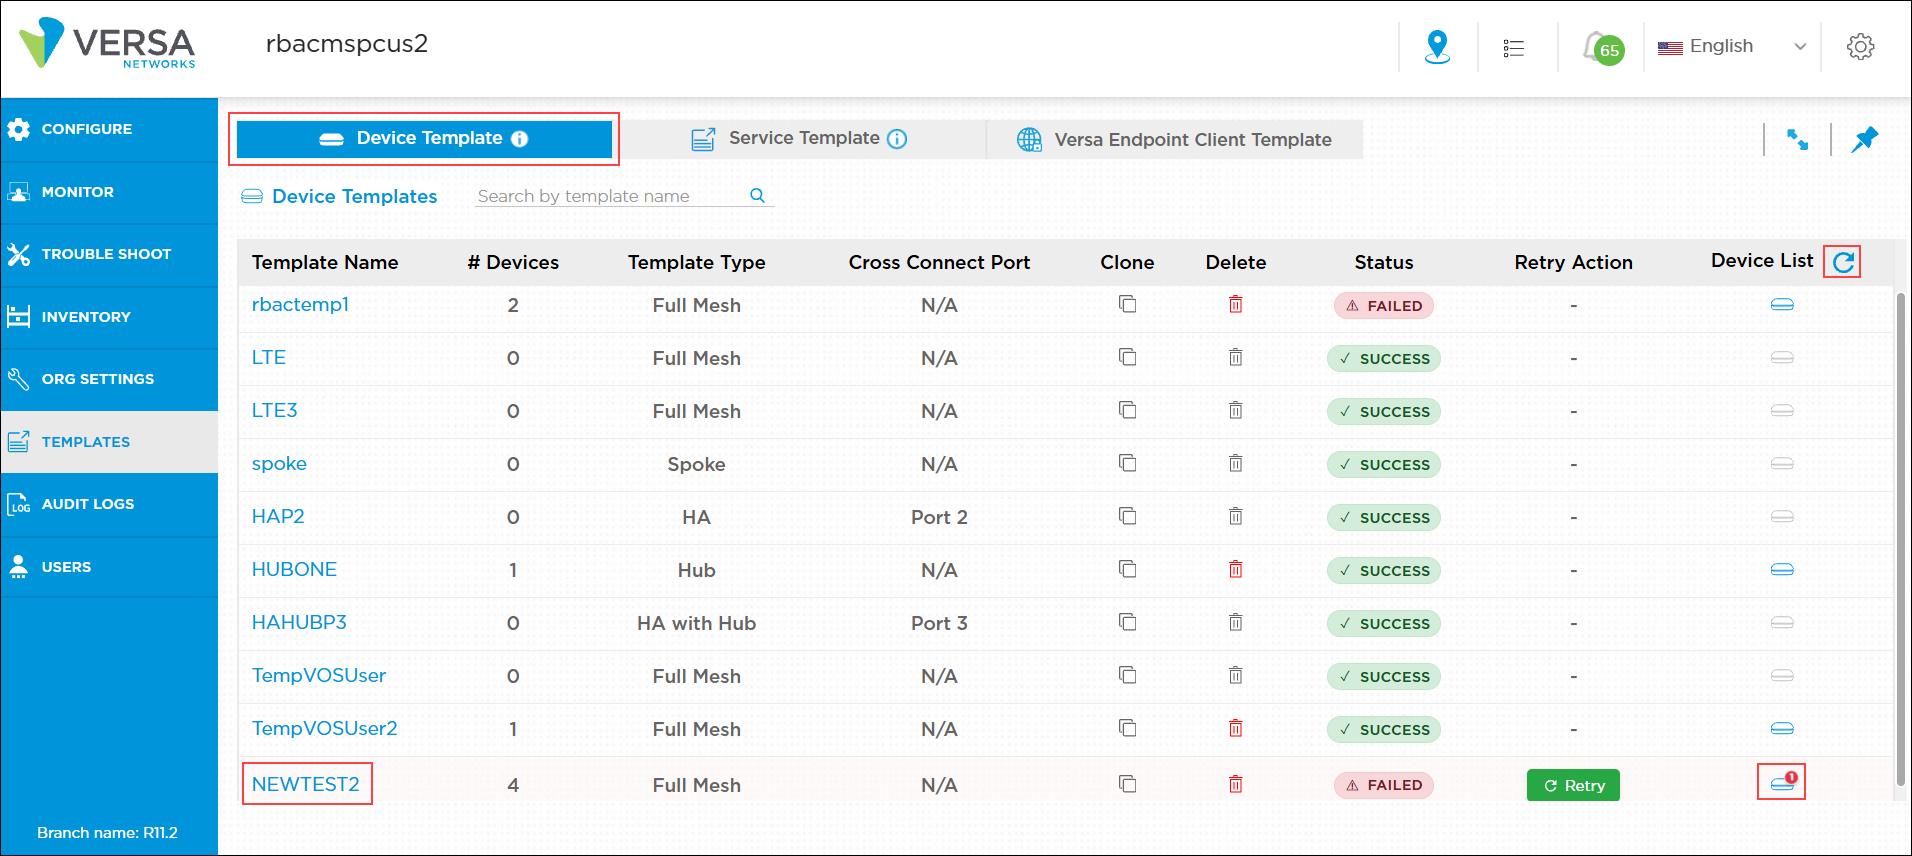
- Click Templates in the left menu bar to open the templates settings dashboard, and select Device Template. The Device Templates section displays the following information.
Field Description Template Name Displays the name of the configuration template. # Devices Displays the number of devices using the template. Template Type Displays the default template's topology. Cross-Connect Port Displays the HA cross-connect port for HA, HA with Hub, and HA with Spoke templates. Clone Click the Clone icon to clone the configuration to another template so that you can customize it.
Delete Click the Delete icon to delete a custom template. You cannot delete a default template or a custom template that is associated with a device.
Status Displays the publishing status of the device using this template:
- Failed
- Success
Retry Action Click the
 Retry icon to republish the failed devices for this template.
Device List Click the Device List icon to view the devices that use the template. The Red circle with a number in the device list icon shows the number of devices that failed during the publish process.
-
Click the
Clone icon, and then enter information for the following fields.

Field Description Clone Option Select a clone option:
- Clone Template—Click to clone the configuration to another template without devices.
- Clone Template with Devices—Click to clone the configuration to another template with devices.
Template Name Enter a name for the template. Template Type Select a template type. A full-mesh template device can be cloned into any topology. If you clone any other topology, such as spoke, it is cloned as a spoke. - Full Mesh
- HA (HA with Full Mesh)
- HA with Hub
- HA with Spoke
- Hub
- Hub Controller
- Spoke
- Cross Connect Port
For HA, HA with Hub, and HA with Spoke topologies, select the HA cross-connect port. You must select the same HA cross-connect port that is used in the HA site configuration. Devices For Clone Template with Devices option, select the devices to copy with the template, and then click Continue. The devices are listed based on the template type (topology) selected, and a template with the device list selected is created.
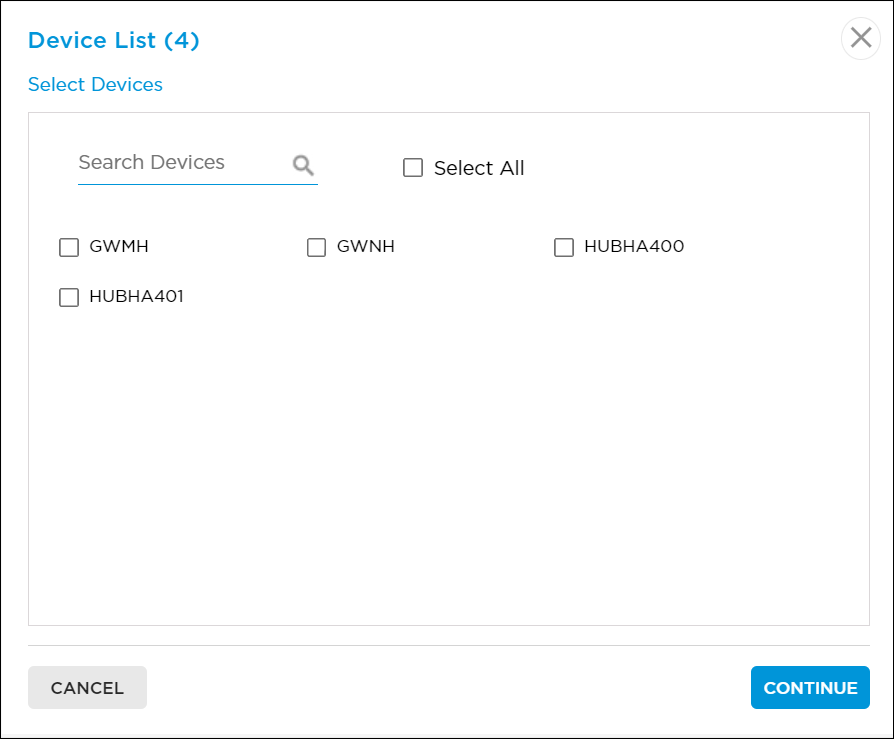
- Click Continue.
To republish a failed device that uses the template:
- Click the
 Retry icon. Click the checkbox for the device or devices you want to republish, or click Select All to select all devices.
 - Click Republish to publish the configuration again.

- Click the
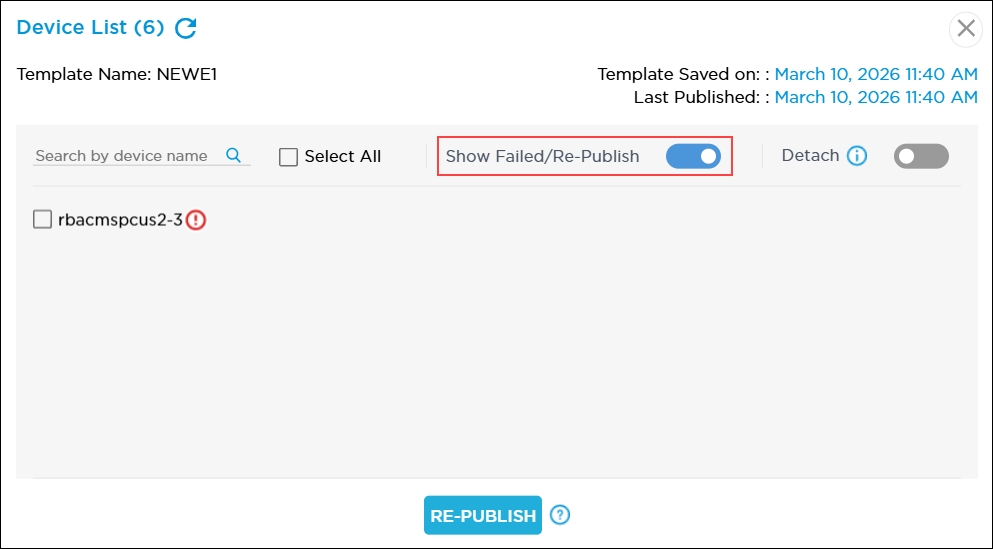
Device List icon to view the devices that use the template. Use the search option to search by device name. In the device list, the device names shown in black are deployed devices and the device shown in blue are activated devices.

Click the Show Failed/Republish toggle to display the devices if a publish operation failed for any device. For failed devices, click the device checkbox and then click Republish to publish the configuration again.

Note: Always republish the configuration to failed devices before adding a new configuration in mass publish.
Publish Device Template Configuration to Multiple Devices
When you publish a device template configuration to multiple devices, all devices associated with the template are selected by default. If you do not want to publish the template configuration to any specific devices, you have the option to add those devices to a new template, which removes them from the current template.
To publish a device template configuration to multiple devices:
- Click Templates in the left menu bar to open the templates settings dashboard, and select the Device Template.

- In the Configuration > Network screen, click the down arrow next to Save to display the Publish option, and then click Publish.

- To publish a device template configuration to all devices associated with the template, in the Device List popup window, click Validate.
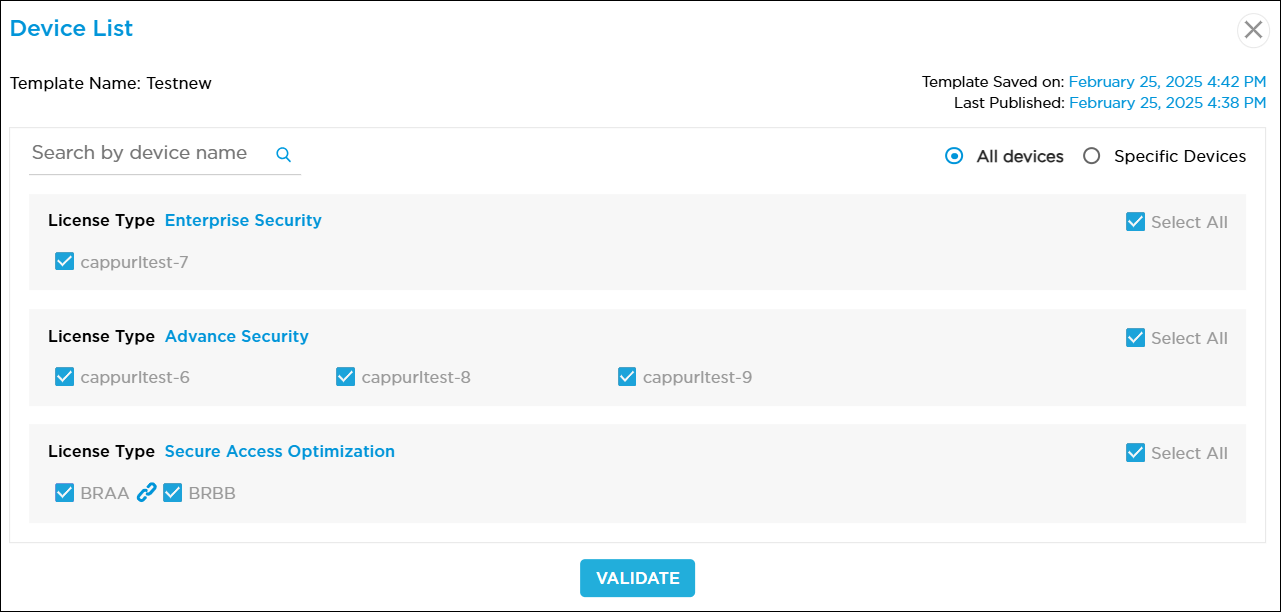
- To select any specific devices to be excluded from publishing the template configuration:
- In the Device List popup window, select Specific Devices. The Specific Devices popup window displays, prompting you to create a new template.
- In the Template Name field, enter a name for the new template, and then click Continue.

- In the Device List popup window, select the devices that you want to add to the new template, which removes them from the current template. You can click Select All to select all devices for a license type.

- Click Validate.
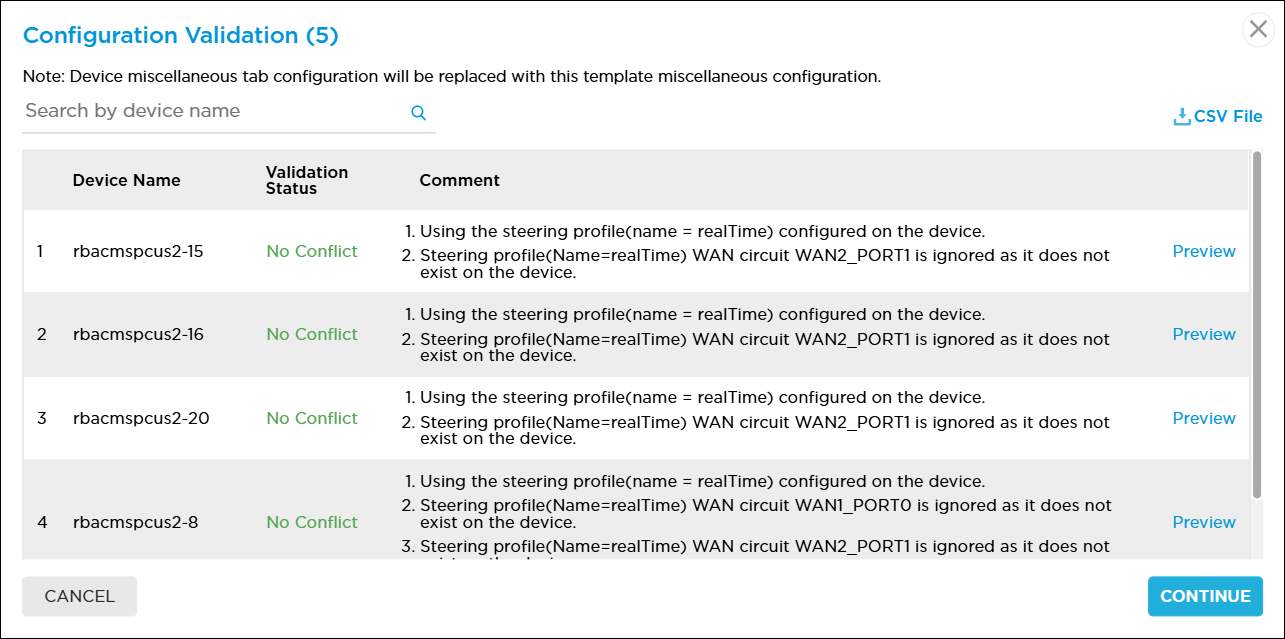
- In the Configuration Validation popup window, check that all devices are listed, and then click Continue.

- Click the
 icon to download the CSV file and check the validation message for all devices.
 - Click Preview to view the configuration on each device and display a notification if there are any conflicts. The following preview example screen shows that to update firewall rules with antivirus and IPS features, you must upgrade to a higher license tier.

- If the Validation Status column shows any conflicts found, the publish task is skipped for the device.
Note: Mass publishing ignores the configuration validation error in the following scenarios:
- When a deleted rule in a template does not exist in the published device.
- When a rule is updated in a template and does not exist in the published device. Mass publish creates the rule in the published device.
- When a rule is created in a template and already exists in the published device. Mass publish updates the rule in the published device.
- Click the
- Check a blue dot next to the device icon to display the publish status. The blue dot disappears after the task is completed. Use the Refresh icon next to the Device List column to check the publish status. If the publish failed on a device, the blue dot changes to a red dot with the number of devices that failed during the publish process. To view and republish the failed devices, click the Device icon, and then click the Show Failed/Republish toggle. For failed devices, click the device checkboxes and then click Republish to publish the configuration again. You can also click the Retry icon in the Retry Action column in the device templates settings dashboard and republish the failed devices.
- Click the
 Tasks icon to track the publish status for each devices.

View Template Configuration Changes
Titan Portal displays a green animated circle in the Template Configuration Changes screen if the default device template configuration is modified for a device template. The changes are applied to the device when you publish the template configuration.
To view device template configuration changes:
- Click Templates in the left menu bar to open the templates settings dashboard.
- Select Device Template, and then select a template name.
- In the Template Configuration Changes screen, click Template Changes.
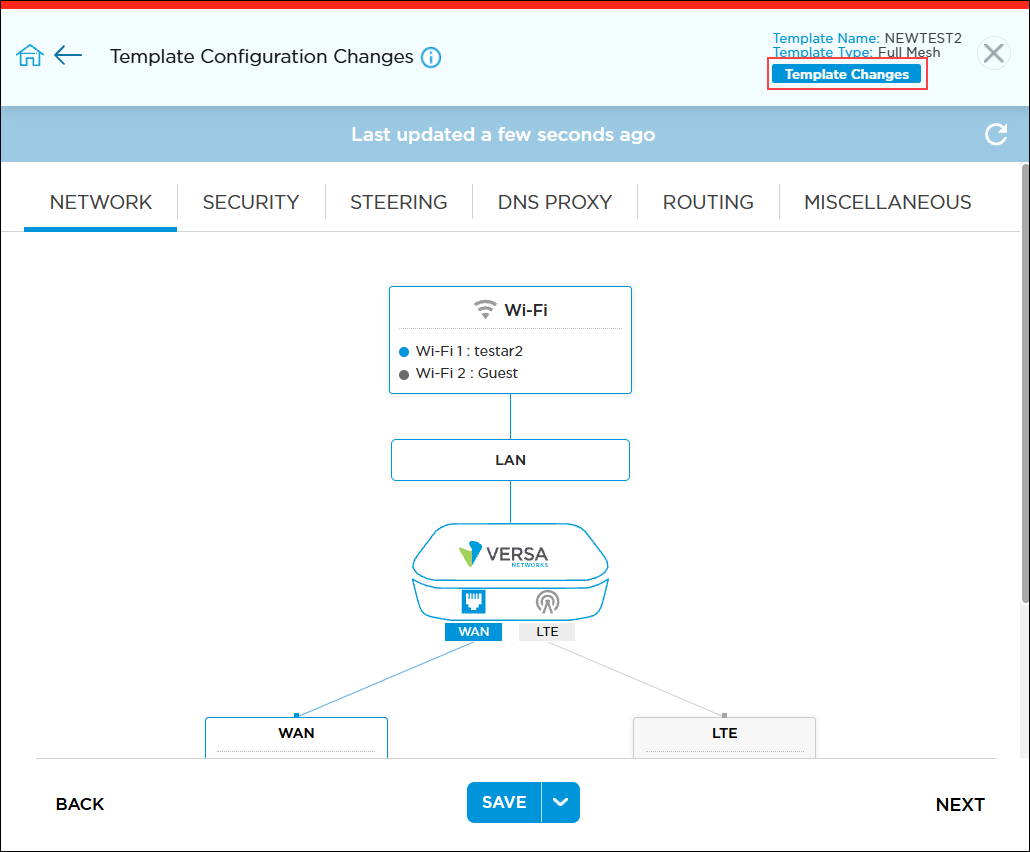
For example, if you make any configuration changes to a firewall rule in the NEWTEST2 device template, the green animated circle is displayed in the Security tab, in the Security Policy, and in the Firewall Rules section, as shown in the following screens.


The following video describes Versa Titan default template overview and configuration.
Service Templates
Service templates provide a standardized method for configuring key service components across multiple devices. Administrators can use service templates to configure settings for application steering, next-generation firewall (NGFW), and endpoint client properties for Titan Portal instances.
After you create a service template, you can associate a device with multiple service templates. You create service templates based on the license tier purchased. When you attach devices to a service template, the system displays only the devices that match the license tier selected in the service template, and features supported by the selected license tier appear in the service template configuration workflow.
Create a Service Template
To create a service template:
- Click Templates in the left menu bar to open the template settings dashboard, and then select Service Template.
- Click Add New Service Template.

- In the Add New Service Template window, enter information for the following fields.

Field Description Template Name Enter a name for the template. License Tier Select a license tier:
- Enterprise security
- Advanced security
- Secure application optimization
- Click Create. The Service Template dashboard displays the new service template.
Manage Service Templates
To view and perform operations on service templates, click Templates in the left menu bar to open the template settings dashboard, and then select Service Template.
The screen displays a table listing the service templates and their publishing status:
- Failed
- Success
- In-progress—Displays while the publish process is in progress.

From this table, you can also perform the following operations on services templates and their associated devices:
| Operation | Description |
|---|---|
| Clone |
Click the |
| Delete |
Click the |
| Retry Action |
Click |
| Attach New Device | Click |
| Device List |
Click the |
Clone a Service Template
- Click the
 Clone icon, and then enter information for the following fields.

Field Description Template Name Enter a name for the template. License Tier Select the license tier based on the license purchased for the device. You can select only the existing license tier or higher.
- Click Continue.
Republish Failed Devices
You can republish failed devices that are associated with the service template using one of the following methods:
- To republish failed devices using Retry Action:
- In the Retry Action column, click
 Retry. The device list screen displays all devices for which the publish operation failed.
 - Click the checkbox for each device that you want to republish, or click Select All.
- Click Republish to publish the configuration again.

- In the Retry Action column, click
- To republish failed devices from the Device List:
- Click the
 Device List icon to view the devices that use the template. Use the search option to search by device name. In the device list, the device names shown in black are deployed devices and the device shown in blue are activated devices.

- Click the Show Failed/Republish toggle to display the devices if a publish operation failed for any device. For failed devices, click the device checkbox and then click Republish to publish the configuration again.
- Click the
Publish the Service Template Configuration to Multiple Devices
Service templates allow you to update a configuration across multiple devices in Titan Portal. When you publish changes made in a service template, the configuration is pushed to the associated devices.
When you create a new service template, the device list shows as empty. Devices are associated with a service template and appear in the device list only after publishing the configuration that matches the selected license tier. If the device list is empty after publishing, reload the page to refresh the device list and view the updated associations.
If you do not want to publish the template configuration to certain devices, you have the option to detach those devices from the template, which removes the devices from the current service template.
To publish a service template configuration to multiple devices:
- Click Templates in the left menu bar to open the templates settings dashboard, and then select the Service Template.
- Click the service template name.
- In the Configuration > Network screen, make the required changes to the service template configuration.
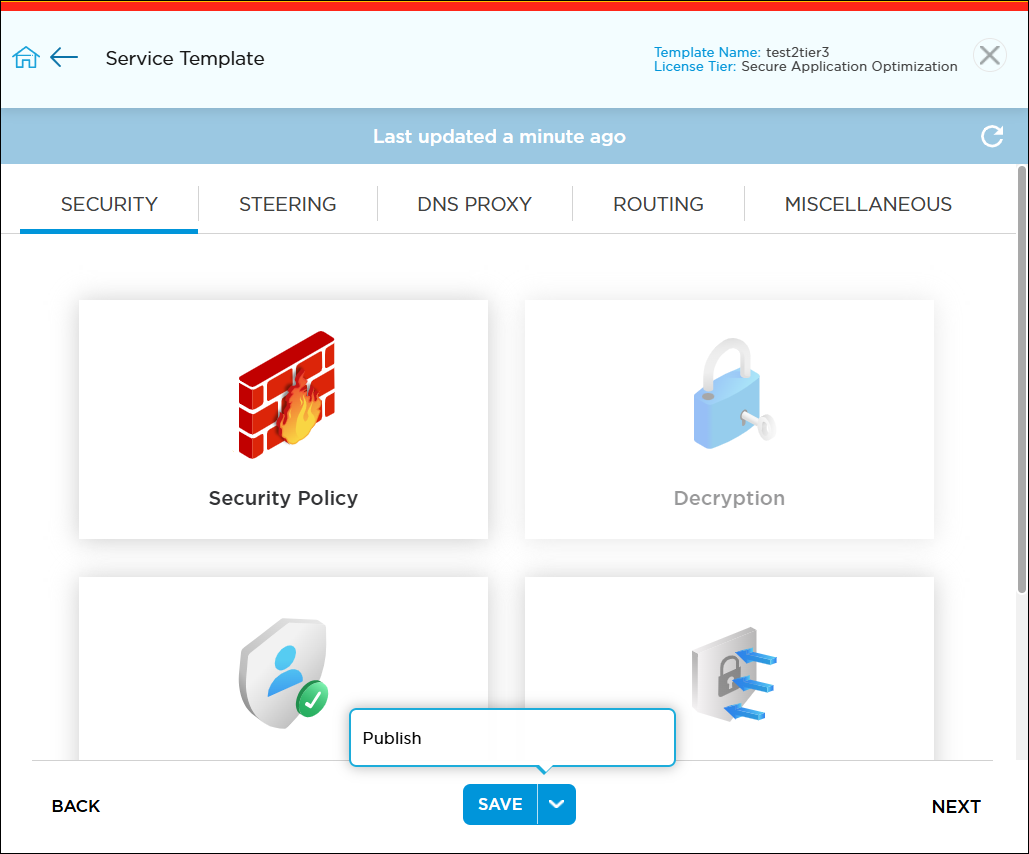
- Click the down arrow next to Save to display the Publish option, and then click Publish.
- To publish a service template configuration to all devices associated with the template, click Validate in the Device List window.

- In the Configuration Validation window, confirm that all devices are listed, and then click Continue.
- Click the
icon to download the CSV file and check the validation message for all devices.
- Click Preview to view the configuration on each device. Titan Portal displays a green animated circle in the Service Template Configuration screen if the service template configuration is modified for a service template. The changes are applied to the device when you publish the template configuration.

- Click the
Remove a Device from the Service Template
You can remove a device from the service template, if needed. Note that when a device is removed from the template, the service template configuration is also removed from the device and you can attach the device to another service template.
To remove a device from the service template:
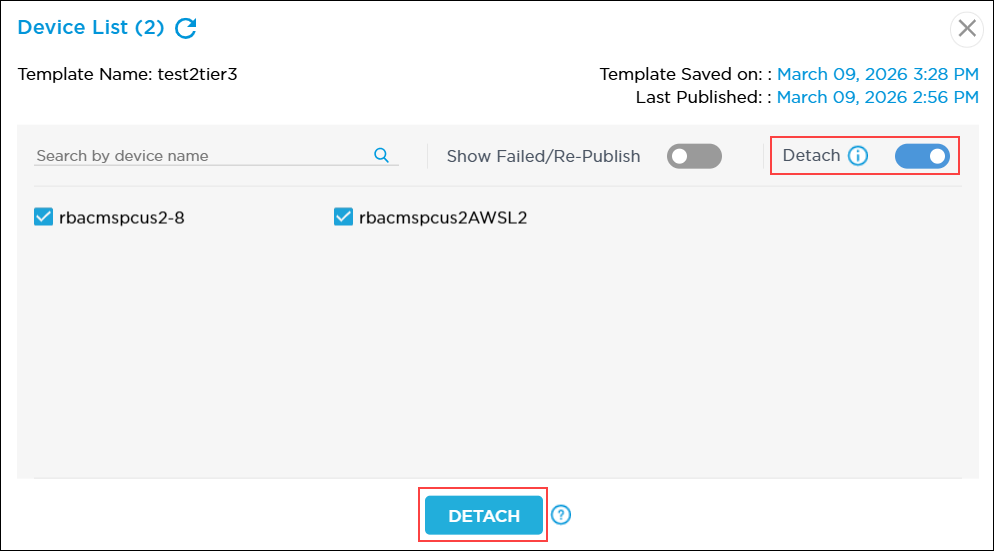
- Click the Device List icon to view the devices associated with the template.
- In the Device List screen, click the Detach toggle.
- Click the checkbox for the device or devices that you want to detach, and then click the Detach button.
View Rules Created From a Service Template
By default, rules created from service templates have an S_ prefix to the rule name to avoid overriding rules with the same name from device templates. If you do not want the S_ prefix added to the rule name, you can deselect the Add "S_" prefix checkbox when you create the rule. Note that the rule may be overridden based on whether you publish the service template or device template if the names are the same.
- Click Templates in the left menu bar to open the templates settings dashboard, and then select Service Template.
- Click a service template name to open the device configuration associated with the service template.
- Navigate to the relevant configuration section.
For example, the following screen shows the service template name with the S_ prefix for the Security Policy > Firewall Rules.
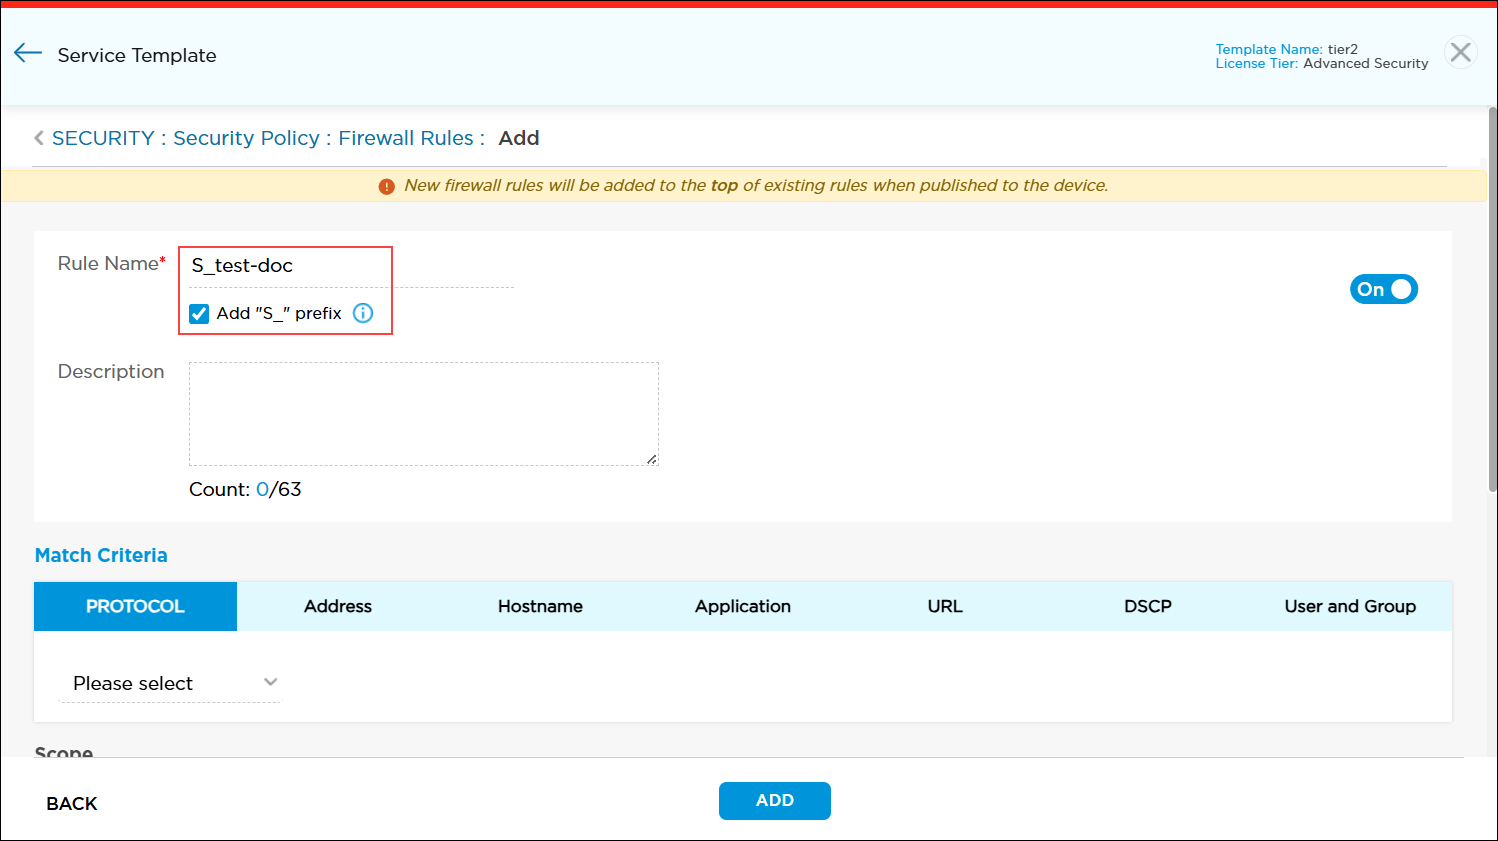

To exclude the S_ prefix, deselect the Add "S_" prefix checkbox while creating the rule.

Create a WAN Interface for Service Templates
When you configure source and destination zones for policy rules, you can select from a list of WAN interfaces.The service template initially has one WAN interface in the zone list. You can configure additional WAN interfaces for the service template.
If you have more than one WAN interface, these are displayed in the Objects: WAN Networks section. The WAN interfaces created in the Objects: WAN Networks section become available across the service template configuration, including:
- Network configuration
- Security policies
- Steering rules
- Routing
To add a WAN interface:
- Click Templates in the left menu bar to open the templates settings dashboard, and then select Service Template.
- Select the Objects: WAN Networks tab, and then click
 Add WAN.

-
In the Add Object: WAN window, enter information for the following fields. When you add a WAN port, if the device is not an HA or a PPPoE device, enter the WAN name and click Add. If you add a WAN port for HA or for PPPoE, you must select the type of device.

Field Description WAN Name (Required) Enter a name for the WAN interface. This is the WAN interface name that appears in the selection list when you configure source and destination zones for policy rules, such as firewall and traffic steering rules. HA Select HA to add the WAN interface to an HA device. PPPoE Select PPPoE to add the WAN interface to a PPPoE device. Description Enter a text description for the WAN interface. - Click Add.
-
To edit a WAN interface, click the
 Edit icon to update the WAN interface, and then click
  Update to save the changes.
 -
To delete a WAN interface, click the
 Delete icon.
Versa Endpoint Client Templates
For a Versa endpoint client or remote access VPN template, you can view the template name, number of devices, and the devices that use the template. Click the Versa endpoint (SASE) client or remote access VPN template name to configure the Versa endpoint client service for the organization. To configure the Versa endpoint client template, see Configure an Endpoint Client Service (Remote Access VPN) Template.
The Versa endpoint client template screen also provides a link to download the Versa Endpoint (SASE) client application for Windows, MAC, and Linux operating systems and validate the endpoint client connection. To copy the portal FQDN and enterprise name of the endpoint (SASE) client, click the ![]() Copy icon parallel to each field.
Copy icon parallel to each field.

You can retrieve the following information and perform the following tasks:
- Template Name—Displays the name of the default configuration template.
- # Devices—Displays the number of devices using the template.
- Status—Displays the publishing status of the devices using this template.
- Retry Action—Click the Retry icon to republish the failed devices for this template. Click Select All to select all the devices or click the device checkboxes to select individual devices, then click the Republish button to publish the configuration again.
- Device List—Click the
Device List icon to list the devices that use the template. The Red circle in the device list icon shows the number of devices that failed during the publish process.
Click theDevice List icon to view the devices that use the template. Use the search option to search by device name. In the device list, the device names shown in black are deployed devices and the device shown in blue are activated devices.

Click the Show Failed/Republish toggle to display the devices if a publish operation failed for any device. For failed devices, click the device checkbox and then click the Republish button to publish the configuration again. You can also click the Retry icon in the Retry Action column and republish the failed devices.

If the SASE gateway or remote access VPN license has expired, the device name displays a blue notification.
Supported Software Information
Releases 11.3 and later support all content described in this article.