Deploy High Availability
![]() For supported software information, click here.
For supported software information, click here.
This article summarizes how to deploy a high availability (HA) site in Titan Portal. For specific details about a step, see the links in Additional Information, below
HA ensures a seamless bring-up of the standby Titan device, thus allowing network services to continue with no disruptions. Any settings that you configure on the primary Titan device automatically extend to the secondary Titan device. The secondary device cannot perform any action until it activates.
You can use Virtual Router Redundancy Protocol (VRRP) to configure HA redundancy. VRRP allows you to have one or more backup router when you are using a statically configured router on a LAN. If the active, or master, router fails, a backup router takes over and continues to forward packets. For VRRP, you configure a virtual IP address, that is shared among two or more routers. One router is designated the master and the others are backup routers. If the master router fails, the virtual IP address is mapped to the IP address of one of the backup routers.
Any changes made to the VRRP interface will be in sync with both the primary and secondary devices. You can also configure VRRP when you configure LAN profiles for IRB interfaces and VLAN interfaces for HA.
To configure and activate an HA Versa CSG300, CSG700, CSG1000, or CSG2000 series appliance:
- Ensure that the two appliances in the HA pair have identical license types, and that you have deployed and activated the licenses on each device. You must deploy and activate each device separately.
- Set up the appliance wiring on two appliances. Wire the configured WAN, HA cross-connect port, and VRRP port, and then configure the site.
- Log in to Titan Portal.

- Create an HA site:
- Select the device.

- Drag and drop the license.

- Create the site.

- Select the device.
- Click Save. The following screenshot shows an example honeycomb with Sites A and B.

- Create configurations for each device separately.

- Install the HA wiring on each router, with wires for the WAN1, cross-connect interfaces, and VRRP.
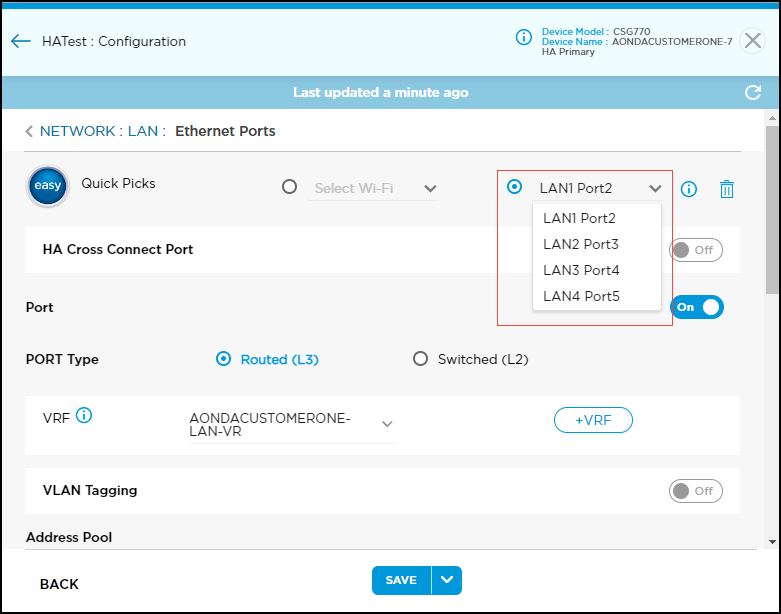
- In the Network > LAN > Ethernet and WiFi Ports screen, select a LAN port in the menu to the right of Quick Picks.

- Click the HA Cross-Connect Port toggle to enable the HA cross-connect port.

- In the Address Pool section, enter information for the following fields.

Field Description IP Address/Mask Enter the IP address and subnet mask to associate with the VRRP. When you configure this IP address for a VRRP, the immediate next IP address will be allocated for the secondary device. For example, if you enter the IP address 172.16.79.1/25 as the primary address, 172.16.79.2 will be the secondary address. VRRP Click the VRRP toggle to turn on VRRP port and enter a virtual IP address. You can configure multiple VRRP ports. Priority Enter the priority to assign to the interface. The interface with the higher or highest priority becomes the VRRP master router.
Range: 1 through 255
Default: 100
- In the Network > LAN > Ethernet and WiFi Ports screen, select a LAN port in the menu to the right of Quick Picks.
- Save the configurations for each device separately.
- Deploy each device.

- Activate each device separately.

Supported Software Information
Releases 11.2 and later support all content described in this article.
