Configure SASE Secure Client Access Routes and DNS Resolvers for Secure Client Access
![]() For supported software information, click here.
For supported software information, click here.
Secure client access profiles define routes and DNS resolvers that are used to bind public keys to the client. A DNS resolver is a server that determines which DNS name server the client uses to perform DNS lookups for all traffic. You can configure DNS resolvers that are shared with the clients when they register.
To configure SASE secure client access routes and DNS resolvers:
- Go to Configure > Secure Client Access > Profiles.

The Secure Client Access Profile List screen displays all currently configured profiles.

- To customize which columns display, click Select Columns and click the columns select or deselect the columns you want to display. Click Reset to return to the default columns settings.

- To edit an existing profile, click the profile name, edit the entries as needed, and click Save.
- To configure a new profile, click + Add. The Create Secure Client Access Profile screen displays with Routes and DNS Resolvers selected by default.

- Click Add Routes to add routes to the profile. The Routes screen displays all current routes. The routes are prefixes that can be reached over the remote access VPN.

- Click + Add to add a new route. In the Add Route popup window, enter information for the following fields.

Field Description Name Enter a name for the new route. Description Enter a description of the new route (optional). Prefix Enter the route prefix, such as 10.2.1.1/24. Metric Enter a value for the route metric, which helps the router to select the best route among multiple possible routes to a destination. Routes with lower metric values take precedence over routes with higher metric values.
Default: None
Range: 0 through 4294967295.
Encryption is enabled Select to encrypt the route and to route the traffic for applications and domains to an encrypted tunnel. By default, encryption is enabled.
To disable encryption, click the slider.

If you disable encryption, traffic is routed on an encrypted or non-encrypted (clear-text) route, depending on the configuration, for applications and domains. If the route is not encrypted, the Versa secure client access creates two tunnels, encrypted and clear text, and then routes traffic. In this case, you might consider securing the application using a different method, such as SSL/TLS.
- Click Add. The Routes screen displays again, and the new route displays in the table.
- Click Back. The Routes and DNS resolvers screen displays again.
- Click Add DNS Resolvers. The DNS Resolvers screen displays all current DNS resolvers.

- Click + Add to add a new DNS resolver. In the Add DNS Resolver popup window, enter information for the following fields.
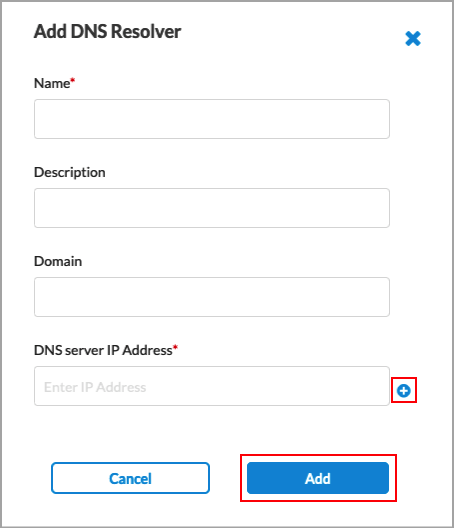
Field Description Name Enter a name for the new DNS resolver. Description Enter a text description of the DNS resolver. Domain Enter a valid domain name for the DNS resolver to send to the client. The client uses the DNS resolver to perform DNS lookups for all traffic. DNS Server IP Address Enter a valid IP address for the DNS server. After entering the first IP address, click the
 Plus icon to add additional addresses.
 - Click Add to add the new DNS resolver to the secure client access profile. The DNS Resolvers screen displays again, and the new DNS resolver displays in the table.
- Click Next. In the Review & Deploy screen, enter information for the following fields.

Field Description Name Enter a name for the new profile (required). Description Optionally, enter a description for the profile. Tags Optionally, enter one or more tags to help identify the profile. Rule is enabled Click the slider to enable the profile.

- Review the remaining information. Click the
 Edit icon to make changes to any of the sections.
 - Click Save.
Supported Software Information
Releases 11.1.1 later support all content described in this article.