Configure Custom IPS-Filtering Profiles
For supported software information, click here.
The intrusion prevention system (IPS) mitigates security vulnerabilities by responding to inappropriate or anomalous activity. Responses can include dropping data packets and disconnecting connections that are transmitting unauthorized data.
You commonly place an IPS system at the perimeter of a corporate network. IPS performs the following types of vulnerability detection to help prevent attacks, including zero-day attacks such as worms or viruses:
- Signature-based detection—Signatures are a set of rules that a vulnerability profile uses to detect intrusive activities. With signature-based detection, a security profile compares a software or application pattern with a database of signatures, identifying malicious activity by matching patterns to those in the database. Versa security packs (SPacks) provide a set of predefined signatures, and you can also create custom signatures.
- Anomaly detection—Anomaly detection monitors a network for unusual events or trends. You configure the vulnerability profile that compares an observed event with the baseline of the normal traffic. Anomaly detection detects patterns that are normally not present in the traffic, so it is useful for detecting new attacks
By default, Versa SASE provides a predefined IPS enforcement policy. This article describes how you can configure custom IPS-filtering profiles.
To configure a custom IPS-filtering profile:
- Go to Configure > Security Service Edge > Real-Time Protection > Profiles.

The following screen displays.

- Select the Malware Protection & IPS tab, and then select the IPS subtab.
Note: In Release 12.2.2, the the IPS subtab was moved under the new Malware Protection & IPS tab.
- Click + Add to add a new IPS-filtering profile. The Create IPS Profile screen displays.
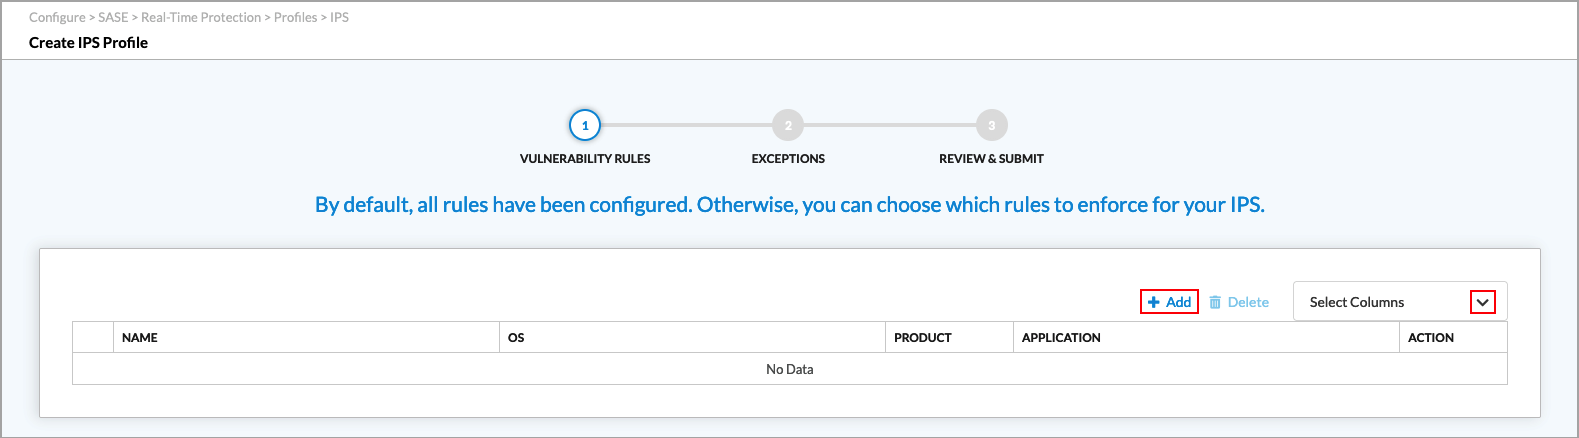
- To customize which columns display, click Select Columns down arrow and then click the columns to select or deselect the ones you want to display. Click Reset to return to the default column display settings.

- Click + Add to add a new IPS profile. The Add Vulnerability Rule screen displays.

- In the Common Vulnerabilities and Exposures (CVE) and Signature Set section, click the
 Plus icon and enter information for the following fields.
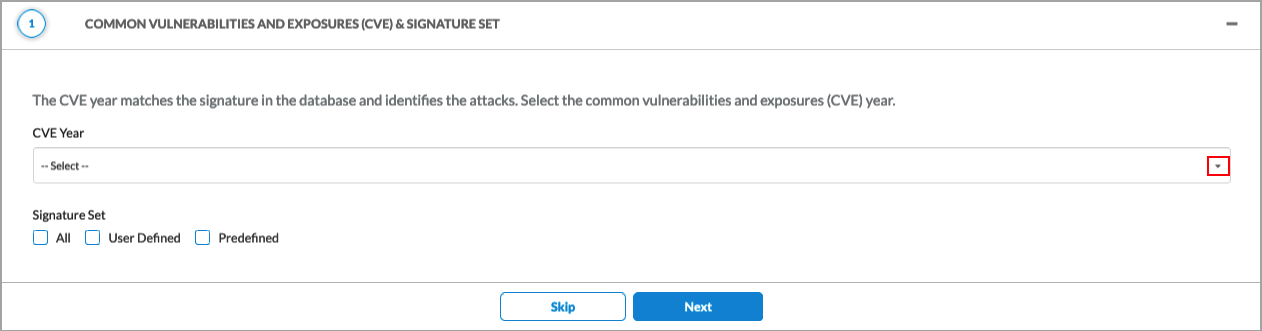
Field Description CVE Year Select one or more CVE years The CVE year matches the signature in the database and identifies the attacks. Signature Set Select the signature set to use for the rule:
- All
- Predefined
- User Defined
- Click Next. In the General section, enter information for the following fields.

Field Description Confidence Select one or more confidence levels to use to match the signatures.
Range: 0 through 9, unselected
Default: None
Action Filter Select one or more action filters to use to match the signatures:
- Alert
- Drop Packet
- Drop Session
- Reject
CVSS Score Select one or more CVSS scores to use to match the signatures.
Range: 1 through 10
Class Type Select one or more class types of vulnerabilities to use to match the signatures. Direction Click to select the direction:
- Both
- Client
- Server
Rule Type Click to select the rule type to use to match the signatures:
- All Rules
- Anomaly Rules
- Signature Rules
- Click Next. In the OS/Product section, click Operating System Version and then select an operating system and operating system version to match for signatures. Click the
 Plus icon to add an operating system; click the
  Minus icon to remove an operating system.

- Click Product, and then select a product and a product version to match for signatures. Click the Plus icon to add a product; click the Minus icon to remove a product.

- Click Next. The Application screen displays all predefined applications. Click an application to add it to the list of applications to match. Use the search box to find specific applications. You can include or exclude the selected applications by clicking the appropriate checkbox.

- Click Next, and then enter information for the following fields.

Field Description Severity Select one or more severity-level match criteria:
- Any
- Critical
- High
- Informational
- Low
- Medium
- Unspecified
References Select and use signatures that match a specific reference type. Click the  Add icon to add the reference type to the rule.
Value Select and use signatures that match a specific reference value. Click the Add icon to add the reference value to the rule. - Click Next. In the Enforcement screen, enter information for the following fields.

Field Description Action Select an enforcement action to apply to the signatures:
- Default
- Predefined
- Allow
- Alert
- Deny
- Drop Packet
- Drop Session
- Reset Client
- Reset Server
- Reject
- Predefined-Persistent
- Versa_Action_Block_SIP
- Versa_Action_Block_SP
- Versa_Action_Block_DIP
- Versa_Action_Block_DP
- Versa_Action_Block_SIP_SP
- Versa_Action_Block_DIP_DP
- Versa_Action_Block_SIP_SP_DIP_DP
- Versa_Action_Block_SIP_SP_DIP_DP_Protocol
+ Add New Click to add a new security action. See Configure SASE User-Defined Objects for more information. Enable Packet Capture (Group of Fields) Click to enable packet capture. When enabled, packet capture logs are sent to Versa Analytics. - Pre-window
Enter the number of packets immediately preceding the attacked packet that you want to capture.
Range: 0 through 10
Default: 1
- Post-window
Enter the number of packets immediately following the attacked packet that you want to capture.
Range: 0 through 10
Default: 1
- Click Next, and then enter a name for the IPS profile and, optionally, a description and one or more tags. A tag is an alphanumeric descriptor, with no white spaces or special characters, that you can use to search the objects.

- Click Add. The Create IPS Profile displays the new profile in the table.

- Click Next to go to the next step, Exceptions. The following screen displays.

- To customize which columns display, click Select Columns down arrow and then click the columns to select or deselect the ones you want to display. Click Reset to return to the default column display settings. The options are:
- Exempt IP List
- Signature ID List
- Action
- Click the
 Add icon. The Add Exception screen displays.

- In the Signatures section, select the predefined or custom vulnerability signatures to add in your vulnerability exception rule.
- Click Next. In the Exception Details section, enter information for the following fields.

Field Description Exempt IP Address Enter the IP address of the device to exempt. Click the  Plus icon to add multiple IP addresses.
Action Select the user-defined or predefined action to take. Click to add a new security action. See Configure SASE User-Defined Objects for more information. Thresholds for Exempted IP Addresses (Group of Fields) - Track By
Select the threshold tracking based on either source address, destination address, or both source and destination addresses. - Interval
Enter the interval value, in seconds.
Range: 1 through 3600 sec.
Default: None
- Threshold
Enter the number of hits per interval based on the traffic direction.
Range: 1 through 65535
Default: None
Enable Packet Capture Select to enable packet capture - Pre-window
Enter the number of packets immediately preceding the packet that you want to capture.
Range: 1 through 10
Default: 1
- Post-window
Enter the number of packets immediately following the packet that you want to capture.
Range: 1 through 10
Default: 1
- Click Next to go to the Threat ID and Description section, then enter information for the following fields.

Field Description Threat ID (Required) Enter a threat ID number.
Range: 0 through 4294967295
Default: None
Description (Optional) Add a description of the exception. Tags (Optional) Type in a tag, then press the Enter key. A tag is an alphanumeric text descriptor with no spaces or special characters. You can specify multiple tags added for the same object. The tags are used for searching the objects. - Click Add to add the exception. The Create IPS Profile screen displays.
- Click Next to go to the Review and Submit section.

- Enter a name for the IPS profile.
- Review the configuration. Click the
 Edit icon to make any changes to the configuration.
 - Click Save to save the new IPS profile.
Supported Software Information
Releases 11.3.1 and later support all content described in this article, except:
- In Release 12.2.2, the the IPS subtab was moved under the new Malware Protection & IPS tab.