Configure Clientless Applications in Concerto
![]() For supported software information, click here.
For supported software information, click here.
Versa Concerto allows you to access your desktop remotely using Apache GuacamoleTM, which is a cloud-based, clientless remote desktop gateway. Guacamole supports standard protocols such as HTTP/HTTPS, virtual network computing (VNC), remote desktop protocol (RDP), and secure shell (SSH). It requires no plugins or client software. Using Guacamole, you are not restricted to any one device or location. As long as you have access to a web browser, you have access to your desktop.
Because Guacamole is a cloud-based application, the desktops that you access do not need to physically exist, allowing you to combine the convenience of Guacamole with the resilience and flexibility of cloud computing.
The Guacamole server runs independently of the Versa SASE gateway. A Versa Operating SystemTM (VOSTM) instance provides connectivity from the SASE gateway to the Guacamole server.
Guacamole does not support multitenancy. For each tenant that wants to use Guacamole, you must deploy a new instance on a per-region basis in order to be close to the SASE gateway. You can deploy a maximum of two Guacamole instances in a region.
Guacamole instances are used for specific tenants. A special appliance tag is applied on Versa Director for the VOS instance that connects the SASE gateway to the Guacamole server. Once you deploy an instance, you select one primary and one secondary clientless access instance (Guacamole instance).
Note: When you onboard a tenant, you need to enable Privileged Access when assigning products to the tenant. If you do not enable Privileged Access, you will not see the RDP, SSH, and VNC tabs in the Clientless Applications screen. Privileged Access is available as an add-on option in the following bundles:
- Versa Secure Access Fabric—Elite Bundle
- Versa Secure Access Fabric—Essential Plus Bundle
- Versa Secure Access Fabric—Professional Bundle
- Versa Secure Private Access (VSPA)—Professional Bundle
For more information about onboarding tenants, see Configure SASE Tenants.
Configure HTTP/HTTPS
To configure which HTTP/HTTPS-based private applications users can access:
- Go to Configure > Security Service Edge > Secure Access > Clientless Application Access > Clientless Applications.

- If you have not yet configured HTTP/HTTPS, the following screen displays. Click Add HTTP/HTTPS Applications.

- If you have already configured one or more client applications, the following screen displays. Select the Private Applications> HTTP/HTTPS tab, and then click the
 Add icon.

- If you have not yet configured HTTP/HTTPS, the following screen displays. Click Add HTTP/HTTPS Applications.
- The workflow to add an HTTP/HTTPS application displays, beginning with step 1, Application Settings. Enter information for the following fields.

Field Description Application URL Enter the actual URL of the application. Example: https://www.example.com. Application Display Name Enter the name of the application to display on the Applications Portal. If not configured, the name from the review page is used. Application Logo URL Enter the URL for the logo to display on the Applications Portal. The URL must include the complete path to the image file hosted on your enterprise network and be accessible from the SSE gateways without requiring authentication. If this is not configured, the application displays the default logo. Advanced Settings (Group of Fields) Enter the location to submit the SAML authentication request. - Application Chain CA
Enter the CA chain to validate the certificate presented by the application. - Enter the location to submit SAML assertion (ACS URL)
Enter the ACS URL. The ACS URL is the location where the service provider's security software receives and processes the SAML response messages containing user authentication information from the IdP. - Enter the location to submit the SAML authentication request (Group of Fields)
- Identity Provider (IdP) URL
Enter the IdP URL. This is the location of the IdP service that is responsible for authenticating and authorizing user access to protected resources. - Identity Provider (IdP) CA Chain
Enter the IdP CA chain. An IdP certificate is a digital certificate used by an IdP to sign SAML messages in single sign-on (SSO). To obtain the certificate, you can typically download it from the IdP's SSO service endpoint, or the IdP can provide it by email or other means. - Entity ID
Enter the entity ID. The entity ID uniquely identifies this SAML service in federation. It must exactly match the entity ID configured on the IdP. - Click Next or select workflow step 2, Review and Submit.

- Enter a name for the application in the Name field.
- Review the configuration details. Click the
 Edit icon in any section to make changes, if needed.
 - Click Add Clientless Applications to add the new application.
Configure Remote Desktop Protocol (RDP)
To configure which RDP servers users can access:
- Go to Configure > Security Service Edge > Secure Access > Clientless Application Access > Clientless Applications.
- If you have not yet configured RDP, the following screen displays. Click Add RDP Applications.

- If you have already configured one or more client applications, the following screen displays. Select the Private Applications > RDP tab, and then click the Add icon.

- If you have not yet configured RDP, the following screen displays. Click Add RDP Applications.
- The workflow to add an RDP application displays, beginning with step 1, Application Settings. Enter information for the following fields.

Field Description Host Address (Required) Enter the IP address of the host the user needs to access. Port (Required) Enter the port of the host the user needs to access. Authentication for Application Type (Group of Fields) - User Name
Enter a user name to use to authenticate. If not specified, you will be prompted for the username when you connect. - Password
Enter a password to use to authenticate. If not specified, you will be prompted for the password when you connect. - Domain
Enter the domain name to use when attempting authentication, if any. Ignore Server Certificate Ignore server certification for RDP authentication. This option is enabled by default. To disable, click the toggle. File Transfer (Group of Fields) - Enable File Transfer
Click the toggle to enable file transfers. This option is disabled by default. - Enable File Upload
Click the toggle to enable file uploads. This option is disabled by default. - Hostname for SFTP
Enter the URL of the host name for the secure file transfer protocol (SFTP). - SFTP Port
Enter a port number for the secure file transfer protocol (SFTP).
Range: 0 and 65535
Default: None
- File Browser Root Directory
Enter the name of the root directory for the file browser. Additional Settings - Access to Clipboard
- Enable Copy from Private Host
Enable copying from the private host. This option is enabled by default. To disable, click the toggle. - Enable Paste to Private Host
Enable Paste to Private Host. This option is enabled by default. To disable, click the toggle. - Method on Client Display Resize
- Automatically disconnect on client resize and reconnect with the new size
Click the toggle to automatically disconnect when the client display is resized, and reconnect with the new size. - Click Next or select workflow step 2, Review and Submit.

- Enter a name for the application in the Name field.
- Review the configuration details. Click the Edit icon in any section to make changes, if needed.
- Click Add Clientless Applications to add the new application.
Configure Secure Shell (SSH)
To configure which SSH servers users can access:
- Go to Configure > Security Service Edge > Secure Access > Clientless Application Access > Clientless Applications.
- If you have not yet configured SSH, the following screen displays. Click Add SSH Applications.

- If you have already configured one or more SSH applications, the following screen displays. Select the Private Applications > SSH tab, and then click the Add icon.

- If you have not yet configured SSH, the following screen displays. Click Add SSH Applications.
- The workflow to add an SSH application displays, beginning with step 1, Application Settings. Enter information for the following fields.

Field Description Host Address (Required)
Enter the IP address of the host the user needs to access using SSH. Port (Required) Enter the port number of the host the user needs to access using SSH. Authentication for Application Type (Group of Fields) - Username
Enter the username to use to authenticate. If not specified, you will be prompted for the username when you connect. - Password
Enter the password to use to authenticate. This parameter is optional. If not specified, you will be prompted for the password when you connect. Upload Private Key File Click to upload the entire contents of the private key to use for public key authentication. If this parameter is not specified, public key authentication is not used. File Transfer (Group of Fields) - Enable File Transfer
Click the slider bar to enable file transfer to the server. This option is disabled by default. - Enable File Upload
Click the slider bar to enable file upload. This option is disabled by default. Additional Settings (Group of Fields) - Access to Keyboard (Group of Fields)
- Enable Copy from Private Host
Click the toggle to allow users to copy to the clipboard. - Enable Paste to Private Host
Click the toggle to allow users to paste from a clipboard. - Method on Client Display Resize (Group of Fields)
- Automatically disconnect on client resize and reconnect with the new size
Click the toggle to automatically disconnect if the client resizes the display, and reconnect with the new size. - Click Next or select workflow step 2, Review and Submit.

- Enter a name for the application in the Name field.
- Review the configuration details. Click the Edit icon in any section to make changes, if needed.
- Click Add Clientless Applications to add the new application.
Configure Virtual Network Computing (VNC)
Virtual Network Computing (VNC) is a cross-platform screen sharing system that was created to remotely control another computer. This means that a computer’s screen, keyboard, and mouse can be used from a distance by a remote user from a secondary device as though they were sitting right in front of it.
VNC works on a client/server model. A server component is installed on the remote computer (the one you want to control), and a VNC viewer, or client, is installed on the device you want to control from. This device can include another computer, a tablet, or a mobile phone. When the server and viewer are connected, the server transmits a copy of the remote computer’s screen to the viewer.
Not only can the remote user see everything on the remote computer’s screen, but the program also allows for keyboard and mouse commands to work on the remote computer from afar, so the connected user has full control (after being granted permission from the remote computer).
VNC transmits the keyboard and mouse input from one computer to another, relaying the graphical-screen updates over a network. Popular uses for this technology include remote technical support and accessing files on one's work computer from one's home computer, or vice versa.
To configure which VNC servers users can connect to:
- Go to Configure > Security Service Edge > Secure Access > Clientless Application Access > Clientless Applications.
- If you have not yet configured VNC, the following screen displays. Click Add VNC Applications.

- If you have already configured VNC, the following screen displays. Select the Private Applications > VNC tab, and then click the Add icon.
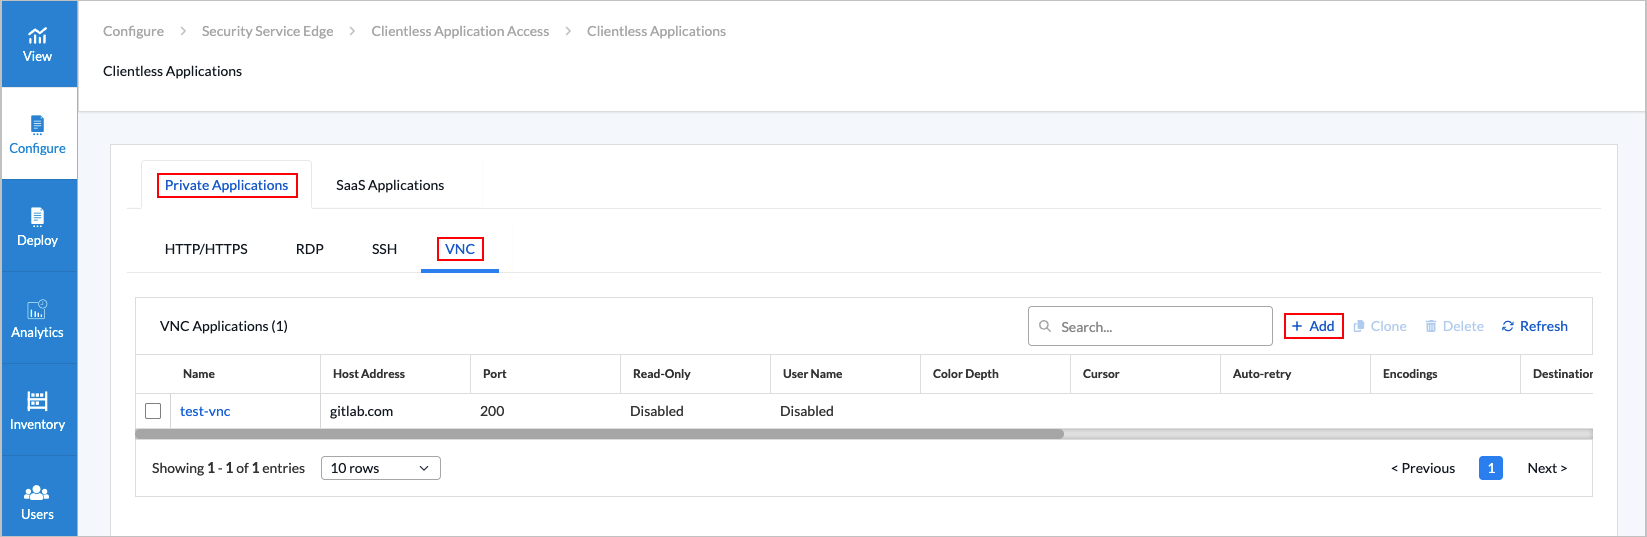
- If you have not yet configured VNC, the following screen displays. Click Add VNC Applications.
- The Add VNC Applications displays, beginning with step 1, Application Settings. Enter information for the following fields.

Field Description Hostname or IP Address (Required) Enter the hostname or IP address of the VNC server that Guacamole should connect to. Port (Required) Enter the port the VNC server is listening on, usually 5900 or (5900 + display-number). For example, if your VNC server is serving display number 1, your port number here would be 5901. User Name Enter the user name to use when attempting authentication, if any. Password Enter the password to use when attempting authentication, if any. Enable Read-Only Click the toggle to make the connection read-only. This is disabled by default. If enabled, no input will be accepted on the connection at all. Users will only see the desktop and whatever other users using that same desktop are doing. Enable Swap Red Blue If the colors of your display appear wrong (for example, blue appears as orange or red), it may be that your VNC server is sending image data incorrectly, and the red and blue components of each color are swapped. If this is the case, click the toggle to enable this option. Color Depth Select the color depth to request, in bits-per-pixel. If specified, you must enter one of the following values: 8, 16, 24, or 32. Regardless of the value chosen, if a particular update uses less than 256 colors, Guacamole always sends that update as a 256-color PNG. Cursor Select Local or Remote. If set to Remote, the mouse pointer is rendered remotely, and the local position of the mouse pointer is indicated by a small dot. Auto-retry Enter the number of times to retry connecting before giving up and returning an error. In the case of a reverse connection, this is the number of times the connection process is allowed to time out. Encodings Enter one or more VNC encodings to use. The format of this parameter is dictated by libvncclient and does not follow the form of other Guacamole parameters. This parameter is optional, and libguac-client-vnc will use any supported encoding by default. Destination Host Enter the name of the destination host to request when connecting to a VNC proxy, such as UltraVNC Repeater. This is only necessary if the VNC proxy in use requires the connecting user to specify which VNC server to connect to. If the VNC proxy automatically connects to a specific server, this parameter is not necessary. Destination Port Enter the destination port to request when connecting to a VNC proxy such as UltraVNC Repeater. This is only necessary if the VNC proxy in use requires the connecting user to specify which VNC server to connect to. If the VNC proxy automatically connects to a specific server, this parameter is not necessary. Enable Audio Click the toggle to enable experimental sound support. VNC does not support sound, but Guacamole's VNC support can include sound using the PulseAudio service, which most Linux systems use to provide audio. This service is capable of communicating over the network. If PulseAudio is configured to allow TCP connections, Guacamole can connect to your PulseAudio server and combine its audio with the graphics coming over VNC. Beware that you must disable authentication within PulseAudio in order to allow Guacamole to connect, as Guacamole does not yet support this. The amount of latency depends largely on the network and how PulseAudio is configured. Audio Server Name Enter the name of the PulseAudio server to connect to. This is the hostname of the computer providing audio for your connection via PulseAudio, most likely the same as the value given for the hostname parameter. If this parameter is omitted, the default PulseAudio device is used, which is the PulseAudio server running on the same machine as Guacamole. - Click Next or select workflow step 2, Review and Submit.
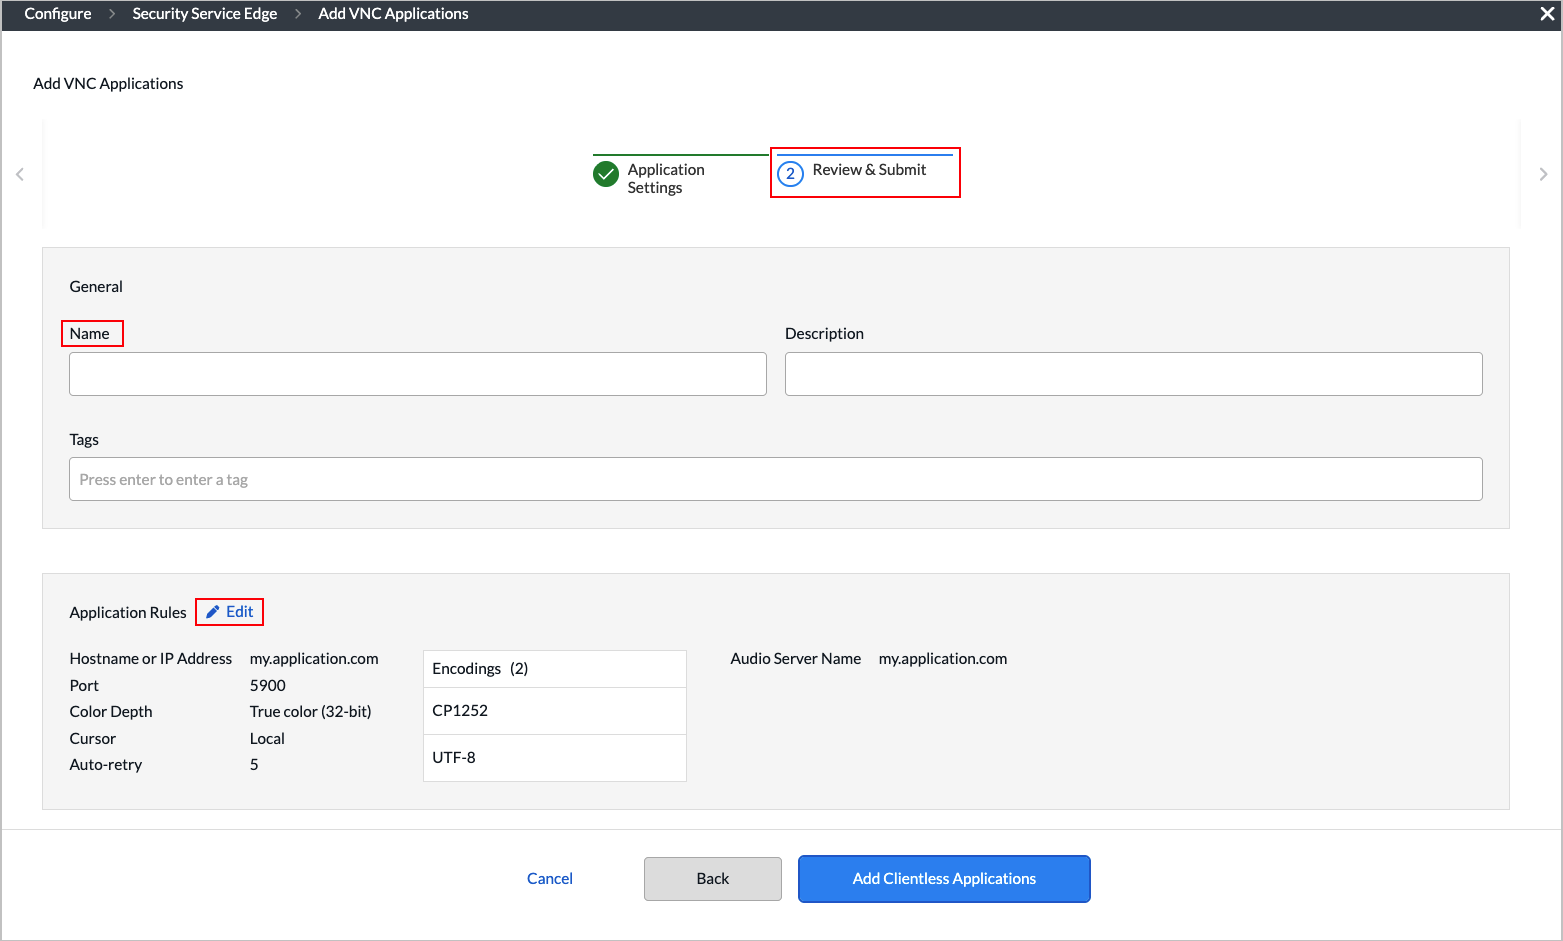
- Enter a name for the application in the Name field.
- Review the configuration details. Click the Edit icon in any section to make changes, if needed.
- Click Add Clientless Applications.
Configure SaaS Applications
To configure SaaS applications users can access:
- Go to Configure > Security Service Edge > Secure Access > Clientless Application Access > SaaS Applications.
- If you have not yet configured a SaaS application, the following screen displays. Click Add SaaS Application.

- If you have already configured one or more SaaS applications, the following screen displays. Click the Add icon.

- If you have not yet configured a SaaS application, the following screen displays. Click Add SaaS Application.
- The workflow to add a clientless SaaS application displays, beginning with step 1, Application Settings.

- Enter information for the following fields.
Field Description Application Select which cloud service you want to grant access to your users. Identity Provider (IdP) URL Enter the IdP URL (including the protocol), which is the location of the IdP service that is responsible for authenticating and authorizing user access to protected resources. ACS URL Enter the ACS URL (including the protocol), which is the location where the service provider's security software receives and processes the SAML response messages that contain user authentication information from the IdP. Entity ID Enter the SaaS private application entity ID. Identity Provider (IdP) Certificate Select an IdP certificate, which is a digital certificate used by an IdP to sign SAML messages in single sign-on (SSO). To obtain the certificate, the administrator can download it from the IdP's SSO service endpoint, or the IdP can provide it by email or other means. - Click Next or select workflow step 2, Review and Submit.

- Enter a name for the application.
- Review the configuration. Click the Edit icon in any section to make changes, if needed.
- In the Application Settings pane, you can click the Eye icon next to Identity Certificate to see the details of the certificate.
- Click Add Clientless Applications.
Supported Software Information
Releases 13.1.1 and later support all content described in this article.