
Deploy Lifecycle Overview
 For supported software information, click here.
You use the Deploy lifecycle to deploy and monitor device configurations for your SD-WAN deployment. Device configurations contain all the information needed to configure a branch, hub, or hub controller. In Releases 13.1.1 and later, device configurations are referred to as main templates. In Releases 12.2.2 and earlier, the configurations are referred to as master profiles.
Before you deploy device configurations, you do the following:
- Set up a Concerto topology that corresponds to your devices, sites, and regions.
- Create device configurations:
- Main templates (Releases 13.1.1 and later)
- Master profiles (Releases 12.2.2 and earlier)
- Prepare the devices for deployment.
To deploy device configurations, you do the following:
- Publish—Send a device configuration (main template or master profile) to Director. Director converts the configuration into a format that is usable by the device, referred to as a VOS device configuration, and then stores it in its local database.
- Commit—Copy the VOS device configuration from Director to a device. The device automatically begins using the configuration.
You can perform the following tasks from the Deploy lifecycle:
- Set up a topology
- Monitor the devices in your topology
- Deploy configurations to devices
- Monitor the deployment process
This article provides an overview of the Deploy lifecycle for Versa SD-WAN. For information about using the Deploy lifecycle for Versa SSE, see Publish SASE Gateways.
Topology
This section describes how to set up and view the topology for your SD-WAN deployment.
Set Up a Topology
To implement your SD-WAN deployment, you define a topology in Concerto. A topology consists of the following components:
- Regions—Regions contain information about the root domain, hubs, and underlying Director instances that are used by a set of sites. For information about setting up regions, see Configure Regions.
- Sites—Sites are groups of Versa Operating SystemTM (VOSTM) devices, typically those found in a physical site. Each site is assigned to a region. For information about setting up sites, see Create a New Site.
- VOS devices—VOS devices include appliances, hubs, and hub controllers. For information about setting up VOS devices, see Configure Appliances, Hubs, and Hub Controllers.
View Regions
- In Tenant view, select the Deploy lifecycle in the left menu bar.

- Select the Regions tab. The existing regions display.
- To view details about a region, click the name in the Region column. The Edit Region window displays.
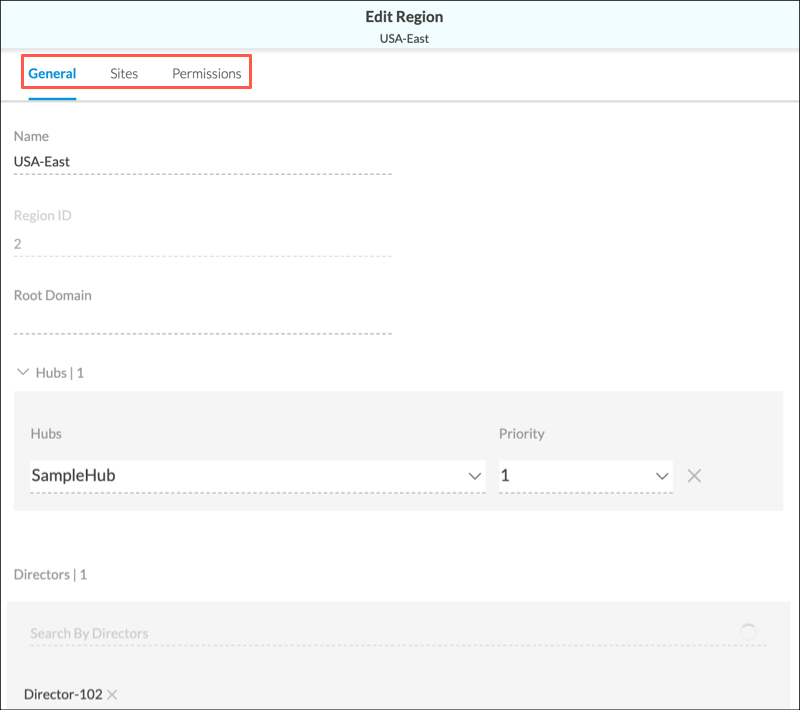
- Click the General, Sites, or Permissions tab to view information about the selected region.
View Sites
The sites tab provides three ways to view sites and devices:
- Honeycomb
- Map
- Table
These views are described below.
Honeycomb View
In the left menu bar, select Deploy to display all sites in Honeycomb view. This is the default view and is indicated by the  Honeycomb icon at the top of the screen.

Each site is displayed as a hexagon in the honeycomb. The types and colors of the lines of each site hexagon have different meanings:
- Dotted line—There is no communication between the Director node and the device site.
- Gray line—The device has never connected to the Director node through the ZTP process.
- Other colors—The lines around each site hexagon are color-coded to indicate the highest-level active security alarm for the site:
- Red—Critical
- Orange—Major
- Gray—Minor
- Blue—Informational
-
The hexagon displays the following information:
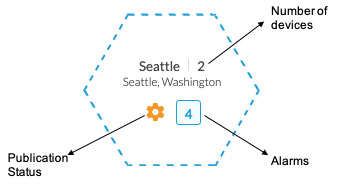
The
 Gear icon indicates that the publication status requires you to take an action. Hover over the Gear icon to see the required action. The publication status messages are:
- Pending Profile—An appliance has been created for a site but has not been assigned a main template/master profile.
- Pending Variables—A main template/master profile has been assigned to an appliance, but values for appliance-specific variables have not been entered.
- Pending Publication—An appliance's main template/master profile has not been published to Versa Director.
- Failed Publication—An appliance's main template/master profile was not successfully published to Versa Director.
-
In the following example, the device hexagon indicates that a variable has yet to be assigned a value. Hovering over a site hexagon also displays the actions you can take, which are Set Template, Publish, and Edit Site in Releases 13.1.1 and later, and Set Profile, Publish, and Edit Site in Releases 12.2.2 and earlier.

To display the number of alarms for the site, hover over the Alarms box. The alarm boxes are color coded, as follows:
- Red—Critical
- Orange—Major
- Gray—Minor
- Blue—Informational
.png?revision=1)
-
To display alarm details, click the Alarms box.

To display summary information for an individual site, click a site hexagon. The Site Summary panel for that site displays on the right. To display a detailed view of the Publication Status or Template/Profile Assignments for all sites or for the selected site, click the Expand icon in the Site Summary section.

Hub devices are displayed at the top of the screen.
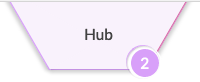
To display hub details, click the circled number.
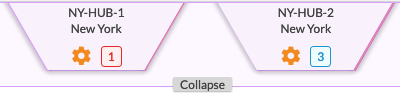
Map View
To display all sites in Map view, click the
 Map icon.

To display the number of appliances at the site and to display an action menu, hover over a site. For information on setting a profile, see Configure Appliances, Hubs, and Hub–Controllers.
Table View
To display all sites in Table view, click the
 Table icon.

View Devices
You can view publication and configuration information for the devices in a site. To do this, double-click on a site hexagon on the Sites honeycomb.
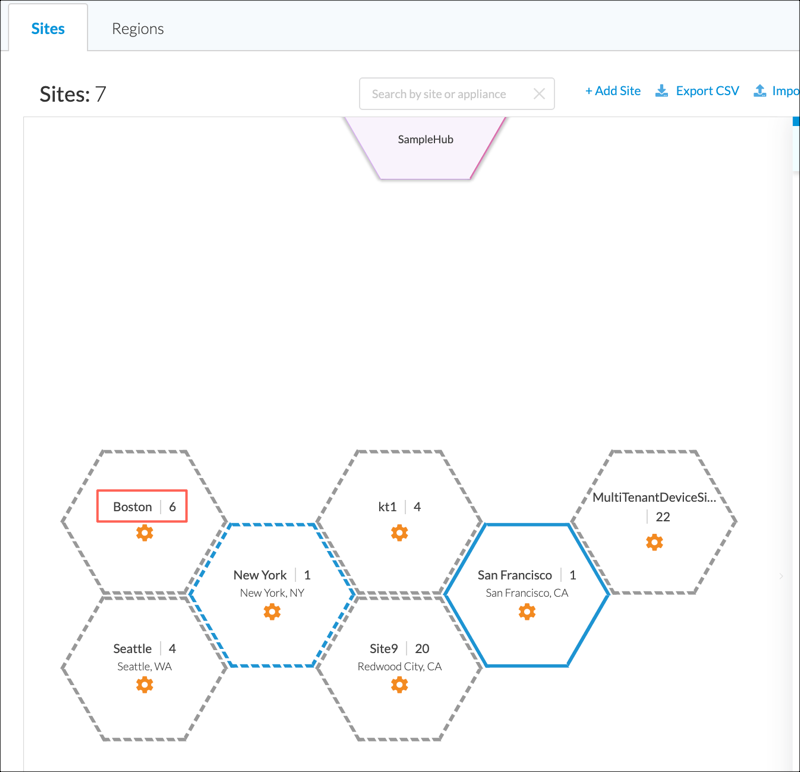
For example, double-click on the Boston hexagon in the above example to display the devices for the Boston site.

Click a device hexagon to display appliance details for the device.
For example, click the NewAppliance hexagon in the above example to display the Appliance Details pane for NewAppliance.

Deploy Configurations to Devices
To deploy a configuration to a device in your topology, you do the following:
- Prepare for deployment—Ensure the device is ready to accept a configuration and that all Concerto device configuration objects and variables are properly set up.
- Publish—Versa Concerto sits above one or more Versa Director instances. Director contains a local database which stores VOS device configurations. A Concerto main template or master profile must be converted into a VOS device configuration before it can be used by a device. The publish action passes the configuration information to Director. Director then converts the information into a VOS device configuration and stores it in the Director database. You can select the following options when publishing a main template or master profile:
- Merge (default)—Select to merge the Concerto configuration with any Versa Director changes to the VOS device configuration. This option is useful when a feature cannot be configured directly in Concerto, such as SNMP. In this case, you configure SNMP for the device in Director so that the VOS device configuration contains SNMP parameters. The SNMP configuration is retained when you publish the Concerto configuration using the Merge option.
- Overwrite—Select to overwrite the VOS device configuration on the Director node.
- Commit—The commit action copies the VOS device configuration from Director to the device. The new configuration becomes the running configuration on the device. You can optionally select the following when committing a device configuration:
- Reboot Appliance—Click to reboot the device after committing the configuration. This option is not typically required, but is sometimes needed to successfully apply the configuration.
- Deploy Device Workflow—Redeploy the device workflow on the Versa Director node. This option is not typically required. For more information, see Commit Template Modifications.
You can deploy configurations for your whole topology, an individual site, or an individual device. Note that Concerto encrypts sensitive information contained in a configuration before deploying. For more information, see Encryption of Sensitive Information, below.
Prepare for Deployment
Perform the following actions before you deploy a configuration to a device:
- Ensure the device is zero-touch provisioning (ZTP) completed.
- Configure a main template (for Releases 13.1.1 and later) or a master profile (for Releases 12.2.2 and earlier). Main templates and master profiles contain all the information needed to configure a device. In many deployments, multiple devices require the same configuration with the exception of values such as interface IP addresses for the devices. In this case, you can define a single main template or master profile that contains all the common information for the devices, and insert variables for the information that differs from device to device.
- Associate a main template or master profile with the device.
- Assign values to device-specific variables you created in the main template or master profile.
To prepare for deployment:
- Ensure the VOS device or devices to be deployed are zero-touch provisioning (ZTP) completed and connected to the underlying Director. This is typically done by the service provider administrator. For more information, see Activate VOS Devices.
When the appliance completes the ZTP process, the hexagon edge color in Honeycomb view changes from gray to blue, indicating that the ZTP process has completed and the appliance is connected to the Director node.
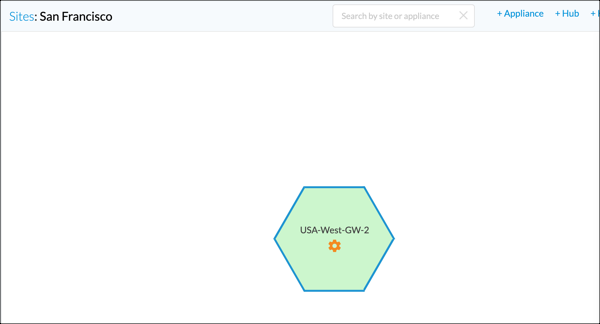
- Configure a new main template or master profile, or identify an existing main template or master profile that contains configuration information for the device or devices. For more information, see Configure Main Templates or Configure Profiles.
- Associate a main template or master profile with each device to be deployed. For each site, you typically associate a single main template or master profile with most or all of the devices at the site. Then, you make individual main template or master profile associations for any devices that require an alternate main template or master profile.
- To associate a main template or master profile with all or some devices for a site:
- From the Sites honeycomb, hover over the site hexagon and select the Set Template or Set Profile option.

The Set Template or Set Profile window displays.

- Select one or more appliances to which to apply the main template or master profile. These appliances must use the same main template or master profile. If any of the site's devices require an alternate main template or master profile, associate the alternate individually for each device.
- Select the Choose Profile tab.
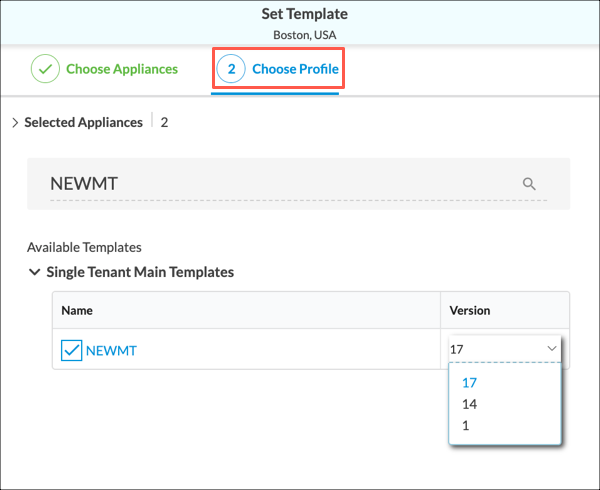
- Click the box to the left of a main template or master profile. You can use the search bar to filter the results that are displayed. If there is more than one version of the main template or master profile, select the version from the drop-down list.
- Click Apply.
- From the Sites honeycomb, hover over the site hexagon and select the Set Template or Set Profile option.
- To associate a main template or master profile with an individual device:
- From the Sites honeycomb, double-click the site containing the device.

- Hover over the device hexagon and select Set Template or Set Profile. The following image shows the devices in the Boston site and the result of hovering over the hexagon for device BstApp.

The Set Template or Set Profile window displays.
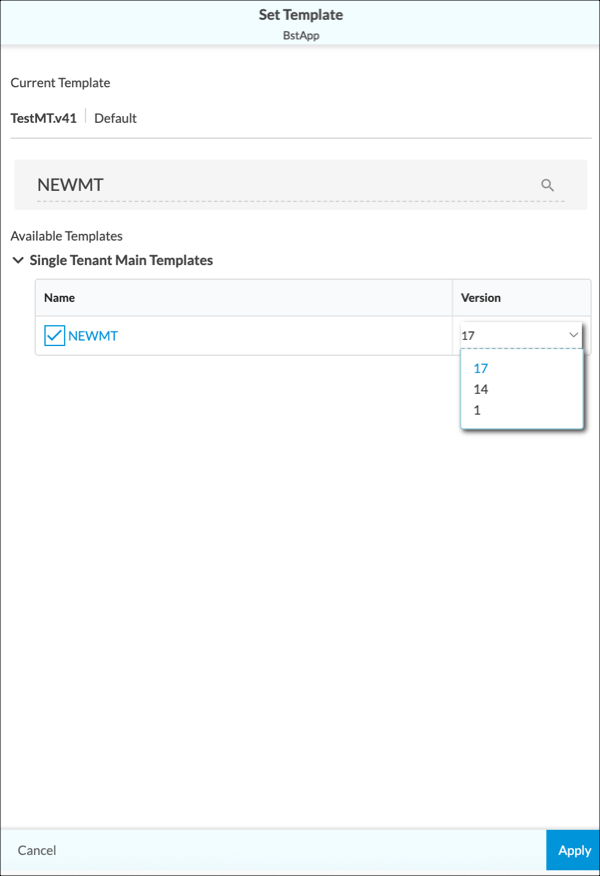
- In the Set Template or Set Profile window, select a main template or master profile. If there is more than one version, select a version from the drop-down list.
- Click Apply.
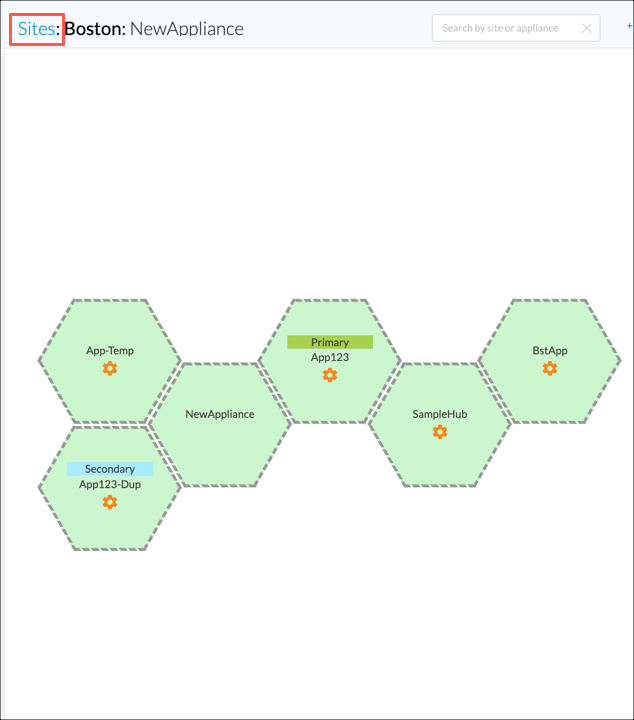
- To return to the Sites honeycomb, select Sites.
- From the Sites honeycomb, double-click the site containing the device.
- To associate a main template or master profile with all or some devices for a site:
- (For Releases 13.1.1 and later.) Enter values for device-specific variables:
- From the Sites honeycomb, double-click the hexagon for the site that contains the device.
- Hover over the device hexagon and select the View Variables option.

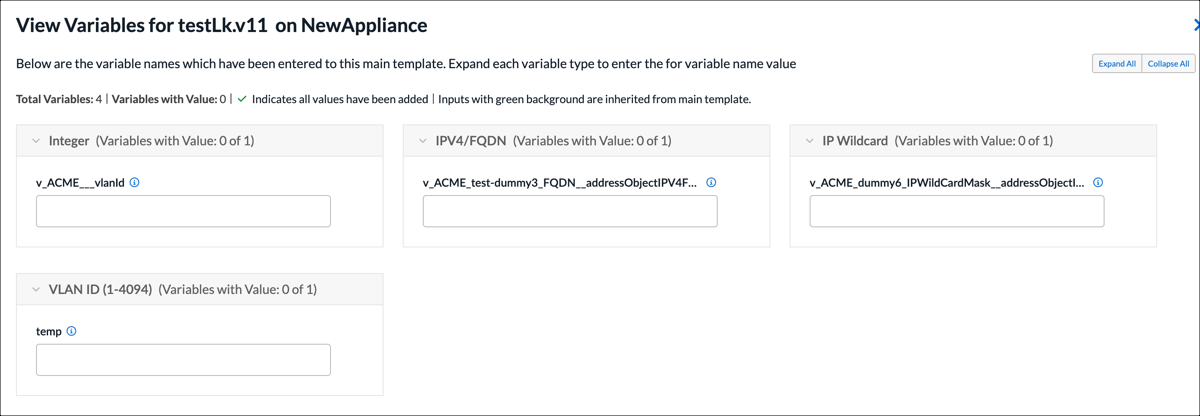
- In the View Variables window, enter values for device-specific variables in the white boxes displayed after the variables.
Note: Main templates can contain variables that apply to all devices that use the main template. You assign values to this type of variable from the Variables step in the main template workflow and these display with a green background on the screen below. If you do not assign a value to a variable in the workflow, Concerto assumes it is device-specific.
- Click Submit.
- From the Sites honeycomb, double-click the hexagon for the site that contains the device.
- (For Releases 12.2.2 and earlier.) Enter values for device-specific variables:
- From the Sites honeycomb, double-click the hexagon for the site that contains the device.

- Hover over the device hexagon and then select View Configuration. The Edit Appliance Configuration screen displays.
Note: Master profiles can contain variables that apply to all devices that use the master profile and therefore are not device-specific. You assign values to this type of variable from the Edit Master Profile window; see Parameterized Variables in Versa Concerto for SD-WAN (12.2.2 and Earlier).

- Hover over the Interface IP variable. The popup window shows that the value for LAN-1-Address is missing.
- Click the variable name. In the Variables window, enter a value for the missing variable. The screenshot here shows that the value is the IP address of LAN-1-Address.

- Click Add. The Edit Appliance Configuration window displays again.
- Select the Permissions tab, and click Save to save the variable.
- On the Edit Appliance Configuration screen, click Save to save the updated master profile.
- From the Sites honeycomb, double-click the hexagon for the site that contains the device.
Deploy Configurations for Multiple Sites and Devices
Use the Publish window on the Deploy lifecycle to view and manage the deployment process for multiple sites and devices in your topology. The Publish window is the primary method used for deploying main templates or master profiles to devices.
The Publish window provides the following information and actions:
- Determine which devices are ready to deploy.
- Deploy the devices you select.
- View current deployment status, including which devices failed the publication or commit process.
- View which devices may still require variable assignment.
- View the publication and commit progress.
To view and manage the deployment process for multiple sites and devices:
- In Tenant view, select the Deploy lifecycle.

- Click Publish. The Publish window displays.

- Select from the following tabs:
Tab Description Ready to Publish View which main templates or master profiles are ready to be deployed, and deploy them to devices.
- The screen displays a list of devices that are prepared for deployment, as described in Prepare for Deployment, above.
- To deploy main templates or master profiles to devices:
- Select the devices from the list.

- Click Publish. The Publish window displays.

- Click the arrow to the left of the Options field to select deployment options. For a description of these options, see Deploy Configurations to Devices, above.
- Click Yes.
- Select the devices from the list.
Current Displays a list of currently deployed devices. Failed to Publish Displays a list of devices that failed the deployment process. Needs Variable Assignment Displays a list of devices that still require variable assignments. See Prepare for Deployment, above. Publish in Progress Displays the deployment status as device configurations are being deployed to devices. - To download publication information in CSV format to your local system, click the Download icon. Each row in the CSV file contains the following information:
- Site—Name of the site
- Appliance—Name of the appliance
- Status—Current publishing status
- Master Profile—For Releases 13.1.1 and later, this field contains the name of the main template assigned to the appliance. For Releases 12.2.2 and earlier, this field contains the master profile assigned to the appliance.
Deploy Configurations for an Individual Site
- Select the Deploy lifecycle.

- Hover over the site hexagon and then select Publish. The Site Publish panel displays on the right side of the screen.
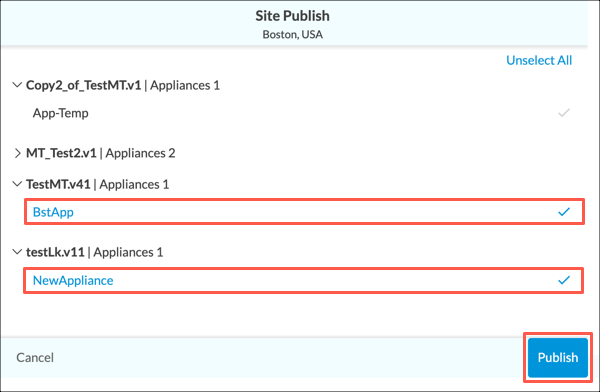
- Select the devices to be deployed.
- Click Publish. The Publish window displays.
- Click the arrow to the left of the Options field to select deployment options. For a description of these options, see Deploy Configurations to Devices, above.
- Click Yes. Status bars in the Site Publish panel indicate the deployment status.
Deploy a Configuration to an Individual Device
This section describes how to deploy a configuration for an individual device. You can perform any of the following operations for an individual device:
- Publish and commit—Converts and stores the configuration in the Director database and commits the configuration to the device immediately.
- Publish only—Converts and stores the configuration in the Director database. You can commit the configuration at a later time.
- Commit only—Commit the configuration without publishing. The VOS device configuration must have been previously stored in the Director database.
To publish and commit, or publish without committing, a configuration to a device:
- Select the Deploy lifecycle.

- Double-click the hexagon for the site containing the device. The honeycomb for the site displays.

- Hover over the device hexagon and select Publish. The Publish window displays.
- Click the arrow to the left of the Options field and then select deployment options. For a description of these options, see Deploy Configurations to Devices, above.
- Click Yes. A progress bar in the device hexagon indicates the deployment progress.
To commit a configuration stored in the Director database to an individual device:
- Select the Deploy lifecycle.
- Double-click the hexagon for the site containing the device. The honeycomb for the site displays.
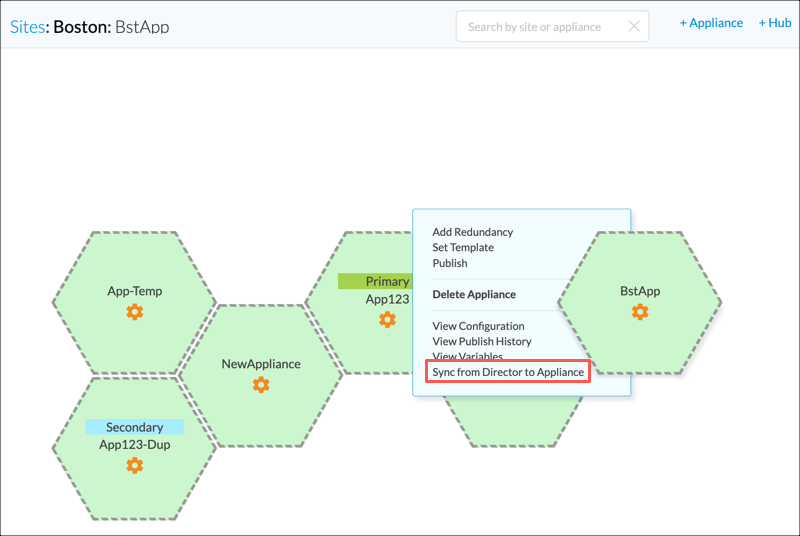
- Hover over the device hexagon, and then select Sync from Director to Appliance.
Encryption of Sensitive Information in Concerto
For Releases 13.1.1 and later.
Concerto nodes encrypt all sensitive information in a configuration before pushing the configuration to VOS devices. The sensitive information is also stored in the database on the Concerto node itself. Concerto nodes automatically encrypt and store sensitive configuration data such as passwords, keys, certificates files, and variables. This includes IPsec preshared keys (PSKs), the LDAP server profile bind password, and the passwords for local database users and user-authentication profile passwords.
The following sample screens show how sensitive data is encrypted and protected in different configuration scenarios, after the password is saved.
- The sample screen below shows that the Bind Password used in the User and Device Authentication Profile configuration is stored in encrypted format in the database.

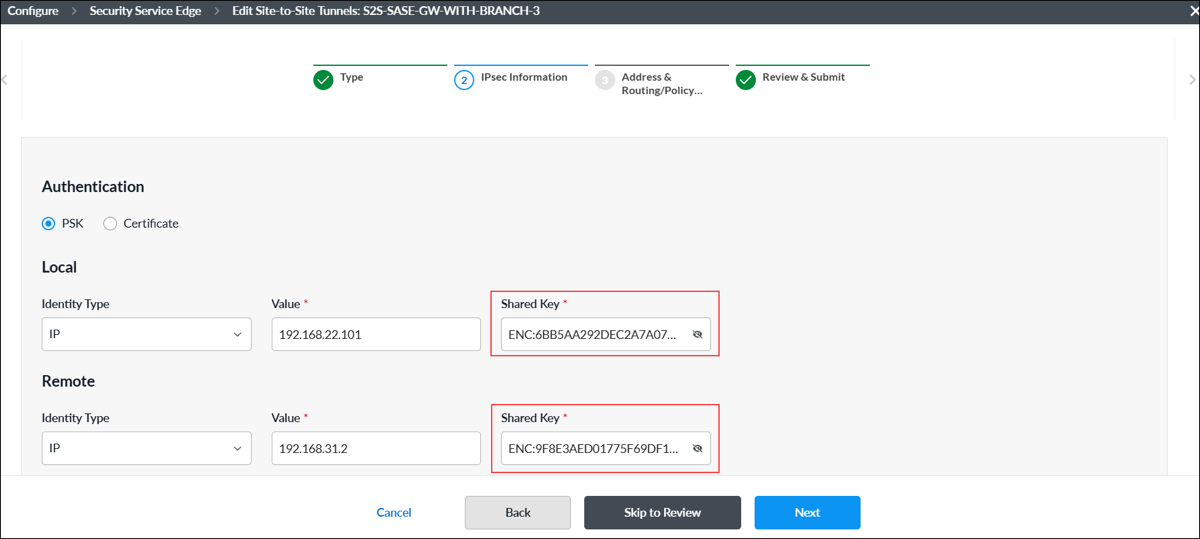
- The sample screen below shows that the Shared Key used in the site-to-site tunnels IPsec information is stored in encrypted format in the database.
- The sample screen below shows the encrypted certificate and private key files that are stored in the database as sensitive files.

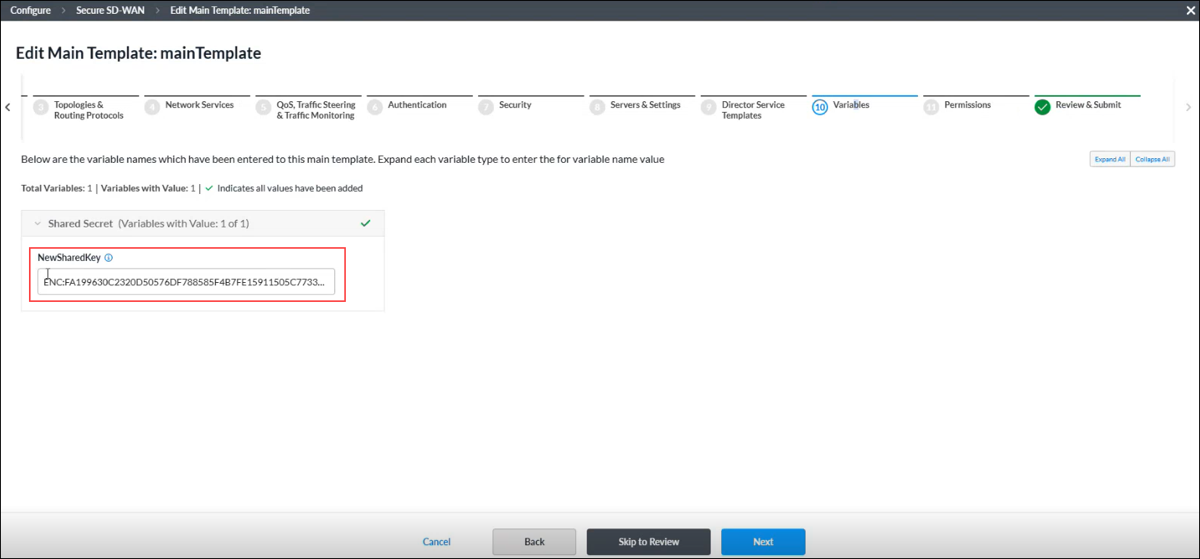
- The sample screen below shows the encrypted sensitive variables used as parameters in a main template. Sensitive template variables are encrypted before being stored in the system.
Supported Software Information
Releases 11.4.1 and later support all content described in this article.