Configure CGNAT Policies
![]() For supported software information, click here.
For supported software information, click here.
Carrier-grade NAT (CGNAT) is a large-scale approach to network address translation (NAT). CGNAT is used to conserve public IPv4 addresses by allowing multiple users to share a single public IP address. CGNAT translates multiple private IP addresses to a limited number public IP addresses using network address and port translation (NAPT) methods. In CGNAT, only port translation of the source address is required for packets communicating from the network to outside.
CGNAT policies allow you to configure NAT rules for CGNAT (Carrier Grade NAT) operations. When you configure a CGNAT policy, you can create various types of NAT rules, such as static, dynamic, and port forwarding, to manage how internal IP addresses are translated to external IP addresses.
This article describes how to configure a CGNAT policy for SD-WAN in Concerto.
Create a CGNAT Policy
You can create a CGNAT policy as part of a main template, or you can create it separately and then associate it with a main template. For more information on main templates, see Configure Main Templates.
- To create a CGNAT policy for an existing main template:
- In Tenant view, select Configure > SD-WAN > Main Templates.
- Select the main template for which you want to configure the policy.
- Click the workflow step for Network Services (here, step 4). The following screen displays.

- Click Add New Carrier Grade NAT (CGNAT) Policy.
- Continue to Configure CGNAT Rules, below.
- To create a traffic steering policy separately from a main template:
- In Tenant view, select Configure > Secure SD-WAN > Network Services > CGNAT Policies.

The following screen displays.

- Click + Add. The Add CGNAT Policies screen displays.
- Continue to Configure CGNAT Rules, below.
- In Tenant view, select Configure > Secure SD-WAN > Network Services > CGNAT Policies.
Configure CGNAT Rules
- In the Add CGNAT Policies screen, click Add CGNAT Rules. The following screen displays.

- Select the NAT mode type:
- Basic NAT-44—Translate source IPv4 addresses statically using 1:1 source NAT mapping. Can also function as an inverse destination NAT rule. Port translation is not supported.
- Destination NAT-44—Static 1:1 destination NAT that also supports destination port translation.
- Dynamic NAT-44—Dynamic source NAT with both IP address and port translation support.
- NAPT-44—Dynamic source NAT with both IP address and port translation support.
- NAT-64—Translate IPv4 addresses to IPv6 addresses, and vice versa. Allows IPv6-only clients to communicate with IPv4-only servers.
- No Translation—No translation is performed on the matching flows.
- NPT-66—Static 1:1 translation of source IPv5 network prefixes.
- Port forwarding—Allows external devices, like those on the Internet, to access services on a private/internal network. This is simplified Destination NAT-44 mode configuration.
- Twice Basic NAT-44—Translate both the IPv4 source and destination addresses simultaneously using 1:1 static translation. Port translation is not supported.
- Twice Dynamic NAT-44—Concurrent dynamic source IP translation, and static 1:1 destination IP and port translation.
- Twice NAPT-44—Concurrent dynamic source IP and port translation with static 1:1 destination IP and port translation.
- Click Get Started. The workflow to create a CGNAT rule displays, beginning with step 1, Match Criteria.

- To configure the criteria to select source and destination traffic for translation, enter information for the following fields.
Field Description WAN Connection Name
(For Port Forwarding mode only.) Select a WAN connection. Source
Select the type of match criteria to use for source traffic, and then enter or select the value that you want to match. Click
 to add additional source match criteria.
- IP Range—Enter an IP address range, such as 10.10.1.1-10.10.1.100. You can enter up to 16 address ranges.
- Subnet—Enter an IP address subnet, such as 10.1.1.0/24. You can enter up to 16 subnets.
- Routing Instance—Select a routing instance.
- Zone—Select a zone. You can select up to 4 zones.
Note: The IP Range and Subnet options are mutually exclusive; you can select one or the other, but you cannot select both of them.
Destination
For Port Forwarding mode, enter one or both of the following:
- Address—Enter a destination IP address.
- Port Range—Enter a destination port range, such as 80-88.
For all other modes, select the type of match criteria to use for destination traffic, and then enter or select the value that you want to match. Click
to add additional destination match criteria. - IP Range—Enter an IP address range, such as 10.10.1.1- 10.10.1.100. You can enter up to 16 address ranges.
- Port Range—Enter a destination port range, such as 80-88.
- Subnet—Enter an IP address subnet, such as 10.1.1.0/24. You can enter up to 16 subnets.
- WAN Connection Name—Select a WAN connection.
- Zones—Select a zone. You can enter to 4 zones.
Note: The IP Range and Subnet options are mutually exclusive; you can select one or the other, but you cannot select both of them.
Protocols Select one or more protocols:
- AH
- ESP
- ICMP
- TCP
- UDP
- 0 through 255
- Click Next to go to workflow step 2, Action. Note: For No Translation mode, this step does not appear. Skip to Step 7.
- Enter information for the following fields.
Field Description DNS64 Prefix (NAT64 mode only.) Translated Destination Pool (Group of Fields) (Port Forwarding, Twice Basic NAT, Twice Dynamic NAT, Destination NAT-44, and Twice NAPT-44 modes.)
Configure the set of internal (private) IP addresses or servers that external (public) users can reach through the NAT device.
- Routing Instance/Connection
Select the translated destinations based on either a routing instance or WAN connection:
- Routing Instance—Select a routing instance.
- WAN Connection—Select a WAN connection. (Not available for Port Forwarding mode.)
Select the translated sources from IP addresses, subnets, or IP address ranges:
- IP Addresses—Enter an IP address, and then click the
 Check mark icon or press Enter. You can enter multiple IP addresses.
 - IP Ranges—Enter an IP address range, and then click the Check mark icon or press Enter. You can enter multiple IP address ranges.
- Subnets—Enter an IP subnet, and then the Check mark icon or press Enter. You can enter multiple IP subnets.
- Server Address
(Port Forwarding mode only.) - Application Port Range
(Port Forwarding mode only.) - Port Range
(Twice Dynamic NAT-44, Destination NAT-44, and Twice NAPT-44 modes.) Translated Source Pools (Group of Fields) (All modes except for Port Forwarding and Destination NAT-44.)
Configure the set of public IP addresses that the NAT device uses to translate private IP addresses from subscribers/users on the internal network. For each pool, you define the IP address and port ranges to use.
- Routing Instance/Connection
Select the translated sources based on either a routing instance or WAN connection:
- Routing Instance—Select a rouing instance.
- WAN Connection—Select a WAN connection.
Select the translated sources from IP addresses, subnets, or IP address ranges:
- IP Addresses—Enter an IP address, and then click the Check mark icon or press Enter. You can enter multiple IP addresses.
- IP Ranges—Enter an IP address range, and then click the Check mark icon or press Enter. You can enter multiple IP address ranges.
- Subnets—Enter an IP subnet, and then the Check mark icon or press Enter. You can enter multiple IP subnets.
- Port Range
(NAPT44, Twice Dynamic NAT-44, and Twice NAPT-44 modes.) - Enable Proxy ARP for Pool Addresses
Click the toggle to enable or disable proxy ARP for pool addresses. Enabling proxy ARP allows a VOS device to respond to ARP requests for IP addresses configured in NAT pools that are both within and outside of the interface’s subnet. Proxy ARP provides local responses, allowing a VOS device to reduce the amount of broadcast traffic over Layer 2 networks (such as EVPN) across SD-WAN and VXLAN. - Enable Addresses Pooling Paired
(NAPT44 mode only.) Click to enable paired address pooling. Use this option for applications that require that all sessions associated with a single internal IP address to be mapped to the same external IP address for the duration of a sessions. - Click Next to go to the workflow step for Review and Submit (this is step 2 for No Translation mode, and step 3 for all other modes).
- In the General section, enter information for the following fields.
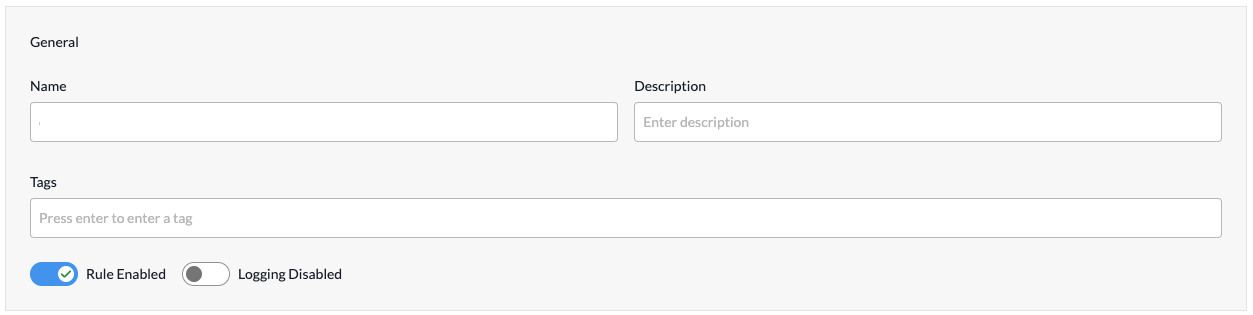
Field Description Name
Enter a name or the rule. Description
(Optional) Enter a description for the rule. Tags
(Optional) Enter one or more tags. A tag is an alphanumeric text descriptor with no spaces or special characters. You can specify multiple tags added for the same object. The tags are used for searching the objects. Rule Enabled
Click to disable the rule once it is saved. By default, the rule is enabled. Logging Disabled
Click to the slider bar to enable logging for the rule. By default, logging is disabled. Logging Profile (Group of Fields) If you enable logging, configure the logging profile.

- Use Default
Click to use the default logging profile. - Custom
Click to use a custom logging profile, and then select the profile from the Logging Profile field.
- To add a custom logging profile, click + Create New.
- For all other sections, review the information. If you need to make changes, click
 Edit.
Edit. - Click Add CGNAT Rules. The Add CGNAT Policies screen displays the saved rule.
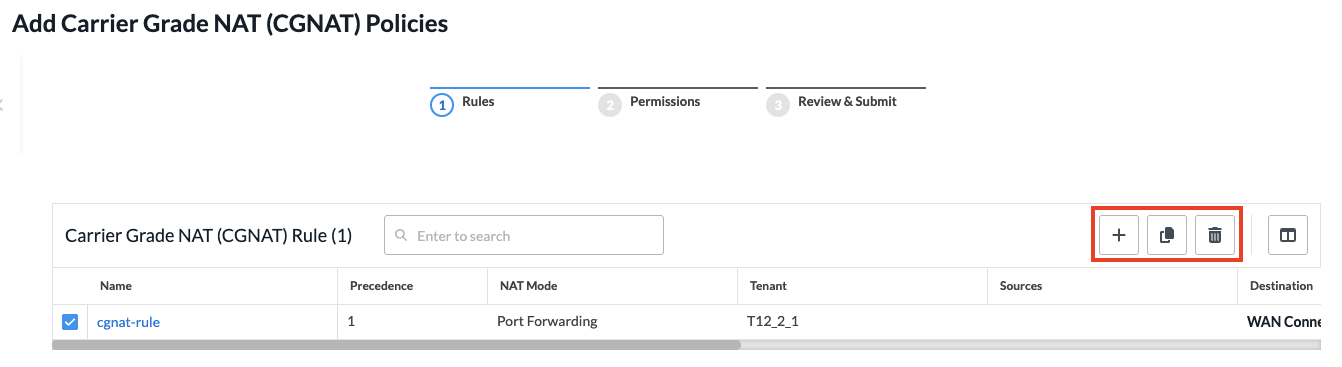
- To add another rule, click + Add in the horizontal menu. You can also select an existing rule and perform the following operations:
- Clone
 —Creates a copy of the rule. You can change the default name of the cloned rule, if desired. The cloned rule then appears in the list of traffic steering rules.
 - Reorder
 —Reorder the selected policy rule.
 - Delete
 —Delete the selected policy rule.
- Clone
- Continue to Configure Permissions, Review, and Submit the CGNAT Policy, below.
Configure Permissions, Review, and Submit the CGNAT Policy
- In the Add CGNAT Policy screen, click Step 2, Permissions. The following screen displays.
- The permission for each role is selected by default, and you can update it. To change permissions for a role, select or deselect the Create, Read, Update, and Delete fields for the role.
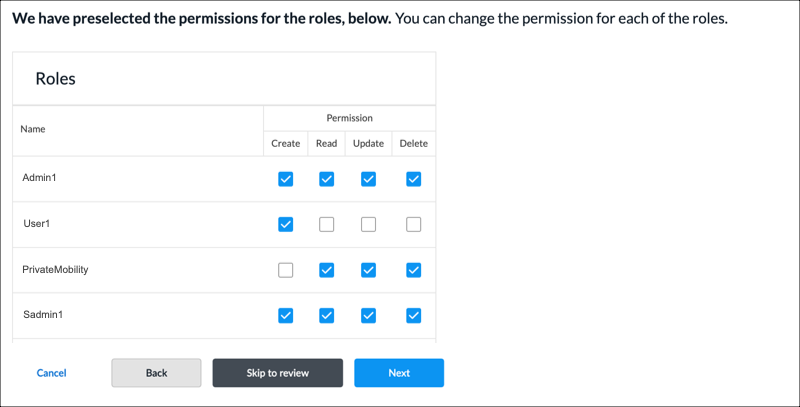
- To change the permissions for a role, select Edit, Hide, or Read in the Permissions column.
- Click Next to go to step 3, Review and Submit.
- In the General section, enter information for the following fields.

Field Description Name Enter a name for the policy. Description Enter a text description. Tags Enter a tag, and then press the Enter key. You can enter multiple tags. A tag is an alphanumeric text descriptor with no spaces or special characters. The tags are used for searching the objects. Reuse Options (For policies added through the Main Templates workflow.) Click Reusable on Other Templates to make the policy usable in other main templates. Otherwise, click Not Reusable. If you mark the policy as reusable, the policy is listed in the Traffic Steering Policies table at Configure > SD-WAN > QoS& Traffic Steering > Traffic Steering. - Review the settings you have selected. Click the
 Edit icon to change a setting, as needed.
 - Click Submit.
Manage CGNAT Policies
You can perform the following actions on CGNAT policies:
- Edit
- Clone
- Delete
- View references
- Propagate
- Compare versions
- View the audit log
- Enable and disable auto delete
For information about these actions, see Manage SD-WAN Policies and Profiles.
Supported Software Information
Releases 13.1.1 and later support all content described in this article.