Configure IP Source Guard
![]() For supported software information, click here.
For supported software information, click here.
Layer 2 devices are susceptible to spoofing attacks in which unauthorized hosts impersonate trusted hosts by using the IP address or MAC address of a trusted host. To prevent source IP and MAC address spoofing attacks on untrusted interfaces, you can configure IP source guard on Layer 2 interfaces. When you enable IP source guard, the Versa Operating System™ (VOS™) device verifies source addresses against those in the Dynamic Host Configuration Protocol (DHCP) snooping table, and it blocks all Layer 3 traffic on the untrusted interfaces. However, DHCP packets are not blocked so that a host connected to an untrusted interface can receive its dynamic IP address. After DHCP assigns an IP address to the host, only traffic from that source IP address is permitted on the interface.
You can configure IP source guard for a bridge domain or for a routing instance. If you configure it at the bridge-domain level, the configuration applies only to that bridge domain. If you configure it at the routing-instance level, the configuration applies to all bridge domains in the routing instance.
To configure IP source guard, you first select an Ethernet interface and ensure that it is not a DHCP trusted port. Then you then enable IP source guard either for the bridge domain or the routing instance.
You can configure IP source guard for VOS devices that are running on Broadcom-based hardware devices, which include the CSG 3000 series and the CSX 4000 Series appliances.
To use IP source guard, you must first configure DHCP snooping. For more information, see Configure DHCP Snooping.
Configure IP Source Guard
First, ensure that the Ethernet interface on which you want to configure IP source guard is not configured as a trusted interface:
- In Director view:
- Select the Administration tab in the top menu bar.
- Select Appliances in the left menu bar.
- Select a device name in the main panel. The view changes to Appliance view.
- Select the Configuration tab in the top menu bar.
- Select Networking > Interfaces in the left menu bar.
- Select ENet in the horizontal menu bar.

- Click the
 Add icon. In the Add ENet Interface popup window, ensure that DHCP Trusted is not selected.

- Click OK.
To configure IP source guard at the bridge-domain level:
- In Director view:
- Select the Administration tab in the top menu bar.
- Select Appliances in the left menu bar.
- Select a device name in the main panel. The view changes to Appliance view.
- Select the Configuration tab in the top menu bar.
- Select Networking > Virtual Switches in the left menu bar.

- Click the
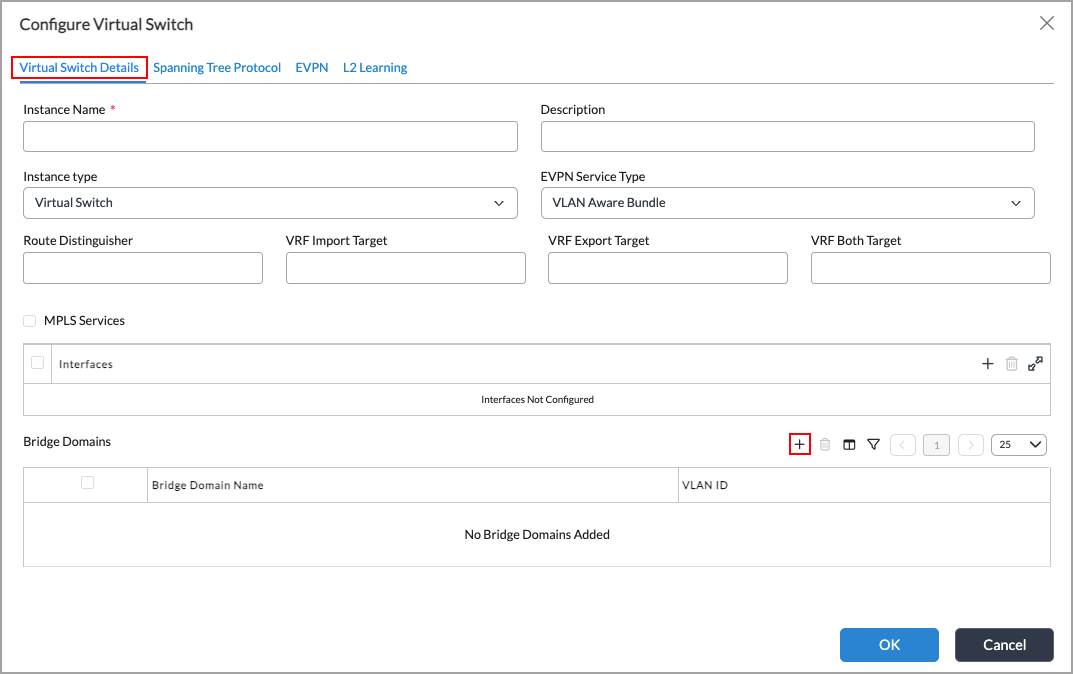
 Add icon. The Configure Virtual Switch popup window displays.
 - Select the Virtual Switch Details tab, and then click the
 Add icon in the Bridge Domains section.

- In the Add Bridge Domains popup window, click IP Source Guard to enable IP source guard.

- Click OK.
To configure IP source guard at the routing-instance level:
- In Director view:
- Select the Administration tab in the top menu bar.
- Select Appliances in the left menu bar.
- Select a device name in the main panel. The view changes to Appliance view.
- Select the Configuration tab in the top menu bar.
- Select Networking > Virtual Switches in the left menu bar.

- Click the
 Add icon. The Configure Virtual Switch popup window displays.
 - Select the Layer 2 Learning tab.

- Click IP Source Guard to enable IP source guard.
- Click OK.
Monitor IP Source Guard
- In Director view:
- Select the Administration tab in the top menu bar.
- Select Appliances in the left menu bar.
- Select a device name in the main panel. The view changes to Appliance view.
- Select the Monitor tab in the top menu bar.

- Select an organization in the Organization field. Click the
 left or
  right icons to display additional column headings.
 - Select Devices > Networking > Source IP Guard.
- Select the information to display for monitoring:
- All
- Bridge Domain Name
- Interface
- IP Address
- MAC Address
- VLAN
Supported Software Information
Releases 22.1.3 and later support all content described in this article.
