Mass Deploy Versa SASE Client using MDM
![]() For supported software information, click here.
For supported software information, click here.
Mobile device management (MDM) is a solution that helps organizations manage, secure, and support mobile devices such as smartphones, tablets, and laptops. You can deploy SASE client to devices managed by Microsoft Intune or Ivanti Neurons for MDM.
To deploy SASE client using Intune or Neurons, you create MDM profiles to retrieve device information from the MDM server. You link the MDM profile to an Intune graph server or a Neurons API server. When a user tries to connect to a Versa gateway using a VPN client, a check verifies whether the device is enrolled with the server and if the device is compliant with the policies you have configured. If the device is managed and compliant, the VPN session is established, and the user is allowed to access internal resources.
This article describes how you can use Intune and Neurons to deploy the Versa SASE client to all the devices managed by these MDM tools. For more information, see Configure MDM Profiles (Director) and Configure the SASE Mobile Device Manager (Concerto).
Mass Deploy Versa SASE Client using Microsoft Intune MDM
This section describes how you can deploy the Versa SASE client to all the devices managed by Microsoft Intune.
Prerequisites
- Before you deploy the software using Intune, you must prep and convert it to it the Intune format (.intunewin) using the Microsoft Win32 Content Prep Tool. Note that conversion to the Intune file type is mandatory. You cannot proceed with SASE client deployment without converting the file format.
- You can download the tool from this location:
https://github.com/Microsoft/Microsoft-Win32-Content-Prep-Tool - For more information about the conversion procedure (for Windows 10 version 1607 or above), see the Prepare a Win32 app to be uploaded to Microsoft Intune | Microsoft Docs 2
- You can download the tool from this location:
- You must join devices to Azure Active Directory (Azure AD) and auto enroll them. The Intune management extension supports devices that are joined by Azure AD or a hybrid domain, and are enrolled by group policy.
Add the Application to Intune
- Log in to the Microsoft Endpoint Manager admin center.

- Select Apps > All apps > Add. The Select App Type screen displays.

- Under App Type, select Windows app (Win32).
Provide Application Information
- Select the App Information tab, and then click Select App Package File.

- In the popup menu, click the drop-down bar, which displays the Windows File Explorer menu. Browse to select the Microsoft Intune file that you created using the utility described in Prerequisites. The following screen displays.

- On the App Information tab, enter the following information.
- Name: The Name is automatically selected.
- Description: Click Edit Description and provide a new description if desired. For example: Versa SASE Secure Access Client for remote devices.

- Publisher: Versa Networks
- Version: Provide the version, for example: 7.2.11
- Category: Select Productivity, Computer Management
- All other information is optional.
- You can skip these fields and select Next.
Configure the Commands to Install and Uninstall the Application
Configure the CLI commands to install and uninstall the application. This enables you to silently install the application and provides a path to uninstall.
- Select the Program tab, and then enter the following information. Replace the name of the .exe file shown in the screenshot with the appropriate name.

- In the Install command field, enter VersaSecureAccess_Client_v7.2.11.exe /SP- /silent /components=base,prelogon.
- For Uninstall command field, enter VersaSecureAccess_Client_v7.2.11.exe /x.
- For Install Behavior, select System. This makes the client application available for all the users of the device. If you need to restrict access to the main user of the device, select User.
- For Device Restart Behavior, select Determine Behavior Based on Return Codes.
- Click Next.
Configure Application Requirements
Configure the requirements that the devices must meet before installing the application:
- Select the Requirements page and enter the following information:

- For the Operating System Architecture field, select 32 Bit and 64 Bit. This allows installation of the SASE client on both systems.
- For Minimum Operating System, select Windows 10 1607
- The remaining fields are optional and you can skip them.
Configure Detection Rules
To configure the rules to detect the presence of the application:
- Select the Detection Rules tab.
- Under Rules format, select Manually configure detection rules. The Detect Rule popup window displays.

- In the Rule Type field, select File
- In the Path field, enter C:\Program Files (x86)\Versa Secure Access.
- In the File or Folder field, select VersaSecureAccessClient.exe.
- From the Detection Method field, select File or folder exists.
- For Associated With a 32-bit App on 64-bit Clients, select No.
Other Options
You can bypass the following pages:
- Dependencies (the client does not have any dependencies)
- Supersedence
Configure Application Assignments
You can select the Required, Available for enrolled devices, or Uninstall group assignments for the app.
On the Assignments page, select from the following options.
- Required: The client is installed on devices in the selected groups. Click Add Group at the bottom of the section, and then select the groups for which to install the client.

- Select All Devices for all devices, which are being managed, to receive the application. In the subsequent menu, you can enter app (here, SASE client), availability timelines, and installation deadlines, and also how to install the client on managed devices.

- Select All Devices for all devices, which are being managed, to receive the application. In the subsequent menu, you can enter app (here, SASE client), availability timelines, and installation deadlines, and also how to install the client on managed devices.
- Available for enrolled devices: Users install the client from the company portal app or the company portal website. This is useful if you have a portal from which company employees can download and install the app. Follow the steps for selection of User groups and devices as above.

- Uninstall: The client is uninstalled from devices in the selected groups. This is required only when you mass uninstall, and does not require any inputs. For example, a filled-in set of menus looks like the following screenshot:

- Click Next, and then select Review+Create. This creates the Application that is pushed out to the selected users/devices automatically so that all the devices can be installed with the Versa SASE client.
Mass Deploy Versa SASE Client using Ivanti Neurons MDM
Ivanti Neurons MDM Portal is a web-based interface to manage and secure mobile devices within an organization. The Ivanti Neurons Portal combined with the Ivanti Go app streamline the management of mobile devices. VOS queries MDM to fetch compliance state and after receiving details, creates Tunnel using SASE client for compliant devices.
You can configure Versa SASE client for iOS and Android from the Ivanti Neurons Portal.
Upload and Configure Versa Certificates on Ivanti Neurons Portal
If there is a self-signed certificate to be trusted on the device, you must upload it on the Ivanti Neurons Portal before deploying the SASE client.
To upload and configure certificates (here, we show Versa certificates):
- Log in to the Ivanti Neurons Portal and select Configurations from the left menu.

- In the Add Configuration screen, click Certificates.

- In the Create Certificate Configuration screen, click Choose File and upload the Versa root CA and intermediate CA certificates.

- Click Next after you upload the certificate files.

- To distribute this configuration among users/user groups or devices/device groups, click Custom.

- Then, select the required tab from Users, User Groups, Devices, or Device Groups to select. The screenshot above shows User Groups.
- Click Done. The next screen displays the uploaded Versa certificates.

Configure Versa SASE Client on Ivanti Neurons Portal
After you add the Versa certificates, you add the SASE client application (iOS or Android) on the Ivanti Neurons Portal:
- On the Ivanti Neurons Portal main screen, select Apps and then App Catalog on the left menu.
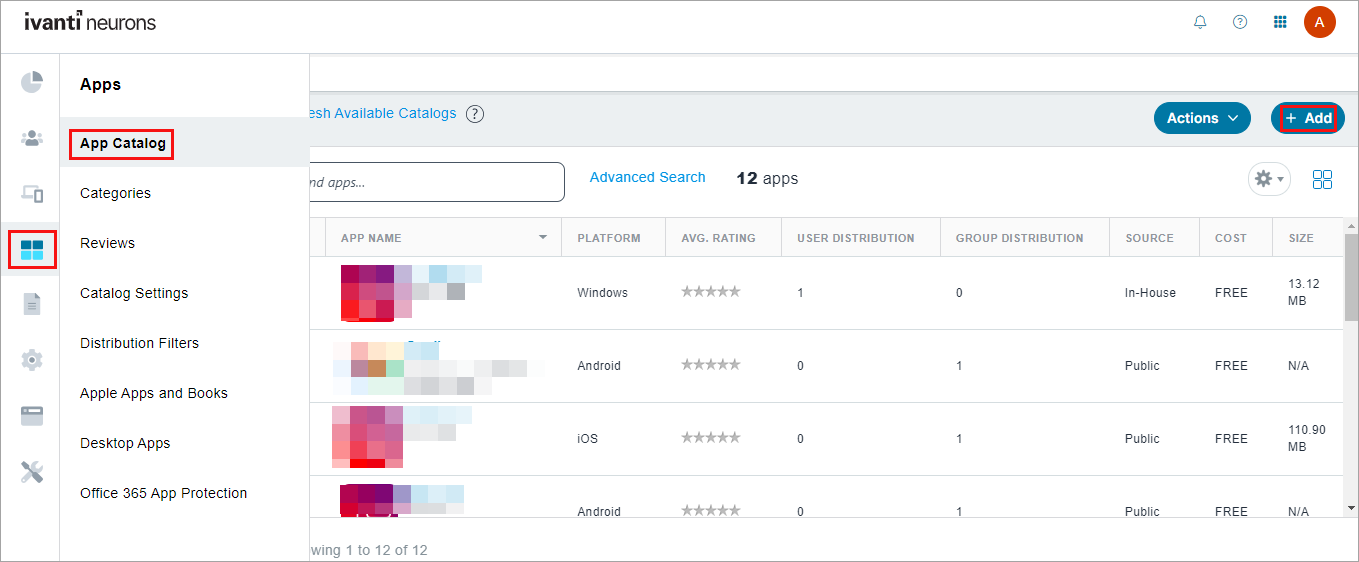
- Click + Add. The Add App screen displays with Step 1 Choose as the default option.
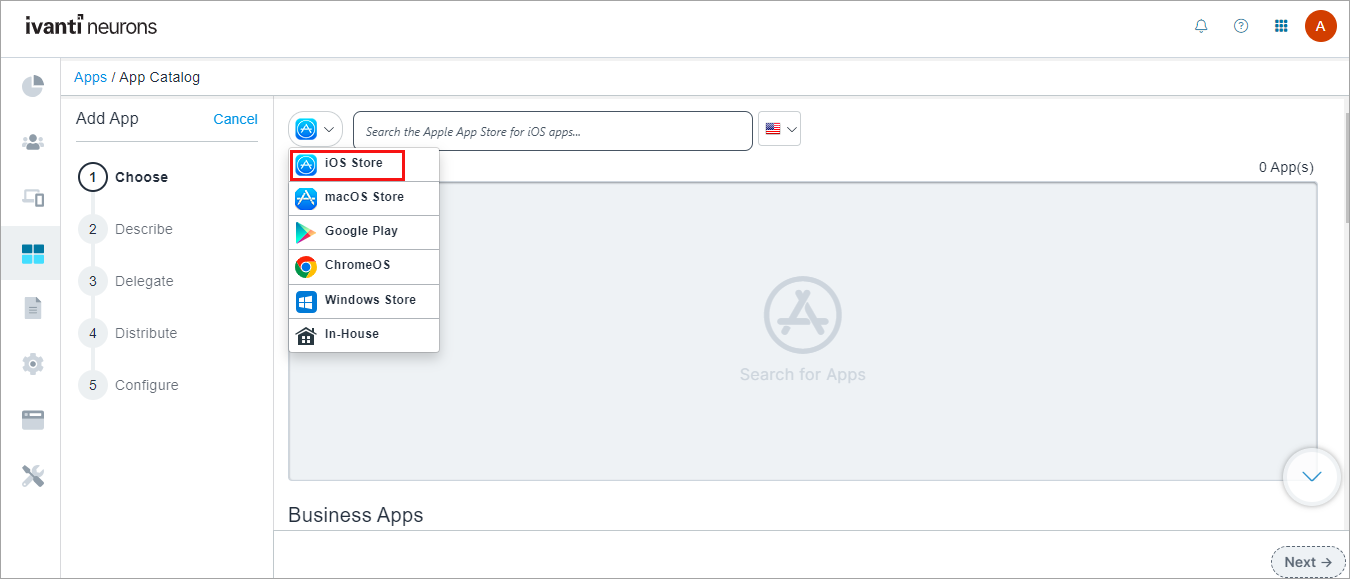
- For SASE client for iOS, select iOS Store from the drop down.
- For SASE client for Android, Select Google Play.

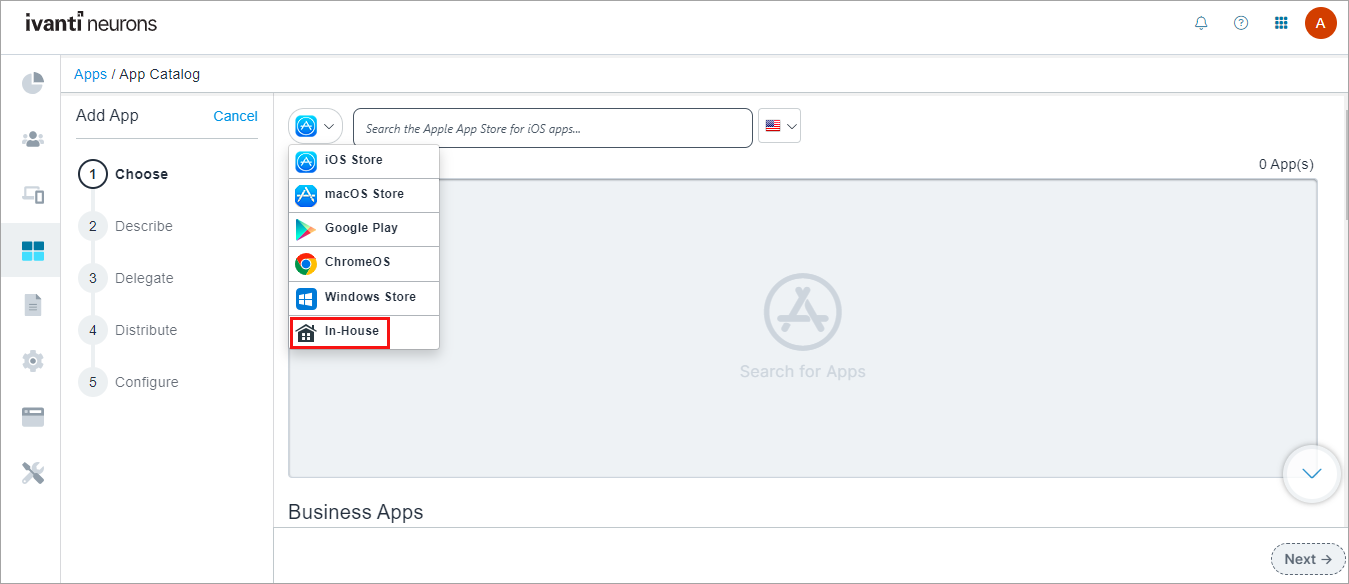
- To upload the SASE client file from your computer, select In-House and select the file (IPA file for iOS).
- In the search field, search for SASE client and click on Versa SASE Client. The steps to add SASE clients for iOS and Android are similar and here, we cover SASE client for iOS.
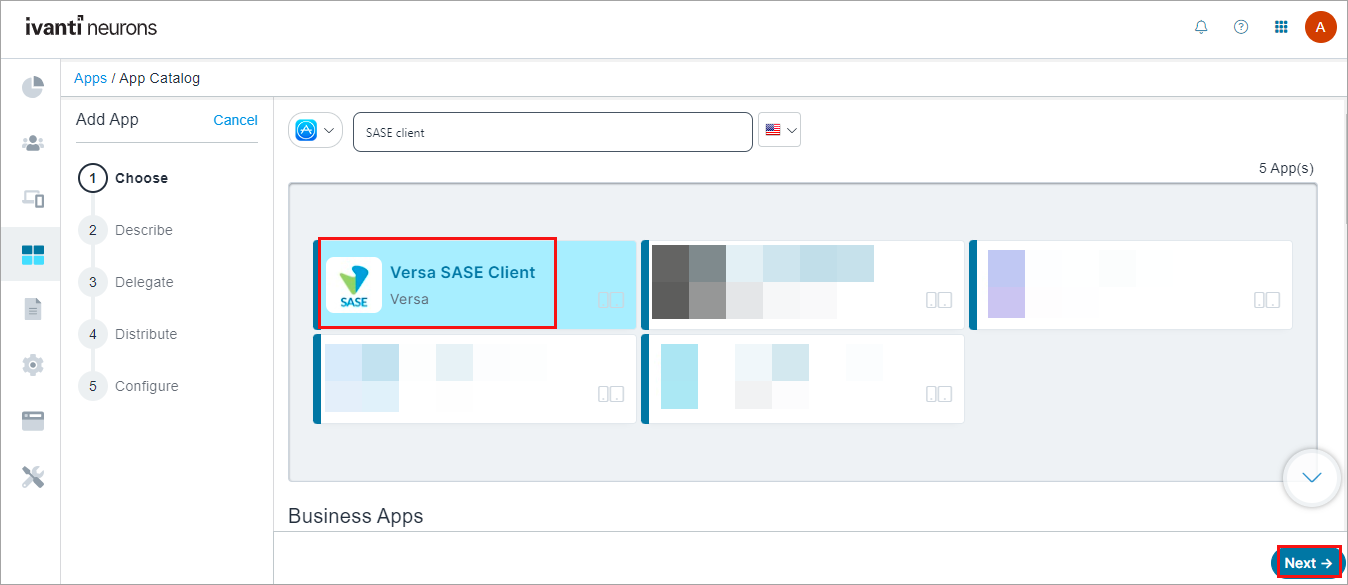
- Select Versa SASE Client and click Next. The Describe screen displays Versa SASE Client details.

- Business is selected by default as category. Other fields are optional.
- Click Next until you reach Configure screen (retain default options in the Delegate and Distribute screens). These steps are different for iOS and Android.
- For iOS, scroll down and click + next to Apple Managed App Configuration.
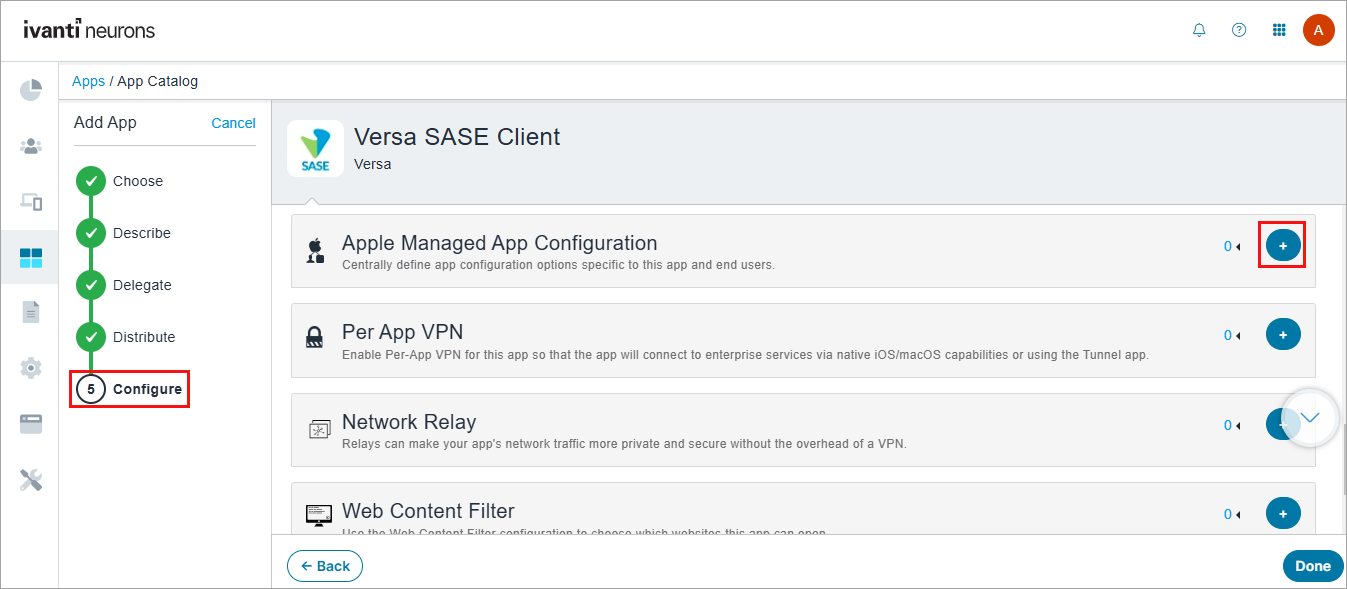
The following screen displays.

- Enter a name for the SASE client configuration setup.
- To specify values for user registration values such as Device ID, FQDN, Enterprise Name, and User click + Add under Apple Managed App Settings and enter the required values.

- Click Use .plist to populate these values by uploading a .plist file.

- Click Choose File and upload the .plist file with user registration values. The values that display depend on the values in your .plist file. Click here for a sample .plist file.

SASE client provides the following attributes for MDM to populate during client deployment and provisioning. These attributes prepopulate the minimum required information for the client to register and connect to the gateway. For example:
Attribute Description device_id (Optional) Identifier that MDM assigns to the device. This is used to query MDM to fetch the device compliance state by using the APIs provided by MDM. This is required only if the Device Compliance Check is required, and it only applies to the MDMs for which API integration is performed. fqdn (Optional) Portal FQDN to which the client registers. If this information is provided by MDM, the client reads and displays it on the Register UI. If not, the user must enter the FQDN to complete SASE client registration. user_id (Optional) Username to use to register with the SASE service. If this information is provided by MDM, the client reads and displays it on the Register UI. If not, the user must enter the username to complete SASE client registration. enterprise_name (Optional) Enterprise name of the user that the client uses for registration. It is used on the SASE portal to identify the tenant when the client initiates a registration request. If this information is provided by the MDM, the client reads and displays it on the Register UI. If not, the user must enter the enterprise name to complete SASE client registration auto_logon (Optional) If enabled, MDM provides the FQDN, enterprise name, and username, and the client automatically registers and connects to the gateway if Always On is enabled. The user is not required to authenticate because the SASE portal and gateway trust users managed by MDM.
is_versa_root_ca_req (Optional) If set to True, Versa root CA is mandatory for portal registration. managed_device (Optional) If set to True, Managed status is reported as True to EIP. - Optionally, you can choose to distribute this configuration. To distribute it among users/user groups or devices/device groups, click Custom.

- Then, select the required tab from Users, User Groups, Devices, or Device Groups to select. The screenshot above shows User Groups.
- Click Done.
- For Android, click + next to Managed Configurations for Android

- Select the relevant configuration options.

- Specify the values for Device ID, FQDN, Enterprise Name, and User. For more information about these field, see Use the Versa SASE Client Application.

- Click Next and then Done.
- Select the relevant configuration options.
- For iOS, scroll down and click + next to Apple Managed App Configuration.
This completes the Ivanti Neurons Portal configuration for Versa SASE client.
Ivanti Go MDM Modes
Ivanti Go enables employees to securely connect their personal devices to the enterprise network. Ivanti Go works along with Neurons for MDM.
Ivanti Go has the following MDM modes for user devices, which provide different levels of control and separation of personal and work data on devices:
- Work Profile—Designed for bring your own device (BYOD), scenarios where employees use personal devices for work purposes. This profile helps create a separate, secure workspace on the user's device, isolating work data and applications from personal data and applications. To configure this mode, you log in to Ivanti Go on your phone and configure your work account.
- Device Owner—Intended for corporate-owned, personally enabled (COPE) or fully managed device scenarios. This setup provides the organization full control over the device. To configure this mode, scan the QR code to provide you COPE device and then install the SASE client application from Ivanti Go.
To install Versa SASE client using Ivanti Go:
- Open Ivanti Go from your device.

- On the Home screen, click the
 Menu icon.
 - In the next screen, click Apps@Work.
- In the next screen, select the Categories tab and click Business.
- In the Business screen, click Versa SASE Client to install the application. Automatic registration triggers after the SASE client is installed.
For more information, refer to Ivanti Go documentation.
Supported Software Information
Releases 21.2.1 and later support all content described in this article.
Additional Information
Configure MDM Profiles
Use the Versa SASE Client Application
Configure Versa Secure Access Service
