API Integration Between Versa Secure SD-WAN and Zscaler Internet Access
![]() For supported software information, click here.
For supported software information, click here.
This article describes how to integrate Versa Secure SD-WAN with Zscaler Internet Access (ZIA) and deploy Versa Secure SD-WAN and Zscaler solutions.
Versa Operating SystemTM (VOSTM) devices integrate with Zscaler using a site-to-site IPsec VPN tunnel from the CPE to a Zscaler local service node (ZEN server). Versa Director provides workflow-based automation to configure IPsec tunnels from Versa SD-WAN CPEs to ZIA using the Zscaler API. You use template-based workflows to create the following tunnels and location:
- Two or more tunnels to primary and secondary Zscaler servers from each CPE for data forwarding.
- Location for each CPE.
Versa Director supports IPsec tunneling between the CPE to Zscaler servers. For multiple LAN VRs configured on the CPE, you can choose one or more VRs from which traffic is forwarded to Zscaler servers. For each internet link, a primary tunnel is created to the primary ZEN server and a backup tunnel is created to the secondary ZEN server.
Secure SD-WAN Topology
Versa Networks VOS interoperability with Zscaler is achieved using a site-to-site IPsec VPN tunnel which allows VOS branch device to direct traffic to a Zscaler local service node. Versa secure SD-WAN devices forward internet-bound traffic to Zscaler's cloud security platform to ensure that all web traffic is secured.
The Zscaler peer type supports WAN and LAN networks as originating endpoint of the tunnel. For Zscaler peer type, you must provision primary and secondary tunnels from each CPE to the primary and secondary ZEN servers for redundancy. For the virtual routing instance, you select a VPN profile to associate with the tunnel and with the LAN VRF organization.
The following diagram illustrates the integration topology between Versa active-active SD-WAN devices and Zscaler primary and secondary Zen servers.

The LAN VR1 and LAN VR2 are virtual routing and forwarding (VRF) instances and the Interim VR is used as a transit VRF which aggregates traffic from the LAN VRFs before forwarding it to Zscaler. Traffic originating from LAN VRFs is routed to the Interim VR and from the Interim VR, routing policies forward the traffic to the Zscaler VR. The Zscaler VR then sends the traffic through the established IPsec tunnels to either the Zscaler Primary or Zscaler Secondary ZEN server.
The Zscaler VRs have another cross-connect interface which are mapped to the Active-Active tunnels. The active-active setup ensures that if one device fails, the other device can forward traffic without any connectivity issues. To route the traffic, Zscaler uses BGP protocol.
Deploy a VOS Branch in Zscaler Using a CMS Connector in Versa Director
This section describes how to create a CMS connector on a Director node to automate bringing up a VOS branch in Zscaler. To create the CMS connector, you do the following:
- Create Resources in Zscaler
- Gather Information from Zscaler
- Create a CMS Cloud Connector in Versa Director
- Configure a Site-to-Site Tunnel in a Workflow Template for Zscaler
- Configure a Site-to-Site Tunnel in a Device Workflow for Zscaler
- Verify IPsec Tunnel Services
- Verify IPsec Tunnel Information from Zscaler
Create Resources in Zscaler
As part of this procedure, you configure a login ID and password for Zscaler, which you need to create the CMS cloud connector in Versa Director.
Add SD-WAN Partner API Role in Zscaler
To add an SD-WAN partner API role:
- Login to the Zscaler cloud portal.
- Click Administration > Role Management.

- On the Role Management screen, select Add SD-WAN Partner API Role.

- In the Add SD-WAN Partner API Role popup window, enter information for the following fields.

Field Description Name Enter a name for the SD-WAN partner API role. Select this role name when creating the partner API client to specify the SD-WAN partner API client's level. Access Control Select the permissions:
- Full
- View Only
SD-WAN API Partner Access Partner access options are selected automatically and cannot be edited.
Add SD-WAN Partner API Client in Zscaler
To add an SD-WAN partner API client:
- Login to the Zscaler cloud portal.
- Click Administration > Administrator Management.

- On the Administrator Management screen, select Add SD-WAN Partner API Client.

- In the Add SD-WAN Partner API Client popup window, enter information for the following fields.

Field Description Login ID Enter the login ID for the Zscaler admin account. Email Enter an email address for the SD-WAN partner API client. Name Enter a name for the SD-WAN partner API client. Partner Role Select an SD-WAN partner API role to specify the SD-WAN partner API client level. Status Select Enabled or Disabled Comments Enter any additional information. Password Enter a password for the SD-WAN partner API client. Confirm Password Re-enter the password for the SD-WAN partner API client.
- Click Save.
Gather Information from Zscaler
In this procedure, you gather the Zscaler cloud name and API key, which you need to create the CMS cloud connector in Versa Director.
To gather the cloud name and API key from Zscaler:
- Login to the Zscaler cloud portal.
- Click Administration > Partner Integrations.

- In the Partner Integrations page, select the SD-WAN tab. Note the API key in the Key column.

- To find the Zscaler cloud name, check the URL that the administrator uses to log in to the Zscaler server. For example, if an organization logs into admin.zscalerbeta.net, then that organization's cloud name is zscalerbeta.
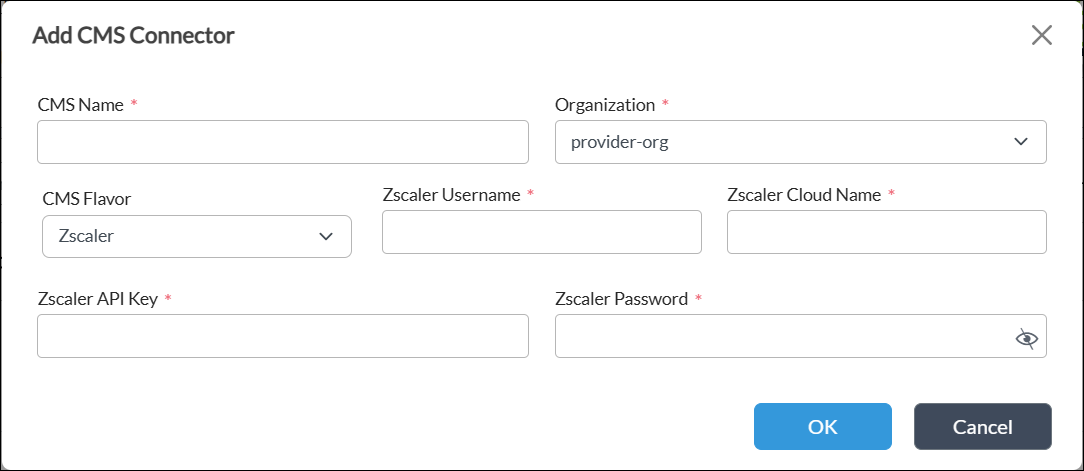
Create a CMS Cloud Connector in Versa Director
To establish a connection between a VOS device and Zscaler, and manage that connection through Versa Director, you must first configure a CMS connector on Versa Director. Note that you can create only one CMS connector per tenant for Zscaler integration.
When you create the CMS cloud connector on Versa Director, you need the following information:
- Zscaler username and password that you configured in Add SD-WAN Partner API Client in Zscaler, above.
- Cloud name and API key that you gathered in Gather Information from Zscaler, above.
To create a CMS cloud connector in Versa Director:
- Log in to Versa Director.
- In Director view, select the Administration tab in the top menu bar.
- Select Connectors > CMS in the left menu bar. The CMS connectors table displays.

- Click the + Add icon. In the Add CMS Connector window, enter information for the following fields.
Field
Description CMS Name (Required) Enter the name of the CMS connector. The name is a text string. Organization (Required) Select an organization for the CMS connector. CMS Flavor Select Zscaler for the type of cloud device. Zscaler Username (Required) Enter the username of the Zscaler administrator account. Zscaler Cloud Name (Required) Enter the Zscaler cloud name. To find the Zscaler cloud name, check the URL that the administrator uses to log into the Zscaler server. For example, if an organization logs into admin.zscalerbeta.net, then that organization's cloud name is zscalerbeta. Zscaler API Key (Required) Enter the integration API key to access the Zscaler ZEN server. Zscaler Password (Required) Enter the password of the Zscaler administrator account. - Click OK.
Configure a Site-to-Site Tunnel in a Workflow Template for Zscaler
- In Director view, select the Workflows tab in the top menu bar.
- Select Template > Templates in the horizontal menu bar.
- Select an SD-WAN post-staging template in the main pane. To create a new workflow template, see Create and Manage Staging and Post-Staging Templates.

- Click Step 3, Tunnels. In the Partner Site-to-Site Tunnels section, click the + Add icon.

- In the Partner Site-to-Site Tunnels popup window, enter information for the following fields.

Field Description Name (Required) Enter a name for the site-to-site tunnel. Peer Type Select the Zscaler peer type. Tunnel Protocol Select the IPsec tunnel protocol to use to reach the peer. WAN Network Select one or more WAN networks to use. This network is the originating endpoint of the tunnel. The highest priority is 1.
Organization Select the organization for which the site-to-site tunnel is created. LAN VRF Select one or more virtual routing instances to use to reach the LAN. - Click OK, and then click Save.
- If modifying an existing device:
- Click Step 7, Review, and then click Re-Deploy.
- Commit the template.
Configure a Site-to-Site Tunnel in a Device Workflow for Zscaler
To configure a Versa Director–Zscaler IPsec site-to-site tunnel for a device:
- In Director view, select the Workflows tab in the top menu bar.
- Select Devices > Devices in the left menu bar.
- Select a device in the main pane.

- Click Step 4, Tunnel Information. Select a tunnel name, and then click the
 Add icon. The tunnel displays in the Zscaler tunnels list. Note that you cannot configure a public IP address for tunnels created using an IPsec tunnel protocol. To create a new device workflow, see Configure Basic Features.
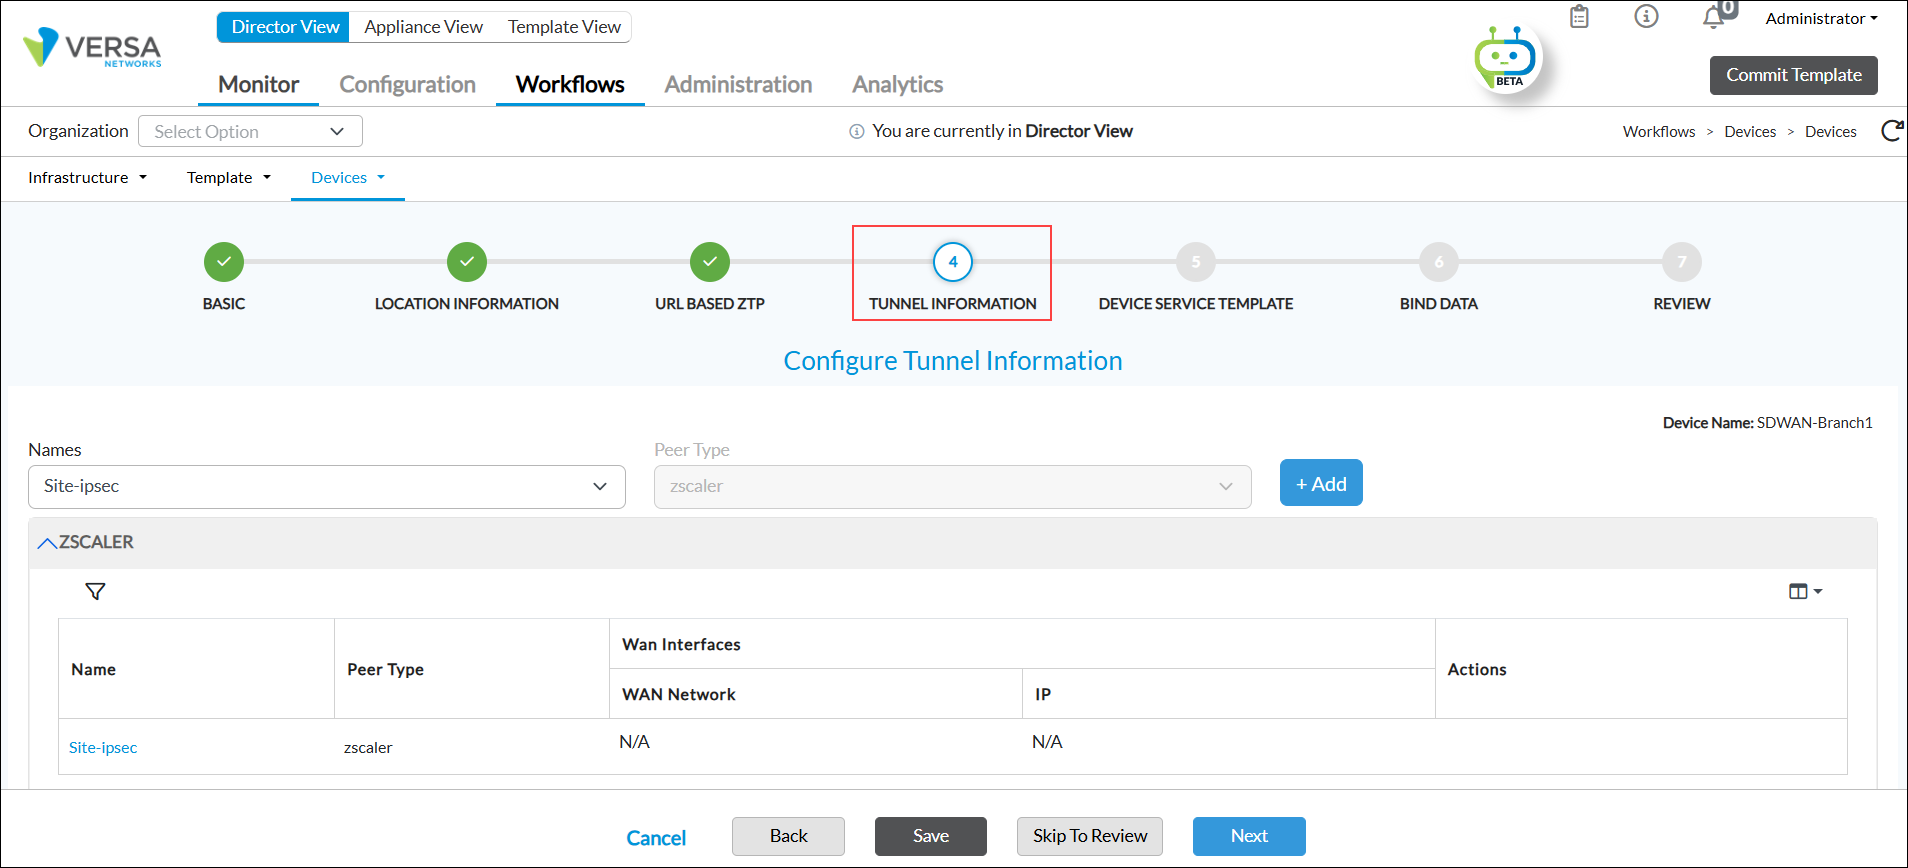
- Click Save.
- If modifying an existing device:
- Click Step 7, Review, and then click Re-Deploy.
- Commit the template.
Verify IPsec Tunnel Services
To verify IPsec tunnel services for a site-to-site tunnel:
- In Director view:
- Select the Monitor tab in the top menu bar.
- Select Devices in the horizontal menu bar.
- Select a device in the main pane. The view changes to Appliance view.
- Select Services > IPsec in the horizontal device menu bar.

- On the IPsec tab, select IKE History, and then select an IPsec tunnel. Click an entity to view the IKE history.

- Select IKE Security Association, and then select an IPsec tunnel. Click an entity to view the IKE security details.

Verify IPsec Tunnel Information from Zscaler
To verify IPsec tunnel information from Zscaler:
- Login to the Zscaler cloud portal.
- Click Analytics > Tunnel Insights.

- Select the Insights tab. To view the tunnel information, define the tunnel data type and filters and then click Apply Filters. You can select different data types to view from the drop-down list above the chart.

- Select the Logs tab. To view the tunnel logs, define the filters and then click Apply Filters.

Supported Software Information
Releases 22.1.4 (Service Release dated 2024-12-20) and later support all content described in this article.